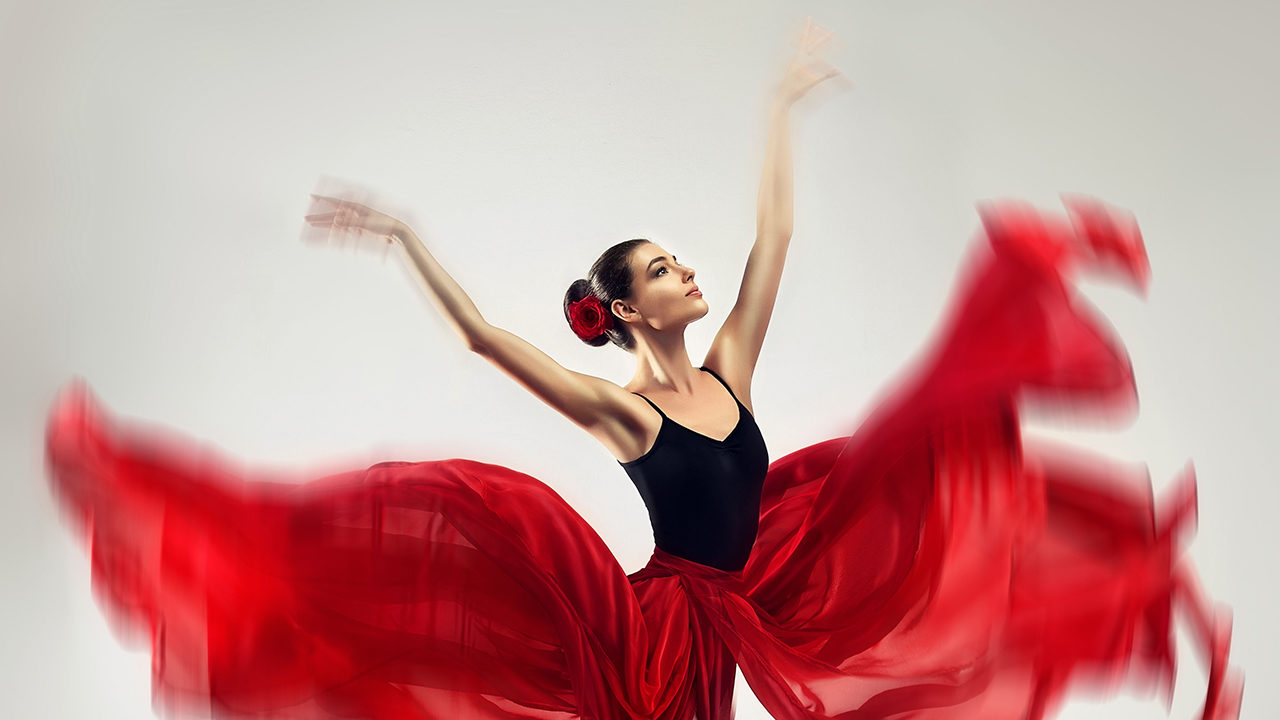
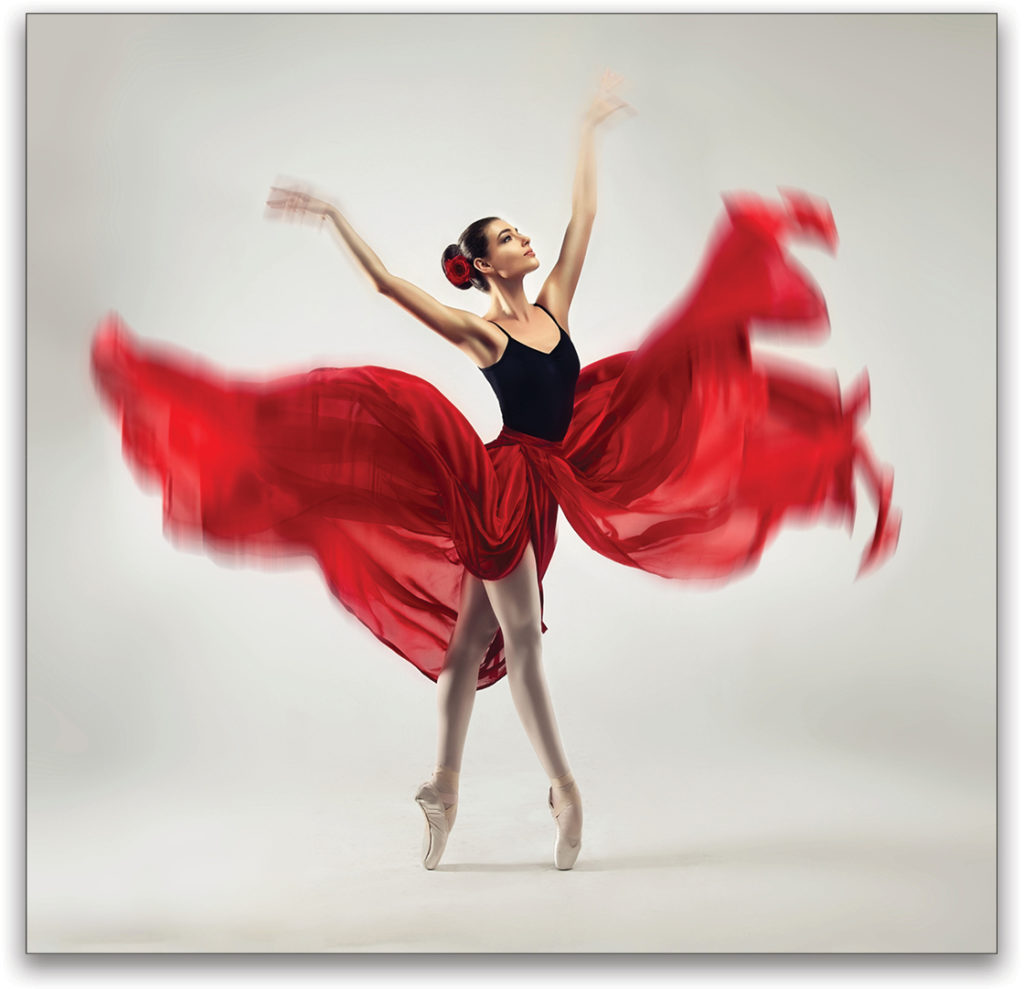
Let’s be honest, as photographers, our goal is to capture as much as possible of the final image in-camera, but it doesn’t always turn out that way. Sometimes it’s not until later, when we examine the finished catalog of images, that we realize they just aren’t popping the way we intended. Something’s missing. In this case, adding a bit of blur to specific areas of the image is a great way to give our photographs a little extra drama.
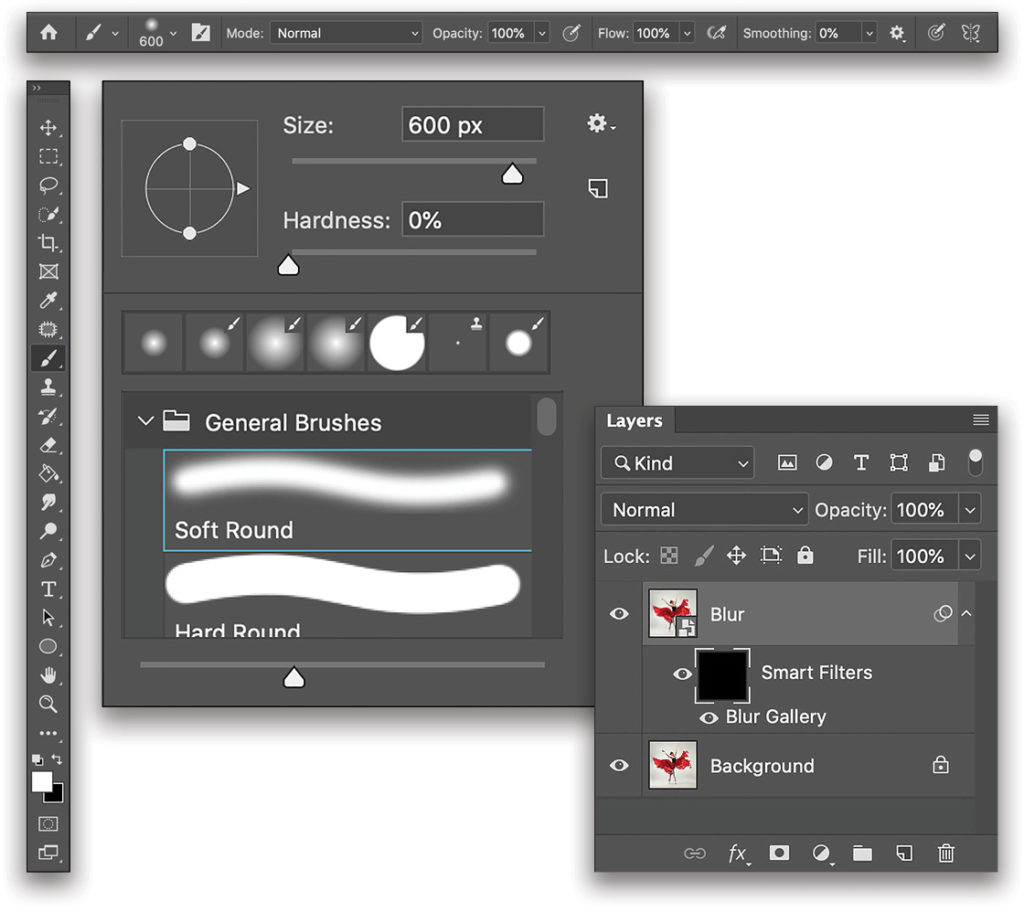
Step One: Open your image in Photoshop, and duplicate the Background layer using the keyboard shortcut Command-J (PC: Ctrl-J). You’ll want to work on this extra layer throughout the entire process so as not to make direct changes to your original image, and so you can play around until you get the desired blurred effect. Let’s rename that duplicate layer “Blur” to keep track of it. (To rename a layer, double-click its name in the Layers panel.) Then, go to Filter>Convert for Smart Filters to convert the layer to a smart object.

If you’d like to download the low-res watermarked version of this image to follow along, click this link, log in with your Adobe ID, and click the Save to Library button. Double-click the image in the Libraries panel (Window>Libraries) to open it in Photoshop. To make it easier to work with the image, increase the resolution of the practice file. (We normally don’t recommend enlarging images, but this is only for practice purposes.) Go to Image>Image Size, turn on the Resample checkbox, set the Width to 2,000 pixels, and click OK.
Step Two: With the Blur layer selected, go to Filter>Blur Gallery>Path Blur. The reason we want to use Path Blur on this image, and not something like Motion Blur, is because we want to create movement in many different directions instead of just one. For example, her arms may be rising while the fabric of the dress may be falling, or the outer edges of the fabric may be falling at a faster rate than the fabric closer to her body. Using a different blur option would mean we’d have to duplicate our layer multiple times and mask out areas on every layer, essentially creating a whole lot of unnecessary work for ourselves.
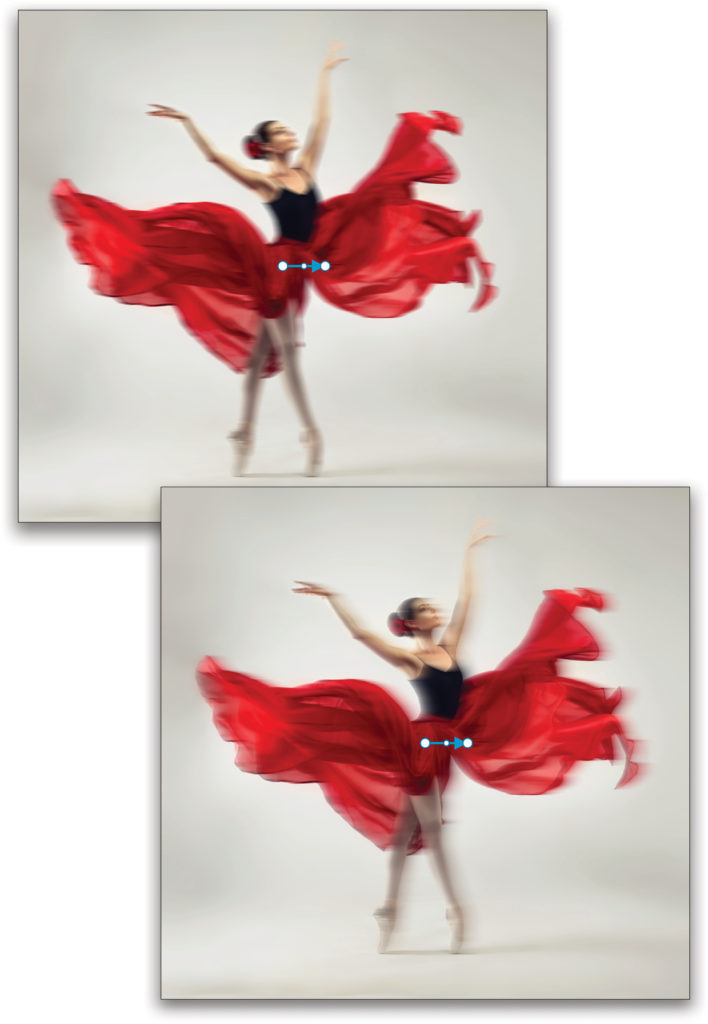
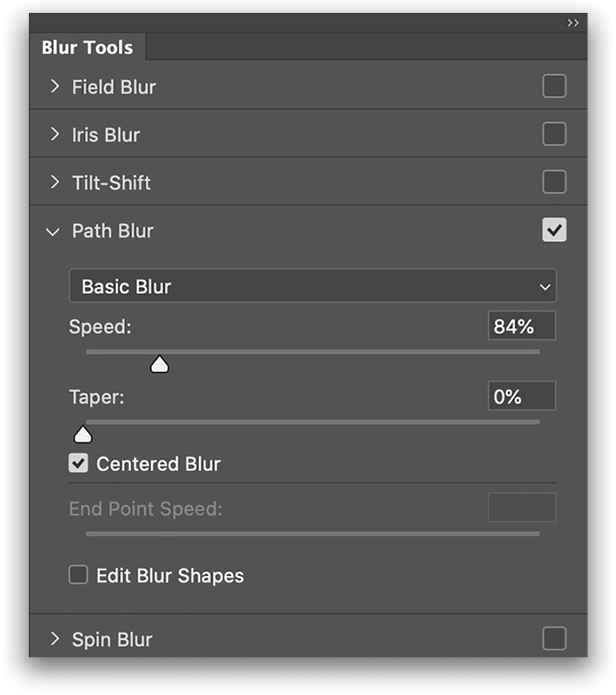
Step Three: In the Path Blur section of the Blur Tools panel, some default options will be checked already. The first option we have to choose is either Basic Blur or Rear Sync Flash in the drop-down menu. Basic Blur creates an all-around even blur, while Rear Sync Flash is meant to duplicate the in-camera effect of freezing part of your subject while blurring the movement. You can see the difference in the following example images. It’s up to you which you prefer. In this case, we’re going to stick with Basic Blur.
Step Four: The Speed changes the amount of blur in the image, while the Taper option changes how quickly the effect transitions from one point of the image to another. The higher the Taper amount, the clearer the image; while the lower the Taper amount, the more blur will be applied. For now, we’ll leave these two values at their default settings until we make our paths toward the end.
Another important feature is the Centered Blur option, which ensures the blur samples from both sides of the pixels when turned on (it only samples one side when turned off). Since we’re going to mask out the blur over certain parts of the image, you’ll want to make sure this box is checked.
Edit Point Speed allows you to adjust how much blur is at the beginning or end of the path (click on the point you want to adjust). This is useful if you’re trying to blur motion going to or from the camera, since motion closer to the camera appears more blurred than motion further away from the camera. The photo we’re using in this example is all in one plane; therefore, we won’t be using this feature today, so it’s okay to leave it unchecked.
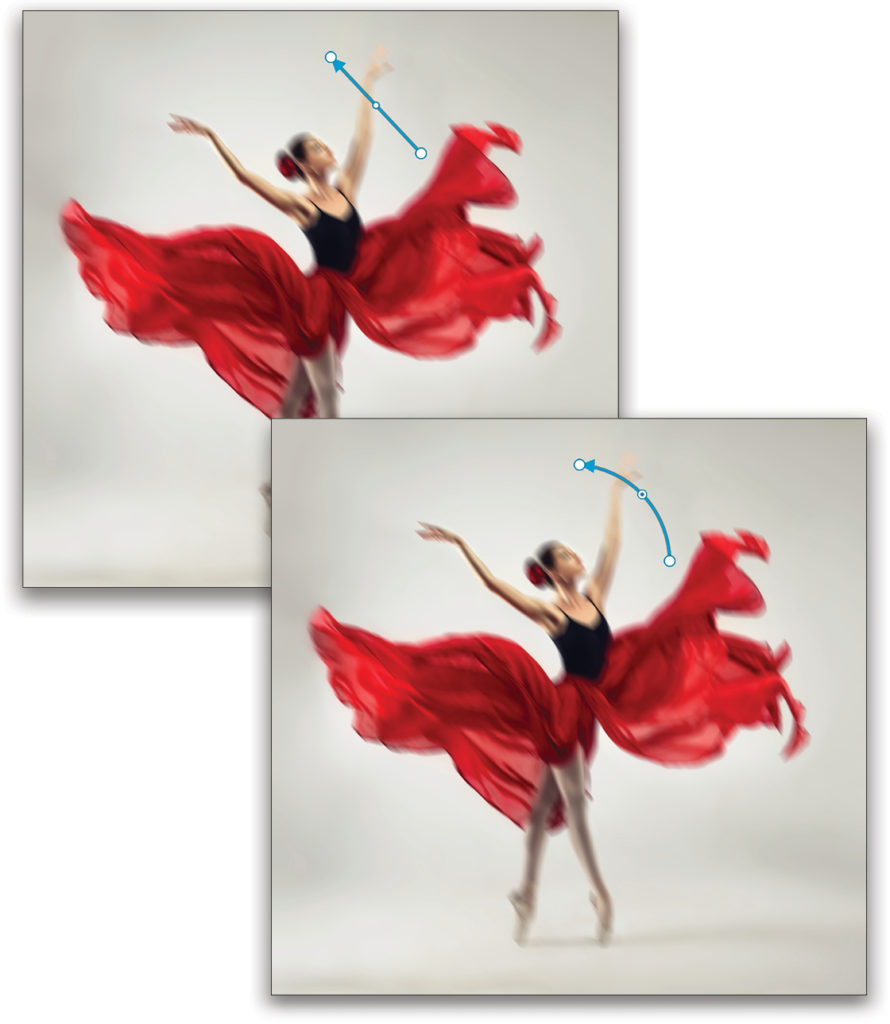
Step Five: Now let’s create our paths for the blur. In this photograph, we want the direction of the blur to follow the natural movement of the dancer. Assuming she was holding the dress and let go of it as she raised her hands to the ceiling, her arms would be moving upward, in a circular motion around her head, while the fabric of her dress would be falling down in a more vertical motion. So the first path we’ll make is for her left arm.
You can either click on the default path to adjust it, or delete it altogether by selecting it and pressing the Delete (PC: Backspace) key. Here we’re deleting it and making a new path. Click-and-drag at an angle starting at a point to the right of her left arm to just past her left arm. As you can see, the path is a straight line, but we want a curved path. All we need to do to fix this is select the center dot and pull the path outward to create the desired curve (as shown).
Step Six: Repeat this process with each area of the photograph where you want to add blur. In this example, we’ll create additional paths for her right arm and one for each side of her dress. Keep in mind, even though both her hands are moving upward, they’re moving opposite to each other, so each hand needs its own path, and the endpoint of each path needs to be pointing upward. For the paths for the dress, start each path above the dress, and drag downward so they’re pointing down.
Another important note is that you want to make sure one path doesn’t interfere with another. In this example, the path for her left arm was affecting the path for her dress, so we needed to adjust the endpoint of the arm path away from the dress. (Tip: To move an entire path, hold the Command [PC: Ctrl] key, and then click-and-drag on the path.) Some parts of the photograph will look a bit warped, but that’s okay because we’re going to mask those areas out later.

Step Seven: Once you’re happy with your paths, it’s now time to adjust the Speed and Taper values in the Path Blur panel. For this photograph, we’re going to put Speed at a value of 84% and leave Taper at its original value of 0%. Once finished, click OK up in the Options Bar.
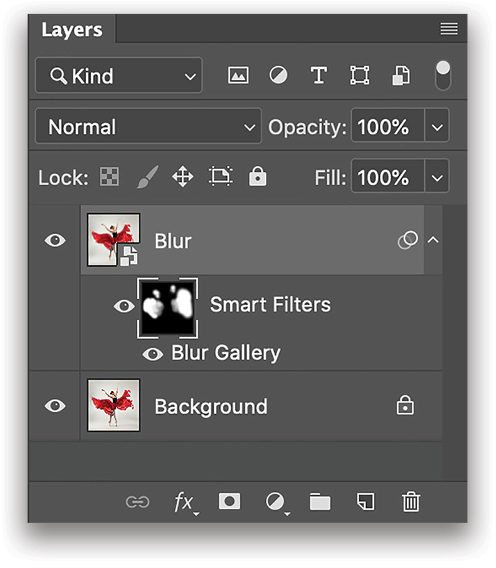
Step Eight: We have two layers: our Background layer and our Blur layer with the Path Blur applied as a smart filter. Now, all we have to do is mask out where we don’t want the blur to appear. Click on the mask thumbnail next to “Smart Filters” in the Layers panel to make it active. With the layer mask selected, press Command-I (PC: Ctrl-I) to invert it, filling it with black. This hides the entire blur effect.
Next, press B to select the Brush tool, and press D to set the Foreground color to white. In the Options Bar, click on the brush preview thumbnail to open the Brush Preset Picker, and set the Hardness to 0%. Also in the Options Bar, set the Opacity and Flow to 100% to start off. You can always adjust these values as you go through the masking process. As you paint, you can quickly change the size of your brush by using the Bracket keys ([]) on your keyboard.
Step Nine: Simply paint with white to reveal the parts of the blur you’d like to show through. In this case, we’ve used the Brush at 100% Opacity to mask away the outer areas of the fabric and lowered the Opacity to mask away some of the inner areas of the fabric, since that’s how the blur would have appeared in-camera. If you need to make changes to the actual Path Blur, simply double-click the words “Blur Gallery” below the Blur layer in the Layers panel to open the Blur Gallery.
Don’t Be Afraid to Experiment!
Adding blur in post is all about experimentation, having fun, and adding an artistic and unexpected effect to your current photographs. The Path Blur filter is a great way to do this, adding specific motion blur to any area of your photo. See what you can do with it. Whether it’s a vehicle or a body in motion, or even a completely stationary object you just want to mess with in Photoshop, the options are endless.

This article originally published in the November/December 2019 issue of Photoshop User magazine.


