One of my favorite things to experiment with in Photoshop is filters. There are so many and, by playing around with the right, or even wrong, combinations you can get some interesting results. Here, we’ll use a variety of filters to create a custom image effect to be used as a displacement map. By taking advantage of smart objects and smart filters, it opens up a world of possibilities.
STEP ONE: Let’s begin by creating a blank Photoshop file. Go under the File menu, choose New, and set the Width and Height to 1500 pixels. Whatever your chosen dimensions are, they must be in a square format like this for the effect to work. Once you’re done, click OK (or click Create, if you’re not using the legacy New dialog, as I am).
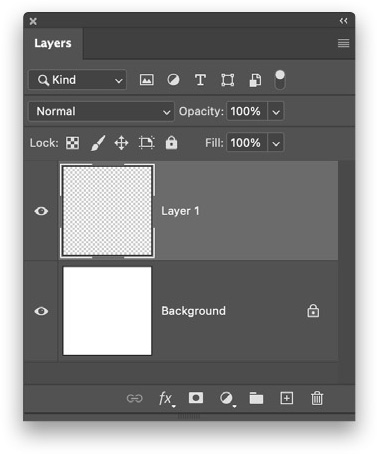
STEP TWO: In the Layers panel, create a new blank layer by clicking the Create a New Layer icon (it’s the second one from the right) at the bottom of the panel, or by pressing Command-Option-Shift-N (PC: Ctrl-Alt-Shift-N). Also, press the D key to make sure your Foreground and Background colors in the Toolbar are set to the default black/white.
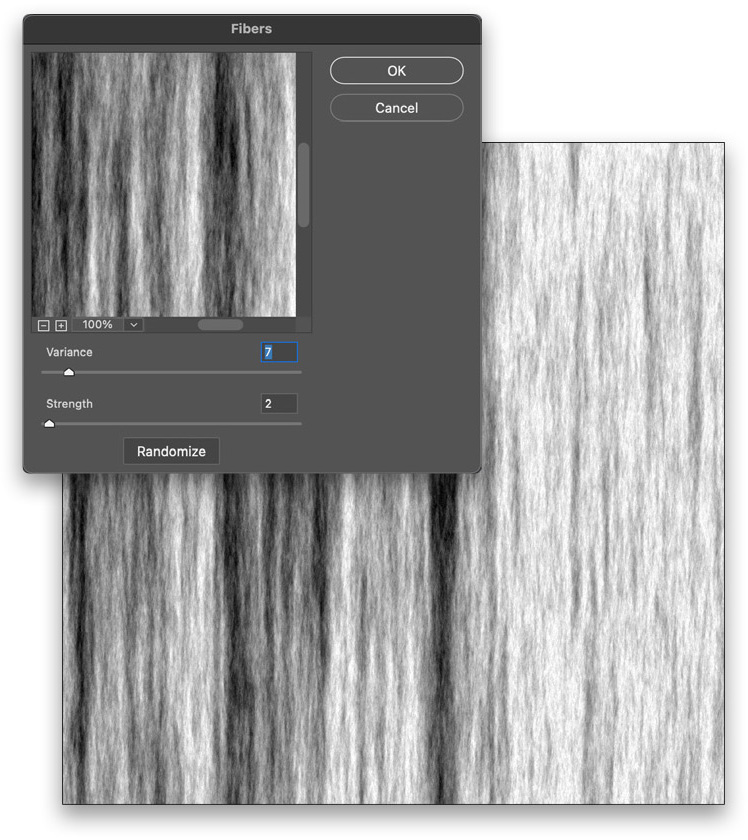
STEP THREE: Next, go under the Filter menu, under Render, and choose Fibers. This filter creates random streaks that you can tweak using its Variance and Strength sliders, and the colors are based on the Foreground and Background colors set in the Toolbar. With these settings, I have a fairly soft set of streaks. You can click the Randomize button (at the bottom of the dialog) to get a different arrangement, which means your final result will look different because of this randomization. Click OK, when you’re done.

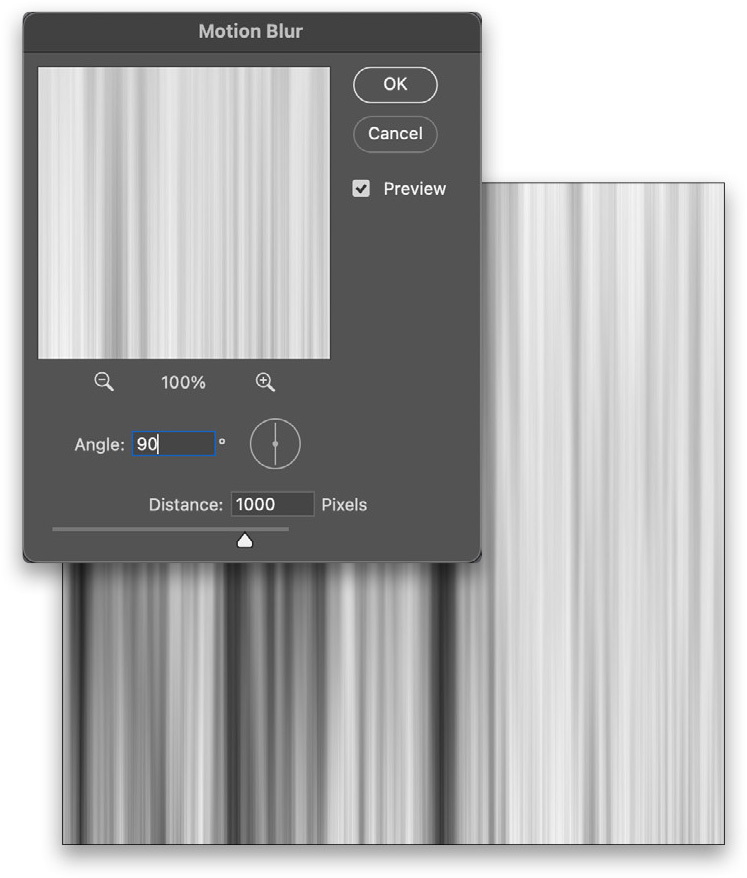
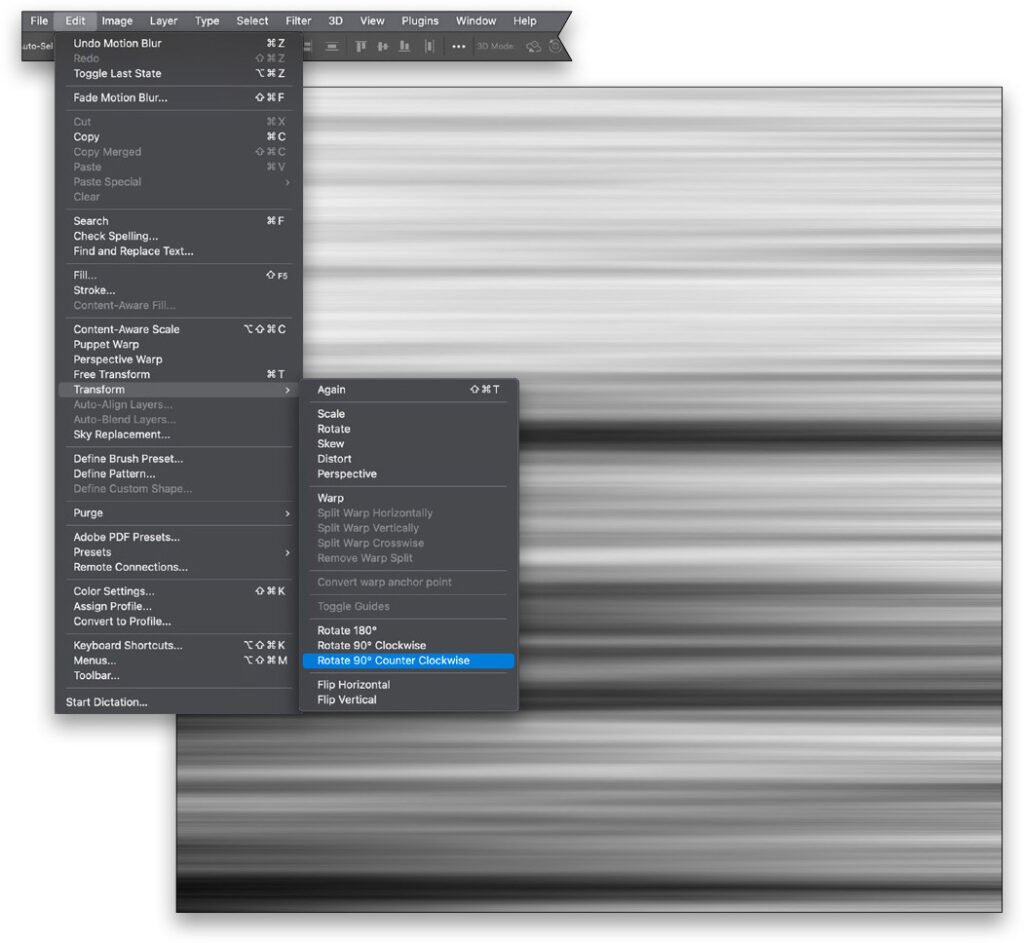
STEP FOUR: Go under the Filter menu again, this time under Blur, and choose Motion Blur. In its dialog, set the Angle to 90° and the Distance to 1000 pixels. This will essentially smooth and straighten the streaks. Click OK.
STEP FIVE: While the Fibers filter applies the streaks vertically by default, we need the streaks to be running horizontally for this next part. So, with this layer selected, go under the Edit menu, under Transform, and choose Rotate 90° Counter Clockwise. I chose that option because I want the darker streaks to be at the bottom of the canvas.
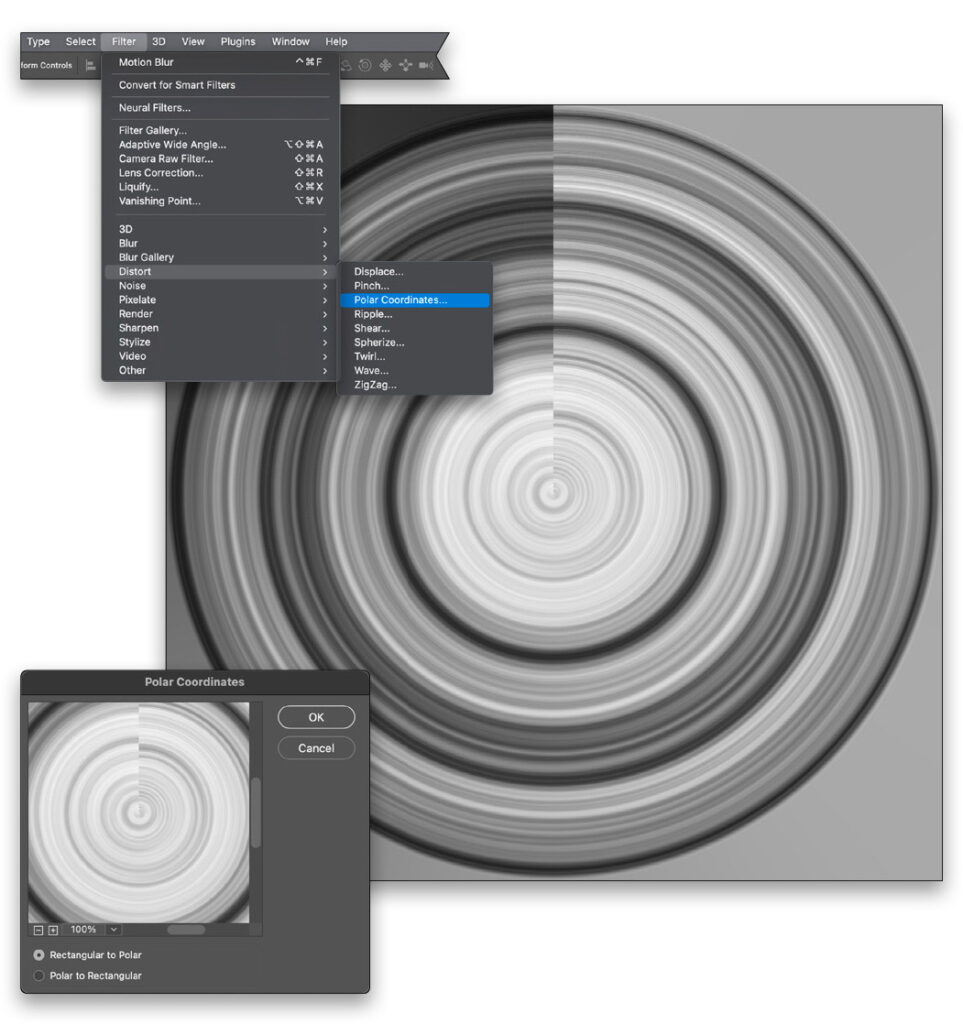
STEP SIX: Once again, go under the Filter menu, this time under Distort, and choose Polar Coordinates. In its dialog, choose Rectangular to Polar and click OK. This wraps the image in a circle, connecting the two ends. Don’t worry about the seam where it doesn’t line up; we’ll be hiding that anyway.
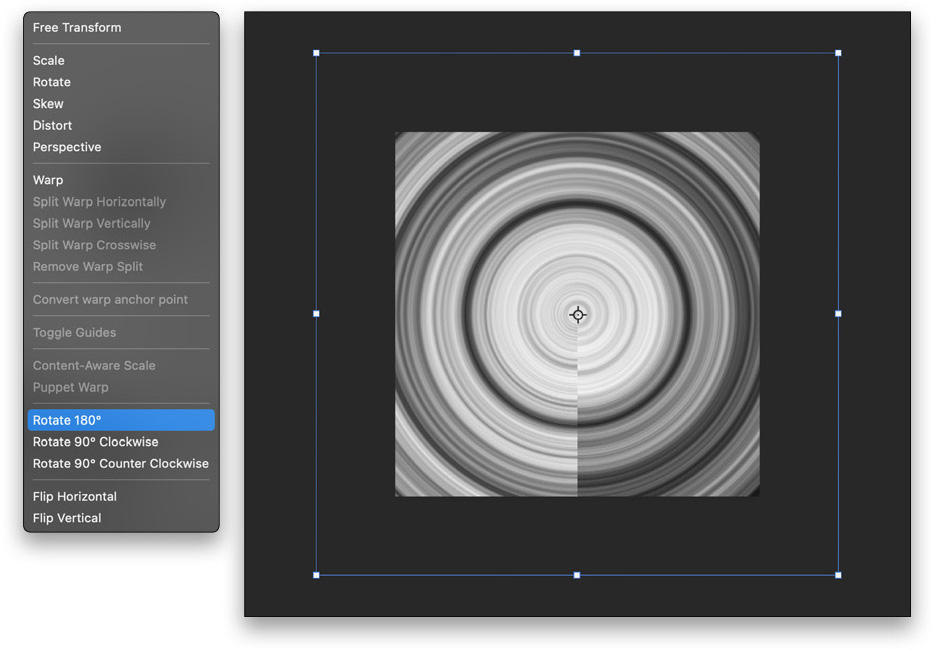
STEP SEVEN: The seam is, however, in the top half of the image and we want it to be on the bottom half. I also want the circle streaks to go all the way to the corners, so press Command-T (PC: Ctrl-T) to activate Free Transform, and then Right-click on the image and select Rotate 180°. Now, proceed to scale the layer until the edges of the streaks reach the corners of the canvas. Press Enter when you’re done. Remember, when scaling beyond the canvas edges, press Command-0 (zero; PC: Ctrl-0) to reveal the full transformation box.
STEP EIGHT: Now, let’s create a duplicate version of this file for the displacement map by going under the Image menu and choosing Duplicate. (Tip: Press-and-hold the Option [PC: Alt] key and you can bypass the naming dialog that pops up.)
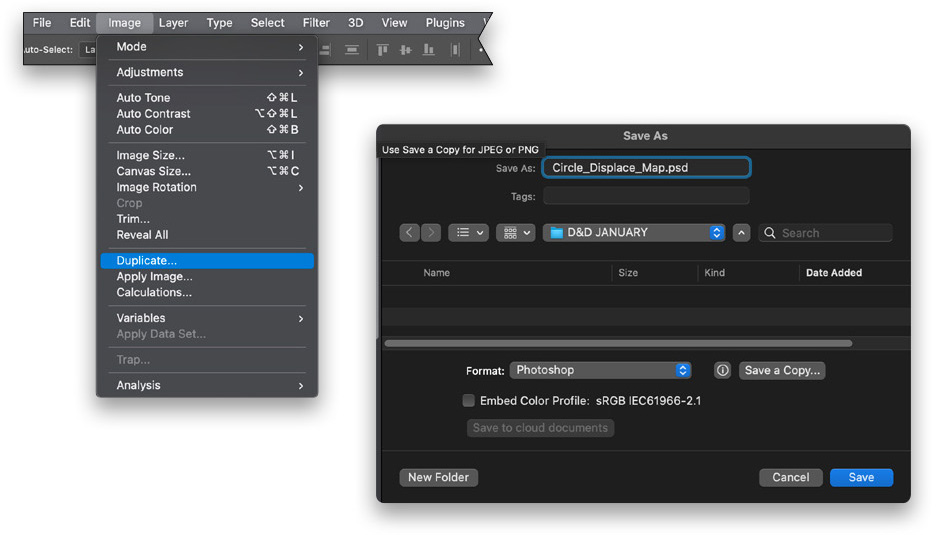
STEP NINE: Go under the Layer menu and select Flatten Image or just press Command-E (PC: Ctrl-E) to merge visible layers. Then, go under the File menu and choose Save As. Give the file a name, set the Format pop-up menu to Photoshop, and then save it to your desktop or a designated folder. Close this file when you’re done.
STEP 10: Next, open the subject image you want to use. Here, I have a shot I’ve been wanting to use for a while: I just thought it was a cool shot, but never had a reason to use it. Go ahead and click-and-drag or copy-and-paste the subject image into the original working streak image.
If you’d like to download the low-res watermarked version of this image to follow along, click this link, log in with your Adobe ID, and click the Save to Library button. Drag the image from the Libraries panel (Window>Libraries) into your working file. Right-click on the layer in the Layers panel and choose Rasterize Layer.
Back in the working image, turn off the circle streak layer for now and place the subject layer underneath. Bring up Free Transform again, to size the image to fit the canvas, and then press Enter.
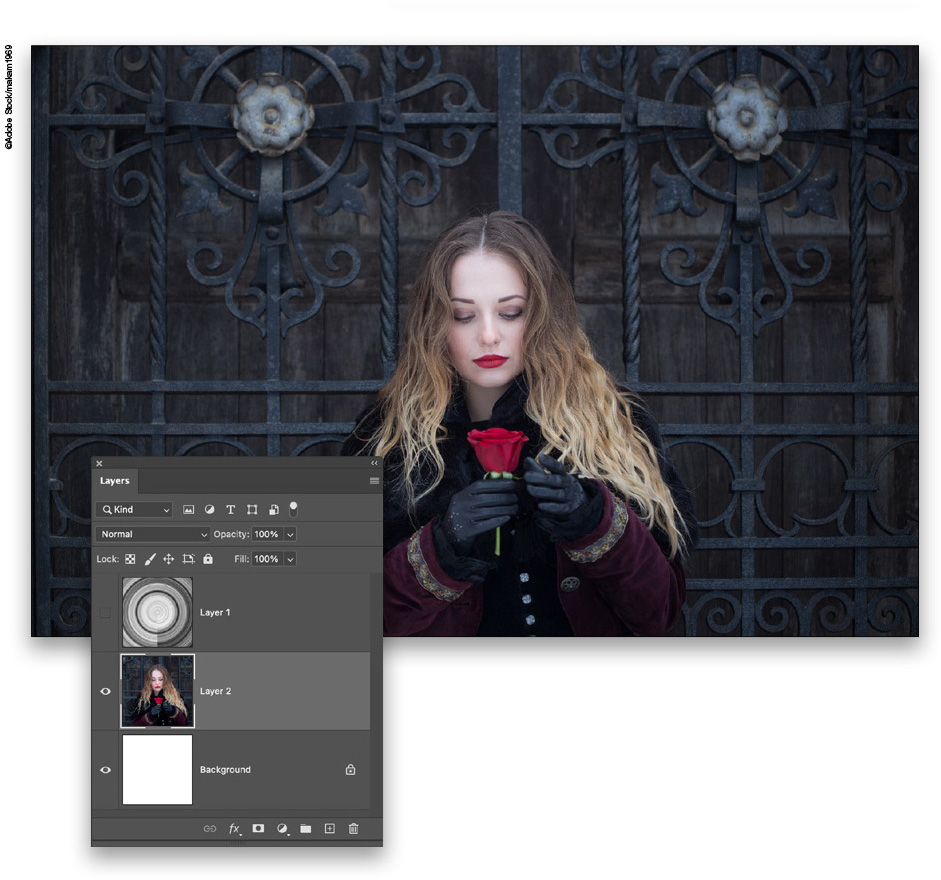
STEP 11: Here, I have the subject centered rather large in the canvas area. You can check your centering by pressing Command-R (PC: Ctrl-R) to activate the rulers, and then dragging out vertical and horizontal guides to the center until they snap in place. (Snap must be checked on in the View menu.) Use this to center the subject better. When done, press Command-; (PC: Ctrl-;) to hide the guides and Command-R to hide the rulers again.
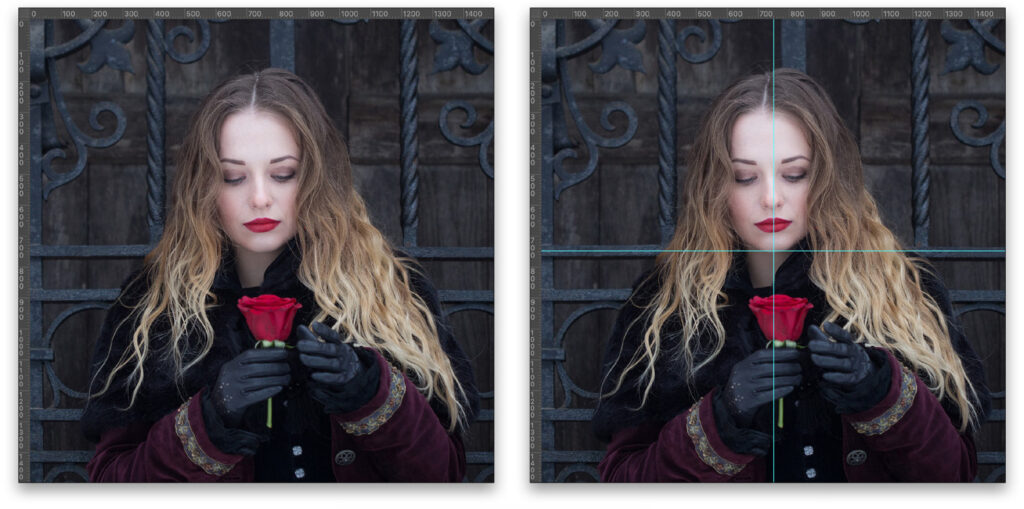
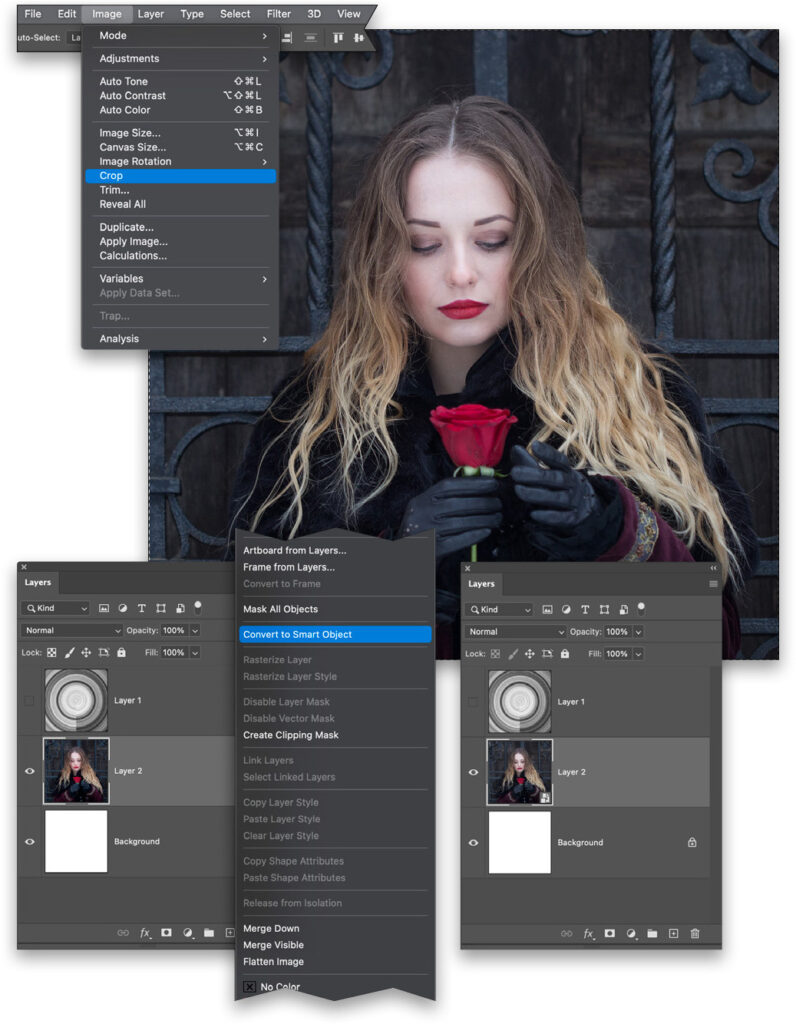
STEP 12: Next, we need to crop the image. While we only see the image in the canvas area, the rest of the image is still there, and when we apply a filter it will affect the entire image, especially since we’re going to contain it in a smart object. So, press Command-A (PC: Ctrl-A) to select the entire canvas area, then go under the Image menu and choose Crop. Press Command-D (PC: Ctrl-D) to Deselect when you’re done.
STEP 13: With the subject layer still selected, click the Layer panel’s flyout menu, and choose Convert to Smart Object.
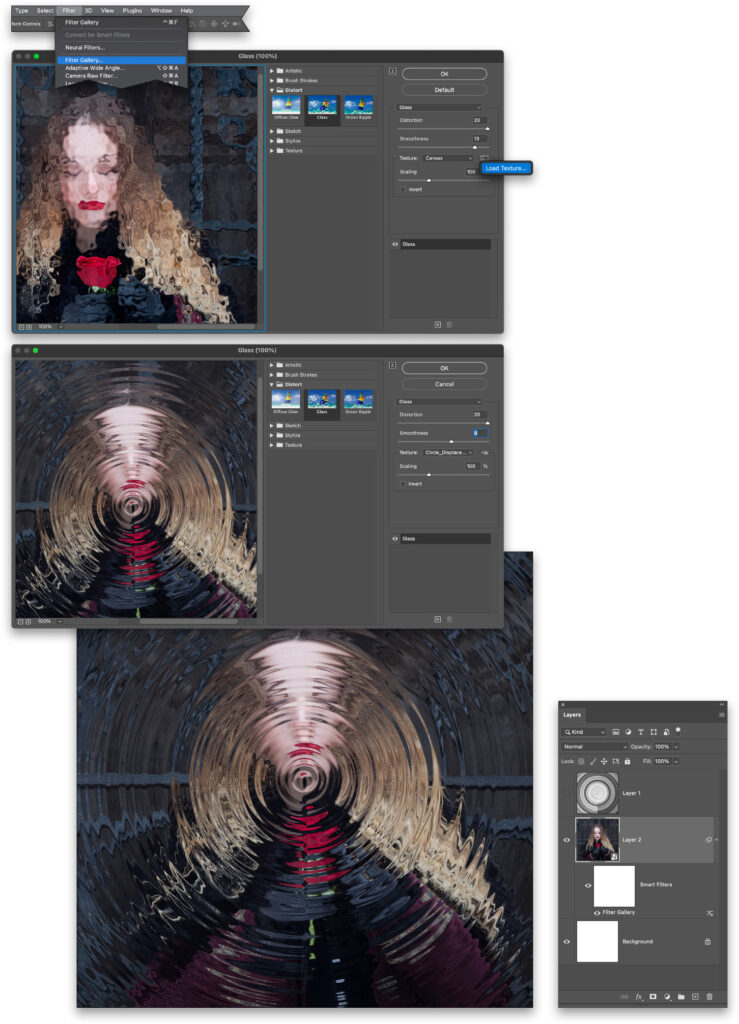
STEP 14: Now, let’s displace; however, we’re not using the normal Displace filter because there’s another Distort filter that allows you to apply a custom file. Go under the Filter menu and choose Filter Gallery. In the center panel, click on Distort and choose Glass. Notice in the Texture section on the right, there’s a small menu icon. Click on that icon, and then choose Load Texture.
When the file window opens, go ahead and locate the displacement file we created earlier, and then click Load. You will see the glass distortion take the shape of the circular streaks, and you can adjust the Distortion and Smoothness to modify the effect more. Click OK, when you’re done.
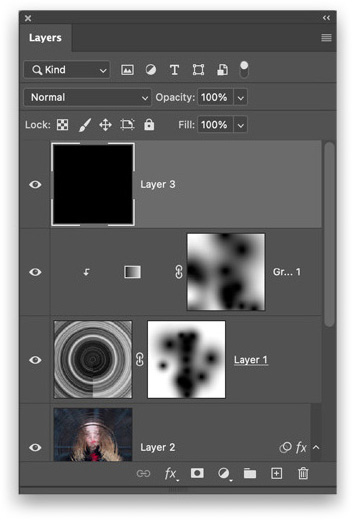
In the Layers panel, you can see the filter is applied as a sublayer, along with a layer mask.
STEP 15: While this looks pretty cool, let’s really take advantage of smart filters by applying the same filter again. Go under the Filter menu and choose the very first item, which is the last filter applied. It will open the Filter Gallery dialog again allowing us to change the settings. Here, I varied them and also activated Invert. Click OK.
Note that I’m not touching the Scaling slider in the Filter Gallery because the displace file and this image are the same size. If I adjust the scale it will offset them. In some cases, it could look cool; it really depends on the image.

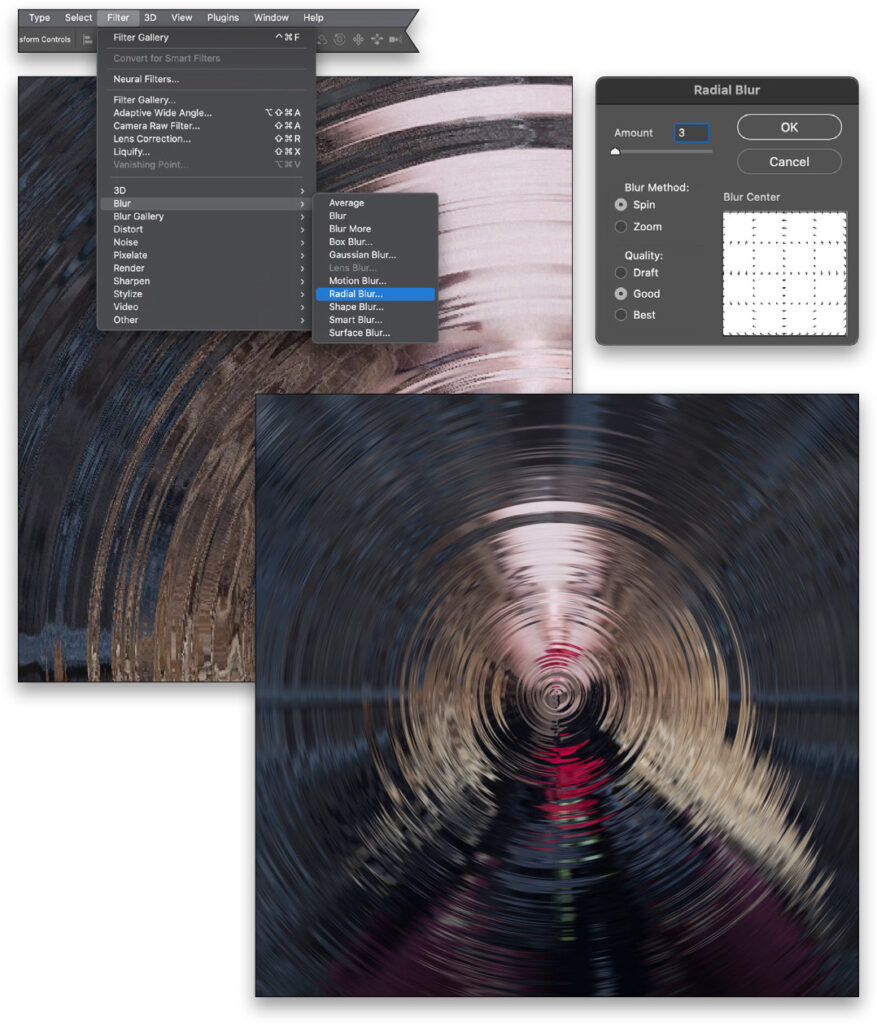
STEP 16: While the effect looks good so far, there are some rough edges and artifacts in there now. To smooth them out, go under the Filter menu, under Blur again, and choose Radial Blur. Set the Amount to around 2 or 3 and keep the Blur Method set to Spin. Click OK.
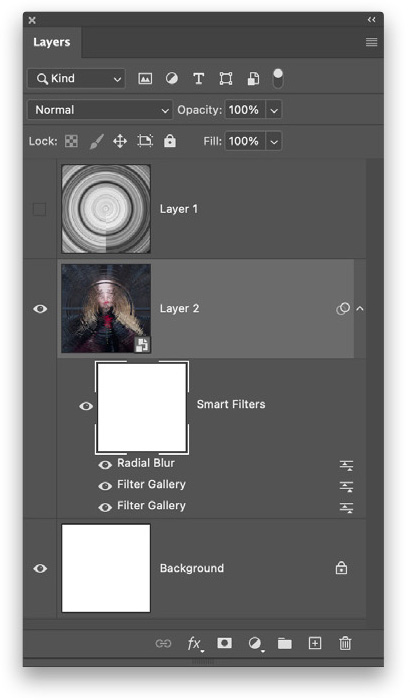
STEP 17: It has a nice smooth distortion now, but we need to bring the subject back. In the Layers panel, you’ll notice that, once we applied the filters to the smart object layer, it created a Smart Filters layer mask. This allows us to hide or reveal the filters in specific areas.
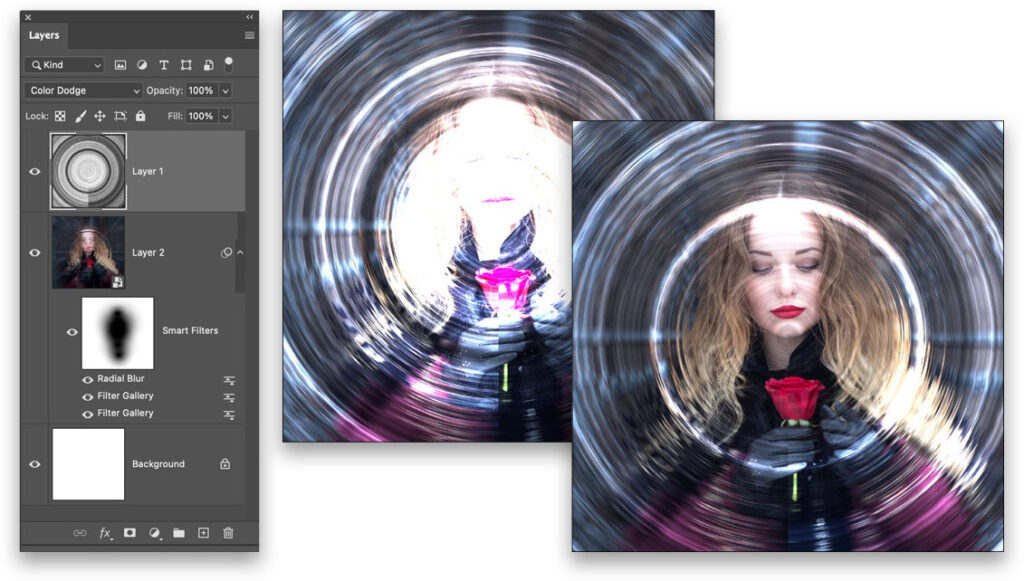
STEP 18: Click on that Smart Filters layer mask to select it, then go to the Toolbar and choose the Gradient tool (G). Up in the Options Bar, choose the Foreground to Transparent gradient from the Gradient Picker, and then select the Radial Gradient style. Press the X key to set your Foreground color to black, and then starting in the center of the image, click-and-drag out a small gradient to reveal the subject. Instead of one or two big gradients, I like to add several smaller ones to reveal just the details I want to see.
You can always go back and modify the filter settings by double-clicking the filter name under the layer mask.

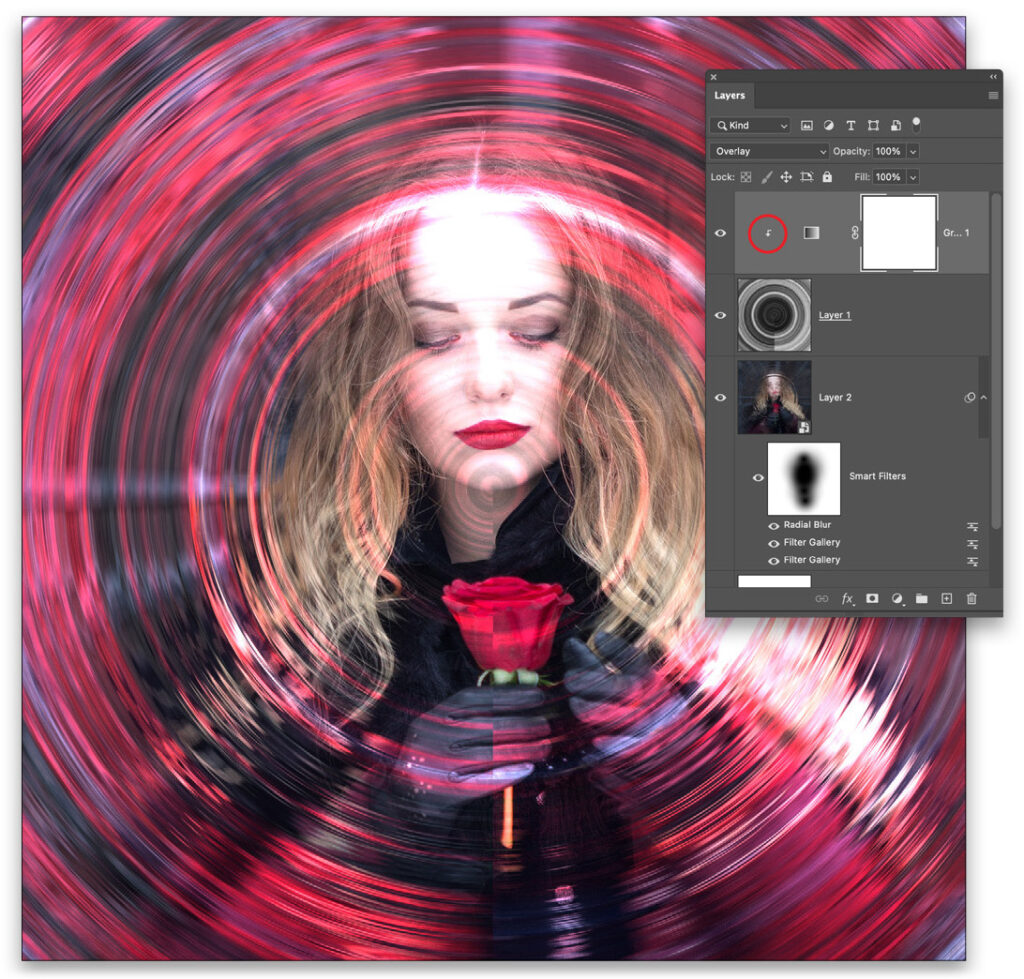
STEP 19: Remember the circular streak layer from earlier? Go ahead and click on it to make it active, turn it back on, and make sure it’s still at the top of the layer stack. Near the top of the Layers panel, change its layer blend mode to Color Dodge. It will look outrageous, but if you simply invert the layer by pressing Command-I (PC: Ctrl-I), you get a less harsh result.
STEP 20: Now, click on the Create New Adjustment Layer icon at the bottom of the Layers panel (the fourth icon from the left) and choose Gradient Map. In the Properties panel that appears, click on the down-facing arrow to the right of the gradient ramp, and then open the Reds folder in the gradient presets. Choose the first preset, named Red_01, and then change its layer blend mode to Overlay. Again, this will look outrageous, but if you clip the adjustment layer to the streak layer below it, by pressing Command-Option-G (PC: Ctrl-Alt-G), it will isolate the effect to just that layer.
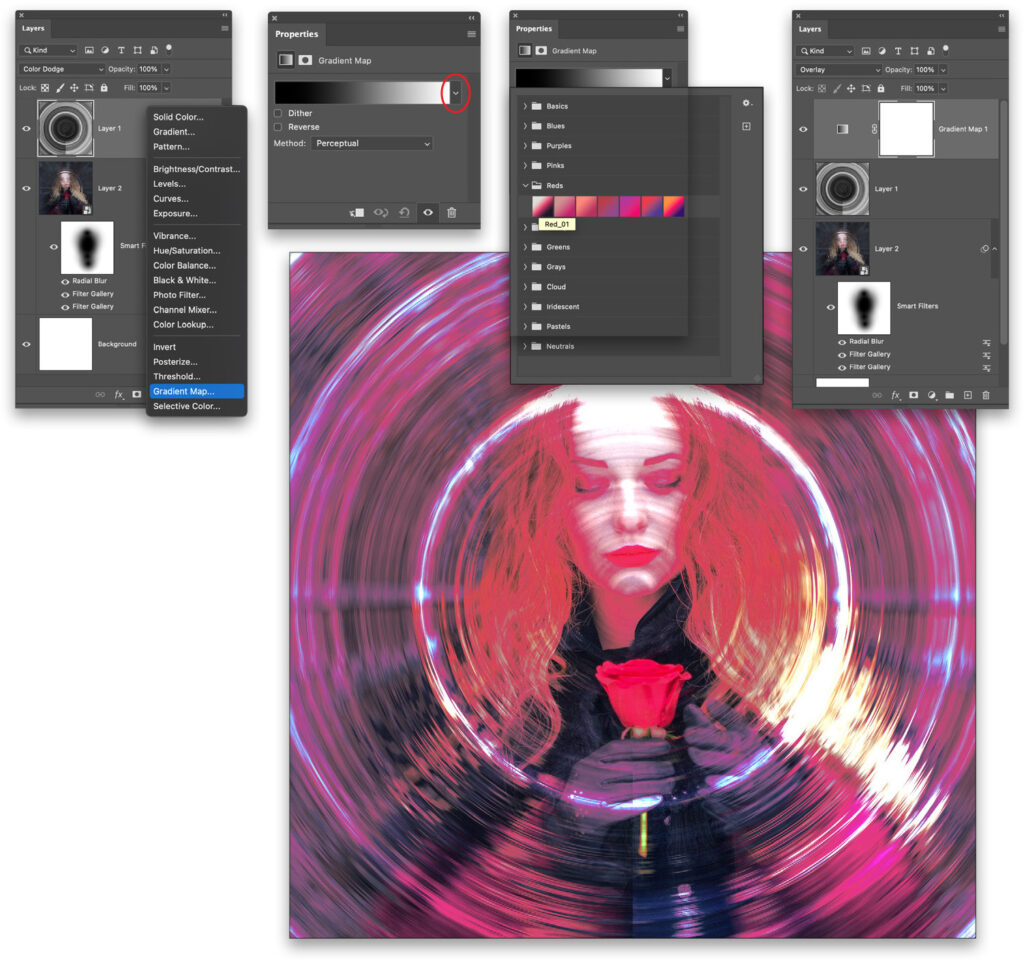
STEP 21: This is still a bit much, so with the Gradient Map adjustment layer mask selected, use the radial Gradient tool again to fade away random areas of the color effect.
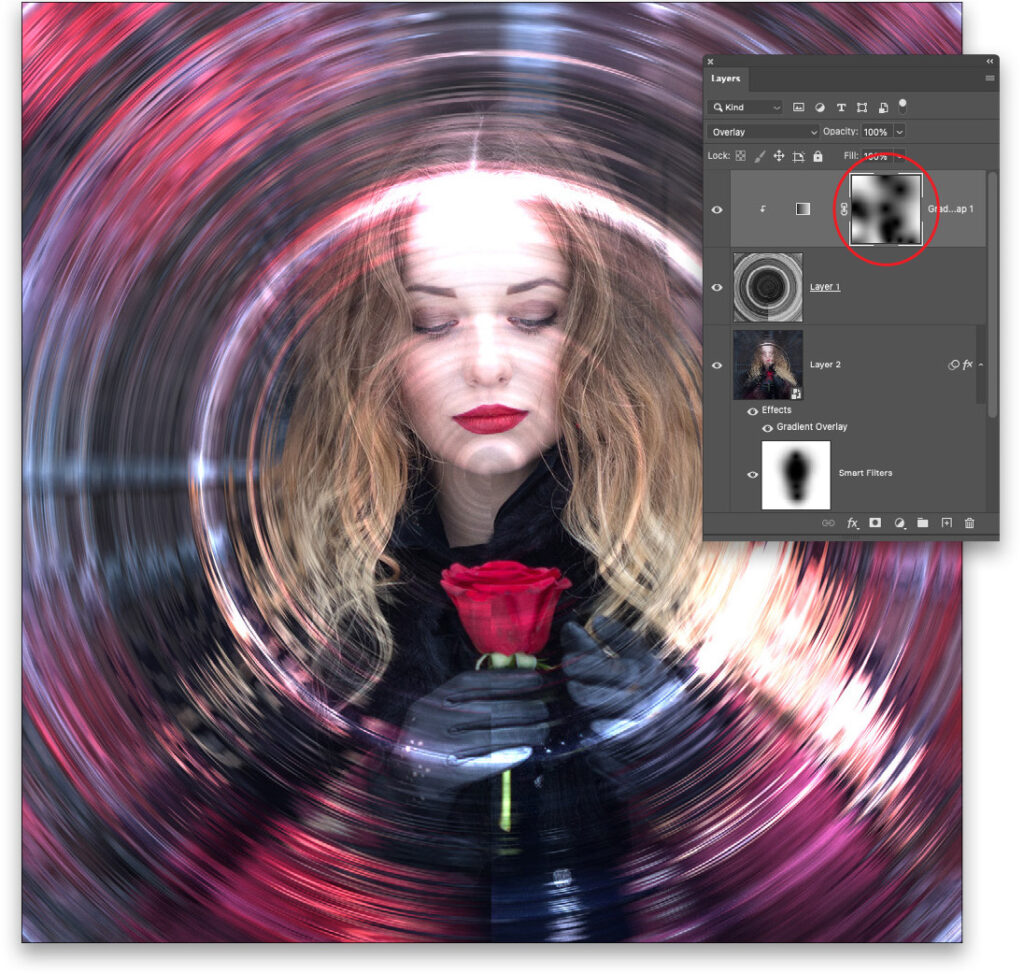
STEP 22: Next, click on the circle streak layer, then click on the Add Layer Mask icon at the bottom of the Layers panel and use the radial Gradient again to give it a similar mask treatment as we did to the Smart Filters mask on the subject layer. Notice how the masking hides the seam of the streaks.
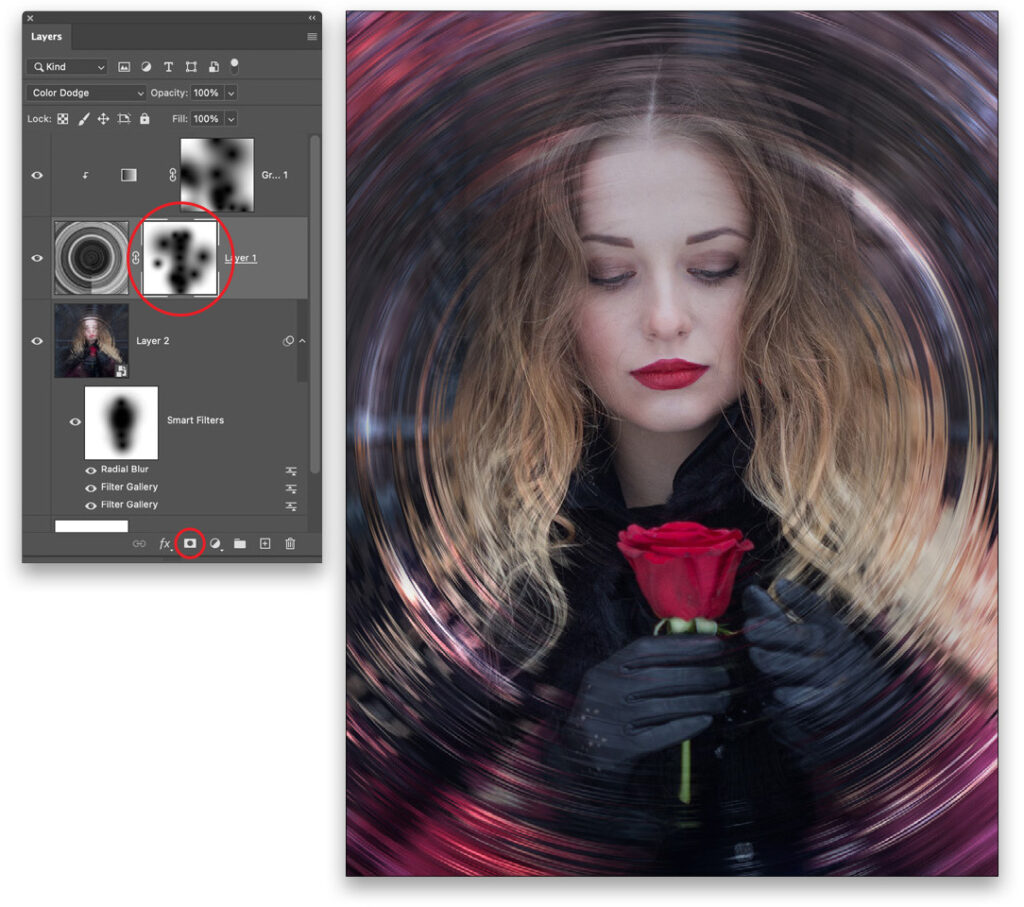
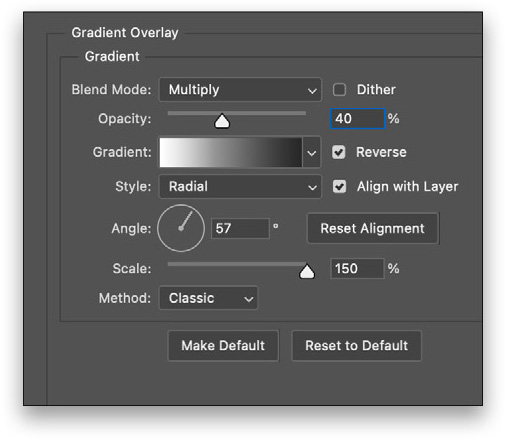
STEP 23: Finally, let’s add a couple finishing effects. First, click on the subject smart object layer in the Layers panel, then click on the Add a Layer Style icon (the second icon from the left) at the bottom of the panel, and choose Gradient Overlay. Here, you can see I’m using a simple black-to-white radial gradient, with Reverse turned on, that gives a sort of focused light effect. Enter these same settings and click OK.
STEP 24: Click on the Create a New Layer icon at the bottom of the Layers panel to create a new blank layer and move it to the top of the layer stack. Fill it with black by pressing Shift-Delete (PC: Shift-Backspace), choosing Black from the Contents pop-up menu, and clicking OK.
STEP 25: Go under the Filter menu, under Render, and choose Lens Flare. Position the flare point in the upper-left corner of the preview, select the 50–300mm Zoom, and then set the Brightness to 150%. Click OK.
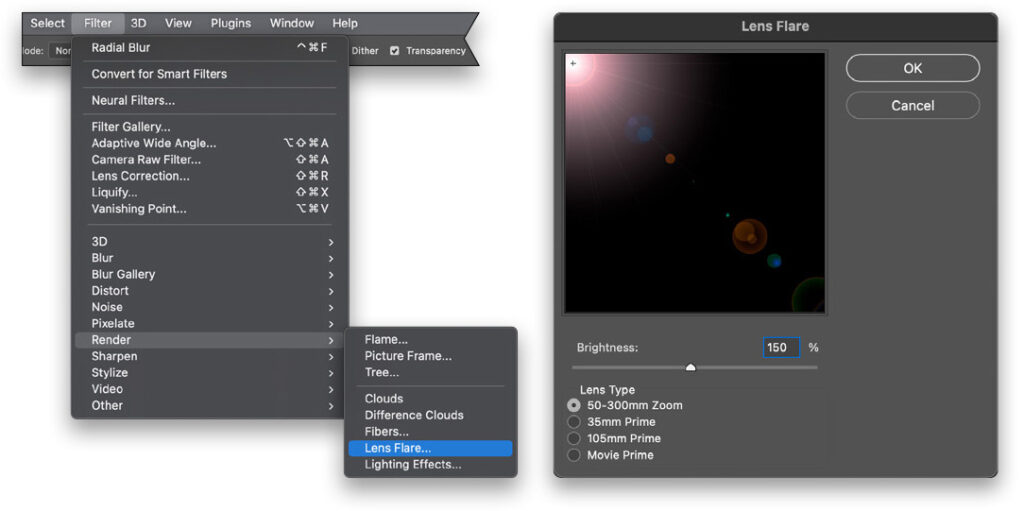
STEP 26: Change this Lens Flare layers blend mode to Screen. Then, lastly, activate Free Transform again (Command-T [PC: Ctrl-T]), and scale the flare layer until the hot spot in the upper-left corner is just out of view. Press Enter when you’re done.
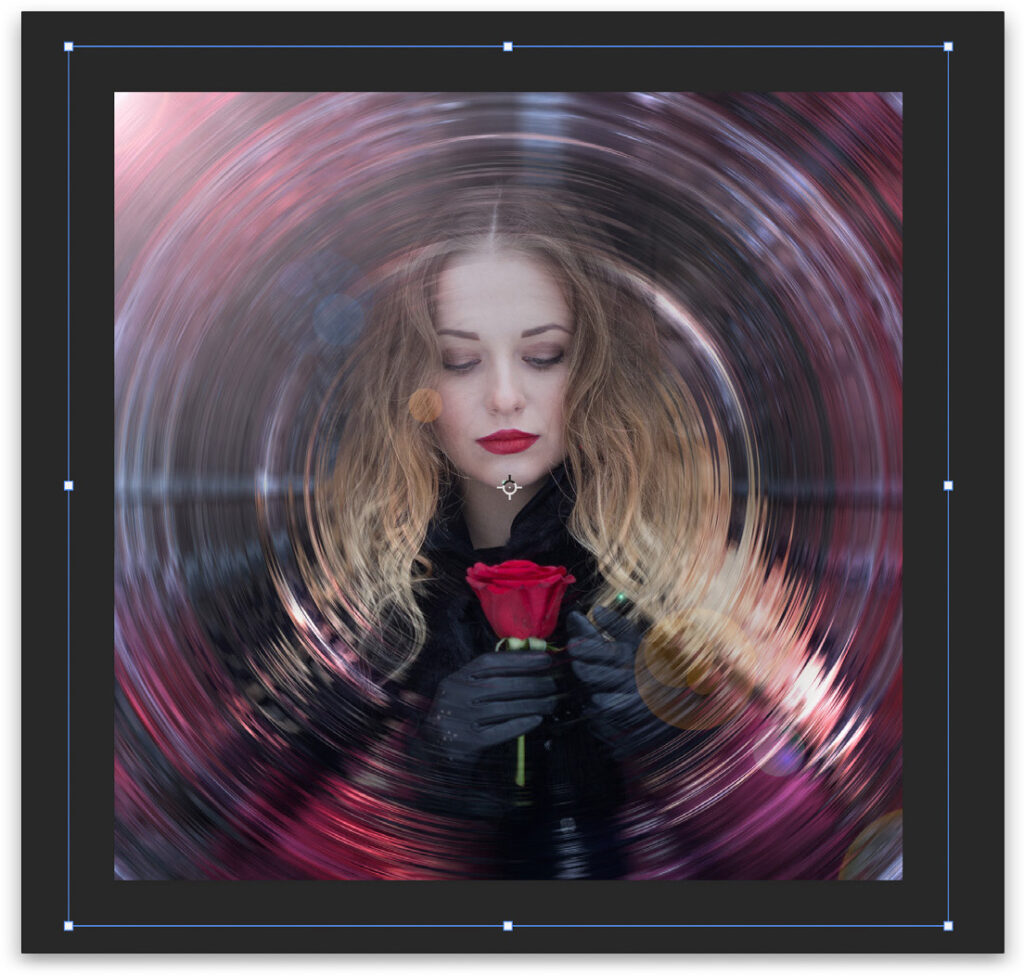
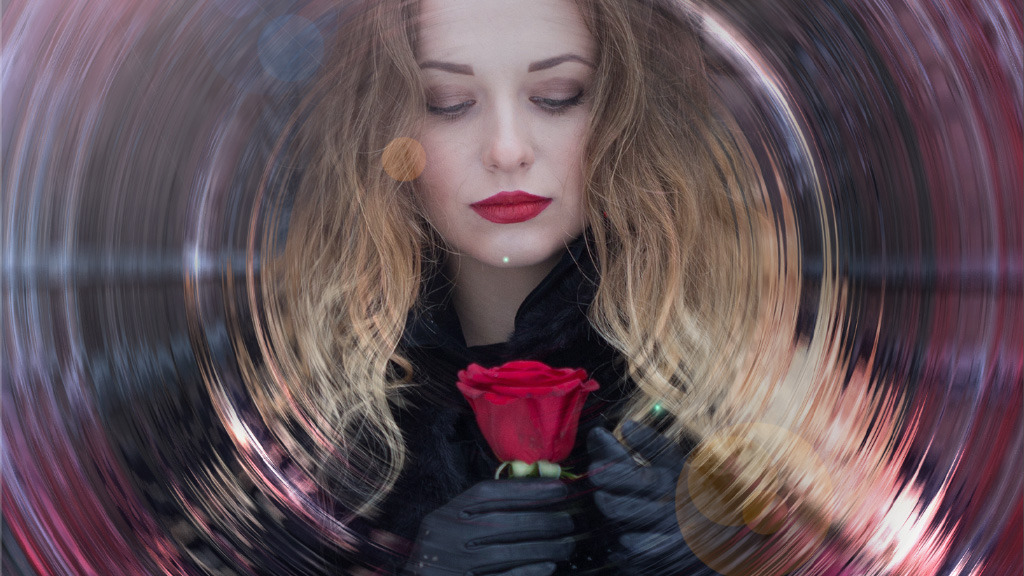
So there you have it; some fun with creating your own custom distortion maps. You can change out the subject now just by opening the smart object layer, dropping in a new subject, closing it, and saving the changes. Modify the Gradient Map adjustment layer and voilà!
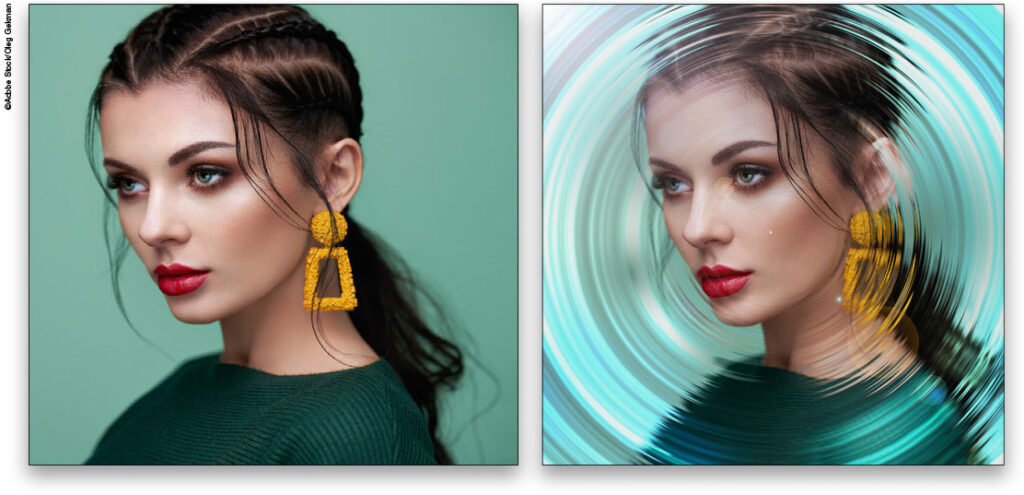
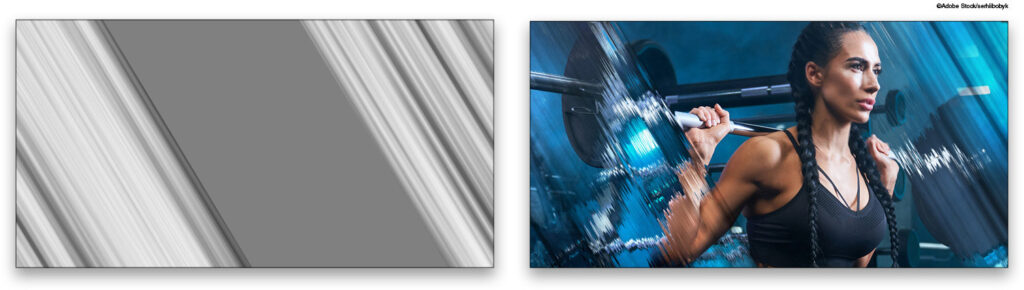
You can also experiment with other types of streak elements. Below is the same process using a vertical streak at a slant.
This article originally published in the January, 2023 issue of Photoshop User magazine.
About Photoshop User and KelbyOne
Photoshop User magazine comes out digitally 12 times a year and is part of KelbyOne, the leading educational resource for Photoshop, Lightroom, and photography. Pro members have access to more than 900 video courses and 100 back issues of Photoshop User. To learn more about KelbyOne, click here.


