
Photoshop has made some amazing strides with automated selection tools. Select Subject has saved me countless hours by making tedious, manual processes a one-click affair! Well, usually. Sometimes the results do need a little help, even with fairly simple edges. This month we’ll look at a couple of ways to combine the new and the old for doing speedy cleanup work on basic edge selections.
Note: Before we begin, I want to set some expectations. These techniques are about working quickly to get solid results and should be added to your larger bag of tricks. They’re meant to help with getting the job done, not perfection. Spend a few seconds to see if you get acceptable results and if not, try something else.
If you’d like to download the low-res watermarked version of this image to follow along, click this link, log in with your Adobe ID, and click the Save to Library button. Double-click the image in the Libraries panel (Window>Libraries) to open it in Photoshop.
To make it easier to work with the image, increase the resolution of the practice file. (We normally don’t recommend enlarging images, but this is only for practice purposes.) Go to Image>Image Size, turn on the Resample checkbox, select Preserve Details 2.0 from the Resample drop-down menu, set the Width to 5,000 pixels, and click OK. Then go to Select>Subject.
A DIFFERENT PATH
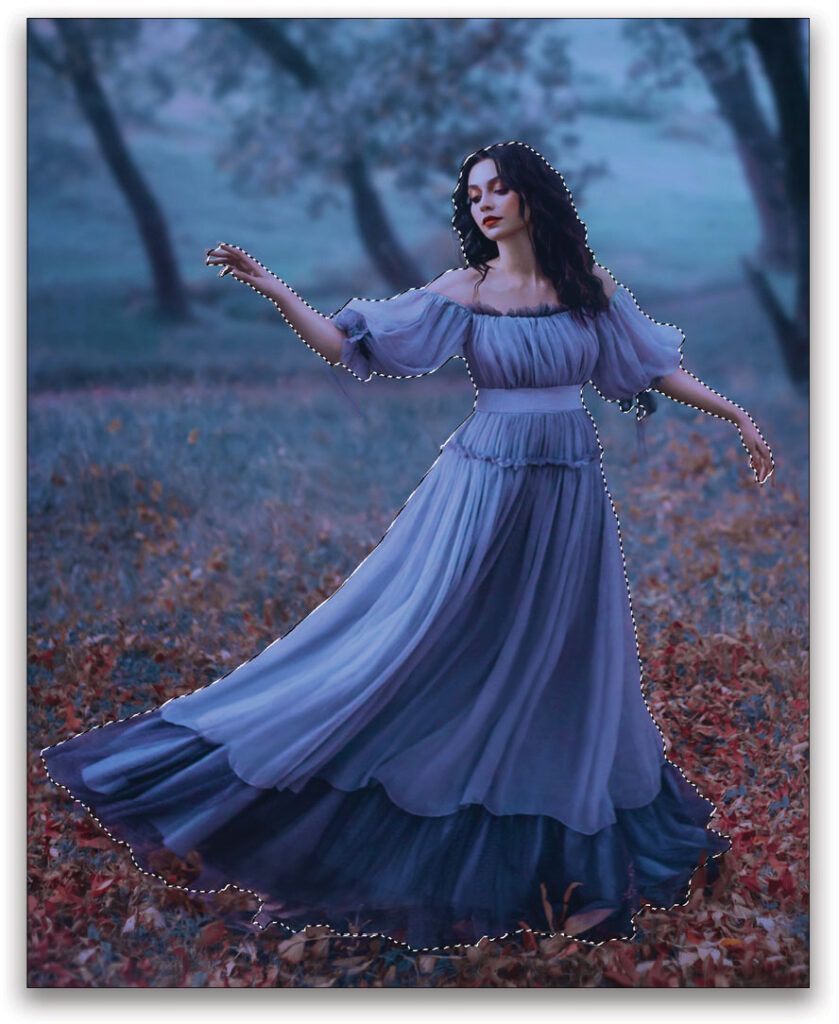
The first trick takes advantage of a slight imperfection in how Photoshop generates paths from selections. Take a look at the “marching ants” selection of this mysterious dancer in the woods.
Select Subject gives a pretty good result, but the edges of the dress are…not so good. Below left is the mask along the right side (with the selection active, click the Add layer mask icon [circle in a square] at the bottom of the Layers panel).
Tip: You can see the mask itself by holding Option (PC: Alt) and clicking on the layer mask thumbnail in the Layers panel. This also lets you work directly on the mask with nearly any of Photoshop’s layer tools (if you were watching a movie, this would be foreshadowing). You can either Option-click (PC: Alt-click) the layer mask thumbnail again, or click on the regular layer thumbnail to return to the image.
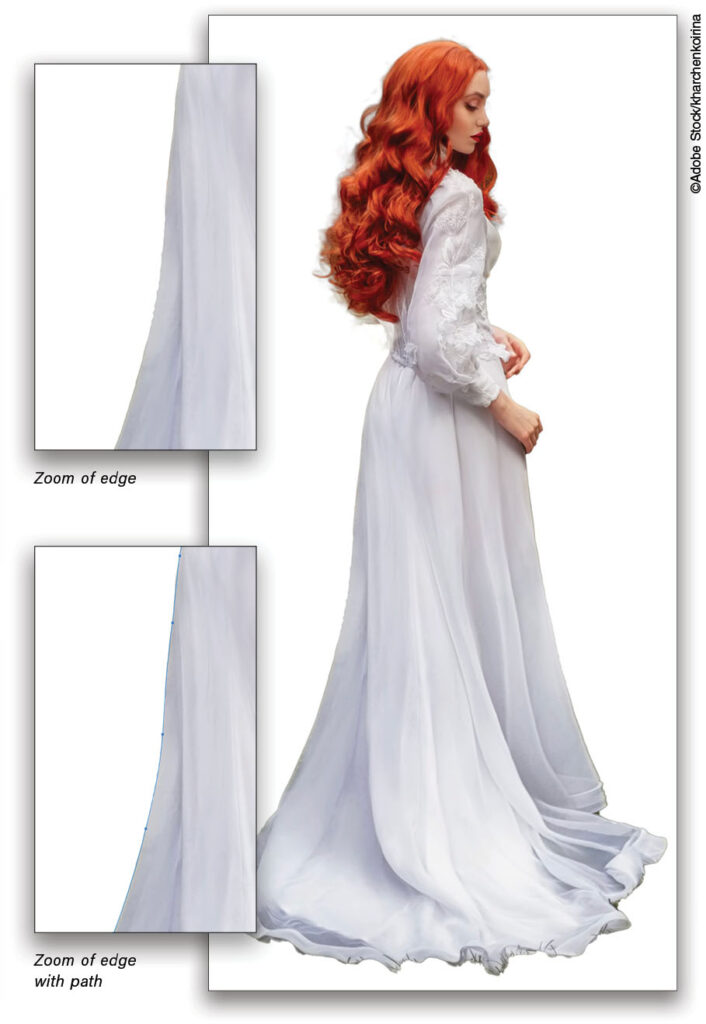
STEP ONE: Since the dress is fairly smooth already, let’s try using a path to clean up those edges. Hold Command (PC: Ctrl) and click on the layer mask thumbnail to load it again as a selection. Now open the Paths panel (Window>Paths) and click on the Make Work Path from Selection icon (it looks like a circle with four small dots around the perimeter).
What we get is a path that has smoothed out some of the rough selections. Photoshop will try to minimize the number of control points it adds to a path, which means it automatically reduces the jagged edges.
STEP TWO: We’ll need to work with the original image visible, so the first thing to do is turn off the layer mask. Go back to the Layers panel and click on the layer mask thumbnail, then open the Properties panel (Window>Properties). Click the Eye icon at the bottom right of the Properties panel to toggle visibility of the layer mask.
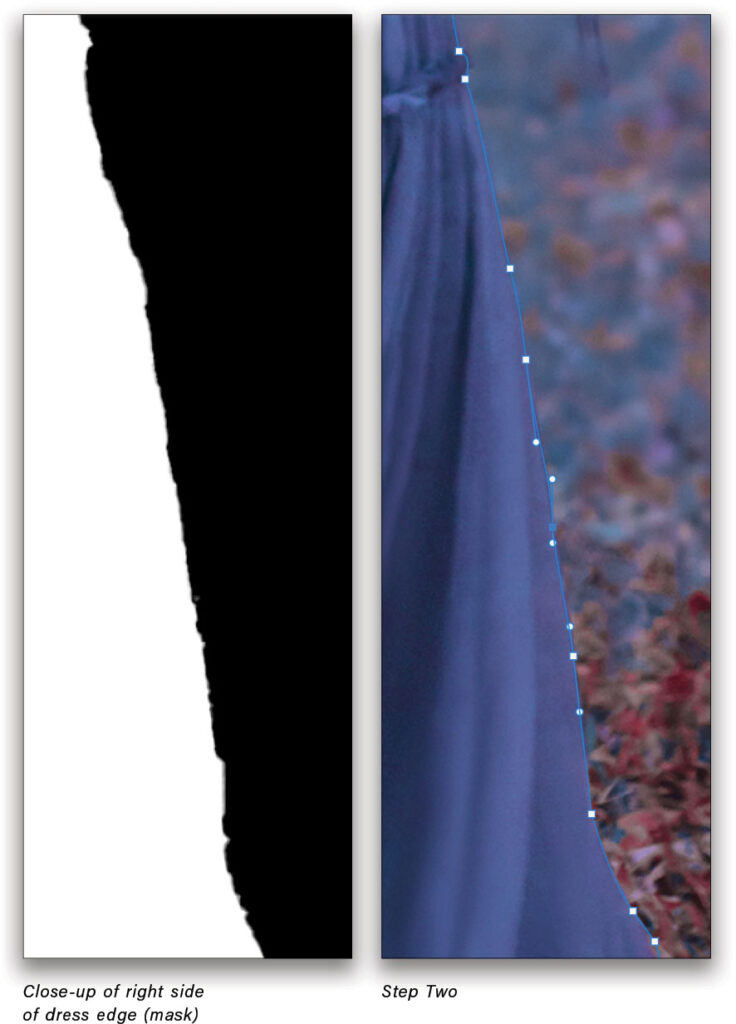
STEP THREE: Now let’s grab the Direct Selection tool. (Make sure you have the Direct Selection and not the Path Selection tool! The Direct Selection tool is the white arrow nested below the Path Selection tool [A] in the Toolbar.) Start tweaking a few points by clicking on them to make them active (an active point is blue, while all the other points are white), and then drag them around. If you need to remove a few extra control points, grab the Delete Anchor Point tool (nested with the Pen tool [P] in the Toolbar) and get rid of any points that are in your way or making the path too complicated.
(Note: If you need a primer on using the Pen tool and paths, see “Let’s Get Surgical” in the February 2019 issue of Photoshop User.)
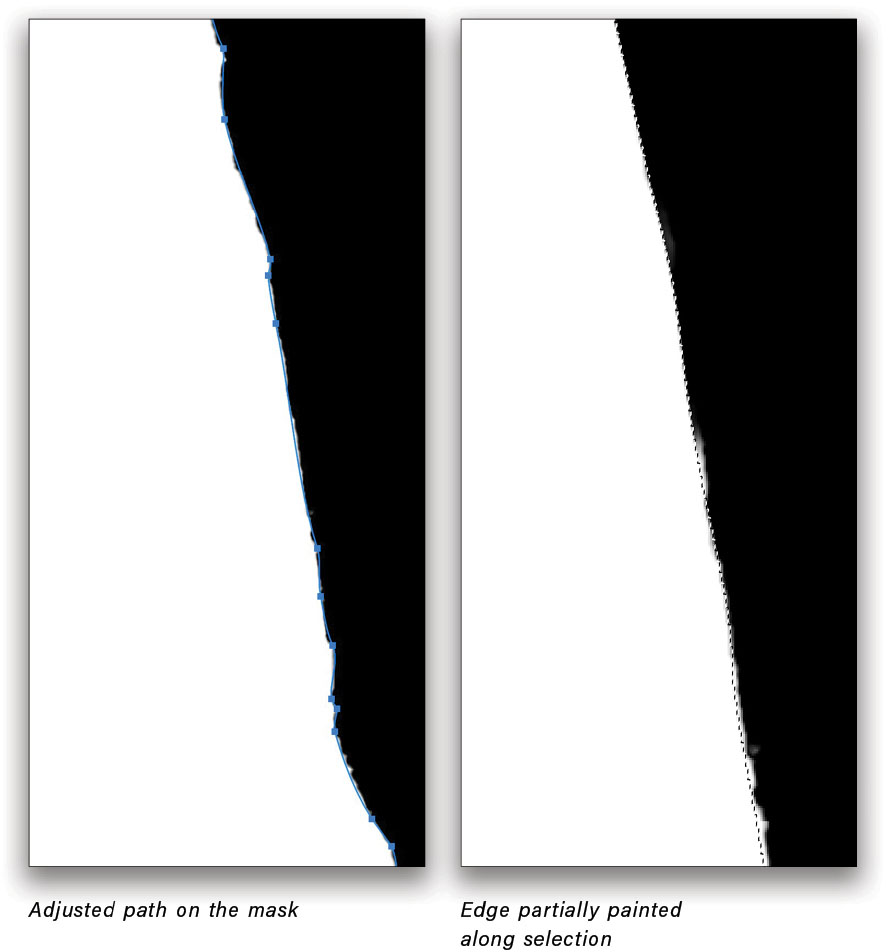
Remember that you can drag active points directly, drag their handles to rotate the line at that point, or even use the Arrow keys on your keyboard to nudge them around. And if you find that some of the nodes create corners where you want a smooth curve, hold Option-Command (PC: Alt-Ctrl) and drag the node to convert it to a curve.
STEP FOUR: When you’re happy with the path on that side, click the layer mask thumbnail in the Layers panel to reactivate it. Now go to the bottom of the Paths panel and click Load Path As a Selection icon (dotted circle) to convert the path back to, you guessed it, a selection. The interior subject area is selected by default so you have the option of painting with white inside the selection; the selection will keep you from painting outside the lines. You can also go to Select>Inverse and paint with black. Often you’ll need a little of both to clean up the edges so that the mask is completely white over the subject and completely black outside the subject.
Without using the path method, you’re stuck trying to manually paint those edges, which can take a lot of time.
BLUR AND LEVELS
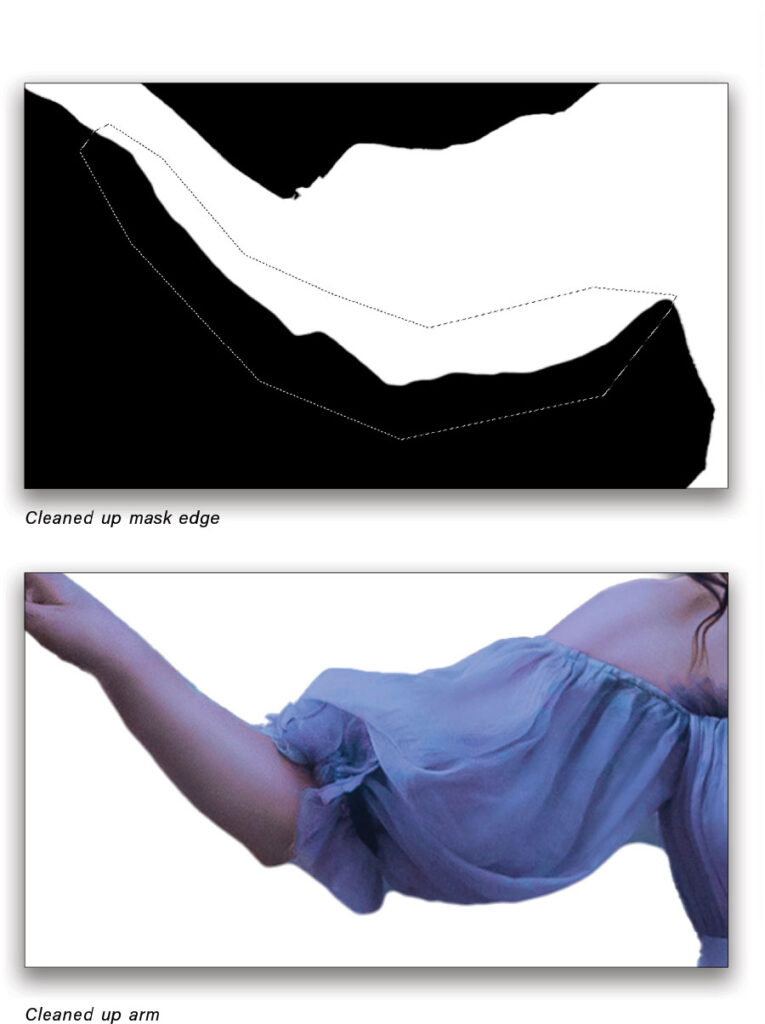
But what if you don’t really need to adjust the edge and only want to clean things up a bit, such as under the sleeve and arm, as shown here? There’s a quick way to accomplish this, too!
STEP ONE: In this case, create a selection around the area of interest: I used the Polygonal Lasso tool nested with the Lasso tool [L] in the Toolbar). Make the mask active, and then add a little Guassian Blur (Filter>Blur>Gaussian Blur). Again, make sure you’re adding the blur to the mask and not the layer itself. Use only enough blur to get rid of the speckled, jagged pixels.
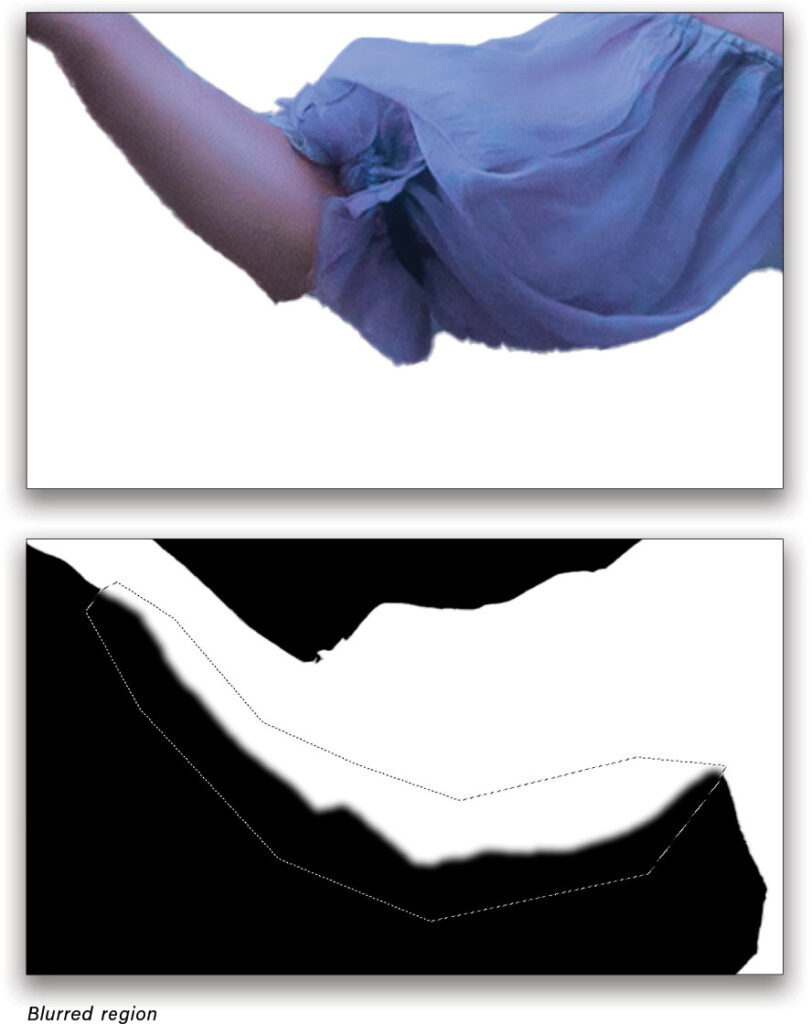
STEP TWO: Remember the hint about foreshadowing? Here comes the payoff: with the selection still active, press Command-L (PC: Ctrl-L) to bring up the Levels adjustment, and drag the black and white end points in toward the middle. Adjust a little at a time to increase the contrast of the blurry edge, making it tighter against the subject.
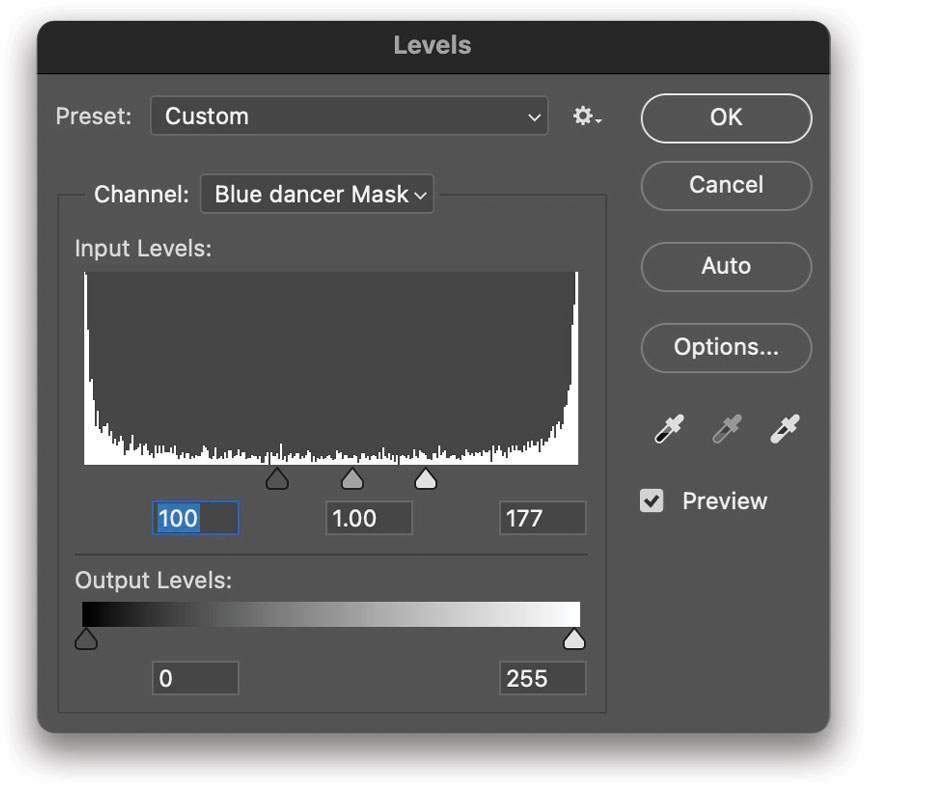
Usually, a Gaussian Blur setting of 3–5 pixels works great but since we’re using the Levels adjustment, you can err on the side of larger values. Being able to tame the edge is really powerful, but at some point you’ll start to lose smaller details. A good balance will leave you with enough definition and a clean edge, but not overly smooth.
Pro tip! You can shift the actual edge position of the mask by moving the sliders in the Levels dialog more in one direction or the other. Dragging everything to the right moves the edge inward toward the subject; dragging left moves things outward. For more on Levels, see “Levels Magic” in the February 2020 issue of Photoshop User.
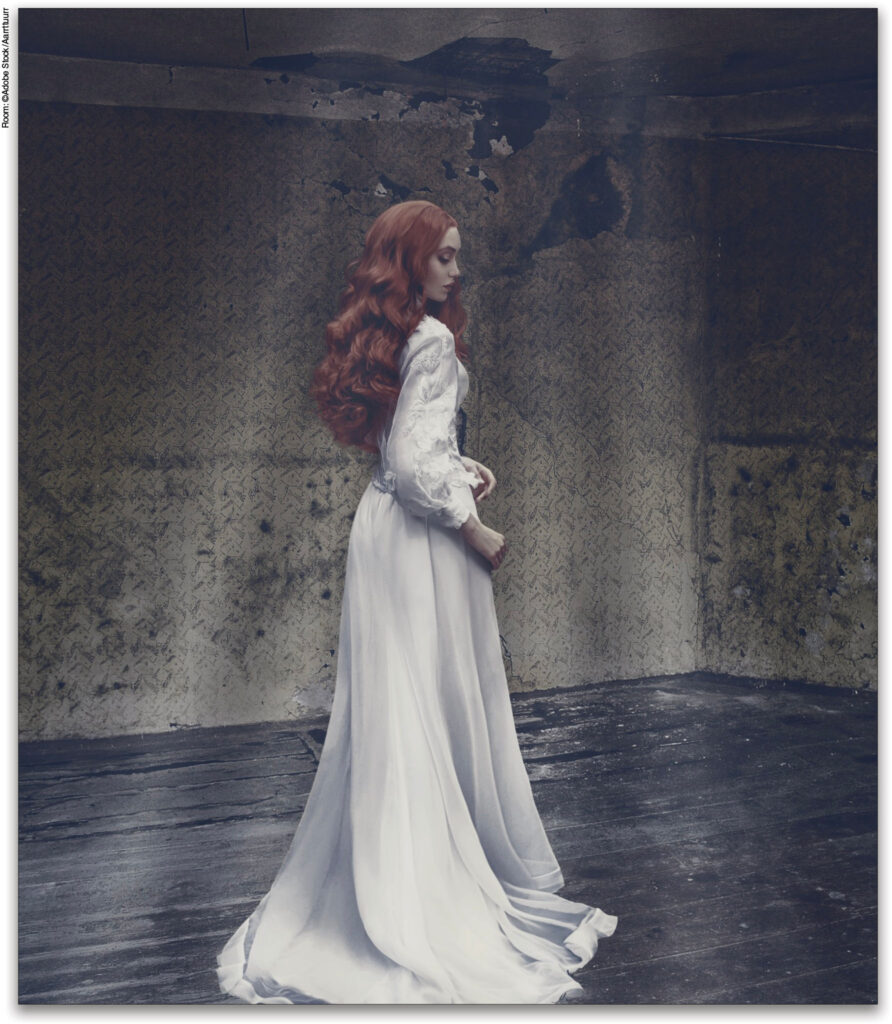
SMUDGE IT
Here’s a little different situation where the Levels trick could work, but it’s a perfect opportunity to add another element. (You can find and download the low-res version of this image from Adobe Stock by clicking here and then open and enlarge it as we did with the previous image.)
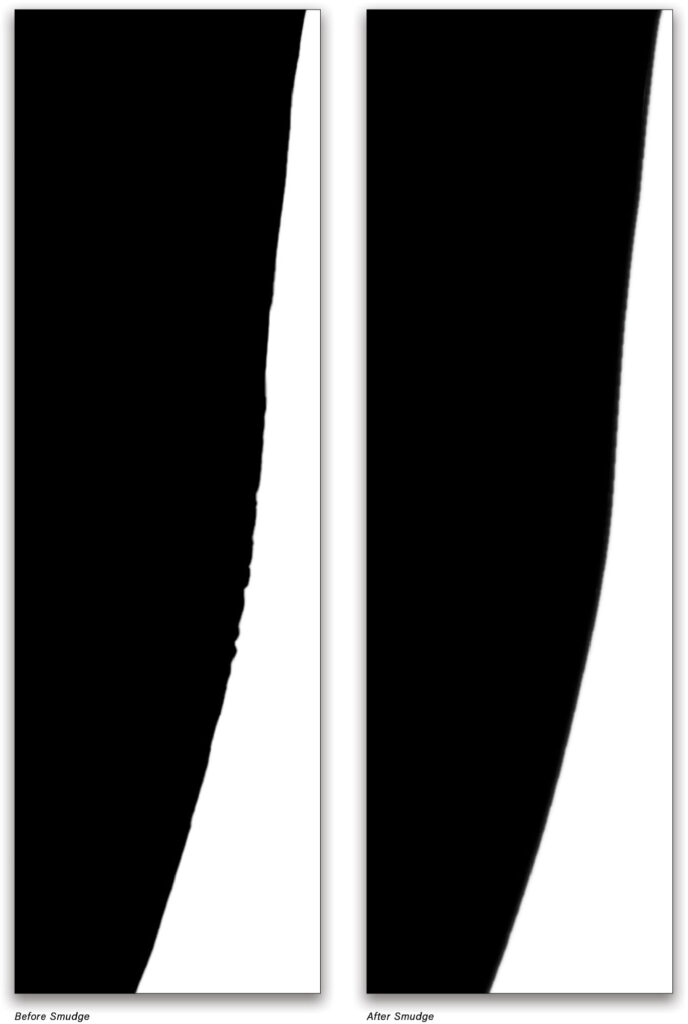
STEP ONE: This time, I’ll go for the Curvature Pen tool (nested with the Pen tool [P] in the Toolbar) and create a path from the model’s hip down to about the bottom of the gown.
STEP TWO: Grab the Smudge tool (under the Blur tool in the Toolbar). Up in the Options Bar set its Strength to 100%, and check the Finger Painting option. For best results, use a soft round brush that’s only a few pixels wide (I chose 9 px for this example). Make sure that you have the layer mask selected! In the Paths panel, click the Stroke Path with Brush icon (gray circle with white outline).
STEP THREE: You can follow this up by stroking the path with the Blur tool as well, as the Smudge tool can sometimes leave other small artifacts. In fact, this version is sometimes an outstanding replacement for the Levels trick above when you’re not sure how much blur you’re going to need. Instead of erring on slightly larger blurs, start smaller and work your way up. So long as the path is enabled, you can repeat the stroke as many times as you like to get just the right blend.
When you’re all done, place your beautifully and quickly cutout model into a new scene!
THE RIGHT TOOLS
The main message here is to use tools that make sense in the moment and exactly where you want them. In both images above, the hair results were acceptable so I wanted to leave those alone. It didn’t make sense to try and fiddle with the Select and Mask dialog to try and get everything at once, especially knowing I could target specific areas with a few different techniques. Building on the results of Select Subject also kept me from having to manually create the mask or do detailed painting.
In many situations you’ll find that these little insider tricks save you frustration and time by letting you refine the power-house Artificial Intelligence tools.
This article originally published in the October, 2022 issue of Photoshop User magazine.
About Photoshop User and KelbyOne
Photoshop User magazine comes out digitally 12 times a year and is part of KelbyOne, the leading educational resource for Photoshop, Lightroom, and photography. Pro members have access to more than 900 video courses and 100 back issues of Photoshop User. To learn more about KelbyOne, click here.


Sometimes there’s a tip, like this one on cleaning selection edges by Scott Valentine that I’m reading on my laptop and know that I’ll want to refer to it next time I’m editing on my desktop. Is it possible to add a feature to “save this article”, kinda like the NYT Cooking section does with recipes? It would be super helpful to users like me.
Hi, Pam! When I post articles to the Insider blog I always try to credit the magazine issue they appeared in. The best bet for saving something for later would be to either bookmark that issue of the magazine in your browser, or download the PDF of the issue. Hope this helps!