Photoshop’s Neural Filters include a fascinating filter called Style Transfer. This filter uses an image from a famous artist as “inspiration” to apply a similar style to your image. The idea behind the technology is really quite amazing and it can be used to create some interesting effects quickly.
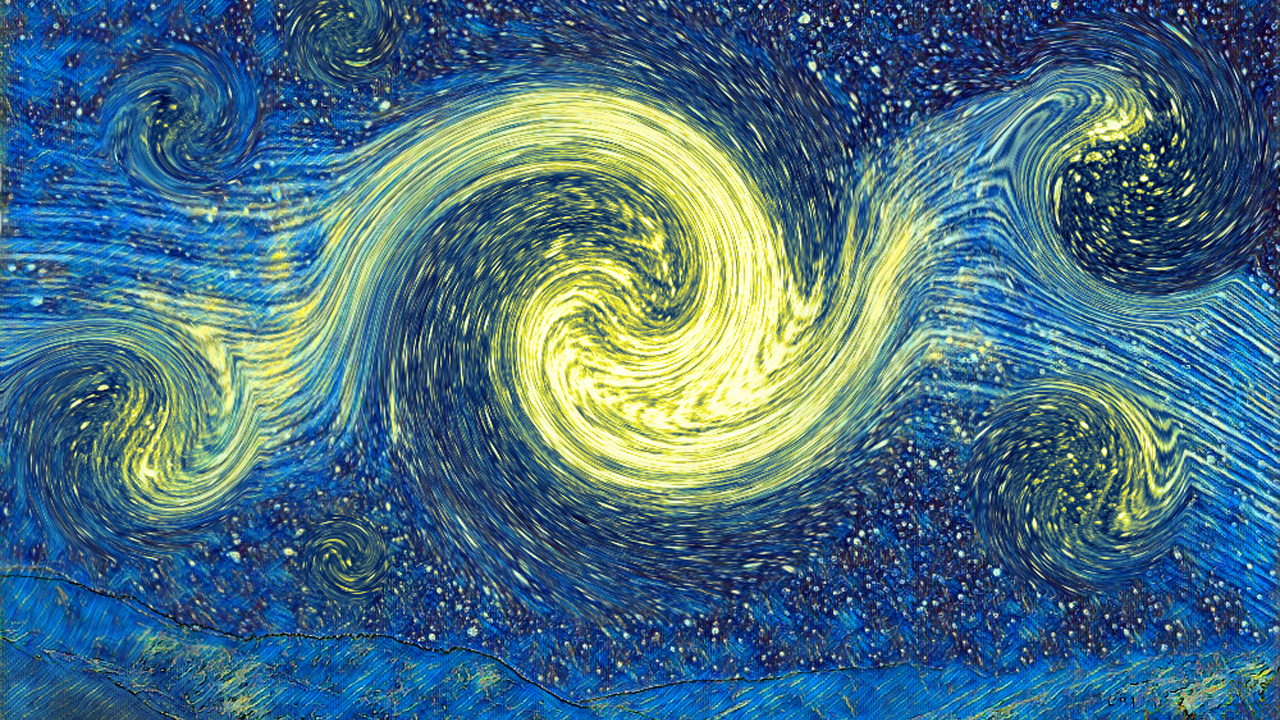
It’s important to govern some expectations here. This feature isn’t attempting to create replicas or reproductions of the paintings by famous artists in history. It doesn’t even come close to that! Rather, it tries to simulate some of the color usage and brushstrokes that it detects in works from those artists. In any case, this project will dive into crafting your own version of Van Gogh’s Starry Night.
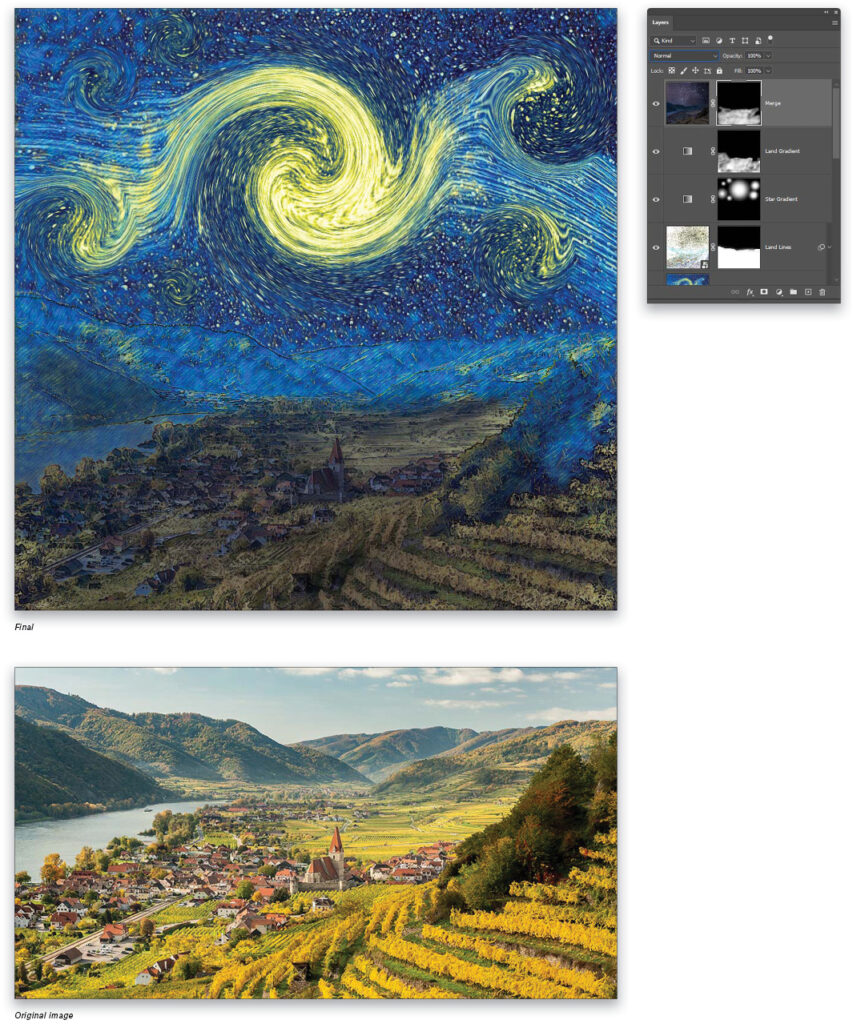
STEP ONE: Open Photoshop and go to File>New to create a New document. Set both the Width and Height to 1000 pixels and the Resolution to 300 ppi. After clicking Create, go to File>Place Embedded and choose a landscape background. Here we used an Adobe Stock image.
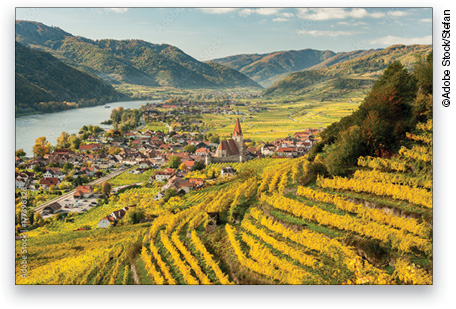
If you’d like to download the low-res watermarked versions of this image to follow along, click this link, log in with your Adobe ID, and click the Save to Library button. Drag the preview image from the Libraries panel (Window>Libraries) into your new document.
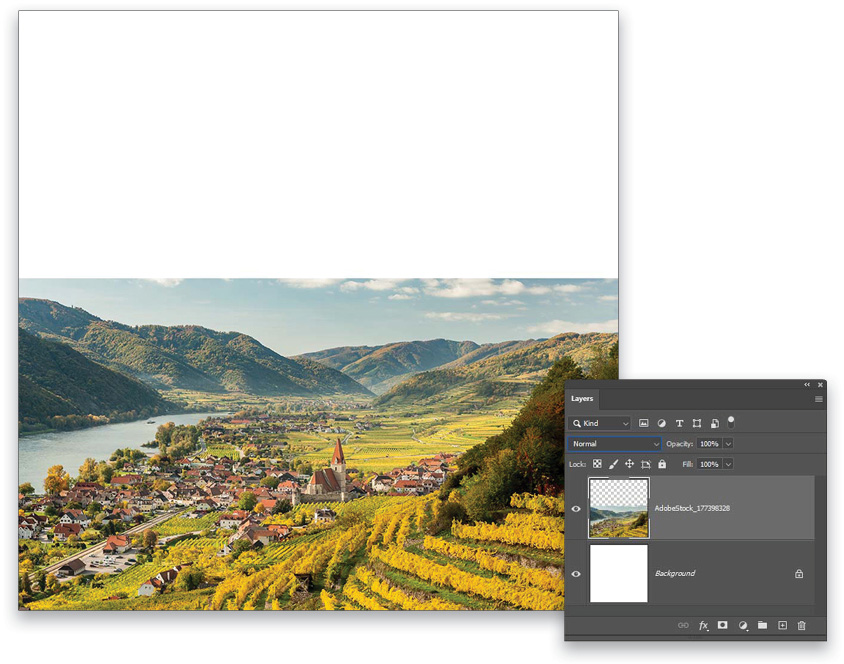
Position the landscape fairly low so the horizon is at about the bottom third of the image. That leaves plenty of space for creating the starry sky. Press Enter to commit the image. Then go to the Layers panel and Right-click on the layer thumbnail and choose Rasterize Layer from the context menu. This changes the layer from a smart object to a regular pixel layer.
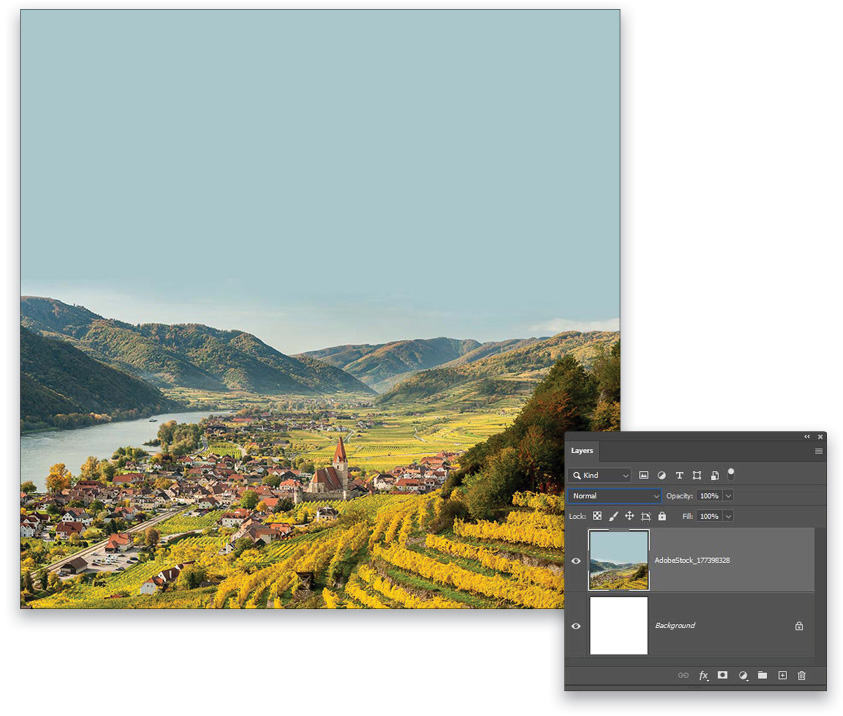
STEP TWO: Use the Rectangular Marquee tool (M) to create a selection of the empty area above the image. Then use the Eyedropper tool (I) to sample the blue color from the sky area. Press Option-Delete (PC: Alt-Backspace) to fill the selected area with the blue color. Cancel the selection with Command-D (PC: Ctrl-D) and switch to the Brush tool (B). Use a large soft round brush to paint over the clouds that are forming a sharp edge.
STEP THREE: Go to Edit>Sky Replacement to get the Sky Replacement dialog. Open the drop-down menu next to the sky thumbnail. Click on the gear icon at the top right and go to Get More Skies>Download Free Skies. This launches a page from adobe.com that has multiple sky packs from which to choose. Download and save the Night Skies Pack.
Back in Photoshop, use the same gear menu to Import Presets, navigate to the Night_Skies_Pack_1.sky file you just downloaded, and click Open. Choose one of the dramatic views of the Milky Way from the new Night Skies folder. Before clicking OK to apply the sky replacement, note that you can drag on the image area to reposition the new sky!
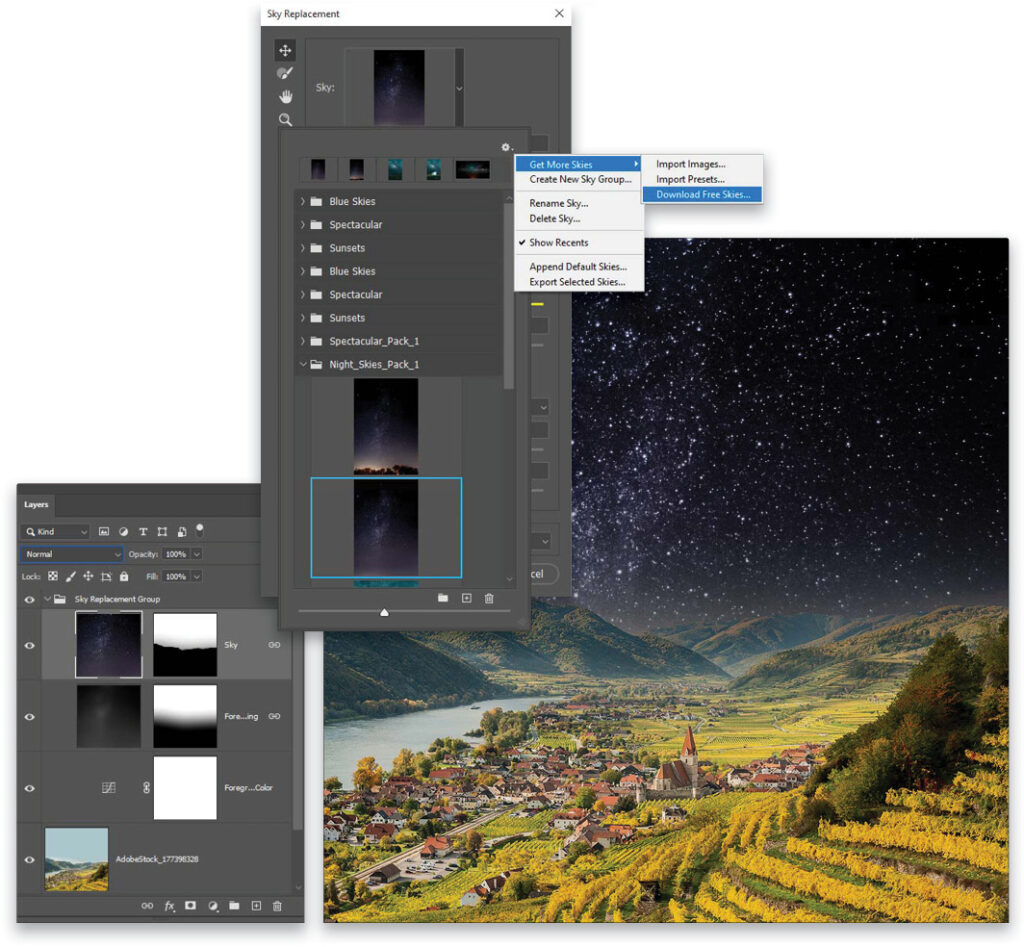
STEP FOUR: Look inside the Sky Replacement Group in the Layers panel for the Sky layer. Duplicate this layer by pressing Command-J (PC: Ctrl-J). Notice that there’s a small chain-link icon at the far right of each of these layers in the Layers panel. That indicates they’re all linked together. Right-click on the Sky copy layer and choose Unlink Layers to disassociate this layer from the others. Then change the layer blending mode to Screen.
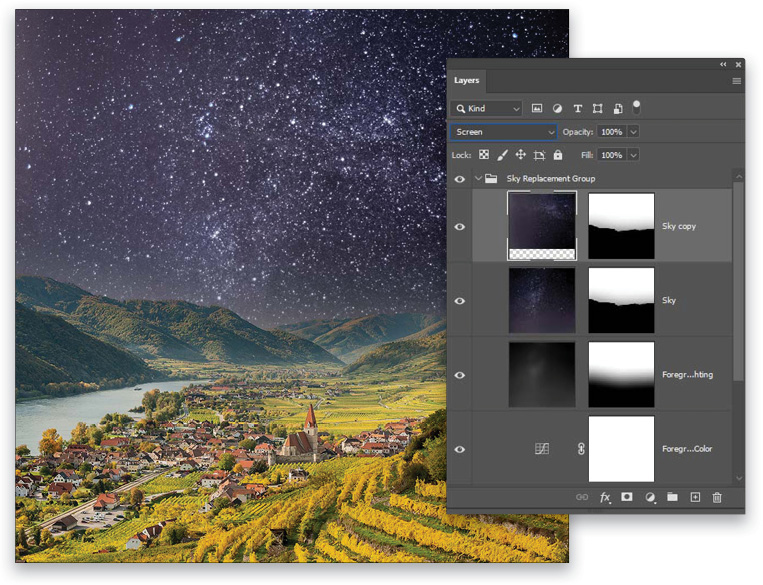
Make sure the layer itself is the active element and not the mask, then press Command-T (PC: Ctrl-T) to get the Free Transform handles. Click-and-drag outside the bounding box to rotate the layer by 90° clockwise, then slide the layer to the right. The idea here is to effectively double the amount of stars in the sky, but not in a way that’s visibly obvious. Press Enter to commit the transformation.
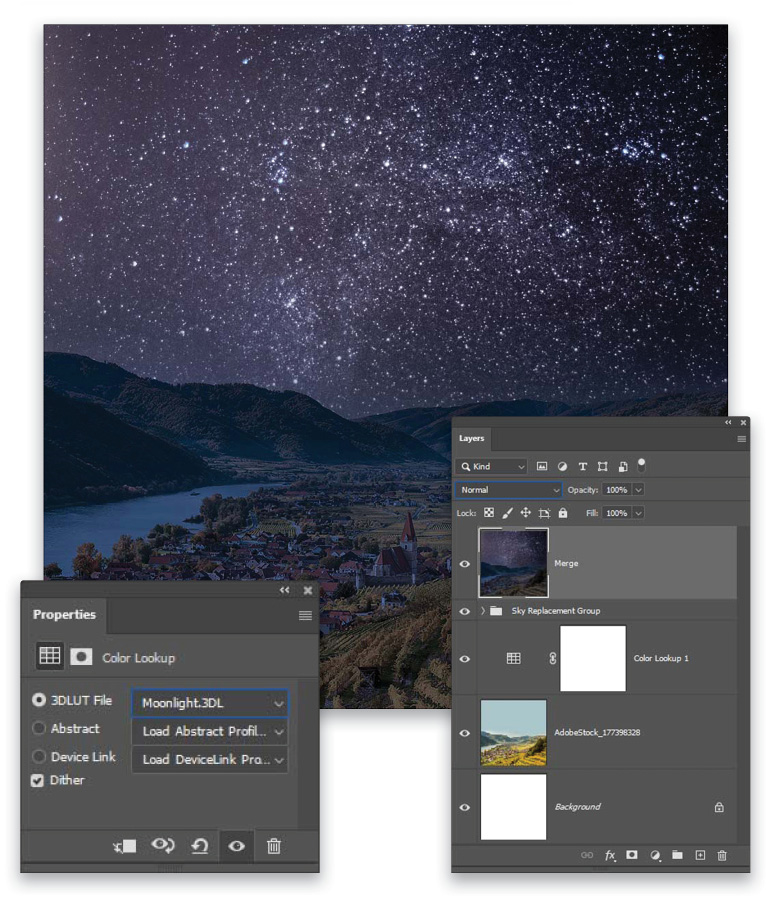
STEP FIVE: The landscape coloring doesn’t match the night sky. The lighting of the landscape is obviously daytime. Add a Color Lookup adjustment layer (Layer>New Adjustment Layer>Color Lookup) just over the landscape layer. In the Properties panel (Windows>Properties), set the 3DLUT File drop-down menu to Moonlight.3DL to give the land area a nighttime tint. Hold down the Option (PC: Alt) key and go to Layer>Merge Visible to create a stamped merged layer of all the visible layers. Move this merged layer to the very top of the layer stack. Double-click its name and rename it “Merge.”
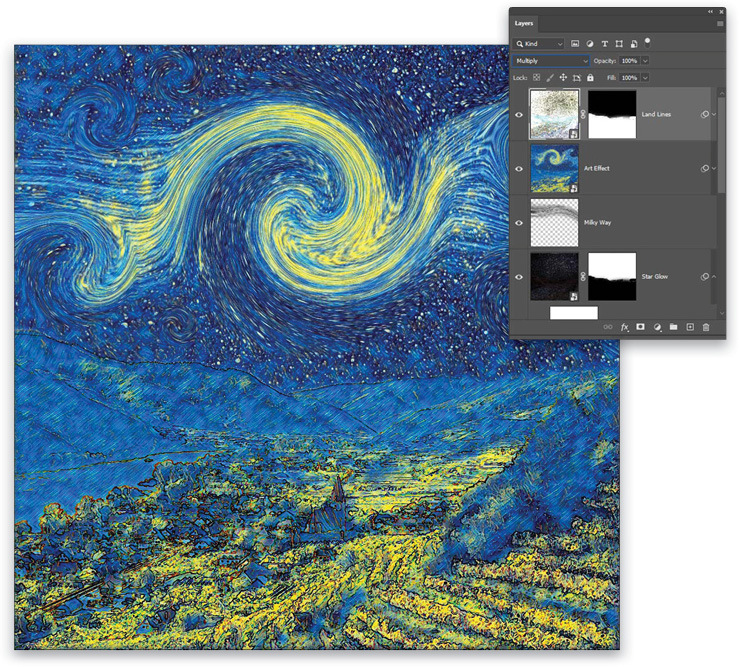
STEP SIX: Duplicate the Merge layer, convert it to a smart object by going to Filter>Convert for Smart Filters, and rename it “Star Glow.” Use Select>Sky to create a selection of the sky, then click the Add Layer Mask icon (circle in a square) at the bottom of the Layers panel to use this selection as a layer mask.
Click on the layer thumbnail to put the focus back on the layer and not the mask, then go to Filter>Filter Gallery. Under the Stylize folder, select the Glowing Edges filter. Set the Edge Width to 1, Edge Brightness to 6, and Smoothness to 3. After applying the filter, set the layer blending mode to Screen.
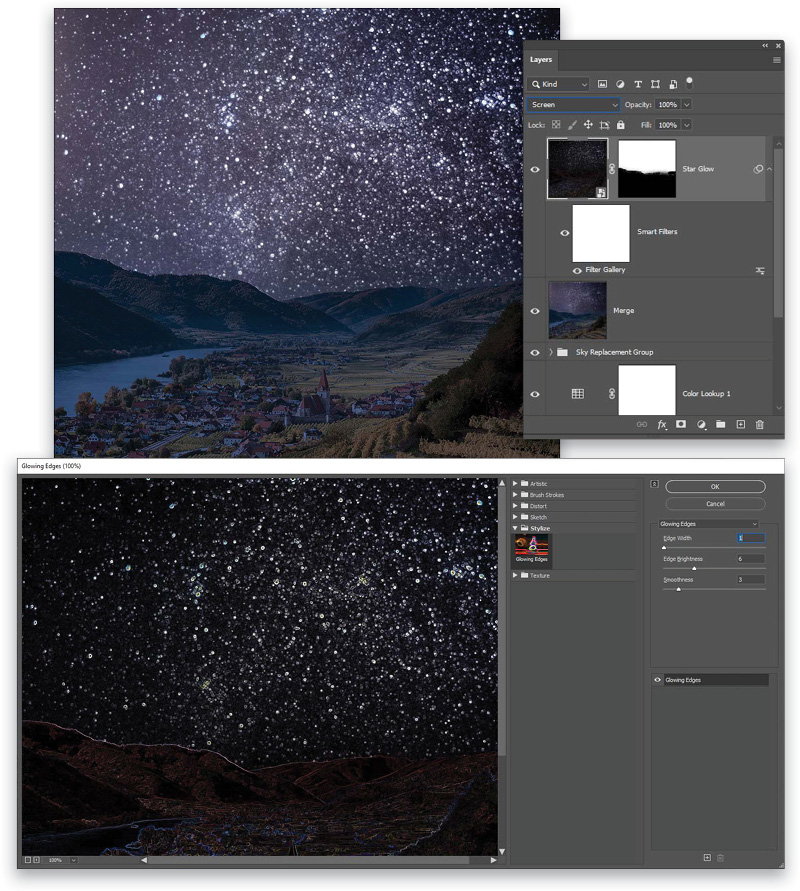
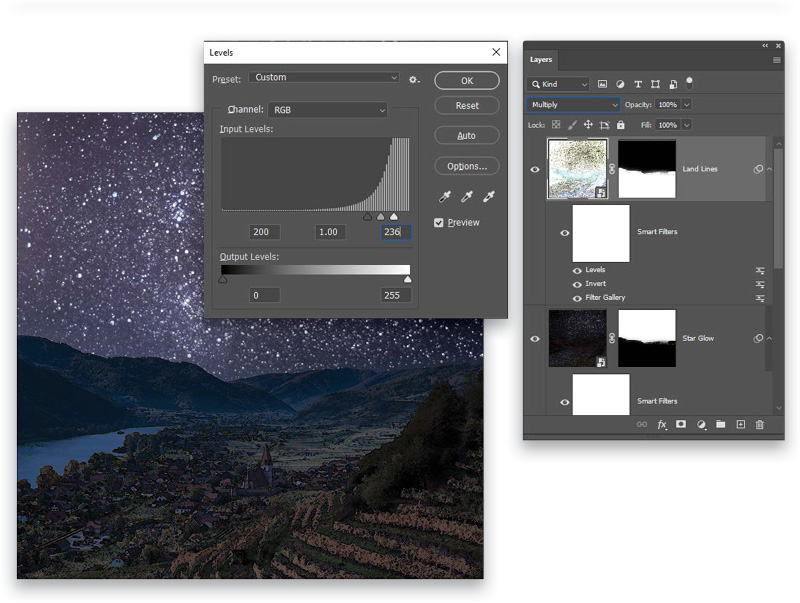
STEP SEVEN: Duplicate the Star Glow layer and rename it “Land Lines.” Click on its layer mask thumbnail in the Layers panel and in the Properties panel, click the Invert button so the mask switches to define the land area instead of the sky. Click back onto the layer thumbnail in the Layers panel and press Command-I (PC: Ctrl-I) to Invert it. Then go to Image>Adjustments>Levels. Set the leftmost handle to 200 and the rightmost to 236. Click OK. This will greatly increase the contrast of the line effect. Then finally change the blending mode to Multiply.
STEP EIGHT: Add a new layer called “Milky Way,” tap the D key to set the colors to the default black and white, and then go to Filter>Render>Fibers. Use a Variance of 16 and a Strength of 4. After rendering the filter, go to Edit>Transform>Rotate 90° Clockwise to turn the layer sideways. Go to Edit>Transform>Warp and click-and-drag around different areas of the layer to create a smooth wave effect to the layer, as shown here. Move areas in small increments to achieve the final shape. Use the corner handles at the top to help create the curve along the top edge. You might have to give this a few tries to get used to using Warp. Press Enter to commit the transformation.
Set the blending mode to Screen to render the dark areas invisible. If the edges appear too sharp and distracting, then grab the Eraser tool (E) and set its Mode to Brush and Opacity around 30%. Using a soft brush tip, paint to remove those edges.

STEP NINE: Create another stamped merged layer at the top of the layer stack and name it “Art Effect.” Convert it to a smart object and go to Filter>Neural Filters. In the Featured set, click the switch to the right of Style Transfer to engage the filter (you may have to download it first). In the Preset section, switch to the Image Styles and look for the image of Van Gogh’s Starry Night. Increase the Brightness setting to +10 and the Saturation to +21. As the Neural Filters are always improving through machine learning, your results may differ from what’s shown here. Click OK.

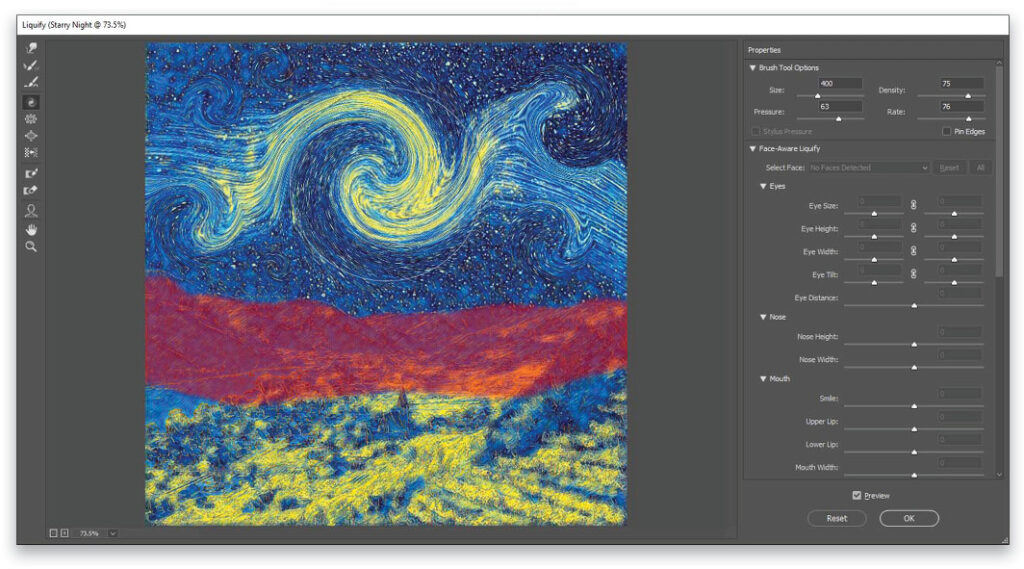
STEP 10: The Neural filter does a decent job but lacks the signature swirls for which the artwork is known. To achieve these, go to Filter>Liquify. First use the Freeze Mask tool (F) to paint over the background mountain range and protect it from the Liquify effects. Then grab the Twirl Clockwise tool (C). Make sure the brush is large enough to cover most of the central sky (we used a Size of 400), and set the Density to 75. Then just hold down the brush in the middle of the sky to get a large swirl pattern with the stars. Reduce the brush size to make smaller swirls around the main central swirl. If some areas become distorted or you reveal any transparent areas around the edges, use the Smooth tool (E) to help smooth things out. As with Warp, this will take some trial and error. Click OK when done.
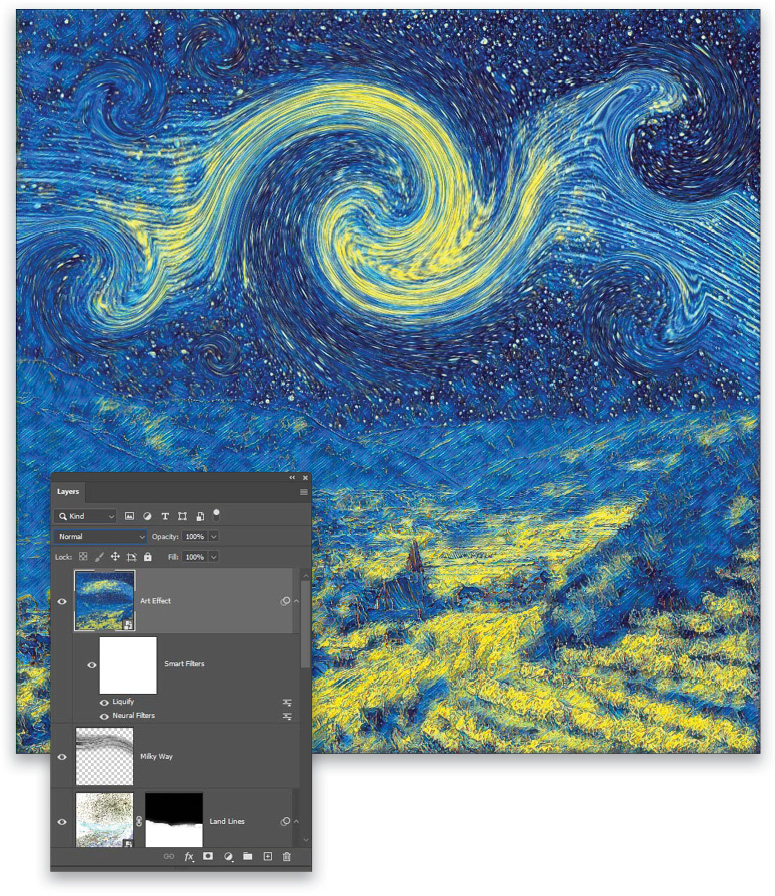
STEP 11: The town area is a bit of a mess after the filter and could use some detail work to help it look visually more like buildings and trees. Fortunately, we already created a layer to enhance the dark outlines of the land area. Grab that Land Lines layer and move it to the top of the layer stack above the Art Effect layer.
STEP 12: The stars could use a bit more color intensity. Add a Gradient Map adjustment layer (Layer>New Adjustment Layer>Gradient Map), name it “Star Gradient,” and click on the gradient preview in the Properties panel to open the Gradient Editor.
Start with the Black, White preset in the Basics set. Click below the gradient ramp to add a color stop. Set its Location at 13%, and then double-click it to open the Color Picker. Select a dark blue (#012759), and click OK to close the Color Picker. Add another color stop at 67% set to a bright yellow (#f7f02d). This recolors the image based on the brightness levels. Click OK in the Gradient Editor.
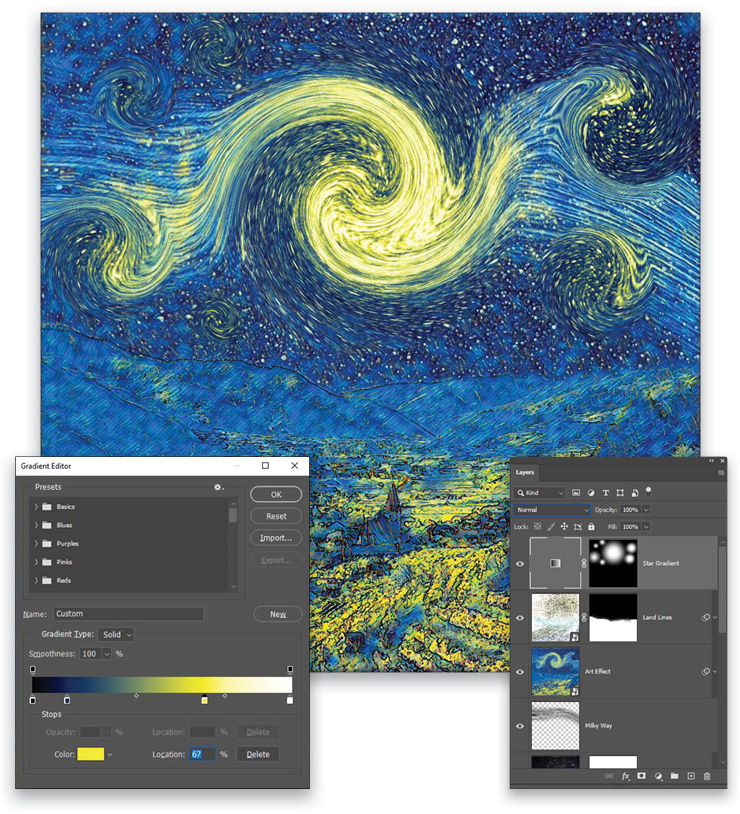
This doesn’t need to be done for the entire image, just the star areas, so target the layer mask on the Star Gradient layer, and press Command-I (PC: Ctrl-I) to Invert it from white to black to completely hide the effect. Then grab the Gradient tool (G), click on the gradient preview thumbnail in the Options Bar to open the Gradient Editor, select the Foreground to Transparent preset in the Basics folder, and click OK. Select the Radial Gradient icon in the Options Bar, and press D to set the foreground color to white. Drag out radial gradients from each swirl effect.
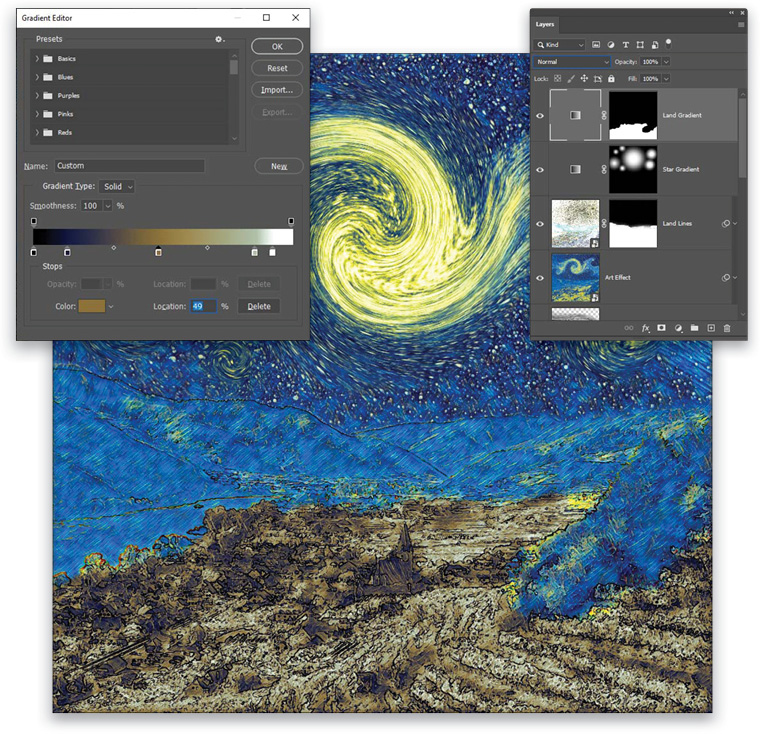
STEP 13: The town area really shouldn’t have the bright yellows of the star light. First, use the Quick Selection tool (nested with the Object Selection tool [W] in the Toolbar) to select the town areas, not the sky or the mountains (if the tool seems to be selecting oddly, make sure the focus isn’t on a layer mask). Then add another Gradient Map adjustment layer named “Land Gradient.” Photoshop will use your selection to generate the mask for the Gradient Map layer.
Click on the gradient preview in the Properties panel to open the Gradient Editor. This one should have a total of five color stops. The color and location assignments should be: black (#000000) at 0%, dark blue (#151840) at 13%, brown (#8c723a) at 50%, light green (#b0bfa7) at 86%, and finally white (#ffffff) at 93%. Click OK to close the Gradient Editor. If you need to touch up the mask, use the Brush tool (B) with a soft-edged brush set to white to reveal the Gradient Map and black to hide it.
STEP 14: The town colorization looks good, but the transitions are too stark. Use the Brush tool at 30% Opacity in the Options Bar with a soft round brush on the mask to hand-apply the effect. Use white to gently apply a bit of colorization to the nearby hills and mountains. Then switch to black and use the brush on the town areas to let some of the blue subtly peek through.
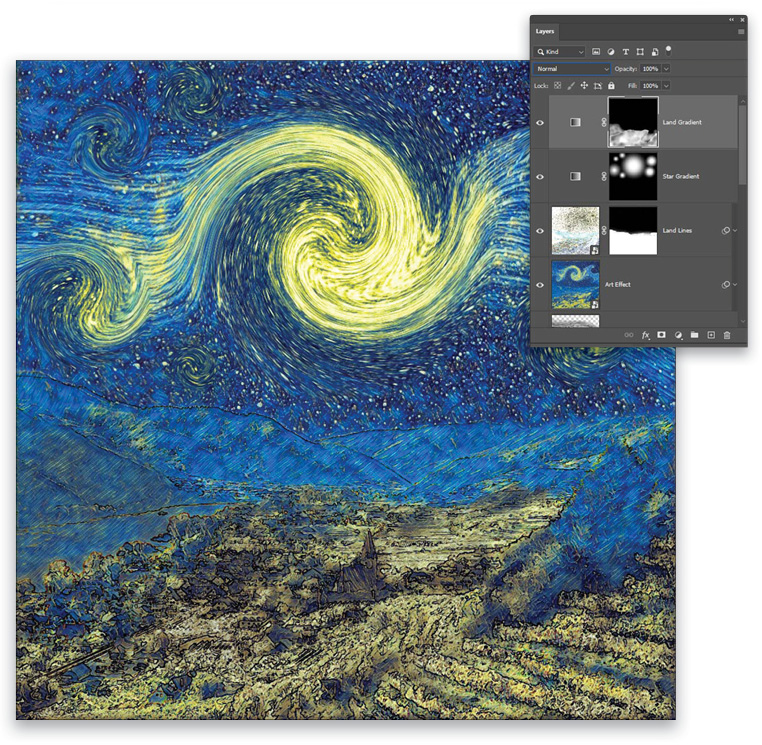
STEP 15: Find the first Merge layer just above the sky replacement group, and move it to the very top of the layer stack. Then hold down the Option (PC: Alt) key and click the Add Layer Mask icon at the bottom of the Layers panel to mask out the layer. Use the same Brush tool we used in the previous step with white paint on this mask to reveal some original details of the town buildings. This is a finishing effect and can be as strong or subtle as you choose, the control being how much brush work is done on the layer mask.
When working with Neural Filters, it’s important to provide feedback by way of the small poll at the bottom of the dialog that asks “Are you satisfied with the results?” Honest answers to this question are tremendously helpful to improving this technology. This means we all get to play a part in making Photoshop even better for everyone!
This article originally published in the January, 2022 issue of Photoshop User magazine.
About Photoshop User and KelbyOne
Photoshop User magazine comes out digitally 12 times a year and is part of KelbyOne, the leading educational resource for Photoshop, Lightroom, and photography. Pro members have access to more than 900 video courses and 100 back issues of Photoshop User. To learn more about KelbyOne, click here.


