Last week, we synthesized skin to replace texture that had been overworked by frequency separation, using a combination of filters and blending. This time around, we’ll create a different kind of skin texture and blending, with a little extra boost for realism.
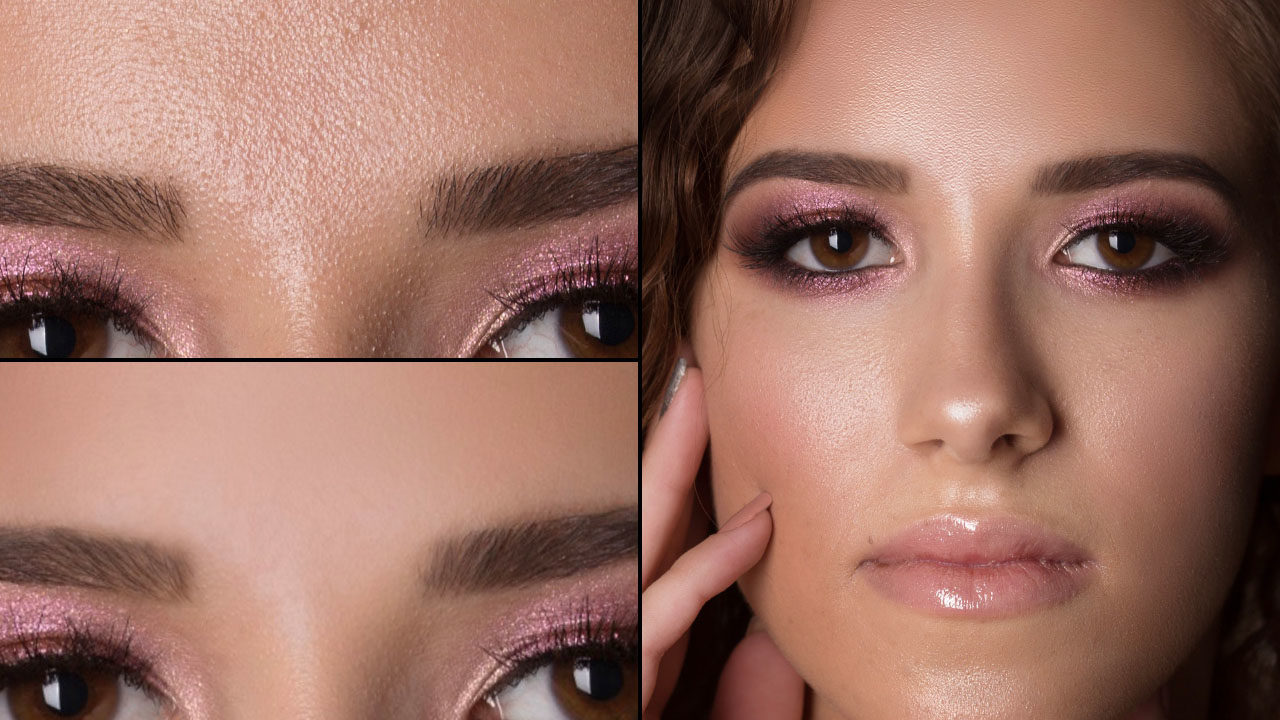
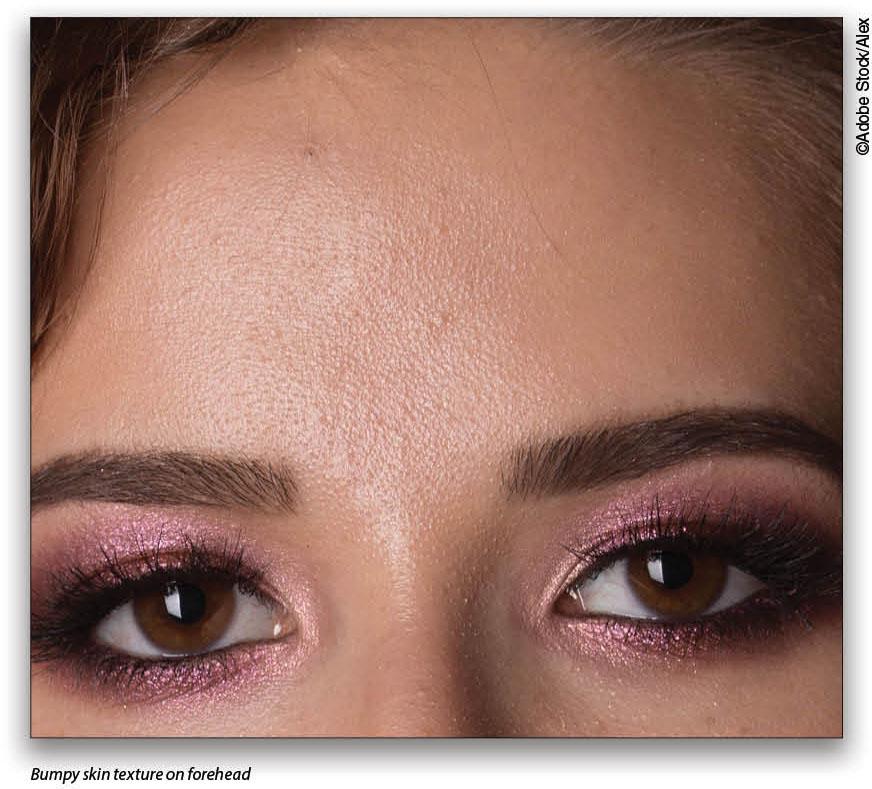
When we created last issue’s skin texture, we focused on the cellular structure and replicating the fine lines using the Fibers filter. Then we used the Filter Gallery’s Texturizer to dynamically emboss a custom texture so we could simulate light direction and scale, using the brightness values of the base texture image to apply the effect. Taking the same initial approach of creating a texture layer, let’s turn our attention to the basic bumpy structure we can see on this woman’s forehead, which is more prominent than the cellular structure we saw last issue. (You can find the image we’re using in this article by clicking here.)
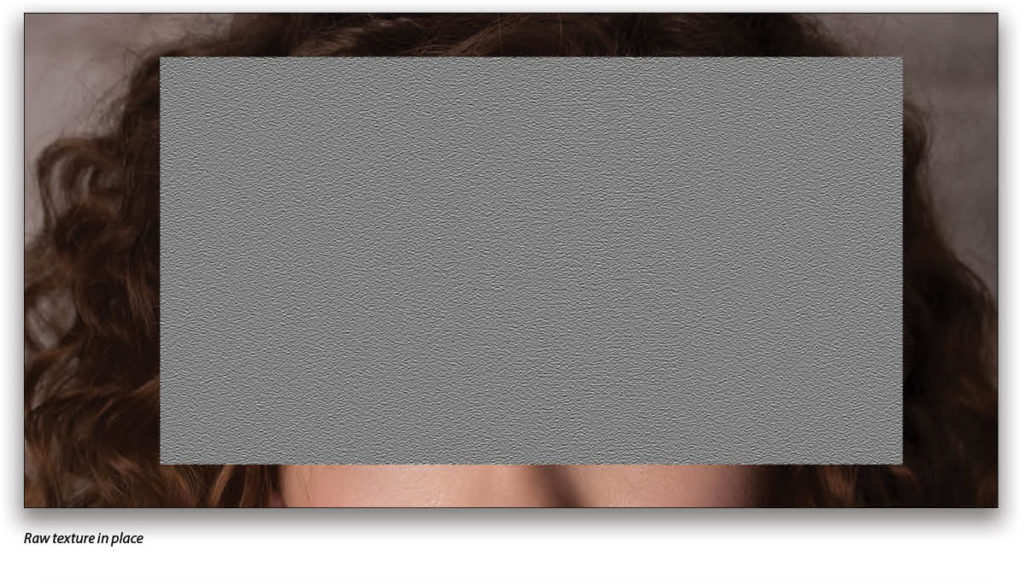
By comparison, this one is pretty easy: Create a new document (File>New) that’s 4000×4000 px, 8-bit, and RGB. Press Shift-Delete (PC: Shift-Backspace) to open the Fill dialog. Set the Contents drop-down menu to 50% Gray, click OK to fill the Background layer with 50% gray, and then:
- Add noise (Filter>Noise>Add Noise): 50%, Gaussian, Monochromatic.
- Crystallize (Filter>Pixelate>Crystallize): 3
- Gaussian Blur (Filter>Gaussian Blur): 1.5–4 px
- Emboss (Filter>Stylize>Emboss): 90°, 6 px, and 50% for Amount

Using noise instead of the Fibers filter results in fine, isotropic (the same in all directions) features with decent randomness, like natural skin. I find the pixel-based noise features to be too small initially, so the Crystallize filter creates larger groups, and that allows smoother bumps with better variation. Finally, the Emboss filter implies depth and light direction.
Save the result as a PSD on your computer where you can find it, with a name like “SkinBump” or similar.
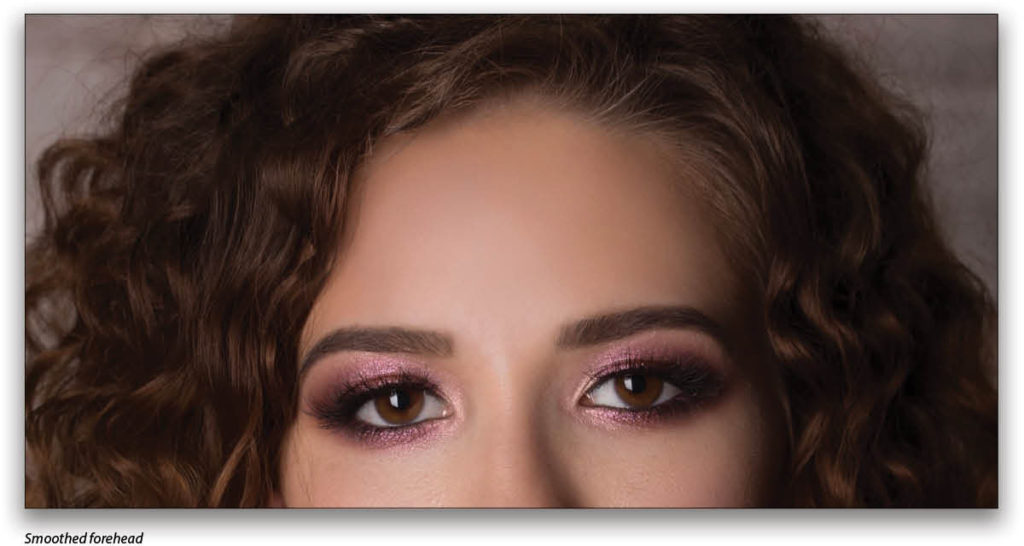
We could apply this result directly by placing the file on its own layer, but for this example, I still want to use the Texturizer under the Filter Gallery. This way I can adjust the scale and apparent depth. Here again the forehead region is overworked and too smooth.
Create a selection area on a new blank layer, fill it with gray, then use the Texturizer filter to apply your new texture (see last issue’s article for detailed instructions on choosing and applying your texture). Click OK to apply the Texturizer.
Last time, we used Overlay to blend; but here I’m using Vivid Light, which is a combination of Color Dodge and Color Burn. When the blending color is lighter than 50% gray, Color Dodge is used to decrease contrast and lighten those areas; for blending colors darker than 50% gray, contrast is increased with Color Burn to darken the area. This results in a more pronounced effect than Overlay, and also contributes some saturation changes, resulting in a more realistic effect.
Now, as seen in the last issue, you can apply the usual warping, adding a black-filled mask, and painting white with a low-Opacity brush to reveal the texture slowly where you want. Since Vivid Light is one of the “Special 8” blending modes that behaves differently with the Fill slider than it does with the Opacity slider, start by lowering the Fill slider in the Layers panel to get a more natural blend. You may find that a balance between the two sliders is necessary. I ended up using Fill at 70%, Opacity at 80%, and added a mask.
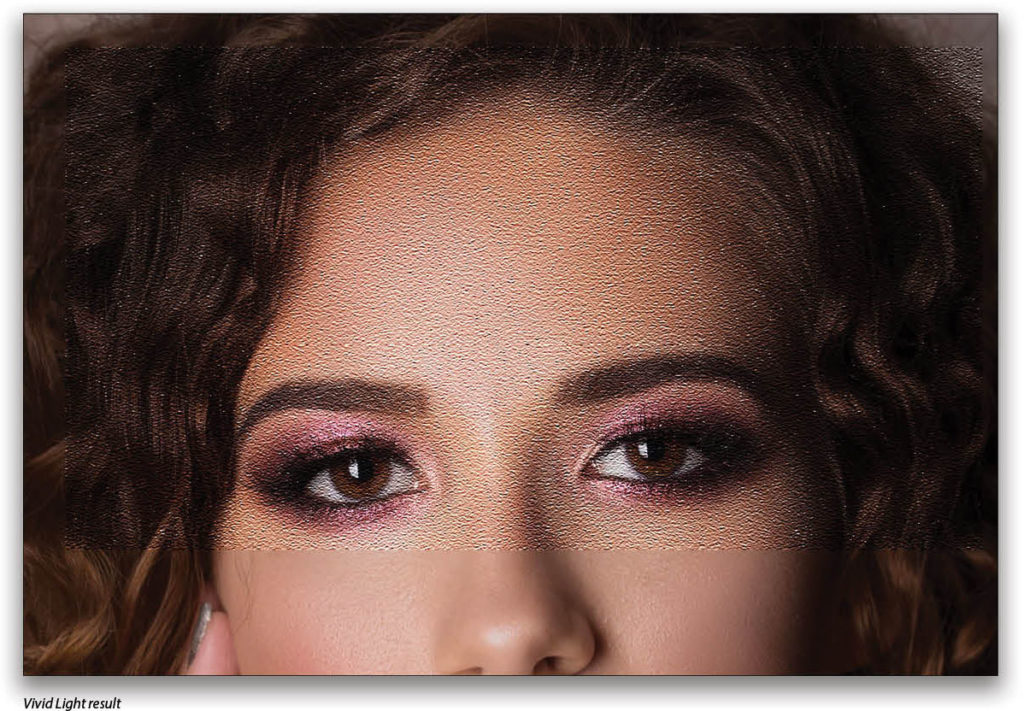
Notice that I’ve masked the texture more strongly in the darker areas to reduce its appearance. This mimics the slight reduction in surface texture detail as light becomes more indirect and soft. Let’s finish this one with a little trick to add some shine, then talk about building up a library of synthetic textures.

Adding Shine
On a blank layer above everything else, use a medium-sized soft brush at 50% Opacity and 30% Flow in the Options Bar and paint a region to have highlight shine. Create solid areas for more shine, and transparent areas for less. Name the layer “Shine.”
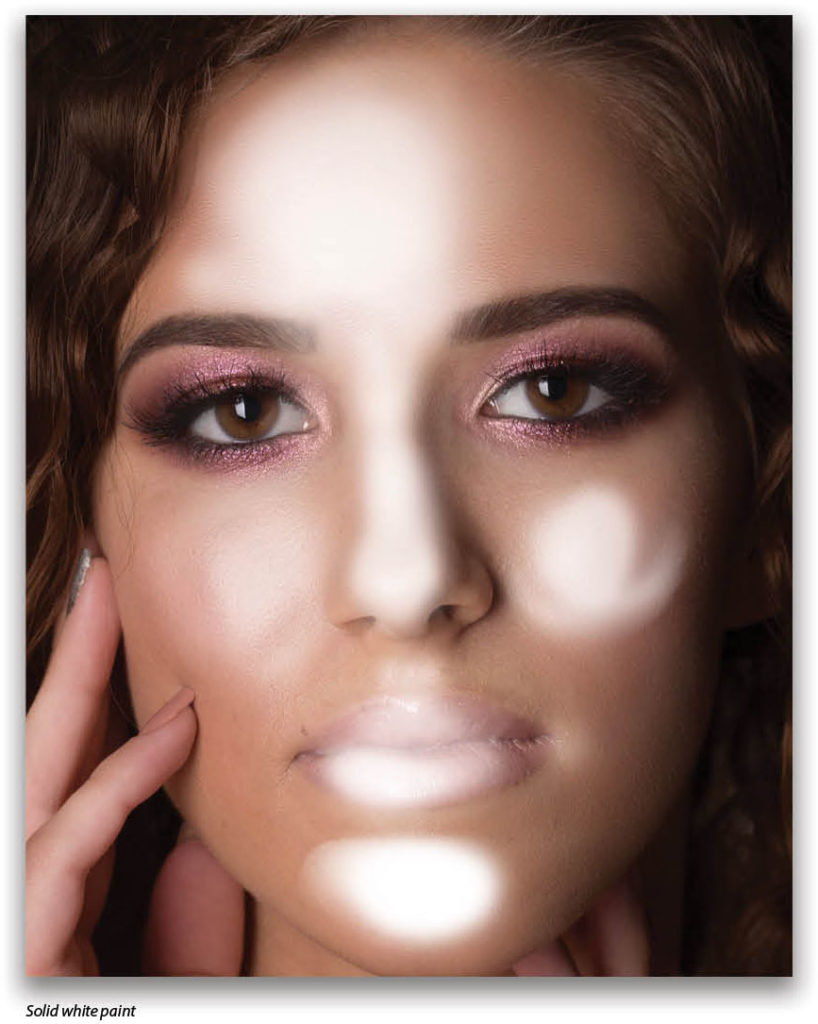
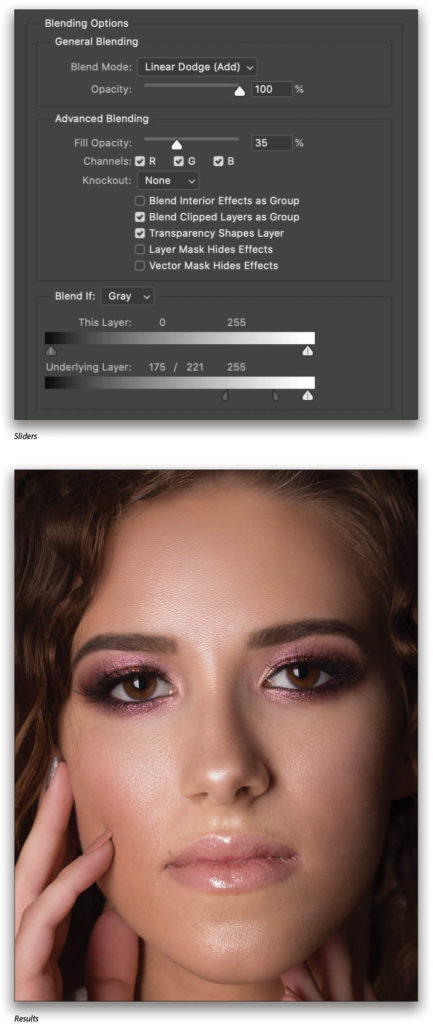
Change the Shine layer blending mode to Linear Dodge (another of the Special 8 blending modes). Double-click on the Shine layer in the Layers panel to open the Layer Style dialog, and in the Blend If section, drag the black slider for Underlying Layer to the right. Hold Option (PC: Alt) and drag one side to split the control, allowing the blend to fade. Your goal is to reduce the highlights to only the bright areas, creating a specular look. I set the slider to 175/221. Finally, I lowered the Fill value to 35%, and clicked OK.
Sweet!
Building a Library of Textures
Okay, so let’s spend the last few lines talking about building up a variety of skin textures. Creating a library of them has two benefits: you can deal with a range of corrections quickly, and you get familiar with creating variations that will allow you to reverse-engineer new textures when you need them to match (within reason) an existing texture.
The Texturizer filter requires an 8-bit RGB PSD file and, while it can use color information (that it converts to brightness), I tend to stick with grayscale images for easier visualization. These also only need to be flat files, so no layer structure is necessary. When I’m experimenting and creating different skin textures, I like to have several layers to play with for blending and adjustments. Rather than creating a new file and flattening each time, I make use of smart objects to manage the filters, and I rely heavily on Stamp Merge Visible and Duplicate Layer.
Start with a layer filled with 50% gray as we did in the tutorial, but immediately convert it to a smart object (Filter>Convert for Smart Filters). Now you can add any of the above filters and change parameters as you work. It’s a fast-and-easy way to explore lots of variations quickly. Also remember that you don’t have to get everything right on a single layer; you can use blending modes and Opacity to combine several results. This isn’t limited to just skin texture, of course. You can start by loading up other textures for a mix-and-match approach.
And don’t forget about using spatter brushes! There are lots of them out there, or you can create your own easily. Use a small, sparse brush with lots of scattering to create more dispersed textures. This is good to combine with generated textures as above, which tend to be more uniform. Natural skin has lots of variation, so get comfortable with studying the differences.
Once you have a look you want to save, create a blank layer at the top of your stack and use Command-Option-Shift-E (PC: Ctrl-Alt-Shift-E) to stamp a copy of what’s currently visible on the canvas. Then Right-click on the new layer and choose Duplicate Layer from the menu. In the box that pops up, go to the Destination section and choose New from the Document menu, which copies the layer to a new document, where you can name and save it to your textures folder.
Tip: I tend to use a couple of descriptive words and a number for variations. For example, I have SkinRough01.psd, SkinBump12.psd, etc. If you have a textures folder on your computer already, just add to that. When you need to use a texture, open up Bridge or Lightroom to preview the folder more easily.
This article originally published in the September, 2020 issue of Photoshop User magazine.


