Most of us have old black-and-white photos from prior generations, and many of these photos are in poor condition. Due to age, they have missing parts, wrinkles, dust, and scratches, etc. Photo restoration requires quite a bit of time depending on the amount of damage to the photo. Colorizing them takes even longer. There are several steps, however, to take before you even open an old photo image in Photoshop.
First, you’ll need a scanner, preferably one that scans not only documents and photos, but also negatives and slides. I use an Epson Perfection V600 Photo Scanner. You’ll also need a pair of nylon gloves to handle the photos, negatives, and slides. Nylon gloves are better than cotton gloves because less dust and lint accumulates on them—important when handling a photo. They also protect photos, negatives, and slides from skin oils. Always wash your gloves after handling photos.
Another recommendation is to purchase a can of compressed air to spray slides before scanning. Never spray the glass of the scanner; compressed air can scratch the glass or damage the scanner.
If you don’t have a lint-free cloth, purchase one to clean your scanner’s glass scanner and computer monitor. This helps to remove dust that can be picked up when scanning photos, negatives, and slides, which create more imperfections that you’ll have to remove in Photoshop. What may appear as dust on a photo in Photoshop could actually be dust on your computer screen, so it’s important to wipe off the monitor regularly.
Scanning Images
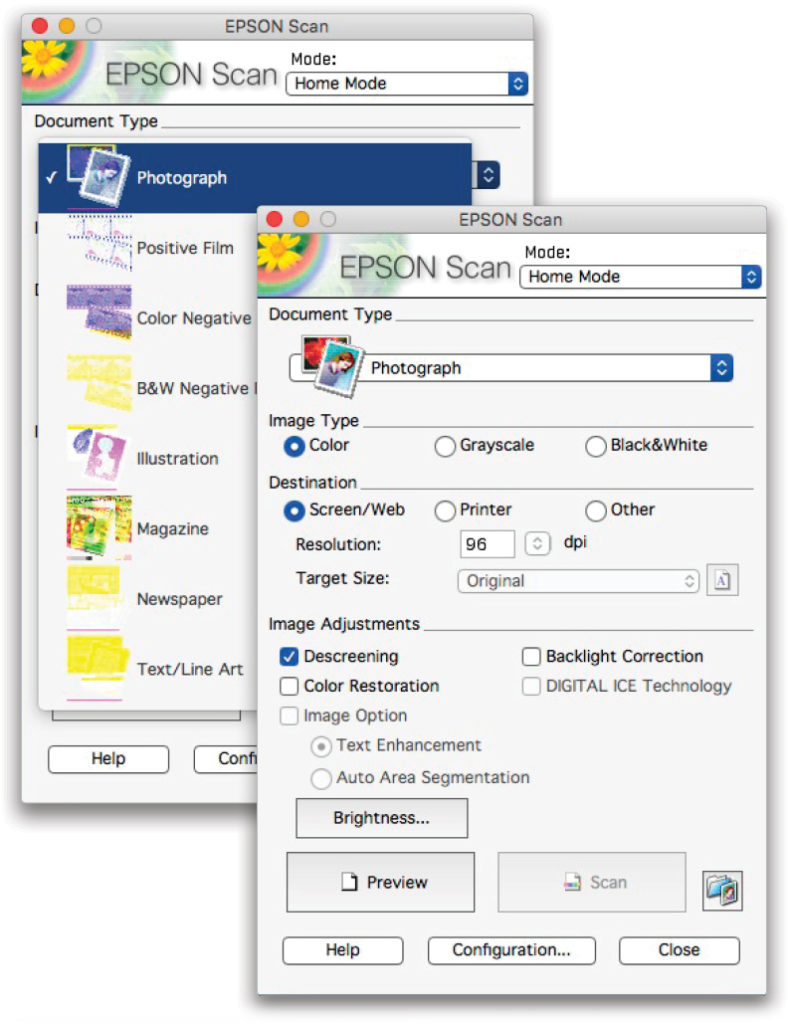
After doing all the above steps, you’re ready to start scanning photos, slides, and negatives. While wearing gloves, place your photo on the glass, and then launch the scanner software. The settings shown here may differ from your software: it depends which scanner you use.
After the software opens, set the mode to Home Mode and your Document Type according to what you’re scanning. Changing your Document Type automatically changes some other settings; for example, if you choose Newspaper, the Image Type changes to Black & White, Resolution is set to 200 dpi, and Image Option is checked with the Text Enhancement bubble chosen. You can also adjust the Brightness, if needed. The Preview button is great for viewing how the document will look before you scan it.
[KelbyOne members may download the file used in this tutorial by clicking this link or visiting http://kelbyone.com/magazine. All files are for personal use only.]
Retouching & Restoration in Photoshop
Step One: To begin the retouching and restoration process, open your image in Photoshop, and then press Command-J (PC: Ctrl-J) to duplicate the Background layer to work nondestructively.
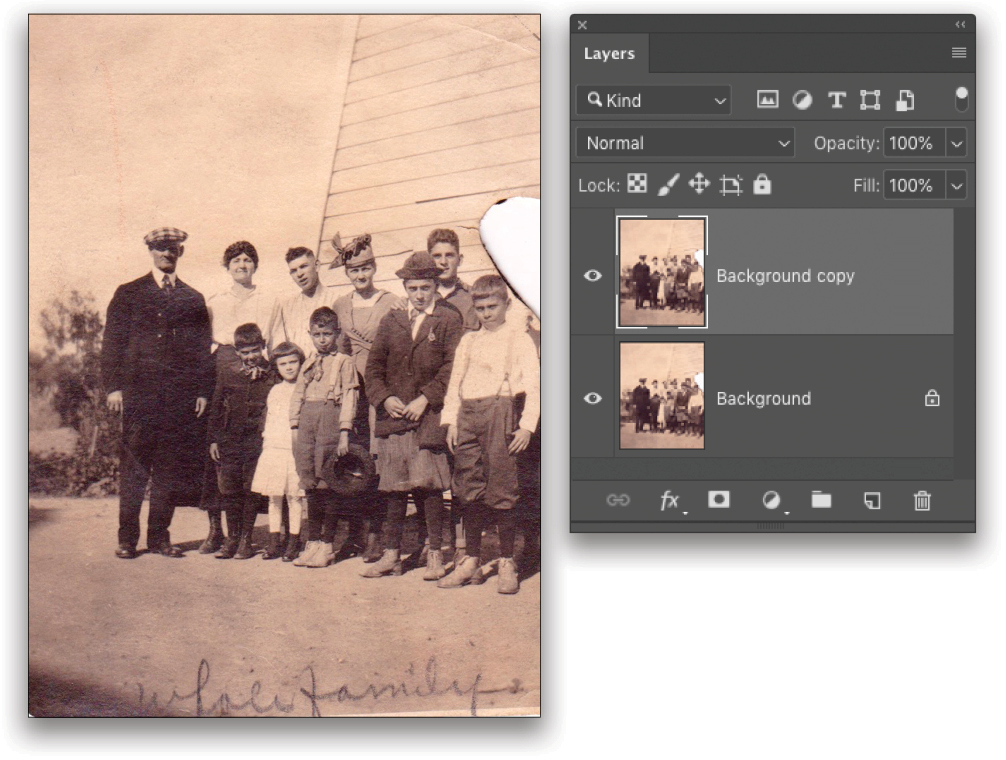
Step Two: If too much “background” is showing, causing the subject(s) of the photo to appear small, use the Crop tool (C) to crop the photo to focus more on the subject.
Step Three: If your photo is sepia, convert the duplicate layer to black and white in Camera Raw. Go to Filter>Camera Raw Filter, set Treatment at the top of the Basic panel to Black & White, and click OK.
Step Four: Using guides, divide the photo into nine rectangles. If you don’t see the Rulers, go to View>Rulers or press Command-R (PC: Ctrl-R). Click on the horizontal ruler and drag out a guide about a quarter of the way down on your photo from the top. Then do the same thing from the bottom. Repeat this process with the vertical ruler, placing lines a quarter of the way in from the edges of the photo.
Step Five: If the photo has missing parts, restore those first. You’ll need to copy areas from an undamaged part of the photo and paste them to the missing section. Tip: Create folders on you computer named “body,” “backgrounds,” etc. and, as you’re retouching images, copy these “good” selected areas into a new file, and then save these files as layered PSDs into the appropriate folder. This library of copied parts can make life easier when you’re retouching other images with missing areas. Keep these folders where they’re easily accessible.
Make a selection of the area that you want to copy with the Lasso (L) or Pen tool (P). Press Command-J (PC: Ctrl-J) to copy your selection to a new layer.
Step Six: Press Command-T (PC: Ctrl-T) for Free Transform, and then move, scale, and rotate the copied section so it covers the missing section of the photo. Don’t worry if it covers any of the subjects because we’ll fix that with a layer mask. Click Enter to commit the transformation.
Step Seven: Click on the Add Layer Mask icon (circle in a square) at the bottom of the layers panel to add a mask to the layer you’ve copied, and reduce the Opacity enough to see through the copied layer to make it easier to paint away any excess that’s covering other objects. Switch to the Brush tool (B), press X until the Foreground color is black, use the Bracket keys on your keyboard to quickly resize the brush as needed, and paint to hide those excess areas. If you accidentally paint away too much, press X to switch the Foreground color to white, and paint to bring that area back. Return the Opacity to 100% when you’re finished.

Step Eight: Create a new layer. Use the Spot Healing Brush tool (J) with these settings in the Options Bar: Size 15 px or smaller, Hardness 20% or lower, Spacing 25%, Type: Content-Aware, and make sure Sample All Layers is checked. Then, start the process of removing dust and scratches by simply painting over them.

Step Nine: If there are larger areas with a crease or mold, another option to use is the Patch tool (nested below the Spot Healing Brush tool in the Toolbar) with these settings in the Options Bar: New Selection (the square icon), Patch: Normal, Source, Transparent checked on, and Diffusion set to 5. Click on the duplicated image layer to make it active, select the area you want to repair, and then drag the selection to a clean area of the photo from which you wish to sample.

Step 10: When using these tools to retouch an image, start in any corner rectangle area as defined by the guides. Move horizontally from the first rectangle to the next and then continue downward. Once you’ve removed dust and scratches, mold, etc., you can hide the guides by going to View>Extras or using Command-H (PC: Ctrl-H).
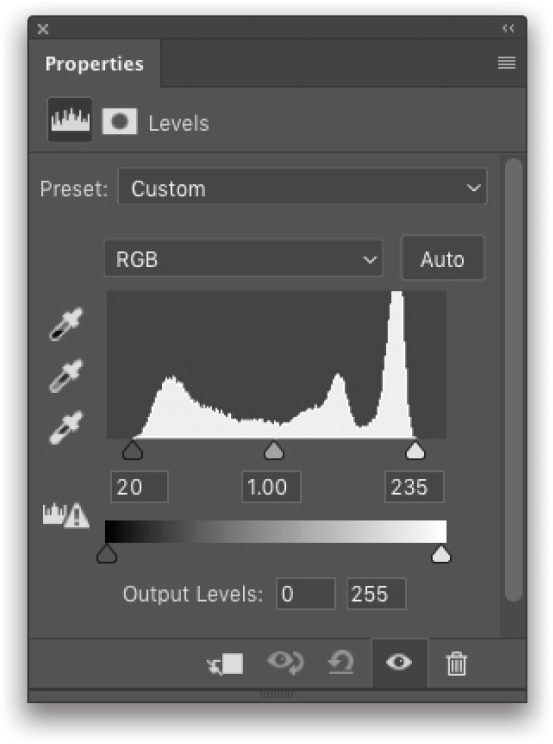
In the photo used here, I brightened the image and made the subjects more pronounced with Layer>New Adjustment Layer>Levels. In the Properties panel, leave RGB selected in the drop-down menu above the histogram. Drag the black slider (left) to touch the left end of the histogram, and drag the white slider (right) to touch right end of the histogram.
Step 11: Also, some of the “lines” looked crooked on the building, so I copied and pasted some of the straight lines to give it a more “even” look.
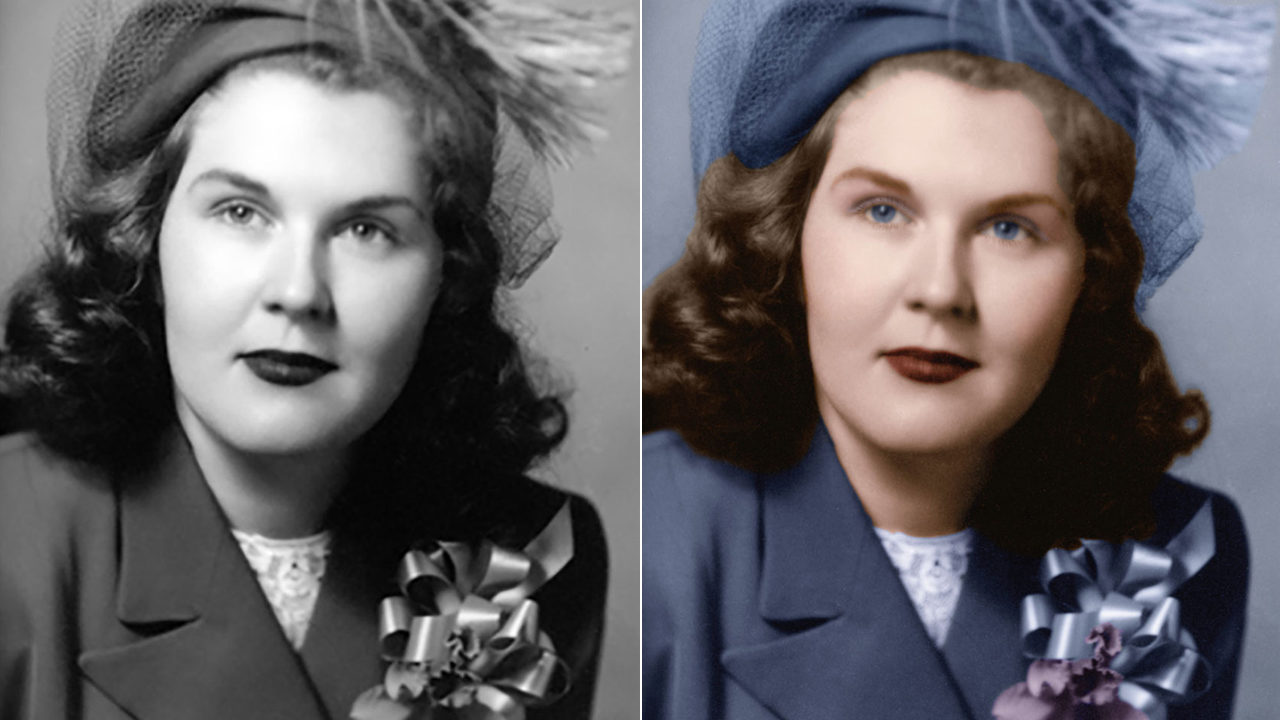
When the restoration is complete, it’s time to colorize your photo (if the original is black and white).
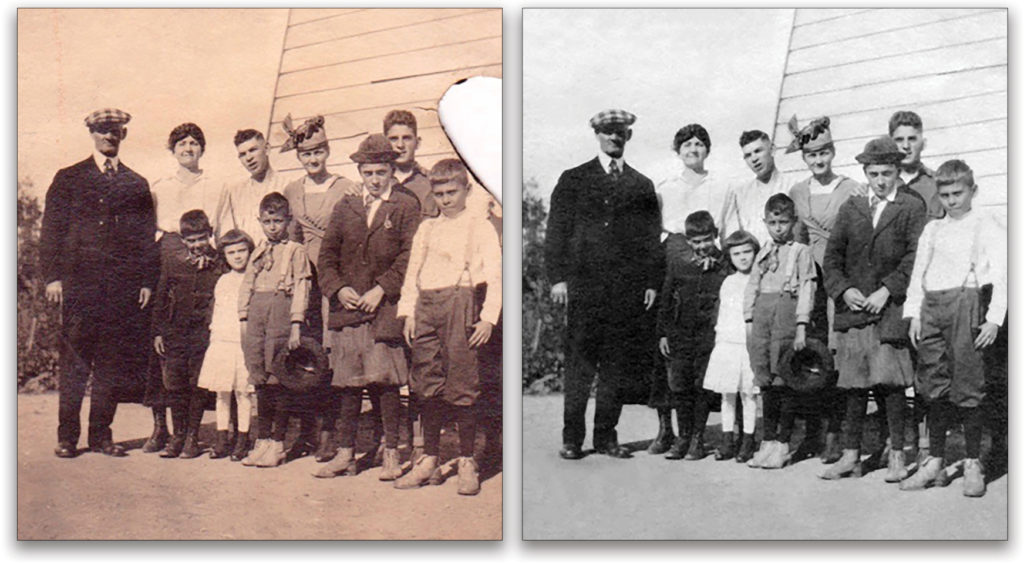
Photo Colorization
Photo colorization shouldn’t be rushed. The first step for accuracy in colorizing an image is to do historical research, regardless of whether you’re colorizing a landmark or a family portrait. Google becomes your friend for this. It can take a while to find the specific uniform color of the day or what style hat women wore in certain time periods. It helps if the photo is dated, but it often won’t be. There’s a book containing photos and descriptions of clothing worn during certain time periods that I recommend: More Dating Old Photographs 1840–1929 by Halvor Moorshead.
Step One: Color hues listed for the following image are specific for this photo, not all photos in general. The first step before colorizing a black-and-white image is to go to Image>Mode and ensure the color mode is set to RGB Color. If it’s in Grayscale mode, you won’t be able to colorize it. Always duplicate the original layer to work nondestructively.

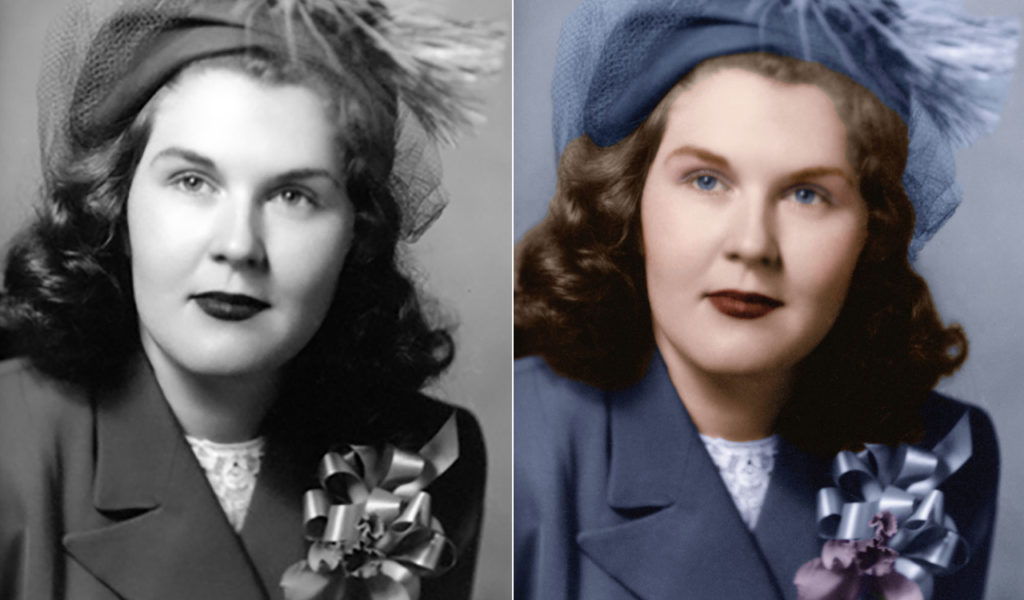
Step Two: Begin colorizing whichever part of the image you wish. Note the dark and light colors before colorizing any image. For this photo, we’ll begin with the suit. Make a selection of the suit with the Pen or Lasso tool.
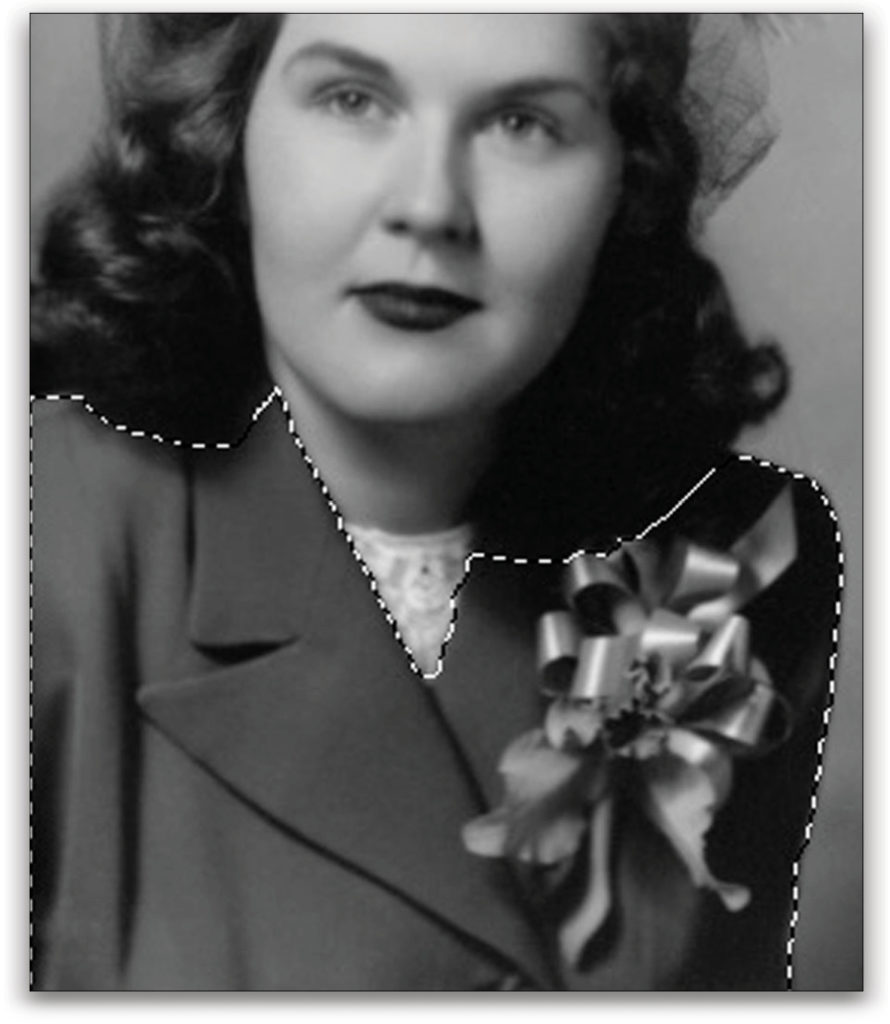
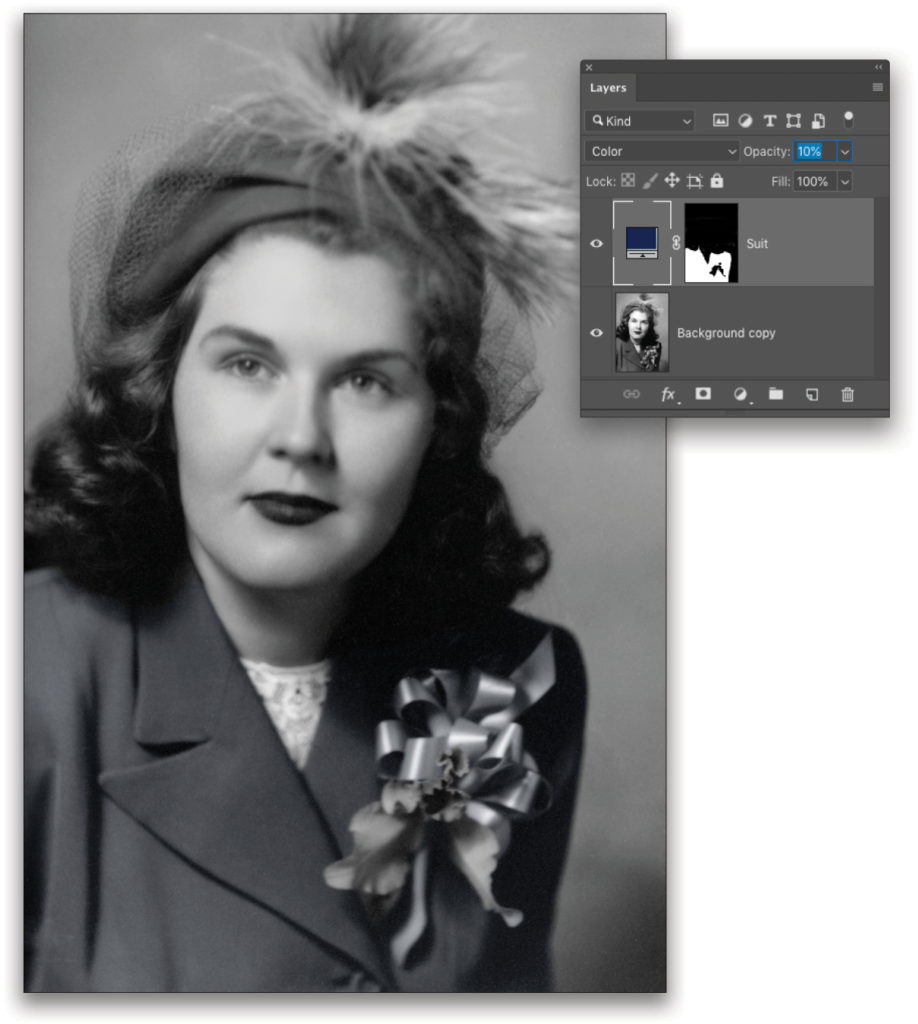
Step Three: Click the Create New Adjustment Layer icon (half-black, half-white circle) at the bottom of the Layers panel and choose Solid Color. Since we don’t know the original color of the suit, choose any color you wish in the resulting Color Picker and click OK. We used # 001f50. (Note: The corsage on the suit was purposely selected to demonstrate painting away unwanted color in the upcoming step.) The adjustment layer uses the selection to generate a layer mask. Double-click the name of the Color Fill layer in the Layers panel and rename it “Suit.”
Step Four: Change the blending mode (near the top left of the Layers panel) from Normal to Color, and add a layer mask. Select the Brush tool (B) and press X until the Foreground color is set to black. Click on the layer mask thumbnail of the Suit layer to make it active, and then paint to remove the color from areas that aren’t part of the suit.
Adjust the Suit layer’s Opacity to 10%. This isn’t a rule of thumb; we’re going to build up the color by duplicating the Suit layer several times and using a different color and Opacity on each layer.
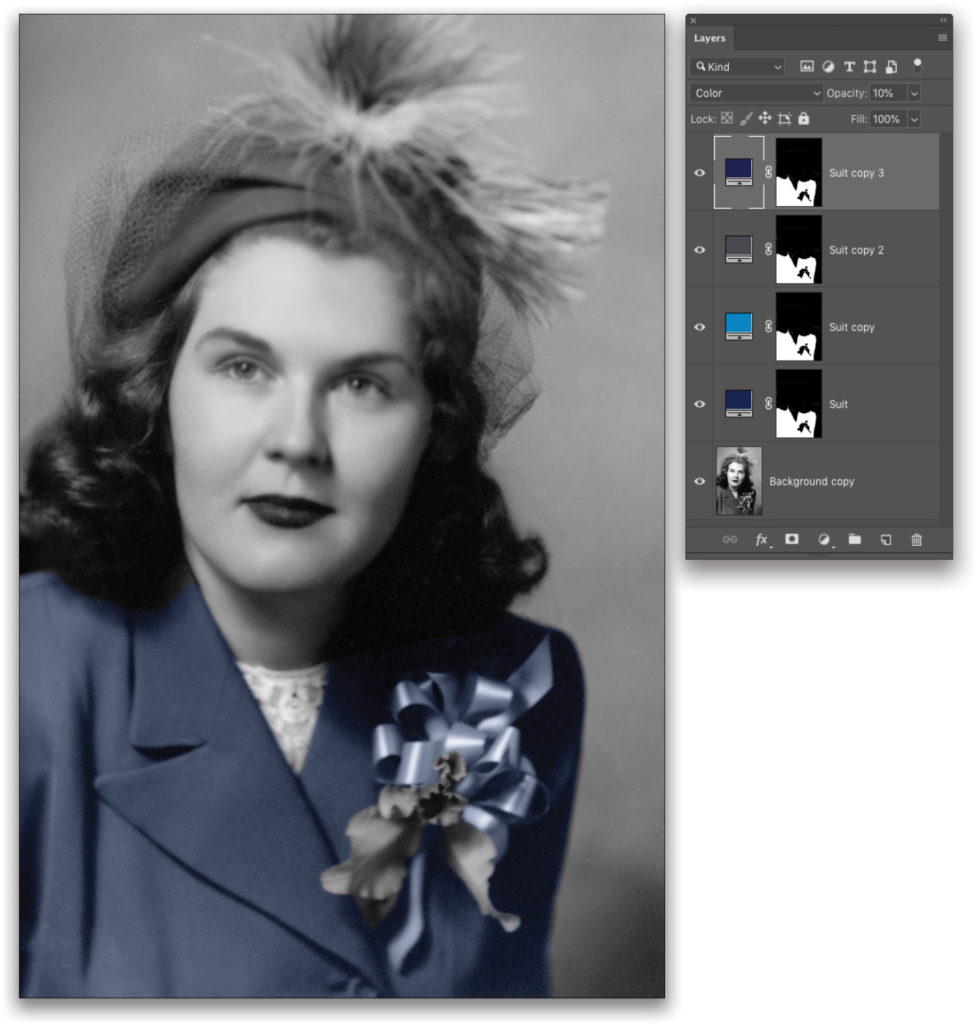
Step Five: Press Command-J (PC: Ctrl-J) to duplicate the Suit layer, and double-click its layer thumbnail to open the Color Picker. Select a different hue of the base color (we used #448ccb) or a complimentary color (Adobe Color Wheel) and click OK. The duplicate layer should automatically be set to the Color blending mode and 10% Opacity.
We copied the Suit layer two more times and changed the hues to #5674b9 and #605ca8, bringing the color tones back to the base color of blue. Again, be sure to experiment with the Opacity of each layer to get the color you want.
Once you complete this, click on the top Suit layer and Shift-click the bottom Suit layer to select all of them. Press Command-G (PC: Ctrl-G) to add the selected adjustment layers to a layer group, and name the group “Suit.” (Note: It’s very important to name all layers to make it easier to go back and adjust them later, if needed.)
Step Six: Follow the same process for coloring the eyes. The colors used for her eyes in this photo are as follows (in ascending layer order): #1f1f50, #484850, and #1182c2.
When colorizing eyes, choose a dominant color (i.e., blue, brown, green) as the base color. For hazel, choose blue as the base color, fill the entire eye with a black Solid Color adjustment layer, and reduce the Opacity to 10–20%. Create a mask on the black layer and paint away the black over the color base (e.g., blue, brown, etc.). All eyes, regardless of color, have a small thin black line on the outer part. Leave that and the pupil black.
Step Seven: To keep the authenticity of the time the photo was taken, don’t add makeup if the photo is dated before 1913. Makeup needs to be subtle for an authentic colorization. When you do add makeup, it should only be blush, eyeshadow, and lipstick. Use Solid Color adjustment layers and reduce Opacity to taste. In this example, I used #813128 for the blush with an Opacity of 15%. For the lipstick, I used #813128 for the base layer, reducing Opacity to 40%, and a Solid Color layer above using #e41125, reducing Opacity to 30%.
Step Eight: In this image, eyelashes were added since they weren’t visible on the original photo. KelbyOne instructor Kristina Sherk provides free eyelash brushes in her Electrifying Eyes–Retouching Eyes in Photoshop course (here’s the link to her site to download the brushes). To load downloaded brushes into Photoshop, simply double-click the .abr files. Kristina also shows you how to make your own eyelash brushes in the September 2018 issue of Photoshop User.
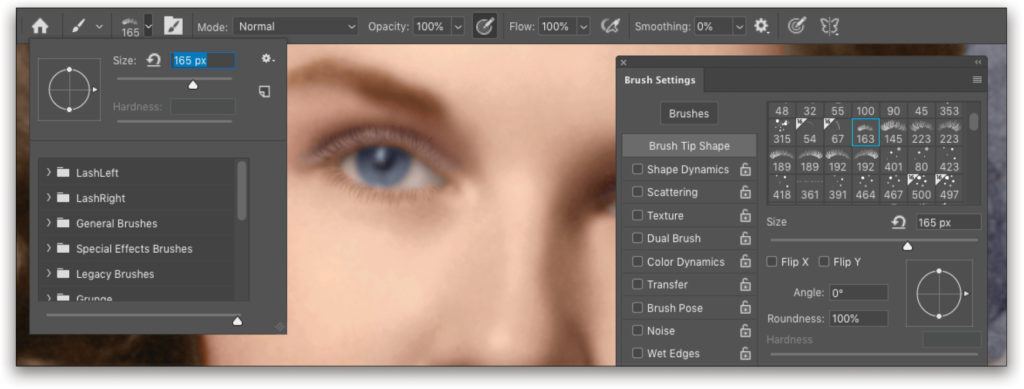
Step Nine: To add the eyelashes, create new layers for the top and bottom of each eye. Set the Foreground color to the same base (bottom) color that you use for the hair. With the Brush tool active, select the appropriate brush tip in the Brush Settings panel (Window>Brush Settings) for whichever eyelash you want to work on first (if you’re using Kristina’s brushes, she has brush tips for both the left and right eye). If you’re making your own brush, set the brush to 50% Hardness.
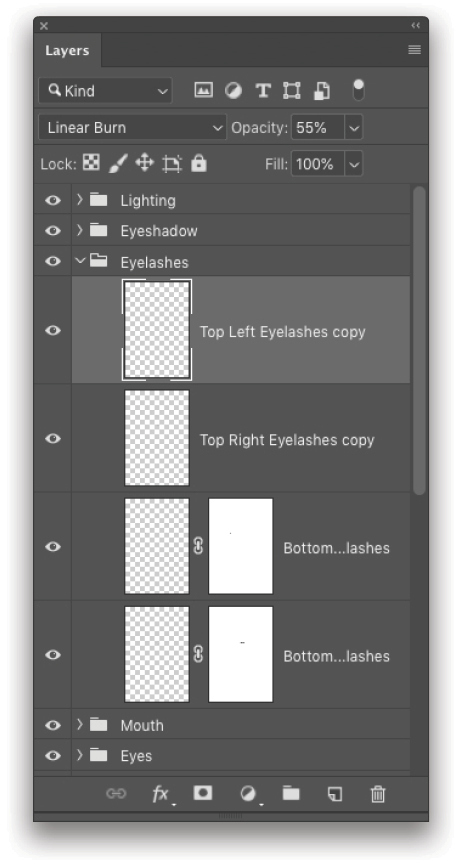
Line the eyelashes up directly where the skin meets the sclera, use the Bracket keys on your keyboard to adjust the brush size, and click once to place each eyelash. Then use Warp (Edit>Transform>Warp) and adjust the lashes to “fit” naturally to the shape of the eye. Press Enter to commit the transformation. Here, each eyelash layer was set to the Linear Burn blending mode with 55% Opacity.
Colorizing Skin
It can be tricky to create authentic-looking skin color. Here’s a link to a chart for different skin colors. Our skin has different hues, so we’ll create a base (bottom) skin tone and build up from there.
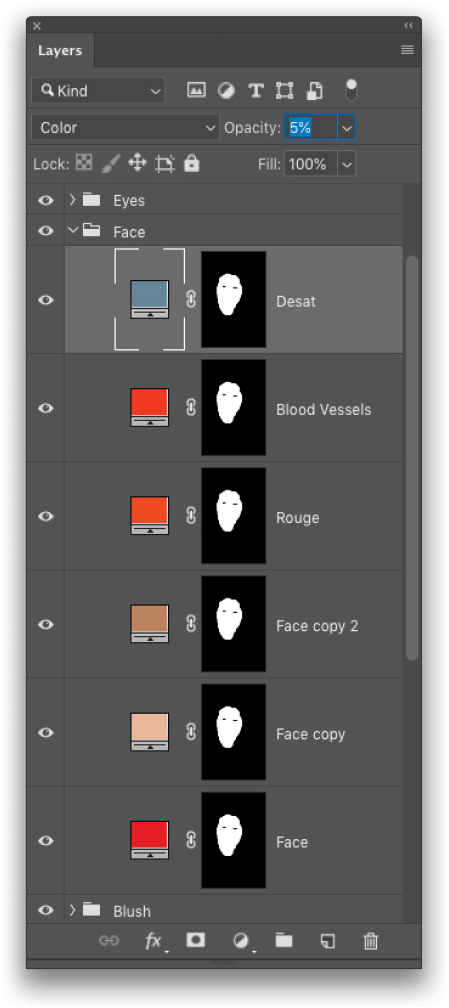
Step One: To start, select an area of skin you want to colorize, and add a Solid Color adjustment layer. The base skin color should be a red tone, so use #CE1212. Change the blending mode from Normal to Color, and reduce the Opacity to between 20–30%. A dominant skin color is then needed, which is a brown shade, so duplicate the Color Fill layer and set it to #8a5e3d.
Step Two: Duplicate the Solid Color layer for rouge (everyone has an orange/red tone to their skin) and set the color to #d44919. Make another duplicate for blood vessels, using #e32d03 and changing the blending mode to Linear Dodge. The Opacity on both the rouge and blood vessel layers should be 5%. Make one more Solid Color duplicate layer above the blood vessels layer for desaturation, using the color #6e8598; set the blending mode back to Color and the Opacity to 5%.
Colorizing Shadows
It’s important to pick up colors surrounding the object you’re coloring. For example, the corsage casts a shadow on her suit. Color those shadow areas on the suit with purple hues. Typically, use either the Color or Lighten blending mode and reduce the Opacity to between 5–10%.
Fine-tuning Contrast & Color
The last step is to click on the folder icon at the bottom of the Layers panel to create a new group and name it “Lighting.” Add a new layer in the group and go to Edit>Fill. Set the Contents drop-down menu to 50% Gray, the Mode to Normal, and click OK. Set the layer Opacity to 10%, then as before, create a Levels adjustment layer with RGB selected. On the Levels histogram in the Properties panel, pull in the light and dark sliders toward the most significant section.
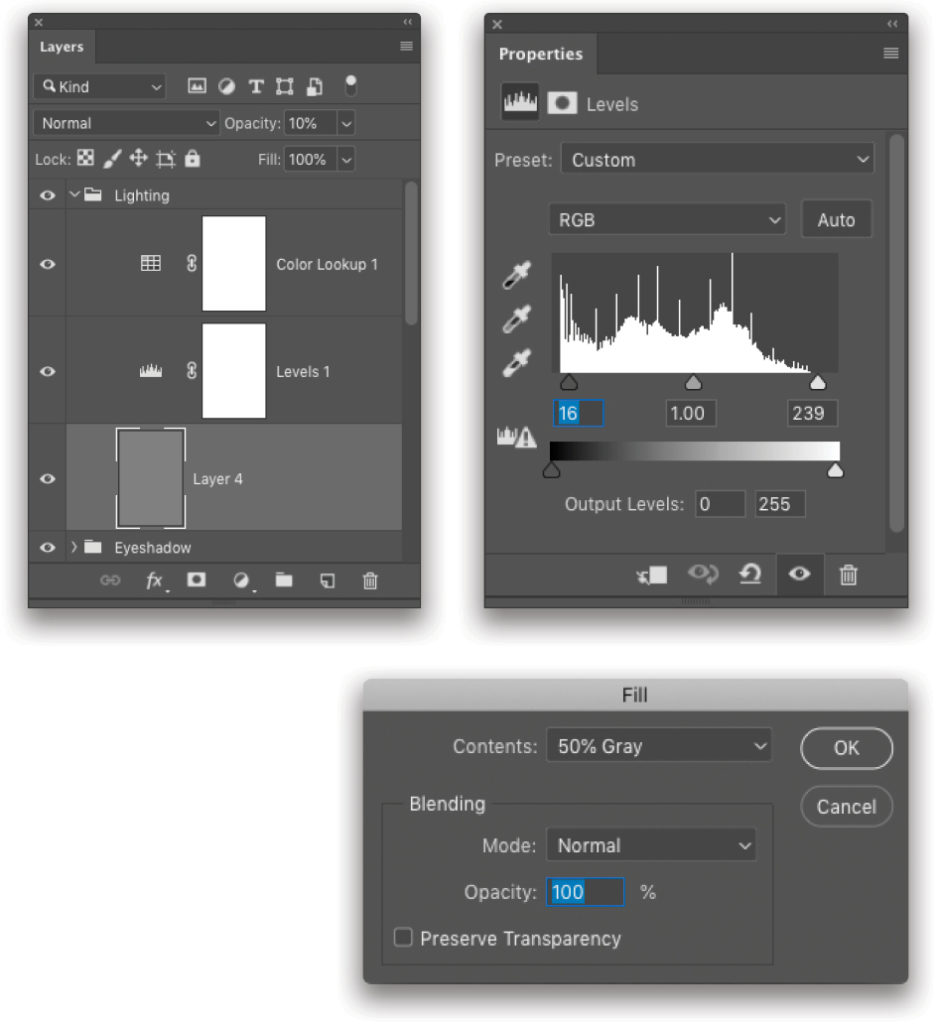
Go to Layer>New Adjustment Layer>Color Lookup. In the 3DLUT File drop-down menu in the Properties panel, we chose Fuji ETERNA 250D Kodak 2395 (by Adobe).cube, which gives the most realistic look of a modern photo.
Finally, many old photos have a texture on the paper that can create a coarse look to the image.
Hopefully, everyone enjoys bringing new life to old or damaged photos! I’d love to see what you create with the photo files provided for this tutorial or your own photos in the KelbyOne Community forum. Happy restoration and colorizing!
This article originally published in the January, 2019 issue of Photoshop User magazine.


Thanks for sharing this Jessica, I appreciate it and very honored to have the opportunity to write the article for KelbyOne 😀.
Happy to share!
I am interested in discussing the coloring technique you use vs. the technique I use. You might be surprised, or not.
Thanks for sharing this Deb and Jessica! Keep these coming! I have a lot of old photographs that I am working on to restore, but I have not colorized any of them yet. Wonderful tutorial! Looking forward to another!
I just clicked on the link posted to her site to download the brushes: https://sharkpixel.com/store/ps_actions/kelbyone-hair-class-action-and-brushes-duplicate-2 It comes up “404 Page Not Found.” Is there an updated link you could post to download the free eyelash brushes? Thank you!
Thanks for pointing that out. Here’s an update link Rita! https://sharkpixel.com/products/kelbyone-eyes-class-lash-brushes-1?_pos=1&_sid=5f2dad9ad&_ss=r
Also I am looking for the link to the short bonus video on removing texture. Thanks!
Hello Rita, here’s the link to the bonus video: https://www.youtube.com/watch?v=yfdoS37Zr-0&feature=youtu.be