
As Lightroom users, we focus on the job Lightroom does with our photos, both in terms of managing and processing them, but it’s worth taking a moment to think about the footprint that the Lightroom-related files leaves on our computers, which when left unchecked, only continues to grow over time.
I’m not at all going to focus on how to manage your photos in this column, so let’s just acknowledge that in the grand scheme of things, your photos and videos will require far more storage space than your Lightroom catalog and its related files ever will. Because this is so obvious, we all take steps to manage our disk space relating to our photo storage. The files associated with running (and backing up) Lightroom tend to accumulate in the background, and it isn’t until we find ourselves running short on disk space that we start to wonder what’s going on behind the scenes.
My goal is simply to shed a little light on the subject so that you can make the decisions you need for your system. There’s not a one-size-fits-all answer here, and you shouldn’t just run out and make changes to your setup if you aren’t having any problems. I just want you to be more fully in the driver’s seat as you make decisions down the road.
When you look under the hood in Lightroom, you find that there are a number of files that work in concert to make Lightroom function, and all of these require some amount of hard-disk space. By default, all of these files exist on your startup drive, and for many of us, that drive is already chock-full of other files too. Increasingly, our startup drives are solid-state drives for improved performance, but these tend to be smaller in storage capacity. This combination of factors can leave some of us running low on free space, which becomes a performance drag of its own. Let’s take a closer look at what these files are, where they can be found, and what you may be able to do to manage them over time.
the catalog
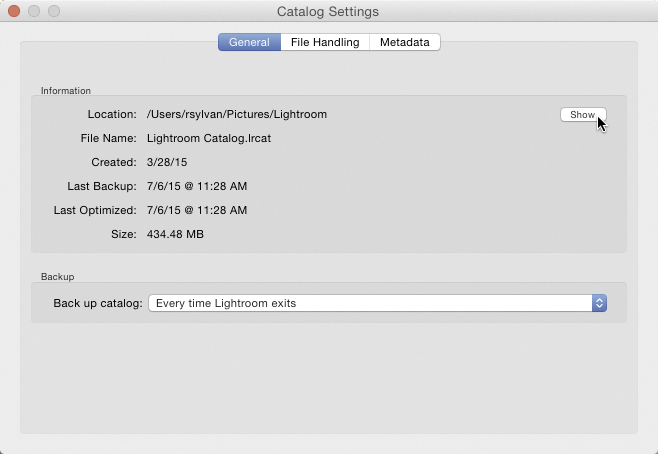
As the most important of all the Lightroom-related files, the catalog is a great place to start. By default the catalog is created within a folder named Lightroom within your Pictures folder. If you’re not sure where your catalog is located, you can go to Lightroom (PC: Edit)>Catalog Settings, and in the General tab, you’ll find its name and location displayed along with other important information about the catalog itself. Click the Show button to open a new file-browser window with that folder selected.
All of the work you do in Lightroom is automatically stored in that catalog file and, as a result, the file size grows over time. The size in bytes of that catalog file will depend on how many photos you’ve imported and how much work you’ve done on those photos. My main catalog, managing over 130,000 images, is about 3 GB, which isn’t much of a disk-space issue.
There’s a saying in backpacking that “every ounce counts,” so for some people shaving 1 GB or more off their catalog might be attractive, but what can you do? The easiest thing is to run the File>Optimize Catalog function. Those folks with really large catalogs are the only ones likely to see any real difference in file size as a result, but they are also the people most likely to be interested in reducing its file size (and possibly improving performance). There’s no harm in doing it, so give it a try.
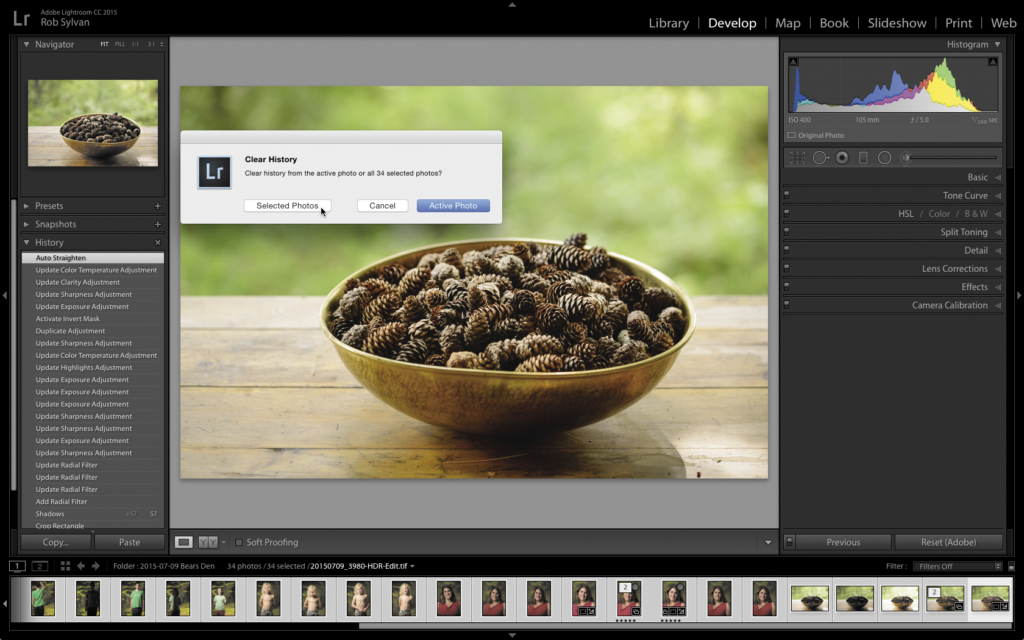
If you’re interested in reducing the catalog file size even more, then you’d have to be willing to give up some of the data stored within the catalog. While I’m not advocating that you do this, I want you to be aware of what’s possible. The one piece of data that can take up a surprising amount of space and that may not be essential to everyone is the running list of adjustments recorded within the History panel of the Develop module. For many of us, it’s only the final state of adjustments that matter, and not all of the many steps it took to arrive there. While we’re in the midst of processing photos, having that running list of steps in the History panel can be very useful for going back to an earlier state or for simply comparing the current state to some point in the past (though snapshots can serve this purpose too). But what about the history steps for photos processed several years ago?
Only you can say what’s most valuable to you, but removing that information from your catalog will make the file size smaller. To clear the history, select a photo (or multiple photos) in the Develop module, then go to Develop>Clear History. If you’ve selected multiple photos, you’ll be prompted to confirm if you want to clear the history from just the active photo or from all selected. Once you make your choice there’s no progress meter to indicate anything has changed; just let it run for a bit, then check the History panel for confirmation.
When you think it’s complete, run the Optimize Catalog function to sweep it all away. Note: The individual history steps aren’t saved as part of the information that can be written to a photo’s XMP metadata. Once you remove it from the catalog, it’s gone for good, so be thoughtful about what you’re trading and perhaps run a test on a backup copy of your catalog first. Speaking of catalog backups, let’s tackle those next.
managing catalog backups
While Lightroom doesn’t have a function to back up your photos, it does have an automated mechanism for creating backup copies of the catalog file on a regular basis. If you go back to the General tab in the Catalog Settings, you can configure Lightroom to periodically create an exact copy of the catalog file on a schedule of your choosing. The next time you exit Lightroom on that schedule, you’ll be prompted to run the catalog backup process, and it’s only in that dialog that you can choose where you want the backup copy created (ideally you’d choose a different drive than the one used for your working catalog). Worth noting is that, as of Lightroom CC 2015 (v6), we have the ability to adjust that schedule from the Back Up Catalog dialog too.
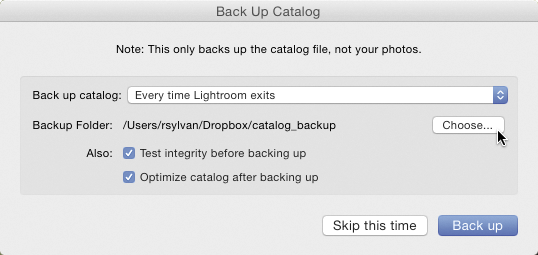
Each time this process runs, an exact copy of your catalog (the .lrcat file) at that moment in time is created in the backup location, and then (as of Lightroom CC 2015) the backup copy is compressed into a zip file as a way to reduce disk space (and to keep people from accidentally opening a backup copy of the catalog).
Using this backup feature can help protect you against data loss through drive failure (if files are being saved to a different drive) or catalog corruption (which is rare, but can happen, and isn’t always obvious at first), and I highly recommend using it. But each time the process runs, a new (compressed) copy of the catalog is created, and there it will remain until the user (you) removes it. (Even though it’s easy to remove the files, I’ve encountered many people who have every backup copy of the catalog ever created still sitting in that folder.)
Using my file browser, I periodically go to the folder where they’re created and delete all but the most recent few. If you think about it, should you ever need to restore a backup catalog, you’d choose the most recent one, right? But what if the data you were hoping to retrieve wasn’t in the most recent catalog copy, wouldn’t it be nice to have a few iterative versions on hand to go back through? Yes, this is more “redundant redundancy,” but I personally enjoy the peace of mind of having them around. The really important message is that you need to be in control and not let automated tasks run unchecked. You may just have gigabytes of drive space waiting to be reclaimed.
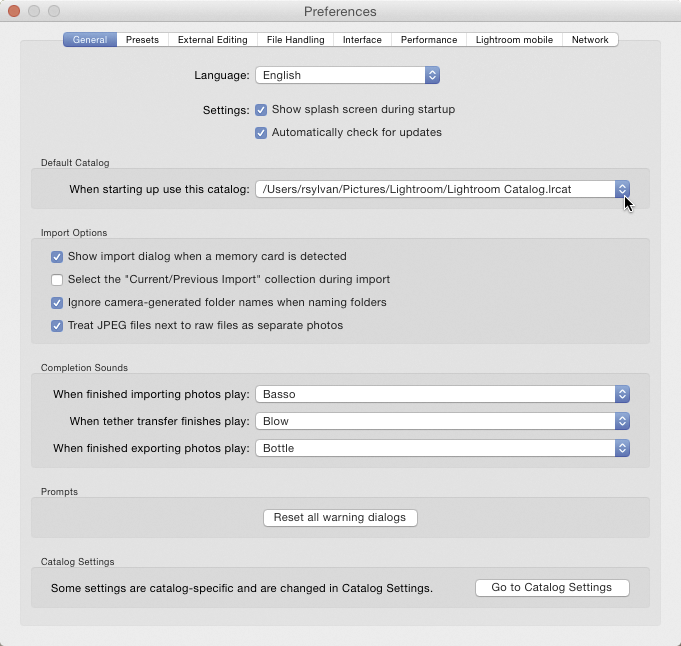
Important public service announcement: Before you go deleting all of your old backup copies, first make sure you know where your working catalog is, and that it’s not somehow located among your backups. You’d be surprised how many people only discovered their catalog was among their backups after they deleted it by mistake. How could this happen? The Default Catalog setting found in the General tab of the Lightroom (PC: Edit)>Preferences is usually to blame, because it’s set to Load Most Recent Catalog. All it takes is a curious user opening an old backup copy of a catalog, then closing Lightroom, which will now set that old backup copy as the “most recent,” so the next time that person launches Lightroom, that backup copy opens. Please take a moment to change your Default Catalog Preference to anything other than Load Most Recent Catalog.
managing import backup copies
Speaking of automated backup processes that are left for the user to manage, the Make a Second Copy To option in the File Handling panel of the Import dialog is another potential disk-space hog. This is a very well-intentioned checkbox, the purpose of which is to allow you to copy the contents of your memory card to two different drives at the same time as a function of the import process. The intention is to store your photos on two different drives so that you can safely format your memory card and continue taking more photographs. This is a very handy feature if your regular full-system backup function only runs once a day (or perhaps less frequently), and you want to duplicate the new
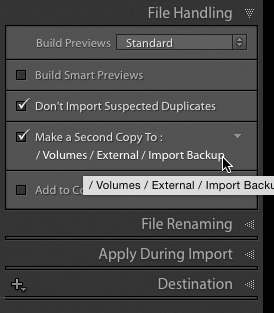
photos immediately.
That’s all well and good, but it’s important to know that Lightroom has absolutely no connection to the second copy of photos it creates. It will rename the second copy files using the file-renaming template you choose on import, but it won’t convert the copies to DNG (if you choose that option on import), it won’t apply Develop presets to the second copies, and it won’t update the second copies in any way after you start working on the primary copies in Lightroom. Management of those second copies is entirely in your hands.
This second copy is essentially a backup of your memory card at the time of import, and is meant to be temporary. I’ll assume you already have a full-system backup plan that includes your working photos and all the changes you make to them over their lifetime. This temporary backup of your memory card is something you need to actively manage so that it doesn’t needlessly waste drive space. Redundancy in your backup is great, but it should be logical and managed redundancy. I periodically delete the old second copies once my full-system backup has run to include the new arrivals.
previews
The next item to consider is the regular preview cache that exists alongside the catalog file. This file will have the same name as your catalog along with the word “Previews” and the extension .lrdata. For every photo that goes through the import process, a collection of preview files are created and stored in this cache file. The goal of the cache is to speed up the performance of Lightroom by having to display only these previously rendered previews (with Lightroom settings) instead of having to re-render them from the source file each time. This also allows for a certain level of offline viewing, such as when an external drive is disconnected. The preview cache is not an essential file, as Lightroom can (and will) re-render the previews as needed, and so it’s not included in the backup process. You might consider excluding it from your full-system backup process too if that’s useful to you.
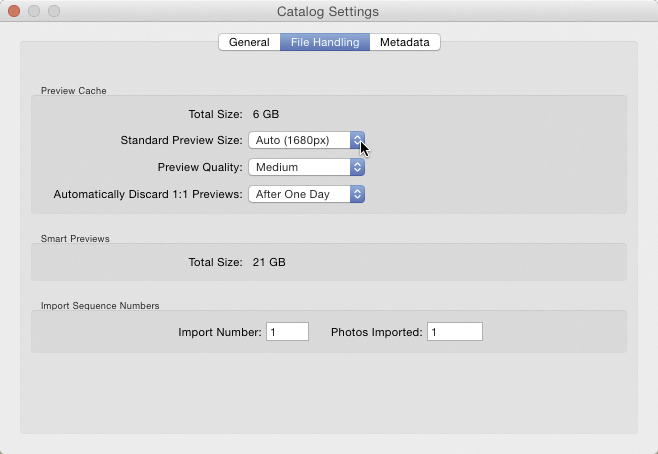
There are a couple of user-configurable settings that can affect the size of the preview cache, and these can be found on the File Handling tab of the Catalog Settings dialog. You can think of this preview cache as a folder of JPEG images, and as such the two factors that affect file size are pixel dimensions and the amount of JPEG compression. The Standard Preview Size setting is what controls the size of the previews that you see in all areas of Lightroom (except for the main Develop window and when you zoom in to 1:1 in the Library), and it comes in a range of sizes. The new Auto setting in Lightroom CC 2015 is intended to automatically configure the largest size of the standard preview to match the screen resolution of your display device, and it’s a set-it-and-forget-it type of setting. The Preview Quality setting controls the amount of compression, and Medium is a good compromise between file size and quality.
Full-sized previews (referred to as 1:1 previews) are also stored in this cache, and these are created any time you zoom to 1:1 in the Library or if you choose the 1:1 option in the Build Previews drop-down menu in the File Handling panel in the Import dialog. You can also manually force them to render via the Library>Previews>Build 1:1 Previews menu. These previews can really eat up some disk space over time.
If you look in the File Handling tab of the Catalog Settings you’ll see an option for scheduling when to discard old 1:1 previews, and there’s also a manual method to discard them under that Library>Previews menu. The logic behind the actual removal of the full-sized previews, however, is a little more complicated than that. (You can read about it if you’d like at: http://robsylvan.com/lrfullpreviews.) What I do is simply delete the Previews.lrdata file once a year or so and force Lightroom to re-render a fresh set of standard previews.
I know it sounds extreme, but there’s no better way to remove all the detritus that builds up over time, and all it costs is the time it takes Lightroom to re-render them again (your photos will need to be online to have the previews re-rendered).
smart previews
Aside from the regular previews, we also have the option to create and use smart previews. Like the regular preview file, this file exists alongside the catalog file, but unlike regular previews, using smart previews is entirely optional. Discussing the ways to use smart previews could be an entire article itself, but suffice it to say that using smart previews gives you the ability to have a very powerful and lightweight workflow when your photos are offline. If you refer back to the File Handling tab of the Catalog Settings dialog, you can also see that it displays a running tally of the size of this cache. The size will vary based on how many smart previews you’ve built. In my case, the cache is 21 GB, which represents almost 21,000 smart previews.
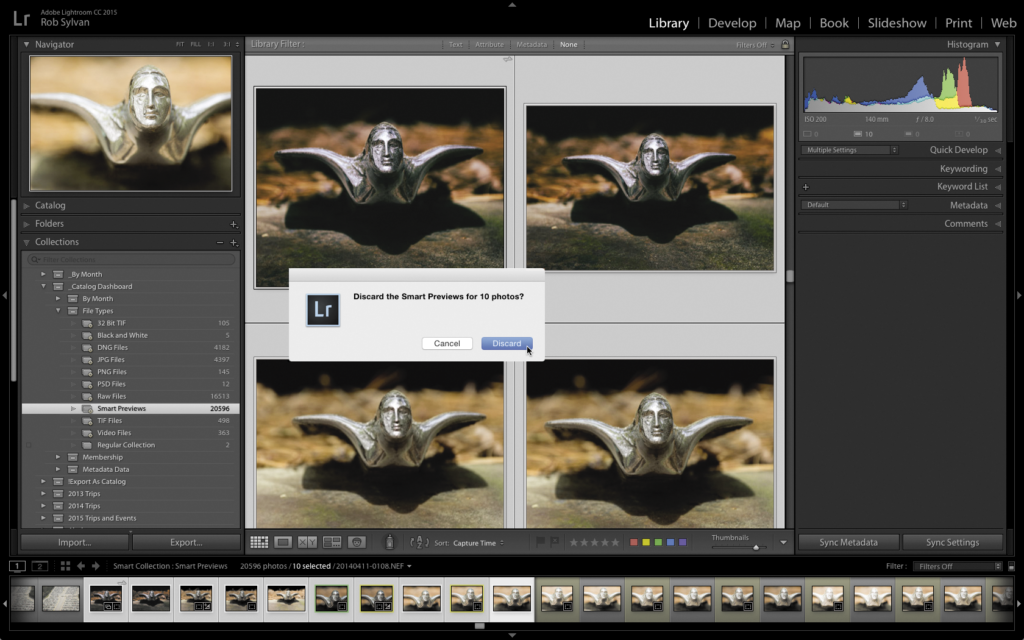
You can manage your smart previews by discarding the ones you no longer need. An easy way to track photos that have a smart preview is to create a smart collection using the rule Has Smart Preview is True. This automatically gathers up all photos having a smart preview. In Grid view, select the photos for which you want to discard the smart previews and go to Library>Previews>Discard Smart Previews, where you’ll be prompted to confirm this action by clicking the Discard button.
mobile downloads
Lastly, if you’re a Lightroom for mobile user, and you’ve synced photos from your mobile device, you’ve probably noticed a Volume Browser that appeared in your Folders panel matching the name of your mobile device. Under that Volume Browser is a folder named Imported Photos, and it’s in there where Lightroom stores the photos it has synced from your mobile device.
In my case, the Volume is labeled RiPhone and currently has 892 photos stored in it. The photos themselves are stored in a file named Mobile Downloads.lrdata, which is located in your Pictures/Lightroom folder, and this location can’t be changed, meaning that even if your synced catalog is located on another drive, the Mobile Downloads.lrdata file will still be created within your Pictures folder. Once the photos are brought over to your computer from your mobile device, however, you can use Lightroom to move the photos to any other folder in your Folders panel, just like you would with any other photo.
This article originally appeared in Issue 14 of Lightroom Magazine.