
In this “Down & Dirty Tricks” tutorial, you’ll learn how I used 3D in Photoshop to create the subtitle art for my Photoshop Tricks for Designers: How to Create Bada$$ Effects in Photoshop book. You can achieve some really impressive effects in a fraction of the time that it would take to create them in other 3D applications—all without ever leaving Photoshop.
Step One:
Start by opening the start_file.psd file from the exercise download or create a new document (File>New) that’s 2000×1000 pixels. When the new document opens, press Command-I (PC: Ctrl-I) to invert the background from white to black.
[KelbyOne members may download the file used in this tutorial here. All files are for personal use only.]
Step Two:
Once you either open the download file or create a new document, click on the Foreground color swatch near the bottom of the Toolbar to open the Color Picker, and set the color to a yellow-orange (R: 247, G: 148, and B: 29), or choose any color you want to use. Click OK to close the Color Picker.

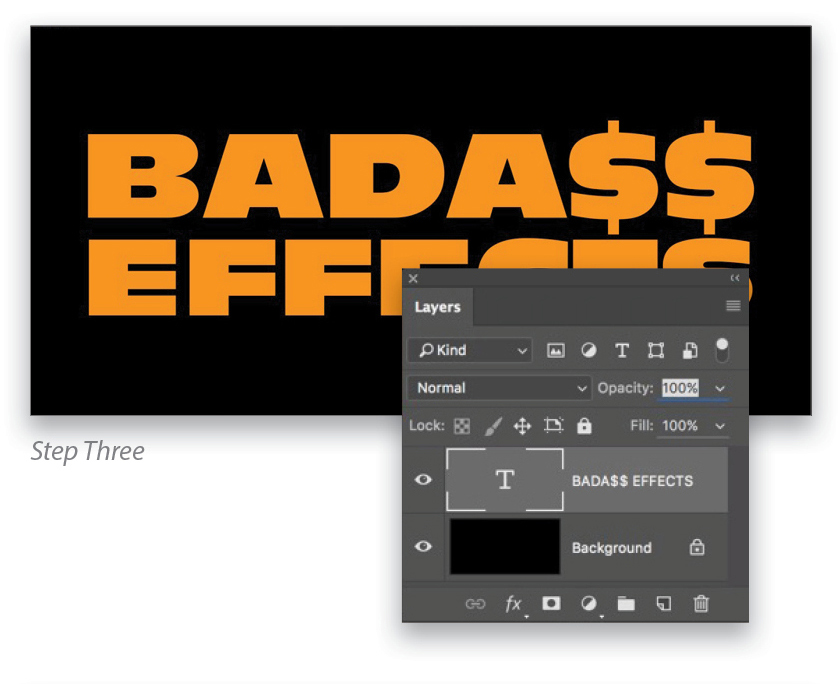
Step Three:
The text is already set in the download file, so if you’re using that file, double-click the type thumbnail in the Layers panel to activate the Type tool and to select the text. Press Option-Delete (PC: Alt-Backspace) to fill the text with the yellow-gold color.
If you’re using your own file and setting your own text, select the Type tool (T) and click on the canvas to set a text layer. Using a bold font, type the title or name you want to apply. Here we used a font from Typekit called Antique Olive Nord D. If you’re typing multiple words, press Return (PC: Enter) after each word to stack the text and then format each word so the lines are equal in length. In this case, we highlighted the top word, increased the size a couple points, and tracked it out a little until it was roughly the same width as the bottom line. To track out the text, select the entire word with the Type tool, hold the Option (PC: Alt) key and press the Right Arrow key on your keyboard several times. This will add space between each letter. If you need to decrease the space between the letters, press the Left Arrow instead.
You may need to adjust the leading as well, which is the space between each line of text. Again, do this by selecting all the text or just the bottom line, hold the Option (PC: Alt) key, and use the Up or Down Arrows, whichever is necessary to make a little space between the words.
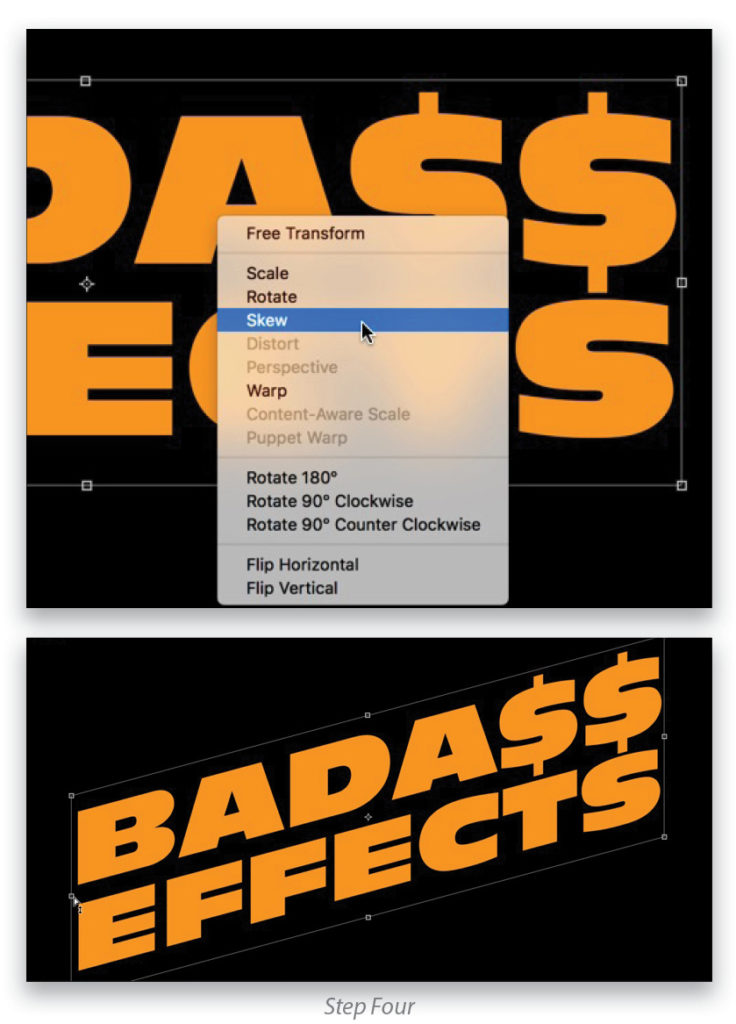
Step Four:
Press Command-T (PC: Ctrl-T) to activate Free Transform. Right-click on the object and choose Skew from the contextual menu. Go to the left side of the transform bounding box, and hold down the Option (PC: Alt) key as you click-and-drag the middle control handle downward. Holding the Option (PC: Alt) key will skew the text based on the center of the bounding box. Once done, press Enter to commit the transformation.
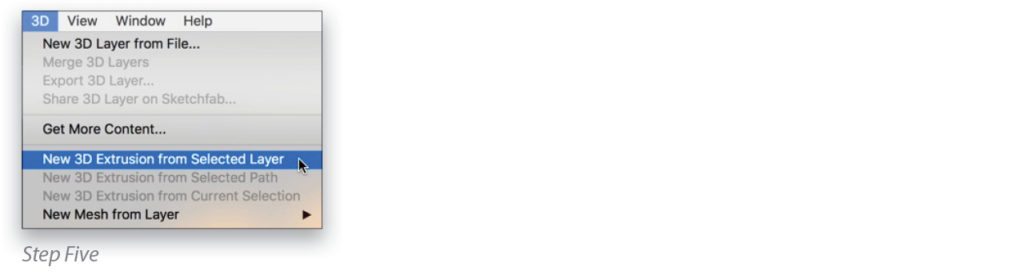
Step Five:
Now that we’ve completed the initial setup for the text, it’s time to convert it to 3D. Go under the 3D menu and choose New 3D Extrusion from Selected Layer. If Photoshop asks if you’d like to switch to the 3D Workspace, click Yes. The text will be extruded and converted to a 3D layer. If you didn’t switch to the 3D workspace, open the 3D and Properties panels, which are located under the Window menu. You need to have both panels open when editing 3D.
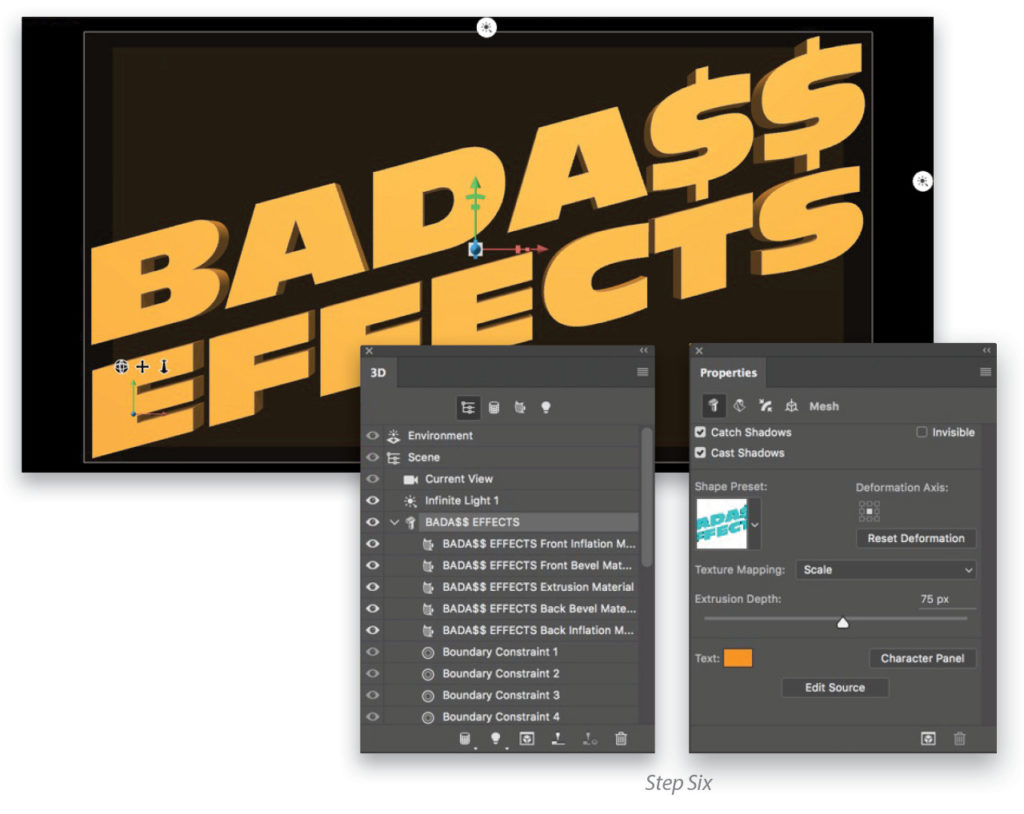
Step Six:
In the 3D panel, select the 3D object BADA$$ EFFECTS in the main list. Go to the Properties panel and set the Extrusion Depth to 75 px.
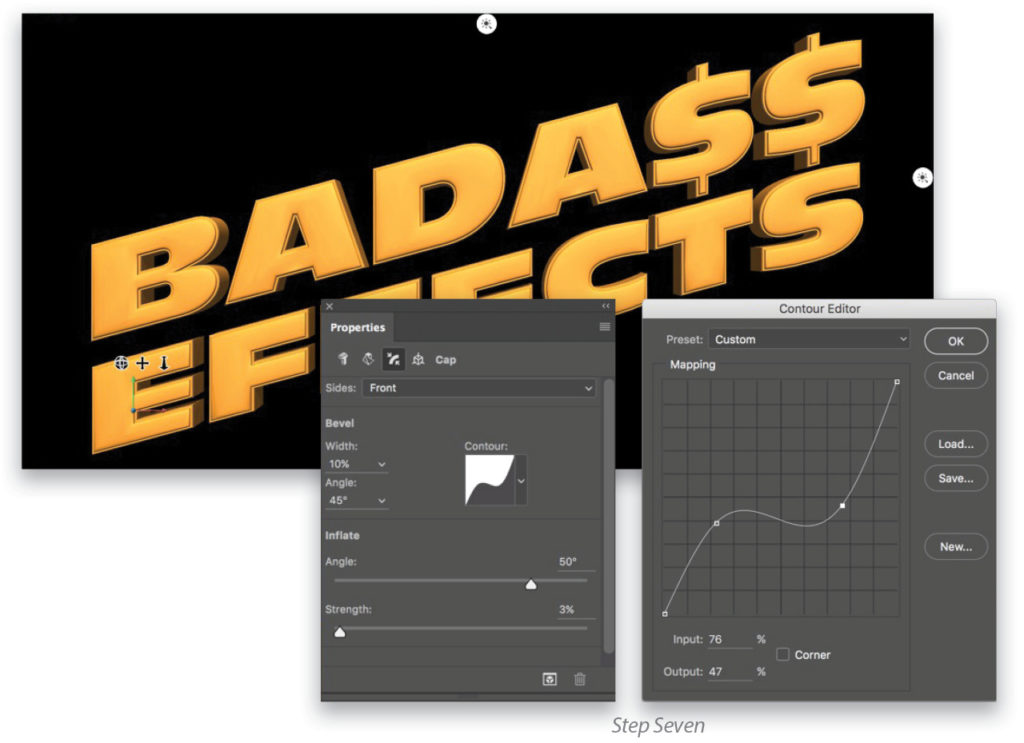
Step Seven:
In the Properties panel, click on the Cap tab, which is the third icon from the left at the top of the panel. Here’s where you set the Bevel and Inflate. Start by setting the Bevel Width to 10%, then click on the Contour thumbnail to open the Contour Editor. You’ll see a 45° line that represents a profile view of the default bevel. Clicking directly on the path will add a new control point that you can drag around to alter the shape of the bevel. Here we added two points and positioned them as you see here. When you click OK, you’ll see the shape updated. Under Inflate, set the Angle to 50° and the Strength to 3%.
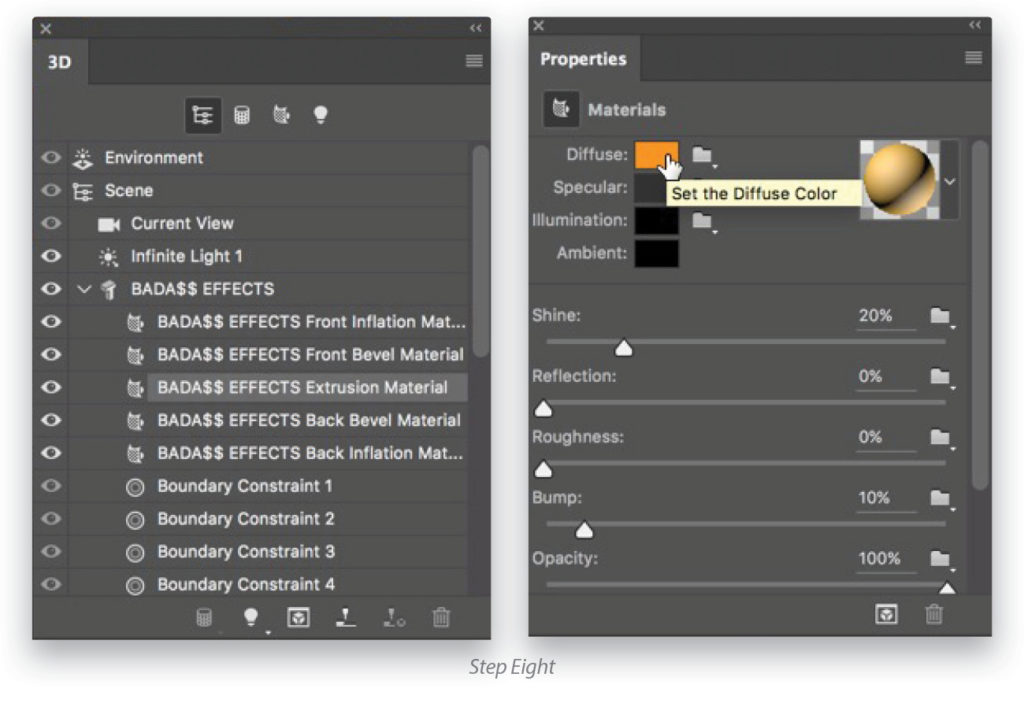
Step Eight:
Go back to the 3D panel and select the BADA$$ EFFECTS Extrusion Material in the list. In the Properties panel, click on the swatch next to Diffuse at the top. When the Color Picker opens, choose black or a really dark-gray color (I chose R: 73, G: 73,
B: 73). Click OK.
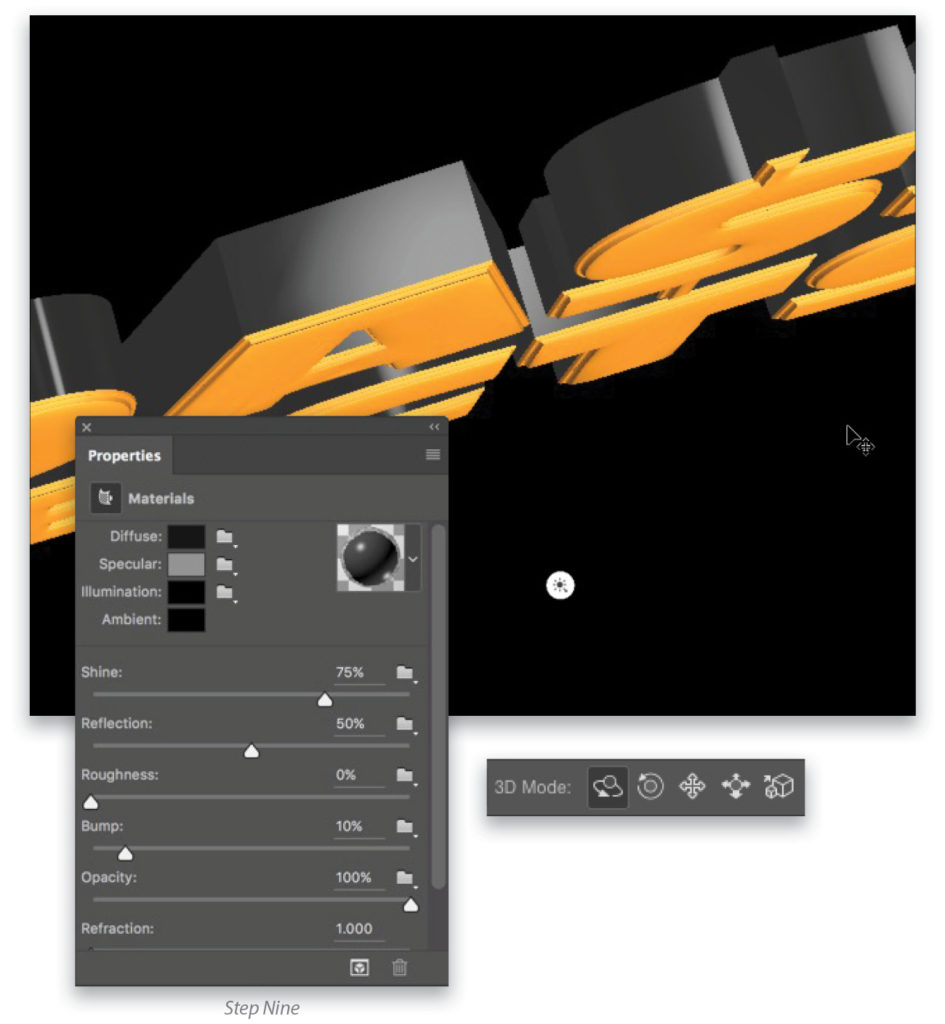
Step Nine:
In the Properties panel, set the Shine to 75% and the Reflection to 50%. Just below the Diffuse setting, click on the swatch next to Specular and choose a slightly lighter gray color in the Color Picker to allow a brighter specular highlight on the black extrusion.
With the Move tool (V) selected, choose the z; it’s the first icon in the 3D Mode section on the right of the Options Bar. Select Current View in the 3D panel, and click-and-drag in the canvas to rotate your view of the text. As you can see here, the reflection of the default IBL (Image Based Light) is now visible on the extrusion surface. We’ll be changing this into a custom IBL in a little bit. Click Default Camera at the bottom of the list in the 3D panel to return to the default front view.
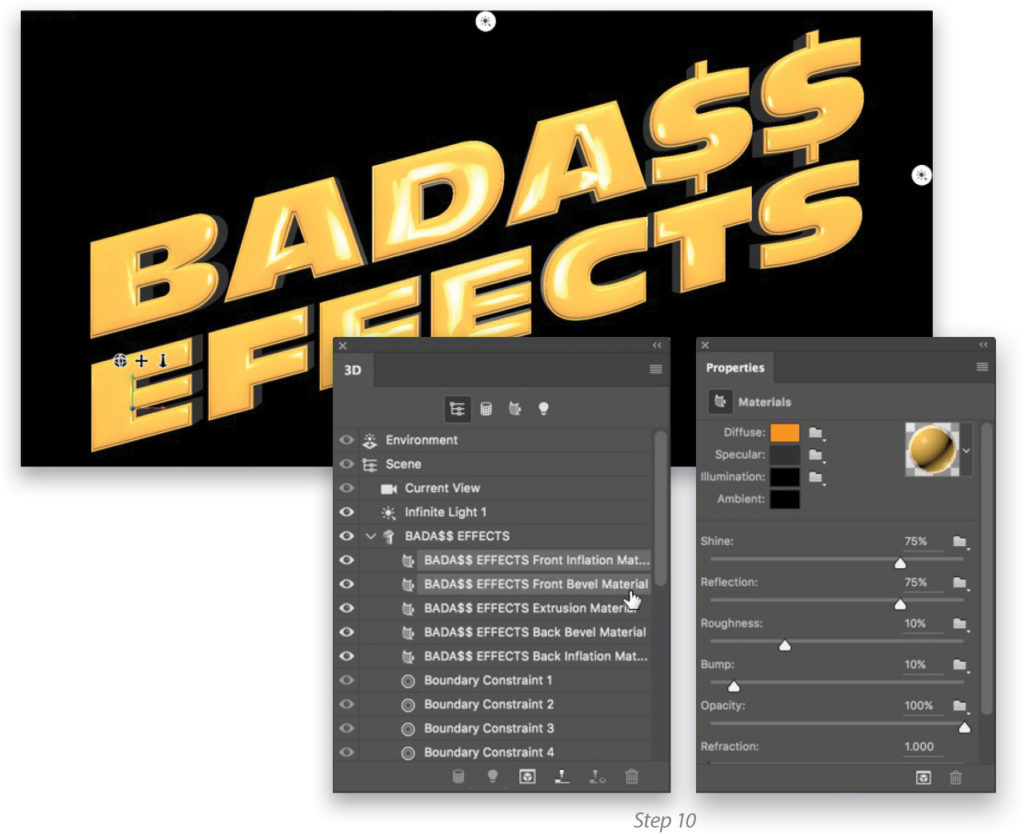
Step 10:
In the 3D panel, click on the BADA$$ EFFECTS Front Inflation material, hold down the Shift key, and click on the BADA$$ EFFECTS Front Bevel Material so they’re both selected. In the Properties panel, set both the Shine and Reflection to 75%. Also set the Roughness to 10%. This will slightly blur the reflection when rendered. You’ll see the default Image Based Light reflected on this surface, which is good, but again, we’ll be changing this in a bit.
Step 11:
In the 3D panel, click on Environment, then in the Properties panel, look for the IBL setting at the top. In the thumbnail preview for the IBL, you’ll see the default is a gray background with some white dots. Click on the icon to the right of the thumbnail preview and choose New Texture from the IBL menu. Just make the new document 1000×1000 pixels at 100 ppi, click on the color swatch to the right of the Background Contents drop-down menu, select black in the Color Picker, and click
OK twice.
![]()
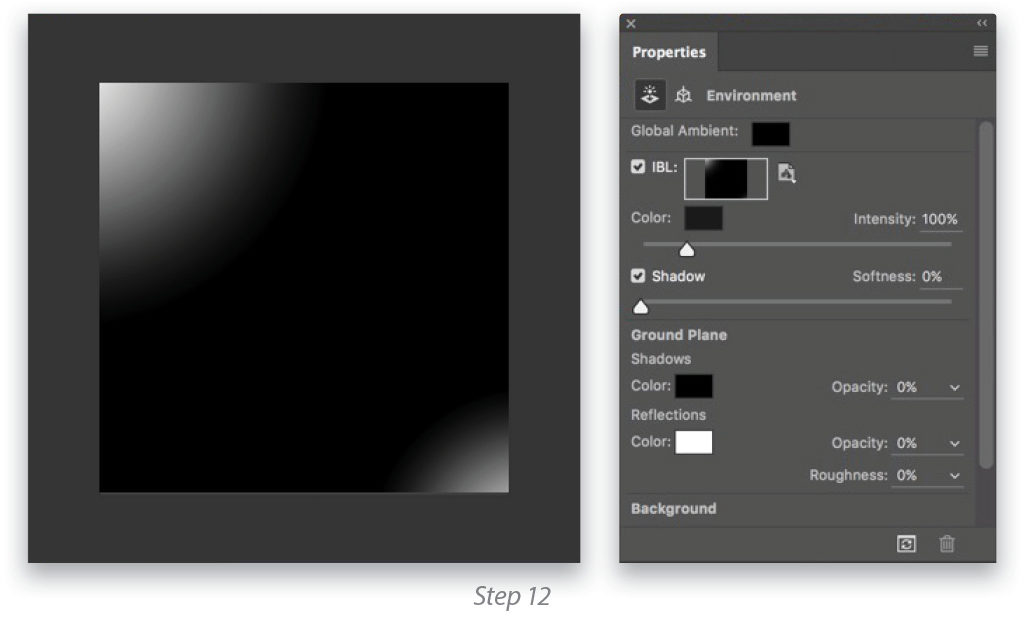
Step 12:
Go back to the IBL menu and choose Edit Texture. Select the Gradient tool in the Toolbar. (Note: If you switched to the 3D workspace, you won’t see the Gradient tool in the Toolbar. Click-and-hold on the three dots right above the color swatches in the Toolbar and you’ll see a long list of tools. The Gradient tool will be in that list.) In the Options Bar, choose the Radial Gradient type, and select the Foreground to Transparent preset in the Gradient Picker. Finally, set the Foreground color to white by pressing D then X.
Zoom out of the document so you can see the area outside the visible canvas. Start a gradient in the upper-left corner just outside the canvas area, and drag in toward the center of the canvas. Then add a smaller gradient in the bottom-right corner. That’s it. Close the document and save the changes.
While still in the Environment settings, go to the Ground Plane Shadows settings and change the default Opacity of 60% to 0%.
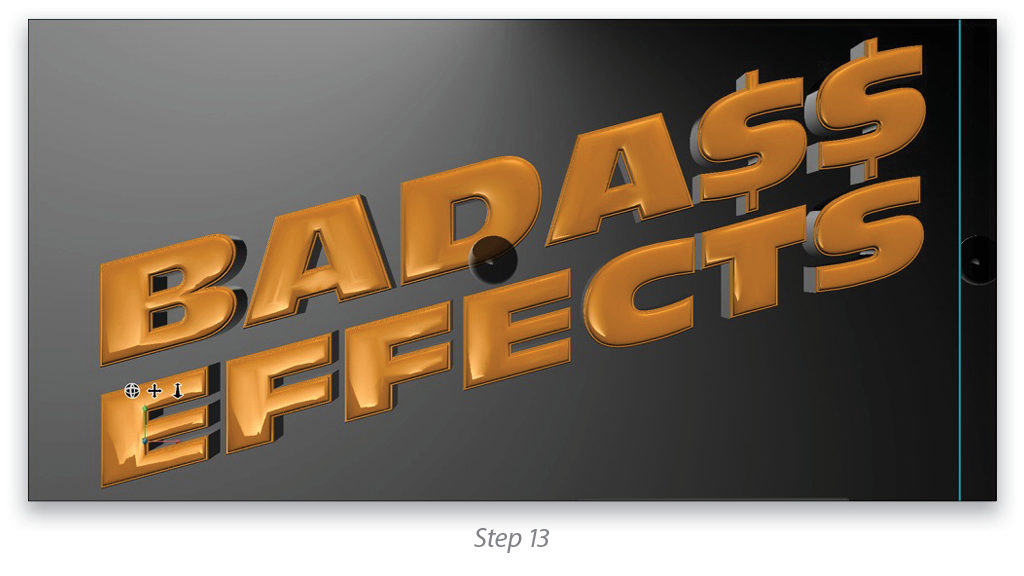
Step 13:
With Environment still selected in the 3D panel, switch to the Move tool. You’ll see a small black sphere appear in the middle of the canvas. This is a model of the IBL that surrounds the text. If you use the Orbit the 3D Camera tool to move it around, you’ll see the specular reflections change on the surface. We’ll finalize the position of this reflection in a minute.
Step 14:
At this point the surface effects are done, but feel free to play with different color and surface effects to get a better idea of how they work. The last steps are to set up the camera and final position of the text, add the final lighting, and render.
First, go to the 3D panel and select Current View, which is the current active camera that we’re using to view the 3D object now. In the Properties panel, you’ll see the 3D Camera settings. Here we want to create a dramatic wide-angle effect, so go to the FOV (Field of View) and set it to a 25 mm lens. You’ll see the object move back in space because of the virtual lens change. Just select the Slide the 3D Camera tool in the Options Bar, then click-and-drag down in the canvas to bring the camera closer to the text.

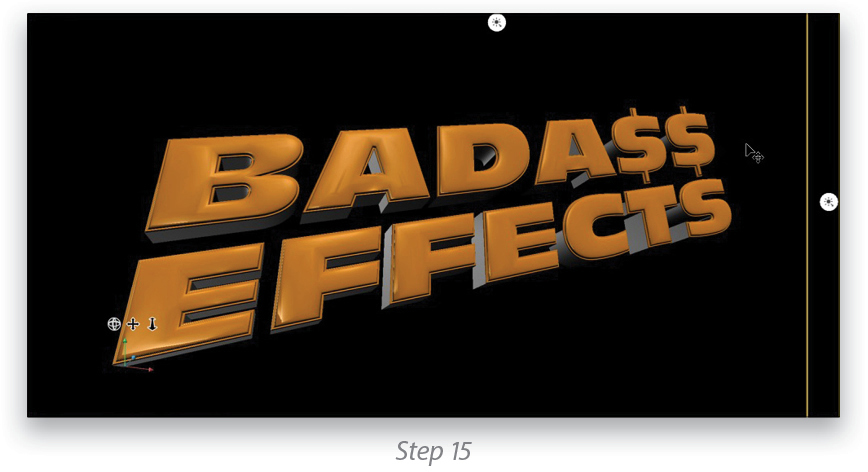
Step 15:
Select the Orbit the 3D Camera tool in the Options Bar and rotate the view to get a more upward viewing angle so you can see the extruded sides. You’ll notice the IBL changes when you move the camera; we’ll fix that in a moment.
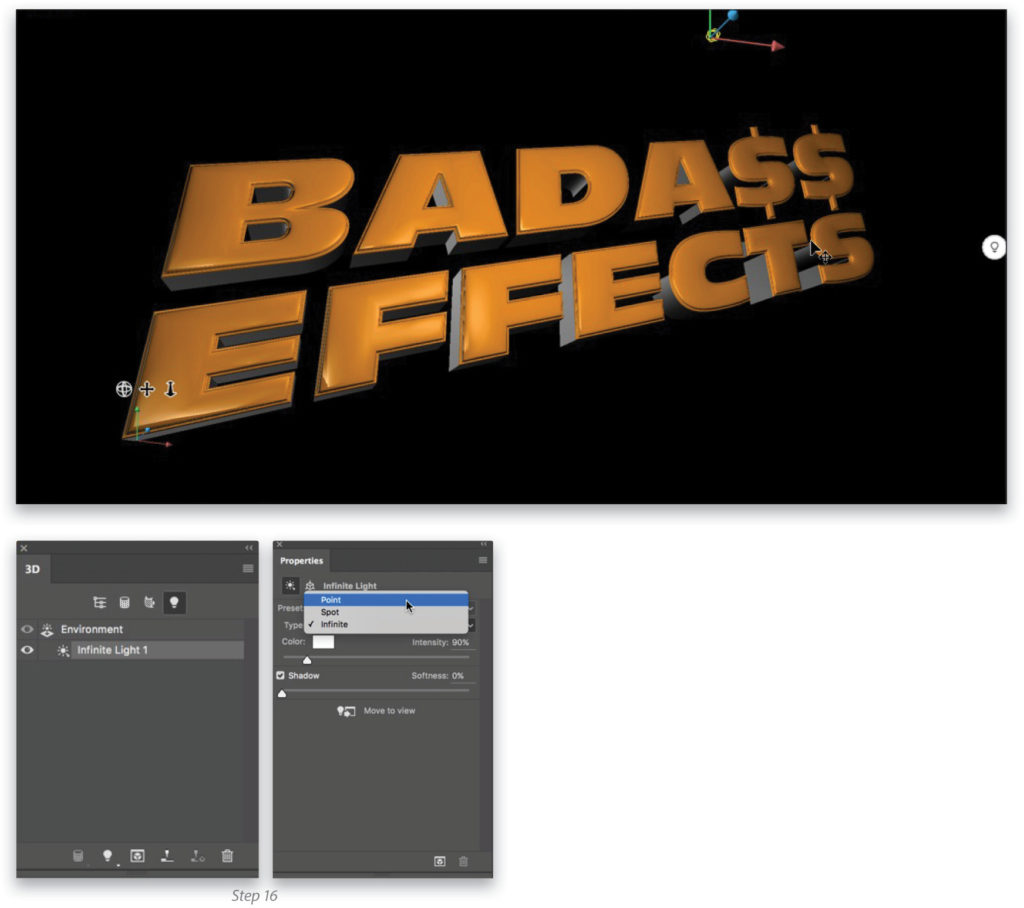
Step 16:
Go to the Lights section of the 3D panel (fourth tab at top) and select the Infinite Light. This was created when we first created the 3D object. It’s a directional light, but it’s evenly distributed over the entire object. Go to the Type drop-down menu in the Properties panel and change it to a Point light. This is a small wireframe ball that emits light in all directions. Once you switch the light, click the Move to View icon directly below the Infinite Light settings in the Properties panel. This will place the light front and center.
Use the 3D tools in the Options Bar to position the point light above the object as you see here. Lights can be tricky at first, so you’ll want to practice a little if you’ve never used them before. You can’t rotate a point light but you can move it horizontally and vertically using the Drag the 3D Object tool, and forward and back using the Slide the 3D Object tool. As you get the light closer to the text, it will become more focused.
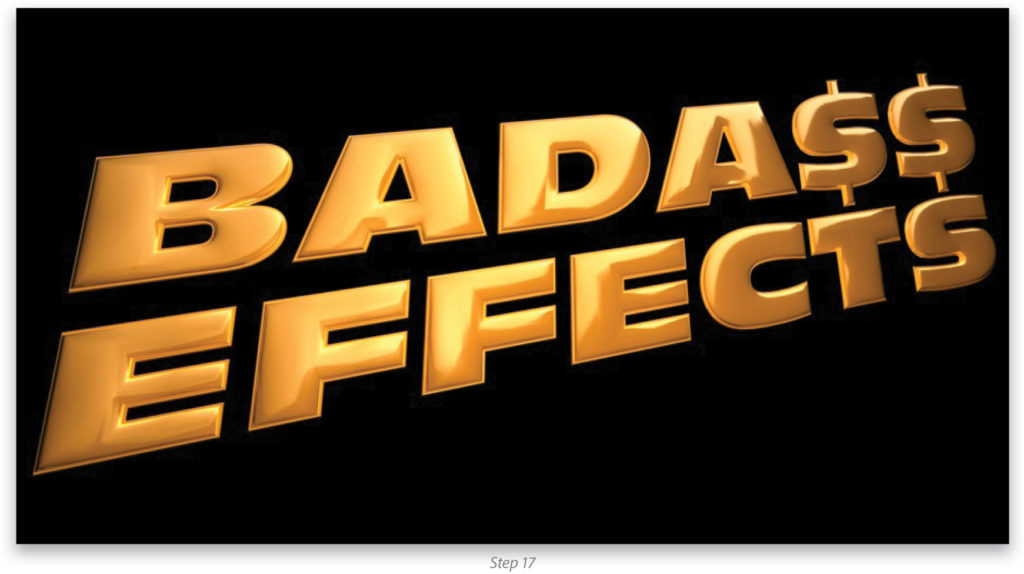
Step 17:
Select Environment in the 3D panel and then use the Orbit the 3D Camera tool to move the IBL around until you see a reflection you like. Now you can start the render to see how it’s going to look. Go under the 3D menu and choose Render 3D Layer, or press Shift-Option-Command-R (PC: Shift-Option-Ctrl-R). You’ll be able to tell early in the render how things will look. If you see any changes you want to make (which I know you will), press Escape to cancel the render and make your adjustments.
You can even change the text by selecting the BADA$$ EFFECTS text object in the 3D panel, and then clicking the Edit Source button in the Properties panel. The original document will open. Just use the Type tool to highlight the text and input new text. When done, close the document and save the changes. The 3D text will be updated with all the effects still in place. You may need to adjust the lighting and camera view a little. When you’re done, just start the render again.
This article originally published in the November, 2016 issue of Photoshop User magazine.
![]()


