Photoshop’s automatic photo-stitcher, Photomerge, lets you easily merge and align multiple photos into a single image. By hiding (masking) parts of each image, you can end up with a single photo containing an entire action sequence; much like a time-lapse, but with stills instead of video. It’s a practical technique for photographers and production artists alike, whether you’re a pro or an enthusiast. Read on!
If you’re photographing this technique, try using a tripod so the images have a head start on alignment; that said though, the examples used here were captured by hand-holding the camera, so it’s not impossible. Next, think about the size or ratio of the end result: Do you want to end up with a wide-angle image (16:9) or something that fits in a standard frame (say, 4:5 or 5:7)? If you’re hand-holding the camera and moving with the action, you’ll likely end up with a wide-angle result, as we do here.
Also, be sure to put your camera into continuous shooting mode (burst), and try shutter priority (Tv on Canon, S on Nikon) or manual focus with a fast shutter speed to freeze the motion. You may also want to experiment with AI Servo mode (Canon) or continuous-servo AF (Nikon), both of which are autofocus systems that continually track a subject. Capturing an action sequence can take patience, so try not to get discouraged if your first effort doesn’t pan out. (KelbyOne members can click here to download the images used in this tutorial.)
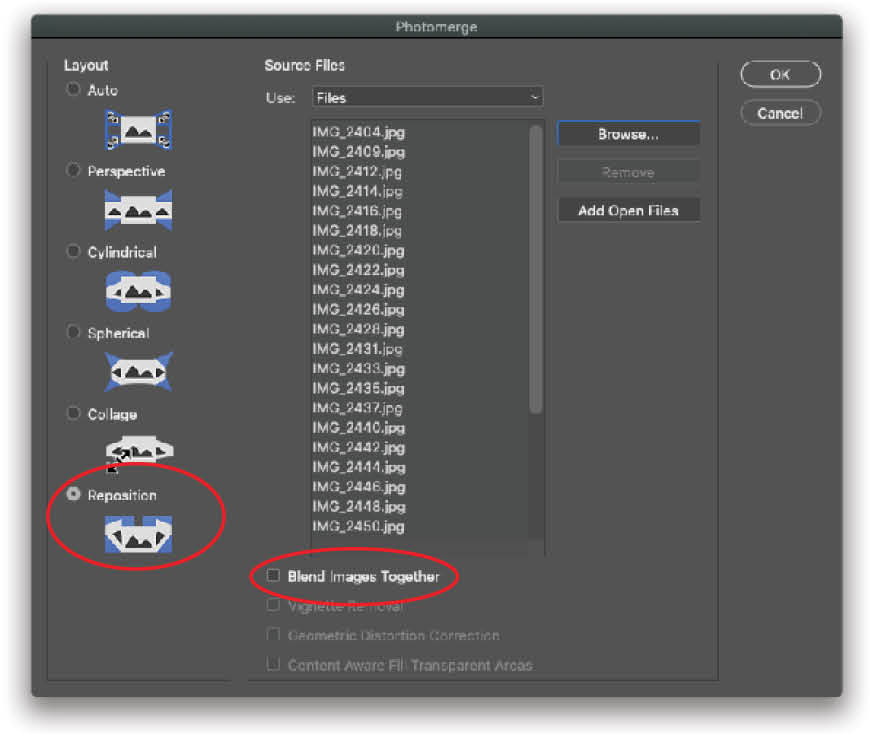
Step One: Let’s bring all the images into a single Photoshop document. To do that, launch Photoshop and choose File>Automate>Photomerge (you can also access this command in Adobe Bridge). In the resulting dialog’s Use drop-down menu, tell Photoshop whether you want to use individual Files or a Folder of files. Then, click Browse to find the images on your hard drive and click Open. (If you’ve already opened the images as documents, click Add Open Files; see the tip below for beginning in Lightroom.)
In the Layout section of the left side of the dialog, turn on Reposition. Next, turn off Blend Images Together: This option uses layer masks to cover up any seams, which we don’t want to do. Make sure the Vignette Removal and Geometric Distortion Correction settings are also turned off, and then click OK. Photoshop combines the images into a new document with each image on its own layer, rotated, and positioned to align with all the others.
Tip: If you’re starting in Lightroom, select the thumbnails in the Library module and then choose Photo>Edit In>Adobe Photoshop 2020, which opens the photos as individual documents. In Photoshop, choose File>Automate>Photomerge and click Add Open Files.
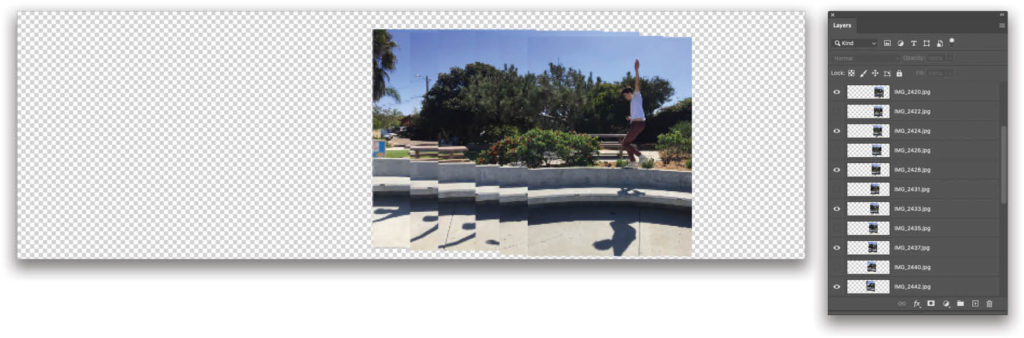
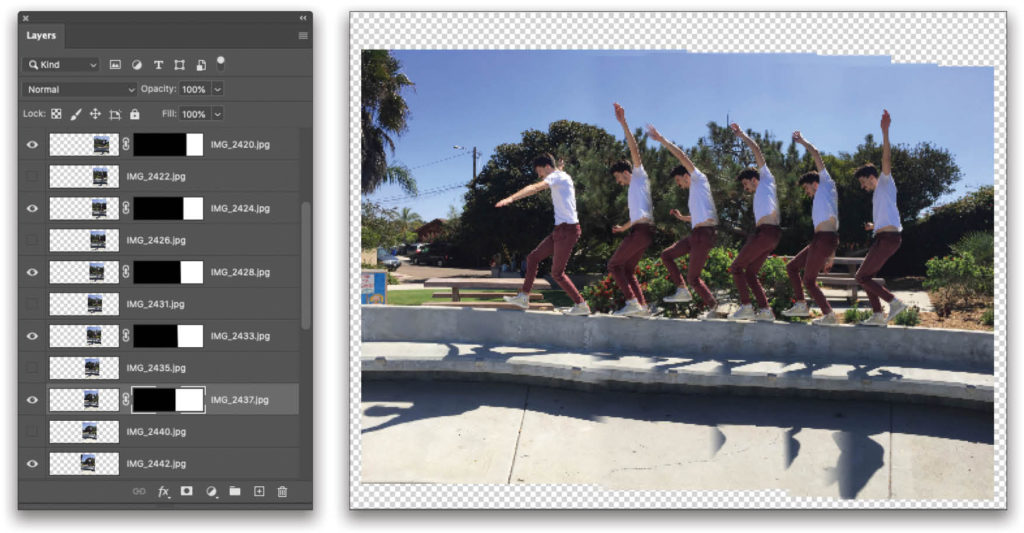
Step Two: Assess the layers by turning on/off each layer’s visibility (Eye icon) in the Layers panel. You want a little space between each subject in the composite, so you may want to use every other layer. Here, we began with 30 images and narrowed it down to 6 that were in the middle of the sequence (see top of next page). To omit a layer, simply leave its visibility Eye turned off.
Tip: You can turn off multiple layers at once by Option-clicking (PC: Alt-clicking) the Eye icon of the layer you want to remain visible; Photoshop turns the rest of them off.
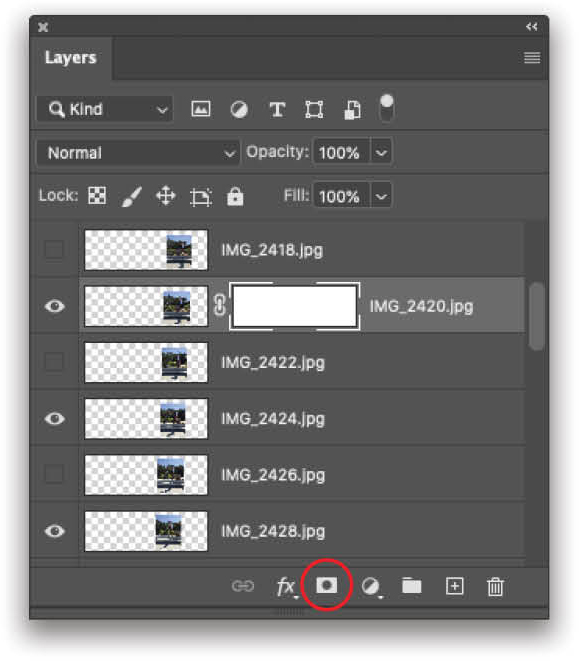
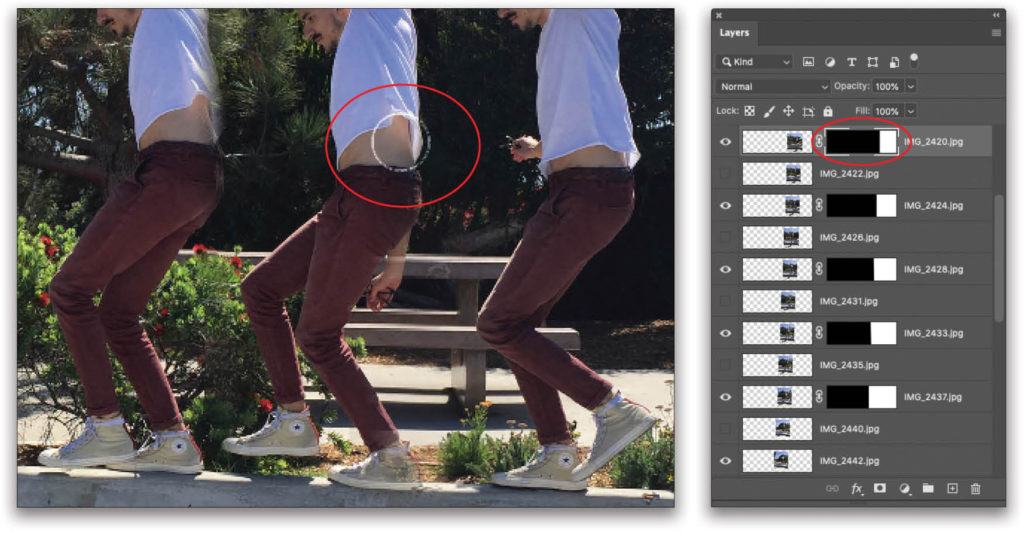
Step Three: We’re going to use layer masks to hide parts of the remaining visible layers, except for the bottom layer. In this example, we need to hide the left side of each layer because our action is moving from right to left. Start by activating the topmost visible layer, and then add a layer mask by clicking the circle-within-a-square icon at the bottom of the Layers panel (circled).
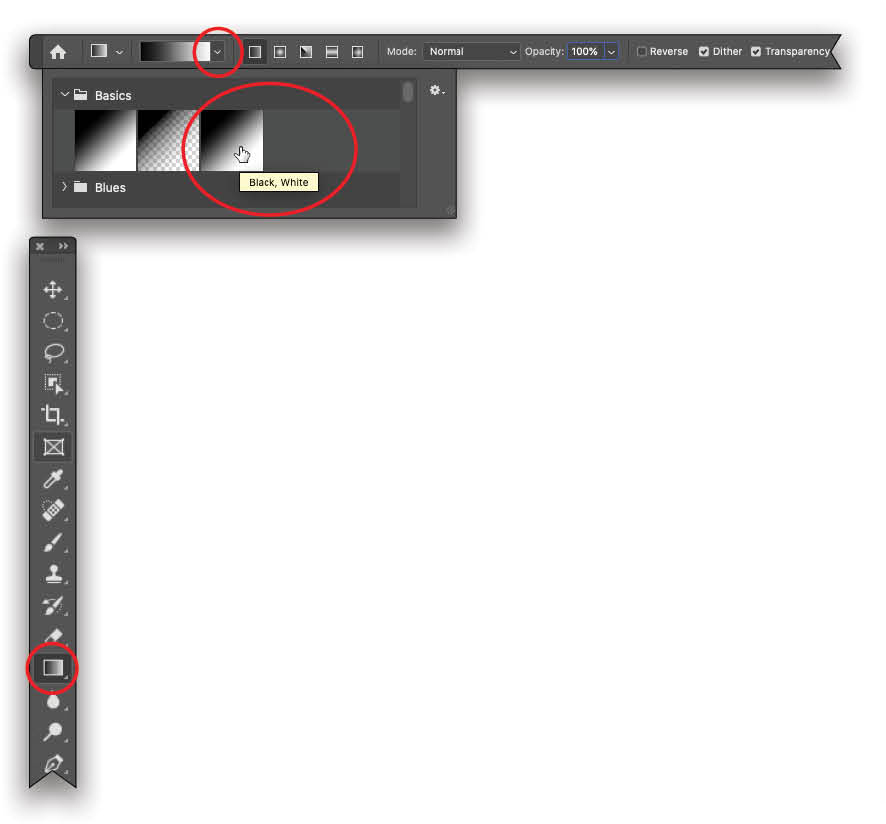
Step Four: In the realm of layer masks, painting with black conceals and white reveals. You can paint black onto a layer mask using the Brush tool; however, it can be faster to hide a large part of one side of each layer—the left side in this example—using the Gradient tool first, and then fine-tuning it with the Brush tool later. To do that, press G to grab the Gradient tool (circled). In the Options Bar, click the down-pointing triangle (also circled) next to the gradient preview thumbnail to open the Gradient Picker. From the Basics category, click the third thumbnail, which is the Black, White option (circled). Make sure you have the Linear Gradient option selected in the Options Bar (it’s the first icon in the group of five icons to the right of the gradient preview thumbnail).
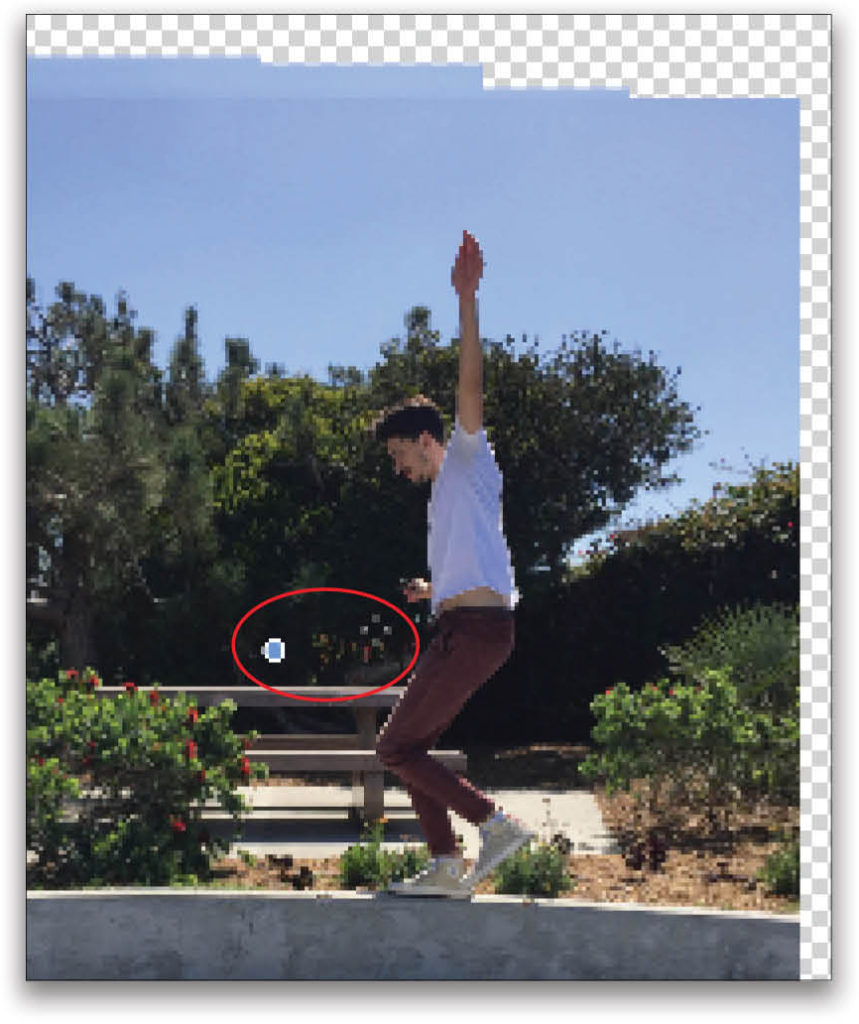
Step Five: With the mask active (it will have little brackets around it in the Layers panel), mouse over to the image and click-and-hold your mouse button just to the left of the subject, then drag rightward for a very small distance until you reach the subject. As you drag, you’ll see a line, and a blue point that represents where you first clicked (circled here). Release your mouse button and Photoshop fills the left side of the mask with black and the right side stays white. This hides the left side of that layer (remember, black conceals and white reveals), revealing the subject on the next visible layer below. If you don’t reveal the entire subject on the layer below, simply keep clicking-and-dragging with the Gradient tool until you get it right.
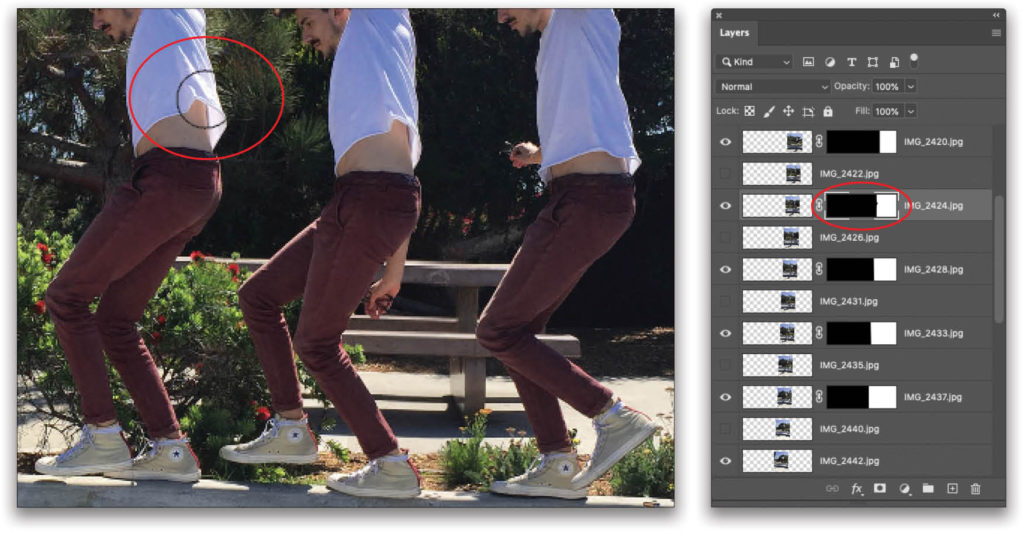
Step Six: Click to activate the next visible layer down. Repeat Steps 3–5 for each visible layer except for the bottom one. When using the Gradient tool on each of the layer masks, drag about the same distance you did for the first layer.
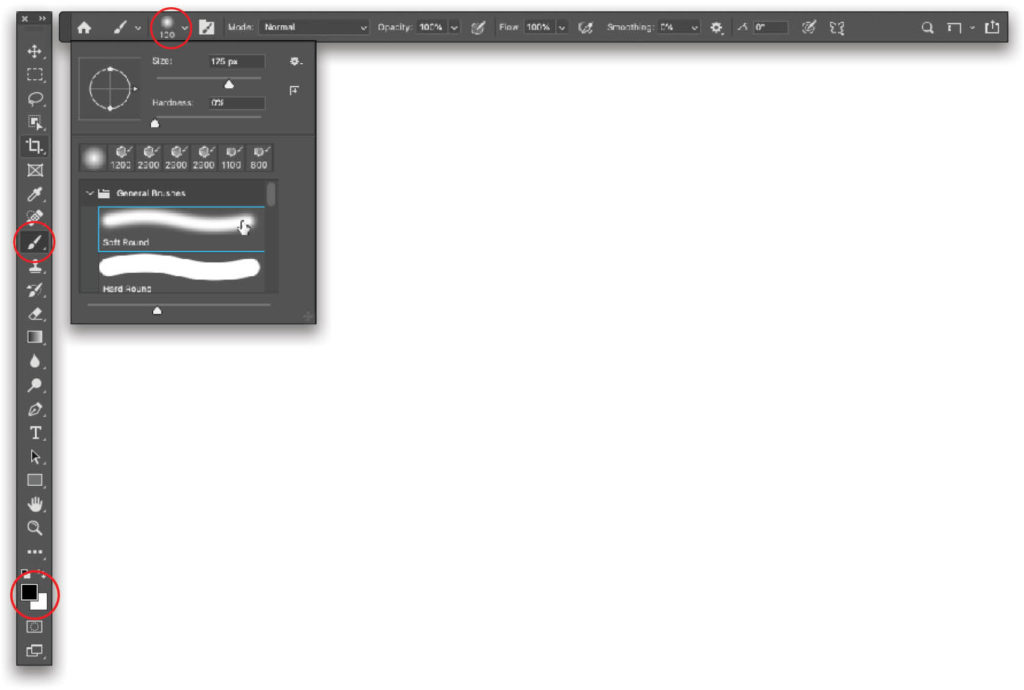
Step Seven: Now we’ll switch to the Brush tool and fine-tune each mask. Press B on your keyboard to grab the regular Brush tool (circled). In the Options Bar, click the Brush Preset Picker (also circled) and choose the Soft Round Brush in the General Brushes folder. Set the brush Size to around 100 pixels for these example images, and make sure Mode is set to Normal and Opacity to 100%. On your keyboard, press D to set the color chips at the bottom of the Toolbar (circled) to their default values of black and white. Press X to flip-flop the color chips so that black is on top.
Step Eight: Zoom in to your image by pressing Command-+ (PC: Ctrl-+) and then reposition your image by clicking-and-dragging while holding down the Spacebar. Click to activate the layer mask on the topmost layer (circled) and then brush across the area you want to hide. On this layer, that’s the left side of the image where it overlaps with the next visible layer down (the brush cursor is circled here). Don’t worry if you hide too much; simply press X to flip-flop your color chips so white is on top and then brush across an area to reveal it again. In this example, don’t worry about the shadow on the bench, as we’ll crop it out in the next step.
Step Nine: Repeat Step Eight for each layer mask.
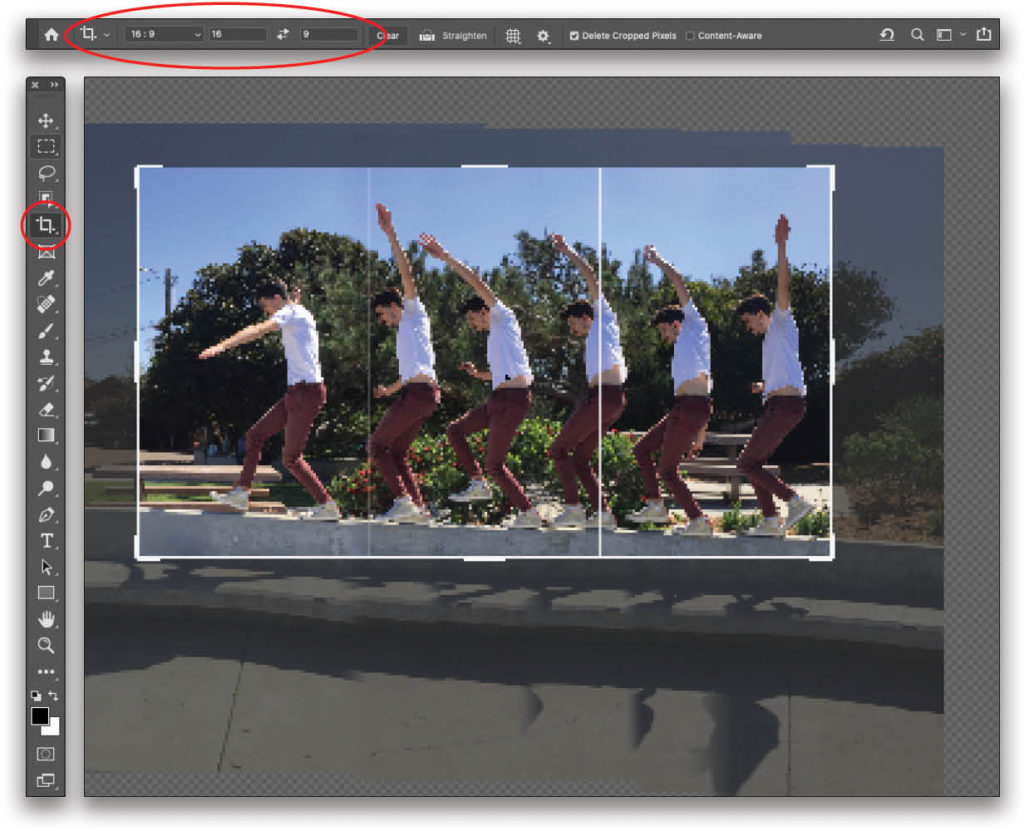
Step 10: Zoom back out of the image by pressing Command- – (PC: Ctrl- –) to evaluate the composite. If you’re happy with the result, press C to grab the Crop tool and from the Ratio menu at the left of the Options Bar, pick the size you want (we used 16:9 here). Drag to adjust the crop handles to resize the crop box, and then drag the image itself to reposition it inside the crop box. Press Enter when you’re finished. Tip: To hide the crop box, simply switch to another tool, such as the Move tool.
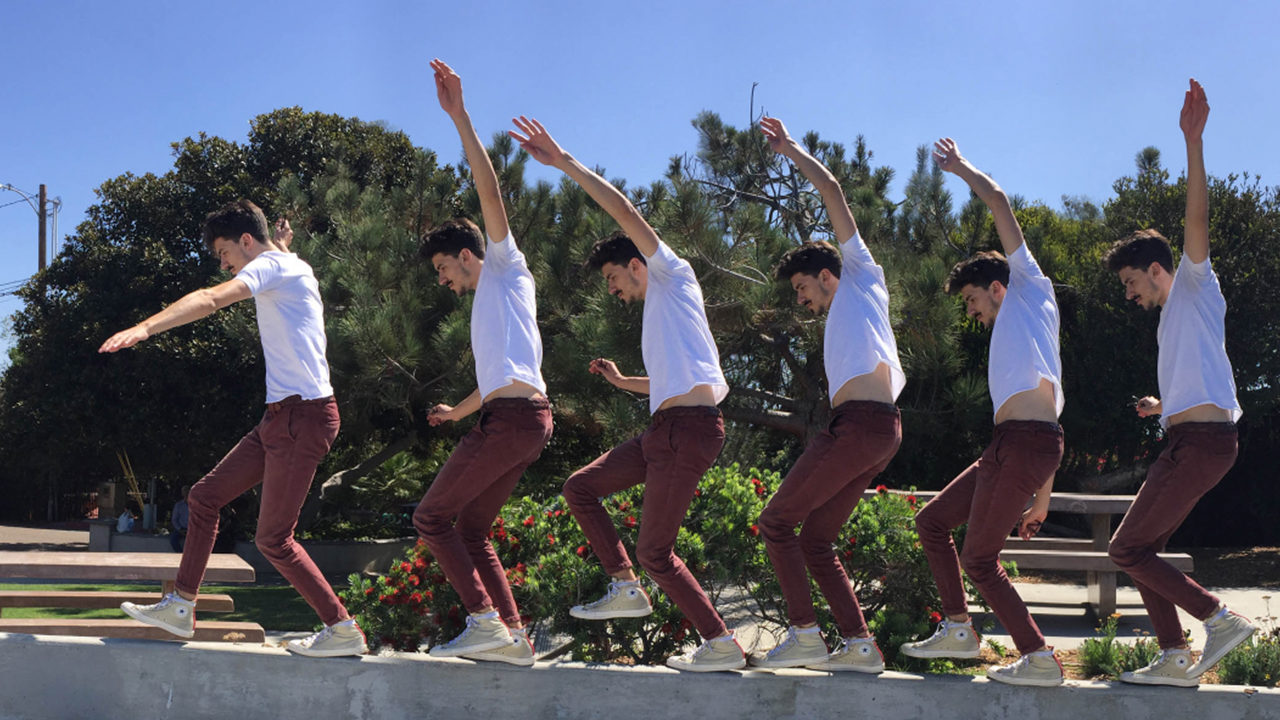
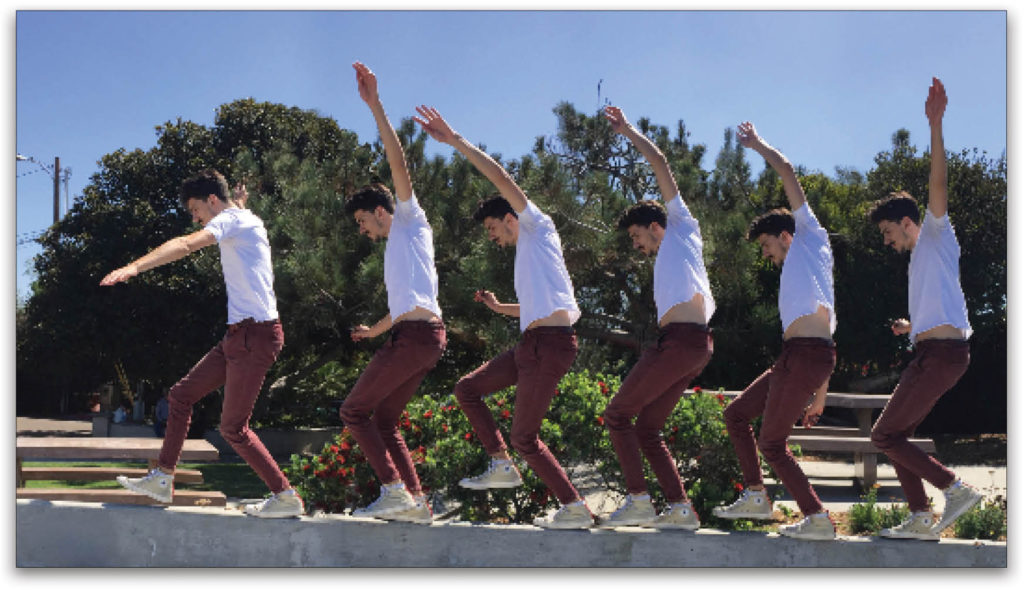
And here’s our final result.
Not only does this technique produce a visually interesting image, it’s a great way to improve your masking skills. In addition, you may consider offering it as a sellable item in your photography business and, for production artists or graphic designers, this technique makes for a slick ad, book, or album cover. Until next time, may the creative force be with yforce be with you all!Not only does this technique produce a visually interesting image, it’s a great way to improve your masking skills. In addition, you may consider offering it as a sellable item in your photography business and, for production artists or graphic designers, this technique makes for a slick ad, book, or album cover. Until next time, may the creative force be with you all!
This article originally published in the June/July, 2020 issue of Photoshop User magazine.


