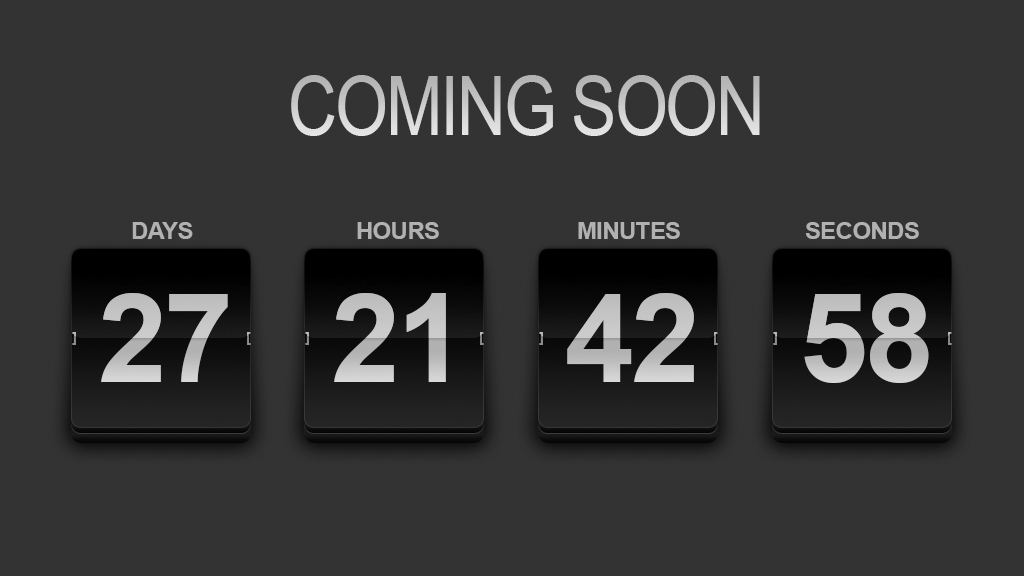
Layer styles are key for making flat art look 3D. In this column, you’ll create a flip-card countdown timer using only the Rectangle tool and a slew of styles. While this technique takes patience and perseverance, the skills you’ll learn today should serve you well throughout your Photoshop career, no matter what you’re making. Let’s get started!
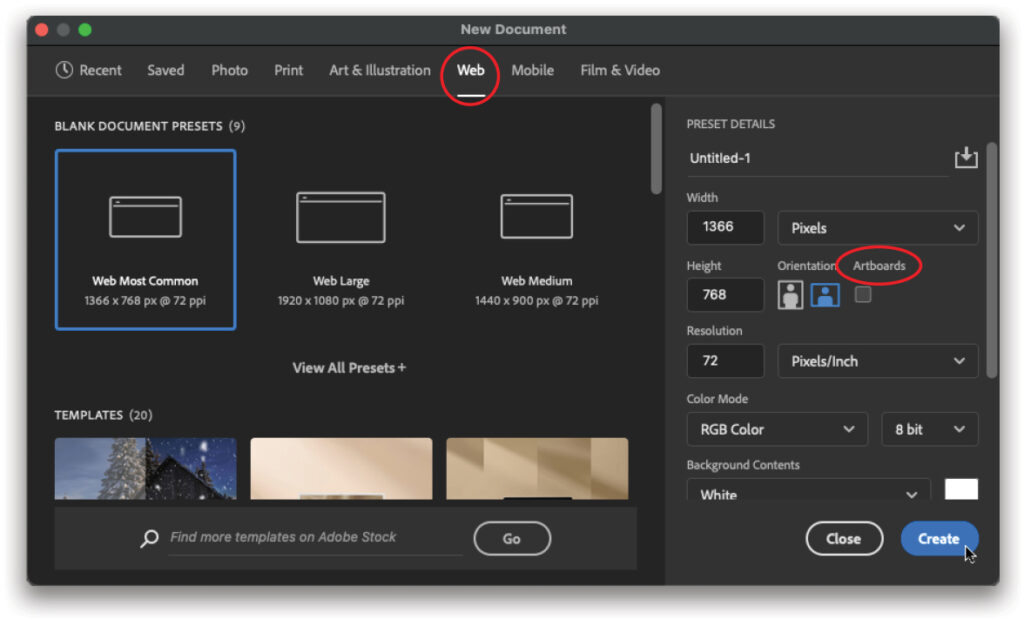
STEP ONE: Choose File>New and in the New Document dialog that opens, choose Web (circled). Pick the Web Most Common template and, in the Preset Details on the right, turn off Artboards (also circled). Click Create.
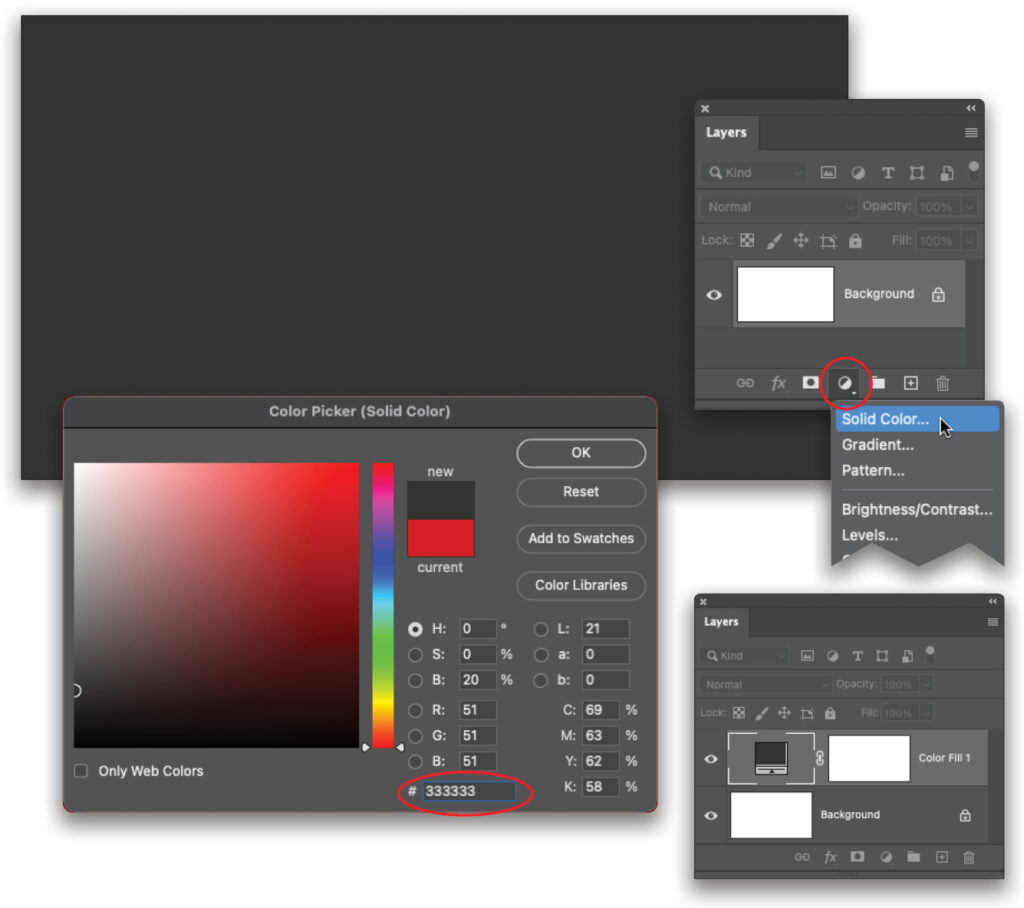
STEP TWO: Let’s add a new background color. Click the half-black/half-white circle at the bottom of the Layers panel (circled) and choose Solid Color. In the Color Picker that opens, enter 333333 into the # field (also circled) for a dark gray. Click OK.
Tip: Sure, you could’ve changed the background color in the New Document dialog; however, a Solid Color adjustment layer makes it easy to change the background color later on: simply double-click the Color Fill 1 layer thumbnail in the Layers panel to reopen the Color Picker!
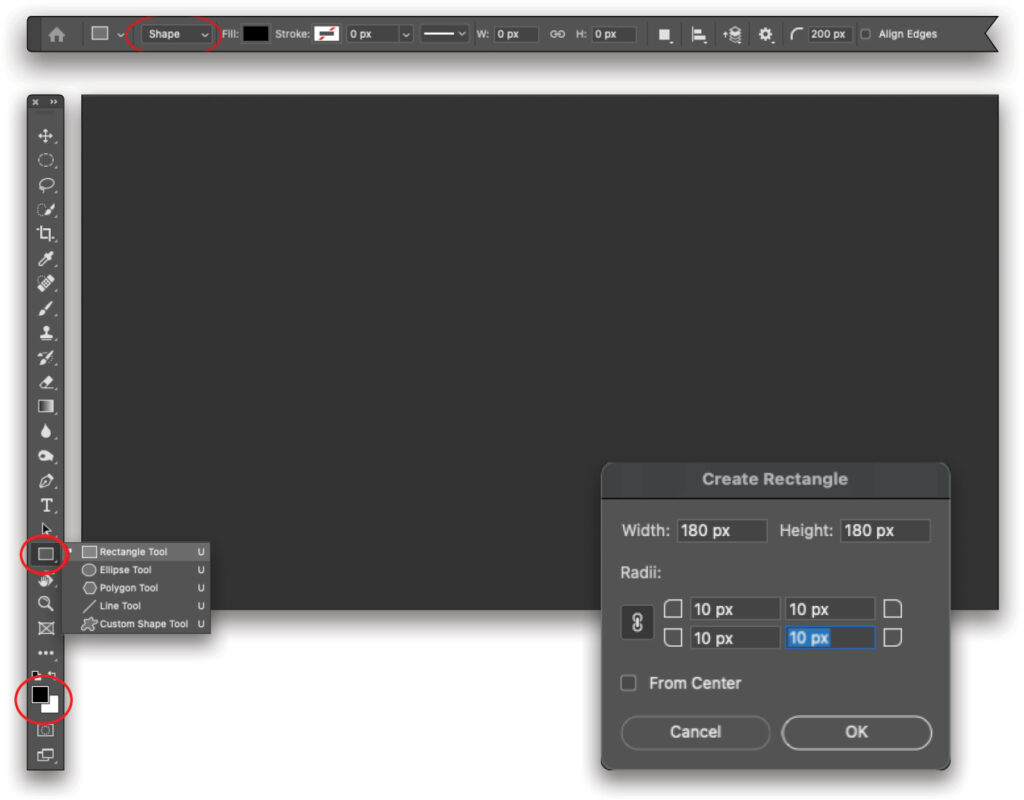
STEP THREE: Press U to grab the Rectangle tool (circled) and then press D on your keyboard to set the color chips at the bottom of the Toolbar (also circled) to the default colors of black and white. In the Options Bar, set the Tool Mode menu to Shape (circled). Single-click atop the document and in the dialog that opens, enter 180 px for both Width and Height, and then enter a Radius of 10 px for all four corners. Click OK.
STEP FOUR: Trot up to the Options Bar and click the Fill preview thumbnail (circled). In the panel that opens, choose Gradient from the row of icons at the top (also circled), which should produce a black-to-white gradient based on the black and white color chips. Double-click the white color stop at the bottom right of the gradient ramp preview (circled) and, in the Color Picker that opens, enter 262626 into the # field for a dark gray. Click OK to close the Color Picker.
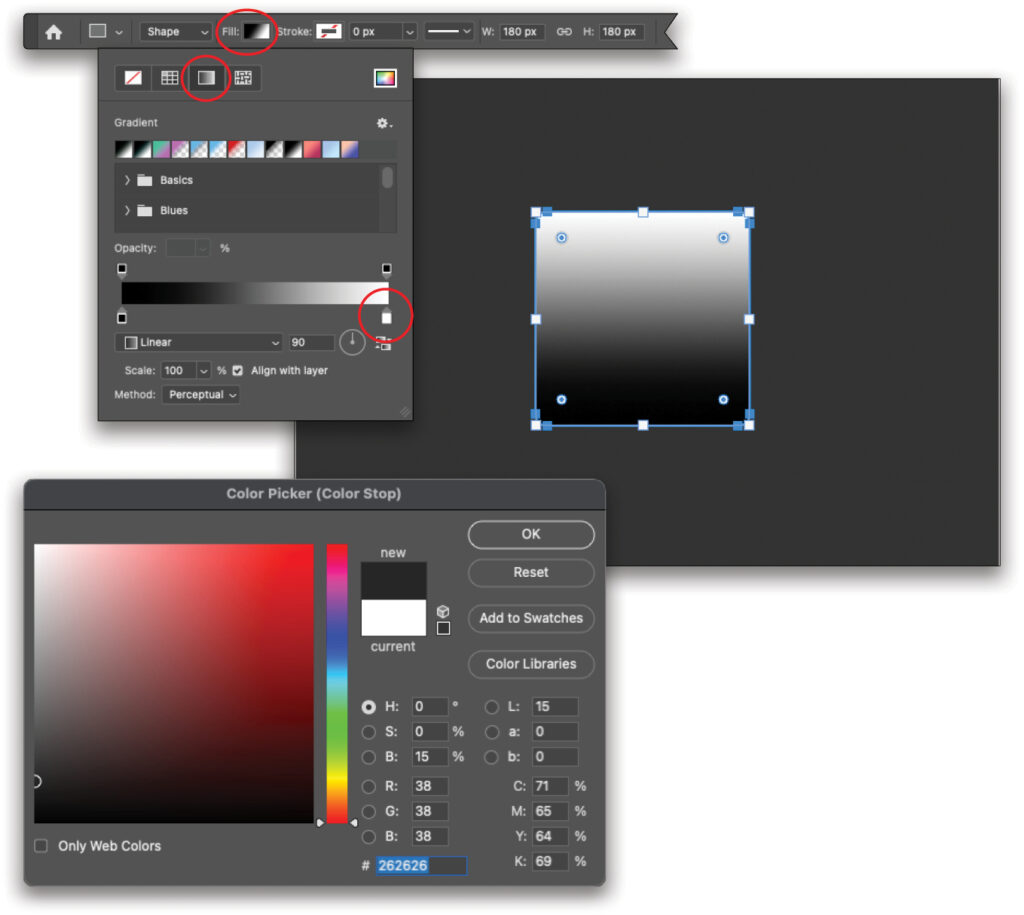
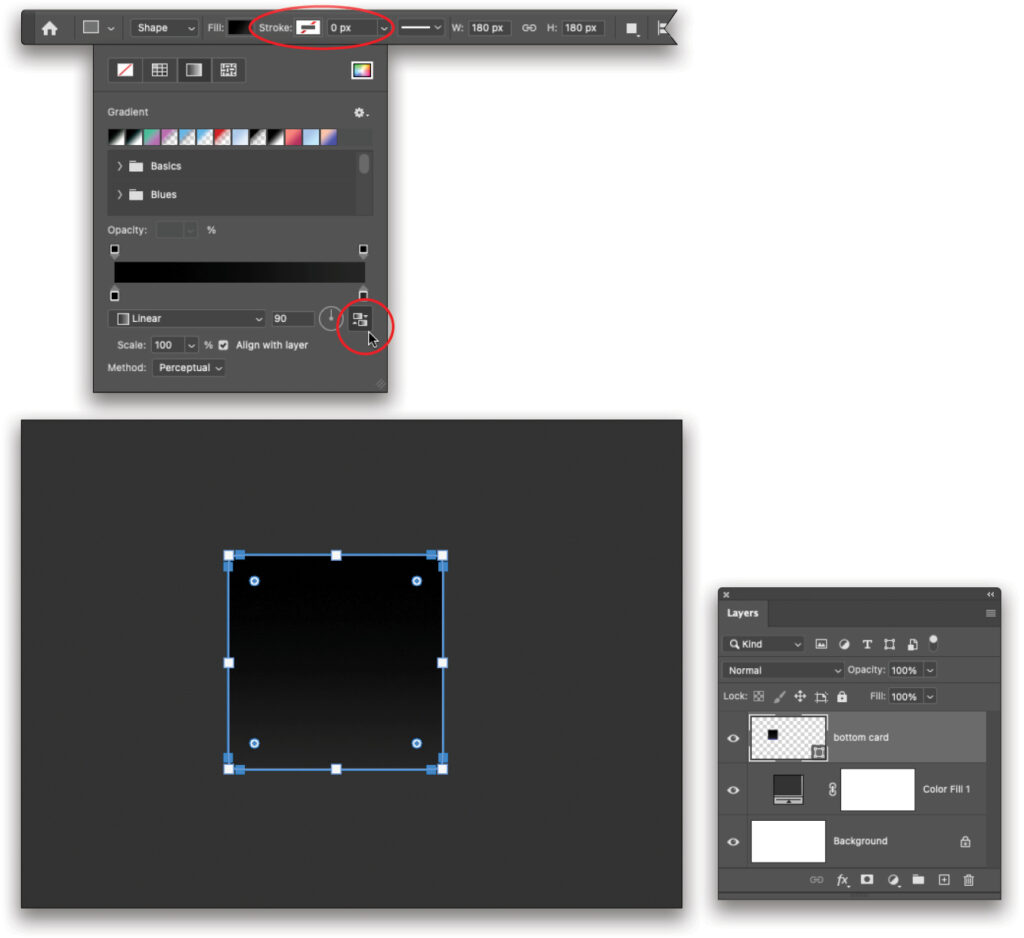
STEP FIVE: Back in the Fill panel, ensure the gradient type is Linear and the angle is 90°. At the bottom right of the Fill panel, turn on the Reverse Gradient Colors icon (circled; it’s darkened when it’s on) so the just-so-slightly lighter gray part of the gradient is at the bottom of the shape. In the Stroke field, enter 0 (also circled). In the Layers panel, double-click the new layer’s name (Rectangle 1) and enter “bottom card.” Press Enter on your keyboard.
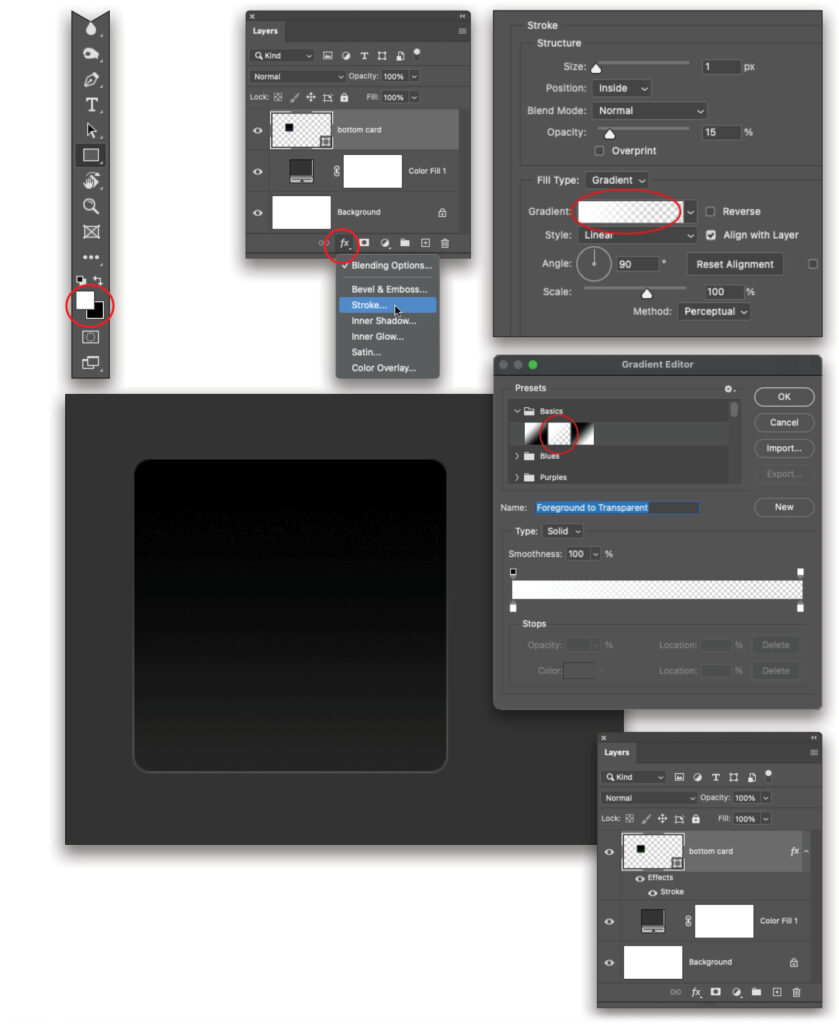
STEP SIX: Press X on your keyboard to flip-flop the color chips at the bottom of the Toolbar so white is on top (circled). Click the ƒx button at the bottom of the Layers panel (also circled) and choose Stroke. In the Layer Style dialog, set the Size to 1, Position to Inside, Blend Mode to Normal, and Opacity to 15%. From the Fill Type menu, choose Gradient. Click the Gradient preview (circled) and, in the Gradient Editor that opens, click the Basics folder and choose the Foreground to Transparent preset (also circled). Click OK to close the Gradient Editor. Back in the Layer Style dialog, set the gradient Style menu to Linear and the Angle to 90°. Click OK. Press V to grab the Move tool to hide the path so you can see the stroke.
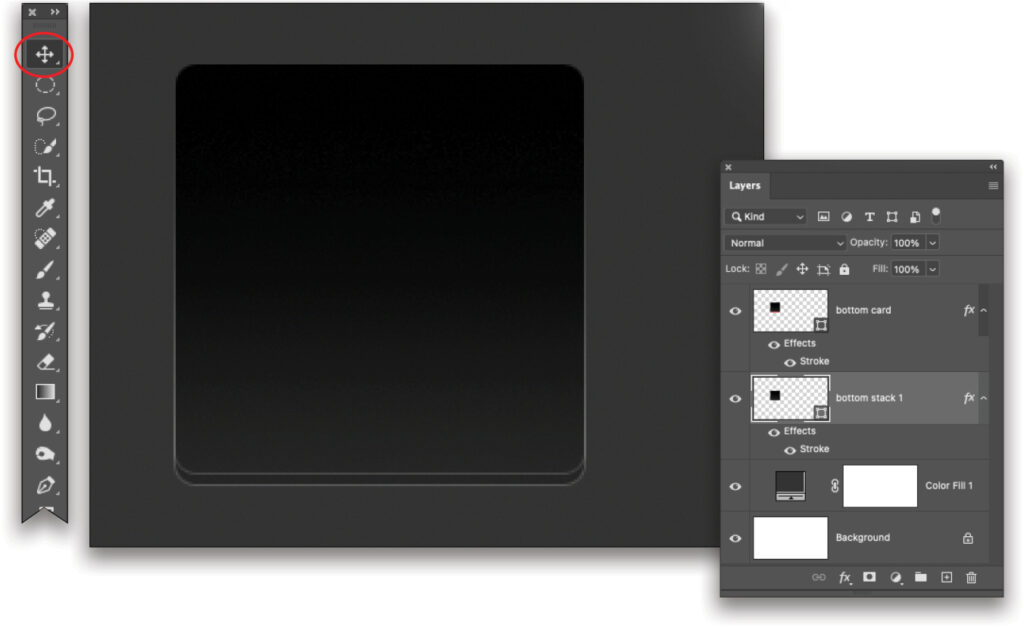
STEP SEVEN: Press Command-J (PC: Ctrl-J) to duplicate the layer. Double-click the new layer’s name (bottom card copy) and enter “bottom stack 1,” then press Enter on your keyboard. In the Layers panel, drag the new layer below the original layer. Now with the Move tool (circled) still active, tap the Down Arrow key on your keyboard five times.
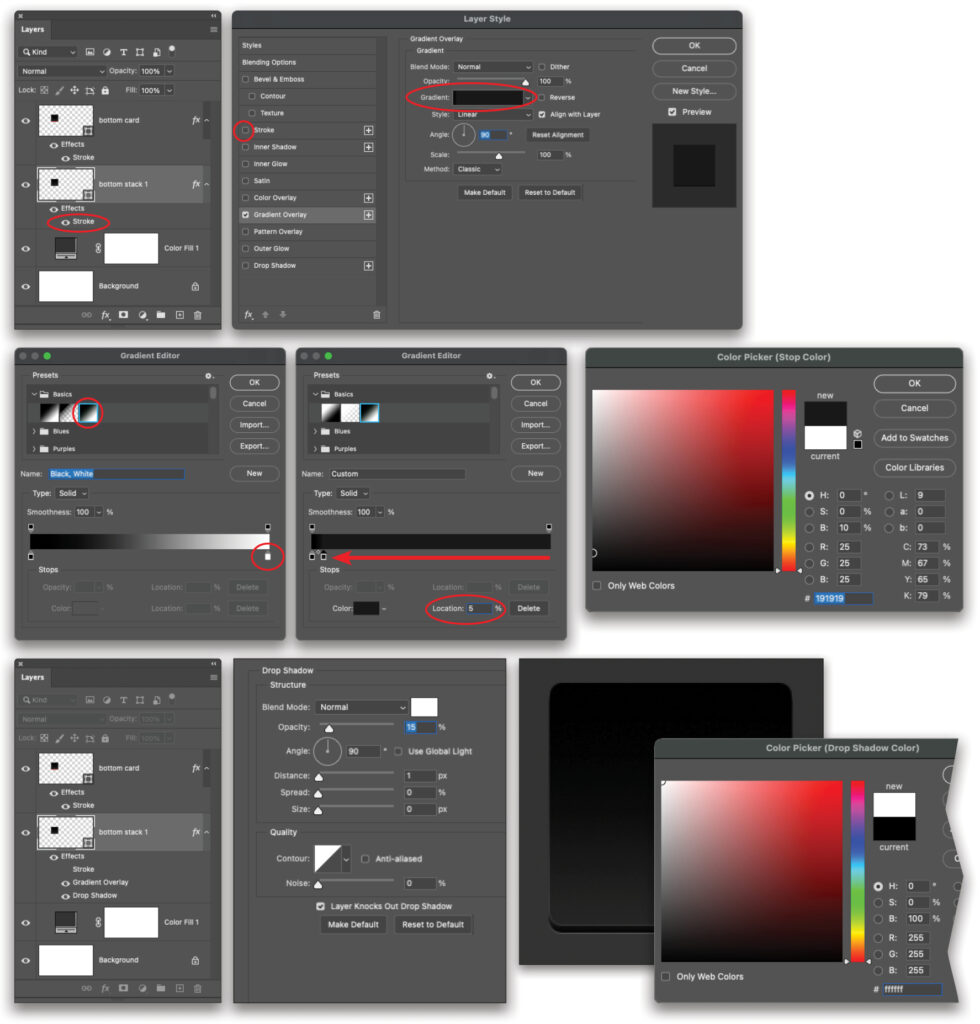
STEP EIGHT: In the Layers panel, double-click the Stroke effect beneath the layer named bottom stack 1 (circled) to open the Layer Style dialog. On the left side of the dialog, turn off the Stroke effect by clicking the checkbox to its left (also circled), and then click the style named Gradient Overlay; be sure to click the style name, not its checkbox, which turns the style on and opens its settings.
Set the Blend Mode to Normal and Opacity to 100%. Click the Gradient preview (circled) and in the Gradient Editor, open the Basics folder and choose the Black, White gradient (also circled). Double-click the white color stop at the bottom right (circled) and in the Color Picker, enter 191919 into the # field and click OK. Back in the Gradient Editor, set the Location field to 5, which moves the color stop almost all the way left. Click OK.
Back in the Layer Style dialog, set the Gradient Style to Linear and the Angle to 90°. On the left side of the dialog, click the style named Drop Shadow. Set the Blend Mode to Normal and click the color swatch on the menu’s right (also circled). In the Color Picker that opens, enter ffffff into the # field, and click OK. Back in the Layer Style dialog, set Opacity to 15%, Angle to 90°, and turn off Use Global Light. Set the Distance to 1 px, Spread to 0%, and Size to 0 px. Click OK.
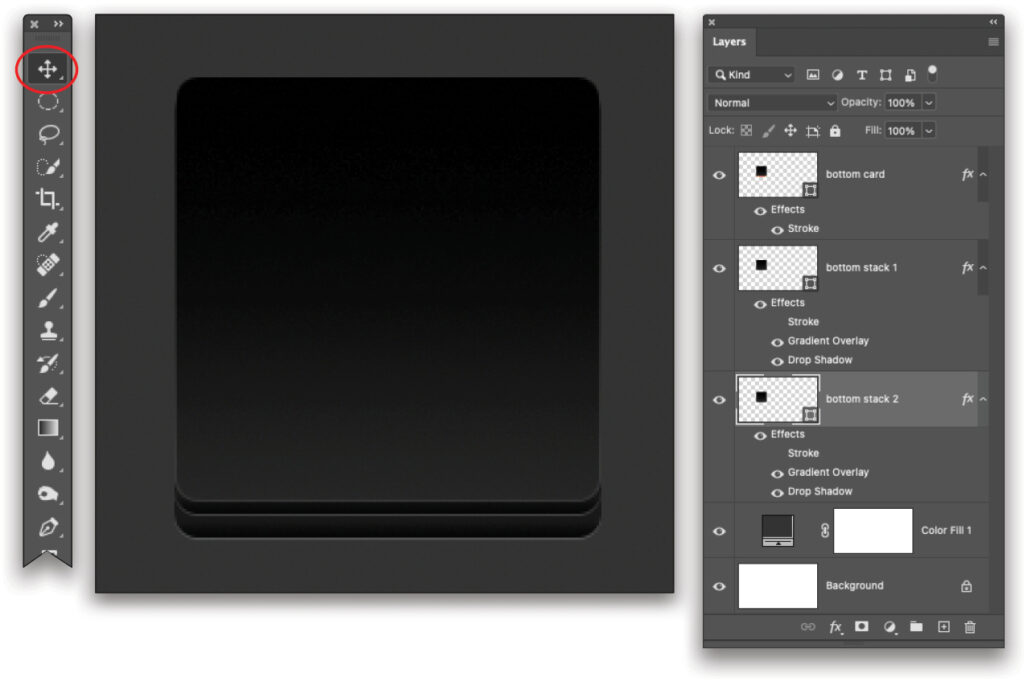
STEP NINE: Press Command-J (PC: Ctrl-J) to duplicate the layer. Double-click the new layer’s name (bottom stack 1 copy) and change it to “bottom stack 2,” then press Enter on your keyboard. In the Layers panel, drag the new layer below the one named bottom stack 1. Press V to grab the Move tool (circled) and then tap the Down Arrow key on your keyboard 10 times.
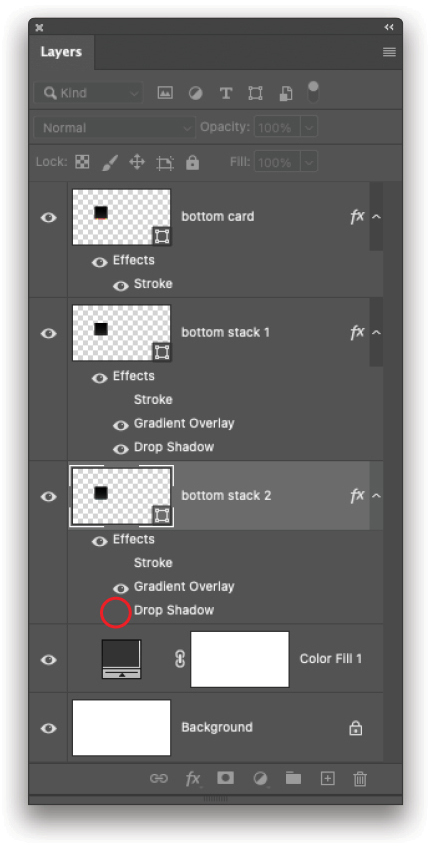
STEP 10: In the Layers panel, turn off the visibility icon for the Drop Shadow (circled) beneath the layer named bottom stack 2.
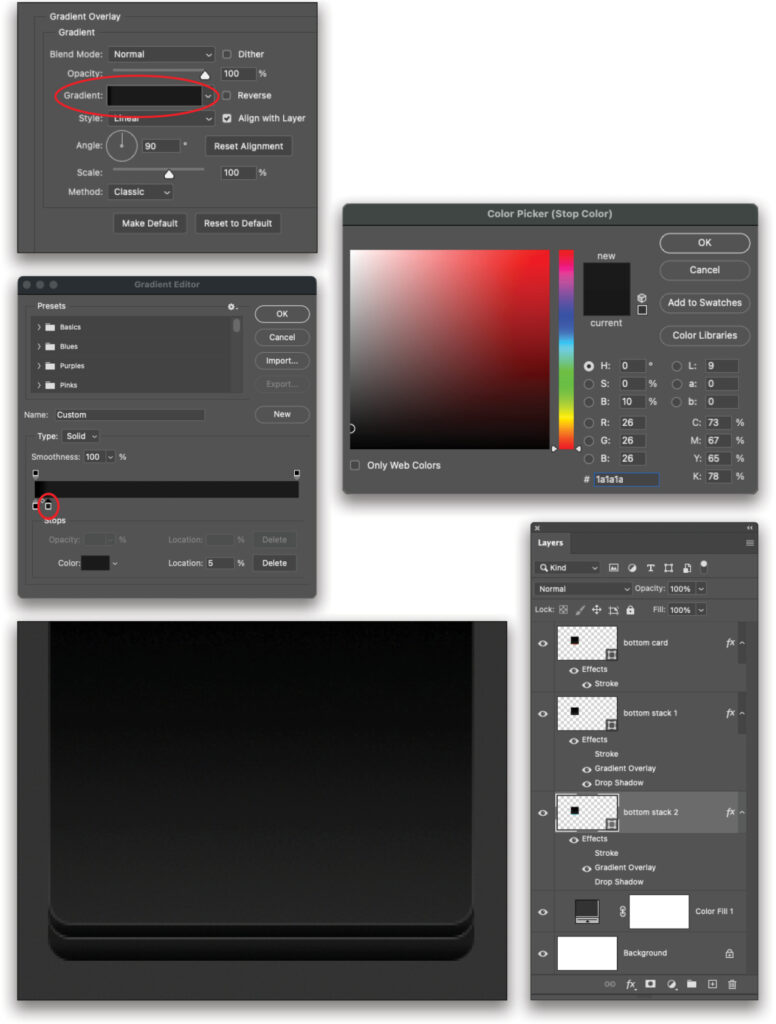
Double-click the Gradient Overlay effect above it to open the Layer Style dialog. Click the Gradient preview (also circled) and in the Gradient Editor, double-click the second color stop at the bottom (circled) and in the Color Picker, enter 1a1a1a into the # field and click OK. Back in the Gradient Editor, click OK to close it, and then click OK again to close the Layer Style dialog. Now the card stack effect at the bottom of the timer is coming to life!
STEP 11: Press Command-J (PC: Ctrl-J) to duplicate the layer. Double-click the new layer’s name (bottom stack 2 copy) and change it to “stack shadow,” then press Enter on your keyboard. In the Layers panel, drag the new layer below the layer named bottom stack 2.
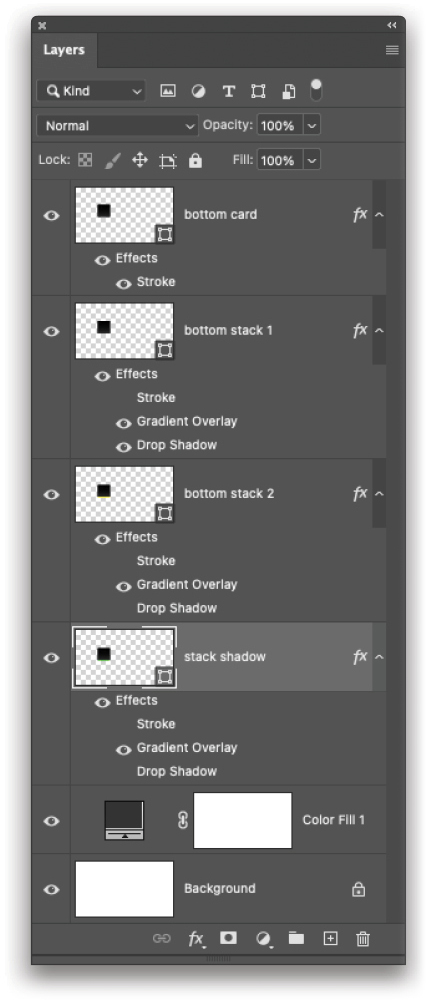
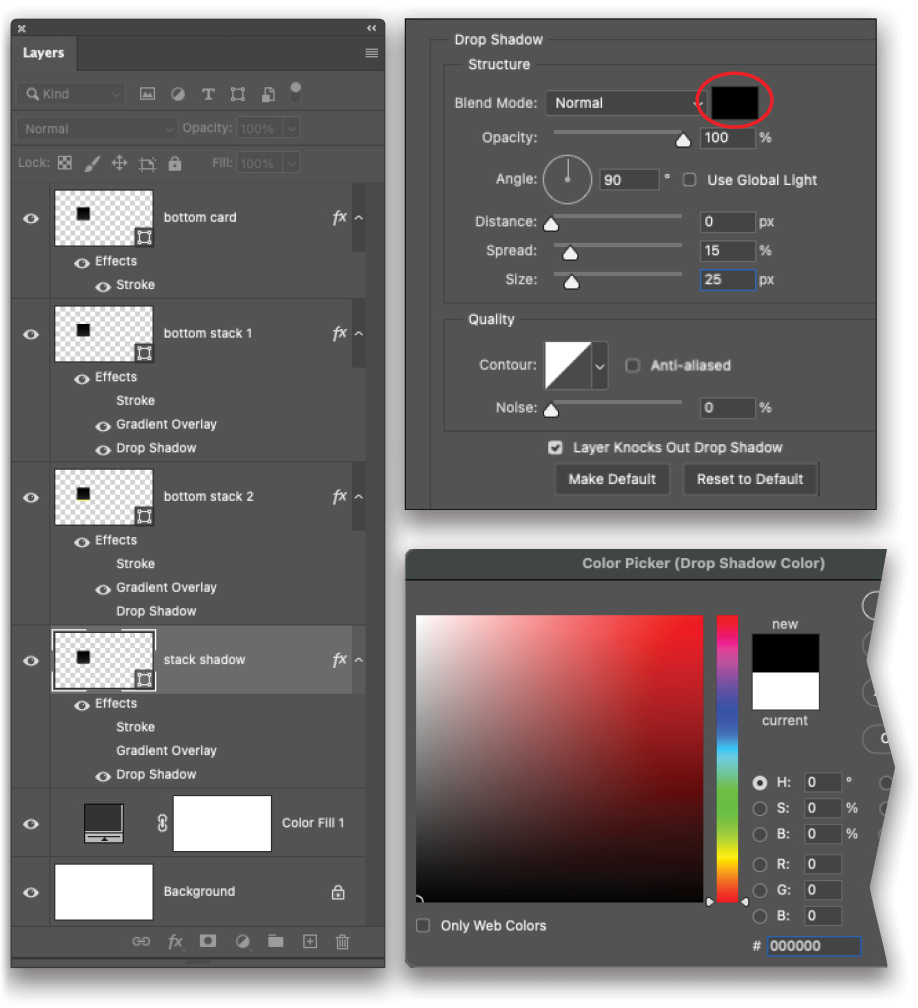
STEP 12: In the Layers panel, turn off the visibility icon for the Gradient Overlay on the layer named stack shadow, and turn on the visibility icon for the Drop Shadow. Now double-click the Drop Shadow effect to open the Layer Style dialog. Click the color swatch on the right of the Blend Mode menu (circled) and in the Color Picker that opens, enter 000000 into the # field, and click OK. Back in the Layer Style dialog, set Opacity to 100%, Distance to 0 px, Spread to 15%, and Size to 25 px. Click OK.
STEP 13: Now let’s change the perspective of the shadow so it’s narrower at the top, as it would be with a real flip-card timer. With the stack shadow layer active, choose Edit>Transform>Perspective, and a bounding box appears around the shape. Drag the top-right handle leftward to around 3.6°. Press Enter to accept the change.
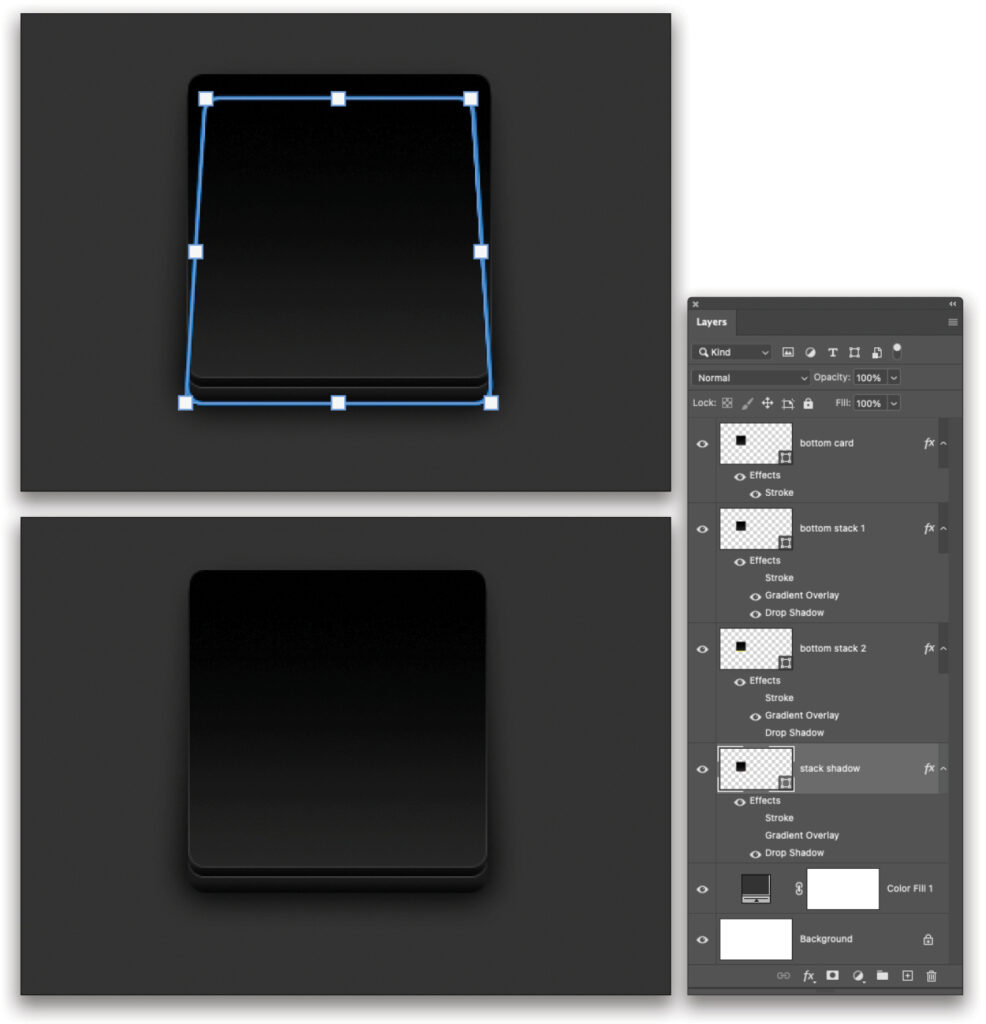
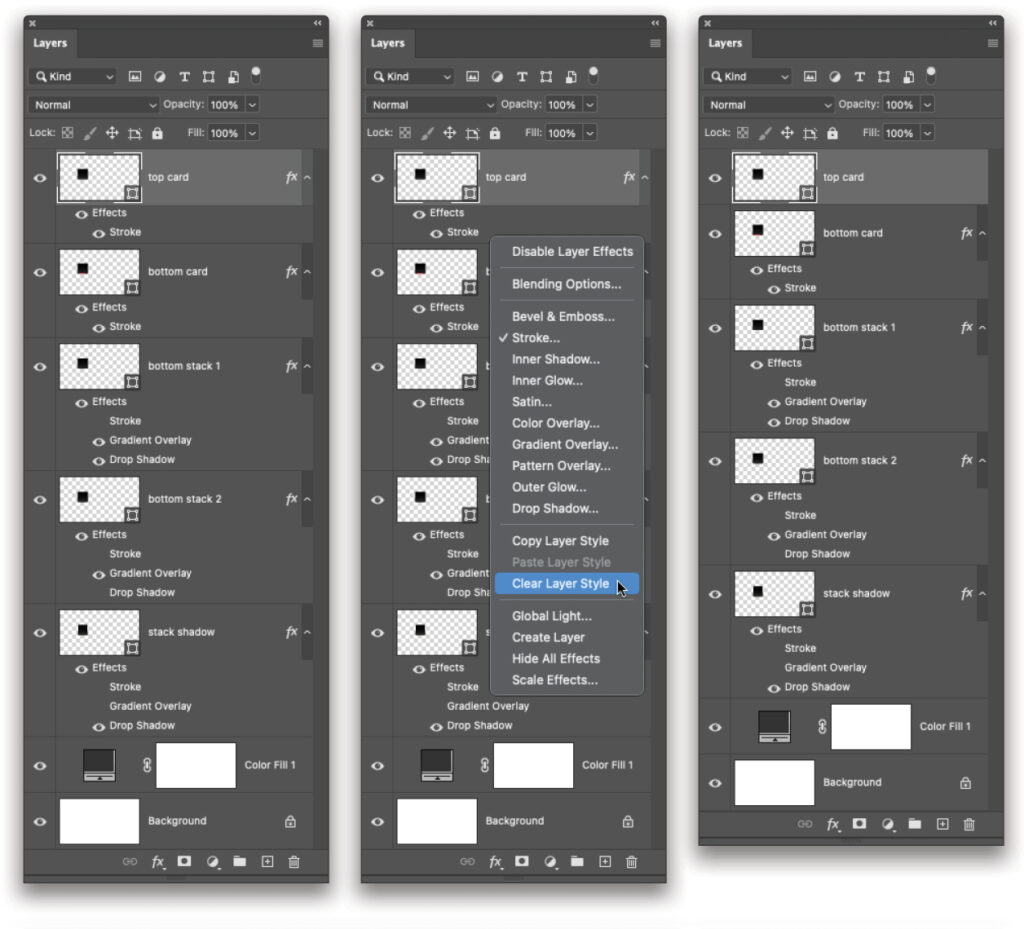
STEP 14: In the Layers panel, activate the layer named bottom card and press Command-J (PC: Ctrl-J) to duplicate it. Double-click the new layer’s name (bottom card copy) and change it to “top card,” then press Enter. Right-click near the layer style named Stroke and choose Clear Layer Style.
STEP 15: Press Command-T (PC: Ctrl-T) to summon Free Transform. Hold the Shift key, and drag the bottom-center handle upward until the height is 90 px (a little pop-up next to the cursor displays the height as you drag). Press Enter. In the Layers panel, lower the Opacity to 40% (circled). Notice the fold that’s appeared between the top and bottom cards.
STEP 16: Now let’s add a connecting bracket to each side of the cards. Press T to grab the Type tool (circled) and in the Options Bar, set the font to Arial, style to Bold, and the size to 14 pt. Click the color swatch (also circled) and in the Color Picker, enter ffffff into the # field for white. Click OK. Click atop the document (below the path of the top card layer) and type a Right Bracket (]). Mouse away from the bracket and when the cursor turns into an arrow, drag to position the bracket on the left side of the cards, centered over the fold. Press Enter, and in the Layers panel, lower the Opacity to 40% (circled).

STEP 17: Press Command-J (PC: Ctrl-J) to duplicate the layer. Choose Edit>Transform>Flip Horizontal. Press V to grab the Move tool and then Shift-drag it to the right edge of the cards.

STEP 18: Press T to grab the Type tool, click atop the card stack, and enter a two digit number. Double-click the layer thumbnail of the new type layer to highlight the text, and choose Window>Character. In the Character panel, set the size to 124 pt (circled). Tab over to the Tracking field and enter –25 (also circled), so the numbers are closer together. Click the Color swatch (circled) and in the Color Picker that opens, enter b2b2b2 into the # field. Click OK. Now mouse over near the number and when the cursor turns into an arrow, drag to center the number atop the cards. (You can click the layer thumbnail of the type layer again to get rid of the white text highlighting.)
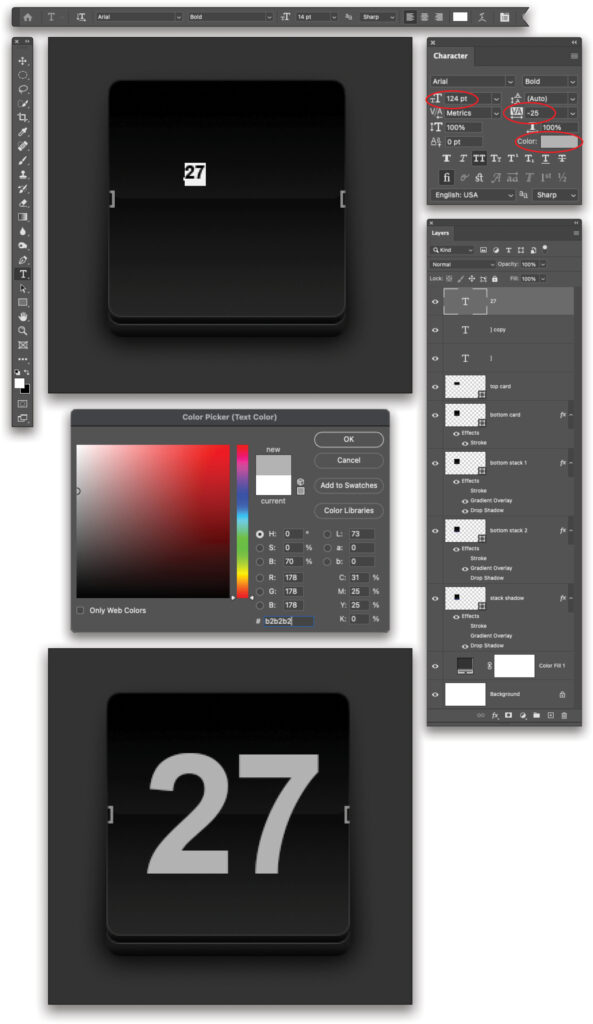
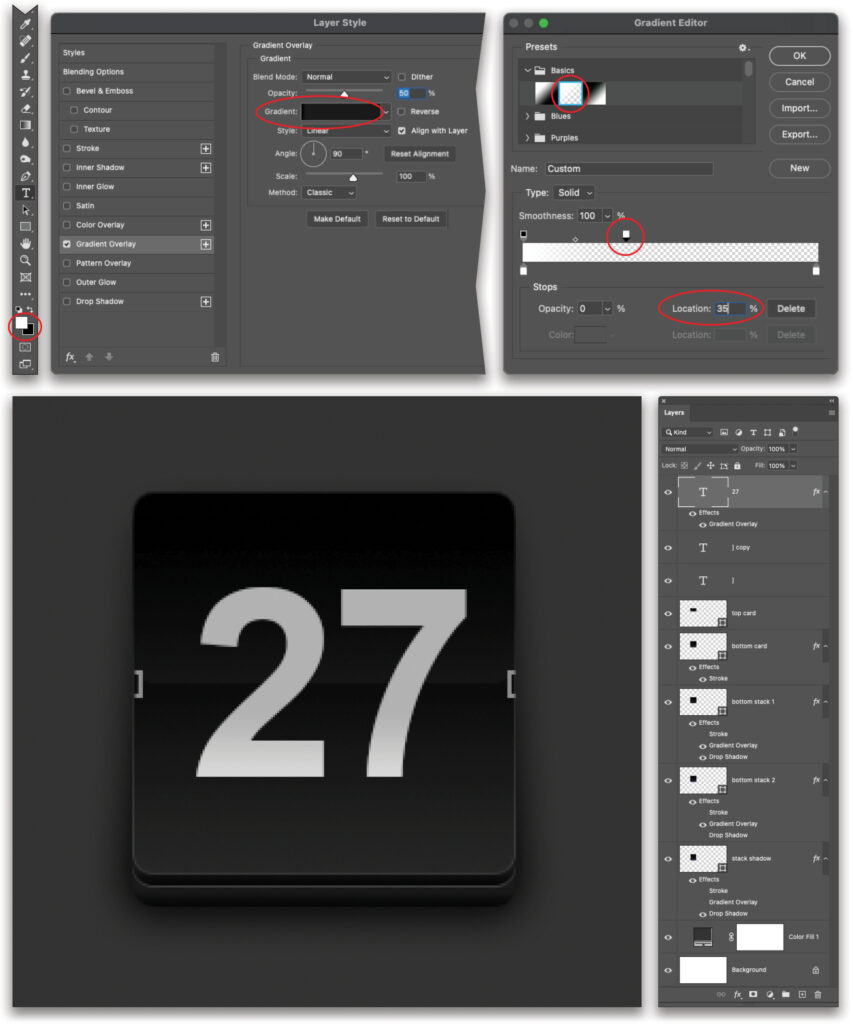
STEP 19: Now let’s add a gradient overlay to the number. Look at the color chips at the bottom of the Toolbar (circled) and make sure white is on top (if it isn’t, press X to flip-flop them). Click the ƒx icon at the bottom of the Layers panel and choose Gradient Overlay. In the Layer Style dialog, set the Blend Mode to Normal and Opacity to 50%. Click the Gradient preview (also circled) and in the Gradient Editor, open the Basics folder and choose the Foreground to Transparent gradient (circled). Click to select the top right opacity stop (also circled) and set the Location field to 35 (circled). Click OK to close both dialogs.
STEP 20: In the Layers panel, Option-drag (PC: Alt-drag) the layer named top card to the top of your layer stack, which creates a copy of it. Click the ƒx icon at the bottom of the Layers panel and choose Gradient Overlay. Set the Blend Mode to Overlay, Opacity to 40%, and then click the Gradient preview. In the Basics folder, choose Foreground to Transparent and click OK.
Back in the Layer Style dialog, click the style named Drop Shadow (remember to click on the style name itself) and set the Blend Mode to Normal, Opacity to 35%, Angle to 90°, and turn off Use Global Light. Set the Distance to 0 px, Spread to 0%, and Size to 5 px.
On the left of the Layer Style dialog, click Blending Options (circled). Set the Opacity to 100% (which brings the layer Opacity back up to 100%) and then set the Fill Opacity to 5% (which drops the opacity of the shape fill only). Click OK.
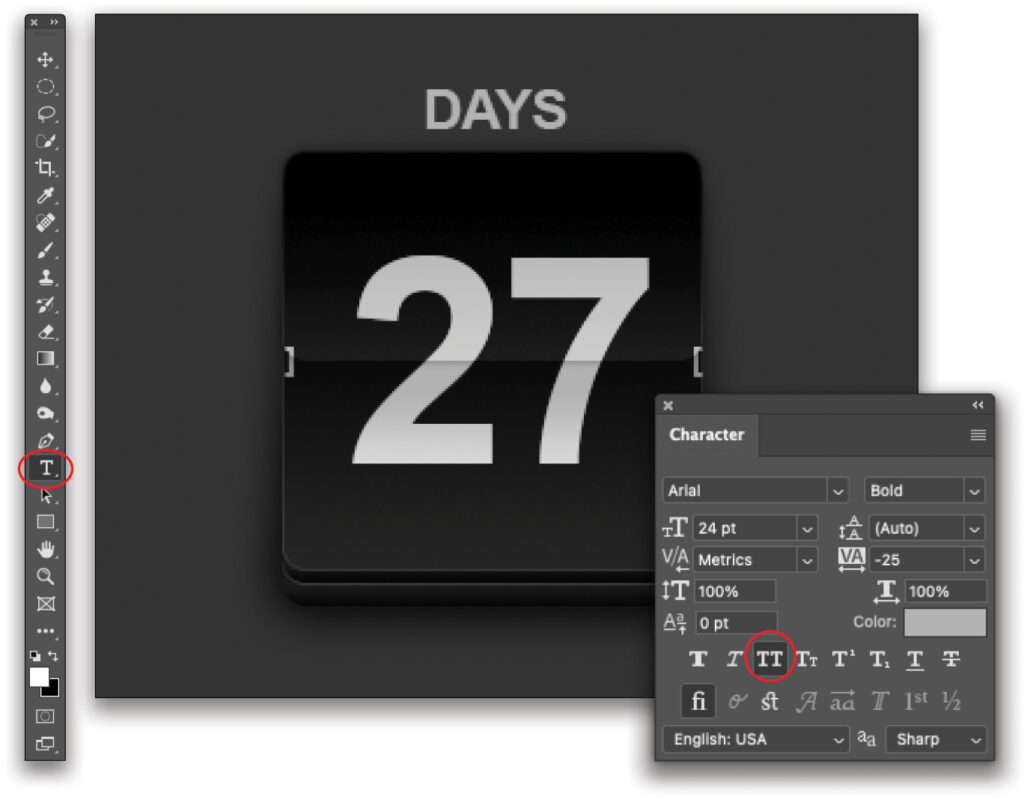
STEP 21: Press T to grab the Type tool (circled), click above the card stack and enter the word “days” (it’ll be too big, but that’s okay). Double-click the layer thumbnail of the new type layer to highlight the text, and in the Character panel, set the size to 24 pt and press Tab to commit that change, and then turn on the All Caps button (circled). Mouse over near the number and when the cursor turns into an arrow, drag to center the word above the cards. (Click the layer thumbnail of the type layer again to get rid of the white text highlighting.)
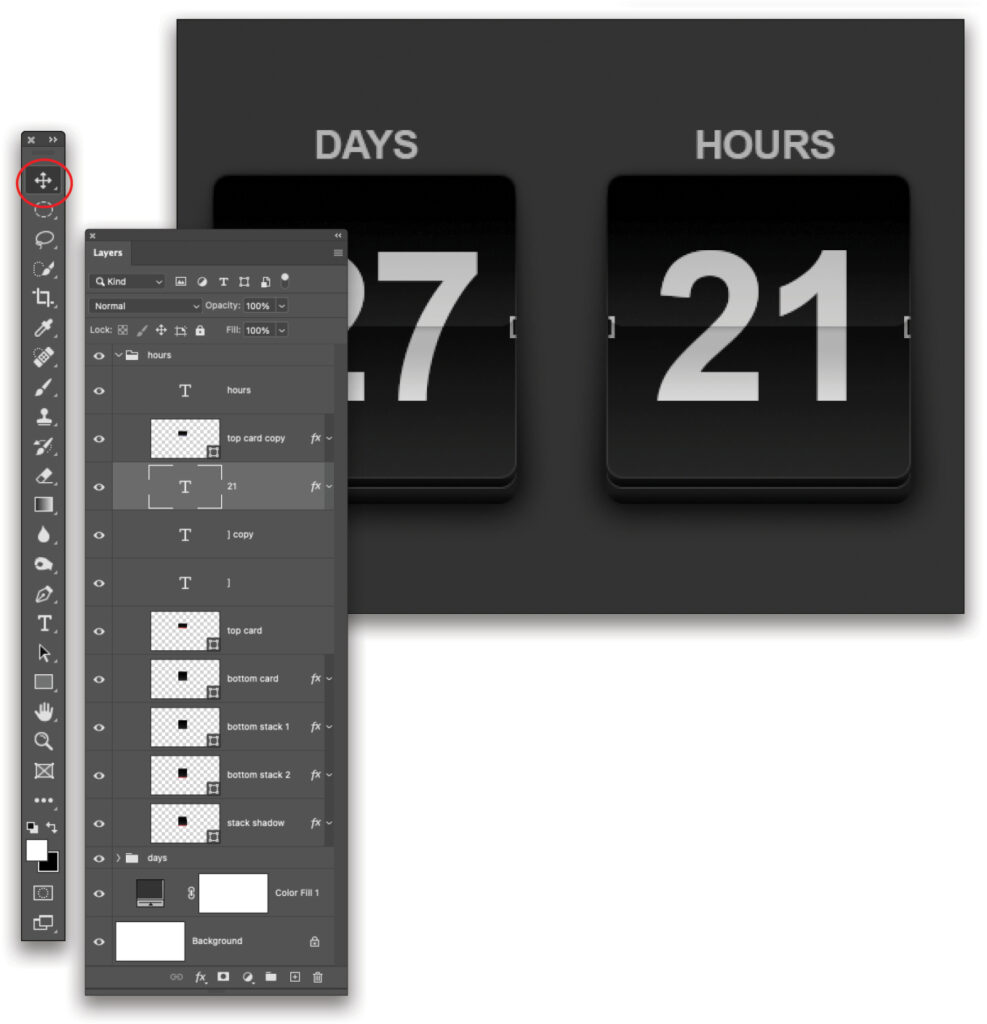
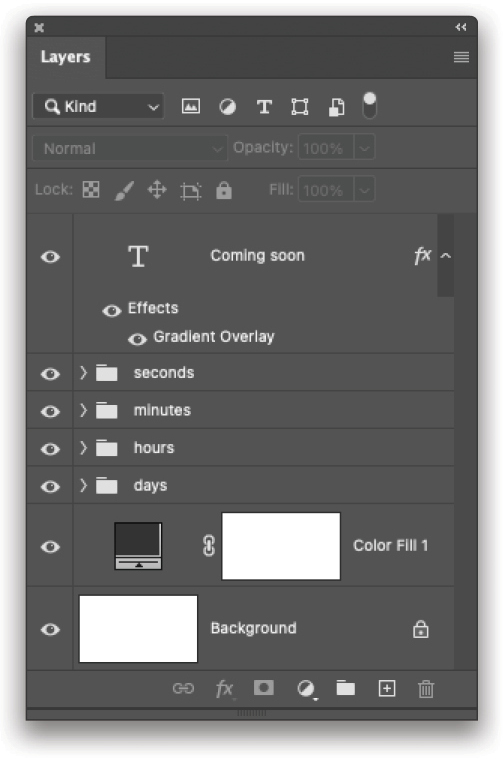
STEP 22: With one countdown timer complete, you can duplicate it (thank goodness!). To do that, click to activate the layer named days at the top of your layer stack, then Shift-click the layer named stack shadow, to activate all the layers in between. Click the folder icon at the bottom of the Layers panel to group them. Double-click the group name (Group 1) and rename it “days.” Press Command-J (PC: Ctrl-J) to duplicate the group, rename the group to “hours,” grab the Move tool (circled) and Shift-drag it rightward. Now expand the group, change days to hours, and change the timer number.
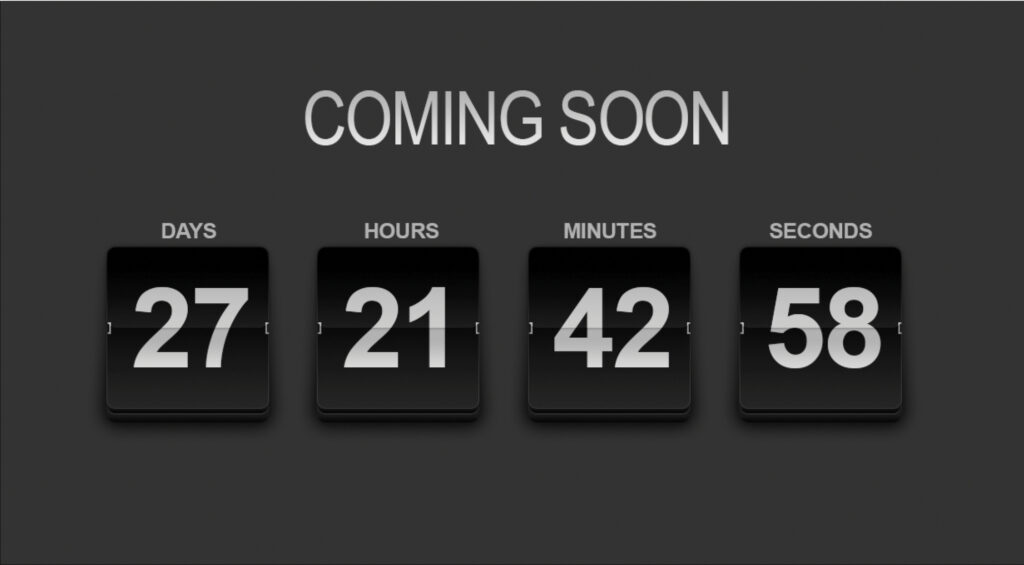
Here’s the final effect after creating a few more timers and adding a title:
Congratulations on sticking with it! Be sure to save the document in Photoshop format so you can open it and edit your countdown timer later on. Until next time, may the creative force be with you all.
This article originally published in the February, 2023 issue of Photoshop User magazine.
About Photoshop User and KelbyOne
Photoshop User magazine comes out digitally 12 times a year and is part of KelbyOne, the leading educational resource for Photoshop, Lightroom, and photography. Pro members have access to more than 900 video courses and 100 back issues of Photoshop User. To learn more about KelbyOne, click here.


