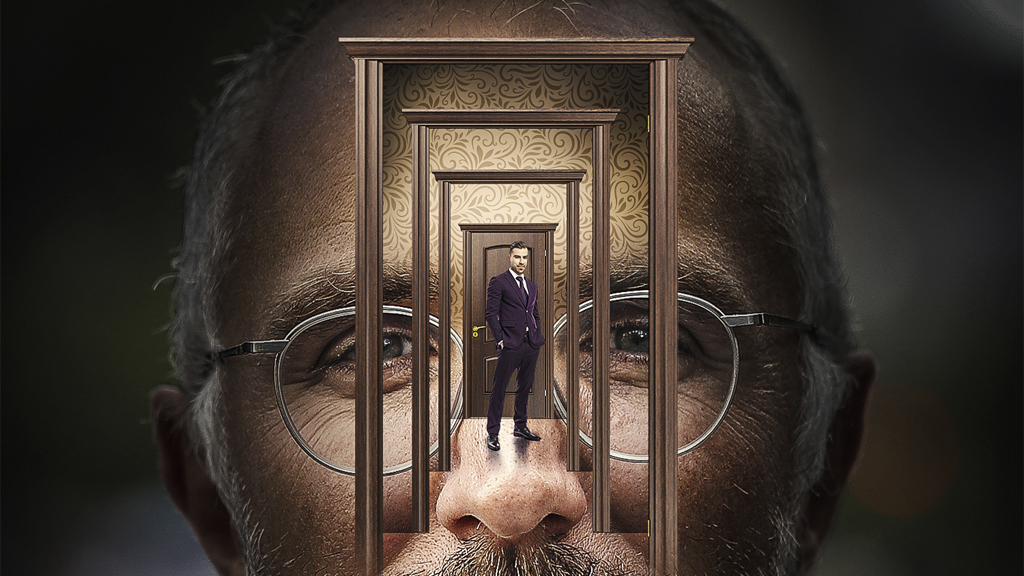
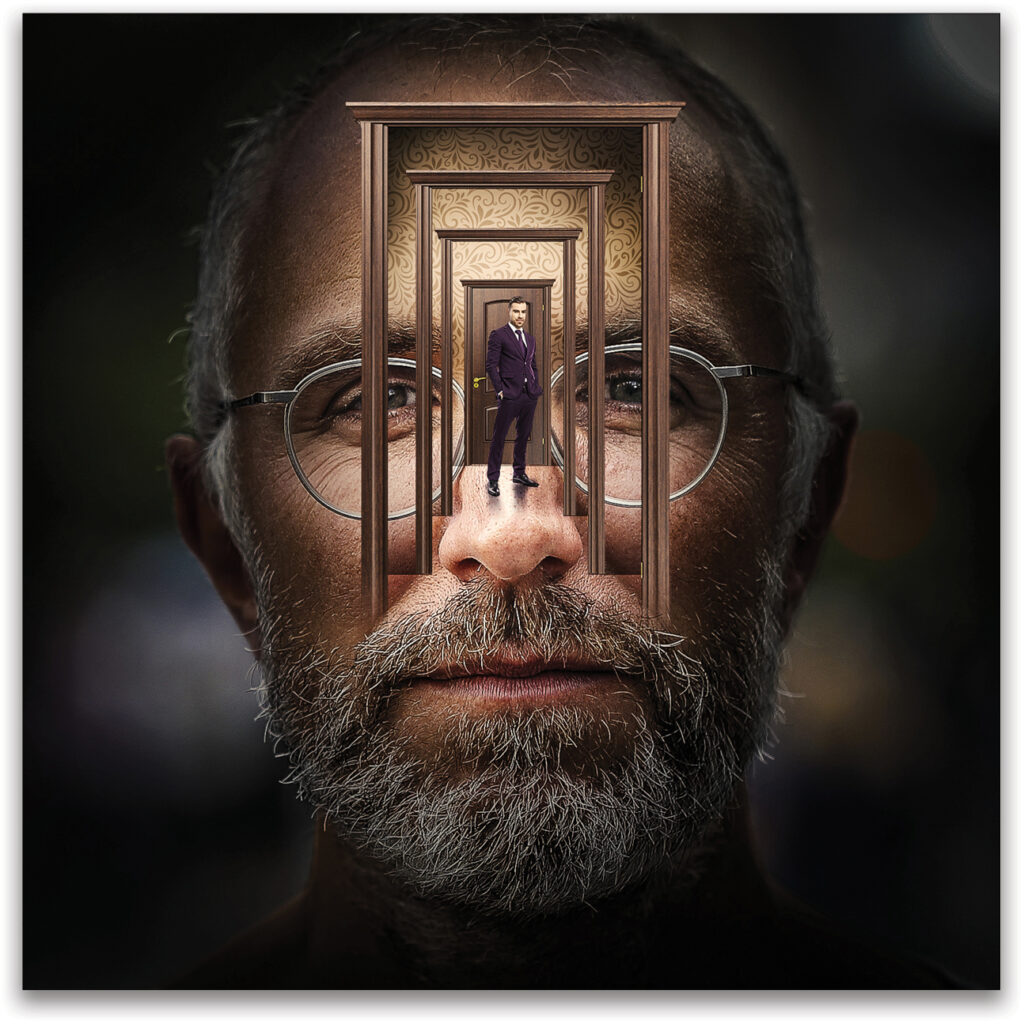
The new FX series, The Patient, attempts to dig deep into the mind of a compulsive killer and his kidnapped therapist. As the series progresses, layer upon layer of mental and emotional anguish is revealed. Despite the grim but compelling concept, we thought the promotional material featuring a visual representation of getting into someone’s head was a fun idea for a project!
Our project includes several steps that make good use of some clever masking tricks and Photoshop know-how to craft a mental landscape of enveloping doorways. The project does use some stock images from Adobe stock, but it’s possible to use the lower-resolution free versions to learn the techniques.
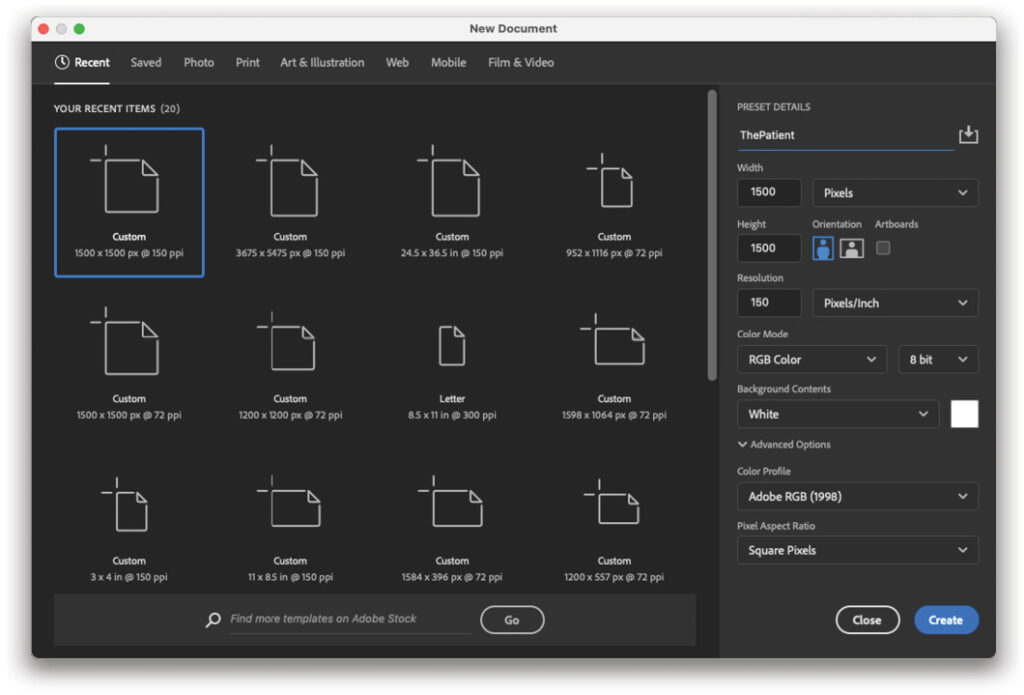
STEP ONE: In Photoshop, create a new document (File>New) and set both the Width and Height to 1500 pixels, and the Resolution to 150 ppi. After creating the document, go to File>Place Embedded and select a stock image of an aging bearded man with spectacles.
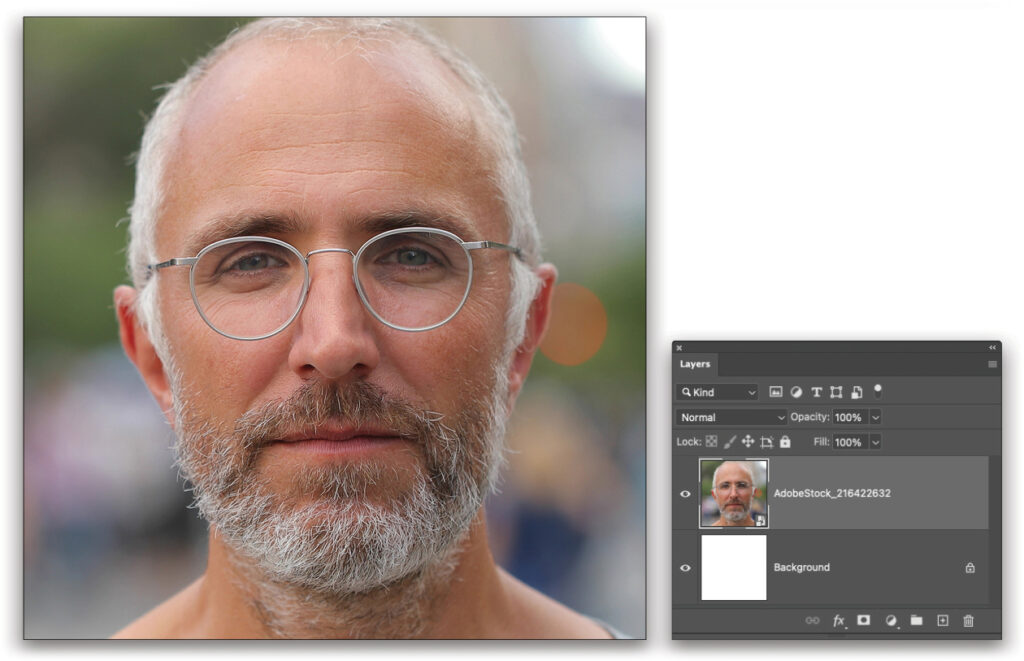
If you’d like to download the low-res watermarked version of this image to follow along, click this link, log in with your Adobe ID, and click the Save to Library button. Drag the image from the Libraries panel (Window>Libraries) into the new document.
Scale and position the image so the man’s face fills the frame at the center. Press Enter to commit the image.
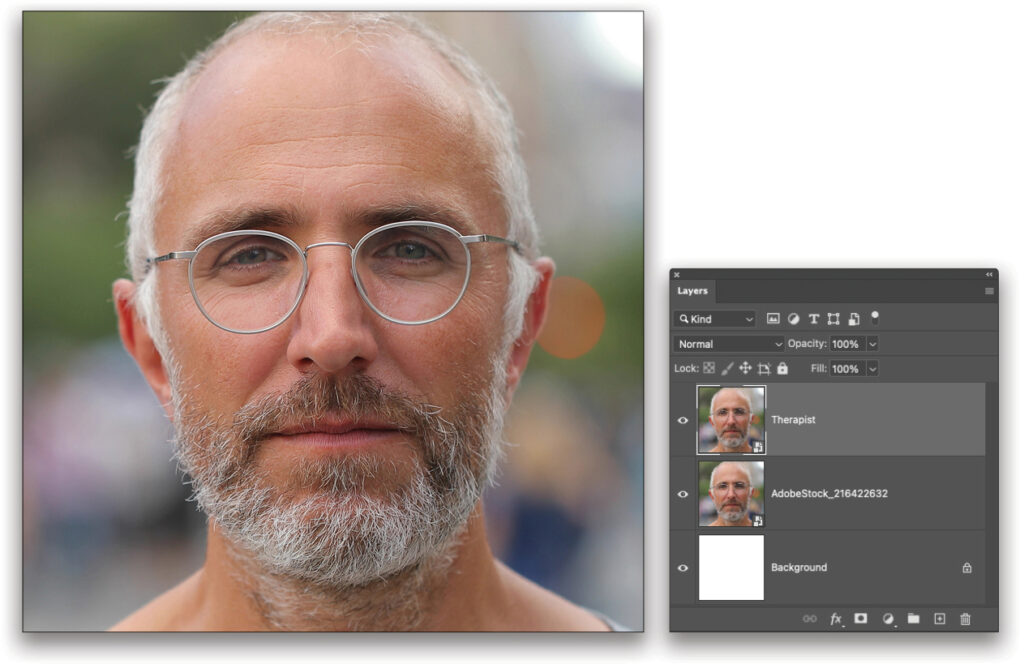
STEP TWO: The stock image extends well beyond the canvas bounds and can cause unexpected results in the Camera Raw Filter that we’re about to use. To mitigate this, use Select>All and then Command-J (PC: Ctrl-J) to copy the selected pixels to a new layer. Double-click the name of the new layer in the Layers panel and rename it “Therapist.” Go to Filter>Convert for Smart Filters to convert this to a smart object.
STEP THREE: Go to Filter>Camera Raw Filter and, in the Basic tab, set the Exposure to –1.85 and the Clarity to +60. In the Detail tab increase the Sharpening to 55. Then in the Effects tab, set the Vignetting to –50 to substantially darken the edges.
Click on the Masking icon (gray circle with dotted outline) on the right, select Radial Gradient, and draw a gradient that encompasses most of his face. Set the Exposure to +2.25, Contrast to –1, Highlights to +56, and Clarity to +37. Click OK.

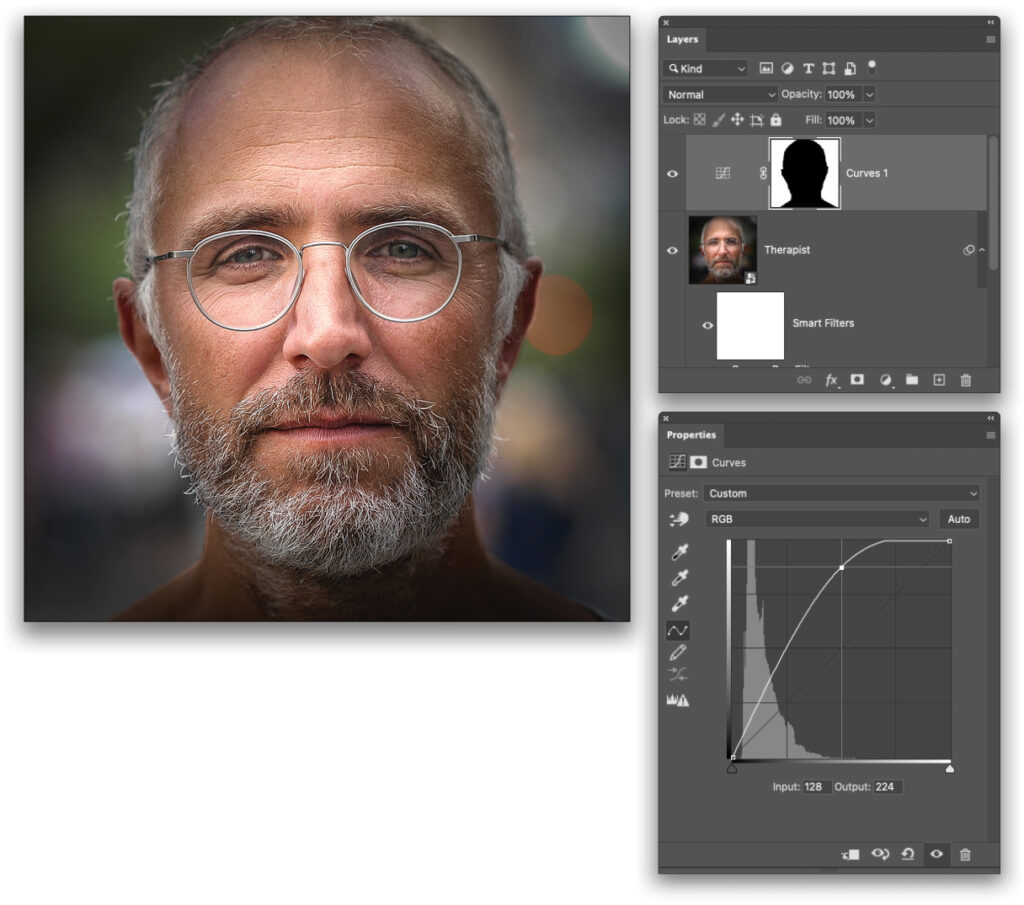
STEP FOUR: After applying the Camera Raw Filter go to Select>Subject to let Photoshop create a selection around the man’s head. Then go to Select>Inverse to select the background and not the subject. Add a Curves adjustment layer (Layer>New Adjustment Layer>Curves) and Photoshop automatically uses the selection as a mask on the adjustment layer. Add a central point to the curve in the Properties panel (Window>Properties) and pull it up about one and a half grid spaces to brighten the background and give a near-silhouette effect to the subject.
STEP FIVE: Open the stock image of the door. You can find it on Adobe Stock by clicking here. Once it’s saved to your Libraries panel, double-click it to open it in Photoshop. Use Select>Subject to select the door and frame. Click the Add Layer Mask icon (circle in a square) at the bottom of the Layers panel to create a mask from the selection. Use the Crop tool (C) to crop the top and bottom of the image so the top and bottom of the door are at the edges of the document.
Then add a new layer beneath the door layer and grab the Gradient tool (G). In the Options Bar, select the Linear Gradient icon, click on the gradient preview thumbnail to open the Gradient Editor, choose the Foreground to Transparent preset in the Basics set, and click OK. Press D to set the Foreground color to its default of black and drag a slight gradient up from the bottom of the frame to give a faint indication of the bottom edge of the adjoining wall. Lower the Opacity of this layer to 60%. Then save this file as “DoorFrame
.psd” and close the file.

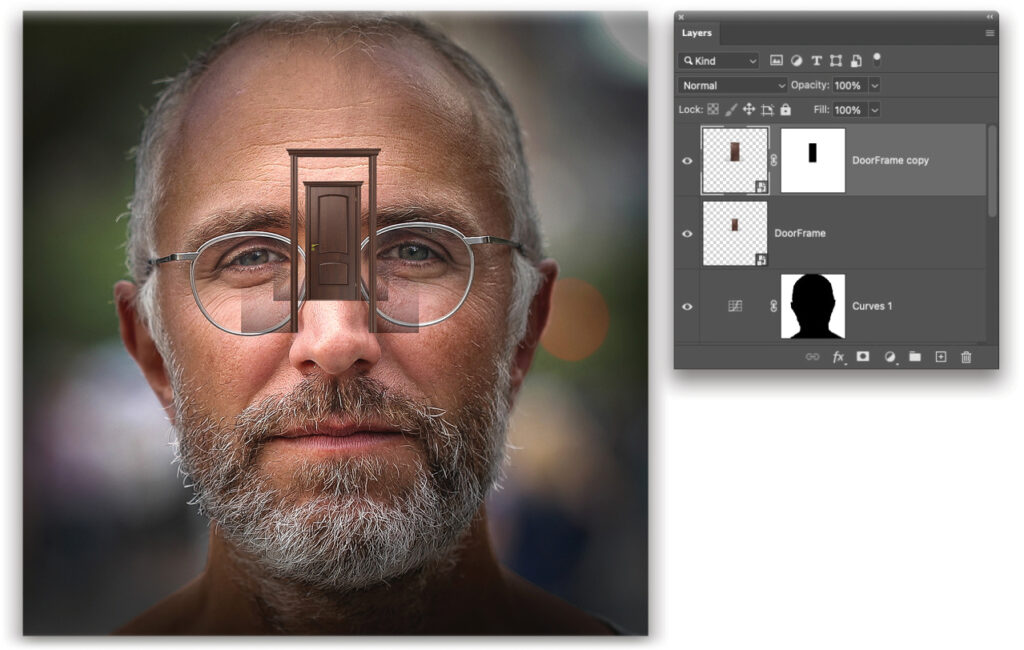
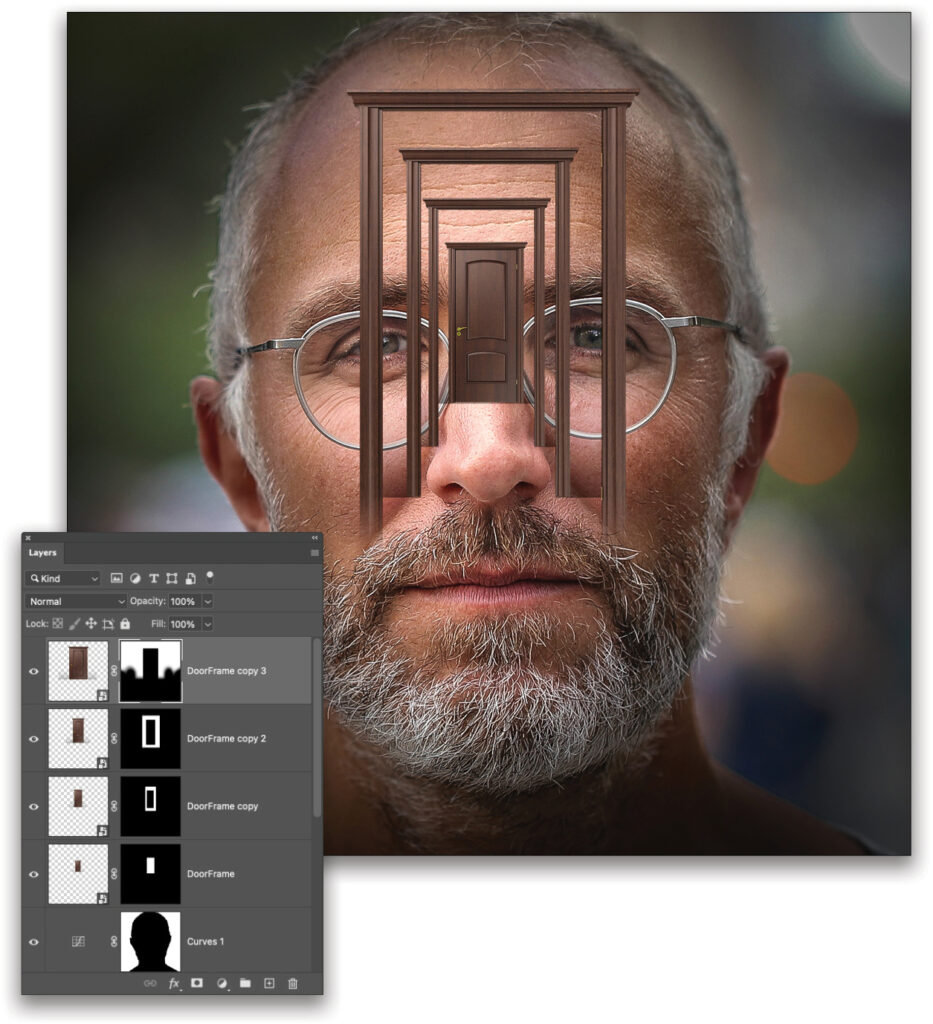
STEP SIX: In the main working file, go to File>Place Embedded, navigate to the DoorFrame.psd file, and click Place. Scale it down to fit just between the man’s eyes. Press Enter to commit the image This will serve as the basis to begin building the illusion of several enveloped doorways.

STEP SEVEN: Press Command-J (PC: Ctrl-J) to duplicate the doorframe layer. Then press Command-T (PC: Ctrl-T) to get the Free Transform handles and scale this copy up until it touches the inside edges of the man’s eyes (holding down the Option [PC: Alt] key will make the layer scale from the center point). Press Enter.
Then use the Rectangular Marquee tool (M) to select the actual door within the doorframe (while drawing the selection, you can click-and-hold the Spacebar to reposition it.) Hold down the Option (PC: Alt) key and click the Add Layer Mask icon to mask out the selected area.
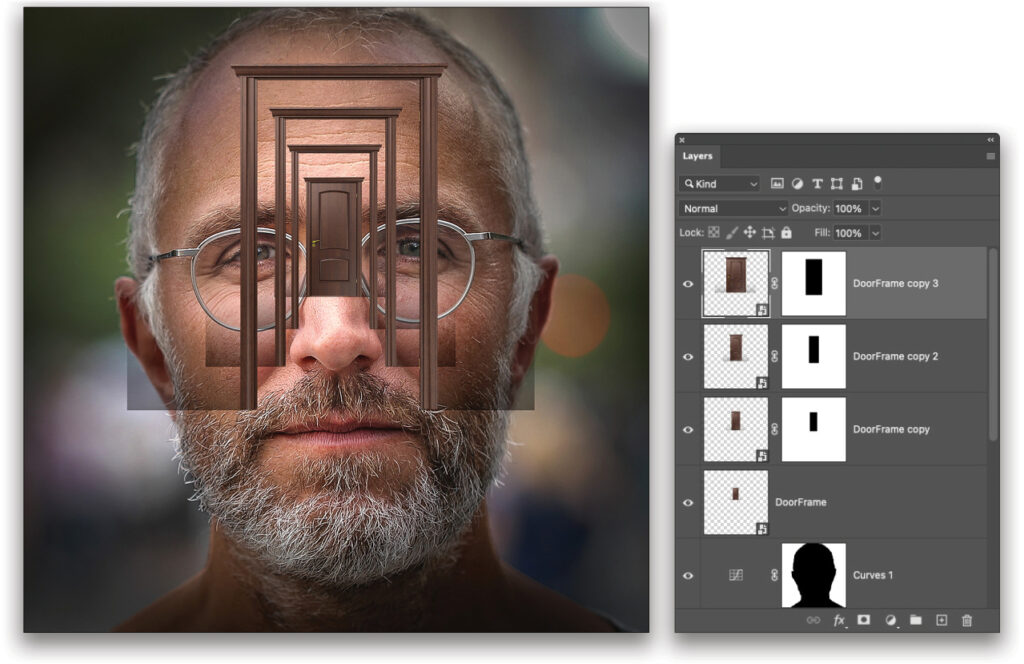
STEP EIGHT: Make two duplicates of the masked DoorFrame copy layer and scale each of them up to continue the door-within-a-door illusion. The spacing between each subsequent doorframe should also increase as the doorway size increases. Just be careful not to obscure the pupils of the therapist.
STEP NINE: Currently, the gradient shading at the bottom of each doorway is visible outside the doorframe that should be in front of it. To correct this, use the Rectangular Marquee tool and select the inside area of the largest doorframe. Then, go to Select>Inverse to select the area around the doorframe. Click on the layer mask thumbnail for the next smallest door in the Layers panel, which should be the DoorFrame copy 2 layer. Press D then X to set black as the Foreground color, hold Option (PC: Alt), and tap Delete (PC: Backspace) to fill the selection with black, thereby hiding the gradient effect of the next smaller door that was sticking out beyond the largest door. Repeat this process for the next largest door.
After you make your selection of the third and smallest doorway (the DoorFrame copy layer), click on the DoorFrame layer to make it active, and then Option-click (PC: Alt-click) the Add Layer Mask icon to hide the gradient from the actual door that’s extending beyond that smallest doorway.
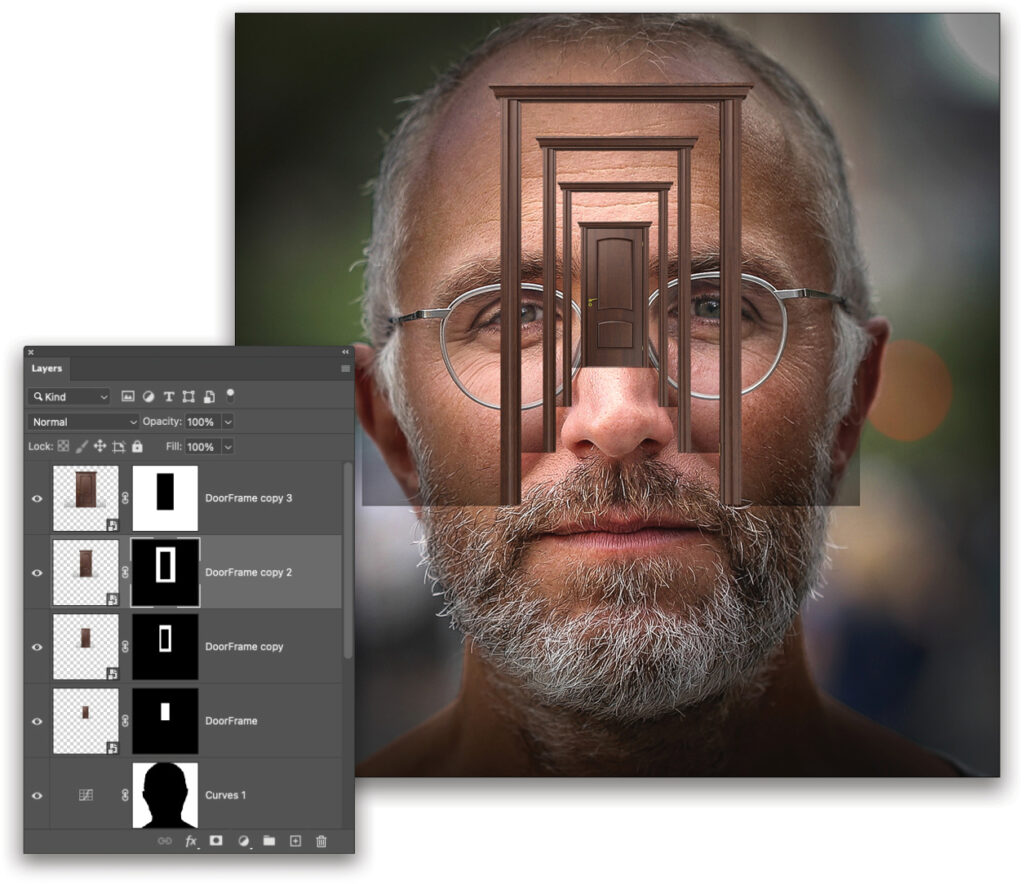
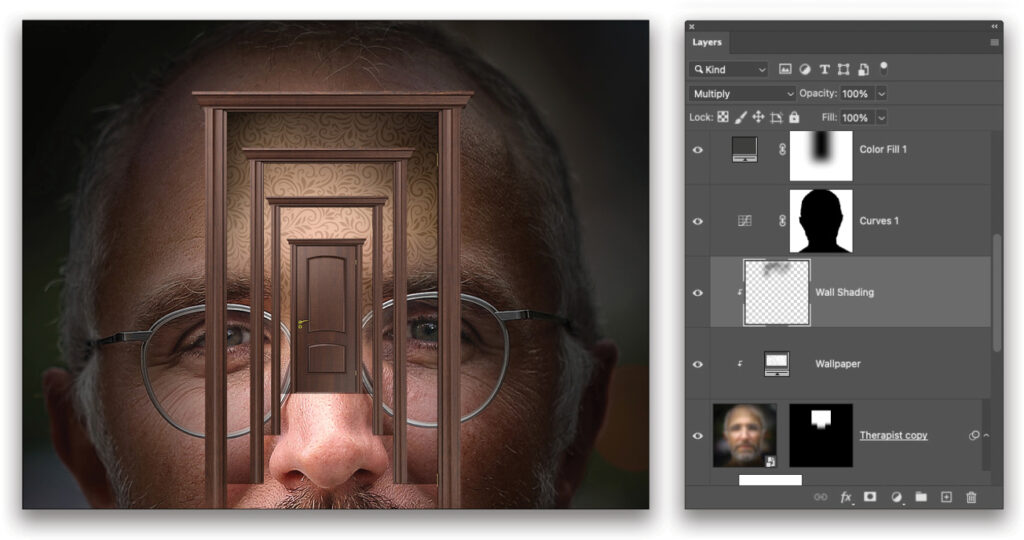
STEP 10: In the Layers panel, click on the mask thumbnail on the largest doorframe layer (DoorFrame copy 3). Using the Gradient tool with the Linear Gradient and Foreground to Transparent preset and the Foreground color set to black, draw a gradient just a short distance up from the base of the doorframe to fade out the bottom of the frame. If the outside edges of the gradient shading is still visible, grab the Brush tool (B), set the Foreground color to black, and paint on the mask to hide those, too.
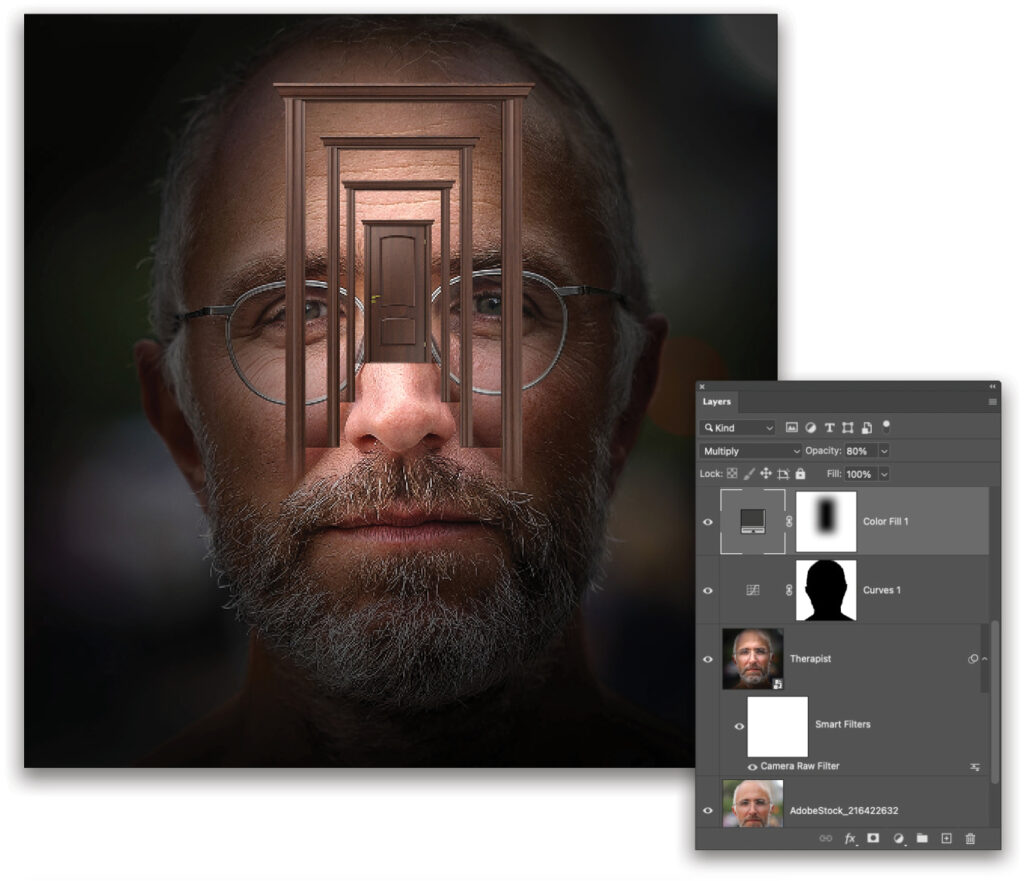
STEP 11: This virtual hallway should be visibly brighter than the surrounding area of the image. Make the Curves adjustment layer the active layer and go to Layer>New Fill Layer>Solid Color. Set the color to a deep gray (#3c3c3c) in the Color Picker and click OK. Set the layer blending mode to Multiply and reduce the Opacity to 80%. This darkens the entire image, so click on the mask of the Color Fill layer to make it the active element. Use the Rectangular Marquee tool to create a selection around the largest doorframe and fill it with black. Press Command-D (PC: Ctrl-D) to cancel the selection, go to the Properties panel for the mask, and set Feather to 100 px.
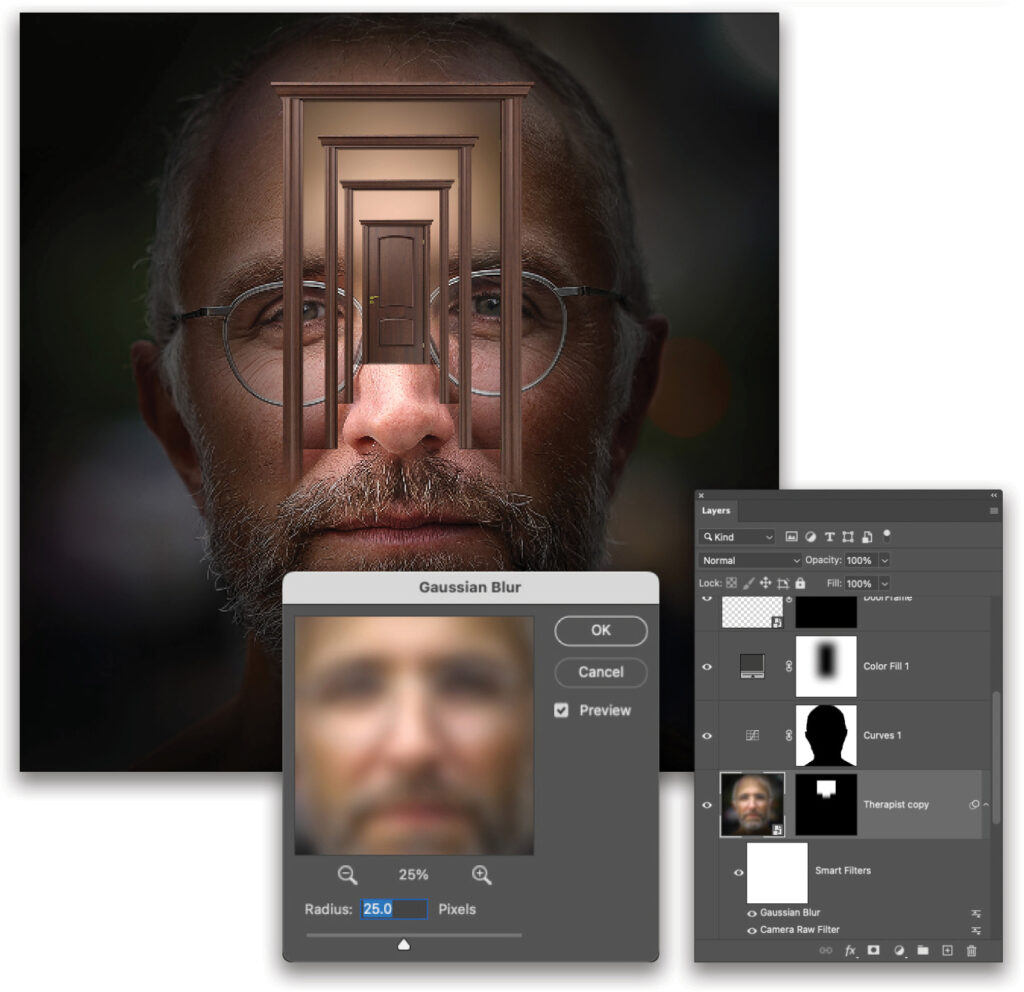
STEP 12: Make a duplicate of the Therapist layer, go to Filter>Blur>Gaussian Blur, set the Radius to 25 pixels, and click OK. Create a rectangular selection inside the largest doorway going from the top to about halfway down the actual door, and use that to create a layer mask. Now, use the Brush tool with a large soft round tip set to black and paint on the mask to fade out the hard visible line at the bottom, to reveal his eyes and eyebrows. This will serve as the basis of the wall texture for the doorways.
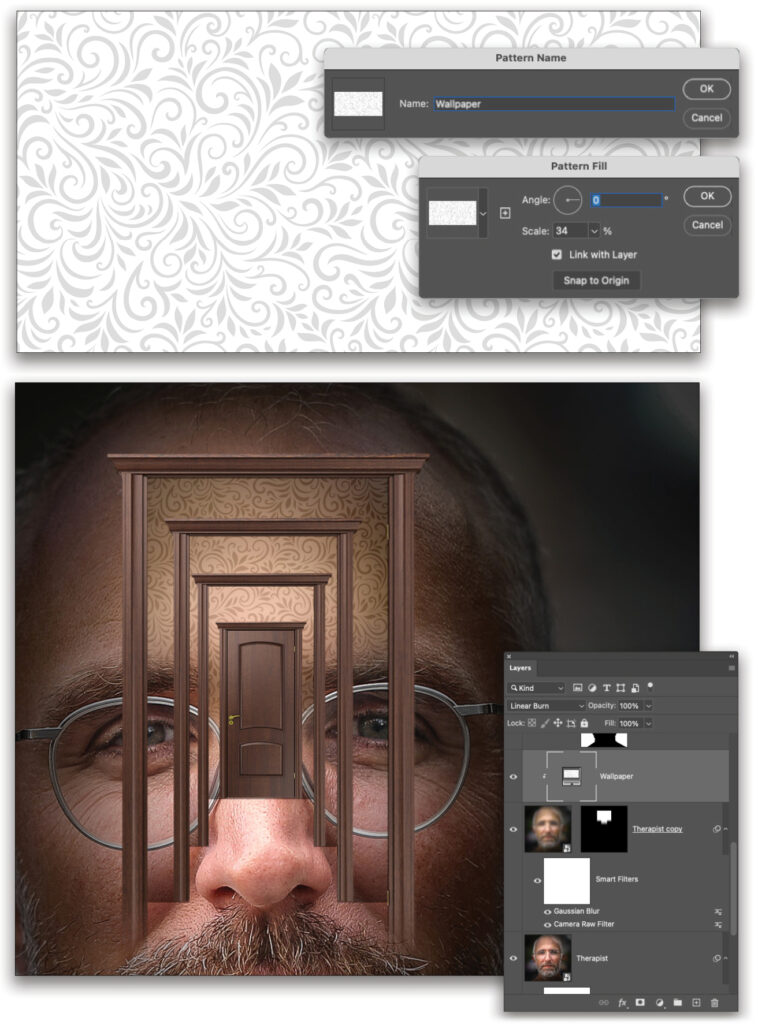
STEP 13: Open the stock image of the decorative pattern (you can find it on Adobe Stock by clicking here). Since the Adobe Stock preview of this image downloads as an AI file, instead of clicking Save to Library, click Download Preview, and then drag the downloaded file onto the Photoshop icon to open it in Photoshop, instead of Illustrator. Click OK in the Rasterize EPS Format dialog.
Go to Edit>Define Pattern, name the pattern “Wallpaper,” and click OK. Back in the project file, go to Layer>New Fill Layer>Pattern. Name the layer “Wallpaper” and click OK. In the Pattern Fill dialog, select the new Wallpaper pattern, set the Scale to 34% (if you used the preview version of the decorative pattern from Adobe Stock, try a Scale of 15% instead), and click OK. Then change the layer blending mode to Linear Burn and clip the layer to the blurry therapist layer with Layer>Create Clipping Mask.
STEP 14: Add a new layer over the Wallpaper layer and name it “Wall Shading.” Set the blending mode to Multiply and clip the layer to the Wallpaper layer. Then grab the Brush tool again with a very large Soft Round brush tip set to 50% Opacity in the Options Bar. Hold down the Option (PC: Alt) key to get the eyedropper and click to sample a dark-gray color in the image. Then gently paint in some shading at the top of the wallpaper area.
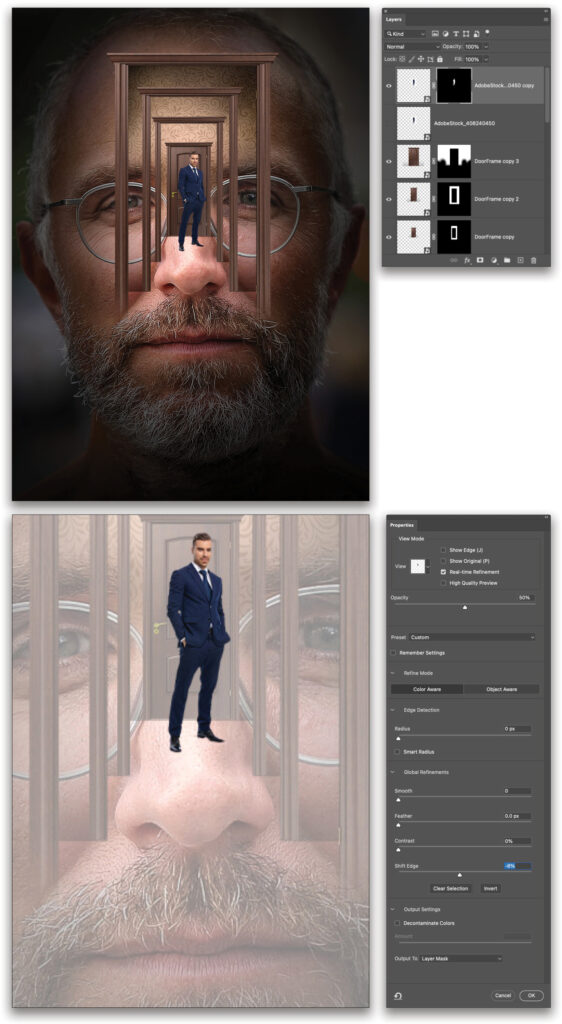
Step 15: Use File>Place Embedded to add an image of a man in a suit. You can find our image on Adobe Stock by clicking here. If you’re using the Adobe Stock image, drag it from your Libraries panel into your working file. Right-click on the layer in the Layers panel and choose Convert to Smart Object.
Drag the layer to the top of the layer stack, and use Free Transform to resize and position him so it looks like he’s standing in front of the door at the end of the hallway. Duplicate the layer and hide the original by clicking its Eye icon in the Layers panel.
On the copied version, use Select>Subject to create a selection of the man. Go to Select>Select and Mask to enter that workspace, set the View menu at the top of the Properties panel to On Layers (Y), and zoom into the man. Move the Shift Edge slider toward the left until it’s clear that the selection isn’t grabbing any of the white border pixels (about –8%, but you might have to go higher if you’re using the low-res Adobe Stock image). Set the Output To drop-down menu at the bottom of the Properties panel to Layer Mask, and click OK.
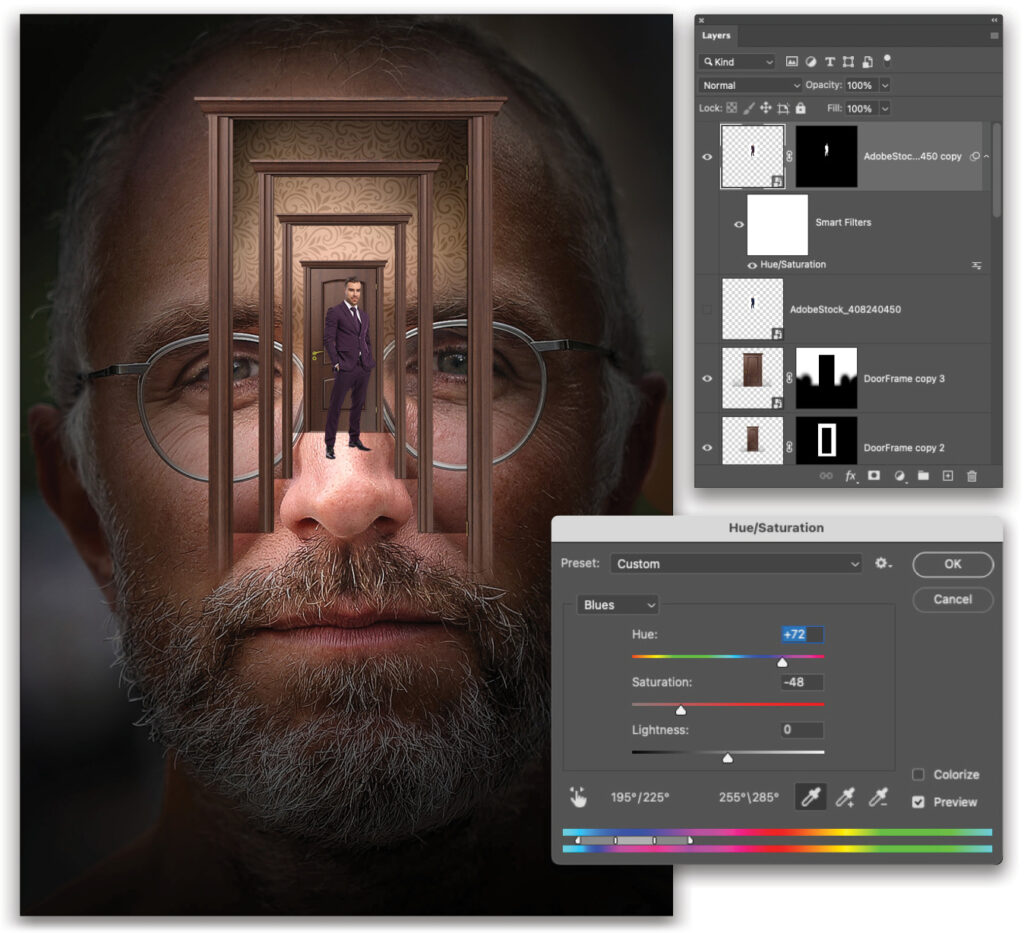
STEP 16: The blue of the man’s suit is a distraction from the otherwise warm color palette of the rest of the image. In the Layers panel, click on the layer thumbnail of the man in the suit so the layer is active and not the mask. Go to Image>Adjustments>Hue/Saturation, and change the drop-down from Master to Blues. Set the Hue to +72 and reduce the Saturation to around –48. This changes his suit to a more purplish tone, which fits the project better. Click OK.
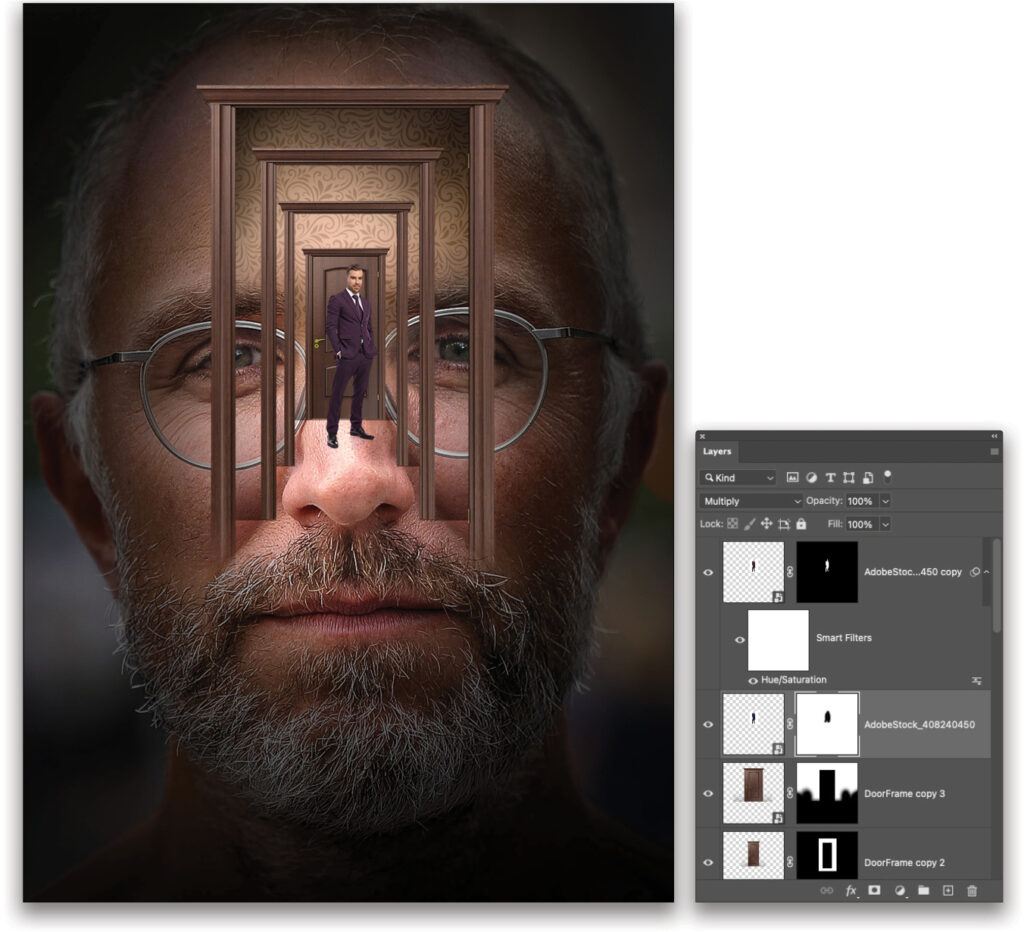
STEP 17: When shrinking the selection to prevent any white fringe, it’s possible some border areas were trimmed too much. To compensate, reveal the original layer of the main in a suit and set the mode to Multiply. Then add a layer mask and use the Brush tool set to black to paint out any distractingly dark edges.
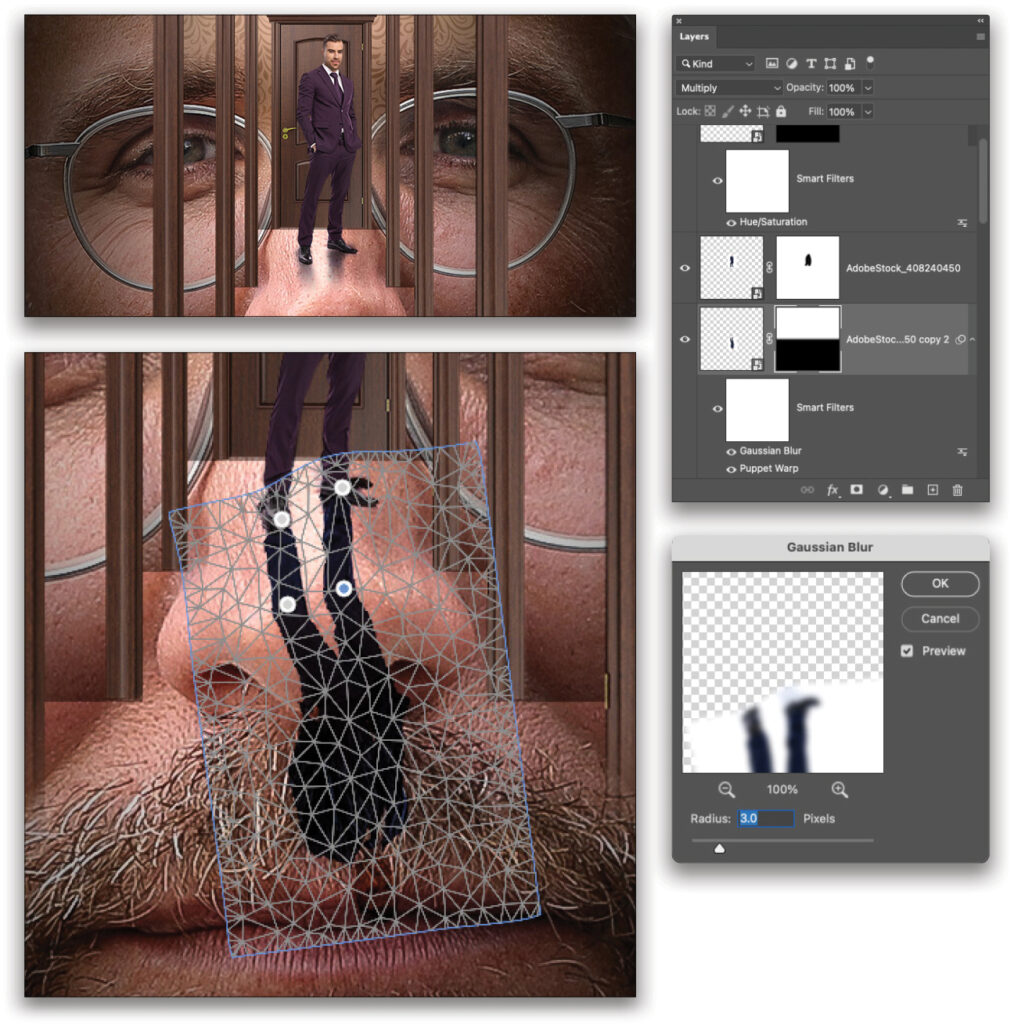
STEP 18: To help ground the figure to the “floor,” he needs a shadow. Make another copy of the original man in suit layer and move it beneath the original. Delete the mask that came with it, then go to Edit>Transform>Flip Vertical and use the Move tool to drag the layer down so it’s a reflection of the man. Position it so his right foot is touching the right foot of his reflection, leaving a gap between his two left feet.
Go to Edit>Puppet Warp and click to place pins on the feet and knees of the shadow layer. Then move the pin of the offset foot up to meet the foot of the original layer. Press Enter to commit the warp. Go to Filter>Blur>Gaussian Blur and use a radius of 3 Pixels to soften the shadow, and click OK.
Finally, add a layer mask and grab the Gradient tool. Using the Linear Gradient and the Foreground to Transparent preset with the Foreground color set to black, draw a gradient on the mask from just below the knees of the reflection to just above the shoes of the man to fade the shadow out from top to bottom.
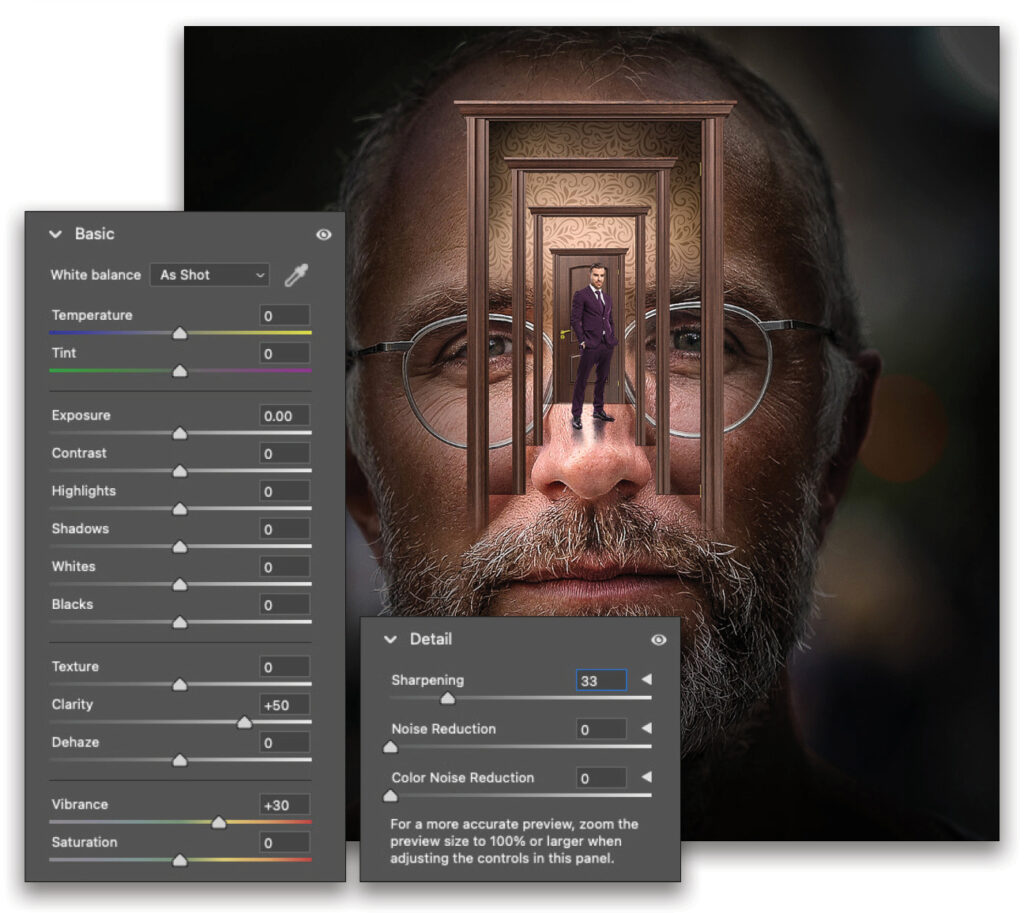
STEP 19: Go to the topmost layer, hold down the Option (PC: Alt) key, and select Layer>Merge Visible. Then turn the merged layer into a smart object and run the Camera Raw Filter. In the Basic tab, increase the Clarity to +50 and the Vibrance to +30. In the Detail tab increase the Sharpening to +33. Click OK.
Step 20: To finish off the effect, let’s add a Color Lookup adjustment layer (Layer>New Adjustment Layer>Color Lookup). Set the 3DLUT File drop-down menu in the Properties panel to filmstock_50.3dl, and reduce the layer Opacity to around 65%.

While this project had more steps than most of this type, it’s significant to understand why each particular feature was chosen for each purpose. Features like masking, blending modes, and smart objects are all critical functions to know when crafting a complex composition. Gaining a deeper understanding of these Photoshop features will put you one step closer to being inside the head of
a master compositor!
This article originally published in the October, 2022 issue of Photoshop User magazine.
About Photoshop User and KelbyOne
Photoshop User magazine comes out digitally 12 times a year and is part of KelbyOne, the leading educational resource for Photoshop, Lightroom, and photography. Pro members have access to more than 900 video courses and 100 back issues of Photoshop User. To learn more about KelbyOne, click here.


