
Creating text inside a shape is one of the coolest text tricks in the book. By drawing a shape with the built-in shape tools and then using the Type tool inside it, the edges of your text follow the contours of the shape. In this column, you’ll put text inside a triangle, and then you’ll put text inside a shape drawn with the Pen tool.
USING A SHAPE TOOL
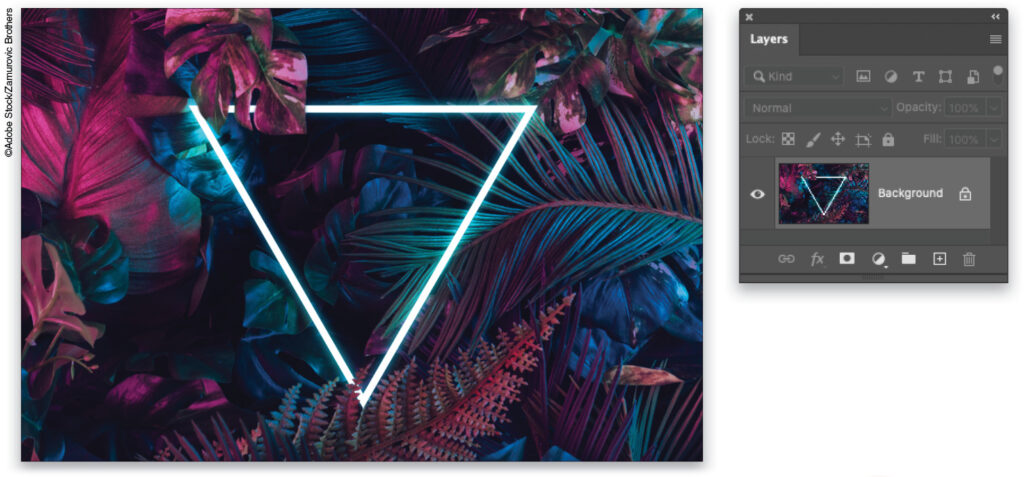
STEP ONE: Open a background image in Photoshop. (If you’re starting in Lightroom, select a thumbnail in the Library module and then choose Photo>Edit In>Adobe Photoshop 2021.) Today we’re using a background that has a triangular shape in it; but you can perform this technique in a new document that doesn’t have a background image.
If you’d like to download the low-res watermarked version of this image to follow along, click this link, log in with your Adobe ID, and click the Save to Library button. Right-click the image in the Libraries panel (Window>Libraries) and choose Edit to open it in Photoshop.
To make it easier to work with the image, increase the resolution of the practice file. (We normally don’t recommend enlarging images, but this is only for practice purposes.) Go to Image>Image Size, turn on the Resample checkbox, select Preserve Details 2.0 from the Resample drop-down menu, set the Width to 3,000 pixels, and click OK.
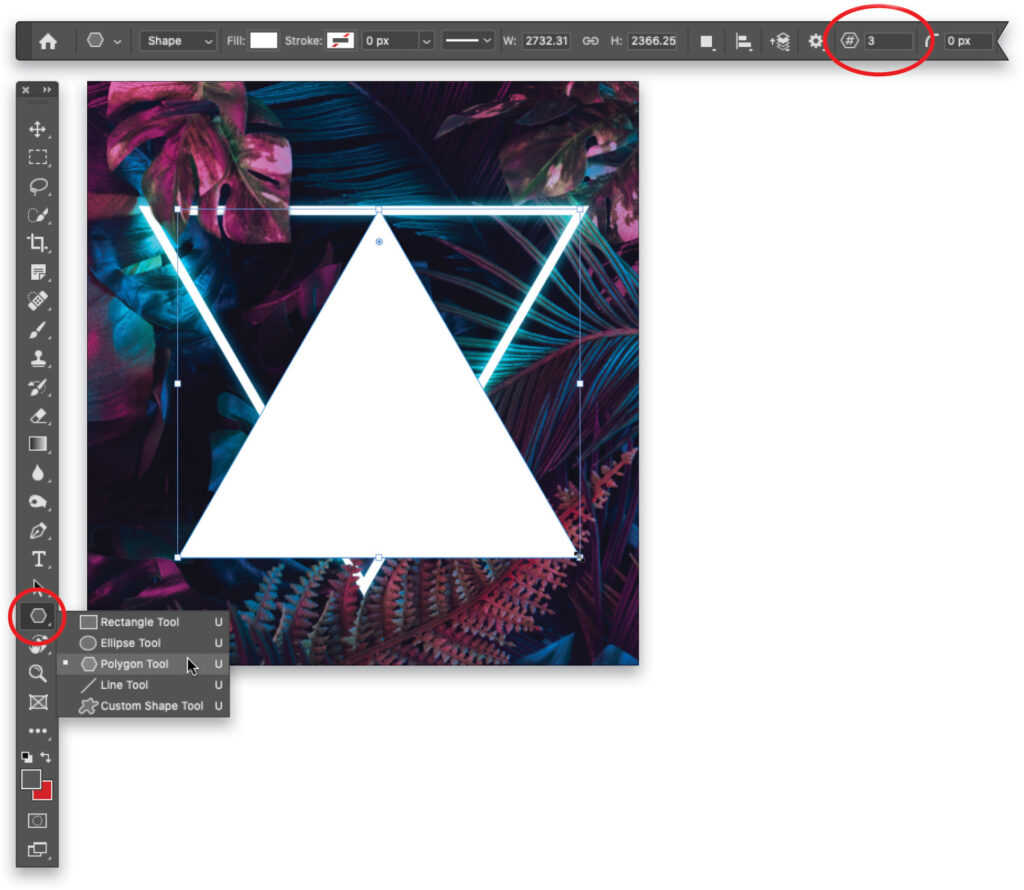
STEP TWO: Grab the Polygon tool from the Toolbar (circled), which is nested with the Rectangle tool (U). In the Options Bar, set the Tool Mode to Shape, set the Fill to any color you’d like (white was used here), and set the Stroke to No Color. (Using a Fill color makes the shape easier to see while you’re drawing it, even if you don’t want the shape to be filled in the final piece.) In the Set Number of Sides field (also circled), enter 3 to make a triangle.
Tip: You can use any shape tool except for the Line tool for this technique. Using Shape mode tells Photoshop to put the shape you’re about to draw onto a new shape layer, which gives you the option of assigning Fill and Stroke (outline) properties.
STEP THREE: Mouse over to your document and Shift-drag from the top-left corner of the triangle in the background image downward until your cursor reaches the bottom-right edge of the document to draw a perfect triangle. It will be upside down for the image we’re using, but we’ll fix that in a minute.
STEP FOUR: With the resizing handles still visible around the triangle, point your cursor a little bit below one of the corner handles and when the cursor turns into a double-sided curved arrow, Shift-drag leftward until you rotate the shape 180°.
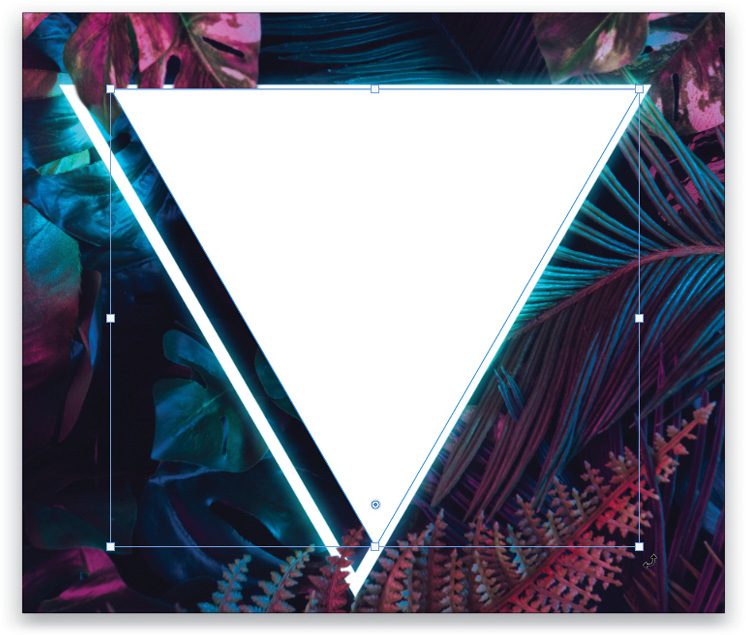
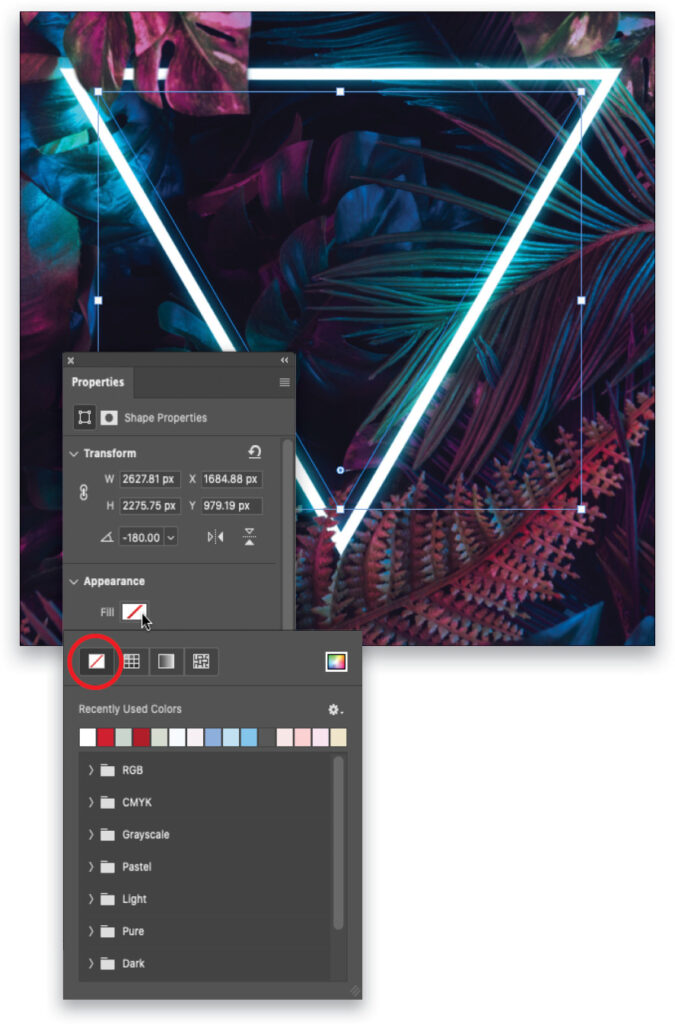
STEP FIVE: The goal is to make our triangle a little smaller than the one in the background image; that way, the text we’re about to add will have some breathing room on all sides. To resize the triangle, Shift-drag any corner handle outward to increase the size or inward to decrease the size. Shift-dragging a middle handle on any side of the bounding box resizes the whole shape. To reposition the triangle, hold down the Command (PC: Ctrl) key, and when your cursor changes to a solid arrow, click-and-drag directly on the rectangle. Don’t press Enter yet!
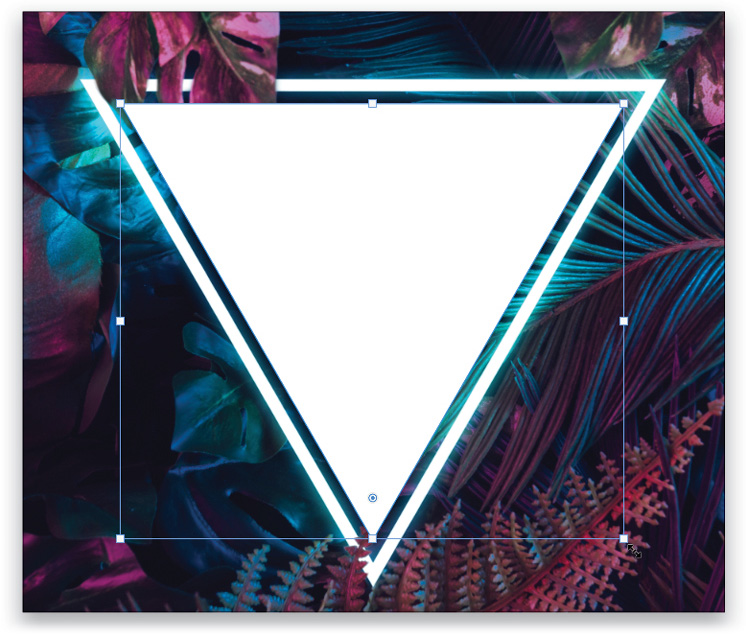
STEP SIX: In the Properties panel (Window>Properties) that should still be open, click the white color swatch next to Fill and, in the menu that opens, choose No Color (circled). You should still see the resizing bounding box around a blue outline of the triangle you drew.
Note: Feel free to use a Fill and/or Stroke (outline) when you’re doing this on your own! Because this background image has a triangle in it, we aren’t using those settings.
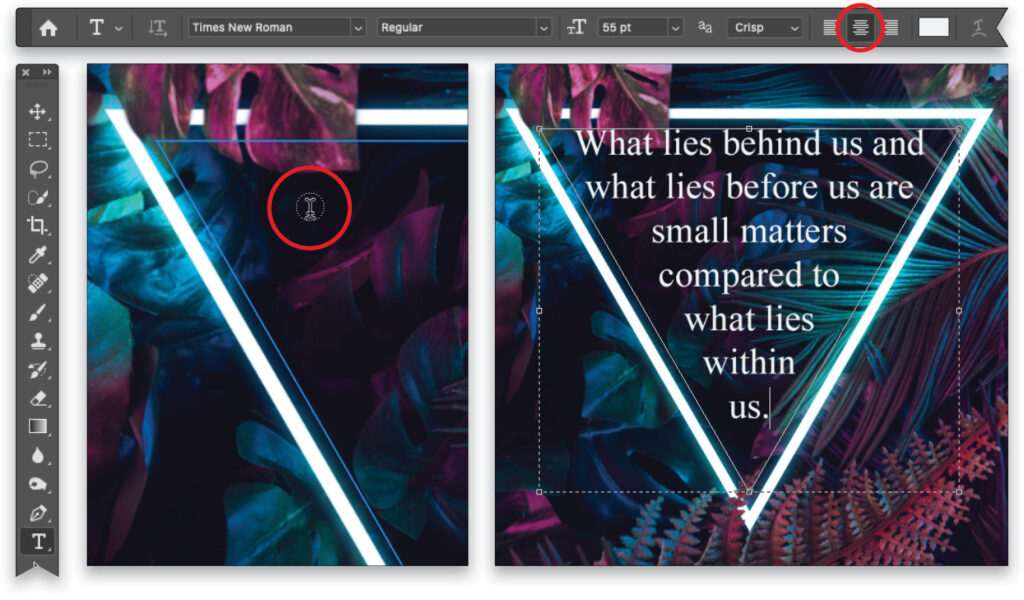
STEP SEVEN: Now let’s add some text. Press T to grab the Horizontal Type tool in the Toolbar (circled). In the Options Bar, pick a font and size (Times New Roman at 55 pt was used here but the type size will depend on the resolution of your image; don’t worry, though, just pick any size for now and see the Tip for resizing text in the next step.) Set the alignment to Center Text (also circled). Click on the color swatch, choose a color for your text (white was used here), and click OK to close the Color Picker.
STEP EIGHT: Mouse over to the shape and when your cursor turns into an I-beam with a dotted circle around it (circled), click to create a text box that matches the shape you drew. Depending on your settings, Photoshop may fill the shape with placeholder text or you may just get a blinking cursor. Either way, enter some text, such as this quote from Ralph Waldo Emerson.
Tip: To visually resize the text so it fits the shape, select all the text with the Type tool, and then click-and-drag on the double T icon to the left of the font size field in the Options Bar. This is called a scrubby slider: drag left to decrease the font size; drag right to increase the font size. Simply drag until the text fits the shape the way you want.
STEP NINE: To resize the text box, drag one of the handles on the bounding box. (Tip: To summon that bounding box later on, just double-click the Type layer’s thumbnail in the Layers panel.) When you resize the text box, the text reflows to match the new size. When you’re finished resizing the text box, either click the checkmark in the Options Bar or click the Type layer in your Layers panel.

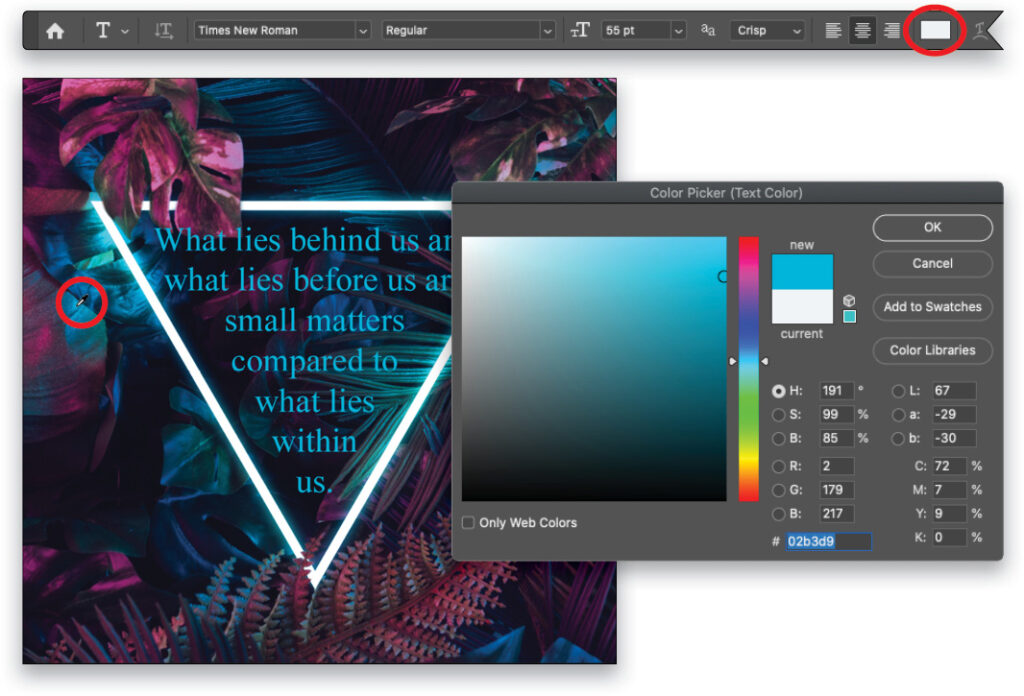
STEP 10: To change font, size, or color, make the Type layer active in the Layers panel, grab the Type tool, select all the text that you want to change, and simply use the Options Bar. One neat trick is to steal a color from the image for the text color. To do that, click the color swatch in the Options Bar (circled) and when the Color Picker opens, mouse over to a color in the image—say, a light blue—and when your cursor turns into an eyedropper (also circled) click to sample it. Click OK to close the Color Picker.
STEP 11: To hide the blue outline of your shape (or rather, the path), click the Background layer in your Layers panel (the path won’t be visible if you export the image in another file format or if you print it). Here’s the final result with the Layers panel.

USING THE PEN TOOL
As mentioned earlier, you can draw your own shape using the Pen tool. As long as the shape is closed, and not left open, you can add text inside it that follows the contours of whatever you draw. Let’s do that now using a different background image. You can find the image we’re using by clicking here.
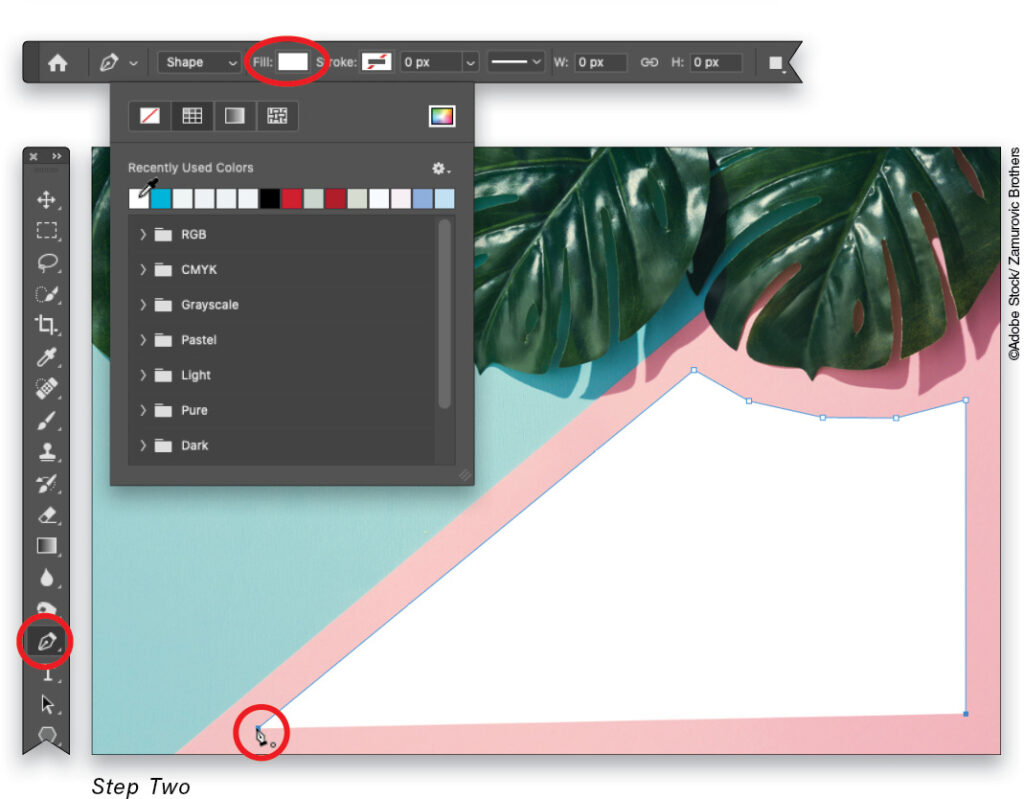
STEP ONE: Press P to grab the Pen tool (circled) and in the Options Bar, set the Tool Mode to Shape and set the Fill color (also circled) to white. Again, using Shape mode gives you the option of adding a Fill and Stroke. We’re using white so it’s easier to see the shape we’re drawing and to ensure that we end up with a closed shape.
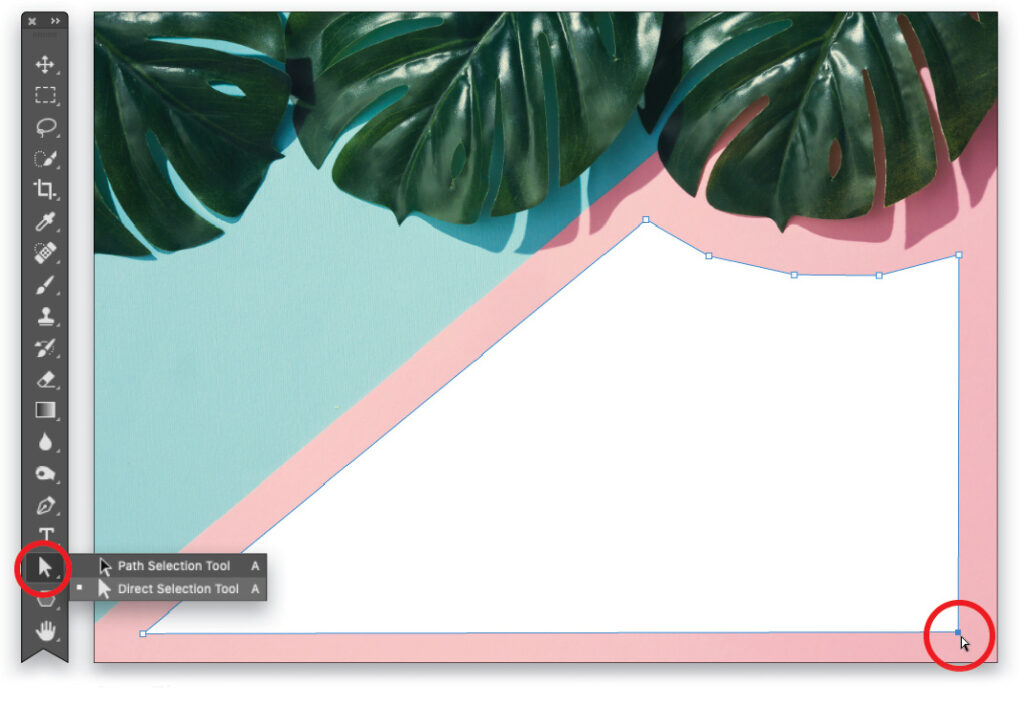
STEP TWO: Mouse over to the document and click near the bottom-left edge of the pink space in the background image to start your shape. Then click near the leaf to set another point, and then click to set a few points around the leaf. Shift-click near the bottom right to set another point in a perfectly straight line. Point your cursor atop the first point and when it turns into a tiny circle (circled), click to close the shape (see previous page). The shape fills with white as you draw it.
STEP THREE: To adjust or move a point you’ve drawn, grab the Direct Selection tool (circled) from the Toolbar, which is nested with the Path Selection tool (A). Mouse over to the document and click the point you want to move. When the point you clicked is solid blue (also circled) and the other points are white, you can drag to reposition the blue (selected) point.
STEP FOUR: Press T to grab the Type tool from the Toolbar (circled). In the Options Bar, pick a font and size (Times New Roman at 62 pt was used here but again it depends on the resolution of your image). Set the alignment to Center Text and use the color swatch as described above in step 10 to sample a color from the image (in this case, the dark blue shadow near the middle leaf).
STEP FIVE: Mouse over to your shape and when the cursor turns into an I-beam with a dotted circle around it, click and add some text, such as this Irish blessing. (See the Tip in Step Eight above for resizing text.)

STEP SIX: Click the checkmark in the Options Bar to dismiss the text box, or simply click the Background layer in your Layers panel to do that and hide the blue outline of the shape you drew. If you don’t want to see the white shape, turn off the visibility Eye of the Shape layer (circled), which is an alternative to using the Properties panel to set the Fill and Stroke to No Color like we did earlier. Here’s the final result.

As you can see, this keeps you from placing lines of type on separate layers just to make them follow a shape. Text can be difficult to read when it doesn’t have a straight edge on either side for your eyes to follow, so reserve this technique for small amounts of text. Until next time, may the creative force be with you all!
This article originally published in the October, 2021 issue of Photoshop User magazine.
About Photoshop User and KelbyOne
Photoshop User magazine comes out digitally 12 times a year and is part of KelbyOne, the leading educational resource for Photoshop, Lightroom, and photography. Pro members have access to more than 900 video courses and 100 back issues of Photoshop User. To learn more about KelbyOne, click here.


