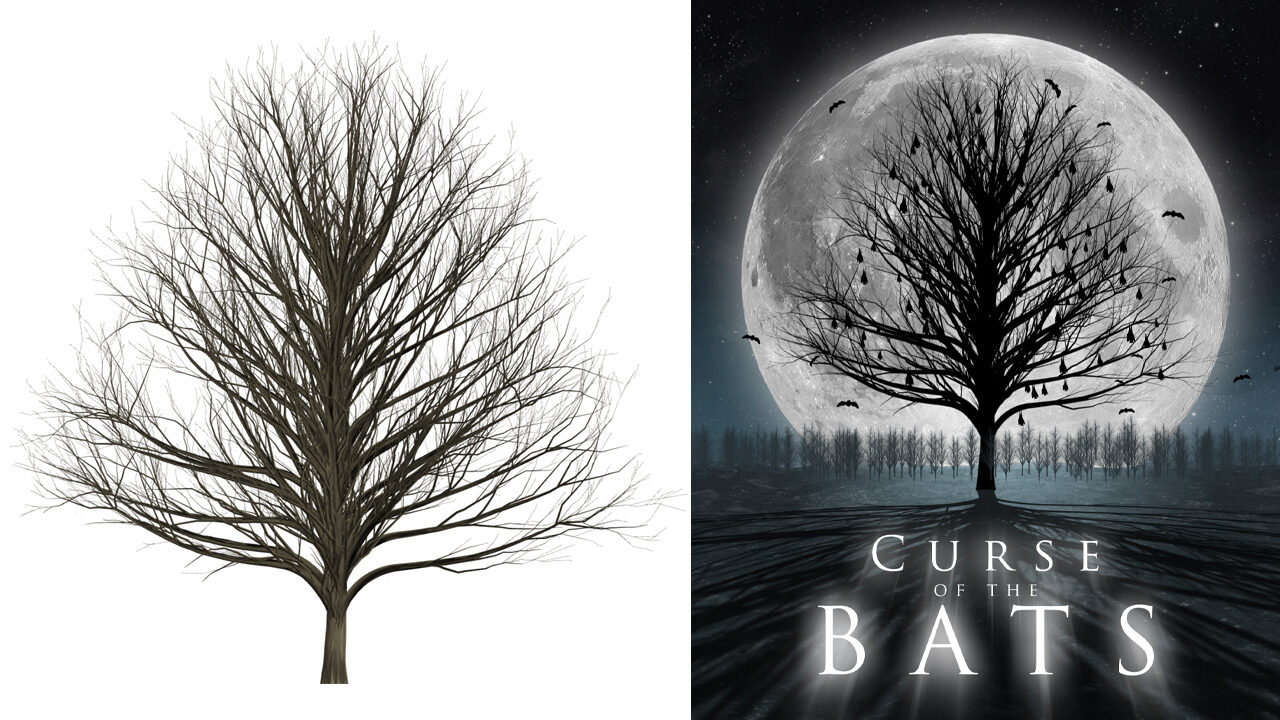
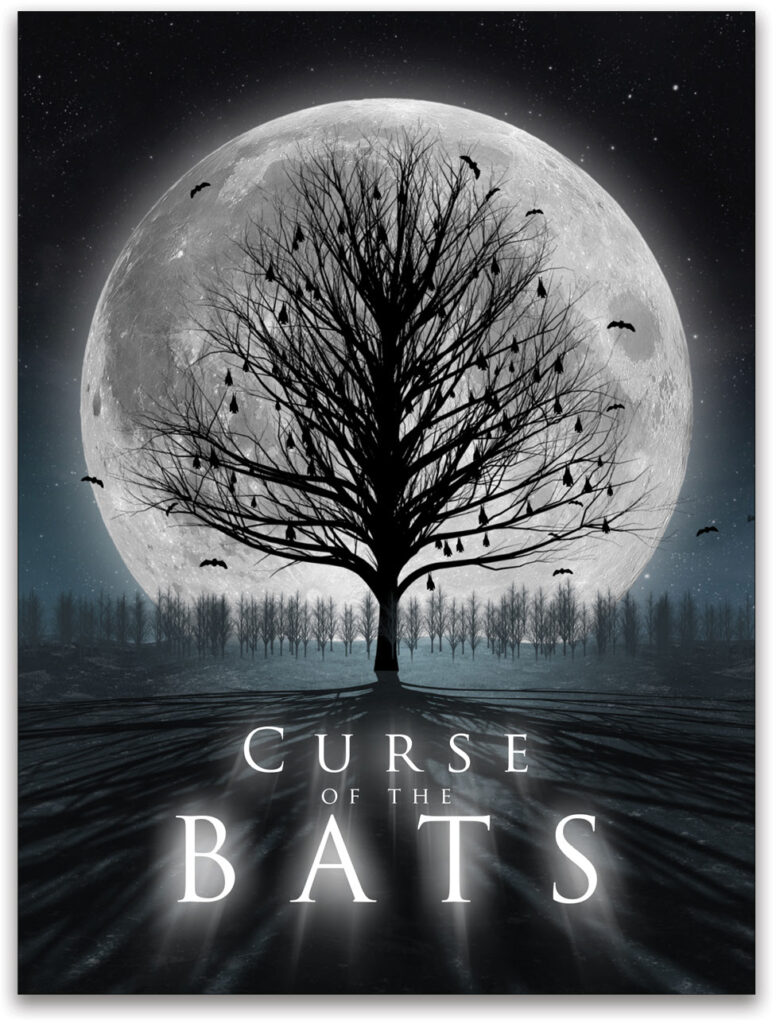
With Halloween on the horizon, I thought we could explore some creative possibilities with features in Photoshop that you probably didn’t know about. We’ll build a movie poster design that has light and shadow effects that we’ll create with layer styles, brush effects, and a little 3D. Enjoy!
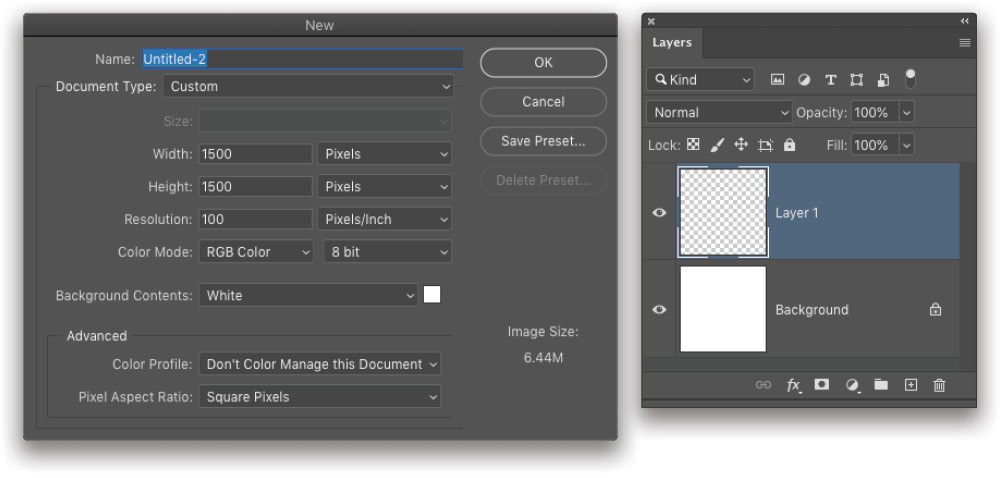
Step One: Start by creating a new Photoshop document by going under the File menu and choosing New. Make the Width and Height both 1500 pixels, change the Resolution to 100 ppi, set the Background Contents to White, and click OK or Create. Once the new canvas is created, open the Layers panel (Window>Layers) and create a new blank layer by clicking the Create a New Layer icon (+) at the bottom of the panel.
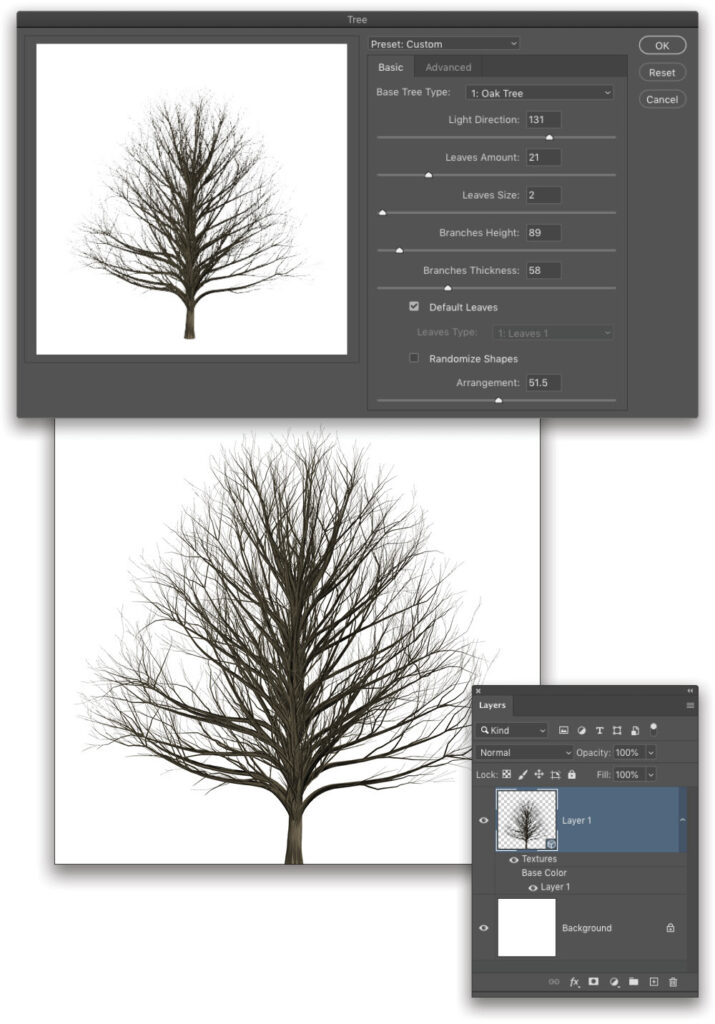
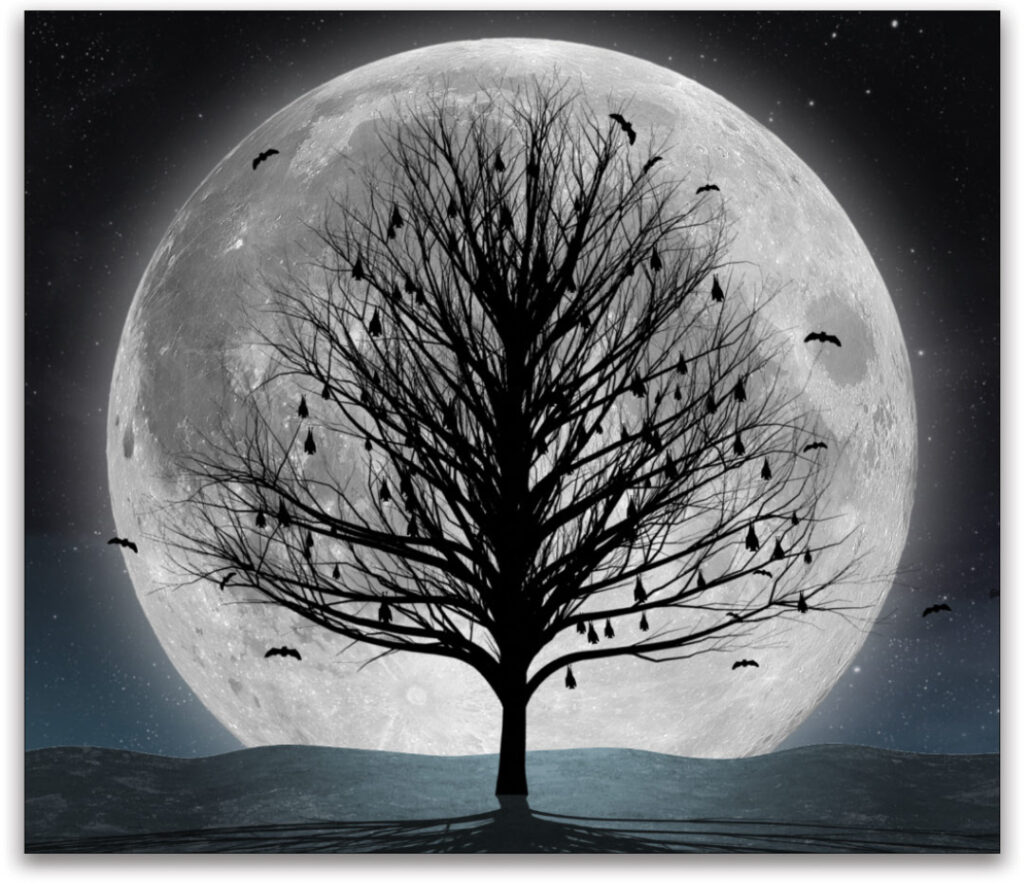
Step Two: With the new layer active, go to the Filter menu, under Render, and choose Tree. (How many of you had any idea this feature was even there?) In the Tree dialog, you’ll see a variety of options. It’s worth playing around with these settings to see what the various trees look like and how you can configure each one. Notice how just changing the Arrangement setting at the bottom can give you a different-looking branch arrangement.
Here we’re using the Oak Tree as the Base Tree Type and leaving it nearly bare of all leaves. Use the settings shown here and click OK when done. Press Command-T (PC: Ctrl-T) for Free Transform, make the tree a little larger, and position it at the bottom of the canvas where it cuts a little off the bottom of the tree. Press Enter to commit the transformation.
Step Three: Now go under the 3D menu, to New Mesh from Layer, and choose Postcard. Click Yes when Photoshop asks if you want to switch to the 3D workspace. This will put the flat image into a 3D space. You’ll see the layer icon change in the Layers panel indicating it’s now a 3D layer.
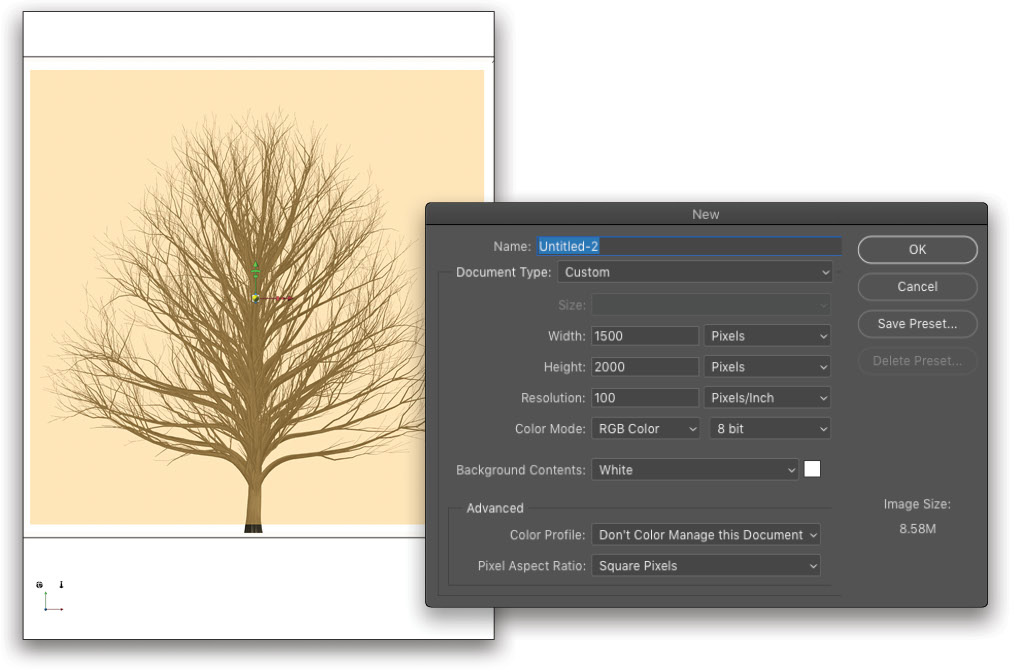
Step Four: Next, let’s create a new document in which to build the final design. Set the Width to 1500 pixels and the Height to 2000 pixels, leave the Background Contents set to White, and click OK or Create. Now go back to the tree image and bring that 3D layer into this new canvas. To bring over the 3D layer, switch to the Move tool (V), hold the Shift key, click on the layer in the Layers panel, and drag-and-drop it into the target canvas. The Shift key will center the layer in the canvas.
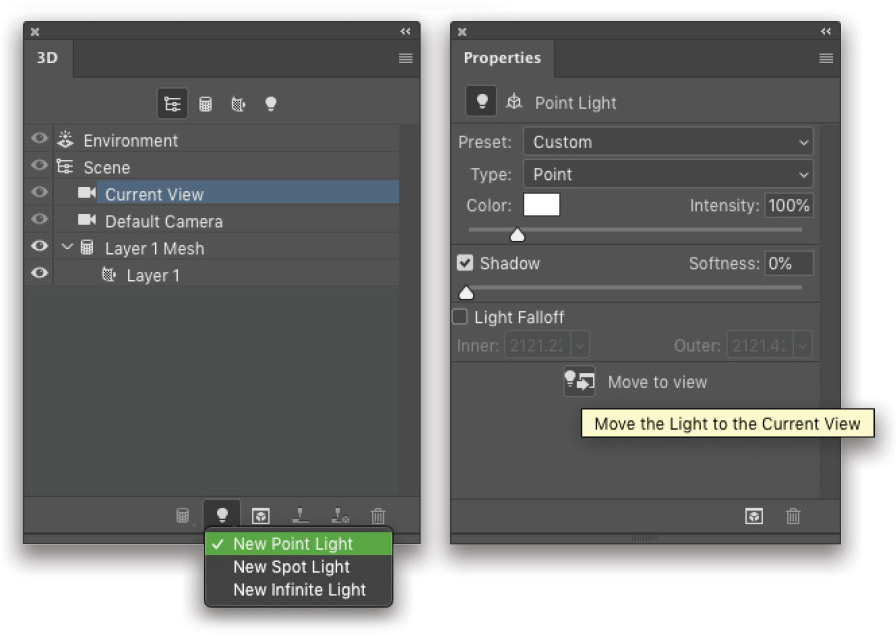
Step Five: If the 3D and Properties panels didn’t open when you switched to the 3D workspace, open both of them in the Window menu. In the 3D panel, click on the Light icon at the bottom, and choose New Point Light. Jump over to the Properties panel, and click on the Move to View button. This will bring the light wireframe into view.
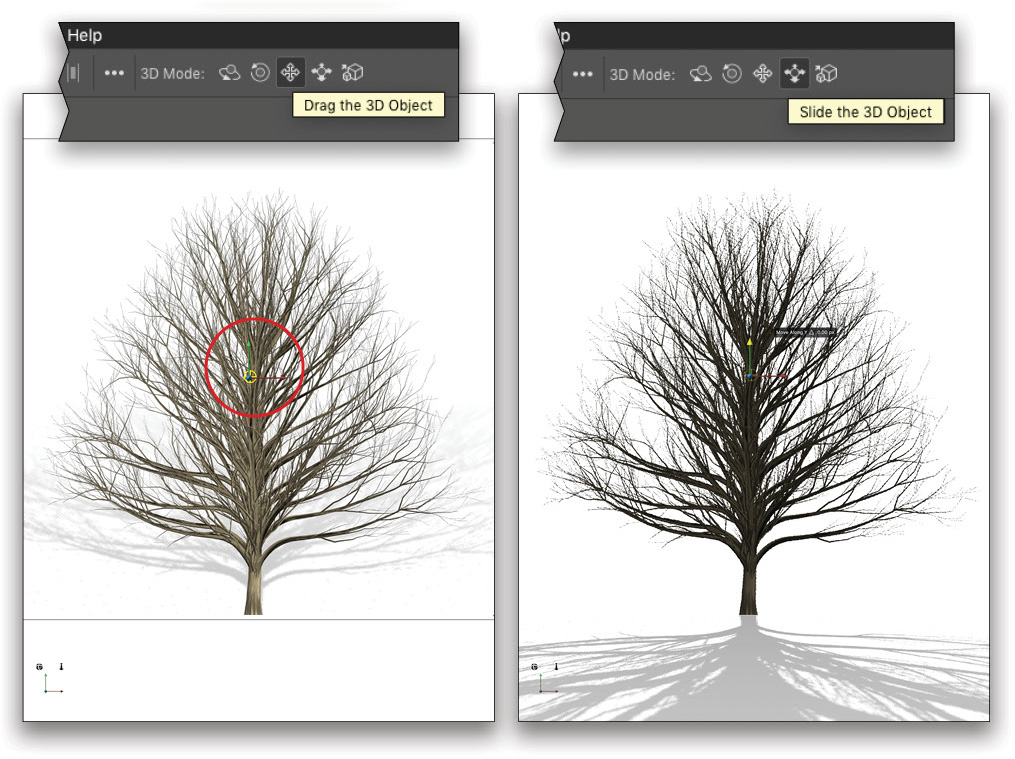
Step Six: With the Move tool active, go to the Options Bar and choose the Drag the 3D Object tool (it’s the third icon in the 3D Mode tools). Make sure the Point Light 1 is selected in the 3D panel, and then click on the image and drag the light (widget) to the middle of the canvas in front of the tree. You can also click-and-drag the arrowheads of the 3D widget itself to move the light along each axis.
Next select the Slide the 3D Object tool in the Options Bar, and then click-and-drag up in the canvas to push the light behind the tree in the 3D space. You’ll see the shadow shift from the back of the tree to the front. You’ll have to drag quite a bit to get the shadow shown here. We’ll continue to adjust this as we add more background elements.
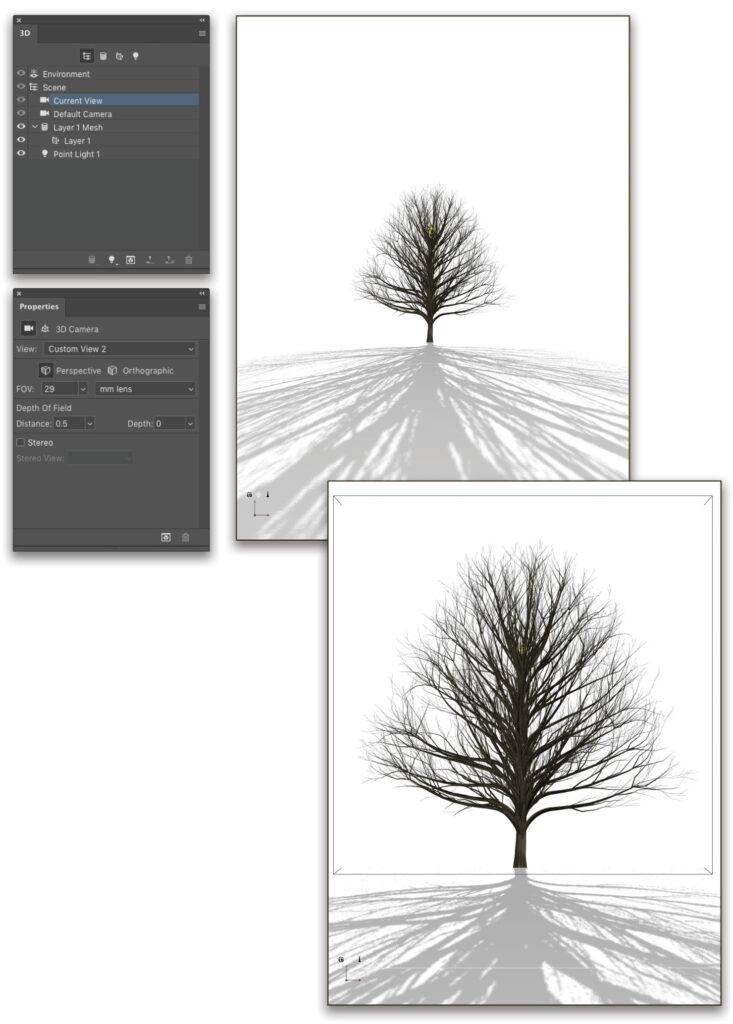
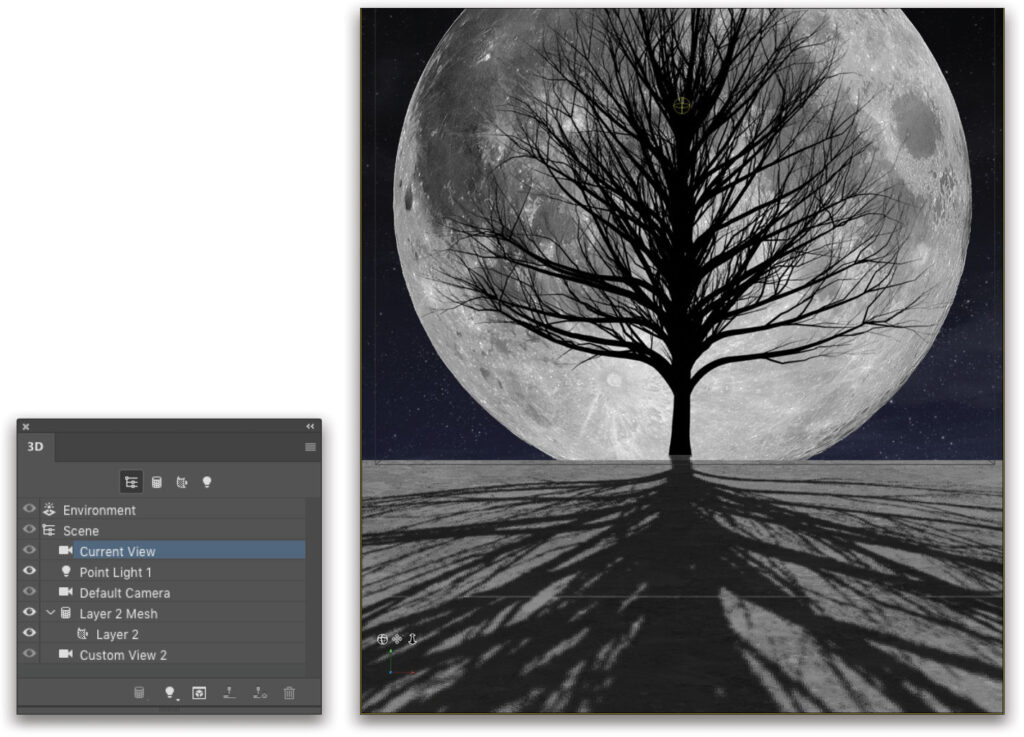
Step Seven: Back in the 3D panel, select Current View, and then in the Properties panel, set the FOV lens setting to 30 (it changes to 29 even when you input 30). This will give a much wider view of the scene so you can see more of the shadow. We do need to adjust the position of the camera now since the tree appears further away. Using the Slide the 3D Camera tool in the Options Bar, click-and-drag down to push the camera closer to the tree. The tree will appear to get bigger in the canvas. Use the Pan the 3D Camera tool to move the tree up in the scene.
Step Eight: Before we get to finalizing the tree’s position and shadow, let’s start adding some background elements. For the ground, we’re going to use a simple texture. (KelbyOne members can click here to download the texture we’re using.) Since it’s a night shot, the ground detail will barely be visible, so even the slightest texture will work. Start by removing the color of the texture by pressing Shift-Command-U (PC: Shift-Ctrl-U). Now use the Move tool to drag-and-drop this texture into the main design file. If needed, use Free Transform to scale the texture to fit in the scene. Position the layer below the tree layer in the Layers panel.
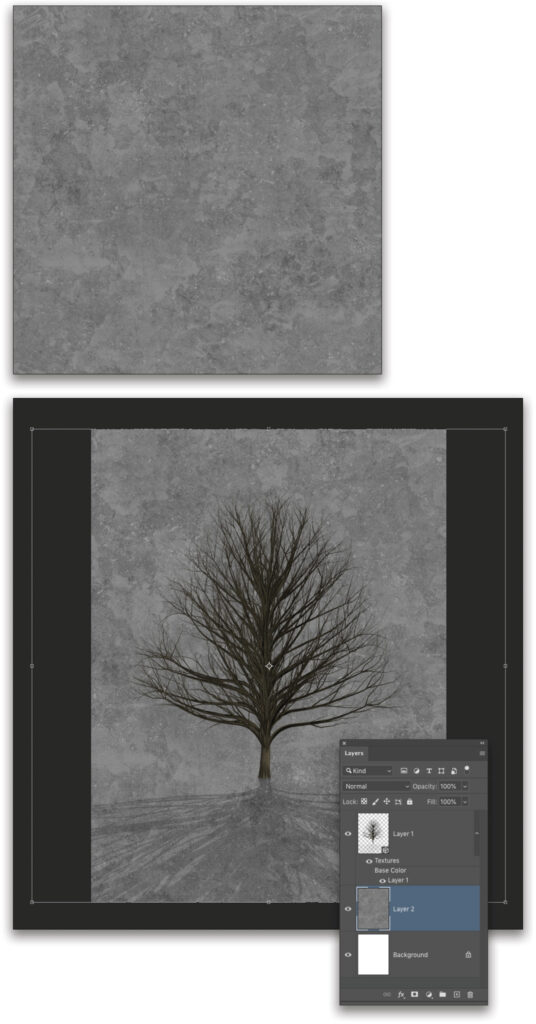
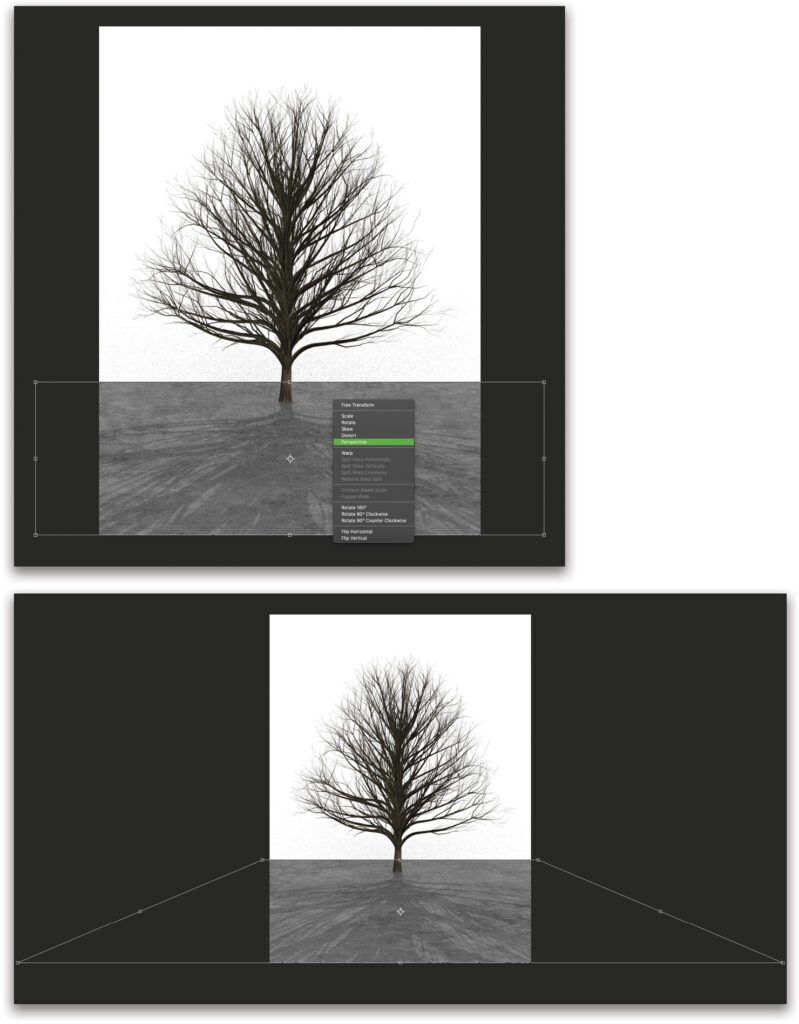
Step Nine: Once you have the texture in the canvas, enter Free Transform again, hold down the Shift key, grab the top-middle control handle, and drag it down to create a ground plane with a horizon line that goes through the trunk of the tree.
While still in Free Transform mode, Right-click on the object, and choose Perspective. Grab the bottom-right corner handle, and drag to the right to scale the bottom in perspective. Also grab the top-right corner handle and push it in close to the document’s edge. Press Enter when done to commit the transformation.
Step 10: Click on the white Background layer in the Layers panel, and press Command-I (PC: Ctrl-I) to invert it to black (your tree may be a little darker and harder to see than what’s shown here, but don’t worry about that for now.). Now let’s add a starry-night background. You can certainly try several different ones, depending on the scene. This one is simply an image of scattered stars from Adobe Stock. If you’d like to download the low-res watermarked version of this image to follow along, click this link, log in with your Adobe ID, and click the Save to Library button. Drag the image from the Libraries panel (Window>Libraries), drop it in your working file, and then move this layer to the bottom of the layer stack just above the Background layer. Use the transform handles to scale the sky into the canvas area, and press Enter.
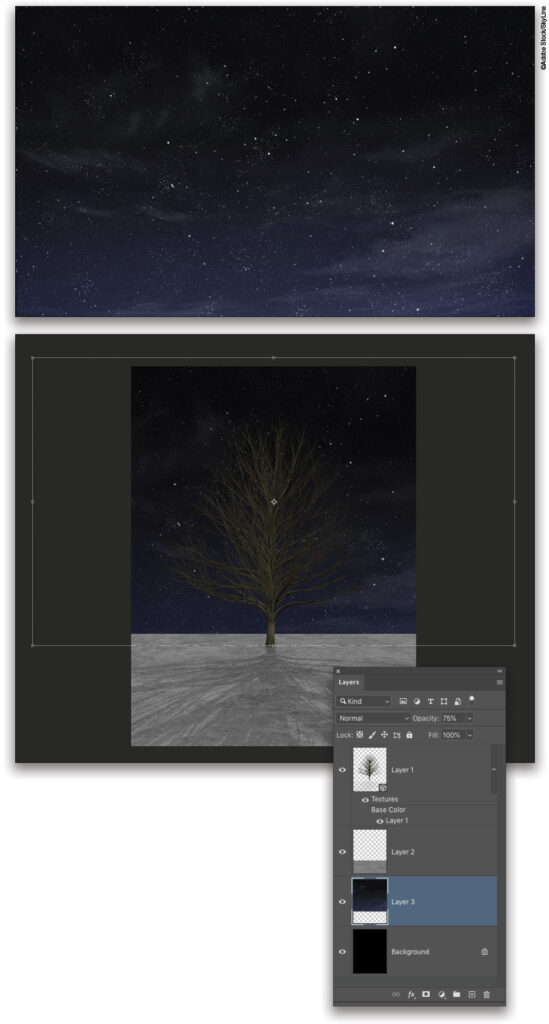
To give the sky a little bit of atmospheric distance, lower the layer Opacity to 75%. Different sky images may require more or less Opacity, so adjust as necessary.
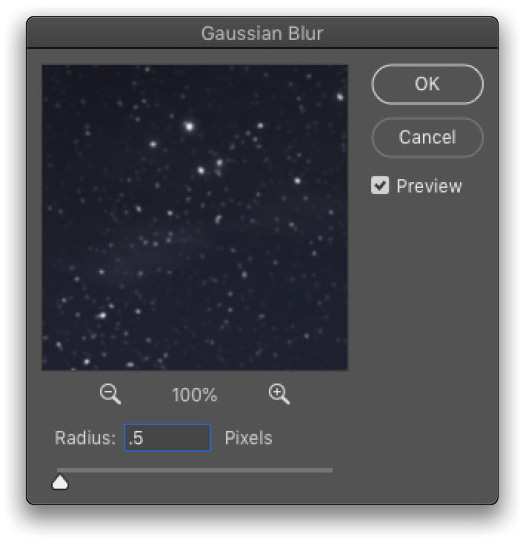
Step 11: To give the stars even a little more distance, go to the Filter menu, to Blur, and choose Gaussian Blur. A very small blur Radius of .5 pixels is all that’s needed here. Click OK.
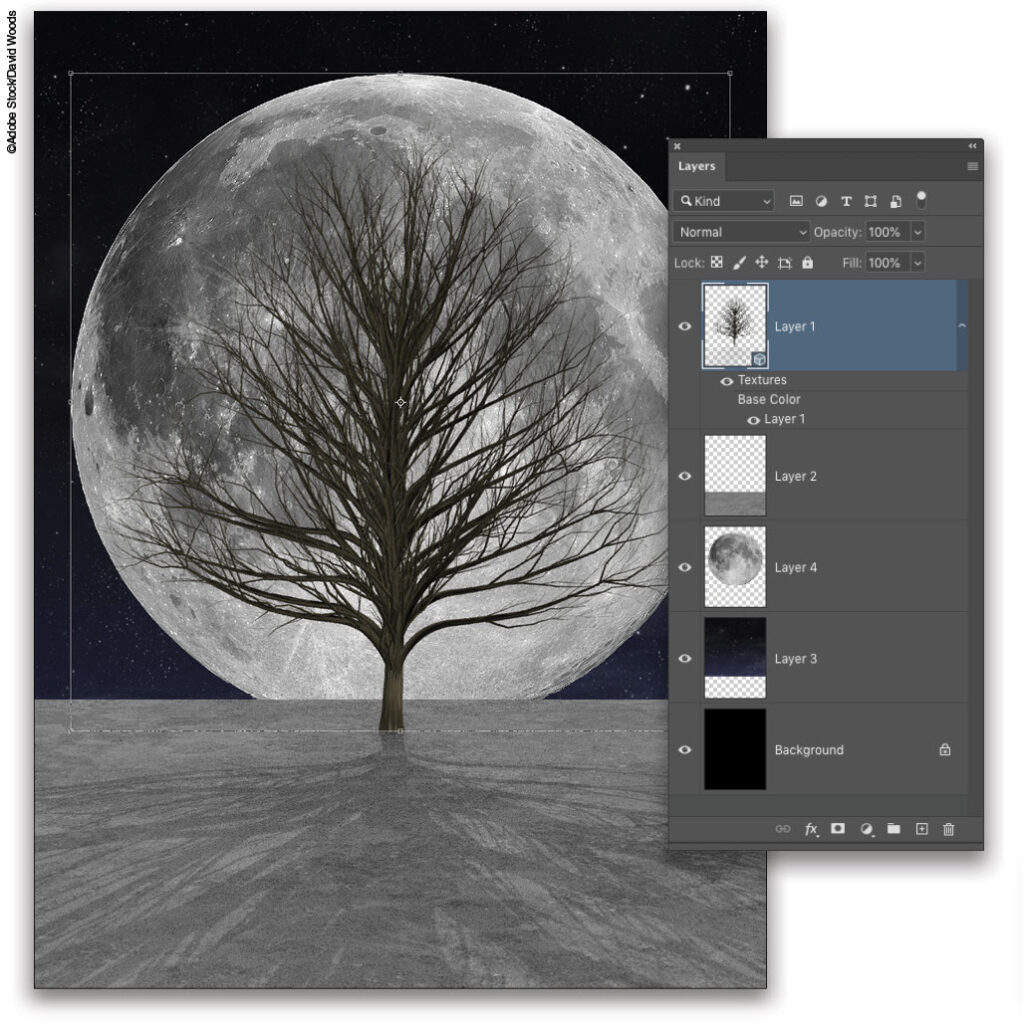
Step 12: Now let’s add our moon. Yes, it will be unrealistically large, but it will look cool! Anyway, any good moon shot will do. Naturally, we found this one on Adobe Stock. You can click here to download the low-res preview, and then double-click the image in the Libraries panel to open it in Photoshop.
Go under the Select menu and choose Subject. Since the background is black, it will easily select the moon. Once selected, use the Move tool to drag it into the main image, and position it between the ground and sky layers in the Layers panel. Then use Free Transform to scale and position it to fit the composition.
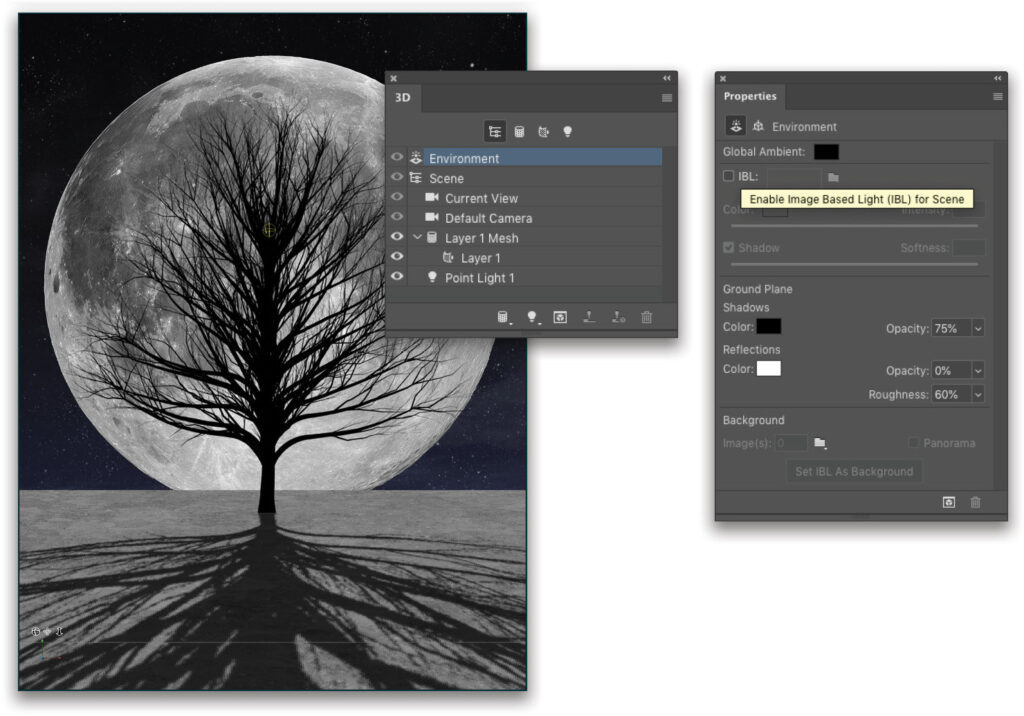
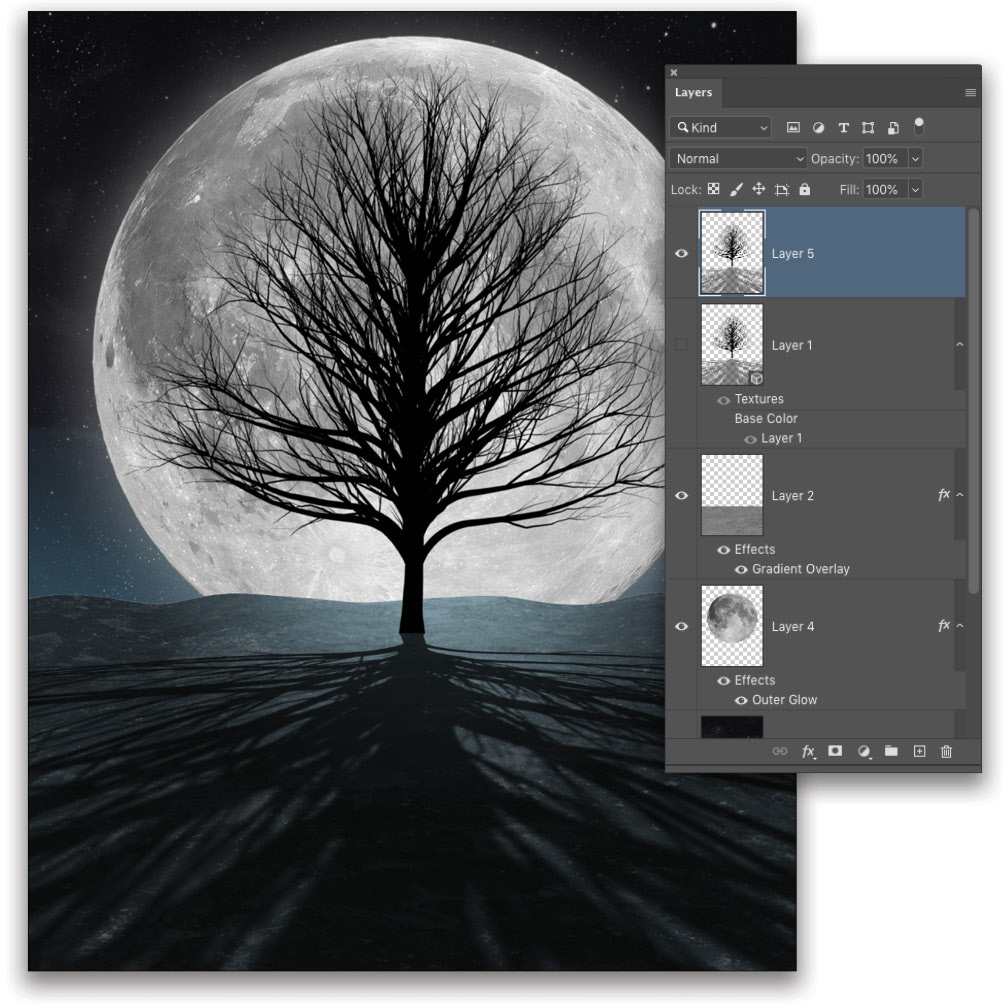
Step 13: Back in the Layers panel, click on the 3D tree layer to make it active. In the 3D panel, choose Environment. Then over in the Properties panel, go under the Ground Plane settings and set the Shadow Opacity to 75%. Also go up to the top of the panel and turn off the IBL (Image Based Light). This will “turn off the lights” in the scene except for the Point Light, which is now giving us a much more dramatic shadow.
Step 14: Now that we have a better idea of how the shadow looks, let’s adjust the light and camera’s position. Go back to the 3D panel and select Current View. With the Move tool active, select the Pan the 3D Camera tool in the Options Bar. Click-and-drag upward in the image to move the camera view to get a lower perspective of the tree, bringing the shadow closer to the camera. Drag up until the base of the tree is sitting on the horizon line.
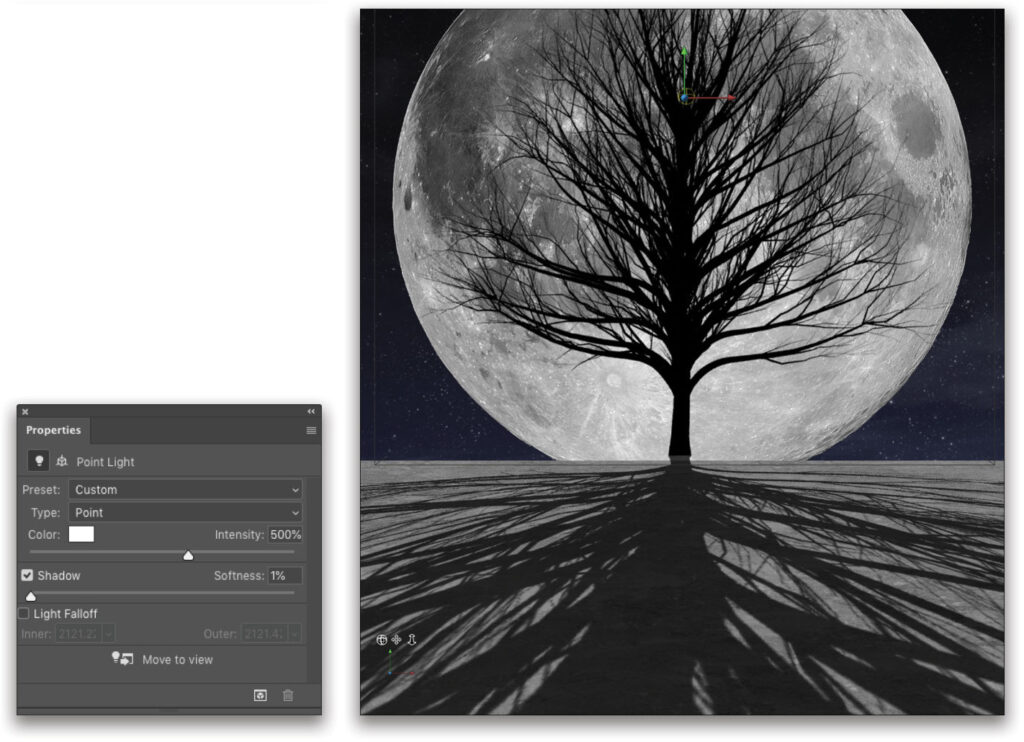
Step 15: Go back to the 3D panel and choose the Point Light again. Use the same Slide and Drag the 3D Object tools to reposition the light to change the shape and length of the shadow in the foreground. Also, in the Properties panel, set the Intensity to 500%, and just below that, set the Shadow Softness to 1%. This will soften the shadows the further they are away from the tree, giving the illusion of depth of field.
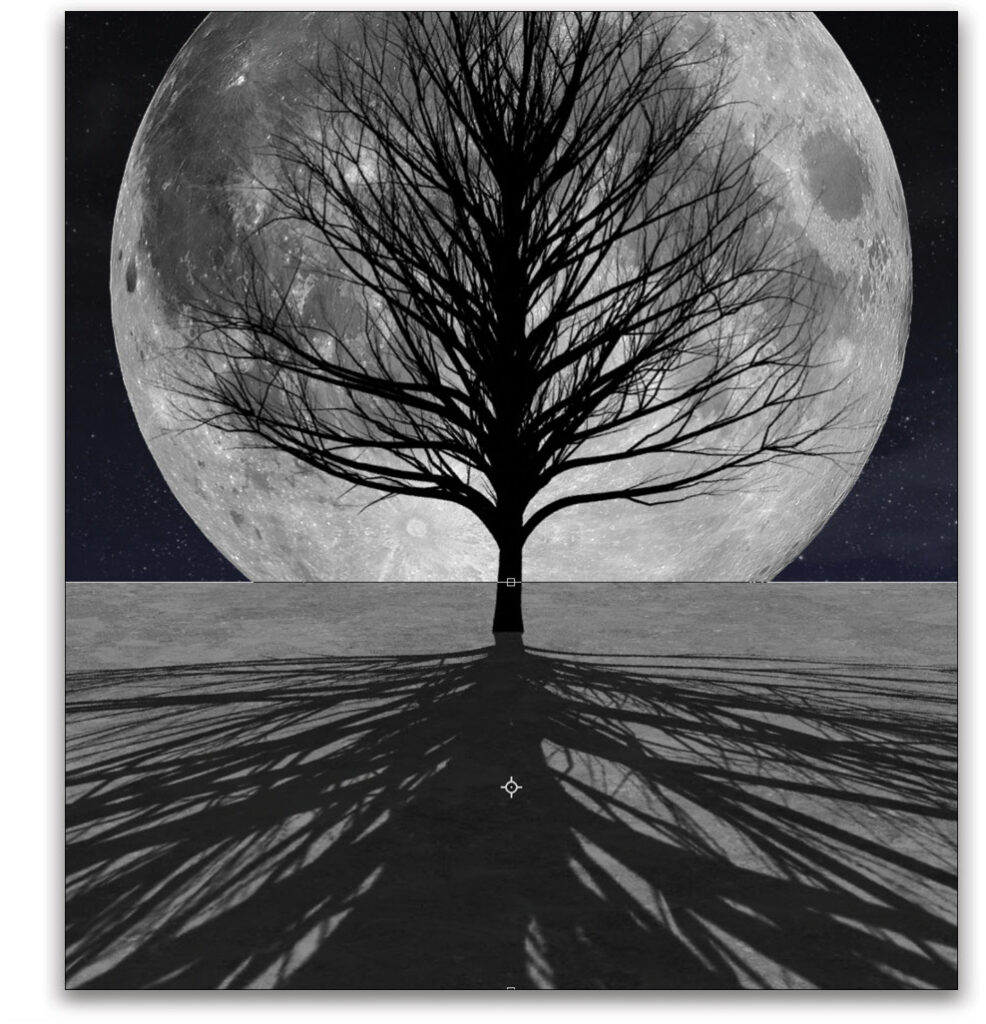
Step 16: If adjusting the camera angle moves the tree above the horizon like it did here, just do a quick Free Transform on the texture layer and scale it up a little so the horizon is higher than the base of the tree. Press Enter to commit the transformation.
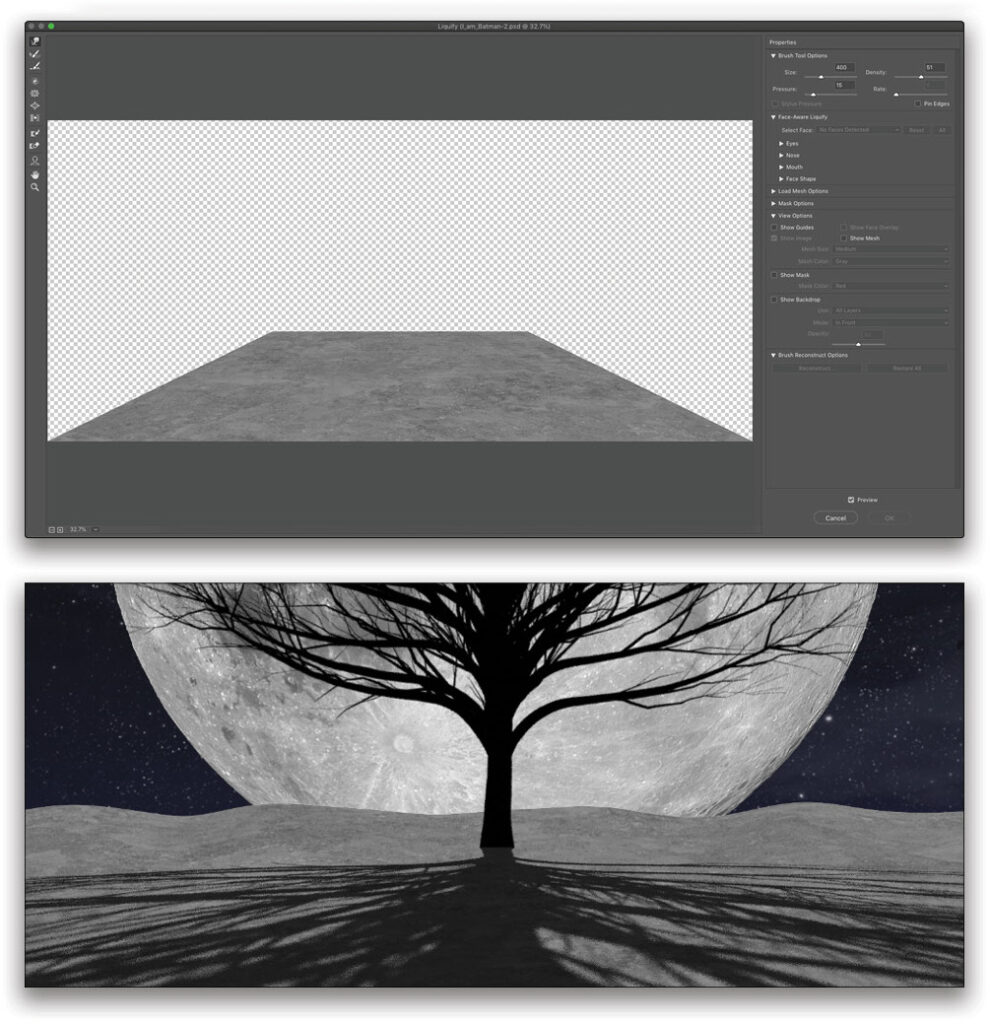
Step 17: The horizon is too straight and doesn’t look natural. To fix that, we’ll do a simple Liquify distortion. With the ground texture layer active in the Layers panel, go under the Filter menu, and choose Liquify.
Make sure the Forward Warp tool (W) is active, and in the Properties panel, set the brush Size to around 400 and the Density to around 50. Also turn off Show Backdrop in the View Options section so you just see the texture. Click-and-drag upward along various areas of the horizon to create a series of small hills. It doesn’t need much, so don’t overdo it. Click OK when done.
Step 18: With the horizon looking a little more natural, let’s turn to creating some atmospheric lighting. Remember, the shadow is on its own layer, and the ground plane is still a regular 2D layer; however, we’re going to light the ground texture with a gradient.
At the bottom of the Layers panel, click on the Add a Layer Style icon (ƒx), and choose Gradient Overlay. In the Layer Style dialog, click on the Gradient preview strip to open the Gradient Editor. Select the first Preset, which is the Foreground to Background gradient.
Double-click on the left color stop below the gradient ramp to open the Color Picker, and select a color. Here we selected a dark-blue color. Repeat for the color stop on the right and set it to a light blue. Click OK to close the Color Picker.
Back in the Layer Style dialog, set the Blend Mode to Overlay, but depending on the texture, different blend modes behave differently so be sure to try others. Also, set the Style to Radial. The lighter color should be in the middle of the radial gradient in the image; if not, then check on Reverse.
Click-and-drag in the canvas to manually position the center of the gradient at the edge of the horizon behind the tree so it looks like it’s the glow from the moon. Set the Angle to 144° to increase the “lighting.” Click OK when done. Remember this is a layer style, so you can double-click on it in the Layers panel at any time to change the colors if needed.
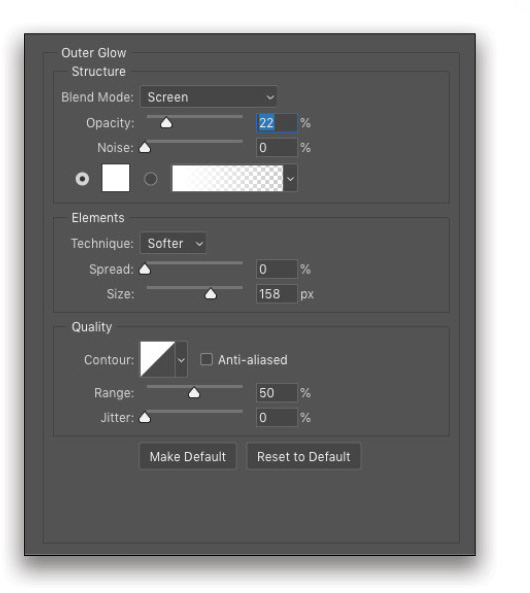
Step 19: Click on the moon layer in the Layers panel to make it active. Go to the Add a Layer Style icon at the bottom of the Layers panel, and choose Outer Glow. Using the settings shown here will create what looks like an atmospheric glow coming off the moon. Click OK.
Step 20: Next, press Command-L (PC: Ctrl-L) to apply a Levels adjustment to lighten the moon a little. Reducing the contrast helps with the atmospheric haze. Notice we only adjusted the midtone slider below the histogram, and also nudged the black Output Levels slider to around 30. Click OK.

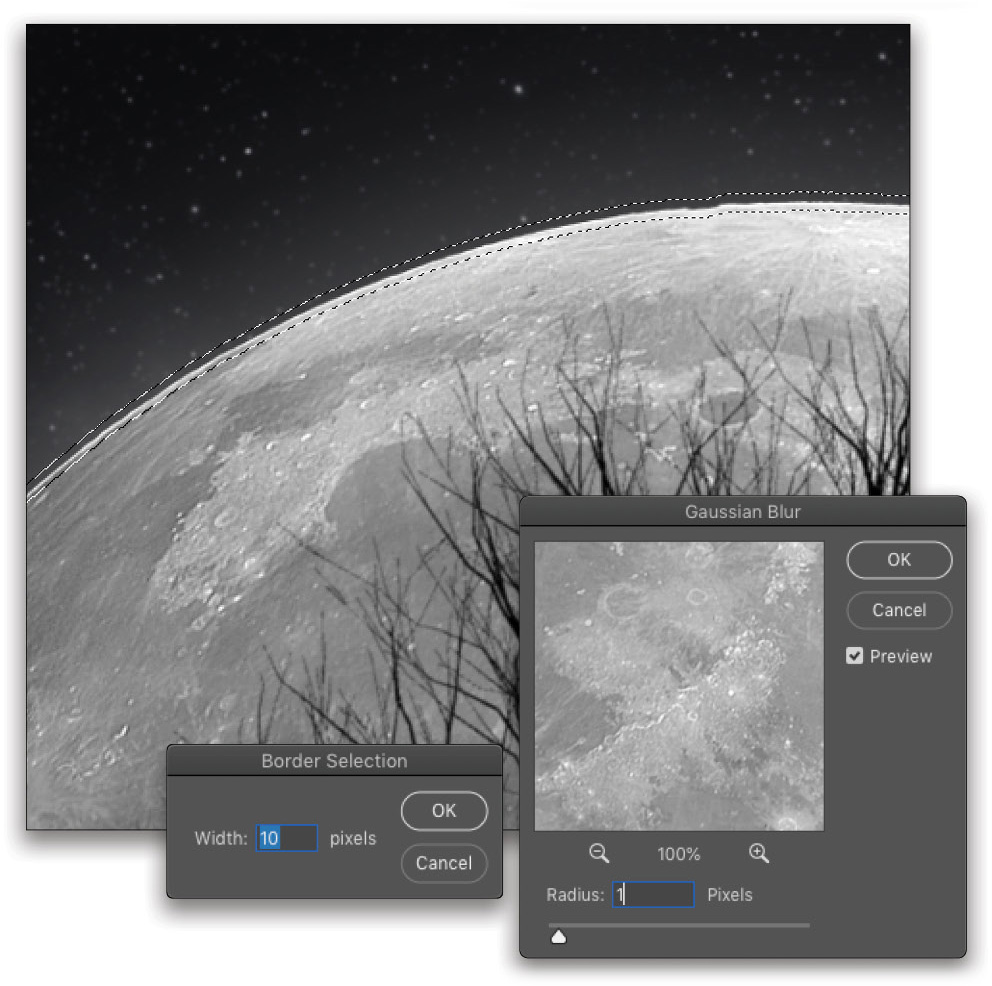
Step 21: To make the moon seem more distant, let’s add some blur to it. First, we want to blur the edges more than the rest of the moon, so hold down the Command (PC: Ctrl) key, and click on the moon layer thumbnail in the Layers panel to load the shape as a selection.
Go under the Select menu, to Modify, and choose Border. Set the Width to around 10 pixels and click OK. This will create a border selection isolated to just the edge of the moon. Go under the Filter menu, to Blur, and choose Gaussian Blur. Set the Radius to 1 pixel and click OK. Press Command-D (PC: Ctrl-D) to deselect.
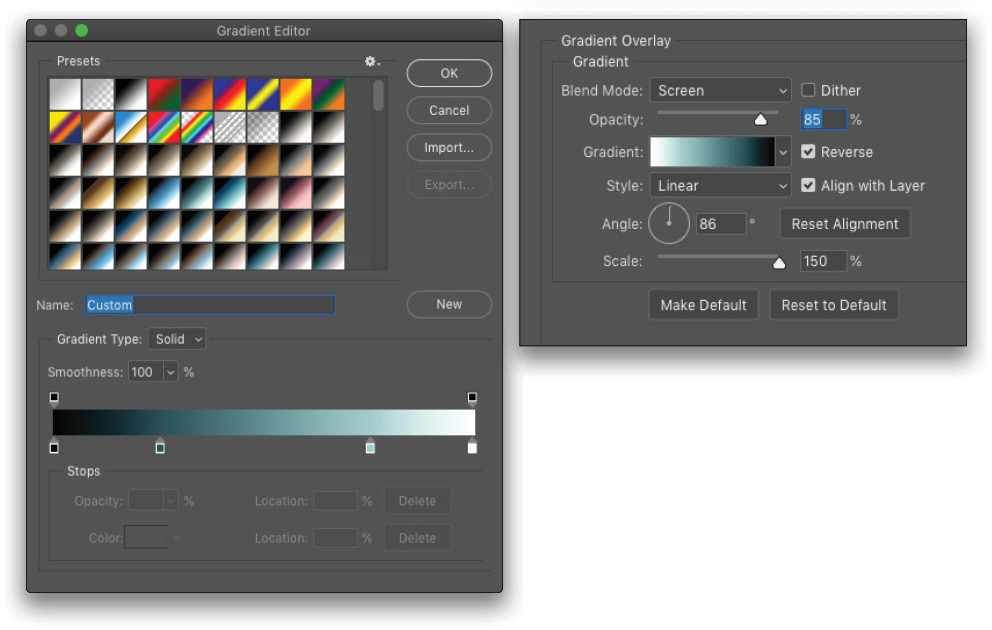
Step 22: Click on the sky image layer to make it active. Click on the Add a Layer Style icon at the bottom of the Layers panel, and choose Gradient Overlay. In the Layer Style dialog, click on the Gradient preview strip to open the Gradient Editor. You should see the same gradient we used earlier. Drag the current color stops inward, and then click below the gradient ramp to add two more stops at either end. Set the stop on the left to black, and the stop on the right to white. Click OK to close the Gradient Editor.
You can see the settings here to add an atmospheric glow to the sky layer, helping it blend in with the overall scene. Click-and-drag in the image to manually position the gradient so the light area is in the area of the horizon line.
Step 23: Now we’re ready to render the 3D layer, so go under the 3D menu and choose Render 3D Layer. You can also press Shift-Option-Command-R (PC: Shift-Alt-Ctrl-R).
Once the render is done (mine took about 5 minutes), press Command-A (PC: Ctrl-A) to select the entire layer area, and press Command-J (PC: Ctrl-J) to copy the image to a regular layer. Then, just turn off the 3D layer by clicking its Eye icon in the Layers panel. This allows you to keep the 3D version so you can switch out different tree elements without having to start over. You can click here to watch a quick video tip on how to do that.
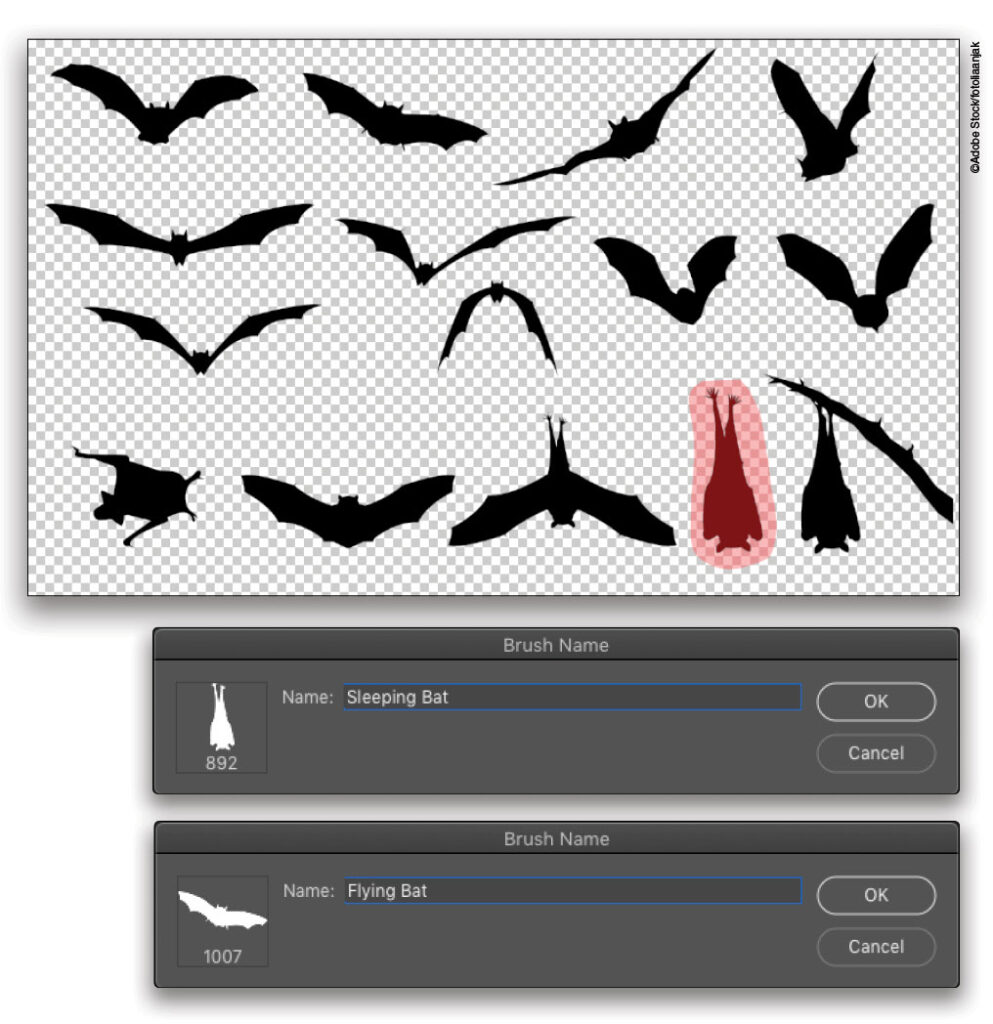
Step 24: Now that the stage is set, it’s time for the stars of the show. Here we have a set of bat shapes in various poses. They’re simple images but perfect for what we need here. You can click here to download the low-res preview from Adobe Stock. Since this is an SVG file, if you double-click it in the Libraries panel, it will attempt to open it in Illustrator. As a workaround, create a new 1,000×1,000-pixel file, and then drag-and-drop the bat image from the Libraries panel in the new document.
Start by using the Lasso tool (L) to draw a selection around the sleeping bat. Then go under the Edit menu, and choose Define Brush Preset. Photoshop will ignore any white areas when defining a brush. Give the brush a name, and click OK. Do the same with one of the flying bat poses. That’s all that we need.
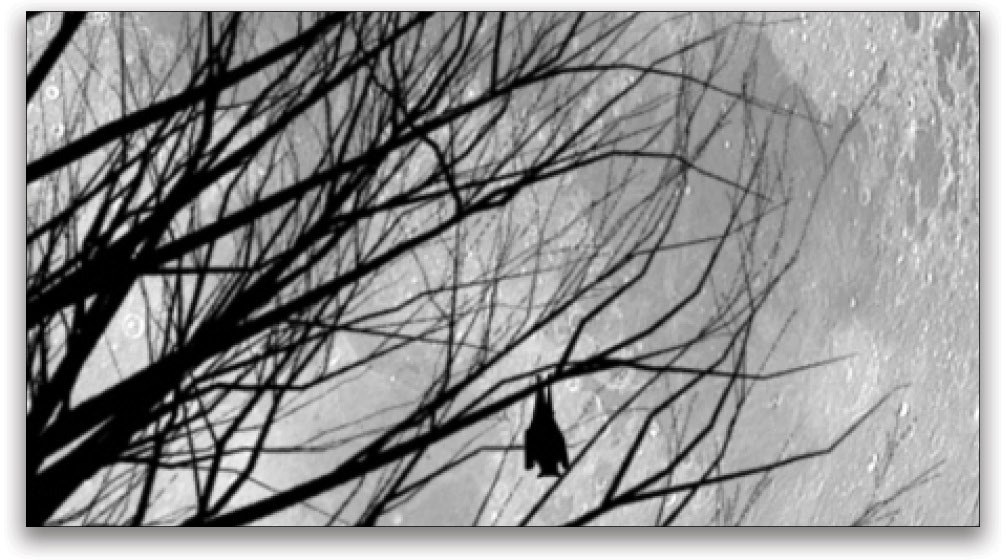
Step 25: With the Brush tool (B) selected, click on the brush preview in the Options Bar to open the Brush Preset Picker, and choose the sleeping bat brush (it should be near the bottom). Use the Bracket keys on your keyboard to size the brush down so the size of the bat is relative to the tree branches. Press D to set your Foreground color to black, and create a new layer on which to paint your bats. Then just dab one instance of the brush to see how it looks.
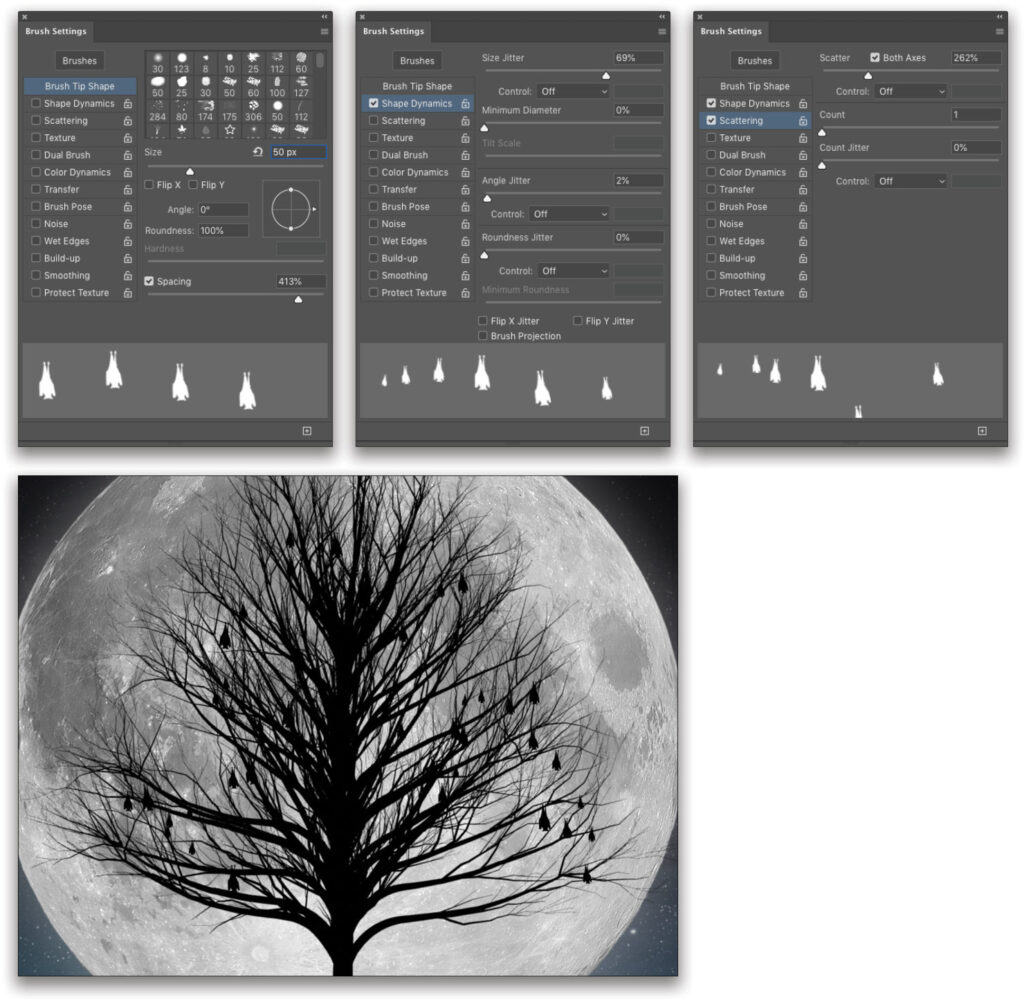
Step 26: Open the Brush Settings panel (Window>Brush Settings). In the Brush Tip Shape section, you’ll see our brush is around 50 px (if you used the low-res image from Adobe Stock to create the brush, set the Size to 100 px). Increase the Spacing to around 400%, and then activate Shape Dynamics in the list on the left. Increase the Size Jitter to around 70%, and set the Angle Jitter to 2%. Activate Scattering on the left, set the Scatter amount to around 260%, and check on Both Axes.
Start painting in the area of the tree branches to create a large group of sleeping bats in the tree. Again, don’t go crazy— but it’s hard not to!
Step 27: Repeat the last two steps, but this time switch to the flying bat brush and paint a few around the outer area of the tree.
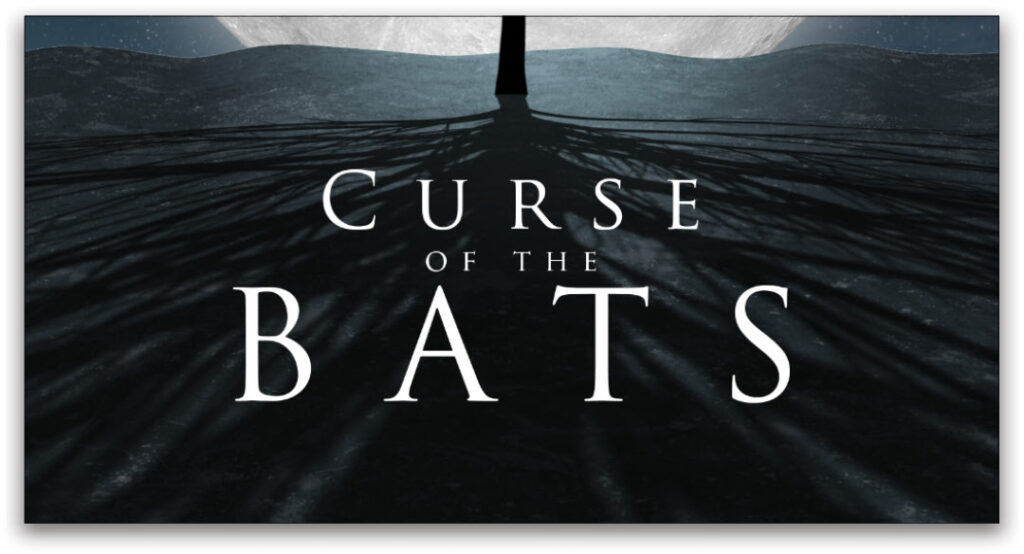
Step 28: Now let’s add some title effects. Here we used the Type tool (T) to set some type in white using the all-too-dramatic, movie-poster font Trajan Pro.
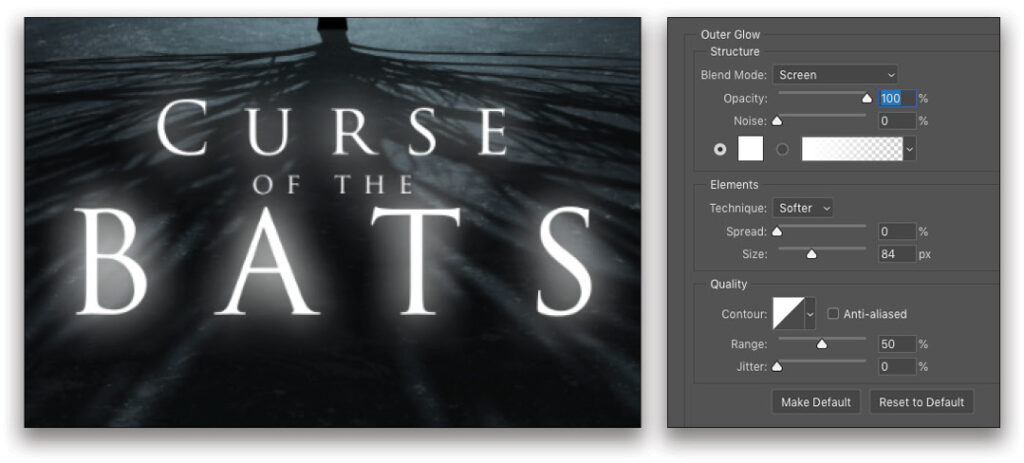
Step 29: Add an Outer Glow layer style to the text similar to what we did with the moon. Notice we have the Size set rather high. Click OK.
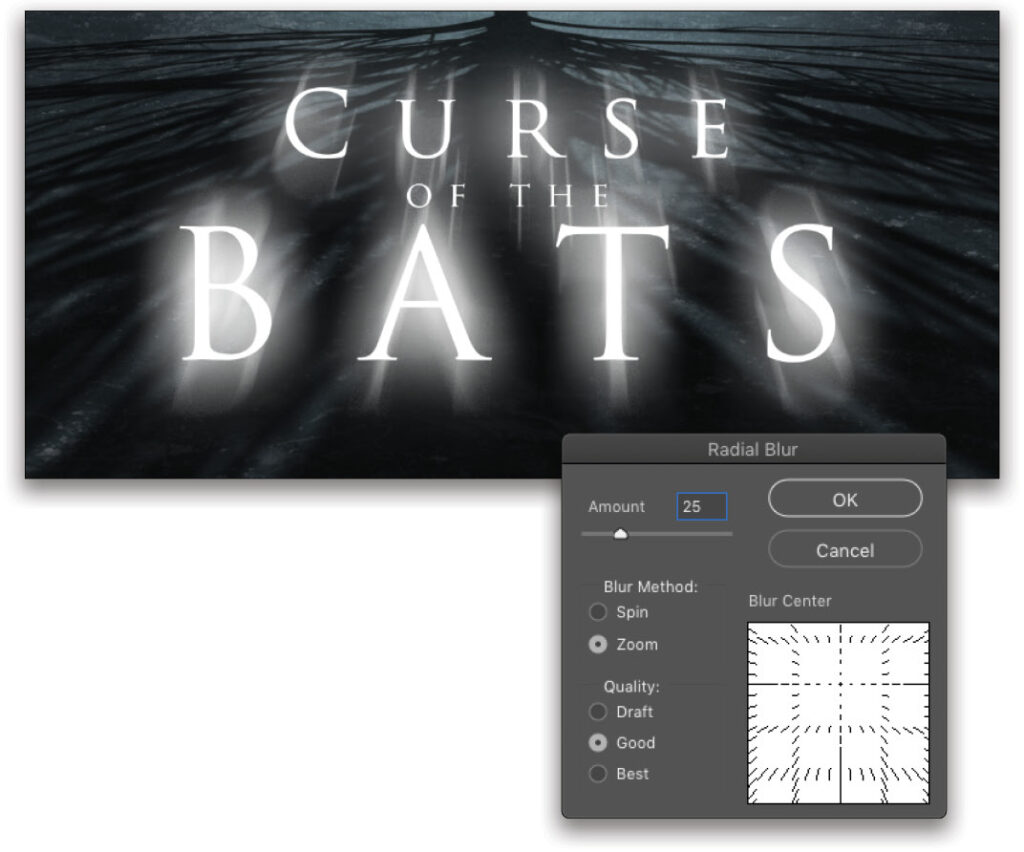
Step 30: Press Command-J (PC: Ctrl-J) to make a duplicate of the text layer. Right-click the duplicate layer and choose Rasterize Type. Then Right-click the layer again and choose Rasterize Layer Style. This makes the text and layer style regular pixels.
Go under the Filter menu, to Blur, and choose Radial Blur. Set the Blur Method to Zoom and the amount to 25. Click on the grid in the Blur Center and move it up so the center of the blur is approximately where the center of the moon is in the main image. Click OK.
Apply the filter again by pressing Control-Command-F (PC: Ctrl-Alt-F). This gives a quick-and-cool glare coming from the text.
There’s one final step to finish the image, and that’s adding some other trees along the edge of the horizon. For that, we’ll create a custom tree brush similar to the way we created the bats in the scene. To see how this is done, click here to check out a bonus video.
This article originally published in the October, 2020 issue of Photoshop User magazine.
About Photoshop User and KelbyOne
Photoshop User magazine comes out digitally 12 times a year and is part of KelbyOne, the leading educational resource for Photoshop, Lightroom, and photography. Pro members have access to more than 900 video courses and 100 back issues of Photoshop User. To learn more about KelbyOne, click here.


