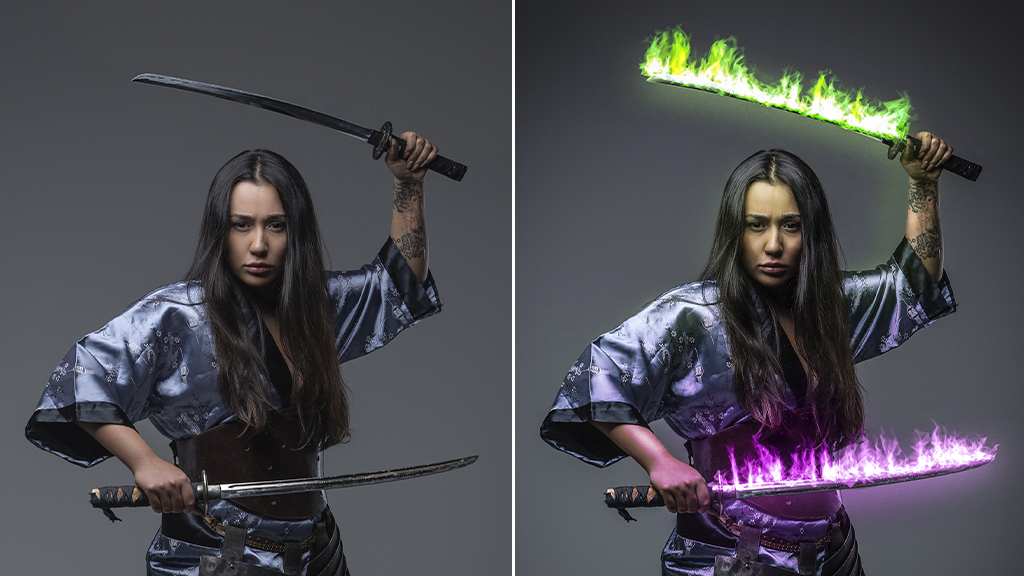
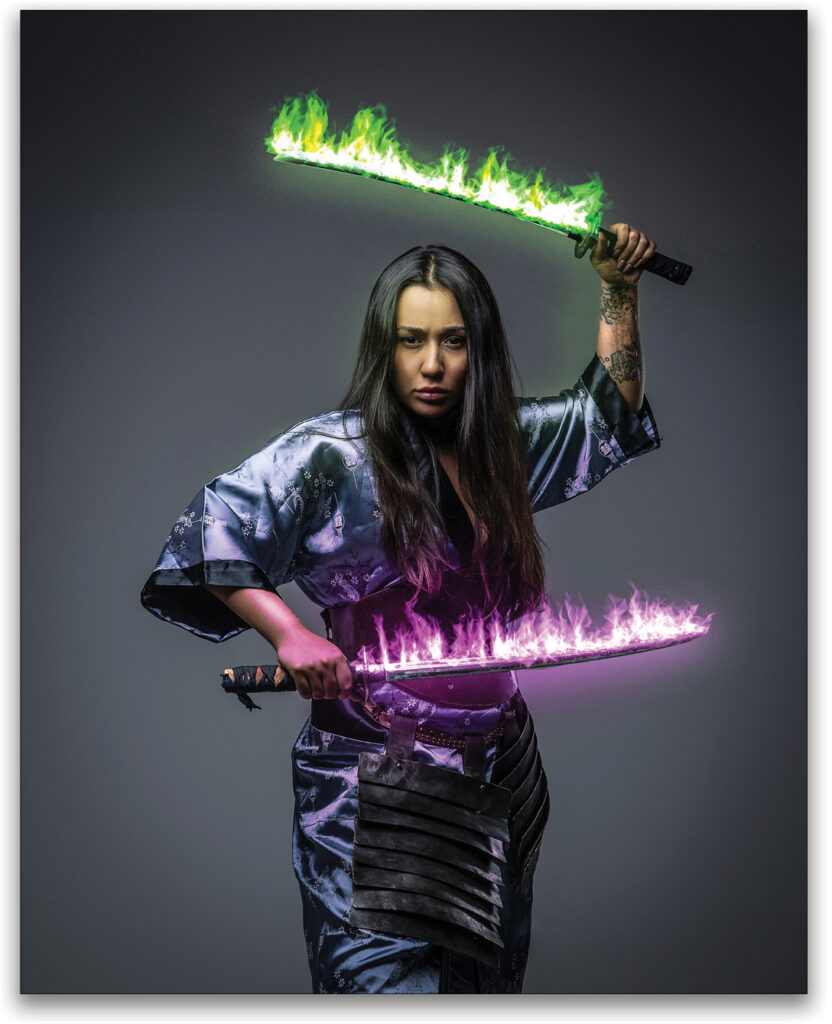
The marketing materials for the 2023 movie Dungeons & Dragons: Honor Among Thieves promises a fun adventure filled with familiar elements of the genre. Fans of D&D hope those promises are paid off with an enjoyable film that loves magical adventure as much as we do. So looking forward to that, we figured we’d use our own D&D column, “Down & Dirty Tricks,” to explore how to use Photoshop to create one of the elements from that universe: The Flaming Sword!
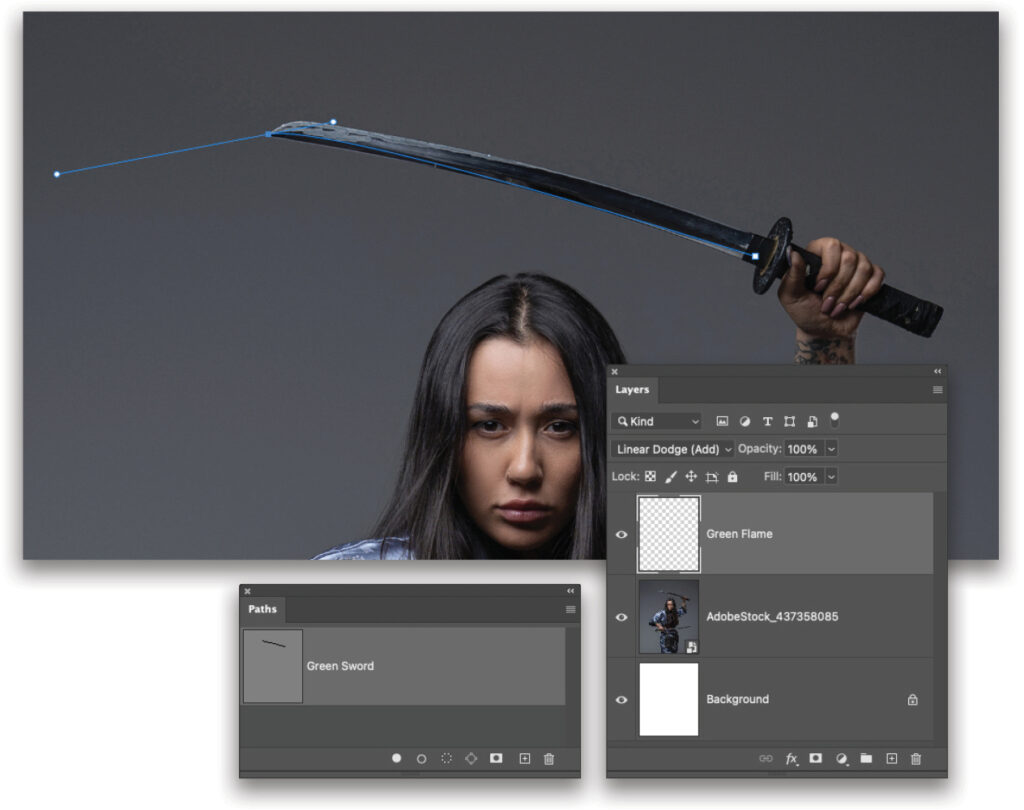
STEP ONE: In Photoshop create a new document with File>New, set the Width to 2000 pixels and the Height to 2500 pixels. Click Create, then use File>Place Embedded to drop in an image of a sword-wielding warrior. For this, we’ve used an image from Adobe Stock.
If you’d like to download the low-res watermarked version of this image to follow along, click this link, log in with your Adobe ID, and click the Save to Library button. Drag the image from the Libraries panel (Window>Libraries) into the new document. Resize it to fill the document and press Enter.
STEP TWO: Create a new layer over the stock layer, double-click its name in the Layers panel, rename it “Green Flame,” and then set the layer’s blending mode to Linear Dodge (Add). Grab the Pen tool (P), and make sure the Tool Mode is set to Path (not Shape) in the Options Bar. Click to add a point where the bottom edge of the blade meets the hilt. Click-and-drag at the very tip of the sword to add a second point and to create a very simple curve along the bottom edge of the blade. This doesn’t have to be perfect, just follow the curve as best as you can. In the Paths panel (Window>Paths) name the path “Green Sword.”
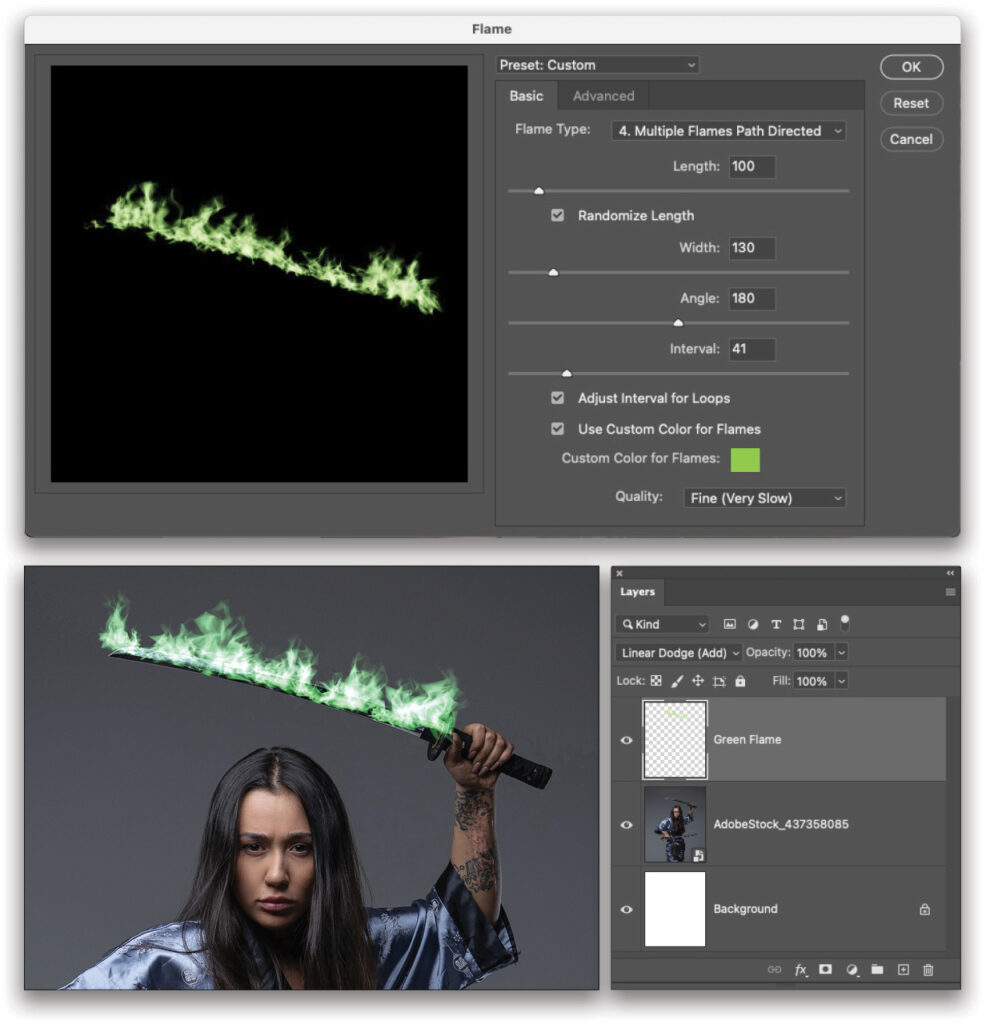
STEP THREE: Go to Filter>Render>Flame and set the Flame Type drop-down menu to 4. Multiple Flames Path Directed with a Length of 100. Enable the Randomize Length option, and set the Width to 130, Angle to 180, and the Interval to 41. Also enable the option for Use Custom Color for Flames, click on the color swatch, and set the color to a bright green (#49F051) in the Colors dialog. Close the Colors dialog, set the Quality to Fine (Very Slow), and click OK to see the results. These settings are just a suggested starting point. Photoshop won’t use the Flame filter as a smart filter, so if adjustments are needed, press Command-Z (PC: Ctrl-Z) to undo and run the filter again with edited settings.
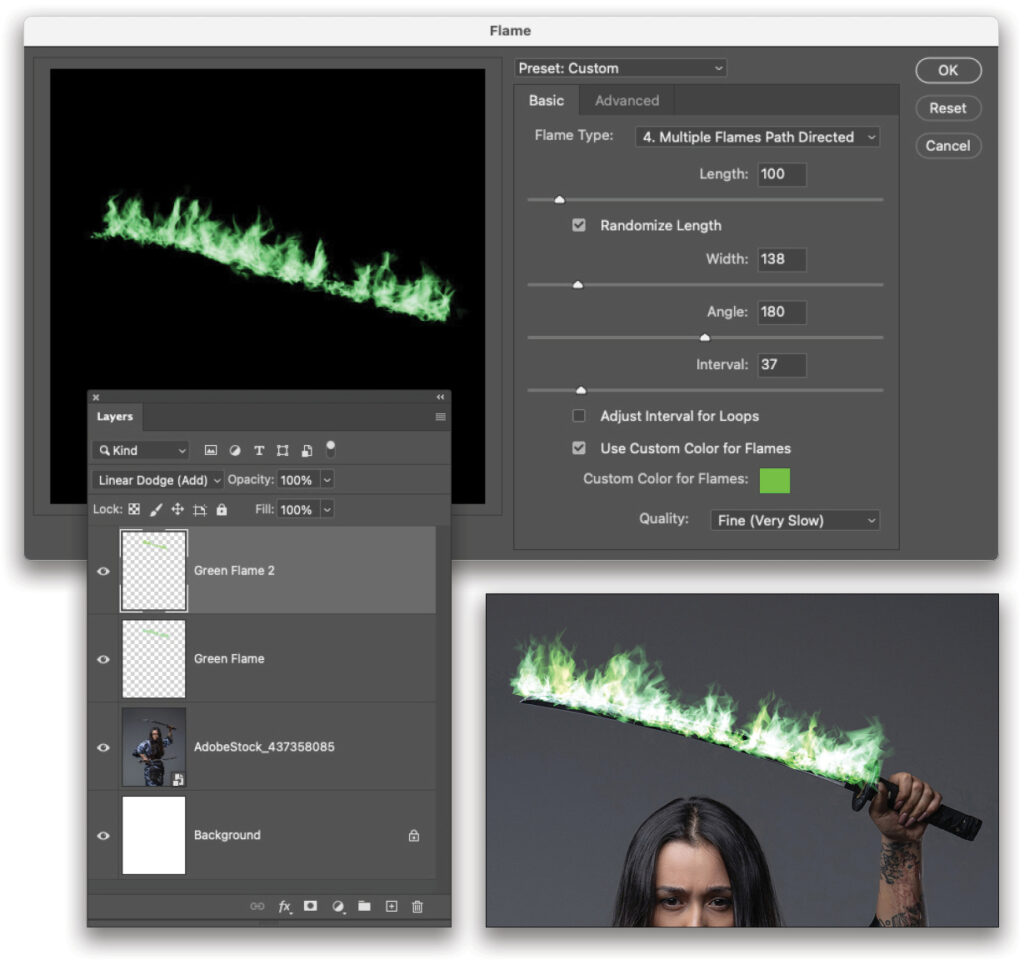
STEP FOUR: Add another new layer named “Green Flame 2” also set to Linear Dodge and run the Flame filter again, but with slightly different settings. This secondary layer of the effect gives more depth and realism to the flame. Feel free to experiment with the settings to see the various ways the flame can be rendered. We used a slightly darker green for this one; you’ll have to experiment with how dark to make the green so the flame isn’t blown out.
STEP FIVE: Shift-click both flame layers in the Layers panel to select them and convert them into a single smart object with Layer>Smart Objects>Convert to Smart Object. Then set the blending mode of the resulting smart object to Color Dodge (you can also try setting the blending mode to Screen if the flames are still too intense). Run the Liquify filter (Filter>Liquify) and use the Forward Warp tool (W) to make manual adjustments to the shape and form of the flames. (Near the bottom of the Properties panel on the right, you can turn on Show Backdrop and lower the Opacity to see the image.) This is a good way to specify where the flame should be the largest and most intense. Tip: Use the Bracket keys on your keyboard to quickly resize your brush as needed.
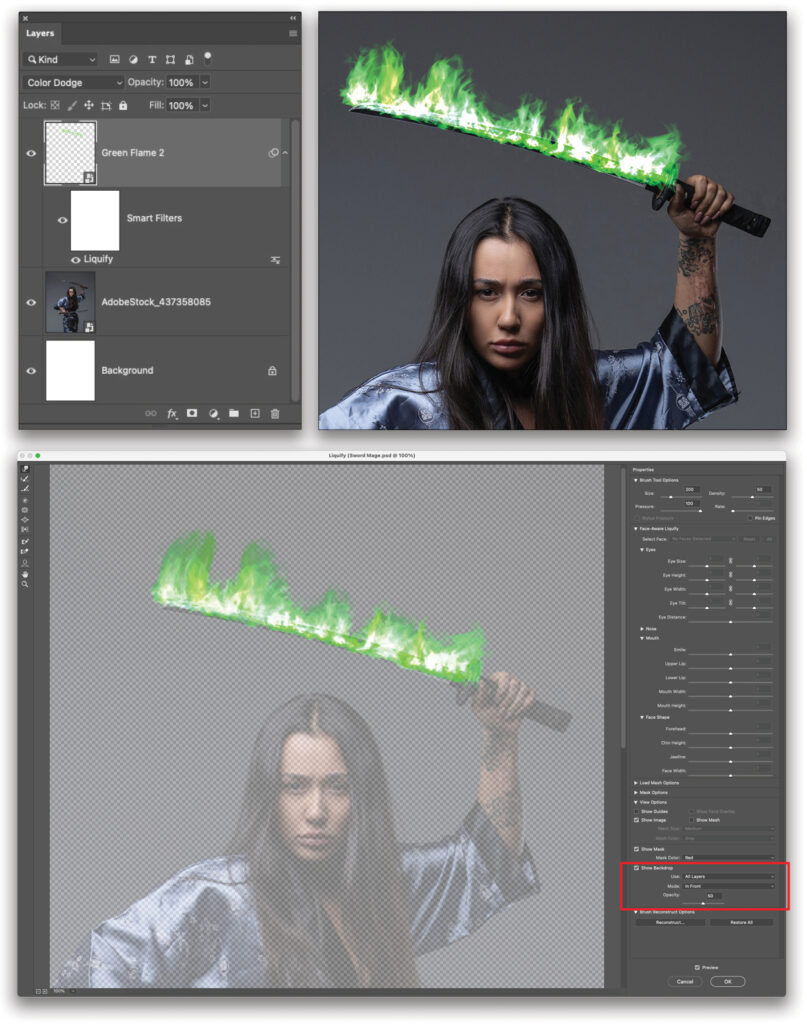
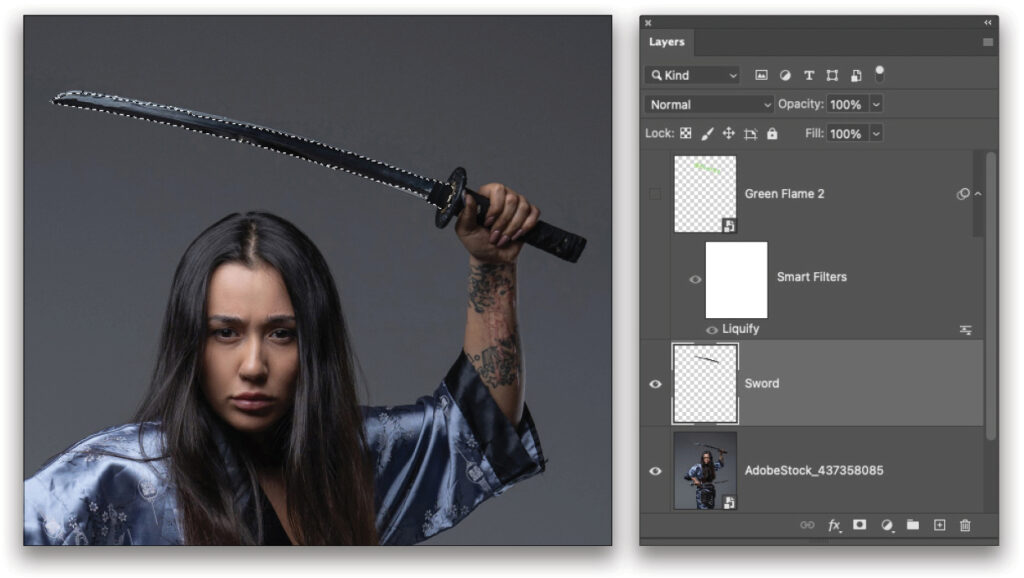
STEP SIX: With the flames in place, we need to direct our attention to the scene lighting to make the effect look more realistic. Click on the stock image layer in the Layers panel to make it the currently active layer. Then use the Quick Selection tool (nested with the Object Selection tool [W] in the Toolbar) to create a selection of just the sword. If it’s helpful, toggle the visibility of the green flame layer (click its Eye icon in the Layers panel) while making the selection. Use the Left Bracket key to make the brush smaller than the width of the sword. If you select any of the background, hold the Option (PC: Alt) key, and paint to remove those parts from the selection. Then press Command-J (PC: Ctrl-J) to copy the selection to a new layer. Name the layer “Sword.”
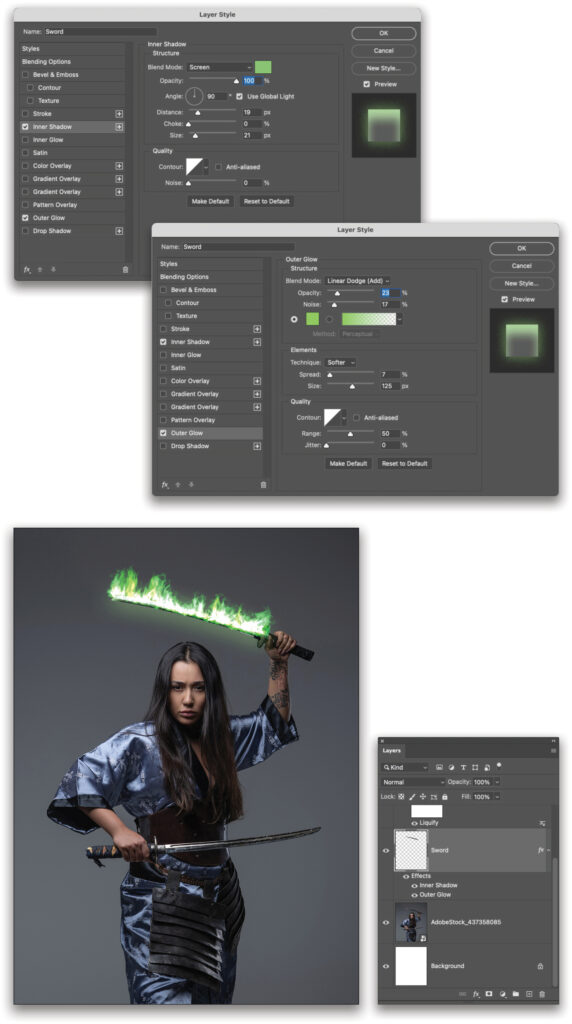
STEP SEVEN: Open the Layer Style dialog for the Sword layer by double-clicking its layer thumbnail in the Layers panel. Start with an Inner Shadow style. Set the Blend Mode to Screen, the color to a lime green (#89c472), and the Opacity to 100%. Use an Angle of 90°, Distance of 19 px, and size of 21 px.
Then click on the words “Outer Glow” in the list on the left side of the dialog, and set its Blend Mode to Linear Dodge (Add), Opacity to 23%, Noise to 17%, Spread to 7%, and Size to 125 px. Click on the color swatch and set it to a slightly brighter green color (#86d55c). Click OK to apply the layer styles.
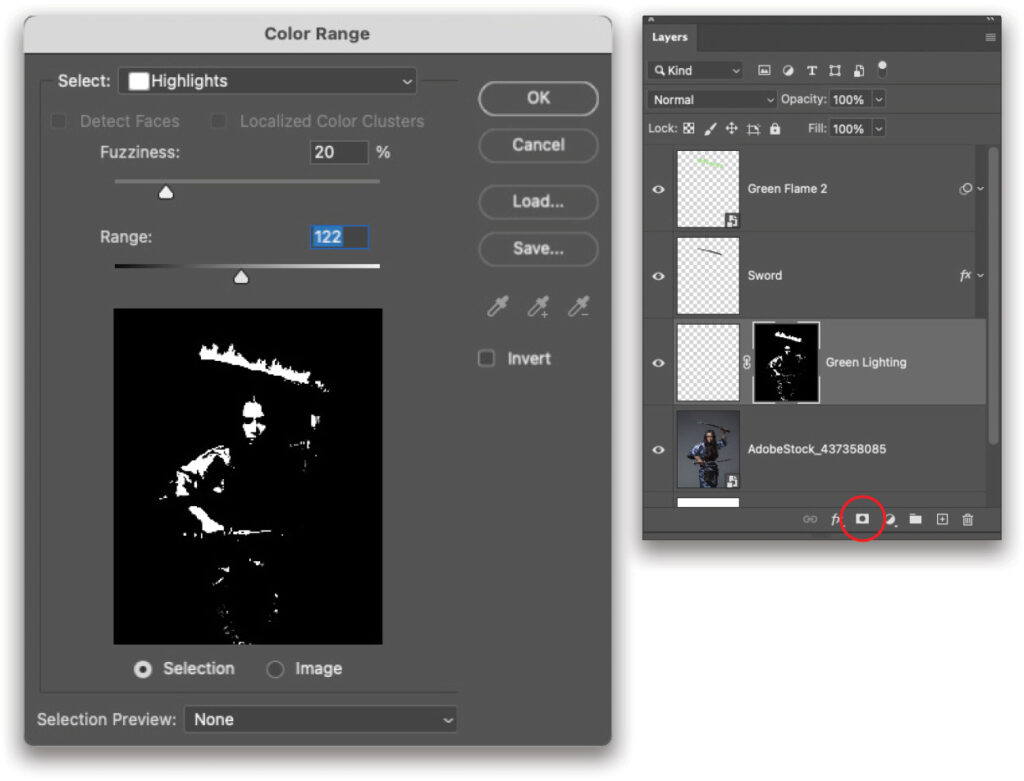
STEP EIGHT: The colored flame should cast a light across the model of a similar hue. Add a new layer beneath the Sword layer and call it “Green Lighting.” Then go to Select>Color Range and choose Highlights from the Select drop-down menu. Set the Fuzziness to 20% and the Range to 122. This will create a selection based on the brightest portions of the image, which is where the light is hitting the subject the most. After clicking OK to create the selection, click the Add Layer Mask icon (circle in a square) at the bottom of the Layers panel.
STEP NINE: Click on the layer thumbnail so the focus is on the layer and not the mask. Set the layer’s blending mode to Soft Light and then sample a light green from the flame to be the Foreground color by switching to the Eyedropper tool (I) and clicking in the image.
Grab the Gradient tool (G) and, in the Options Bar, set it to the Radial Gradient, and click on the thumbnail preview. In the Gradient Editor, choose the Foreground to Transparent preset in the Basics folder, and click OK. Drag out a gradient starting from the brightest part of the sword. The layer mask keeps the color to the bright areas, and the blending mode makes the colorization appear as lighting and not just plain color. If touch ups need to be made, use a soft round Brush (B) on the mask, remembering that white paint reveals, black paint conceals.
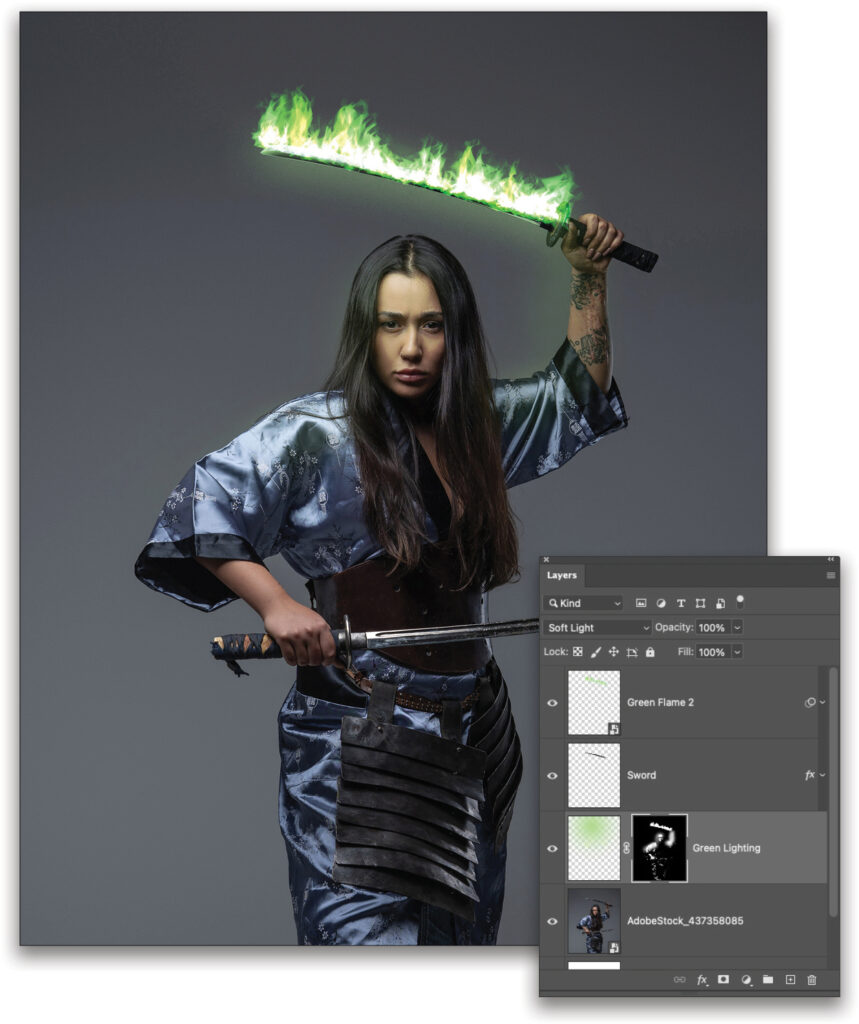
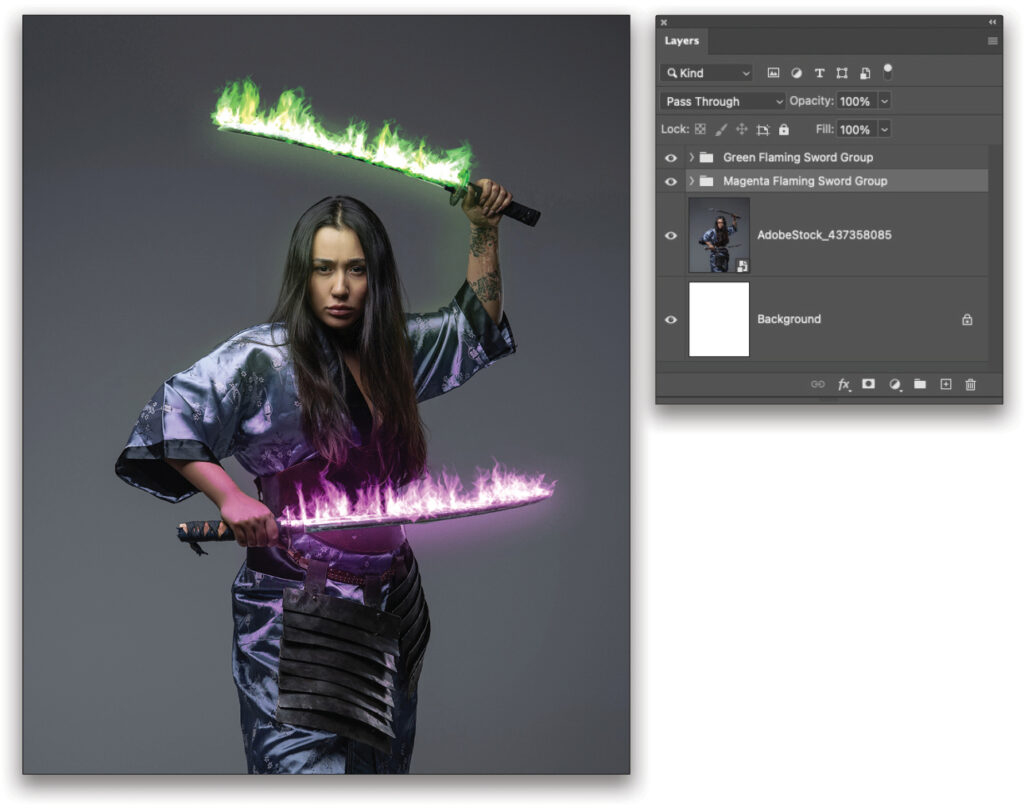
STEP 10: To keep things tidy, put all the layers for the green flaming sword into a single group by Shift-selecting them in the Layers panel and pressing Command-G (PC: Ctrl-G) to group the layers together. Name the group “Green Flaming Sword Group.” Then repeat the same process for the other sword, but make it a different color. When choosing a color, consider picking a complementary color to the first effect; in this case, we went with magenta.
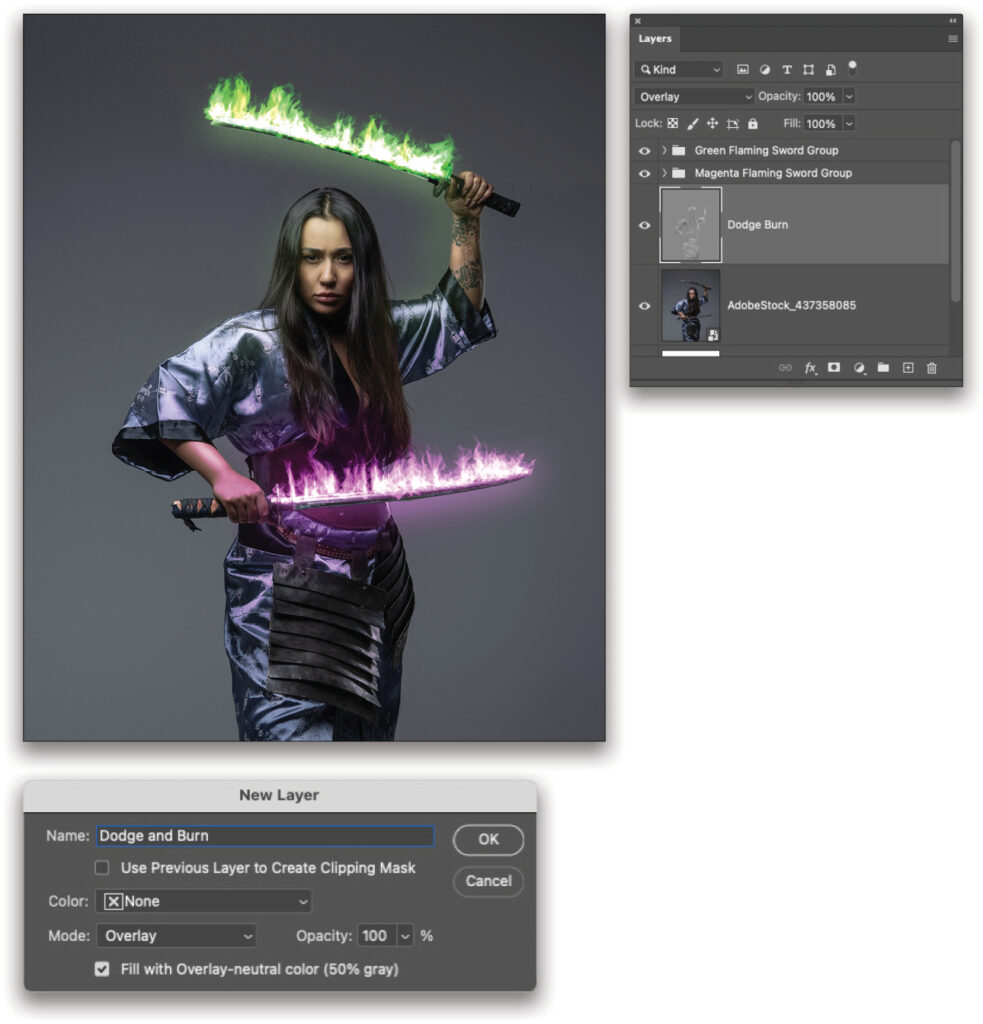
STEP 11: The primary effect is completed at this point, so it’s time for some finishing effects. Add a new layer above the stock image layer with Layer>New>Layer. In the New Layer dialog, set the name to “Dodge and Burn” and the Mode to Overlay. Then check the option box for Fill with Overlay-Neutral Color (50% Gray). After adding the layer, use the Dodge tool (O) to enhance the bright areas and the Burn tool to deepen the shadows.
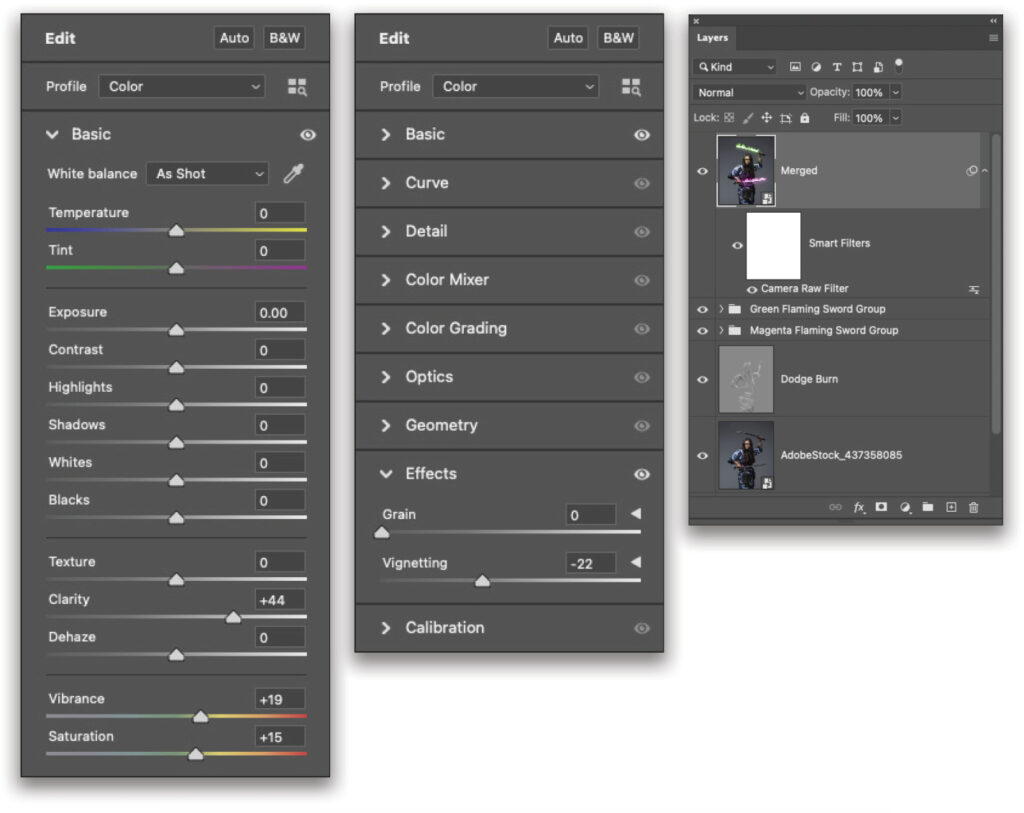
STEP 12: Go to the top layer or group in the Layers panel, hold down the Option (PC: Alt) key and go to Layer>Merge Visible. This will create a merged layer at the top of the layer stack. Turn this layer into a smart object and go to Filter>Camera Raw Filter. In the Basic tab, set the Clarity to +44, Vibrance to +19, and Saturation to +15. In the Effects tab, set the Vignetting to –22. Then click OK and enjoy your image of a mystical sword mage!
The Flame filter in Photoshop can be extremely useful as it follows a drawn path. That way it can be used to add flames to a wide variety of elements. Naturally, a sword is a fun and obvious choice, but the same techniques can be used to add mystical flames to text or titles, all without having to know a fireball spell!
This article originally published in the February, 2023 issue of Photoshop User magazine.
About Photoshop User and KelbyOne
Photoshop User magazine comes out digitally 12 times a year and is part of KelbyOne, the leading educational resource for Photoshop, Lightroom, and photography. Pro members have access to more than 900 video courses and 100 back issues of Photoshop User. To learn more about KelbyOne, click here.


