Skin is a beautiful thing. It’s stretchy and flexible, and exists in complex textures and shades. The same things that make skin beautiful also make it incredibly challenging to re-create in Photoshop. If you use frequency separation for skin retouching, you’ve probably encountered a situation where in order to deal with certain blemishes, you end up losing the essential texture of the surrounding skin.
Because there are so many variations, even on the same body, it can be daunting trying to find a solution, and tempting to fall back on simply using noise or similar textures. This issue, let’s take a look at a somewhat involved technique for synthesizing and applying facial skin textures. First, we need to break down the problem into approachable pieces.
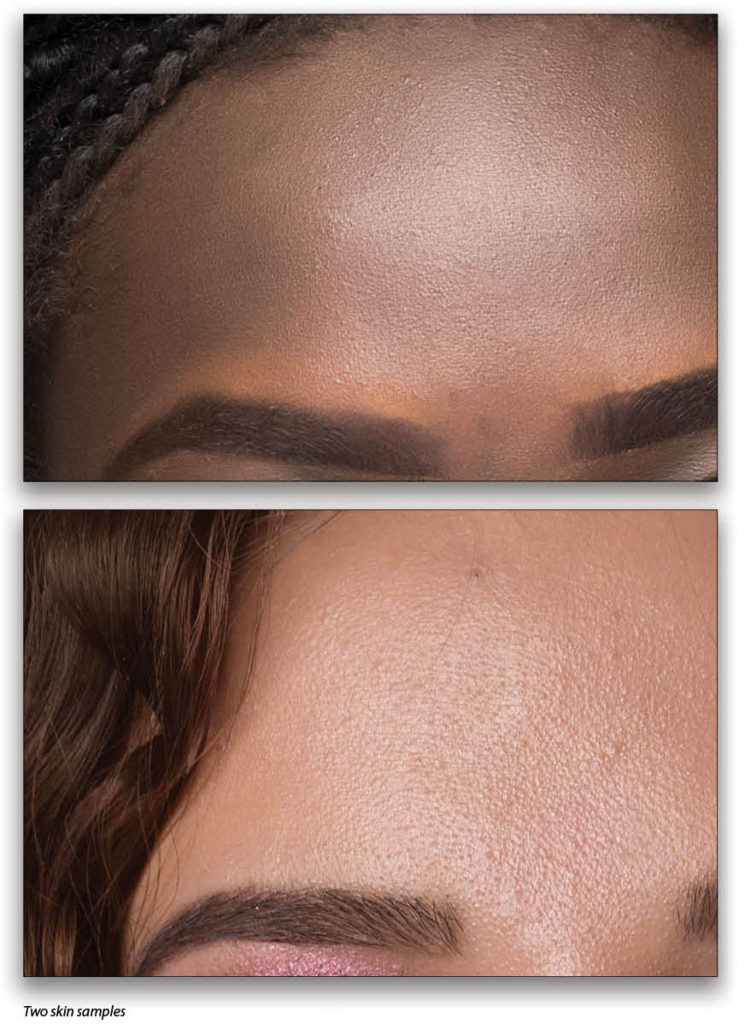
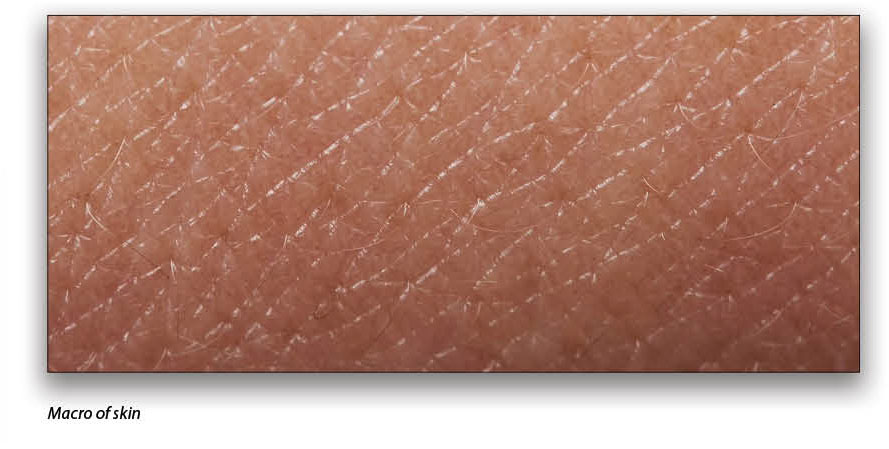
In both of these samples, the skin on the forehead seems dominated by tiny bumps randomly scattered around. This is why most techniques rely on using noise or fine textures like sandstone; but these tend to be overly sharp and they don’t flow with the tension and direction of the skin. There’s also a secondary texture that implies direction of movement and elasticity: fine lines and cell structures. These tend to look more like tiny, irregular triangles as in this macro shot.
We can develop these two elements independently, then combine them in our photo as desired. Keeping them distinct gives us a lot more flexibility for repairing textures in many different areas of the body.
Building the Texture
Let’s start with the lines. So, fire up Photoshop and create a new document (File>New) that’s 4,000×4,000 px, 8-bit, and RGB. Fill the background layer with 50% gray (go to Edit>Fill, select 50% Gray in the Contents drop-down menu, and click OK). In the interest of saving space, I’ll give you the bullet list of steps for creating the texture, then describe the choices and options. The letters at the end of various steps correspond to the letters in the images at the top of the next page.
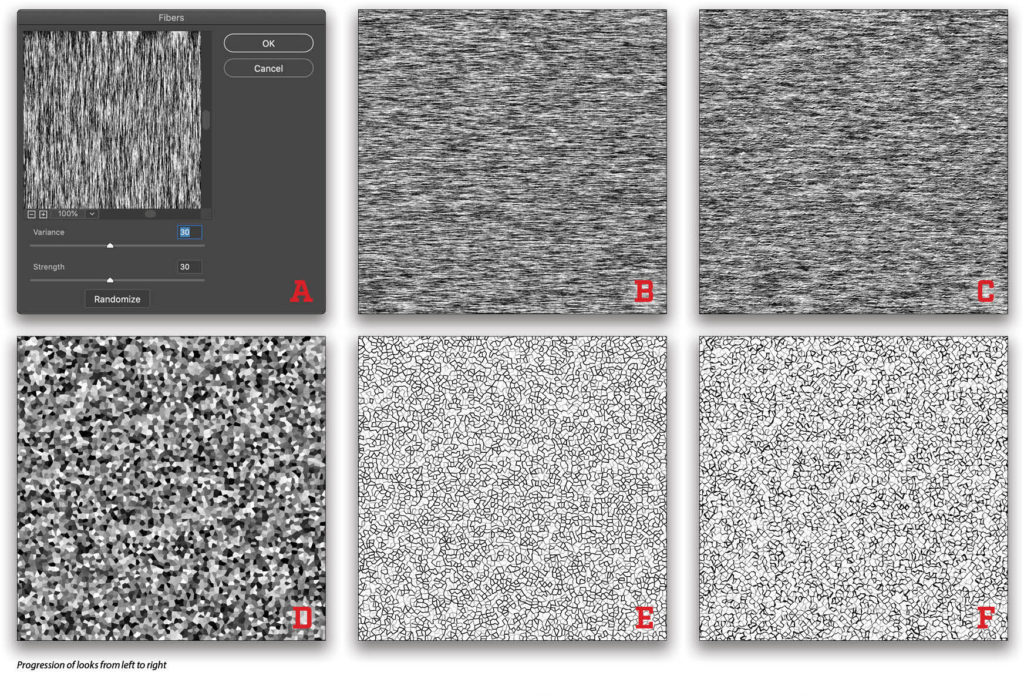
- Duplicate the background layer (Command-J [PC: Ctrl-J]).
- Name the duplicate layer “Fibers.”
- Press D to load the default black and white for the Foreground/Background colors.
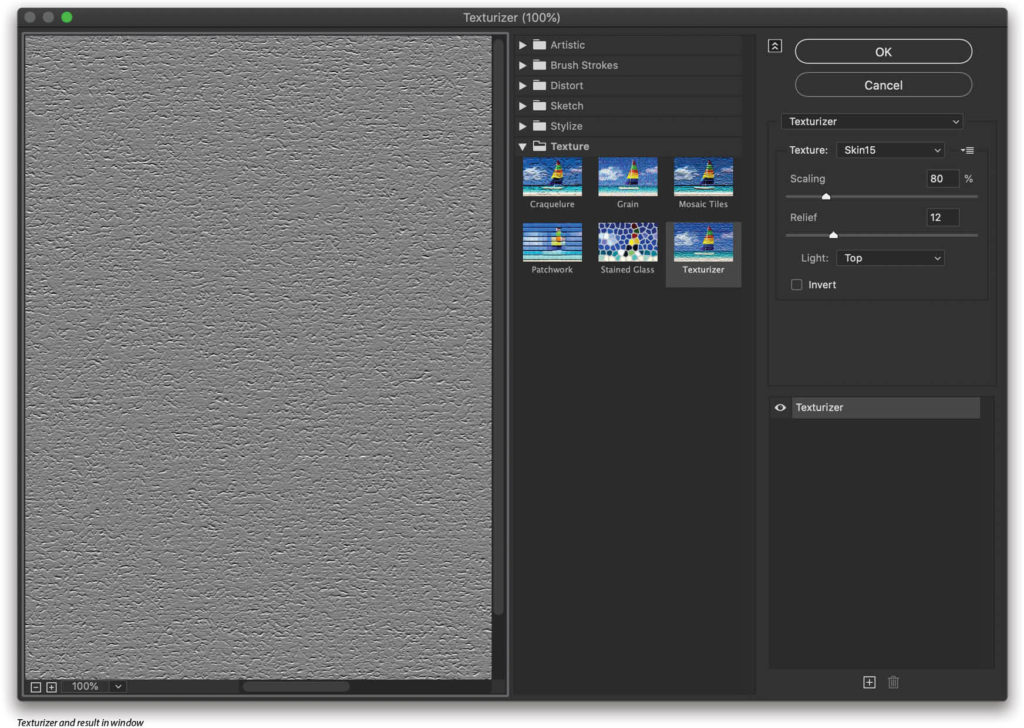
- Go to Filter>Render>Fibers and set both Variance and Strength to 30. (A)
- Go to Edit>Transform>Rotate 90° Clockwise so the fibers are horizontal. (B)
- Go to Filter>Distort>Ripple and set Size to Medium and Amount to 100%. (C)
- Duplicate the Fibers layer.
- Name the duplicate “Cells.”
On the Cells layer:
- Go to Filter>Pixelate>Crystallize and set the Cell Size to 20. (D)
- Go to Filter>Stylize>Find Edges. (E)
- Go to Filter>Filter Gallery, expand the Distort group, and choose Glass. Select Tiny Lens for the Texture, and set Distortion to 2, Smoothness to 9, and Scaling to 100%. (F)
- Get the layer blending mode to Screen and Opacity to 75%.
- Go to Layer>Layer Style>Blending Options, and set Blend If to Gray. Below Underlying Layer, Option-click (PC: Alt-click) the whites slider on the right to split it. Set the left half to 145 and leave the right half at 255.
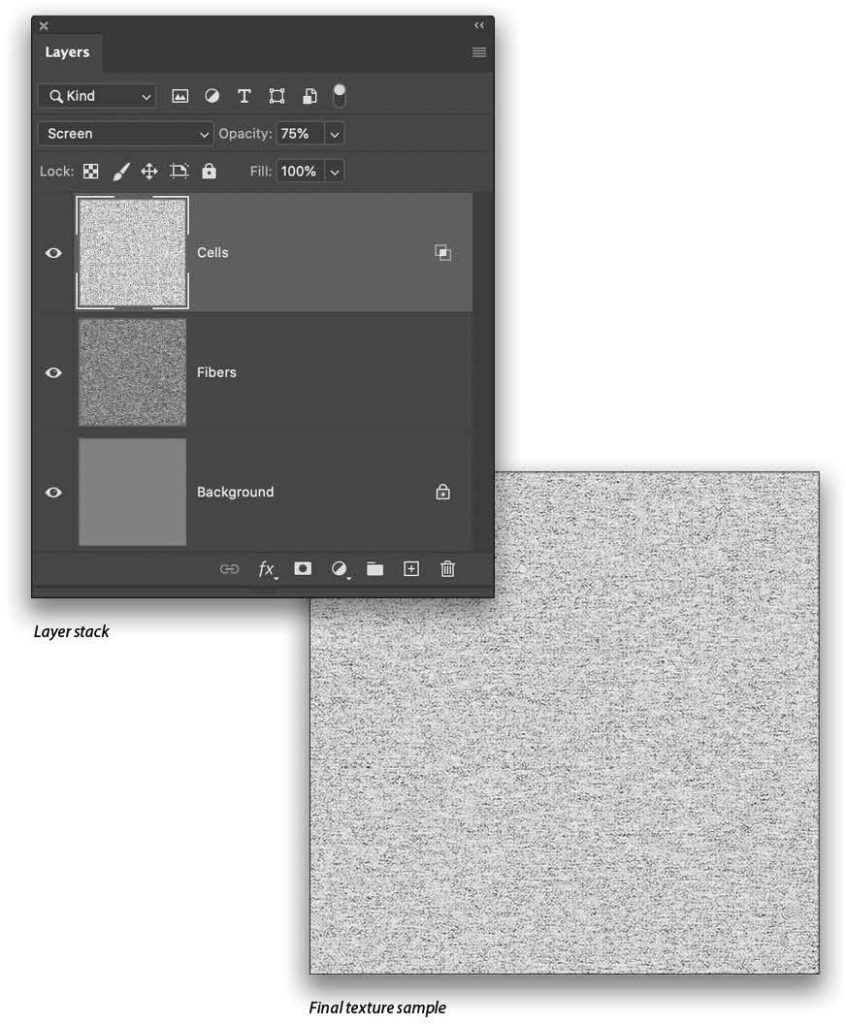
Whew! Now that we have something to look at, let’s talk about what got us there and why. Fibers gives us the fine directional texture with a little randomness. When running the filter, look for a fairly even distribution of values. Hit the Randomize button a few times if you need a variation. The Ripple filter gives it a little fine variation that will show up later when we blend.
Crystallize is where we get the cellular structure, and it’s worth taking a moment to consider some options. The size of the cells will affect the relationship between the cells we see on the skin and the fine lines: Too small and they just look muddy, but too large and they dominate. At these settings, the cell sizes and fibers are reasonably well balanced; but since the goal is to repair existing skin, you may need to adjust the size for a better match.
Also, we could easily stretch the crystals after running the Crystallize filter. If we transform to stretch horizontally, we’ll get closer to the elongated cells from the closeup skin sample above. I’ve left it out here because we’re going to transform the texture after we get it into our portrait document.
Applying a little distortion from the Glass filter breaks up the straight lines, and tends to look a little more organic. Finally, blending with Screen mode and Blend If allows the underlying fiber texture to come through for a somewhat random effect, like real skin. We don’t have to worry about color here because we’re going to apply this as a texture to imply surface variation.
Saving the Result and Putting It to Use
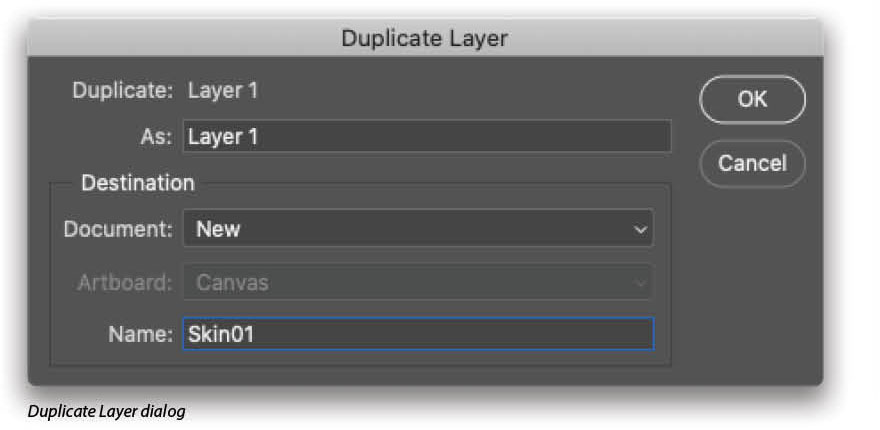
The next thing is to save the result in a format we can use with another filter, the Texturizer. Create a blank layer at the top of your layer stack and stamp a merged copy (Command-Option-Shift-E [PC: Ctrl-Alt-Shift-E]). Right-click on the merged copy and choose Duplicate Layer. In the dialog that appears, choose New in the Document drop-down menu in the Destination section, and give it a name. I like to number my variations (e.g., Skin01.psd), but feel free to use more descriptive names for specific uses. Click OK.
In the new document, flatten the image (Layer>Flatten Image) and save it someplace you’ll remember later. I created a Textures folder, then one for Skin. Let’s put it to use!
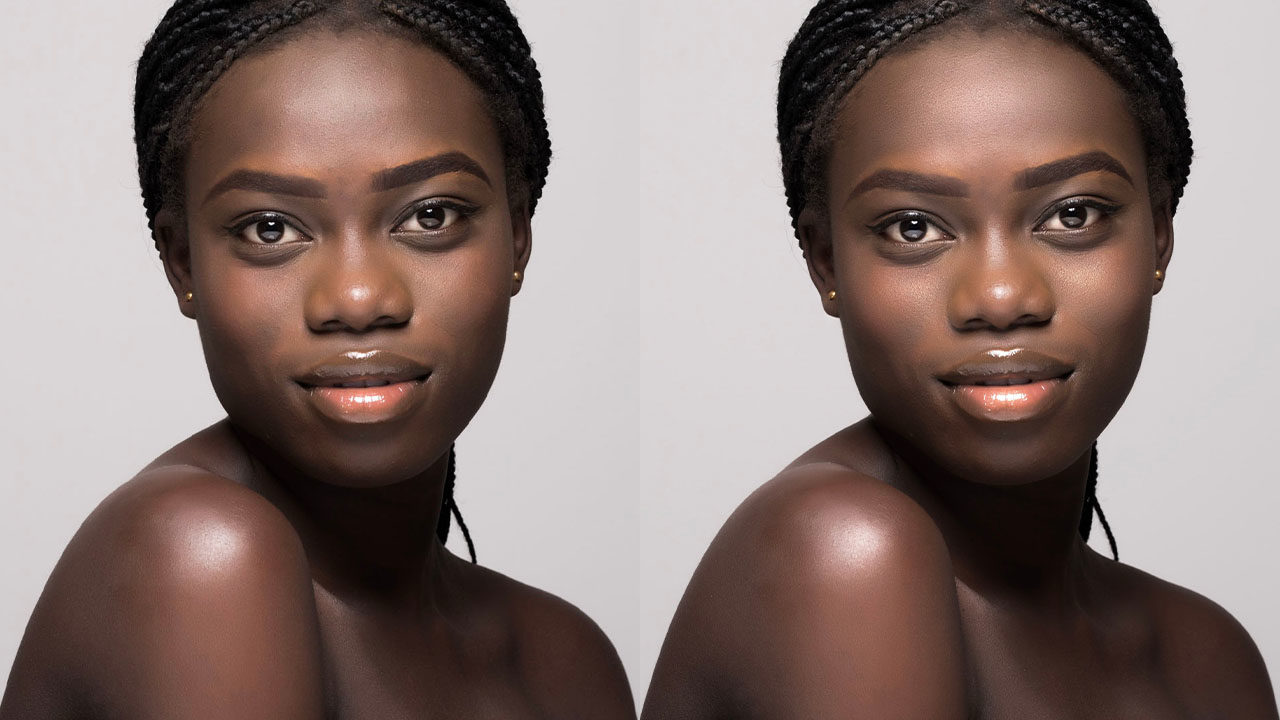
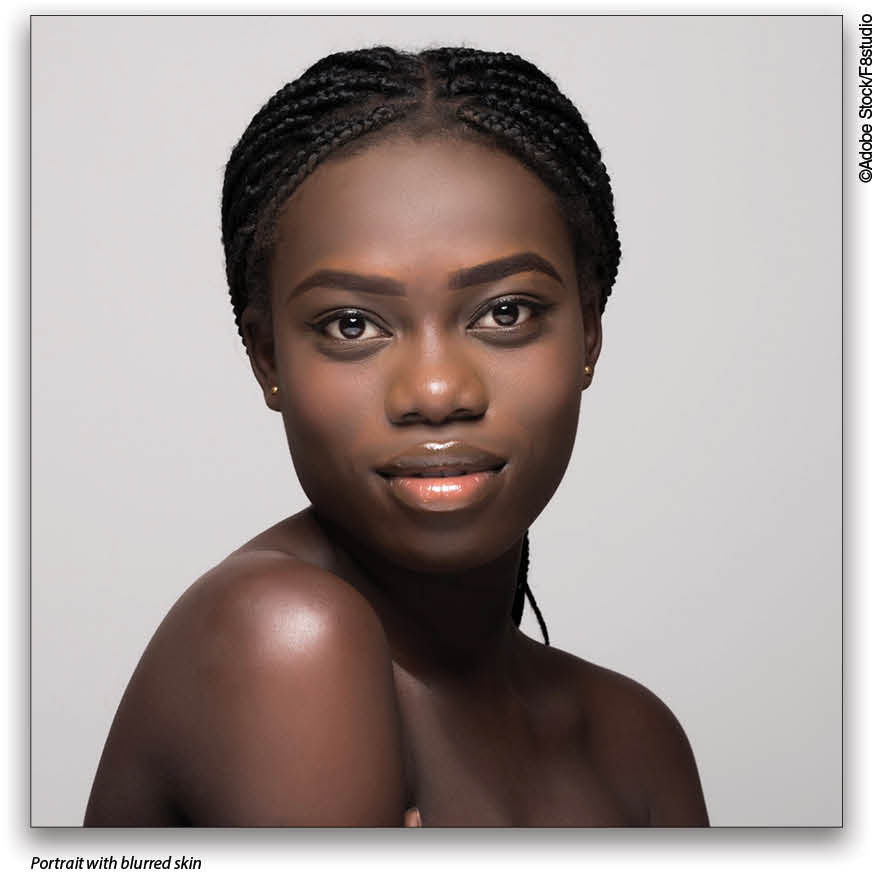
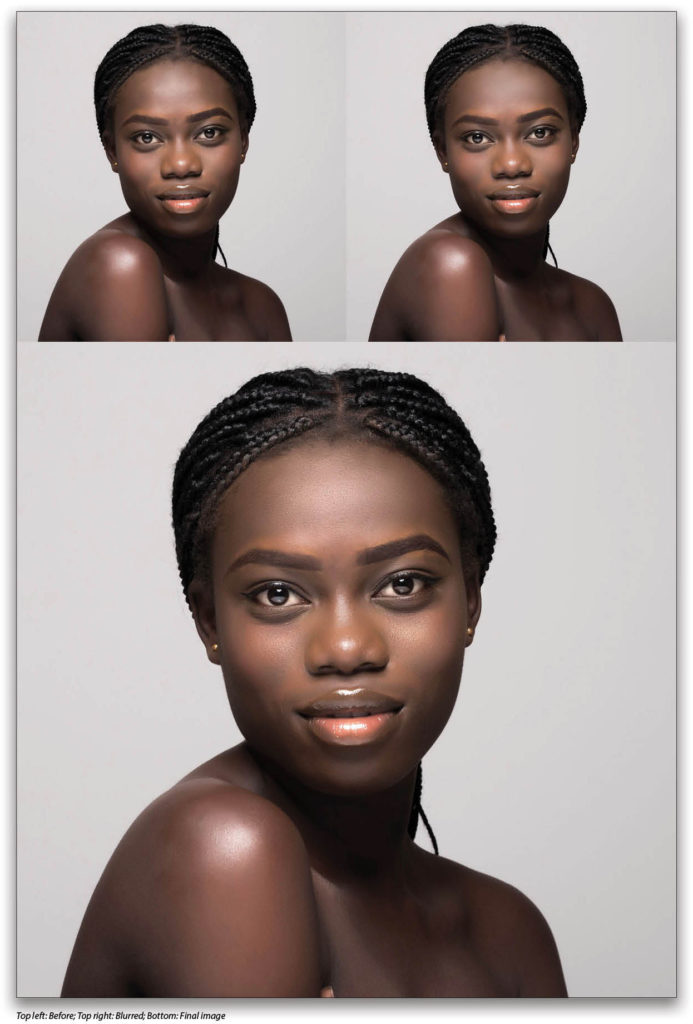
Step One: In my portrait document from Adobe Stock that you can find here, I’ve already applied frequency separation and intentionally overworked the forehead skin to remove most of the texture. What’s left are little variations in hue and brightness, which is not unusual with aggressive corrections.
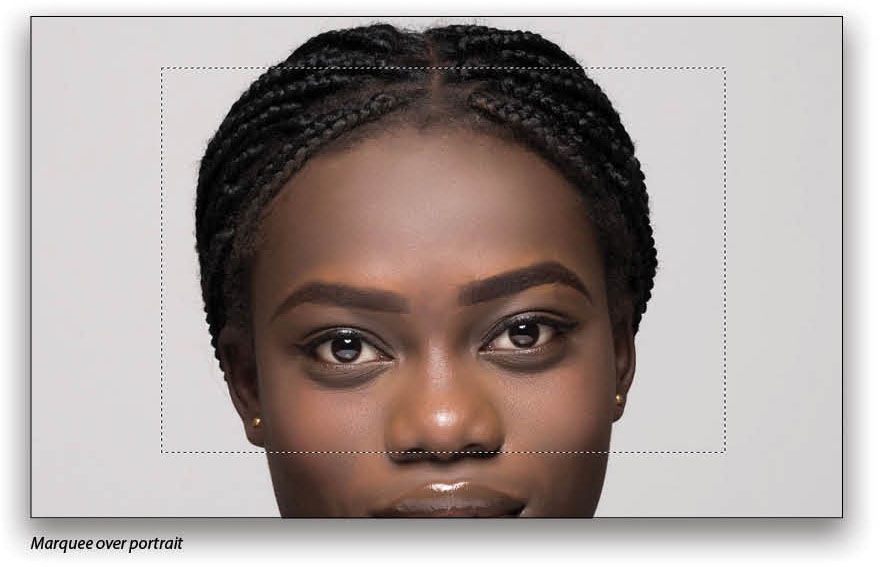
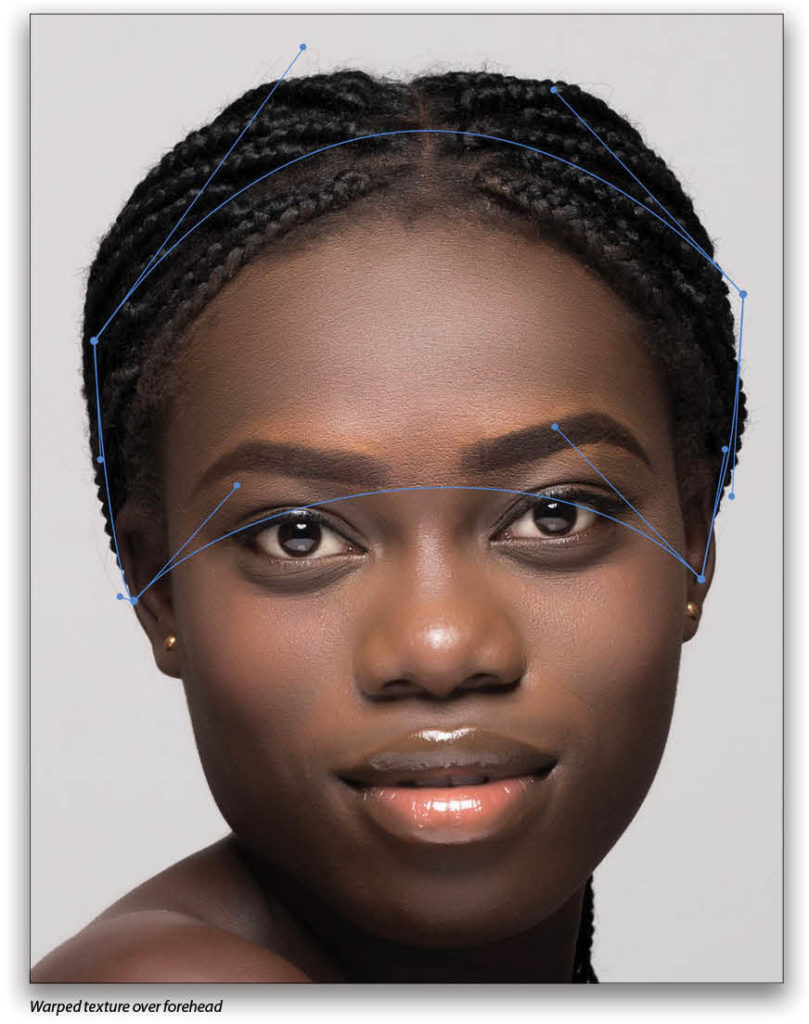
Step Two: On a new blank layer above the photo, drag out a rectangular selection using the Rectangular Marquee (M) that’s about 50% larger than the area you want to cover. Since we’ll be warping and transforming, it’s better to err with a larger selection, as we’ll mask out what we don’t need.
Step Three: Fill with 50% gray, as we did earlier. With the selection still active, go to Filter>Filter Gallery, and choose Texturizer from the Texture set. To the right of the Texture drop-down menu is a disclosure box where you can choose Load Texture. Navigate to your saved texture PSD and load it up (I’m using one version I saved called “Skin15”). Set Scaling to 80%, and Relief to 12. Note: These values will change depending on the scale of your texture and the size of your portrait; I’m working on a photo that’s 5,800×3,900. Click OK.
Pro Tip: Convert the gray-filled layer to a smart object (Layer>Smart Objects>Convert to Smart Object) before applying texture or warping it in the next step so you can go back and make changes if necessary.
Step Four: Press Command-D (PC: Ctrl-D) to deselect the textured box, then name the layer “Forehead Texture.” Change the blending mode to Overlay, then go to Edit>Transform>Warp. We want to align the texture with the natural direction of the skin, so drag within the bounding box to move the texture around. Interestingly, Warp lets you stretch and push around the texture almost like a smoother version of Liquify. Use the handles and corners as needed to get a reasonable approximation of the changing texture on the skin. Pay attention to scale, too! If you need to change it, do so before warping, if possible. Press Enter to commit the warped transform.
Step Five: With the Forehead Texture layer active, Option-click (PC: Alt-click) the Add Layer Mask icon (circle in a square) at the bottom of the Layer panel to add a mask filled with black, which will hide the effect. Then with the Brush tool (B), use a soft, round brush set to 20% Flow in the Options Bar and paint with white on the mask.
Reveal the texture slowly, especially letting it blend softly with any other existing textures. Adjust Opacity and use the Blend If sliders in the Layer Style Blending Options (as we did earlier) should you need to blend the texture with the original skin. To finish this portion, I also continued with some dodge and burn and color adjustment.
Experimenting and Fine-Tuning
Experiment with different blending modes, texture sizes, etc. I find that I usually have to add another painted color layer above the texture to reduce some of the artifacts it can produce. Other things to try are tiny amounts of Gaussian Blur on the texture (0.2–0.5 px), and clipping a Curves adjustment layer to it to reduce the contrast.
The real key here is subtlety, and in most cases you won’t use this approach on large areas; it’s best suited to help recover small problem areas. While the effect won’t stand up to pixel-peeping scrutiny, it will look great and almost imperceptible for most viewing situations.
Next time, we’ll talk about variations to this technique and creating additional types of skin textures.
This article originally published in the August, 2020 issue of Photoshop User magazine.


