I may have told you this before, but October is my favorite month of the year. The weather is usually nice; it’s my birthday month; if you live in a place where you can experience the four seasons, the colors are usually at their peak; and most importantly, it’s Halloween! I absolutely love candy and costumes!
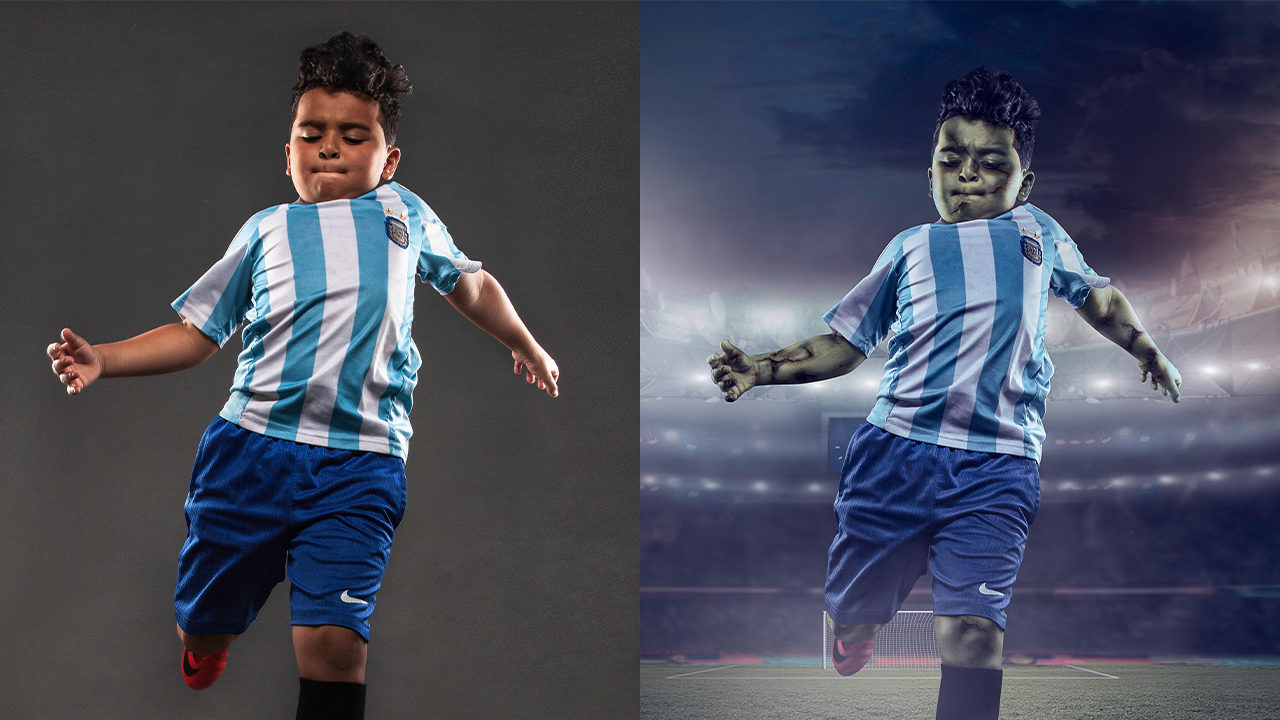
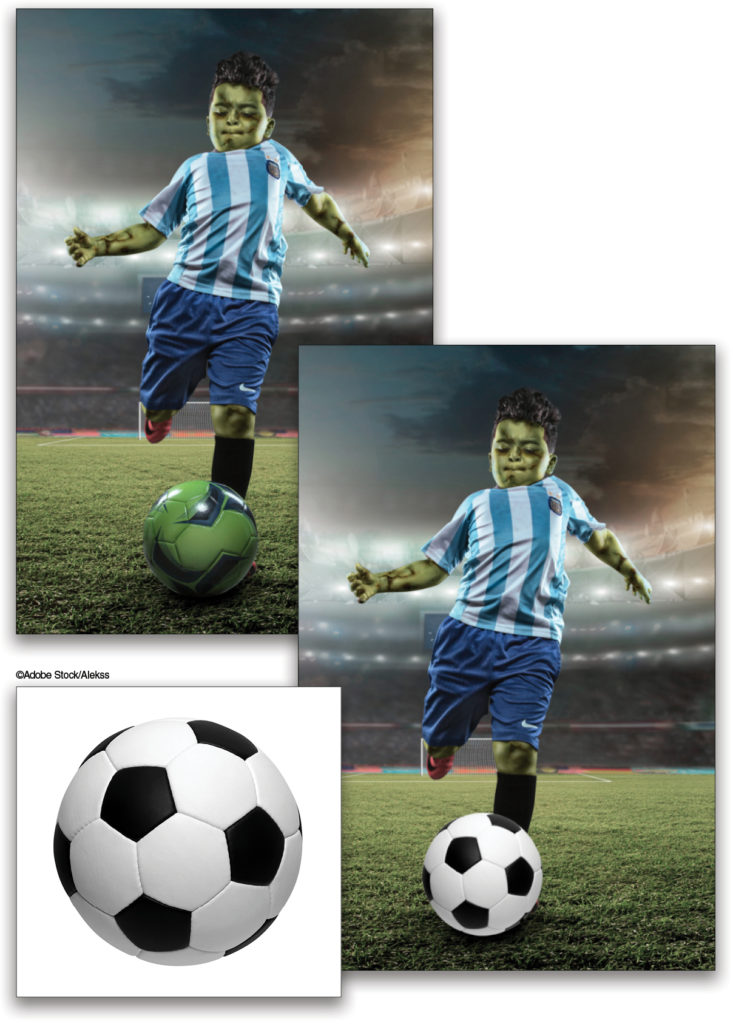
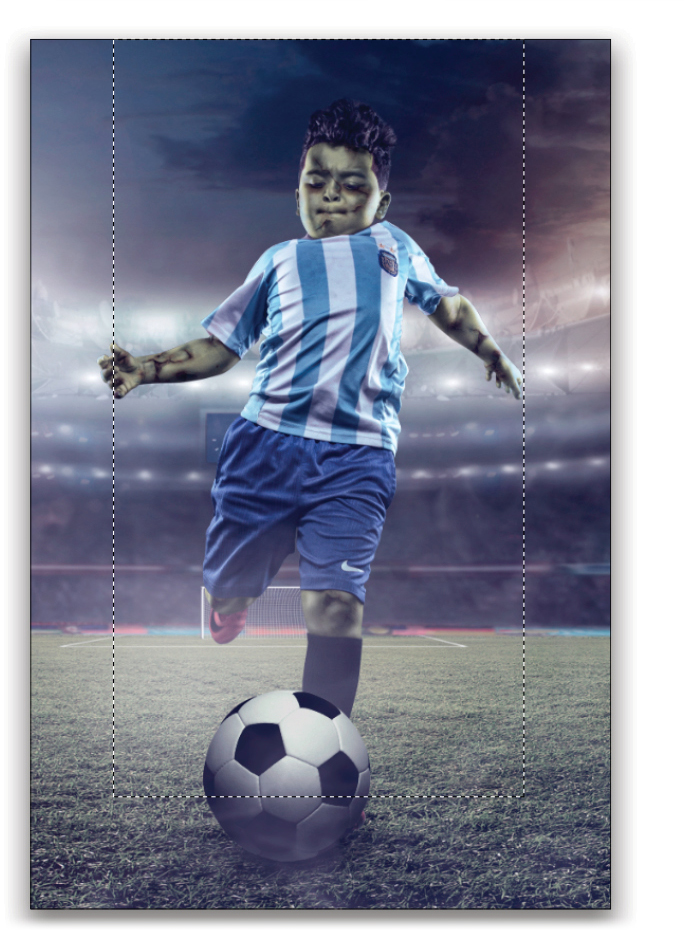
I had a photo session recently with this little boy. He’s totally obsessed with soccer and zombies, and since my mission in this world is to make my little clients’ dreams come true, I turned him into a little soccer zombie! So, if you or your little ones are into zombies, I’m going to teach you how to turn anyone into a brain-eating zombie.
[KelbyOne members may download the file used in this tutorial by clicking here or at http://kelbyone.com/magazine. All files are for personal use only.]
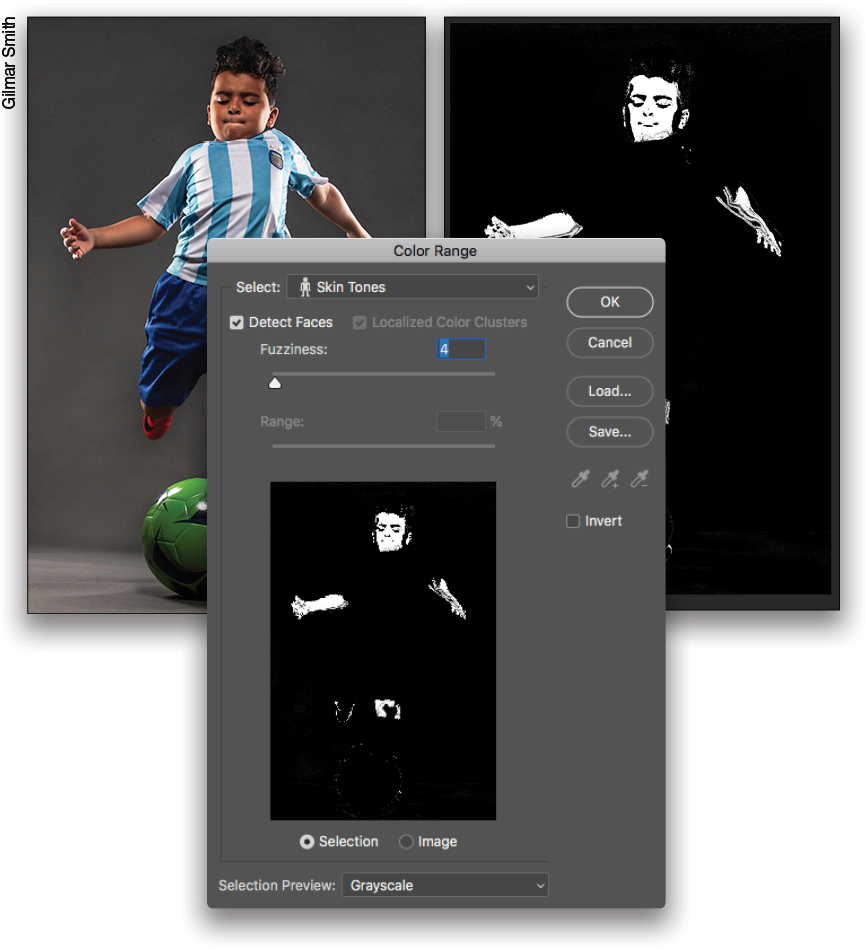
Step One: Go to the Select menu and choose Color Range. We did something similar in my last tutorial, but this time in the Color Range dialog, in the Select drop-down menu, choose Skin Tones, and turn on Detect Faces. In the Selection Preview drop-down menu at the bottom of the dialog, select Grayscale so you can see the preview of the selection in your image. Photoshop will make a decent selection of the skin tones but let’s fine-tune it a little by playing with the Fuzziness slider. Drag the Fuzziness to 4, and click OK.
Step Two: That was a good start, but we’re going to need a better selection to make this zombie skin effect believable. Go to the Layer>New Adjustment Layer menu, select Hue/Saturation, and click OK. The selection you previously created in the Color Range dialog is going to load as a mask in the Hue/Saturation layer. Now, let’s take care of that mask before we move forward.
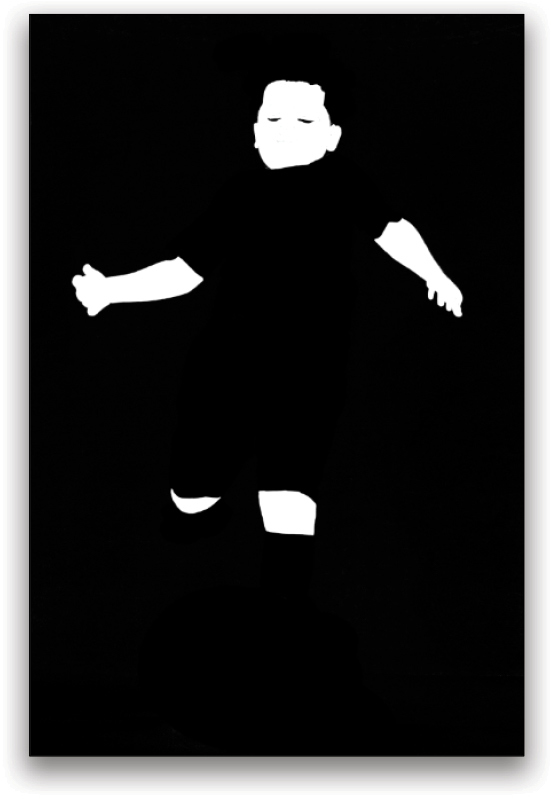
Step Three: Option-click (PC: Alt-click) on the mask thumbnail in the Layers panel to show the mask in the image. There were highlights on our subject’s skin that weren’t successfully selected in Color Range. Let’s take care of that manually with the Brush tool (B). Click on the brush thumbnail in the Options Bar to open the Brush Preset Picker and set the Hardness to 75%, then set the Opacity to 100%. Press D to set the Foreground color to white. Carefully paint on the subject’s skin with white, and if the mask has anything else selected that’s not skin, press X to switch the Foreground color to black, and brush it off. Use the Bracket keys ([]) on your keyboard to quickly change the size of your brush, and use Command-+ and – (PC: Ctrl-+ and –) to zoom in and out, respectively, as needed. The mask should look like this.
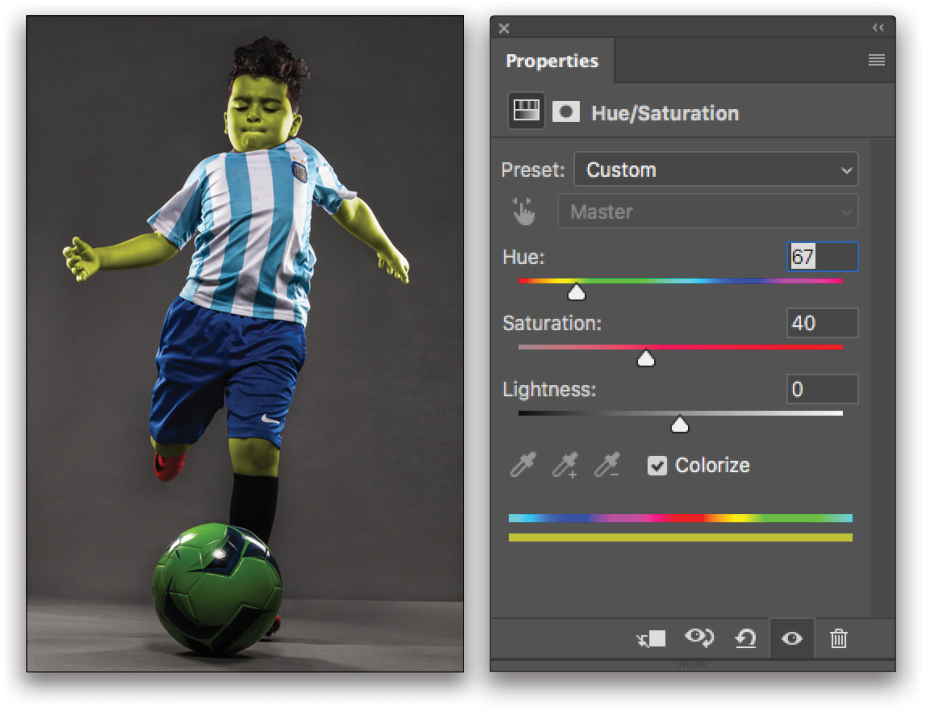
Step Four: Option-click (PC: Alt-click) on the mask thumbnail again to reveal the image, and then click on the Hue/Saturation layer’s thumbnail to make it active and not its mask. In the Properties panel, click on Colorize, and push the Saturation slider all the way to 100%. That way we’ll be able to see clearly the hue we’re going to pick for the skin. Now, in the Hue slider, choose a green. Then go back and adjust the Saturation and Lightness.
Step Five: The little boy is starting to look like a zombie; we have the color, but now we need to add some texture to his skin. I picked a texture from the Rust texture collection from Raw Exchange. The specific texture I chose was Rust 109. You can also search for rust textures on Adobe Stock like this one here. Just sign in with your Adobe ID, click on the down-facing arrow to the right of “Save Preview to…,” and select Open in Photoshop. The watermarked, low-res preview of the file will automatically open in your zombie image. Just press Enter to commit it to your image. If you’re using your own texture file, go to File>Place Embedded, navigate to your file, and click Place.
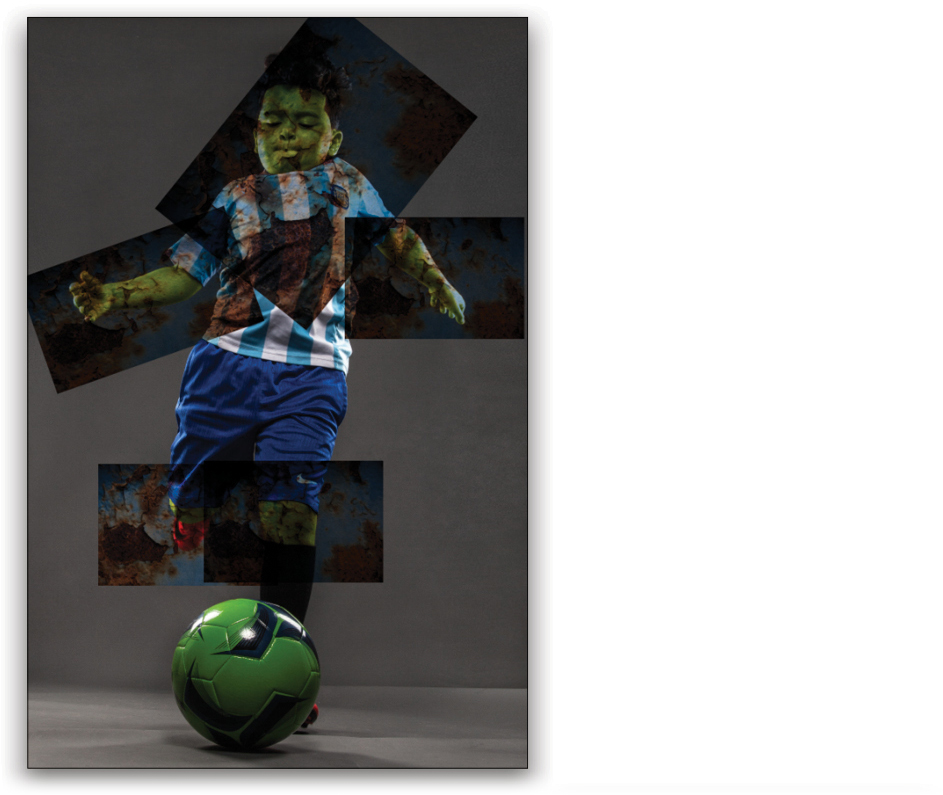
Press Command-J (PC: Ctrl-J) four times so you have five different copies of that texture layer, and set their blending modes to Multiply in the Layers panel. Transform them one by one by pressing Command-T (PC: Ctrl-T) for Free Transform and adjusting their size, rotation, and position as shown here. That way, you can control the amount of texture in every part of the boy’s body.
Step Six: Now, we don’t want to waste time masking all of these layers! So, in the Layers panel, Option-click-and-drag (PC: Alt-click-and-drag) the Hue/Saturation mask we created in Step Three to each one of the texture layers to copy it.
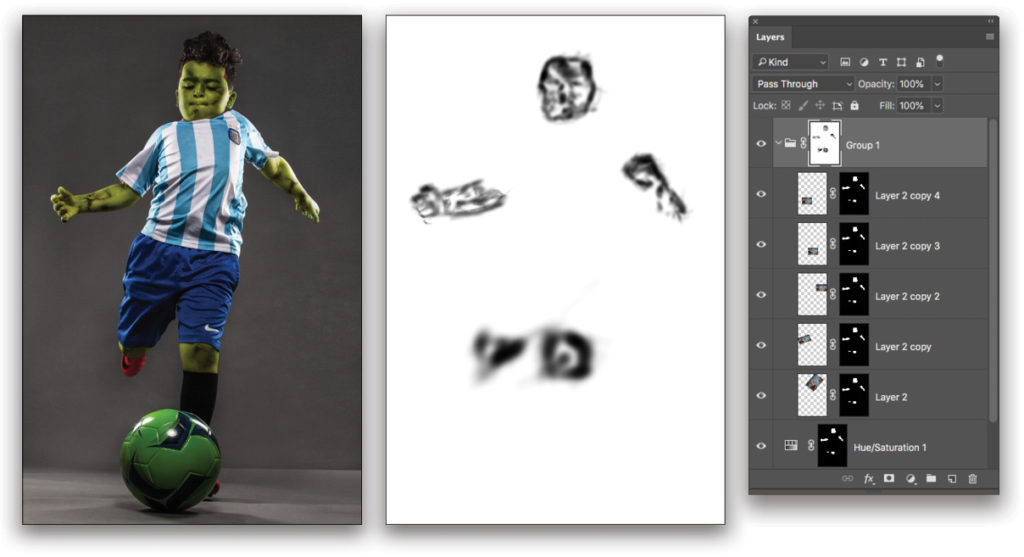
Step Seven: It looks okay, but the texture effect is too much for my taste. Let’s group the texture layers together by clicking the top texture layer, Shift-clicking the bottom texture layer to select all of them, and pressing Command-G (PC: Ctrl-G). Click the Add Layer Mask icon (circle in a square) to add a mask to the group. Pick a soft brush with 100% Opacity and 5% Flow in the Options Bar. Press X until the Foreground is set to black and gradually brush away the effect from various areas of the skin.

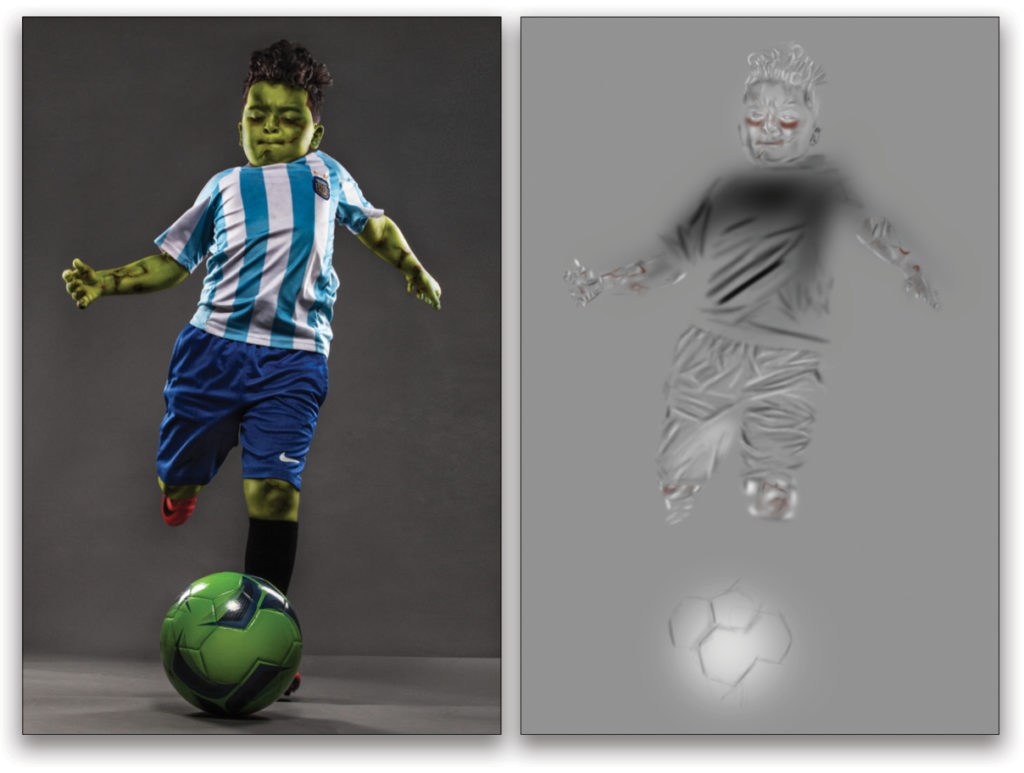
Step Eight: Add a new blank layer, go to Edit>Fill, choose 50% Gray in the Contents drop-down menu, and click OK. In the Layers panel, set the blend mode to Soft Light so the gray is invisible. We’re going to do some serious dodging and burning using this layer.
Step Nine: Pick a soft brush, set its Opacity to 100% and the Flow to 1%. Click on the Foreground color swatch near the bottom of the Toolbar, pick a dark red, and click OK. Brush under the boy’s eyes and in the cracks of the texture to give them more depth. To give you an idea of the areas I’m burning, this is how my layer looks if I set it back to Normal blending mode.

Step 10: Now, let’s do some traditional dodge and burning. With the same brush settings you used in the previous step, set the Foreground color to black and paint over the shadows to create more depth. Go slowly and add the effect gradually. Then, set the Foreground color to white, and this time brush on all the highlights. This is what my final dodge-and-burn layer looks like now.
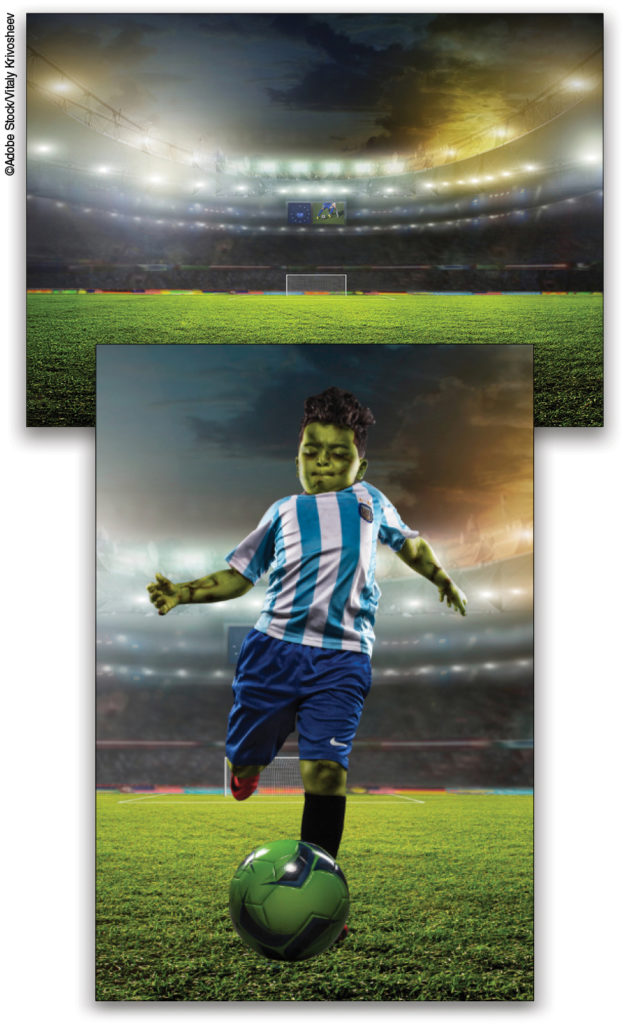
Step 11: I think it’s time to take this zombie to the soccer field! Create a stamped layer of all your layers at the top of the layer stack by pressing Option-Command-Shift-E (PC: Ctrl-Alt-Shift-E)—yes, all at the same time! (I know, who came up with that?)
Step 12: Make a selection of the subject on this stamped layer with your selection tool of choice. (Psst, the Pen tool [P] is the best one! But if you want to cheat for this tutorial, switch to the Quick Selection tool, and try the Select Subject button in the Options Bar.) After your selection is complete, click the Add Layer Mask icon.
Step 13: Now that your subject is isolated on the layer, let’s put him on a new background. I used an image from Adobe stock. As before with the rust texture, you can click this link and open the preview version of this image directly into your Photoshop document. I tried different cropping versions and decided to keep it as is in portrait mode. If you’re using the preview version of the soccer field, when it appears in your document, just hold Shift-Option (PC: Shift-Alt) and drag out a corner point until the image fills the document. Press Enter, and then drag this layer below your isolated subject layer in the Layers panel.
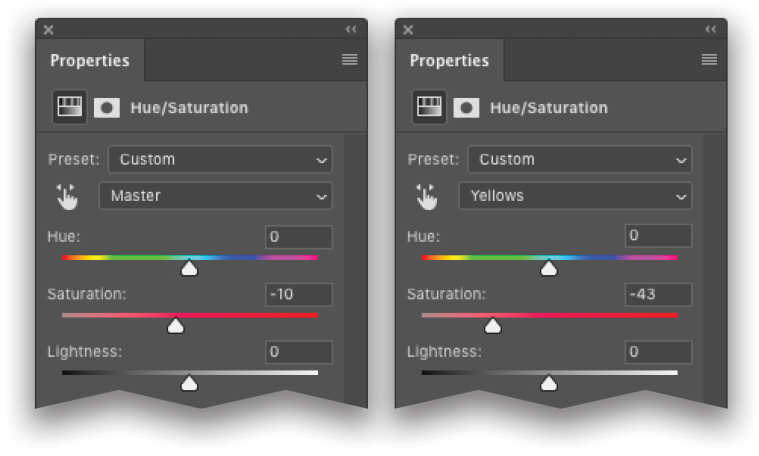
Step 14: I noticed that the grass was oversaturated. Add a Hue/Saturation adjustment layer between the soccer field layer and our subject Layer. In the Properties panel, lower the Saturation to –10, then click on the drop-down menu where it says “Master,” select the Yellows, and lower the Saturation to –43.
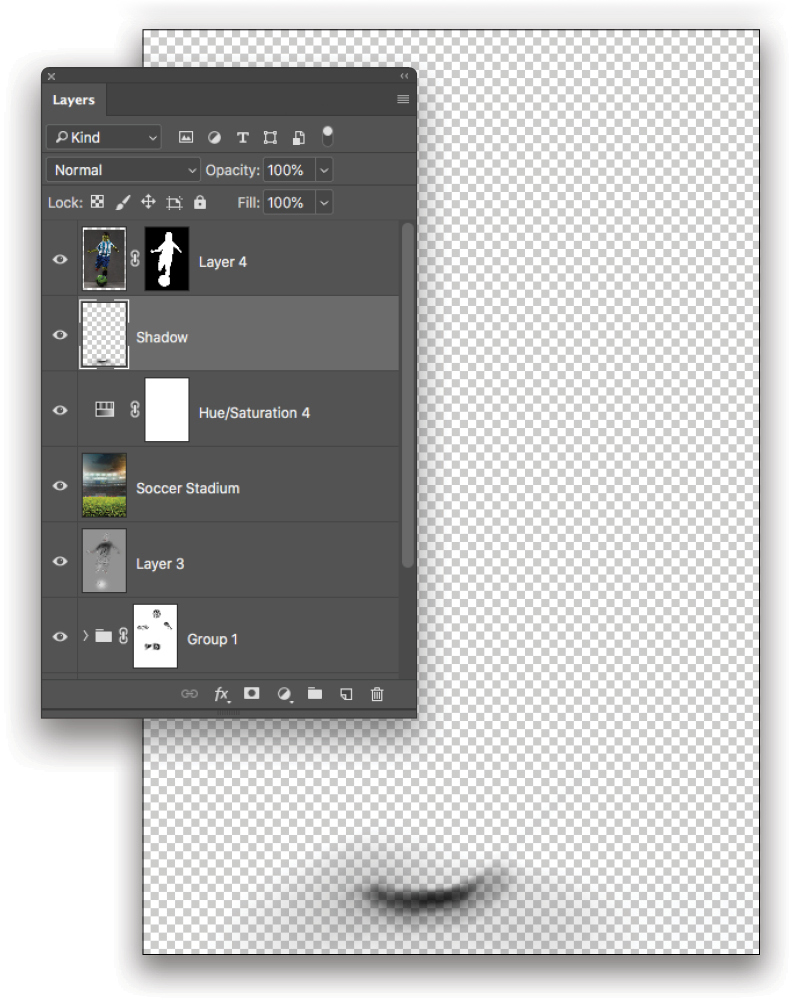
Step 15: Now we need shadows. Take a look at the shadows in the original image and let’s try to re-create them. Add a new blank layer above the Hue/Saturation layer, and change its name to “Shadow.” Pick a soft brush with the same settings we’ve been using (100% Opacity and 1% Flow). Set the Foreground color to black, and paint the shadow under the soccer ball. If you disable all the other layers, your shadow layer should look like this.
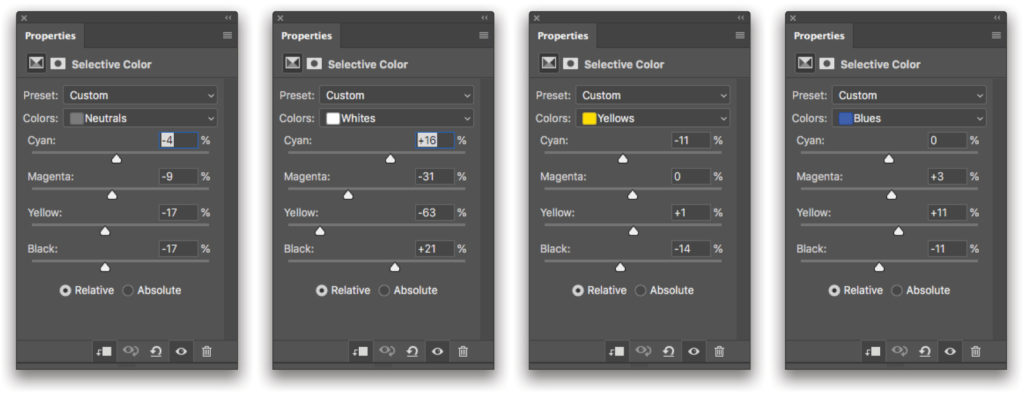
Step 16: The tones in the background image and the subject don’t match. Add a Selective Color adjustment layer above the subject layer, and clip it to the subject layer by Option-clicking (PC: Alt-clicking) between the two layers in the Layers panel. Now, let’s select different colors from the Colors drop-down menu in the Properties panel, and push those sliders around until the tones of the two images match a little better.
Step 17: There was something in the picture that wasn’t speaking to me: The soccer ball! I went ahead and searched for a soccer ball on Adobe stock and placed a new one on top of our boring, green soccer ball. Here’s the link to the ball I used. Just use Free Transform to resize and position the ball, select it, and add a layer mask to hide its background.
Step 18: The new ball is too bright and doesn’t match the rest of the image. First, let’s add a Curves adjustment layer and clip it to the soccer ball layer. Click on the middle of the curve in the Properties panel, and drag it down until the Input value is around 134 and the Output value is around 30. Now click on the layer mask for the Curves adjustment layer, and press Command-I (PC: Ctrl-I) to invert the mask. Press G for the Gradient tool, set your Foreground color to white, and the Opacity to 30%. Click on the gradient preview thumbnail in the Options Bar to open the Gradient Editor, select the Foreground to Transparent preset, and click OK. The gradient Options Bar should look like the one shown here. Now drag the gradient from the bottom of the image to just above the soccer ball.
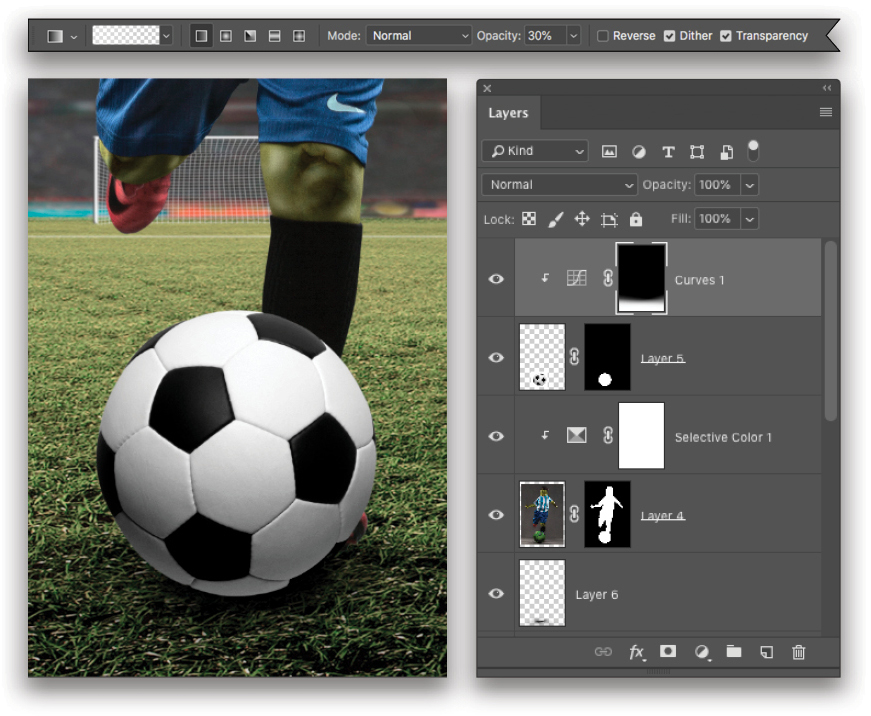
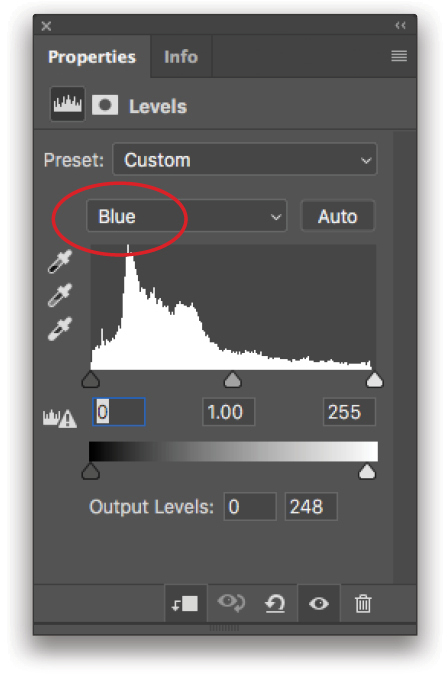
Step 19: Add a Levels adjustment layer, and clip it to the soccer ball layer. Drag the highlights slightly to the left, open up the blacks a little, and drag the midtones to the right. Adjust the Output Levels sliders, as well. Then, select the Blue channel in the drop-down menu just above the histogram, and add a little bit of yellow to the highlights by dragging the highlight slider for the Output Levels to 248. Select the soccer ball layer and the two clipped adjustment layers in the Layers panel, and press Command-G (PC: Ctrl-G) to add them to a group. Rename the group “Soccer Ball.”
Step 20: Add a new blank layer below the Soccer Ball group. Pick a soft brush with 100% Opacity and 100% Flow, and set the Foreground color to white. Make the brush size about 1,000 pixels and just click once between the soccer ball and the boy’s right leg. Now, enlarge that brushstroke using Free Transform so it looks feathered behind the subject, and then adjust the Opacity to 35% and the Fill to 80% in the Layers panel.
Step 21: Add a Hue/Saturation adjustment layer above the Soccer Ball group, and lower the Saturation to –20 in the Properties panel.
Step 22: From the Smoke textures collection from Raw Exchange, I grabbed the texture called “smoke26,” and placed it on top of my layer stack. I set its blending mode to Screen and lowered the layer Opacity to 90%. This added a little bit of atmosphere to the image. Again, you can search for smoke on a black background on Adobe Stock, and use an image like this one. Lower the Opacity to suit.
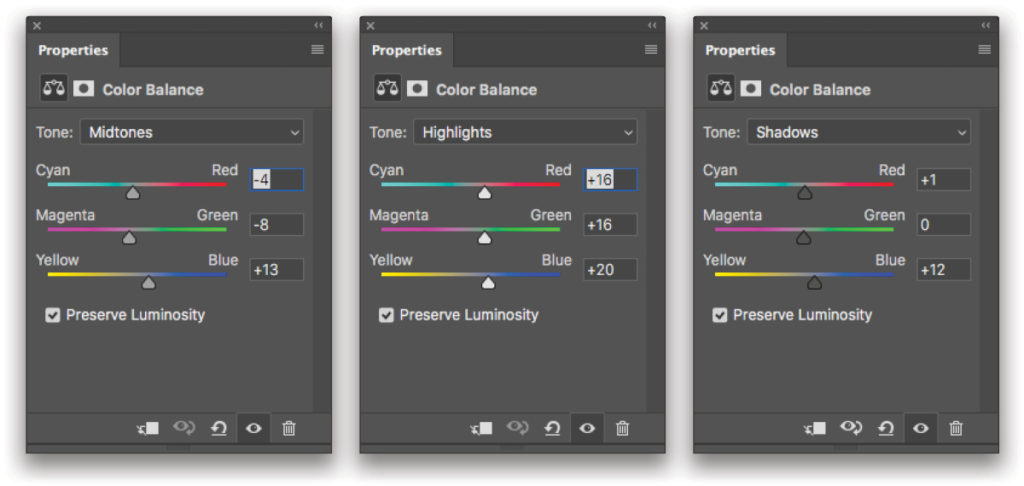
Step 23: Add a Color Balance adjustment layer at the top of the layer stack, and in the Properties panel, adjust the Shadows, Midtones, and Highlights as shown here.
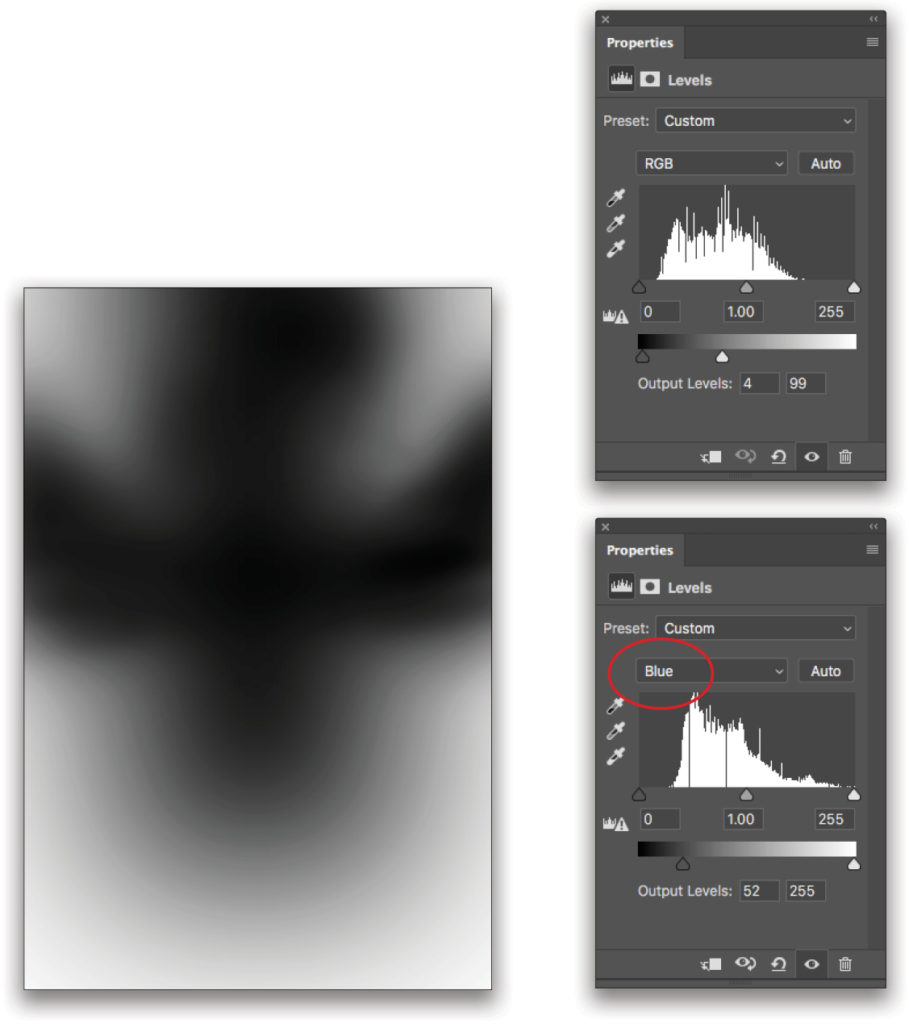
Step 24: With the Rectangular Marquee tool (M) active, make a selection on the image as shown here to use for a vignette. Then, go to Select>Modify>Feather, select a Feather Radius of 500 pixels, and click OK. Then go back to the Select menu and choose Inverse. Your selection should have a U shape.
Step 25: Add a Levels adjustment layer. The selection we created in the previous step is going to load as a layer mask. In the Output Levels, drag the highlights toward the left, and open up the blacks just a bit by dragging the shadow slider to the right. Go to the Blue channel and add a little bit of blue to the shadows by pushing the shadow Output Levels slider to the right. I brushed away the effect of the vignette from the stadium lights in the background by painting with a soft black brush in the layer mask. The final mask looks like the one shown here.
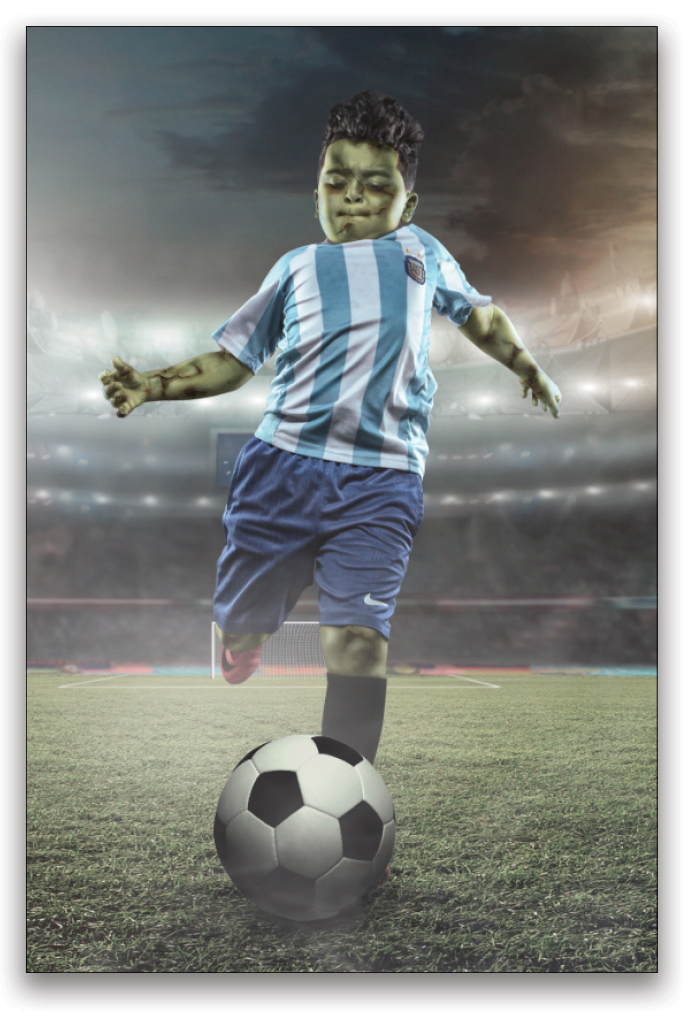
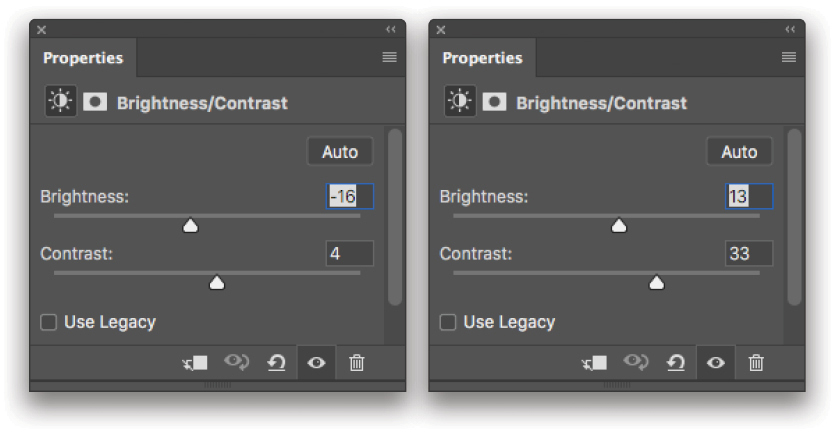
Step 26: Add a Brightness/Contrast adjustment layer. In the Properties panel, set the Brightness to –16 and the Contrast to 4. Finally, I wanted to add contrast on the subject but not on the background, so I added another Brightness/Contrast layer, set the Contrast to 33 and the Brightness to 13, and inverted the layer mask by pressing Command-I (PC: Ctrl-I). I then used a white brush to paint the effect onto the subject. And here’s our final image!
No makeup, no fuss! I hope you enjoyed creating this composite with me, and if you try this zombie technique on your own Halloween pictures, please make sure to tag me and show your results on the KelbyOne Community.
This article originally published in the October, 2018 issue of Photoshop User magazine.
Be sure to check out Gilmar’s class on KelbyOne; Creative Portraits at Home with Gilmar Smith!


