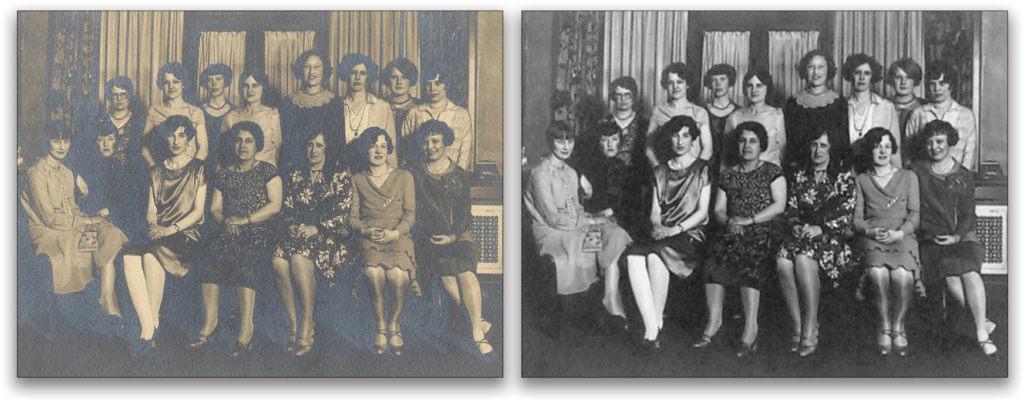
“Silvering” of old photos happens to silver-based emulsions. You can identify silvering by the “metallic” effect and bluish tint on the surface of the print. Common causes of silvering include:
- Stacking images in storage: The acid on the image backing can burn an image and cause the image to slowly silver.
- Fingerprints: Oils on your hands will cause a chemical reaction that will impair the development process. Fingerprints become part of the image and will be impossible to remove on a photo.
- Exposure to extreme temperatures: Exposure to humidity and fluctuating temperatures will cause oxidation and slowly destroy the emulsion of the image. Storing images in a cool, dry location will
help alleviate silvering from developing on them. - Sunlight: Direct sunlight can cause silvering, as well as fading on emulsions.
In some instances, silvering occurs because images weren’t processed properly in the darkroom. Silver-based black-and-white prints were prone to silvering if the image wasn’t washed correctly. Below are steps you can take to remove silver when restoring old photos.
Step One: Duplicate the Background layer twice by pressing Command-J (PC: Ctrl-J) twice. Then, hide (turn off) the top layer by clicking its Eye icon in the Options Bar.
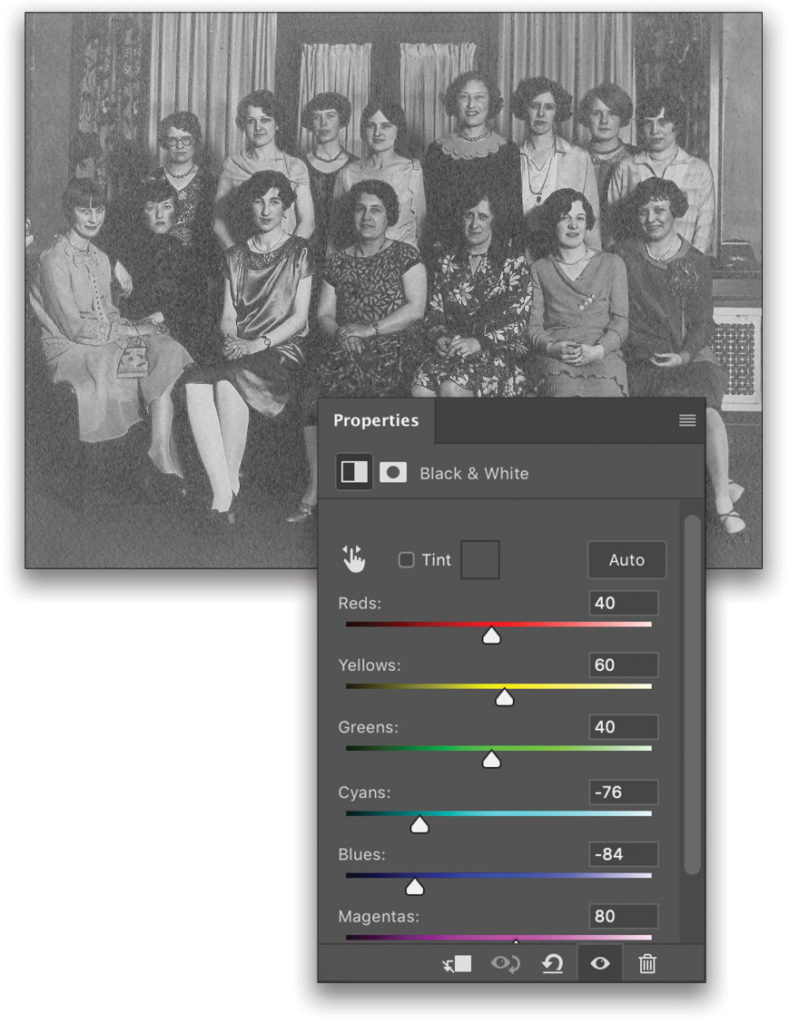
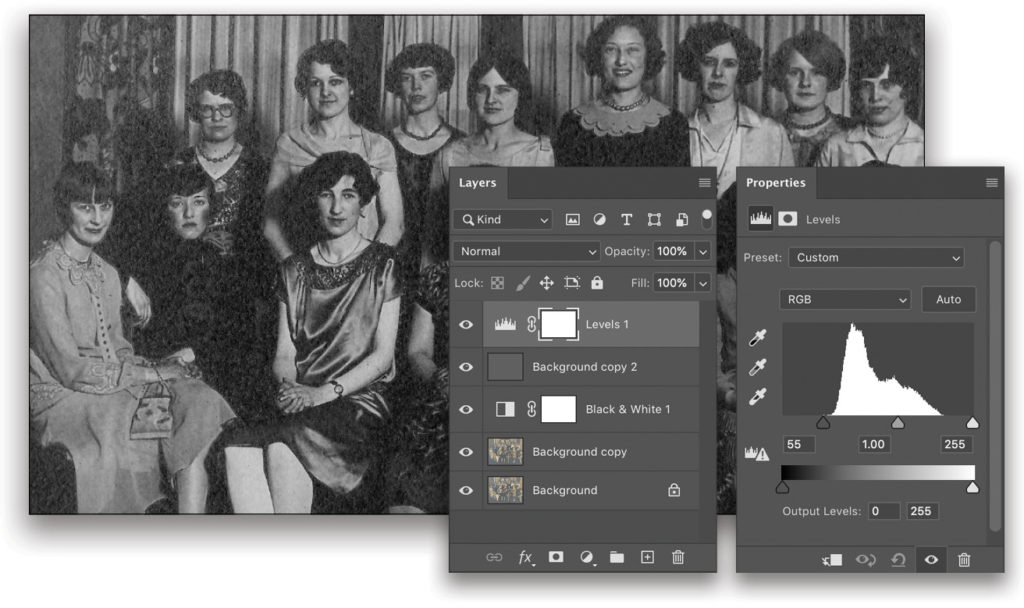
Step Two: Click on the first copied layer in the Layers panel to make it active, and go to Layer>New Adjustment Layer>Black & White. In the Properties panel (Window>Properties), drag the Cyans and Blues sliders to the left. For this particular image, we used –76 for Cyans and –84 for Blues (these settings will vary from image to image).
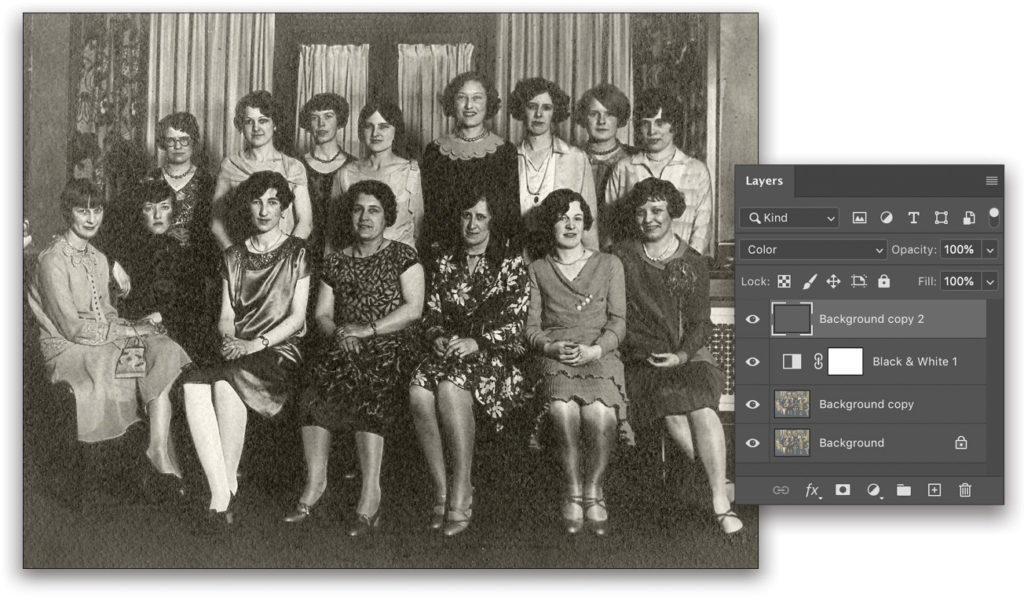
Step Three: Turn the second duplicated layer back on in the Layers panel, and go to Filter>Blur>Average. Change the blending mode from Normal to Color near the top left of the Layers panel, and leave Opacity at 100%.
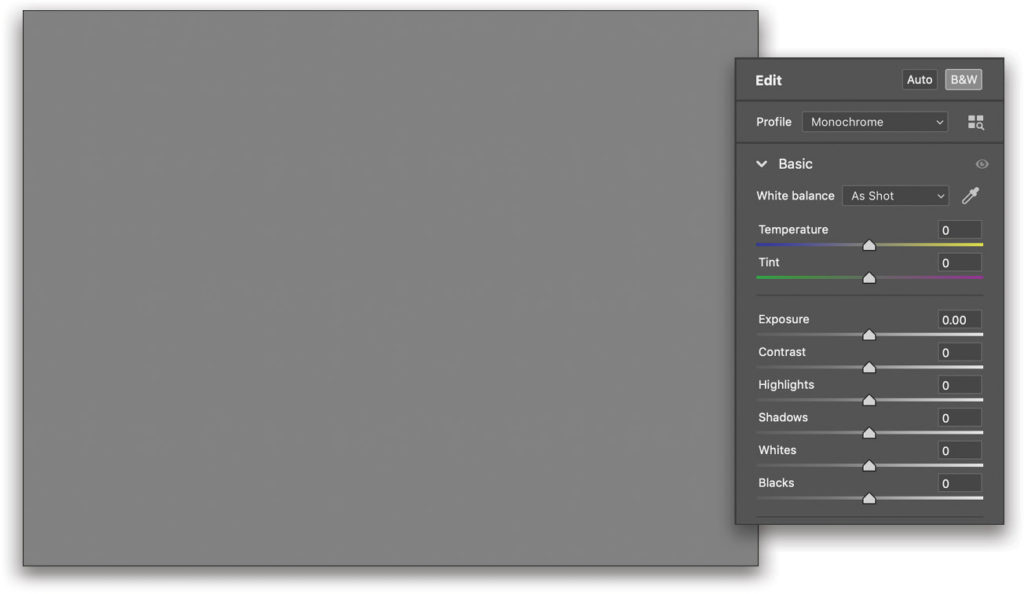
Step Four: On the Background copy 2 layer (the one we just blurred), go to Filter>Camera Raw Filter. In the Profile drop-down menu above the Basic panel, select Monochrome and click OK. This will again convert the image to black and white.
Step Five: Add a Levels adjustment layer (Layer>New Adjustment Layer>Levels), and in the Properties panel, drag the left shadows slider to 55 to darken it a bit. Leave the blending mode set to Normal and Opacity at 100% (again, the settings in these steps will vary from image to image).
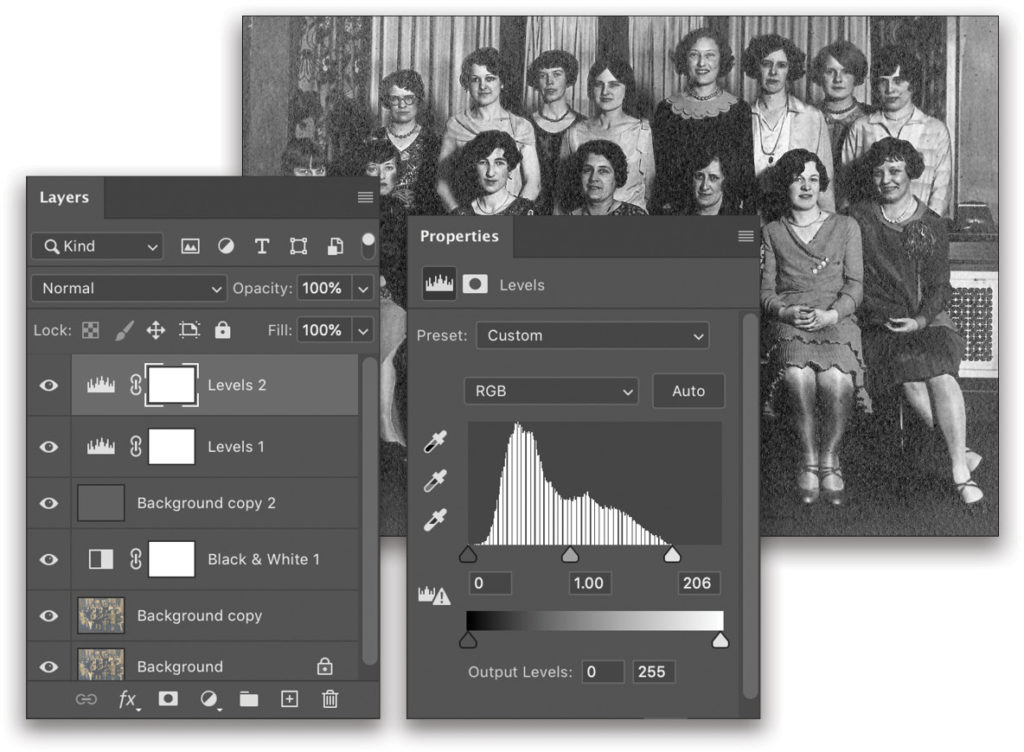
Step Six: Add another Levels adjustment layer, but this time set the right highlights slider to 206 to lighten it a bit.
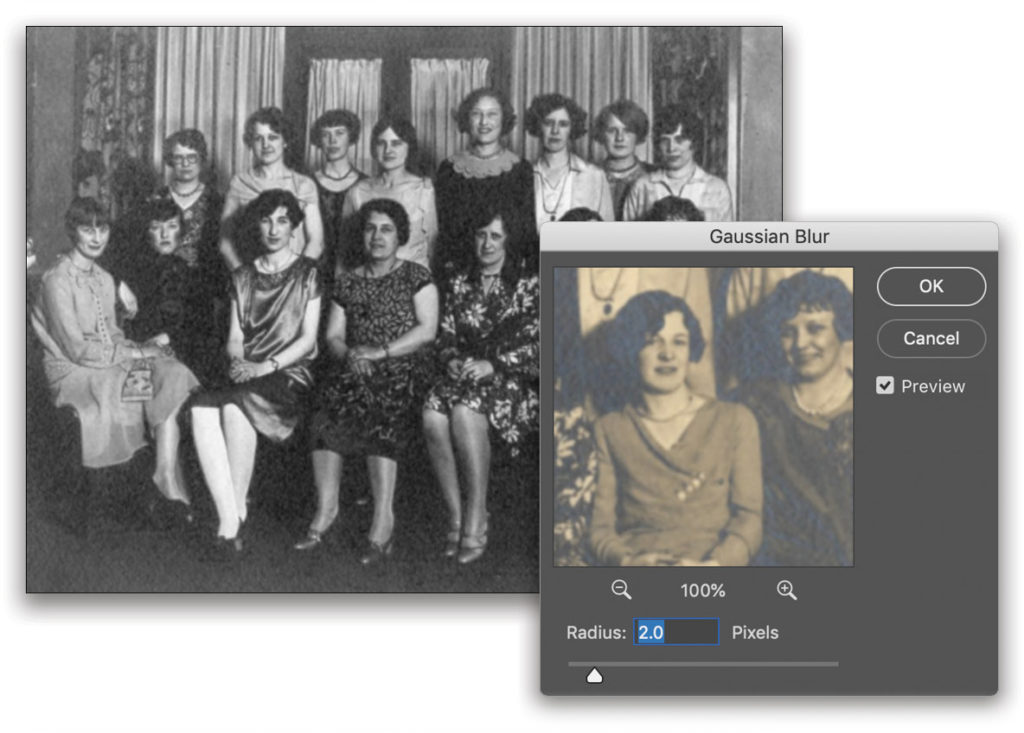
Step Seven: To remove the paper texture, click on the first Background copy layer to make it active, and go to Filter>Blur>Gaussian Blur. Since this image has a coarse look on the paper, move the Radius slider to around 2 pixels in the Gaussian Blur dialog, depending on the resolution of your image. Your goal is to smooth out the texture. Click OK.
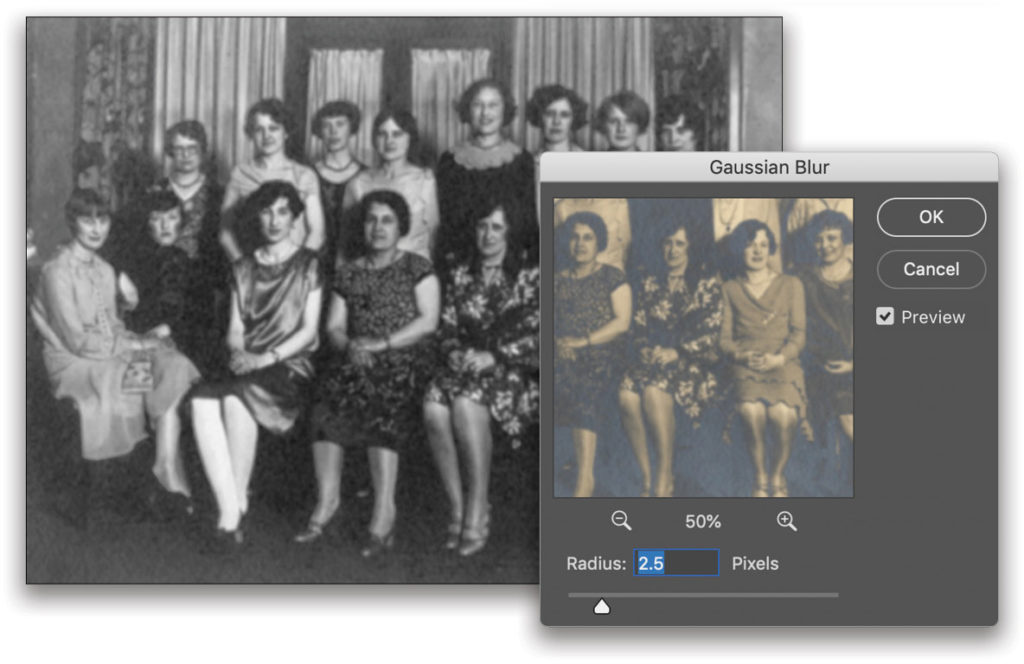
Step Eight: Repeat Step Seven, but this time move the Radius Slider to 2.5 pixels on the Gaussian Blur dialog. Click OK.
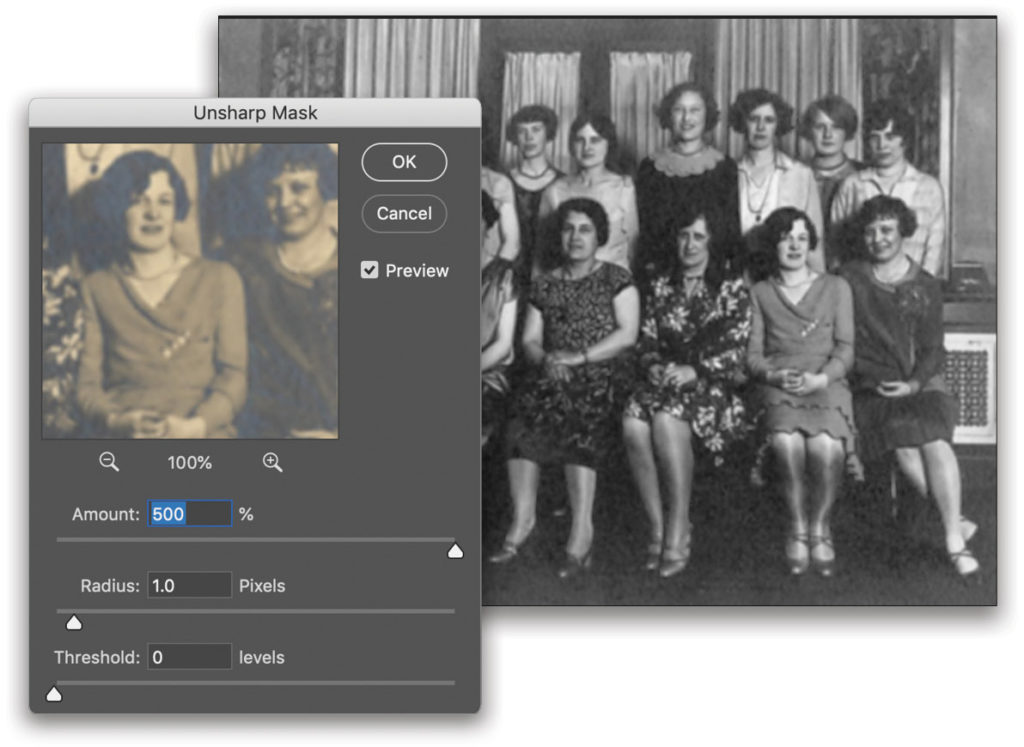
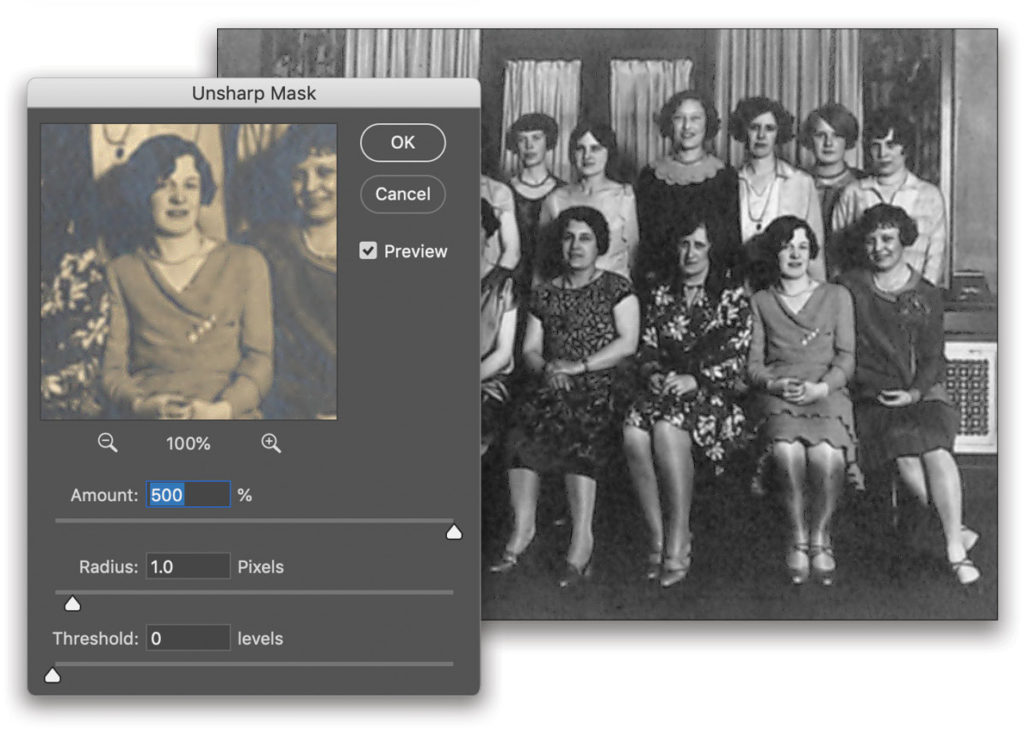
Step Nine: Go to Filter> Sharpen>Unsharp Mask. Slide the Amount slider to 500%, Radius to 1.0 pixels, and leave Threshold at 0 Levels. Again, this depends on the resolution of your image. You want to bring back some of the sharpness you lost with Gaussian Blur. Click OK.
Step 10: Repeat Step Nine, leaving all settings the same in the Unsharp Mask dialog, and click OK.
Step 11: I didn’t do any retouching to this photo, but at this point, retouching and colorizing (if desired) would be the next and steps. Let’s move on to the next technique for colorizing skin through sheer sleeves.
Colorize Skin Through Sheer Sleeves
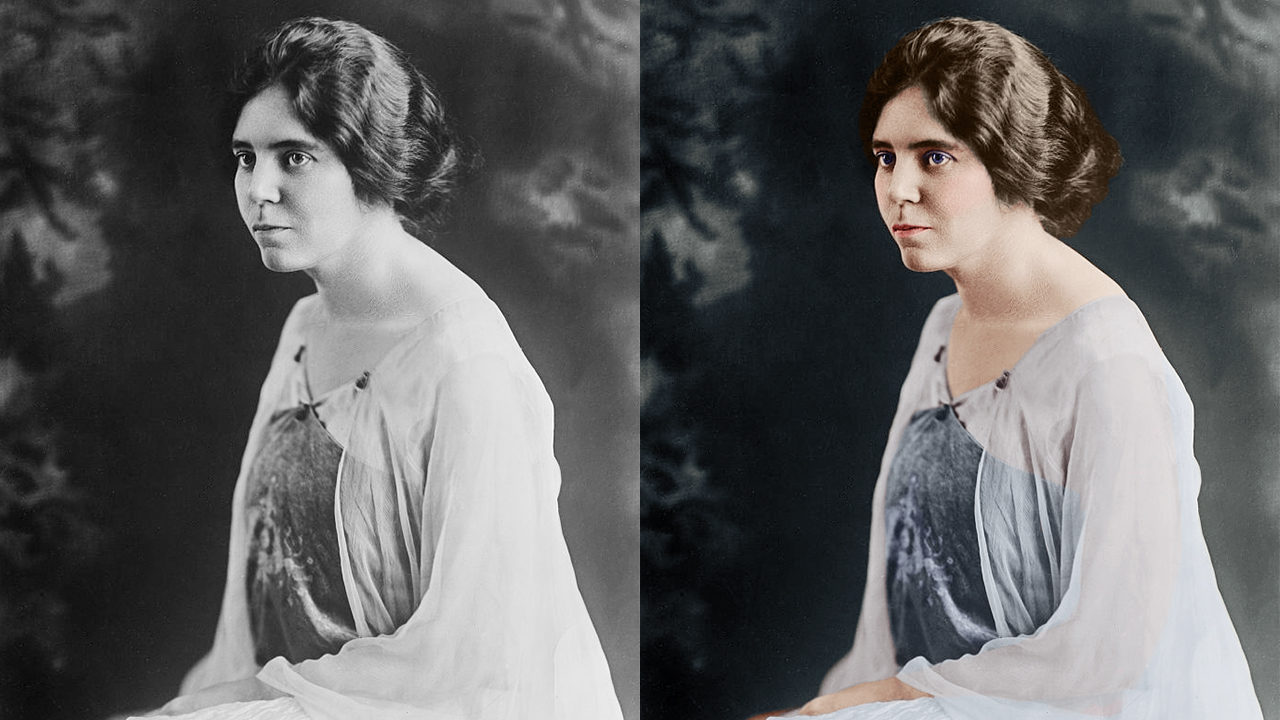
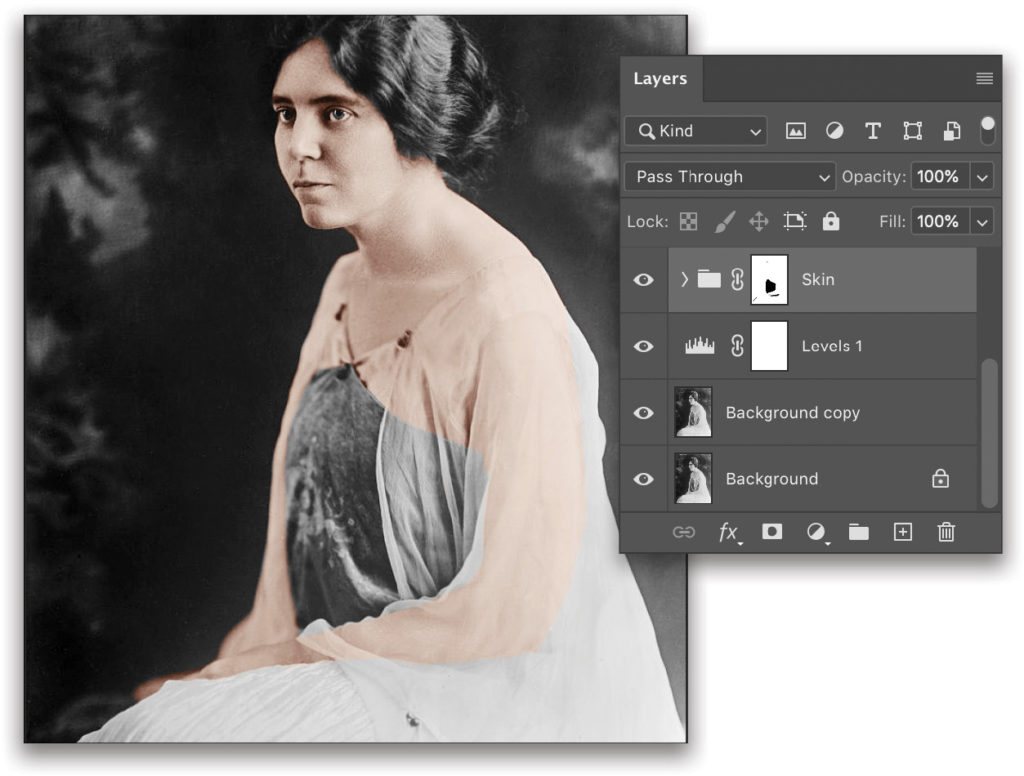
Colorizing skin through sheer sleeves is critical for realism in the overall image; for example, if arms aren’t colorized as skin tones, they end up looking like part of the clothing. There’s a fine line as to what Opacity setting should be used for clothing color and skin colors. To demonstrate this technique, we’re going to use this photo of Alice Paul (Women’s Suffragette) that can be found on the Library of Congress website.
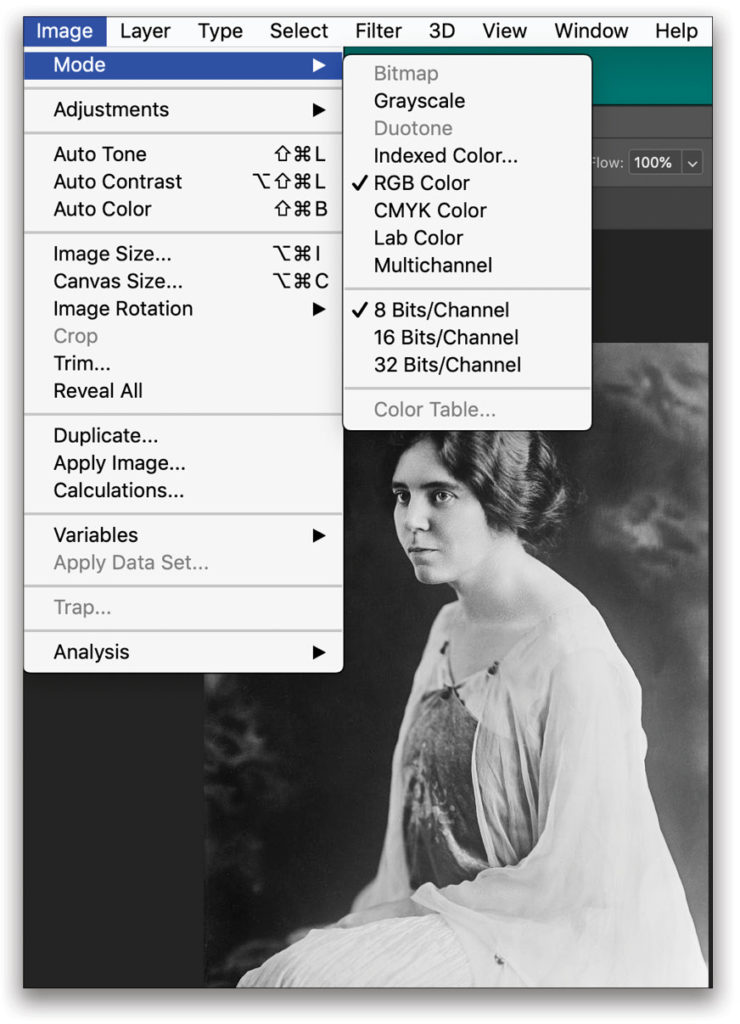
Step One: The first step before colorizing a black-and-white image is to choose Image>Mode and ensure the color mode is set to RGB Color. If it’s in Grayscale mode, you won’t be able to colorize the photo. Always start by pressing Command-J (PC: Ctrl-J) to duplicate the original Background layer and work nondestructively.
Step Two: To begin, let’s colorize the skin. First, use your favorite selection methods to select all the areas of skin you want to colorize. Next, we’re going to add several Solid Color fill layers (Layer>New Fill Layer>Solid Color) to build up the skin colors. The first fill layer you create will use your selection for its mask.
Below is a list of all the Solid Color fill layers we’ll be creating. After you create the first fill layer, change its blending mode from Normal to Color in the Layers panel. You can then press Command-J (PC: Ctrl-J) to make a copy of the fill layer and double-click its layer thumbnail to quickly change its color. Each duplicate will also maintain the Color blending mode and layer mask. Be sure to rename each layer for convenience later.
- Skin: This is the base skin color set to #CE1212 and Opacity 20%.
- Skin copy: Next, we’ll add a peach tone set to #ddb798 and Opacity 20%.
- Skin copy 2: Add a brown shade at #b18463 and Opacity 20%.
- Rouge: Add a rouge color (everyone has an orange/pink tone to their skin) at #d44919 and Opacity 5%.
- Blood Vessels: Now we’ll add blood vessels at #e32d03 and Opacity 5%.
- Deox: Add a deoxidation color at #44d09d and Opacity 5%.
- Desat: Finally, add a desaturation layer at #6e8598 and Opacity 5%.

Step Three: With the top color fill layer active in the Layers panel, Shift-click the bottom color fill layer so they’re all selected, and then press Command-G (PC: Ctrl-G) to place them into a layer group. Rename the group “Skin.” Click the Add Layer Mask icon (circle in a square) at the bottom of the Layers panel to add a mask to the group, and then use the Brush tool (B) to paint with black to remove any skin color from areas like her eyes, eyebrows, and dress. I also added a Levels adjustment layer above the Background copy and dragged the shadows slider slightly to the right in the Properties panel to increase the contrast in the image.
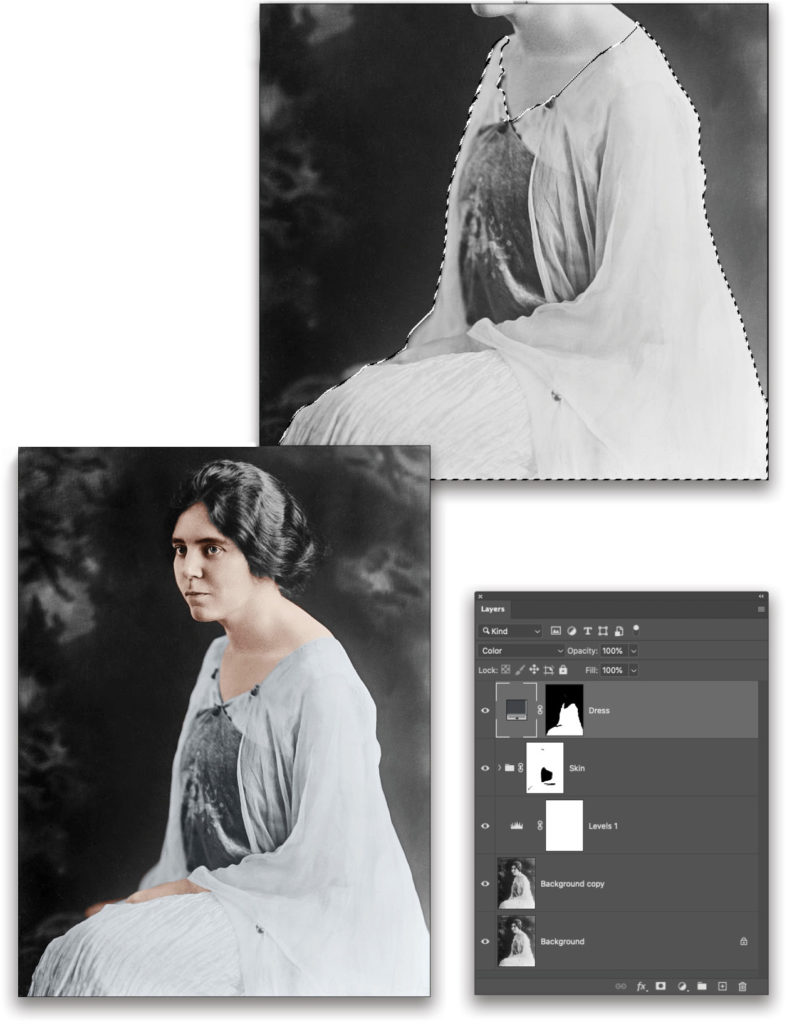
Dress Layers
Step Four: Next, we’ll colorize the dress. Make a selection of the dress with the Quick Selection, Pen, or Lasso tool, and then add a Solid Color fill layer above the Skin group. You can temporarily hide the Skin layer group, if you want, so you can see the dress better for making the selection.
I opted for blue (see next step) but you can choose any color fitting of the time period for realism: Blue, green, pale pink, pale yellow, cream, brown, black, and white would all be fitting for the time this photo was taken, circa 1920. I frequently refer to the Vintage Dancer website for color of clothing by era. It’s a terrific reference tool!
Step Five: Set the first (base) Solid Color fill layer to #3f4449, and change its blending mode to Color. In the Layers panel, click on its layer mask thumbnail, and switch to the Brush tool (B). Set the brush size to around 60 px, depending on your image, and press X until the Foreground color is set to black. Now paint away areas of the image that are covered by the blue fill layer that aren’t part of the dress. Leave this base color fill layer for the dress set to 100% Opacity (again, this varies from image to image). Name this layer “Dress.”
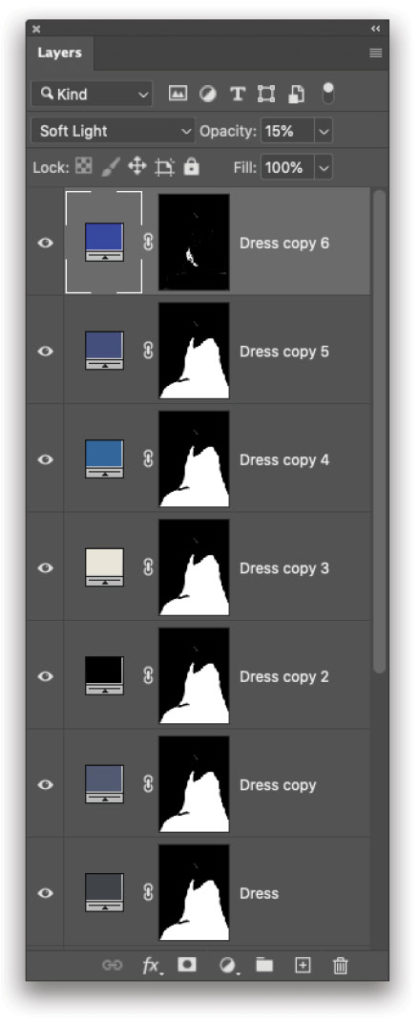
Step Six: Just as we did with the skin layers, we’re going to duplicate the base Dress layer several times. Here’s a list of those layers:
- Dress copy: #505a71 and Opacity 10%
- Dress copy 2: #000000 and Opacity 20%
- Dress copy 3: #eae5d9 and Opacity 15%
- Dress copy 4: #336699 and Opacity 20%
- Dress copy 5: #434f7b and Opacity 15%
- Dress copy 6: #0000d8, Opacity 15%, and change the blending mode from Color to Soft Light. Edit the layer mask so it only affects the lower portion of the darker blue area on the dress.
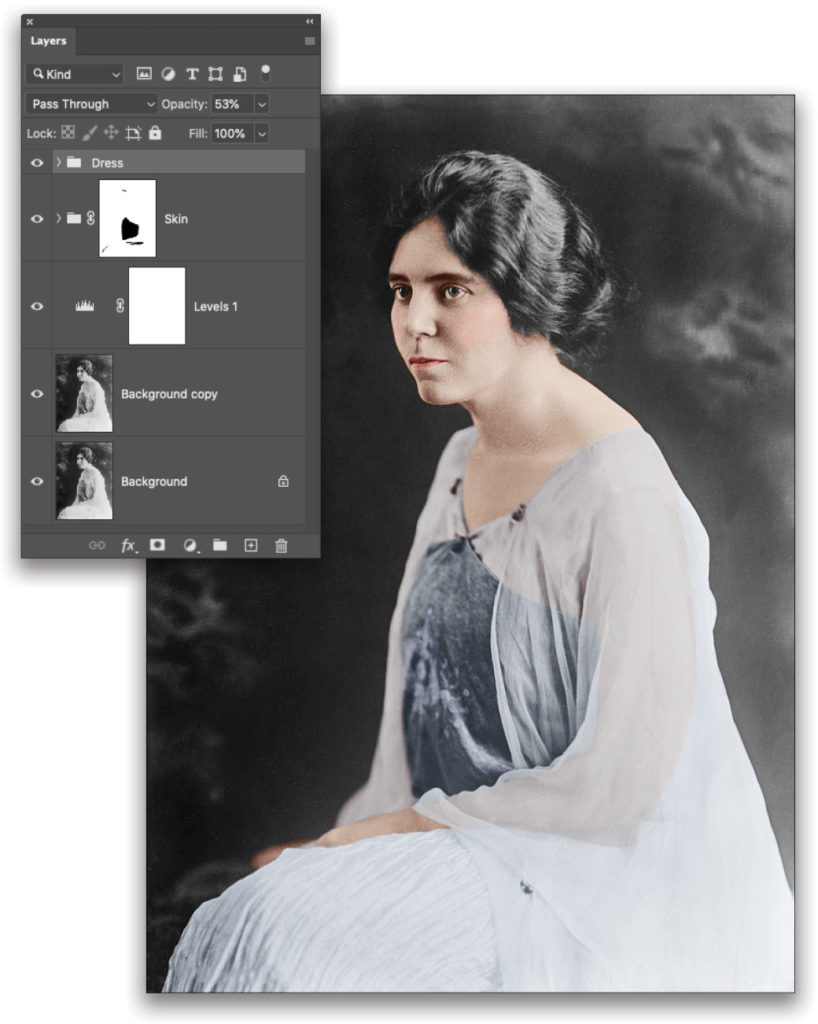
Step Seven: Once you complete these color fill layers for the dress, select all of them in the Layers panel, create a group, and name the group “Dress.” Reduce the Opacity of the layer group to 53% (this isn’t a rule of thumb; it varies from image to image). Notice how her arm realistically appears through the sheer sleeve of her dress.
Step Eight: In the Skin group folder, duplicate the color fill layer that’s set to #b18463 (Skin copy 2), move it above the Skin group folder in the Layers panel, and rename it “Shadow.” Temporarily raise its Opacity to 50% so it’s easier to see the color, and click on its layer mask thumbnail to make it active (see next page).
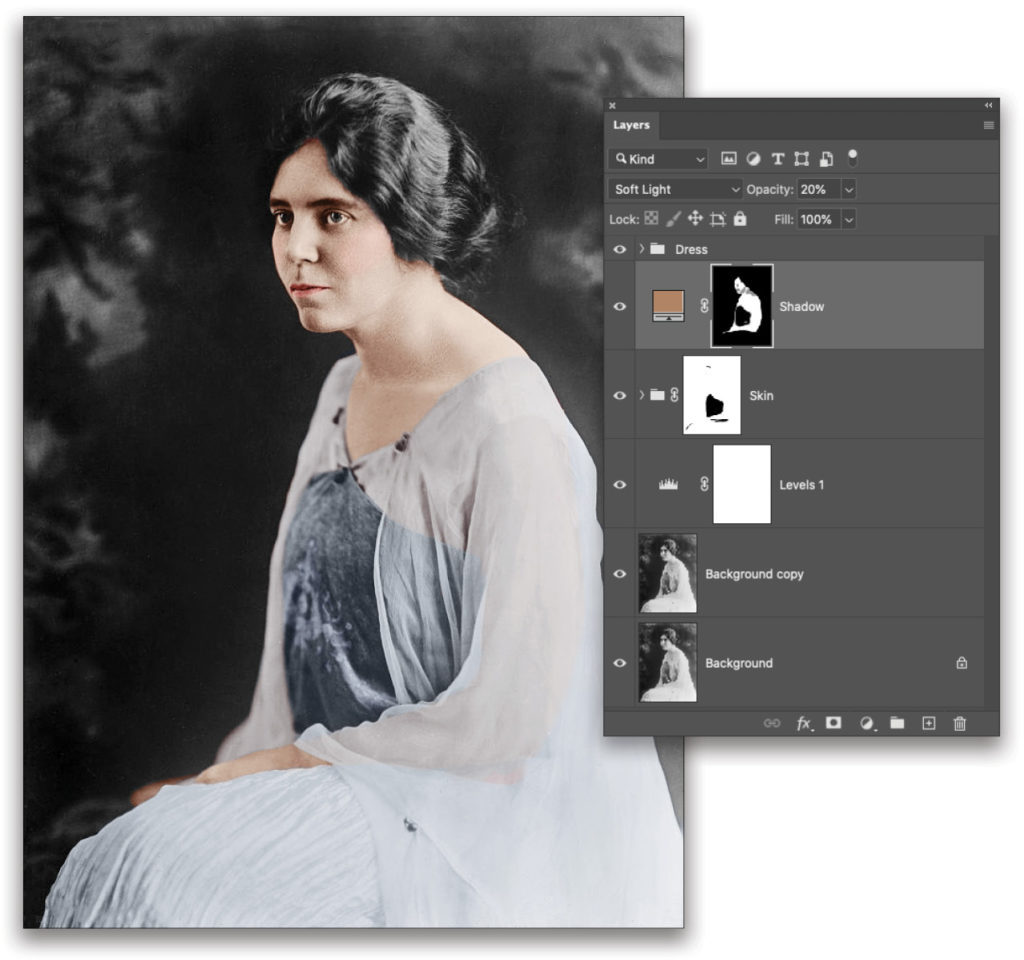
Select the Brush tool, and set its size to 30 px and Hardness to 0%. By reducing Hardness to 0%, it will create a soft effect for shadows. With the Foreground set to black, paint away any “skin” color that may go beyond her arm.
When done, change the layer from Color to Soft Light and reduce its Opacity back to 20%. The key for realism is to have the arm visible, and the sleeve to have a soft and subtle look that matches the rest of the dress.

Step Nine: The last steps are to finish colorizing the image, including her hair, eyes, button on her dress, eyeshadow, and background. You can click here for an earlier article I did in Photoshop User on colorizing eyes.
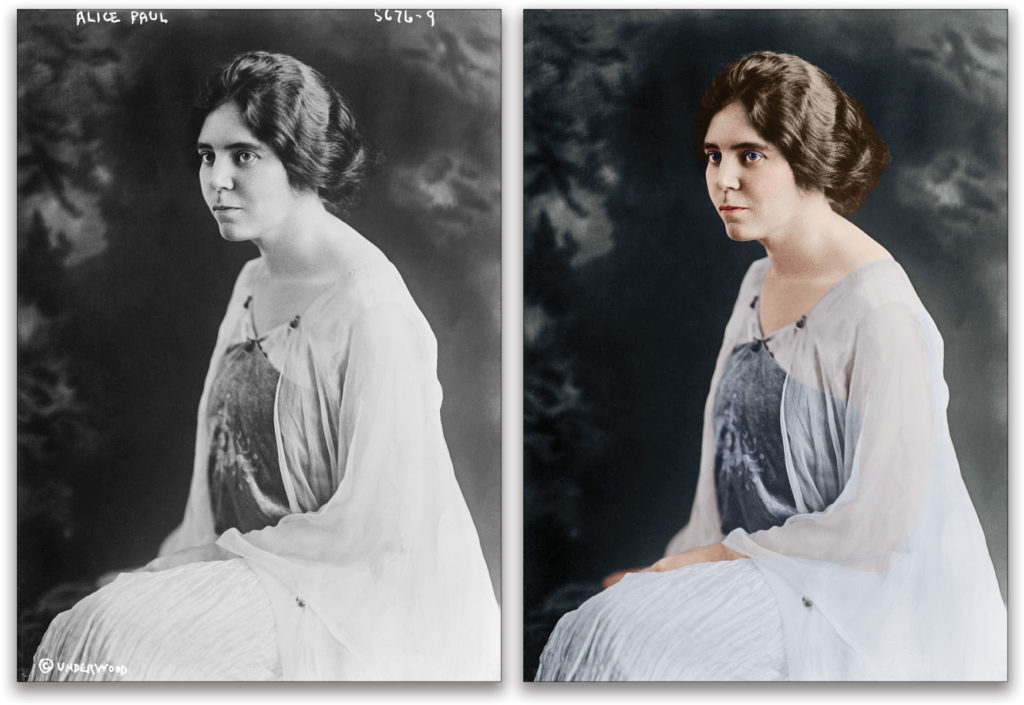
Hopefully, you enjoy bringing new life to old or damaged photos! I’d love to see what you create with the photo we used here or your own photos in the KelbyOne Community forum. Happy restoration and colorizing!
This article originally published in the September, 2020 issue of Photoshop User magazine.


