In this column I’m going to focus on some of my favorite Photoshop filters that are designed for photographic purposes, or to emulate photographic effects. I’ll be covering these in an order that, more or less, conforms to how I might use them in an actual editing workflow. For some corrective filters, it may be better to address certain issues in the RAW editing stage, either in Lightroom or Camera Raw, and I’ll point those out when we come to them.
Camera Raw Filter
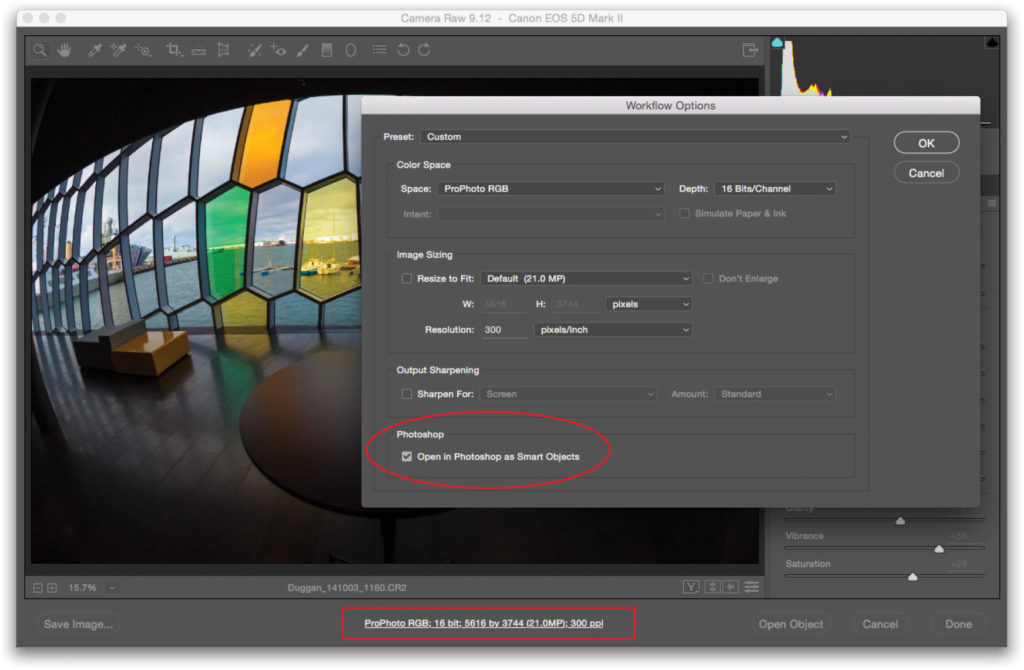
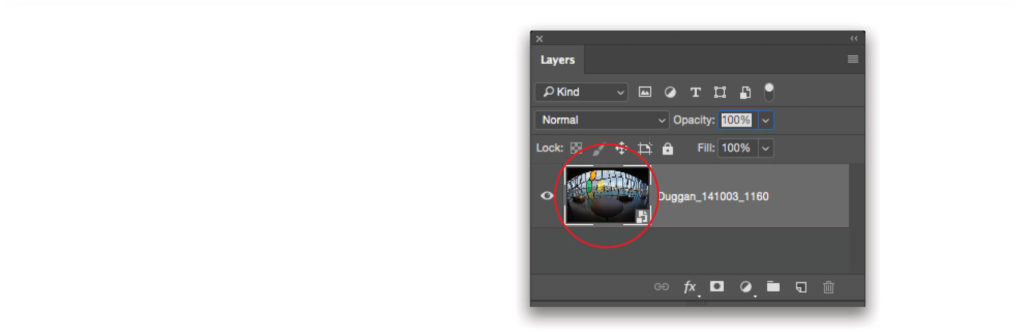
There are two ways you can apply Adobe Camera Raw (ACR) as a filter. The first is if you’re starting out in ACR with a RAW file. Click the single-line workflow summary right under the ACR preview of the photo. In the Workflow Options dialog, turn on Open in Photoshop as Smart Objects (you can also get this same result by holding down Shift when you go to open the image into Photoshop; the Open Image button will change to Open Object). Once the file is in Photoshop, you can revisit your ACR settings simply by double-clicking on the layer thumbnail.
The second way to apply ACR as a filter is from Photoshop’s Filter menu. You can do this to any file, even if it didn’t start out as a RAW capture (note that just because you’re applying changes using Camera Raw, the file or layer won’t have the advantages of a true RAW file created by your camera). For maximum flexibility, so you can revisit what you do in Camera Raw, apply it as a smart filter (see below).
Taking Advantage of Smart Filters
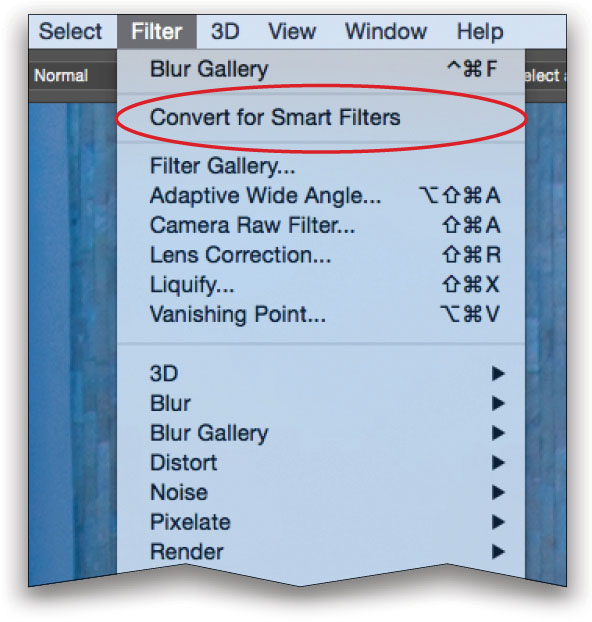
Smart filters are a bit like Adjustment layers in that you can open the filter controls at any time in the future and make changes. To access the smart filter capabilities, the image layer with which you’re working needs to be turned into a smart object first. The fastest way to do this is in the Filter menu via the Convert for Smart Filters command (if you’ve already converted a layer via Layer>Smart Objects>Convert to Smart Object, the smart filters option will be grayed out). Most Photoshop filters can be applied as smart filters. If you’re working with a smart object layer, check the Filter menu; the ones that are grayed out don’t function as smart filters (a few filters are also not available with 16-bit files).
Lens Correction
From a workflow perspective, it makes a lot more sense to address lens corrections in Lightroom or Camera Raw, rather than in Photoshop. But if you find yourself with a file that didn’t start out in either Lightroom or ACR, then the Lens Correction filter can be useful.
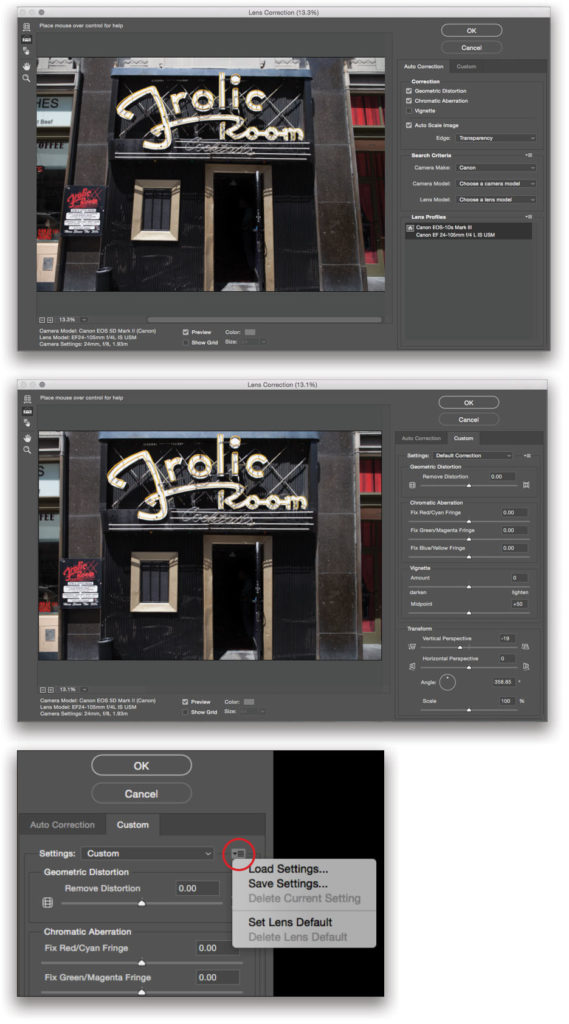
If the file’s EXIF info contains lens data, the correct profiles will automatically be chosen for you in the Auto Correction tab, or you can choose from a long list of available lens profiles. Tools in the upper left allow you to drag on the image to correct for barrel distortion and pincushion effects (though these are much easier to apply via sliders in the Custom tab), as well as a Straighten tool for leveling the image. In the Correction section in the upper right, I’d recommend enabling the correction for Geometric Distortion, as well as Chromatic Aberration.
The Custom tab offers sliders for manually correcting the geometric distortion, chromatic aberration, lens vignetting, transforming the horizontal or vertical perspective, and rotating the image. One feature that can be useful is that you can save a particular batch of settings and load them later on different images. If you find yourself constantly making similar corrections for certain subject matter, then this can save a lot of time.
Noise Reduction
Although Photoshop does have a filter for reducing noise (Filter>Noise>Reduce Noise), I feel that you’ll have much better results dealing with noise reduction on both RAW and other file formats if you apply it in Lightroom or access it when using Camera Raw as a filter. Both those programs also allow you to brush on noise reduction if certain areas need a bit more attention than others. The illustrations here show the Noise Reduction settings in the Detail panel in Camera Raw.
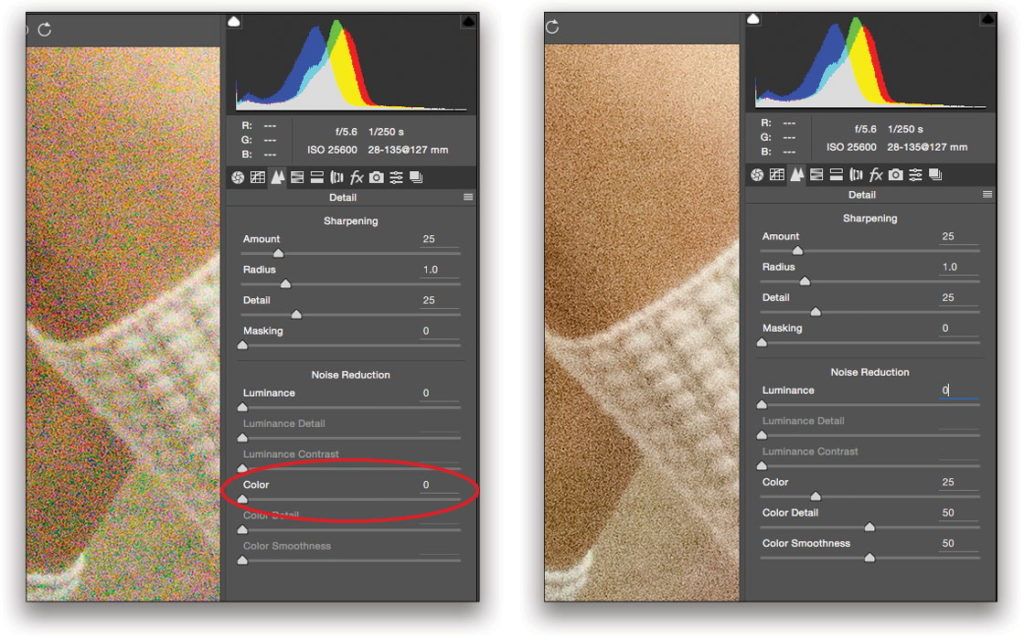
There are two types of noise: luminance and color. Both Lightroom and ACR automatically apply a setting of 25 for color noise reduction, and in most cases this does a great job.
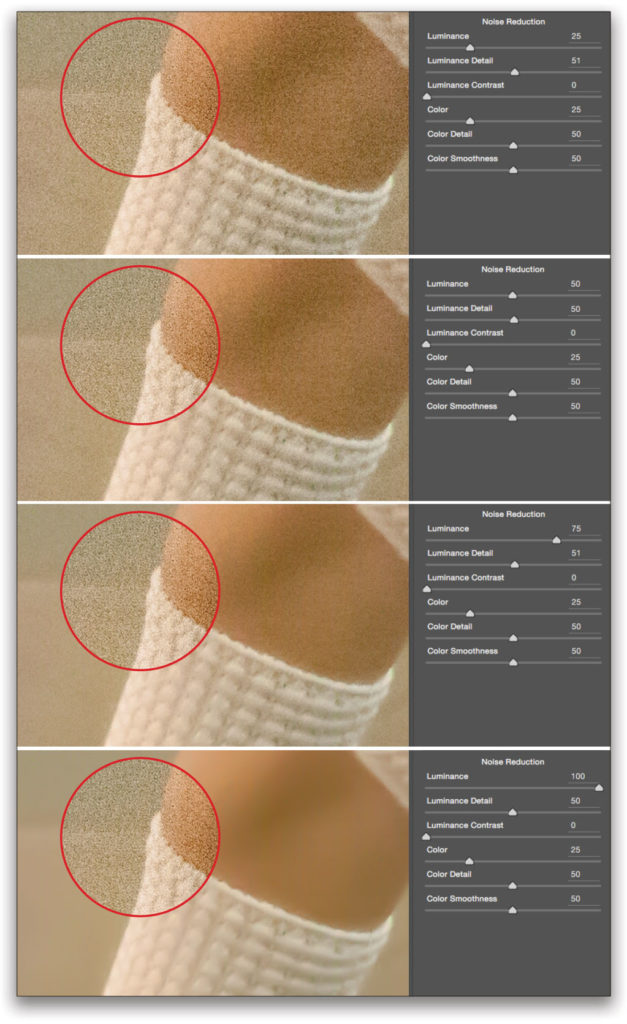
Luminance noise is the mottled pattern that gives shape to the noise, and this is harder to reduce than color noise. To smooth the mottled noise pattern, raise the Luminance slider until you begin to see results (for any noise reduction, be sure to view the image at 100%). In the illustration, you can see a detail view at 100% of a photo shot at ISO 25,600 with Luminance settings of 25, 50, 75 and 100, with the circular inset showing no luminance noise reduction.
Luminance Detail helps to reduce the smoothing caused by the Luminance slider from affecting the details; Luminance Contrast increases or decreases the contrast of the noise pattern. As with many things related to noise reduction, there’s no right setting for any of these sliders; it’s all about knowing how they affect the pixels and finding a combination that works for you. The success you have with any type of noise reduction is influenced by a number of variables: the software you’re using, the quality of the original file, and whether or not it was underexposed. Even at very high ISOs, a well-exposed file will look better than an underexposed file.
Adaptive Wide Angle
This is one of Photoshop’s more interesting and effective corrective filters, though it can take some getting used to. As its name suggests, it’s ideal for correcting distortions that are common with wide-angle lenses, and especially super-wide or fisheye lenses.

In the upper right, there are some Correction presets you can try. Sometimes they work well, at other times not so much; it all depends on the image. The photo shown here was taken with a 15mm lens and has obvious fisheye distortion. I actually like the distortion (it’s why I chose to use that lens!), but if you had such a shot and wanted to correct for it, Adaptive Wide Angle might just do the trick. It should be noted that if lens info is present in the metadata, and there’s a lens profile available for it, this will often do a very good job at correcting fisheye distortion.
To fix this image, I began with the Constraint tool (C) found in the upper left (active by default). I clicked an anchor point on the left side of the curved edge of the road, then held down Shift (the Shift key tells the filter you want the line to be straight, either horizontal or vertical) and dragged the line to the right edge of the road. As you do this, the line should automatically curve to adapt itself to the actual curve in the image. At the other side of the image, I clicked to set another anchor point, and the curved line of the road was immediately corrected to a straight line.
Next, I did the same thing for several of the street light poles, Shift-dragging to define them as vertical lines. I also added a horizontal constraint line to the curved top of the earth mound in the traffic circle, the white line on the road, and the horizon that’s mostly obscured by the mound.
As you work with the Constraint tool, you may notice different colors for the lines: yellow is a horizontal line, purple is vertical, and cyan is unconstrained. There’s also a Polygon Constraint tool (Y) if you need to apply a correction by defining a polygon shape instead of using the line tool. Depending on how drastic the correction to the image, you may need to crop the image afterwards and possibly use Content-Aware Fill, as well as some retouching to fill in some of the missing edges, as I did with this photo.
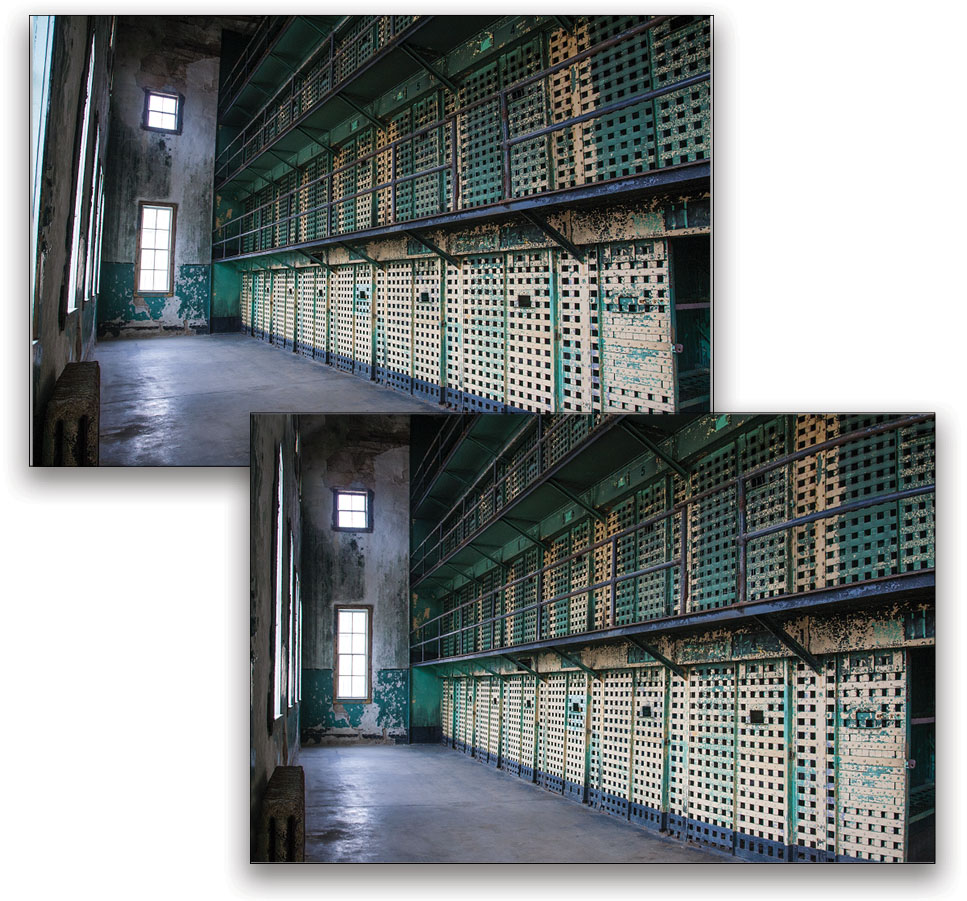
The example shown here is somewhat extreme, but this filter can work wonders on more ordinary shots, as you can see in the before and after view of a cellblock in an old prison.
Lens Blur
There are several blurring filters in Photoshop, but for photo work, I find myself using only a few on a regular basis. One is Lens Blur (Filter>Blur>Lens Blur), which, as the name suggests, tries to emulate the optical blurring that you’d get from a lens. Lens Blur works with either 8- or 16-bit files, but it won’t function as a smart filter. For this reason, usually make a duplicate layer when applying this filter.
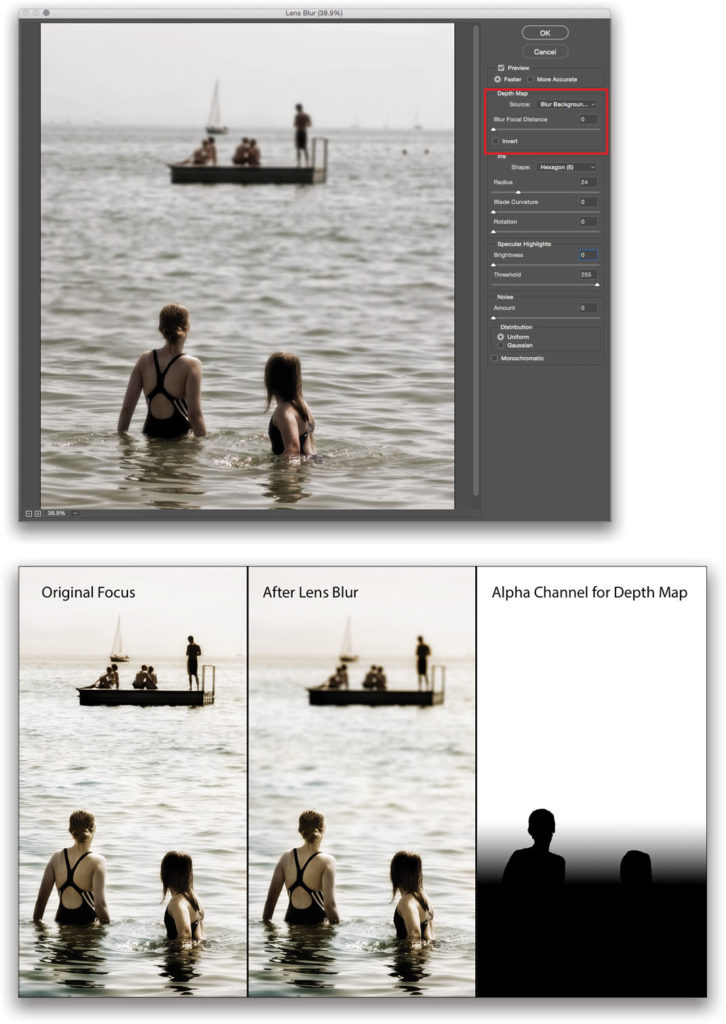
The top section controls the Depth Map, which allows you to use the grayscale tones in an alpha channel to map the blur to the image at varying levels. This can be a very effective way to create a sense of focus falling off into the background of the photo. The success of using a Depth Map in Lens Blur is all about how good your alpha channel mask is; a sloppy Depth Map will yield a rough and sloppy blurring effect, whereas a mask that you take time to create and fine-tune can result in a very convincing shallow depth-of-field effect. In this example, the Blur Focal Distance is set to 0, meaning areas of black in the mask are in focus, while areas of white in the mask are fully blurred. Areas of gray are partially blurred.
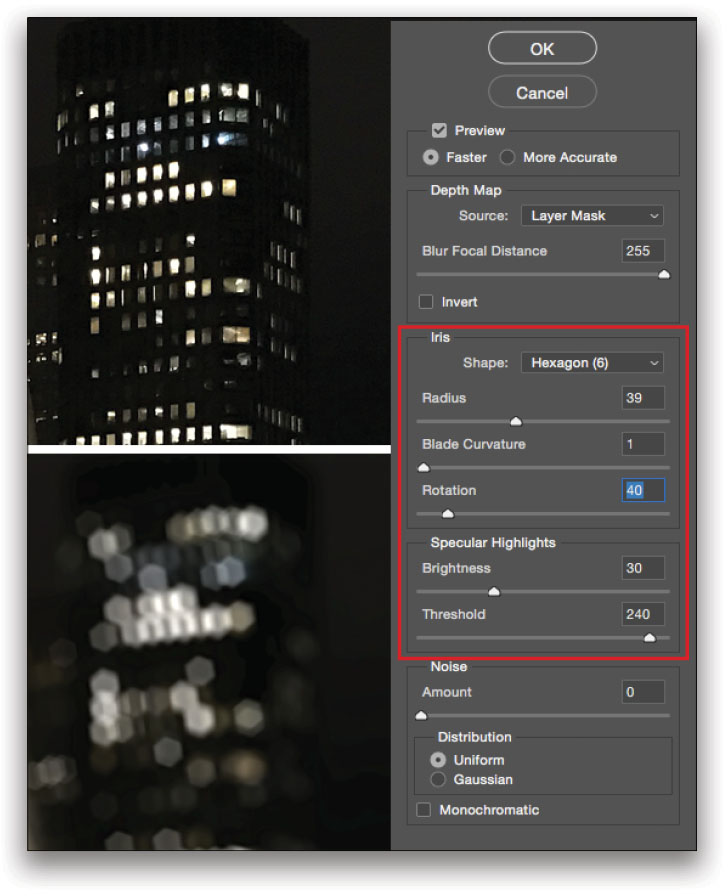
The Iris controls let you mimic the shapes of the bladed iris that controls the aperture in a lens. This shape can show up in bright specular highlights in an actual photo, and this lets you create that effect with this filter. You can control the curvature of the virtual iris blades, and even their rotation. For Specular Highlights, the Threshold slider determines how bright a light point has to be before it becomes a specular highlight (totally white), and you can also adjust the brightness as well. This level of optical geekiness via cool software code is most impressive!
There’s also an option to add noise to an image after a blur has been applied, and this is a good idea to ensure a consistent noise texture throughout the photo, since blurring an image will also blur any original noise that’s present. This isn’t something that would show up in a social media post, but it could if you make a large print.
Blur Gallery
The Blur Gallery (Filter>Blur Gallery) offers five different blurring filters. Unlike the Lens Blur, these don’t try to emulate real-world optical blurring, but rather they impose a blur on top of the photo for a more stylized effect. A plus is that the Blur Gallery effects work as smart filters when a layer is converted to a smart object. Here’s a quick rundown of the five blurring effects:
Field Blur:This blur filter allows you to create multiple areas of blur in a photo. Initially, the entire image will be blurred. Adjust the blur amount using the wheel around the blur “pin,” or use the Blur slider on the right in the Blur Tools panel. Click in an area of the image to add another pin, and adjust the blur in that area separately. Add as many blur pins as you like and adjust each independently to get the effect you want.
Iris Blur: This is a simple blurring effect around an oval iris shape. Drag on one of the four center dots to adjust the transition from sharp to blurry. Drag on the outer ring to resize the iris, drag on any of the small dots on the outer ring to rotate and resize it, and use the square handle to transform between an iris and a rectangle with rounded corners.
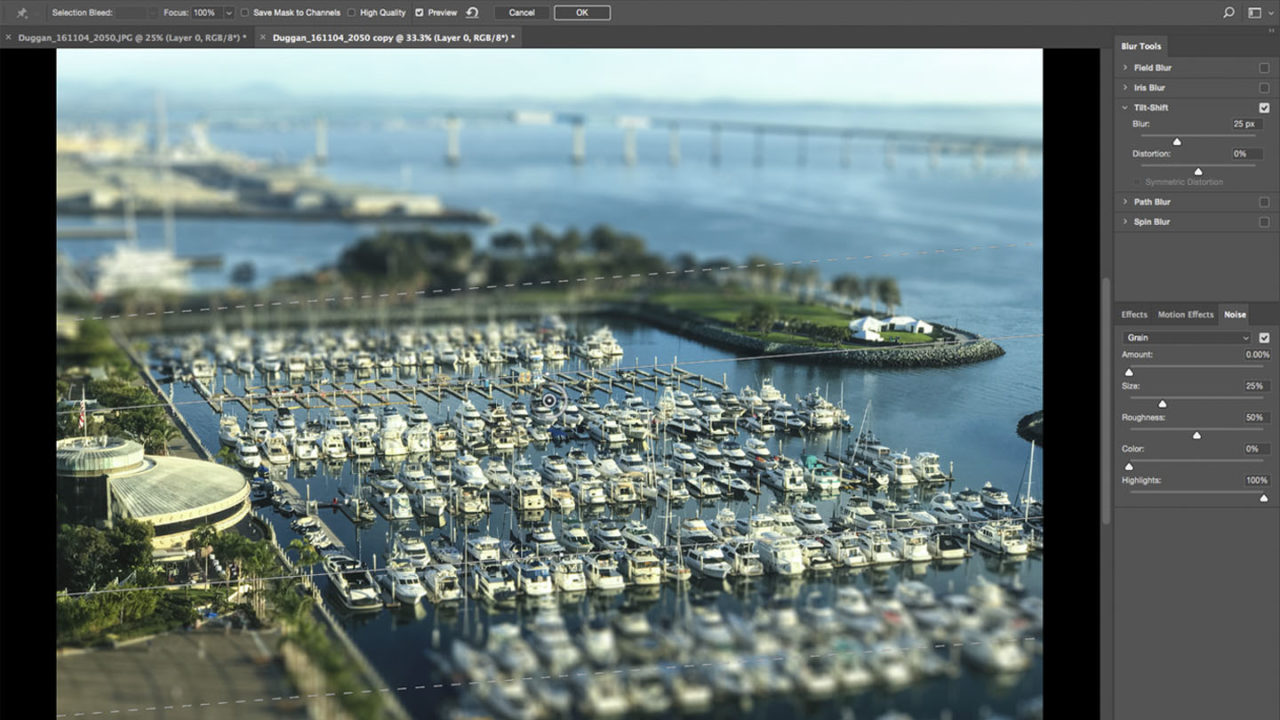
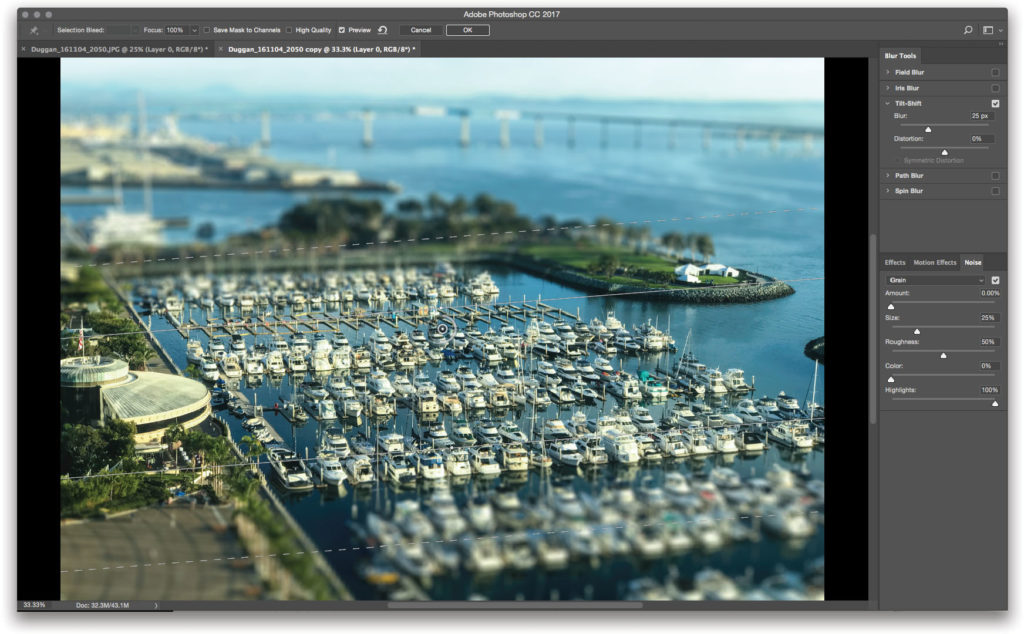
Tilt-Shift: This classic effect, named for the movements on a view camera and the effect they can produce, creates a blur along a straight line. Drag on the lines to adjust the size of the in-focus or blurred areas. Drag on one of the small dots on the solid lines to rotate. This is what you use to turn shots taken from a high vantage point looking downward into scenes that look like a toy cityscape.
Path Blur: This is a very cool tool that lets you place paths, straight or curved, on the image and then create a blur that flows in the direction of the path. You can have multiple path blurs in place, as well as multiple points on each path, and this allows you to create some very trippy blurring effects!
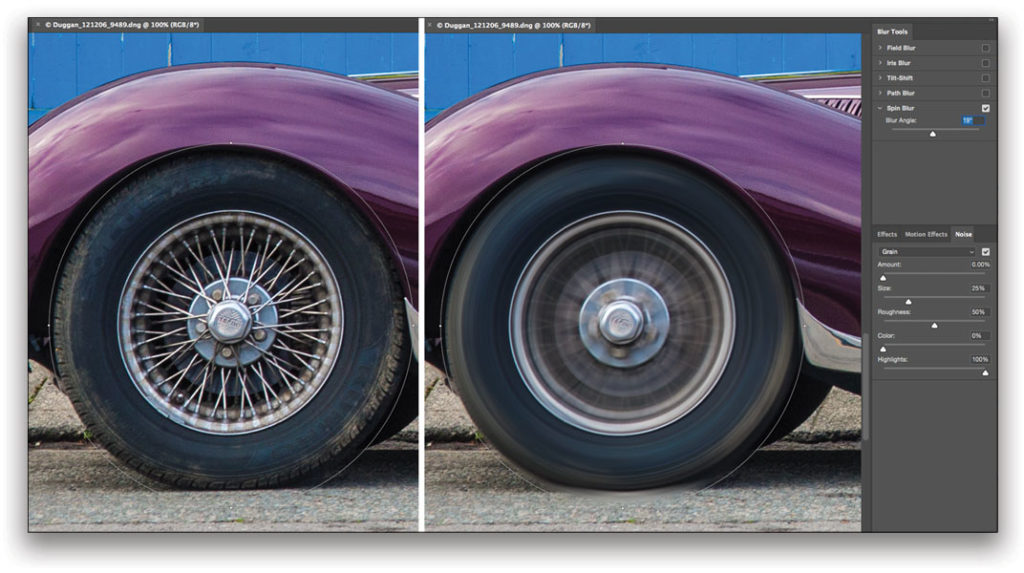
Spin Blur: As the name implies, with this tool you can create a blur that makes it appear as if an object is spinning. This can be very useful if you want to make it appear as if a stationary car is actually speeding down the road. Some masking may be required in order to control slight filter spill beyond the object that’s supposed to be spinning.
Add Noise
As we saw with the Lens Blur filter, sometimes it’s good to add some noise to an image after applying a blur. Another way is to use the Add Noise filter (Filter>Noise>Add Noise). I typically use a Gaussian distribution and choose Monochromatic. Using this as a smart filter lets you re-visit the settings if they need fine-tuning, of course, but a more flexible way to add noise is to do so as a smart filter on a separate layer filled with 50% gray and set to either Overlay or Soft Light blend mode. Those blend modes don’t see 50% gray, so all you’ll see is the noise.
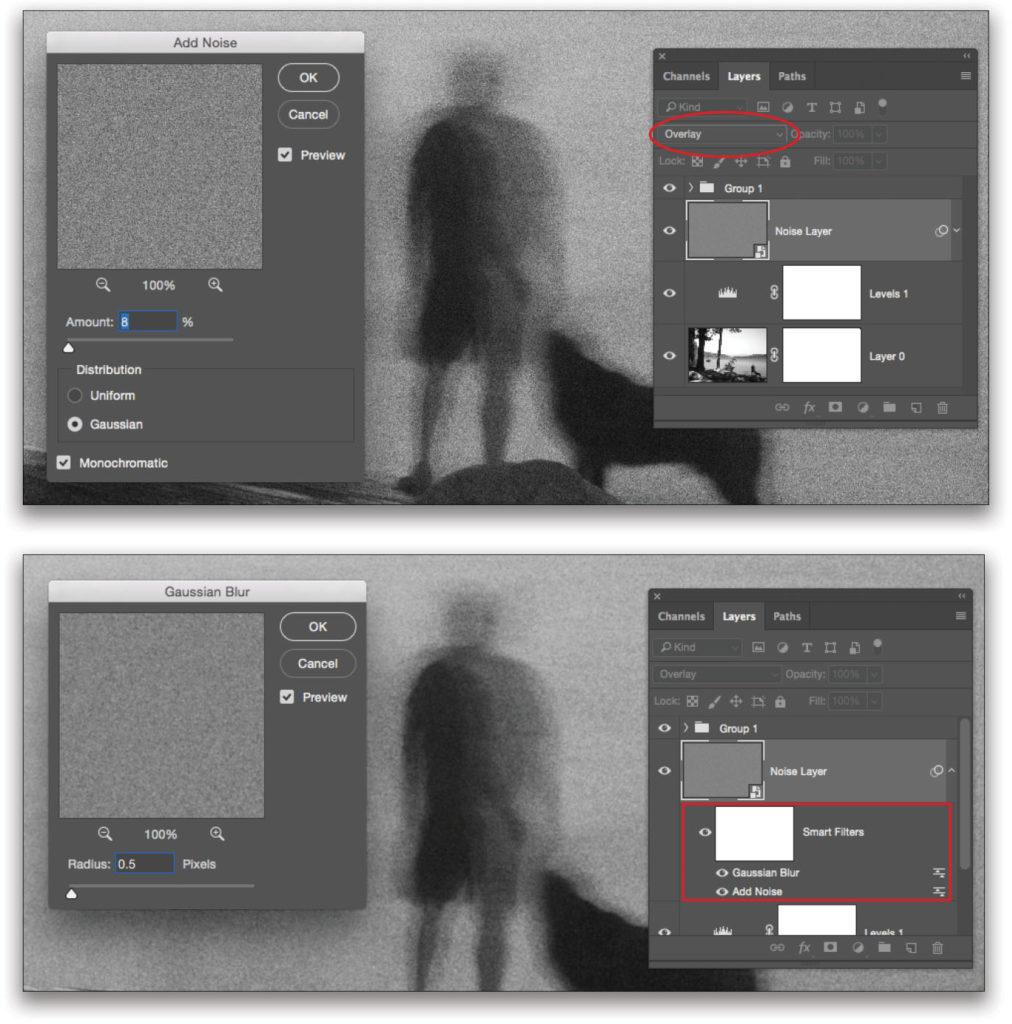
With the noise on a separate layer, you can use the Opacity slider to further adjust it, or even apply a very slight Gaussian Blur to the noise if you want a look that’s closer to how film grain looks when magnified in an enlarged print (sometimes the added digital noise just looks a bit too perfect and hard-edged; slightly blurring it can create noise that appears more organic).
The Sharpen Filters
Sharpening can be applied at different points in the editing process. Initial input sharpening is typically handled in Lightroom or Camera Raw, and this is a very light pass, designed to compensate for the fact that a RAW file is just that, and hasn’t received any sharpening in the camera. With some images, I may apply sharpening in Photoshop to specific areas to draw attention to them, or enhance an important element of detail. Separate layers and smart filters are ideal for this. If I’m printing from Photoshop, then I’ll also apply a final pass of sharpening after the image has been sized to the final print dimension.
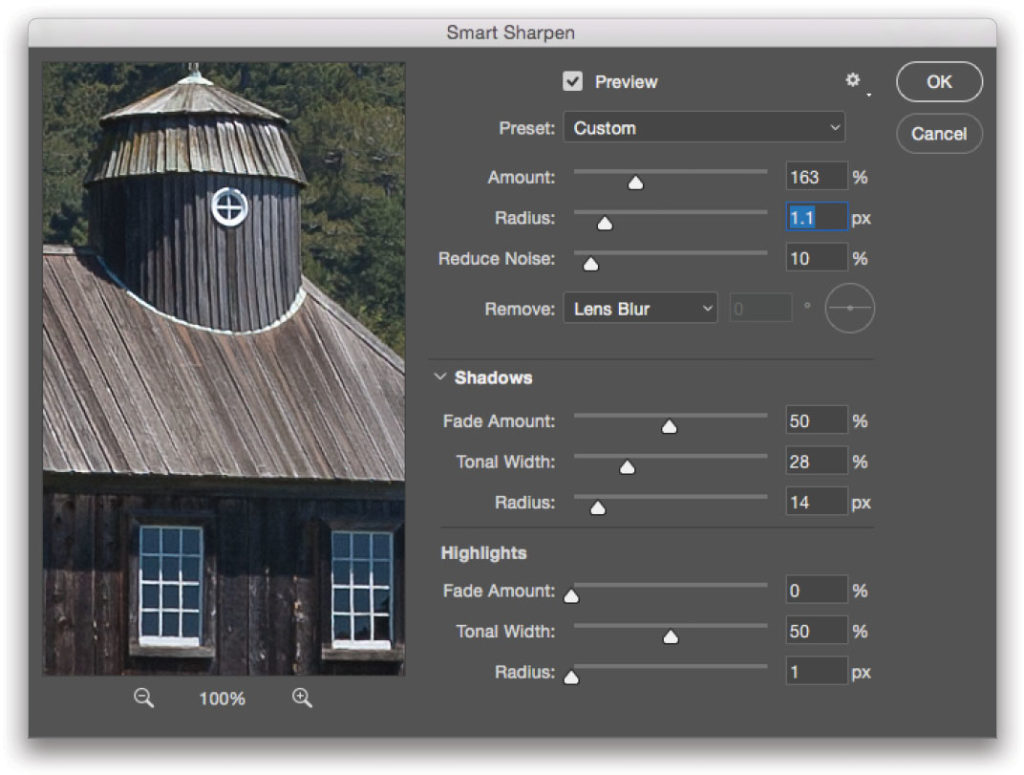
There are five sharpen filters (six if you count Shake Reduction) but the only ones I use on a regular basis are Smart Sharpen and the somewhat confusingly named Unsharp Mask (the name is a throwback to the analog days of prepress image reproduction when an actual unsharp, blurry mask was used to create a sharpening effect). Digital sharpening is a bit of an optical illusion, with the sharpening effect created by increasing the contrast along detail edges in the scene. In both Smart Sharpen and Unsharp Mask, sharpening is always a balance between the Amount slider (how much the contrast is increased on an edge), and the Radius (how many pixels out from an edge are affected by the contrast boost). Radius can often be problematic if it’s set too high, as this is the primary cause of sharpening “halos” along contrast edges.
In addition to the basic Amount and Radius sliders, Smart Sharpen has a Reduce Noise slider, as well as three different methods for removing blurring (I typically leave it set to the default of Lens Blur). There’s also an additional section that lets you customize how the sharpening is applied to the shadows and highlights in the image.
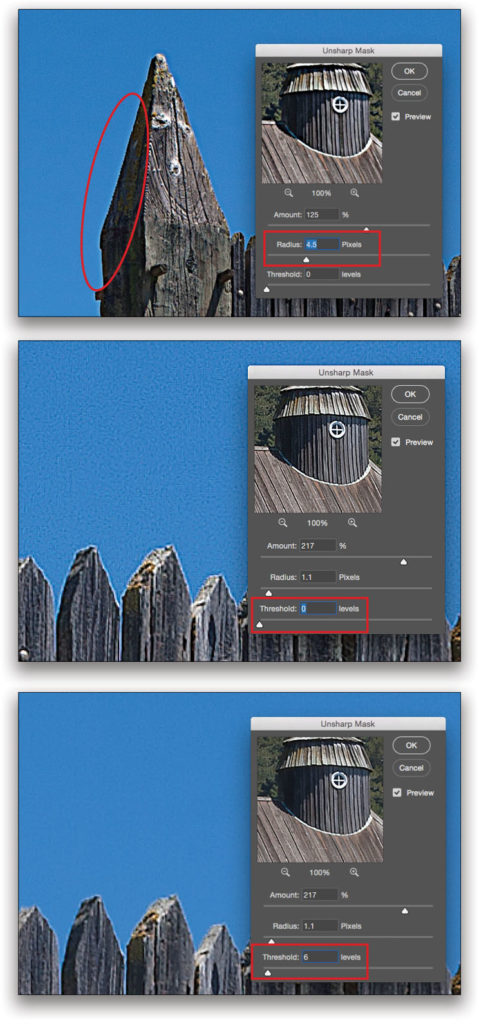
Unsharp Mask offers a Threshold slider, which can be very useful for restricting the sharpen effect from being applied to areas of similar tone and color that you wish to remain smoother, such as a woman’s face or a clear blue sky (see illustration below). The Threshold setting will only apply sharpening if there’s that amount of tonal difference between a pixel and neighboring pixels. For this reason, Unsharp Mask is still preferred for some files, even though I tend to use Smart Sharpen on a more regular basis.


