Here in “Maximum Workflow,” we mostly look at individual tools that can help speed up and expand your workflow. But we’ve never looked at the whole process of a workflow from start to finish. So this issue, we’re going to look at a shoot workflow from concept to final photo.
The Concept
I’ve been shooting with gelled lighting (gels are plastic-colored sheets) for more than 10 years. The recent work of Jake Hicks has spurred me to do even more, so when Jake did an interesting high-key shot using only one light and gels, I had to create something similar. I didn’t copy the lighting directly, but did my own take on it. The shoot was a collaboration so the whole team would have great photos to use.
Styling
While I often use a stylist, I also buy outfits and accessories that I think would work for shoots. In this case, I bought some sale items from Nastygal.com that I thought would work for this. Obviously, there are hundreds of online shops to look at; I just happened to buy from this one.
The Model
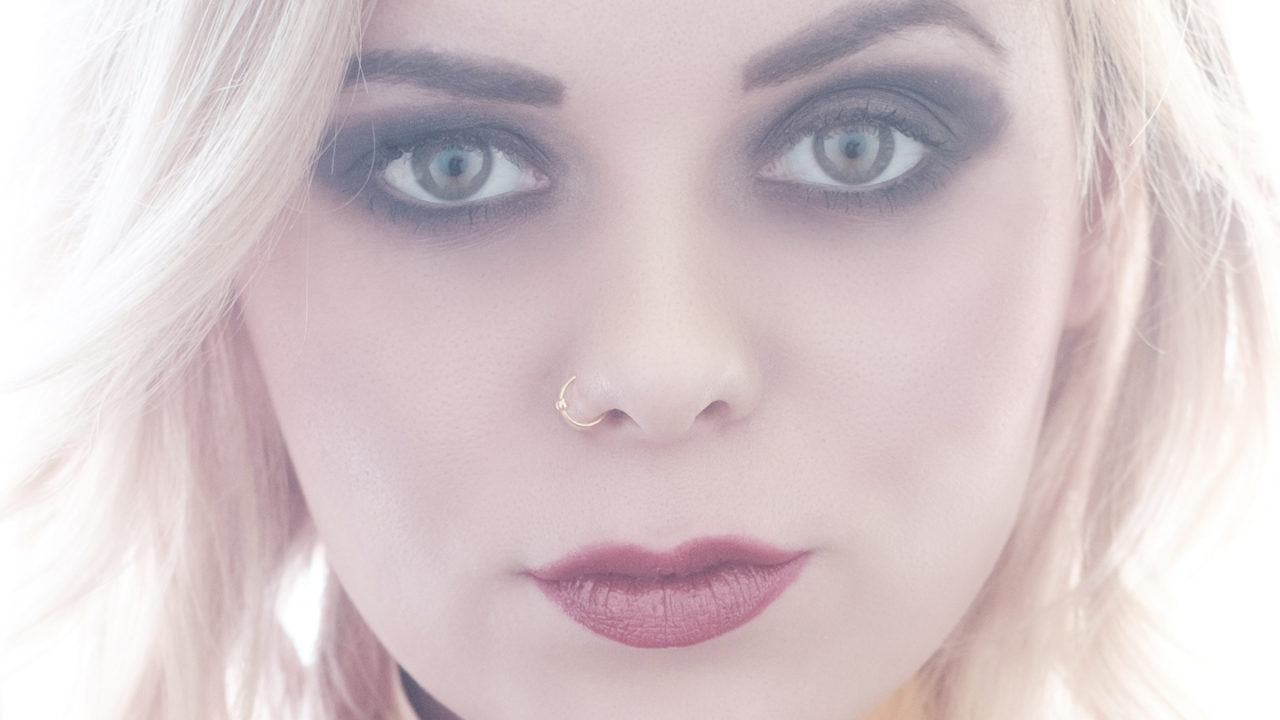
For this shoot, I wanted to use a blonde subject so the hair would work with a corrected gel light. Around that time, Laura, my model, just happened to get in touch with me looking for a shoot.
Makeup
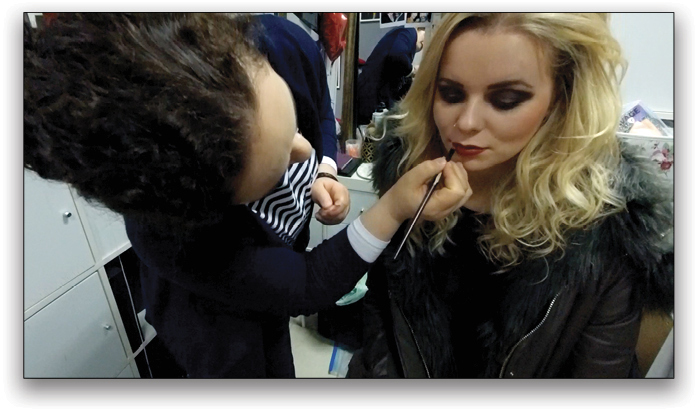
If you can’t do makeup, try to get a professional makeup artist for your shoots. It makes a huge difference. For this project, I called Ewa, a makeup artist with whom I’ve often worked. I knew that a dark smoky eye look would work well with Laura’s hair, and I left the specifics of the look to Ewa. While I’ve taken some makeup courses to get a feel for it, I’d never call myself a makeup artist!
Hair
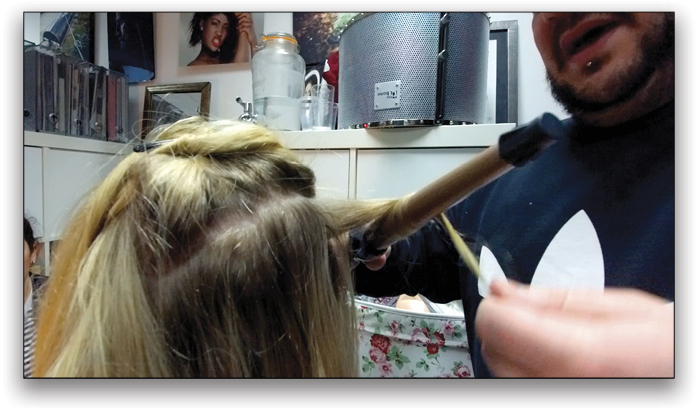
I felt a natural curl would give shape and curve to the shot. Frankie, a hairdresser from The Face, obliged.
The Lighting
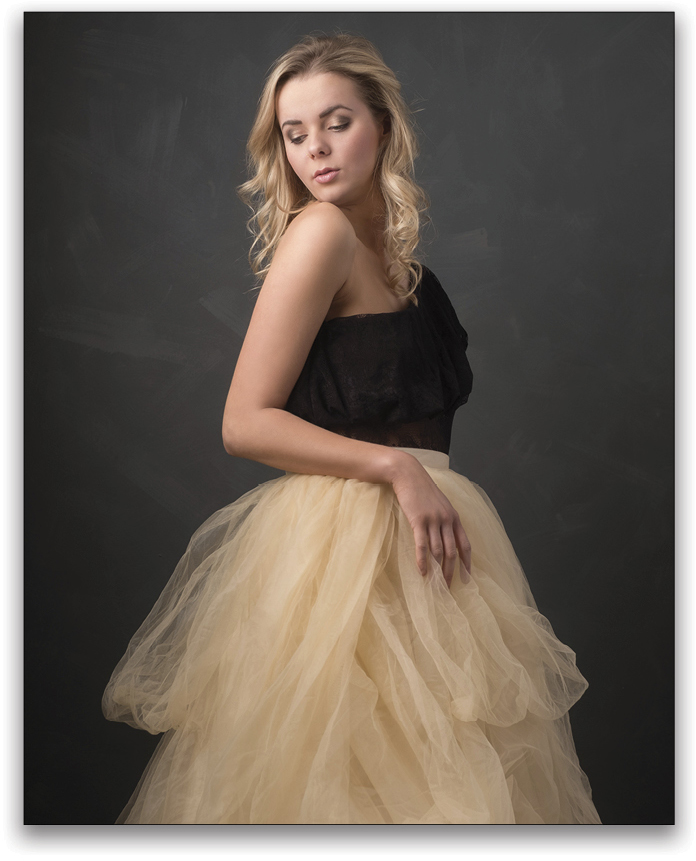
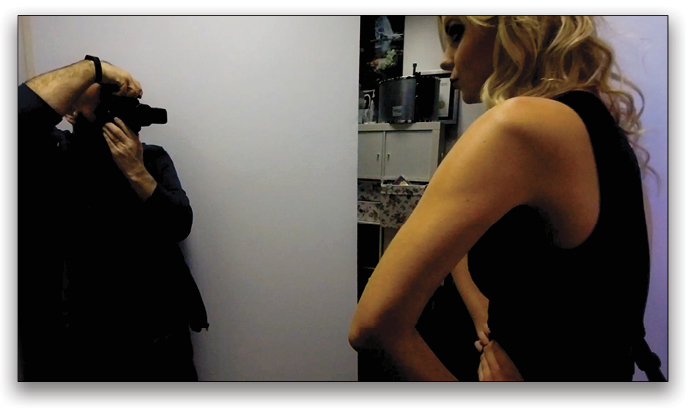
This is a one-light setup. As I was in studio, I used an Elinchrom ELC Pro HD 500 with a Rotalux Octabox 135cm. It could just have easily been done with a speedlight and an umbrella Octa. I put a purple gel over the light, and placed the light behind the model. While it looks weird in the previews, when the white balance is corrected in post, it has a really cool effect on the body edges.
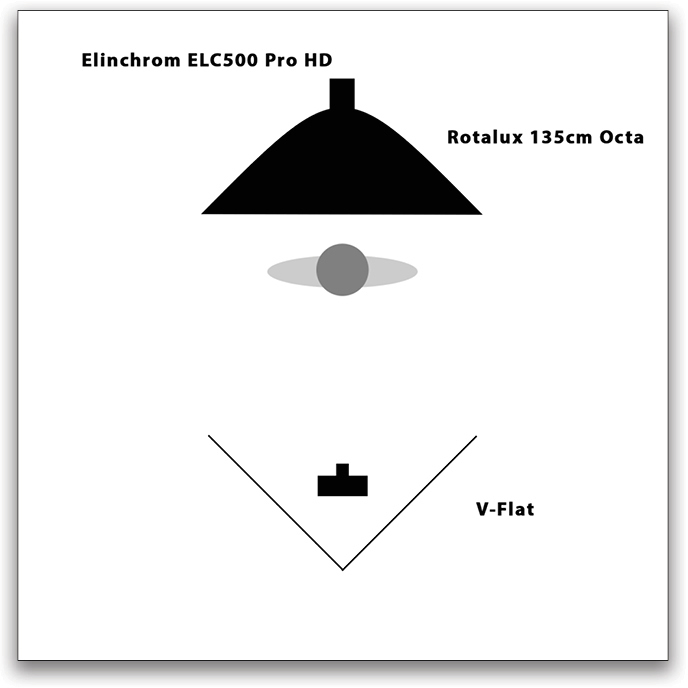
In front of the model, but behind me, I used a white V-flat. My V-flat is two 8×4′ sheets of Foamcore taped together in a V shape. I stood in the wedge of the V and the backlight bounced off this and back onto the model.
Posing
As this was a fashion portrait, obviously I was keen to use slightly exaggerated posing. I directed Laura to push her chin down and out toward me to create shape in the jawline. I had her arch her shoulders in to lift her collarbones. Mirroring can help with this; create the pose yourself and have the subject copy you.
Lightroom
When the shoot is done and dusted, it’s time to get editing!
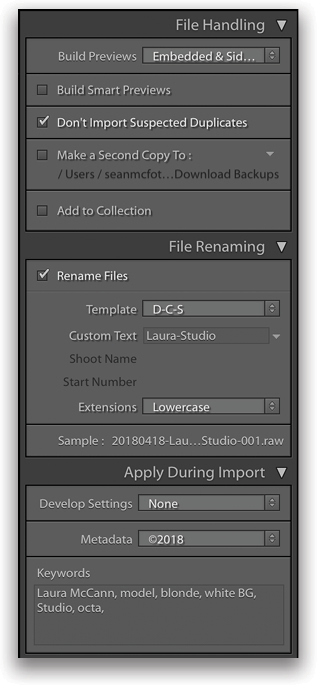
Step One: On import, I give the photos useful names, with a custom-naming template in the form “YYYYMMDD-Custom Name-Original File Number Suffix.” I add generic keywords and use a metadata template with the current year’s copyright information and my contact details. I import into dated folders and, because I’m using the embedded previews, I can just view the in-camera JPEGs to speed up initial selections.
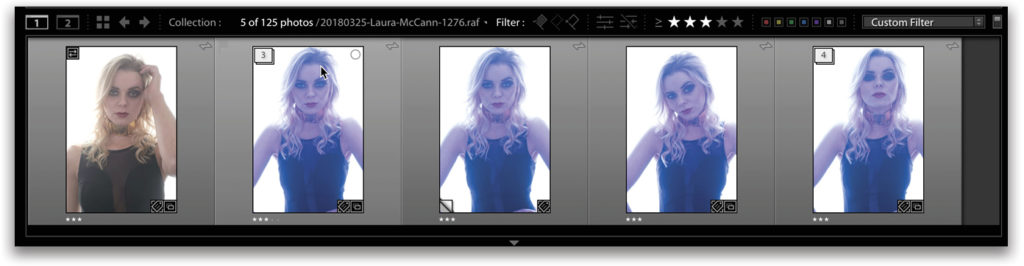
Step Two: To make a cull, I star-rate the photos in passes. I’ll generally bring up six photos at a time in Survey View (N). In the first pass, I give all the images that I like (even vaguely) a 1-star rating. Some sets might have all six images starred; others might not have any.
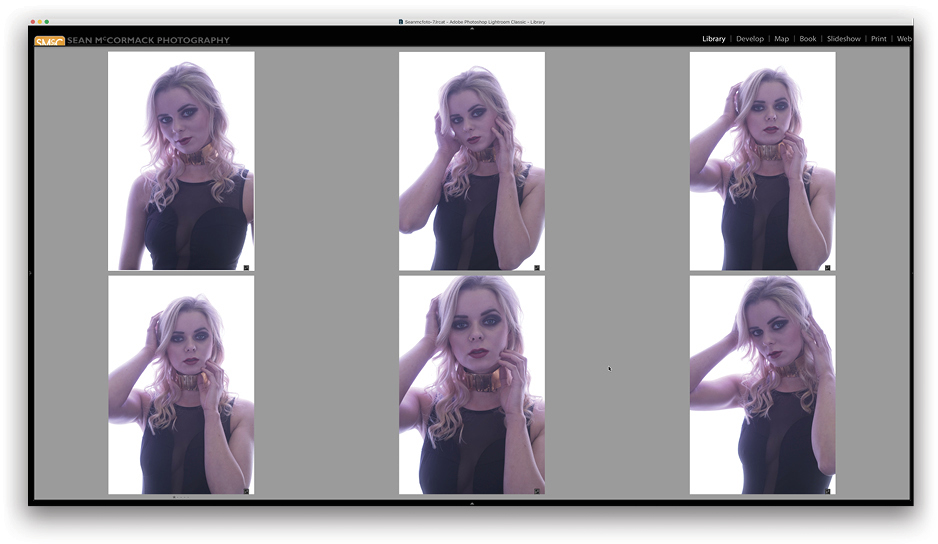
Step Three: Once I’ve made my first pass through the set (in this case, I made a collection for the article), I go to the Filter option above the Filmstrip, and click on the first star to show all images that have a 1-star rating or higher. This narrows my selection down. From there, I do a second pass, but this time I give images 2 stars, and then filter for 2 stars or higher to narrow the set down even more. Finally, I perform a third pass using 3 stars.
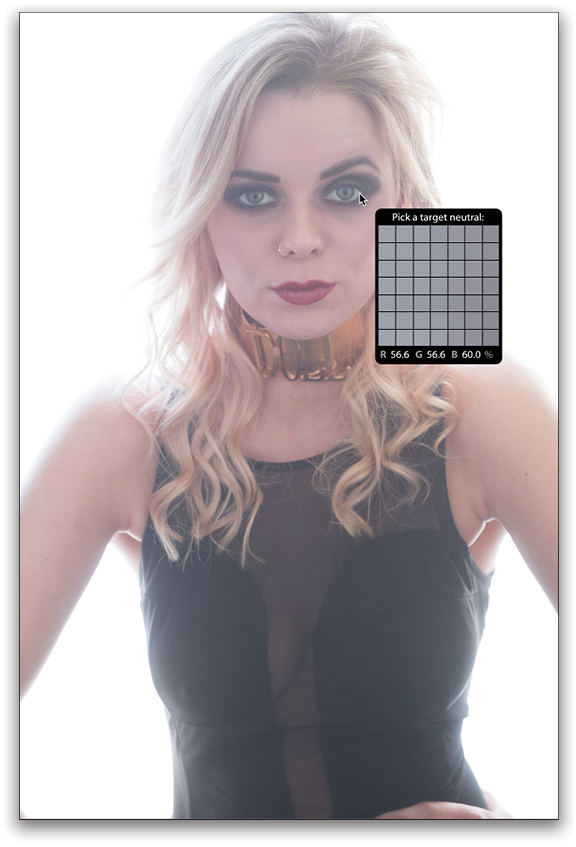
Step Four: I’m specifically editing for the gelled lighting, so into Develop I go. I need to correct my white balance first. The easiest way on this photo is to grab the White Balance Selector (W) and click on either the white of the eye, or the top, which is black.
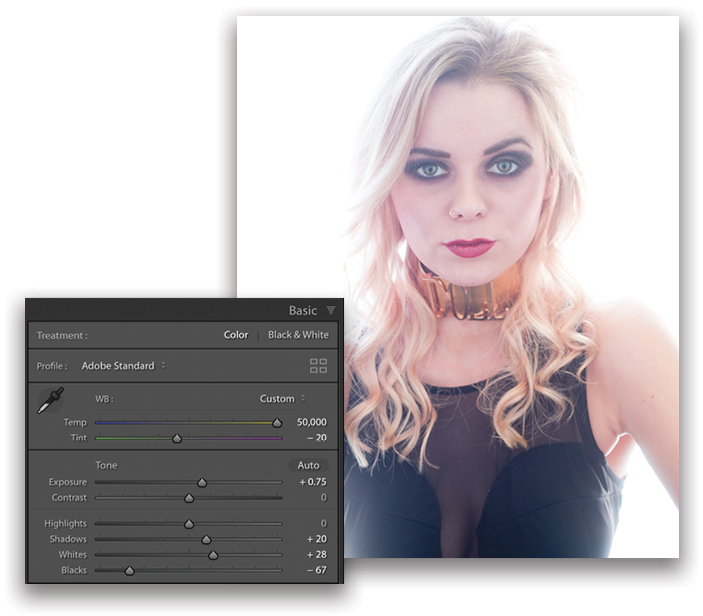
Step Five: Next, I crop to a 4×5 aspect ratio for two reasons: First, the image will be used on Instagram, which crops a 6×4 down, so I’d rather choose the crop myself in advance. Second, the partially visible hand at the bottom is distracting, so I want to remove it.

Step Six: Now I need to work on the contrast in the photo. First, a boost to Exposure is required. While the back is blown out, the skin needs to be lighter. Next, I pull down Blacks to increase contrast. Finally, I open up the Shadows a little and then the Whites to further lighten the photo.
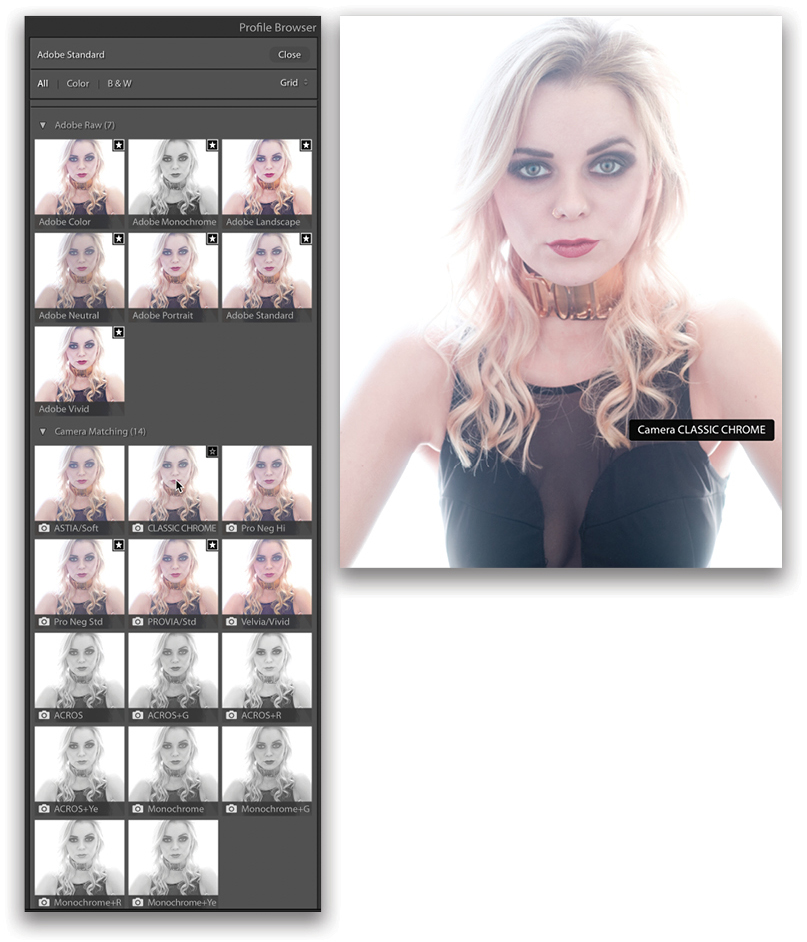
Step Seven: The photo is a little too saturated, but rather than just lower the Saturation in the Basic panel, I jump into the Profile Browser (new in 7.3). It’s the icon with four rectangles at the top of the Basic panel. From there, I can hover over a profile thumbnail, and the main image will update, showing a preview of the profile. Classic Chrome in the Camera Matching set looks great for this (based on your camera, you may have different profiles), but Camera or Adobe Neutral might work for you. My aim is an ethereal look; I’m not looking for super contrast.
Photoshop
Now, it’s time for some Photoshop, so from the Photo menu in Lightroom, chose Edit In>Edit in Photoshop CC 2018. You could also use the shortcut Command-E (PC: Ctrl-E).
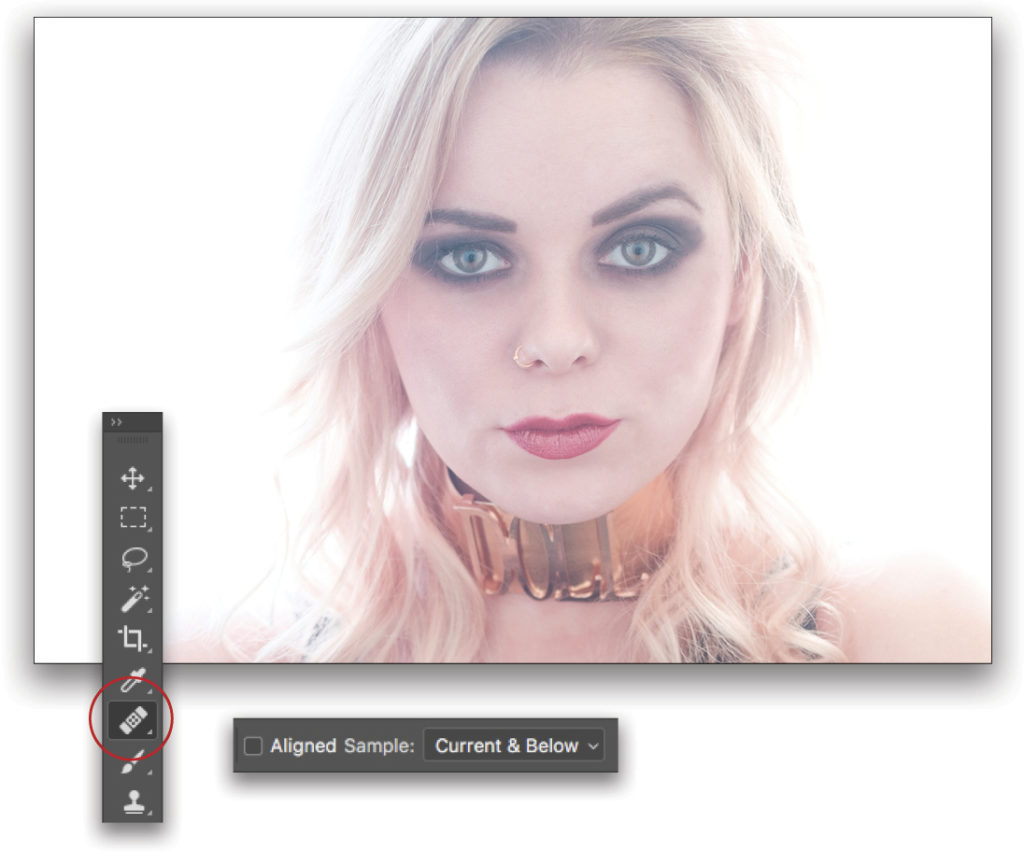
Step Eight: First, we’ll retouch her skin. Create a new blank layer (Shift-Command-N [PC: Shift-Ctrl-N]). Press Shift-J to cycle through the Healing tools until you’re on the Healing Brush in the Toolbar. In the Options Bar, change the Sample drop-down menu from Current to Current & Below. To get started, Option-click (PC: Alt-click) on a clean area of skin, then click on the area you want to fix. It’s a good idea to sample close to where you need to fix. Repeat this until you’re happy with the skin. Only do the really obvious areas now, because the next step will help with the rest.
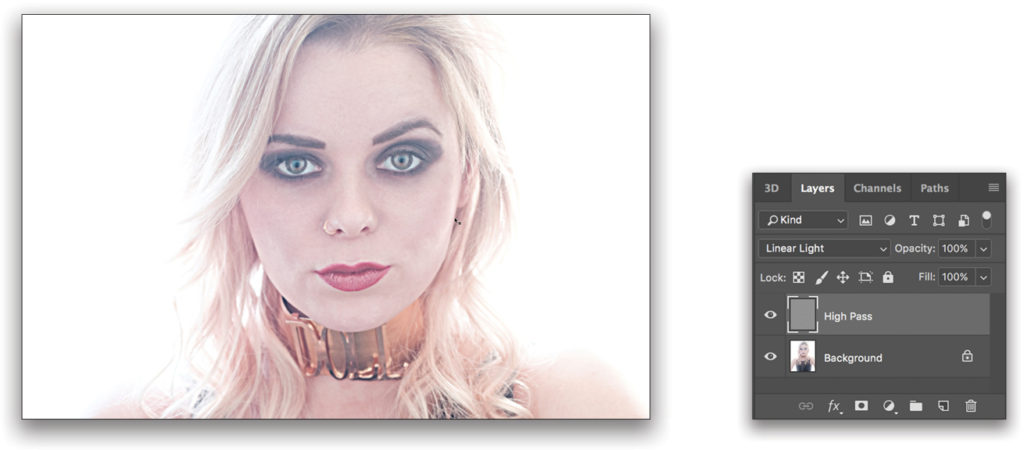
Step Nine: Next, flatten the layers via Layer>Flatten Image. We’re going to even out the skin with a technique called Inverted High Pass (IHP), which is basically an inverted form of the popular Frequency Separation technique.
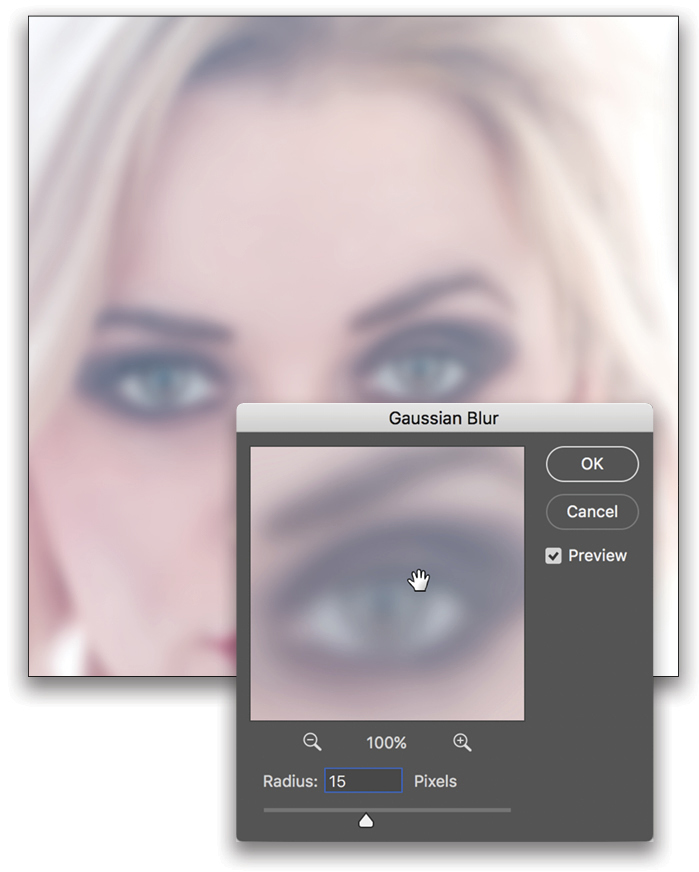
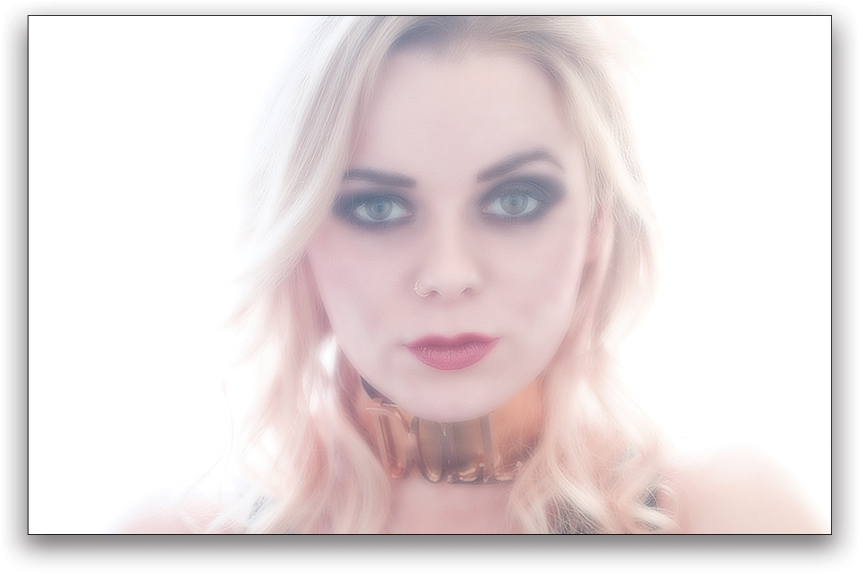
Press Command-J (PC: Ctrl-J) twice to duplicate the Background layer twice. Double-click the first layer’s name and rename it “Blur,” rename the top layer “High Pass.” The trick with IHP revolves around multiples of three. For our Blur layer, we’ll use a Filter>Blur>Gaussian Blur with a Radius of 15. The exact number makes it easier later for the next time we need to use Gaussian Blur. Click OK. You won’t see the blur because it’s hidden by the High Pass layer. I clicked the Eye icon next to the High Pass layer in the illustration shown here just so you can see the effect on the Blur layer.
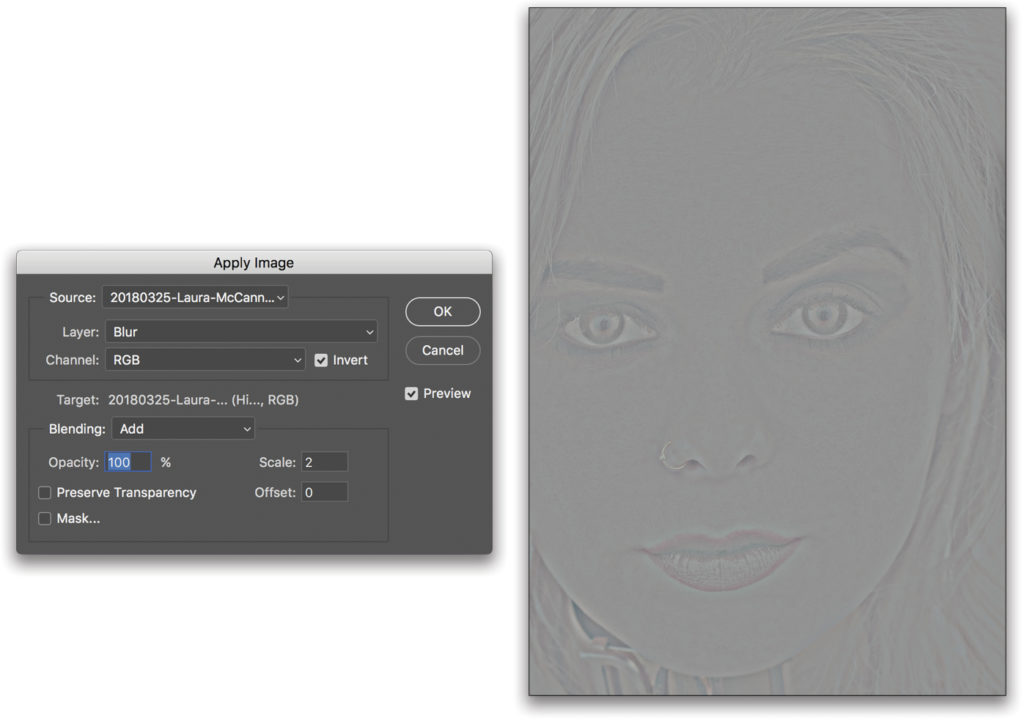
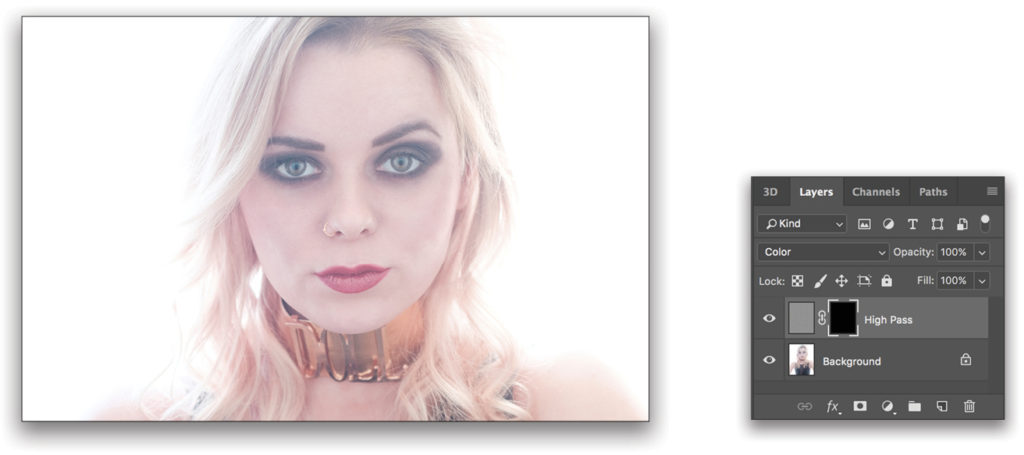
Step 10: Next, select the High Pass layer and go to Image>Apply Image. Select the Blur layer, then click to Invert on the RGB channel. Change the Blending mode to Add, and set Scale to 2 and Offset to 0. These are the same settings you’d use for Frequency Separation. (Note: These settings are for a 16-bit file; for an 8-bit file, use the following settings: Don’t Invert, set Blending to Subtract, the Scale to 1, and the Offset to 128.) Click OK.
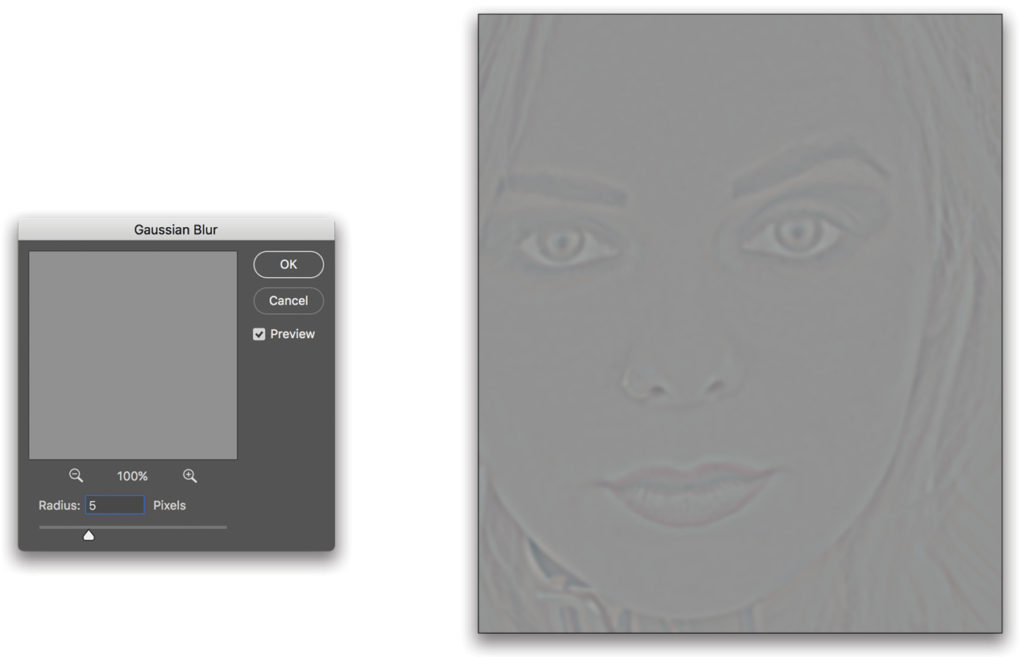
Step 11: Now comes our second Gaussian Blur, but this time on the High Pass layer. It needs to be 1/3 of the first value we used, so set the Radius to 5 and click OK. (Note: Your first blur level should be higher with tighter headshots, and lower for full body, but you always need that 3:1 ratio on the blur; for example, other settings could be 9:3 or 12:4.)
Step 12: Delete the Blur layer, and change the blend mode of the High Pass layer to Linear Light near the top left of the Layers panel.
Step 13: Invert the layer via Image>Adjustments>Invert. The skin areas look great, but the edges look terrible.
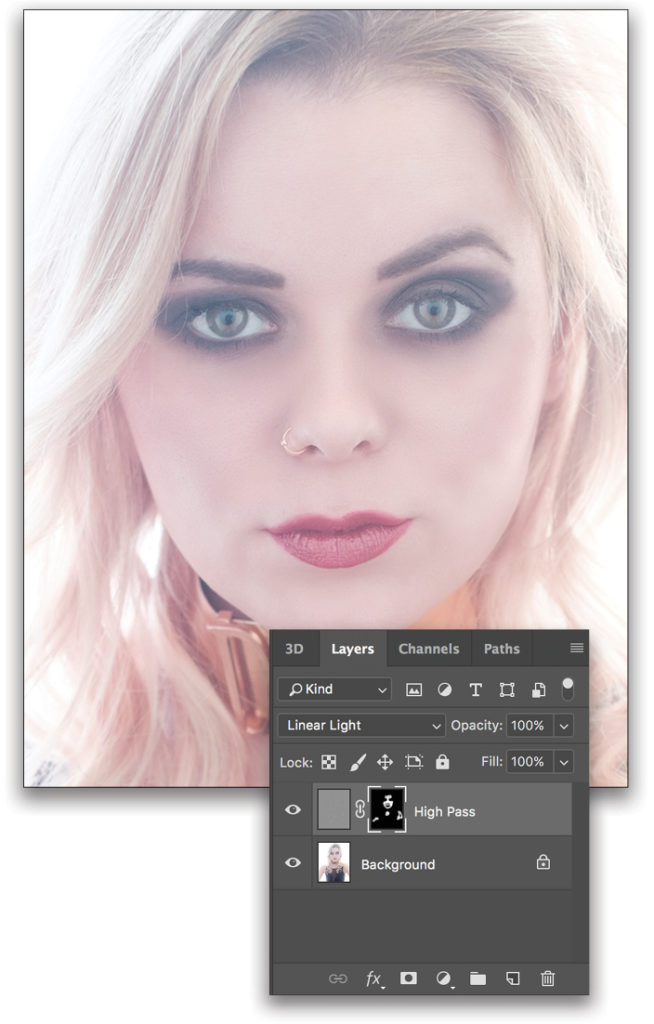
Step 14: It’s time to add a layer mask. Hold down Option (PC: Alt) and click on the Add Layer Mask icon (circle in a square) at the bottom of the Layers panel. This creates a black mask that hides the blur.
Step 15: Switch to the Brush tool (B), press D to set the Foreground color to white, and set the Opacity to 70% in the Options Bar. Now paint back in the skin, avoiding the edges of the face. You can quickly resize your brush using the Bracket keys on your keyboard. The results from this are at least as good as any of the skin retouching plug-ins out there, although it takes longer to set up. You could make an action to speed it up, though.
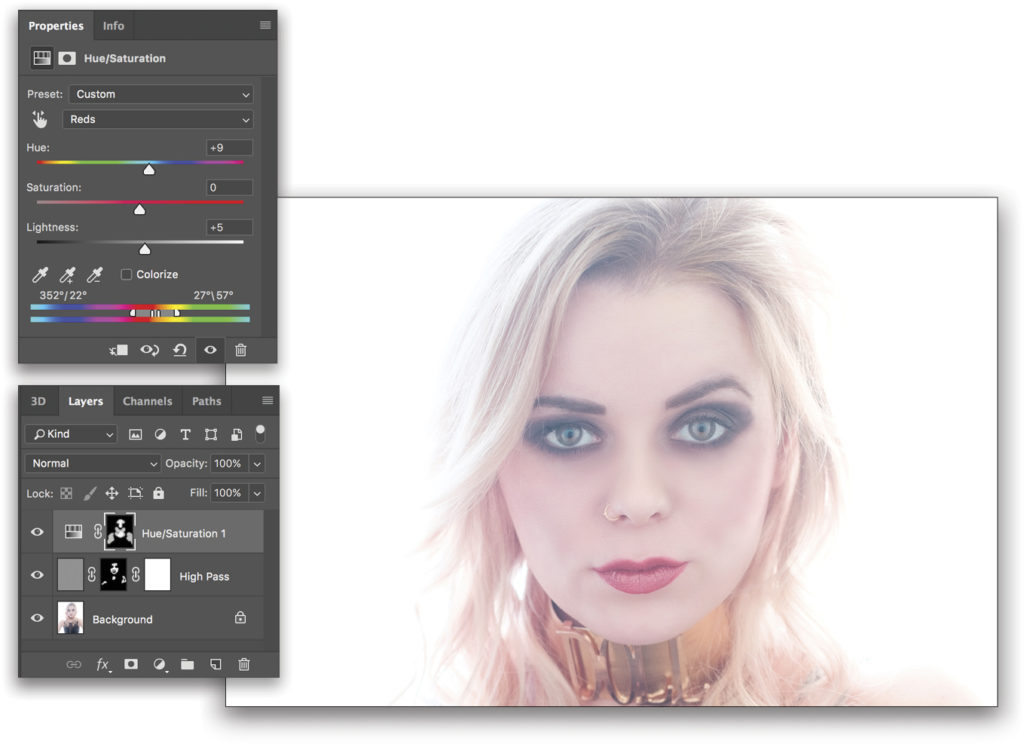
Step 16: The final step in Photoshop is to remove some red. Create a Hue/Saturation adjustment layer (Layer>New Adjustment Layer>Hue/Saturation). In the Properties panel, change the second drop-down menu from Master to Reds. Use the first Eyedropper in the set of three Eyedroppers at the bottom left of the Properties panel to select an area of redness in the skin. Then, use the minus Eyedropper to select a good area of skin. Set the Hue to +9 and increase the Lightness, if required (I’ve used +5). Now, press Command-I (PC: Ctrl-I) to Invert the layer mask, and paint with white on areas where you want to remove red. Save the file.
Exposure X3
Now I’m going to take the image into Exposure X3, a Lightroom plug-in from Alien Skin, for some finishing touches.
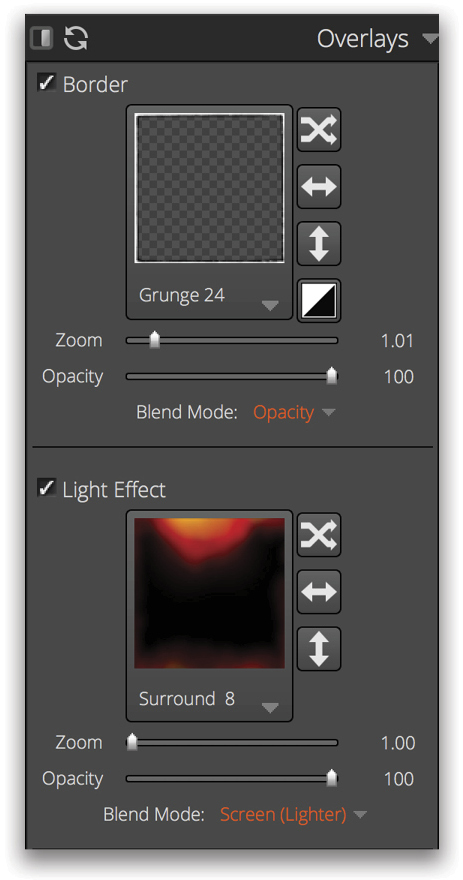
Step 17: Back in Lightroom, I choose Photo>Edit In>Exposure X3. I’m going to use Exposure to create a border for the photo. In the Overlays panel, I turn on the Border checkbox, choose Grunge 24 in the set of Grunge borders, and use the Zoom slider to remove some of the white edge around the border.

Step 18: Finally, I turn on Light Effect in the Overlays panel, and choose Surround 8 in the Surround set. As I want the light leak on the bottom, I click the Flip Vertically icon beside the selection box. That’s it. It’s time to save the file and go back to Lightroom. Below is the final image.
So that, folks, is a typical image workflow from start to finish, using Lightroom with external editors.
This article originally published in Issue 41 of Lightroom Magazine.


