Child, family, and portrait photographer Tracy Sweeney was instructor of two classes at last year’s Photoshop World. This tutorial from her class “Portrait Pop! Enhancing Portraits with AI in Lightroom & Photoshop” showcases how easy it is to relight an underexposed portrait subject in Lightroom and make them really pop from the background. Watch the segment below or follow along in the rest of this post.
Assessing the Initial Image
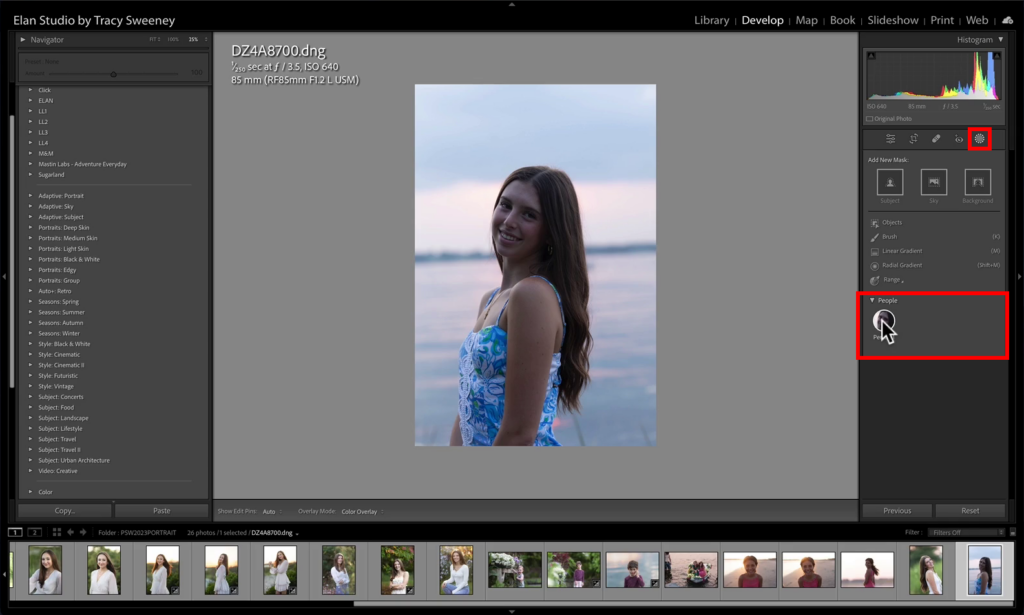
In this image I shot, my subject is exceptionally dark and not exposed properly. The background is exposed nicely, but certainly not her, and so I want to go ahead and brighten her up.

Step 1: Creating a Mask for the Subject
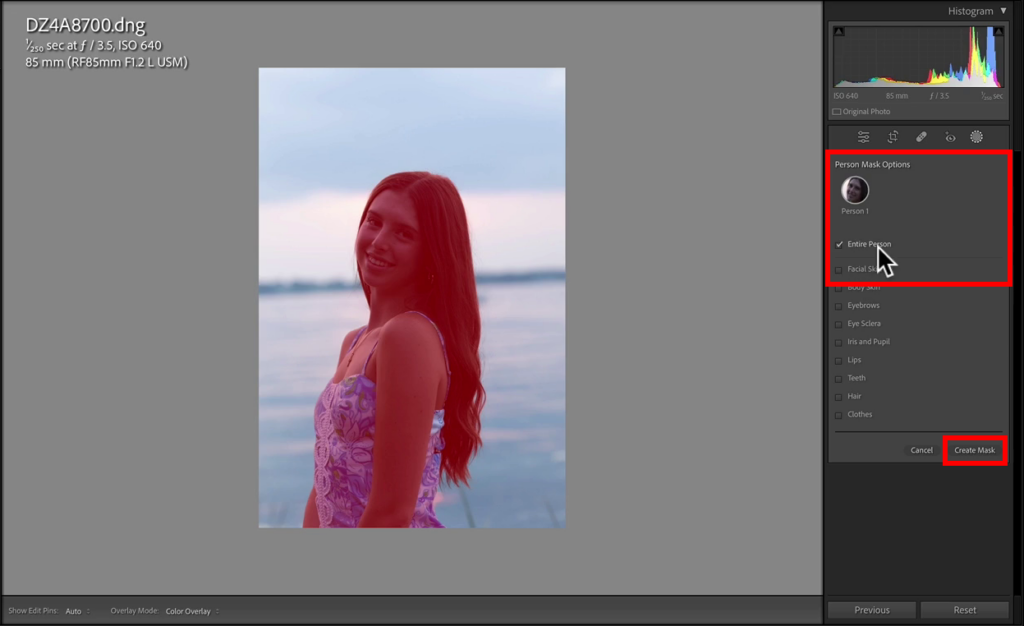
I can do that by clicking the Masking icon and going to “Entire Person” and then clicking Create Mask. This creates a mask based on the entire subject. I can see that a small portion of her dress was omitted from the mask for some reason, but I’m not going to worry about adding back to the mask at the moment because it’s not going to matter for what I’m trying to do, which is just to increase exposure.

Step 2: Adjusting Exposure and Light
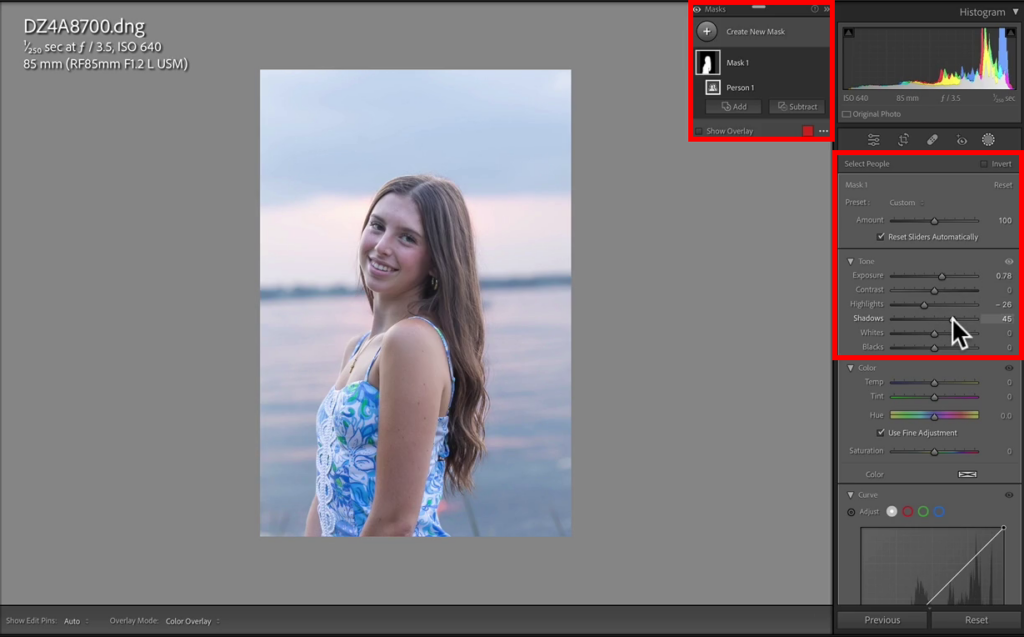
This step is basically about adding back in my light. I’m going to reduce highlights a little bit and I’m definitely gonna add light back into my shadows. Here I moved Exposure to +0.78, Highlights to -26, and Shadows to +45.

I’m going to warm her up because she got really cool. Below you’ll see that under Color I have moved the Temp slider to the right, up to +35.

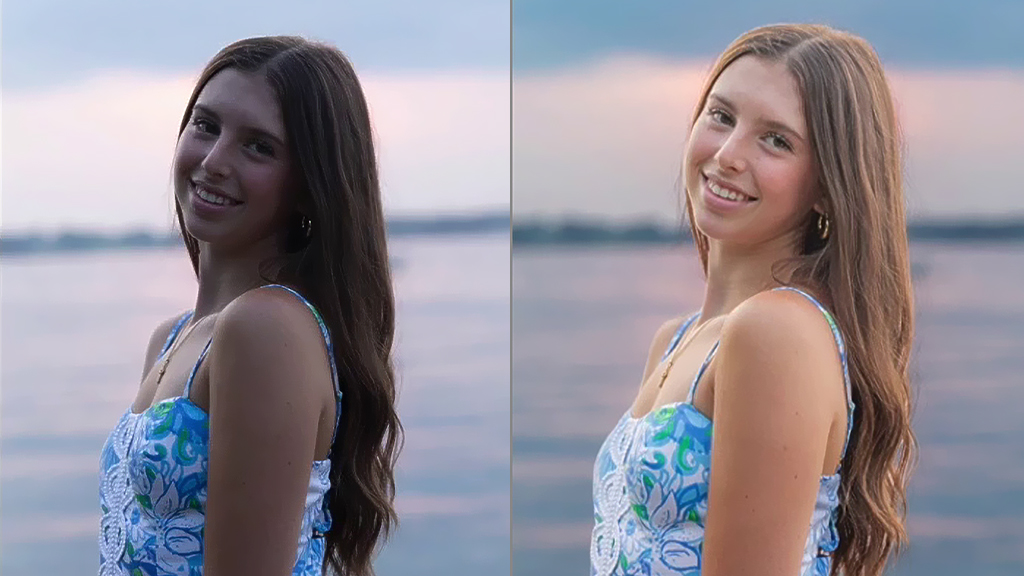
So with those few clicks, look at the before on the left and after on the right. Such a significant difference already.

Step 3: Enhancing Skin and Hair
I’m going to go ahead now and drop my Clarity slider (-16 for this image). That’s going to help smooth her skin out and kind of just everything, including the hair. Again, affecting everything just within that layer mask. It’s not touching the background at all, because I’m just working on the Entire Person mask.

Step 4: Separating the Subject from the Background
I now want to work on the background. Let’s go to the Masks panel, click Create a New Mask and Select Background.

Now I can go ahead and play with sliders affecting just the background. I can drop my exposure a little bit, which will help with the separation. I’m going to drop my highlights just a little bit and I can go ahead and even add a little bit more contrast if I like, and that looks really, really pretty. You can see in the capture below that for this image I set the Exposure to -0.28, Contrast to +17, and Highlights to -27.

And now she’s lit properly. This looks really great, and still has that pretty hue in the background.
Step 5: Making Global Adjustments
Now, I want to make some global adjustments, meaning that anything I do is going to affect both the subject and the background.
Click on the Edit icon to leave your masking controls and go back into the Basic panel. Now that we are no longer on a mask, I can make some adjustments that will affect the whole image. I’m going to go ahead and open up my Shadows (+30). I’m going to drop my Whites a little bit (-33). Then down under Presence, I’ll add some Dehaze (+14) and reduce the Vibrance just a touch (-2).

Step 6: Straighten and Crop
Then, of course, I would want to go ahead and correct the horizon line. Go under Crop Overlay and grab the Straighten Tool and just click-and-drag it over the crooked horizon to straighten it.

And now that’s just a nice, clean, easy headshot that I would include in my gallery.
The Final Look
Even if it’s not an exceptionally creative portrait, it’s a standard image that I always like to include in the gallery for my client. Check out the after image below—definitely more “popping” than before. And with non-destructive edits like these, I could keep playing with it as desired.

With these simple steps, your portraits can go from drab to fabulous in no time. Happy editing!
Join us at Photoshop World 2024 and immerse yourself in an event packed with innovative sessions and inspiring content. Experience top-quality sessions that will push your limits, provide fresh insights, and elevate your photography and design skills.


