
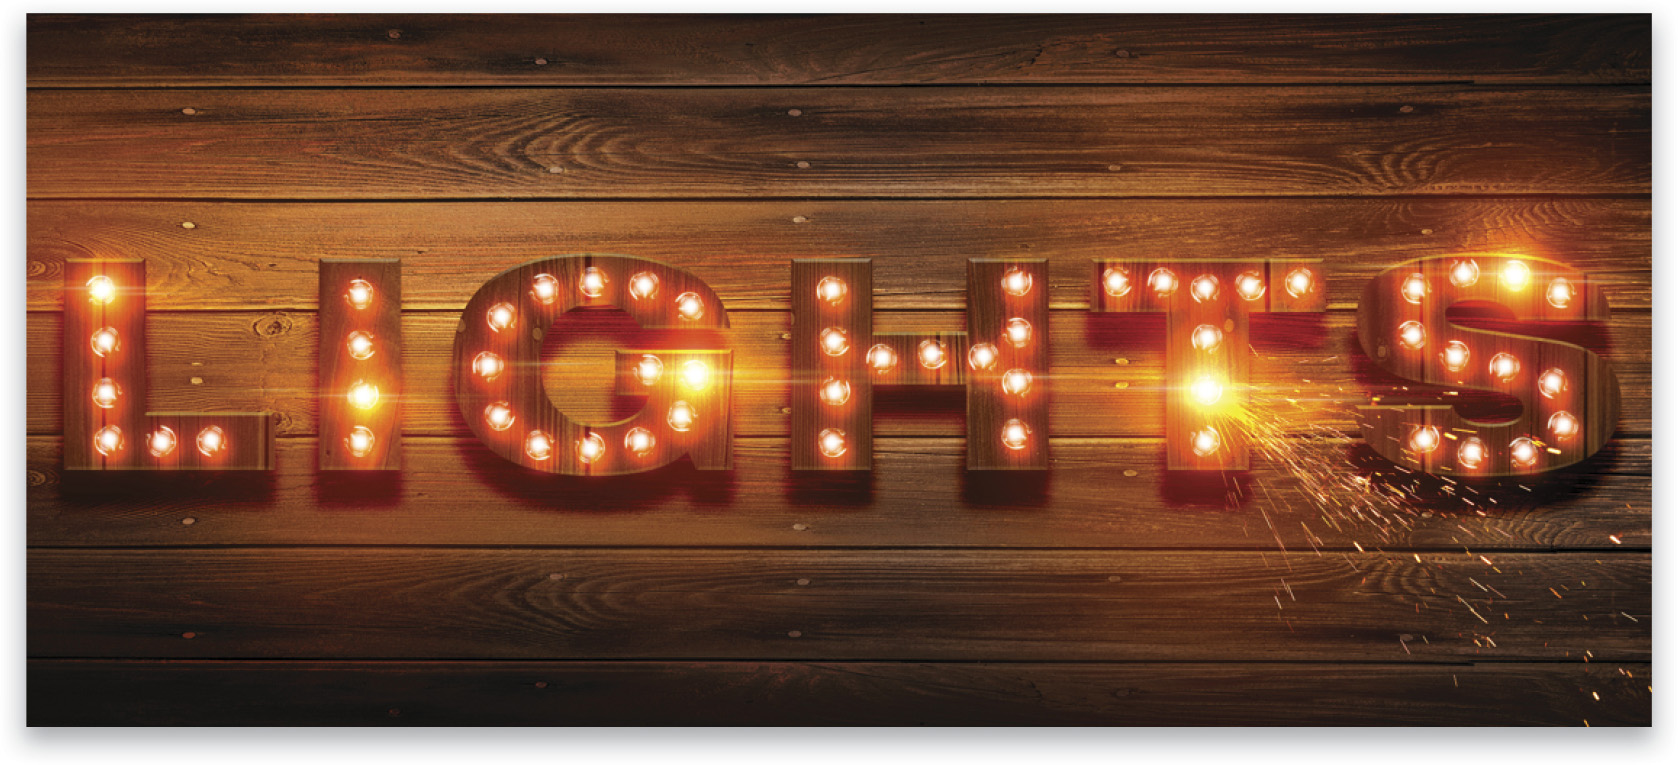
I’ve seen this effect done a number of different ways in Photoshop. In this tutorial, we’ll re-create the effect using brushes and layer styles. I like to do it this way because brushes and styles can be saved so you can use them over and over again, plus it’s easy to modify them for numerous configurations. And, it just looks cool!
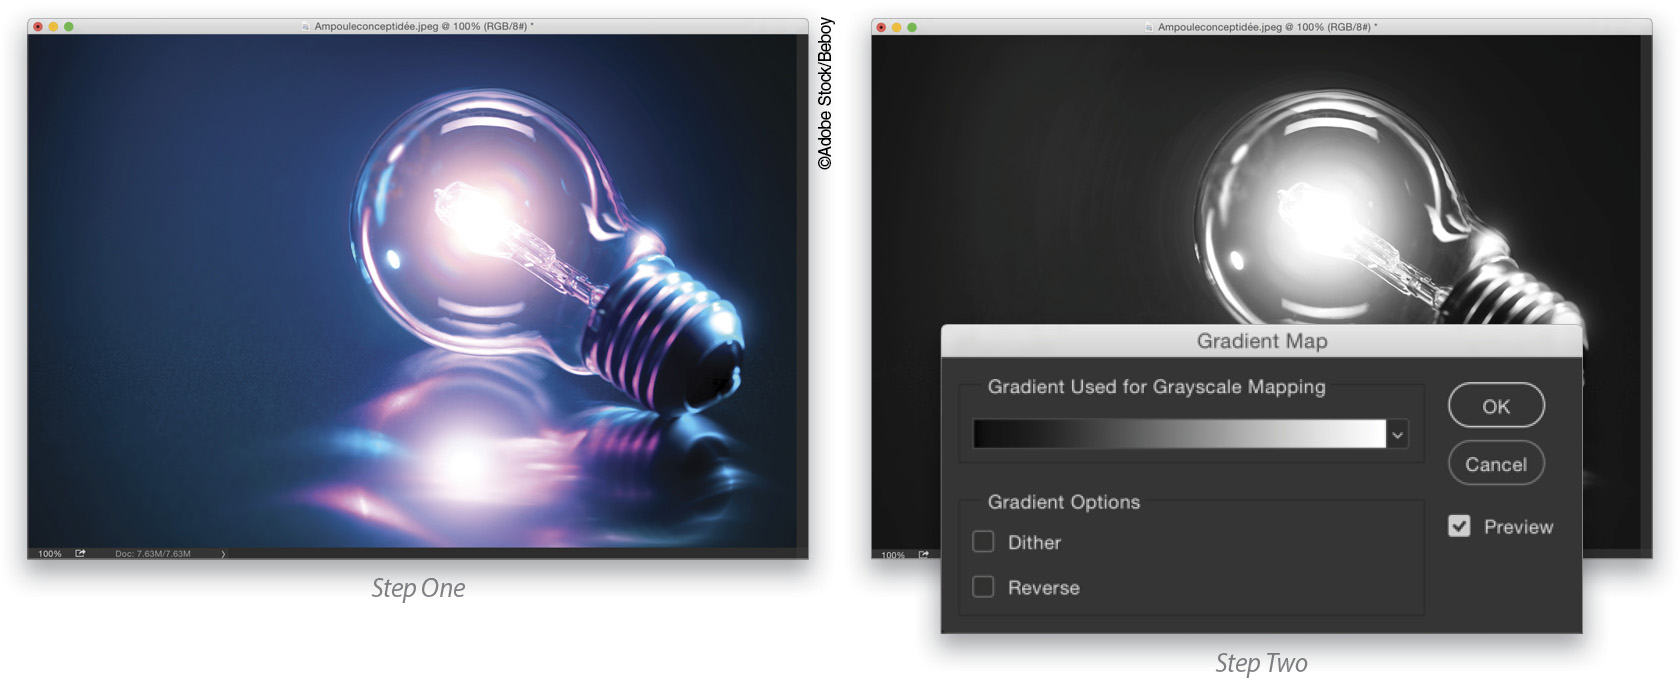
Step One:
Start by opening the image of the light bulb that’s part of the exercise download. This image has good detail in the round area of the bulb, which will make for a good brush.
[KelbyOne members may download the files used in this tutorial here. All files are for personal use only.]
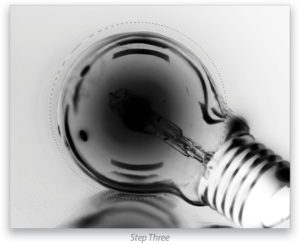
Step Two:
First, remove the color in the image by using the Gradient Map method: Press D to set the default colors, then go under the Image menu to Adjustments and choose Gradient Map. The black to white gradient should automatically be selected, so just click OK.
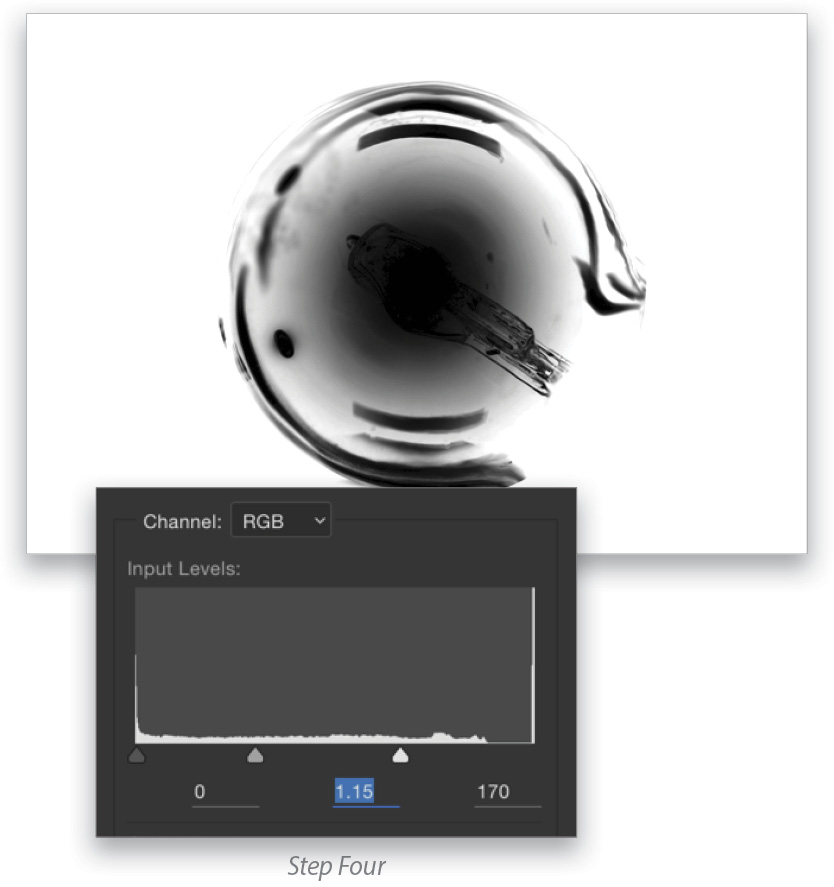
Step Three:
Press Command-I (PC: Ctrl-I) to invert the image to a negative. Then, choose the Elliptical Marquee tool (nested under the Rectangular Marquee tool [M] in the Toolbox). Hold down Option-Shift (PC: Alt-Shift), click in the center of the bulb, and drag out a circular selection that includes just the round area of the bulb. Once the selection is made, press Shift-Command-I (PC: Shift-Ctrl-I) to inverse the selection. Press Command-Delete (PC: Ctrl-Backspace) to fill the selected area with white, and then press Command-D (PC: Ctrl-D) to deselect.
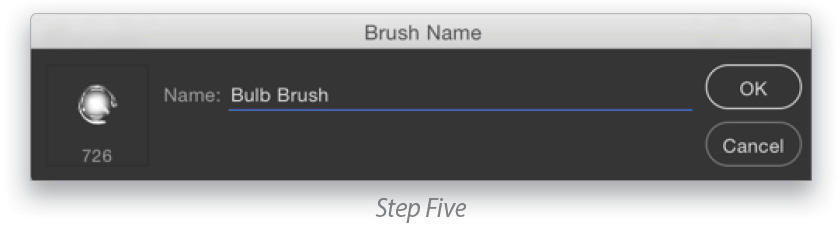
Step Four:
Press Command-L (PC: Ctrl-L) to open the Levels dialog. Push both the white and midtone sliders to the left quite a bit to make the background around the bulb pure white and to boost the contrast in the bulb. Click OK. Finally, we used the Eraser tool (E) set to Brush in the Options Bar to remove some of the stem near the bottom right of the bulb.
Step Five:
Go under the Edit menu and choose Define Brush Preset. Give the new brush a name when prompted and click OK.
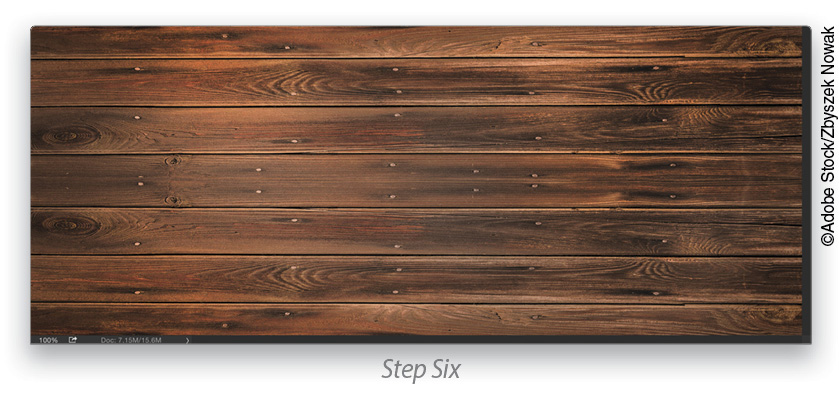
Step Six:
Create a new document (File>New) that’s 2500×1000 pixels at 300 ppi. Then, open the wood texture file from the exercise download. This will be the base texture for the final effect. Switch to the Move tool (V) and click-and-drag this image over to the new document. Press Command-T (PC: Ctrl-T) for Free Transform, scale it to fit in the canvas area, and press Enter to commit the transformation.
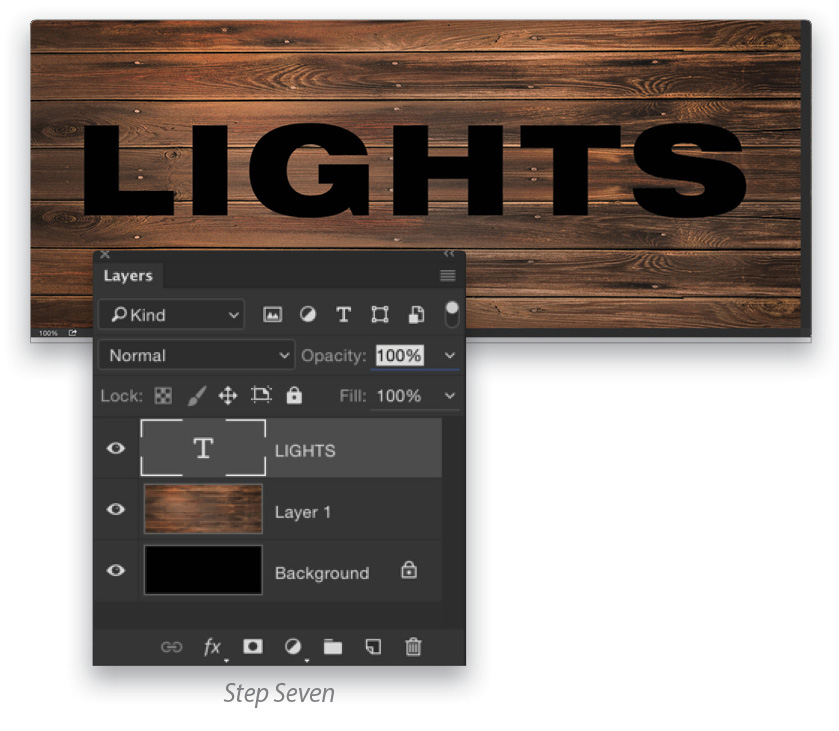
Step Seven:
Press D to set the Foreground color to black, select the Type tool (T) in the Toolbox, and click on the canvas to set a text layer. Type whatever word you want to dress in lights. Here, we just typed, well, “LIGHTS.” Make sure you use a bold font to contain the bulbs; we’re using a font called Swiss Black Extended.
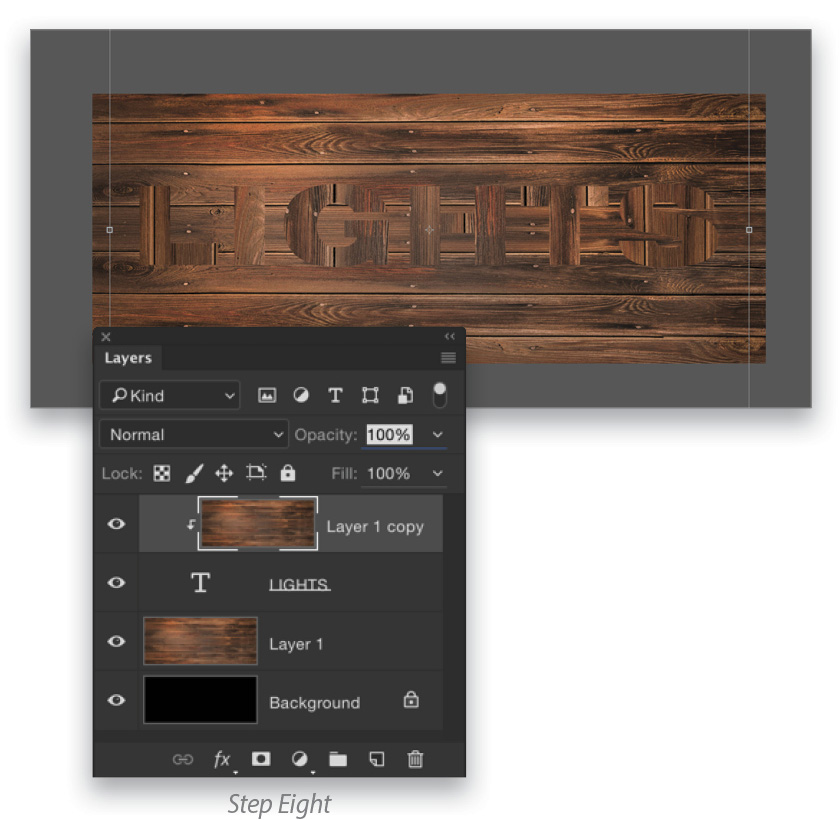
Step Eight:
Click on the wood texture layer in the Layers panel to make it active, and make a duplicate of it by pressing Command-J (PC: Ctrl-J). Place this duplicate layer above the text layer in the Layers panel. Press Option-Command-G (PC: Alt-Ctrl-G) to clip the wood texture layer inside the text layer. Activate Free Transform and then press Command-0 (PC: Ctrl-0) to expand the window so you can see the entire bounding box. Hold down Shift and click-and-drag outside the bounding box to rotate the wood texture 90° inside the text. Then, hold down Option (PC: Alt), grab one of the side control points, and scale the texture out horizontally to fill the text. Press Enter when done.
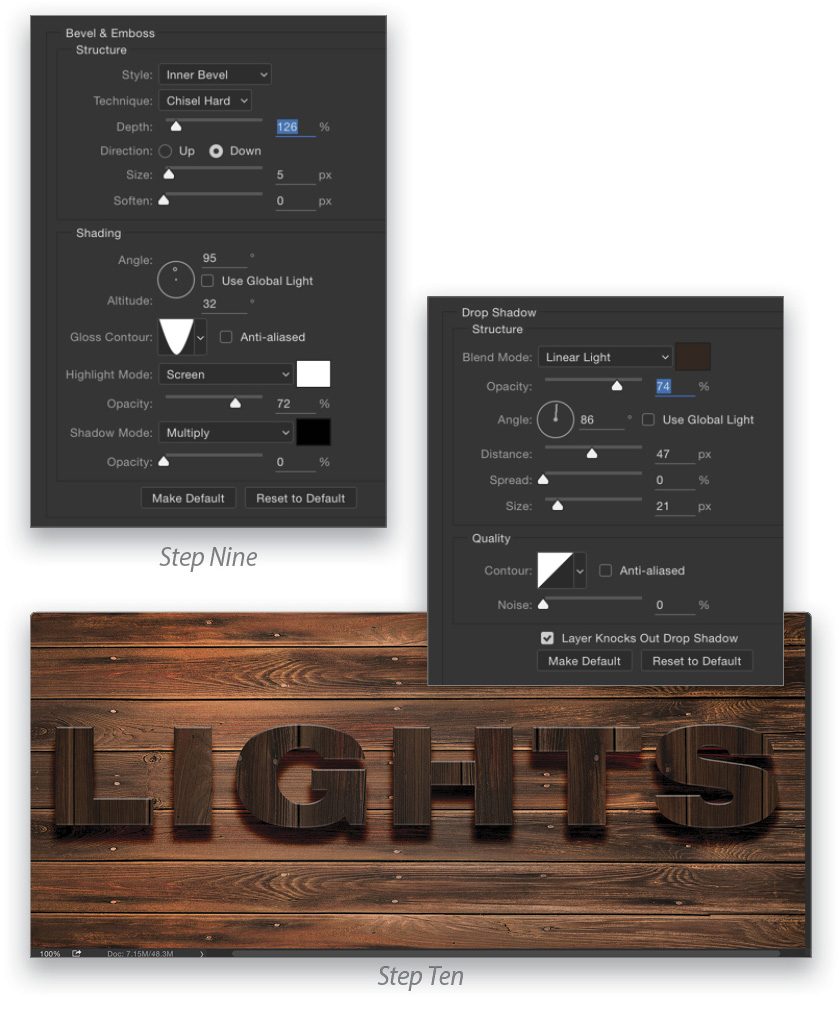
Step Nine:
Now we’ll use a couple of layer styles to add more dimension to this text. Click on the type layer in the Layers panel to make it active, then click the Add a Layer Style icon (ƒx) at the bottom of the Layers panel and choose Bevel & Emboss. Use the settings shown here to get a nice sharp edge. To change the Gloss Contour, click on the down-facing arrow next to the preview thumbnail and choose the Cone – Inverted preset from the Contour Picker. Don’t click OK yet.
Step Ten:
Next, activate Drop Shadow in the list of Styles on the left. The settings shown here work well on the wood texture. Notice the color we chose for the shadow is a dark burgundy color we sampled from the wood itself. (Note: To sample a color from the wood, click on the color swatch to the right of the Blend Mode drop-down menu, click on a color in the image that you want to use, then click OK to close the Color Picker.) Click OK to close the Layer Style dialog. Finally, drop the Opacity of the clipped wood layer to 50%.
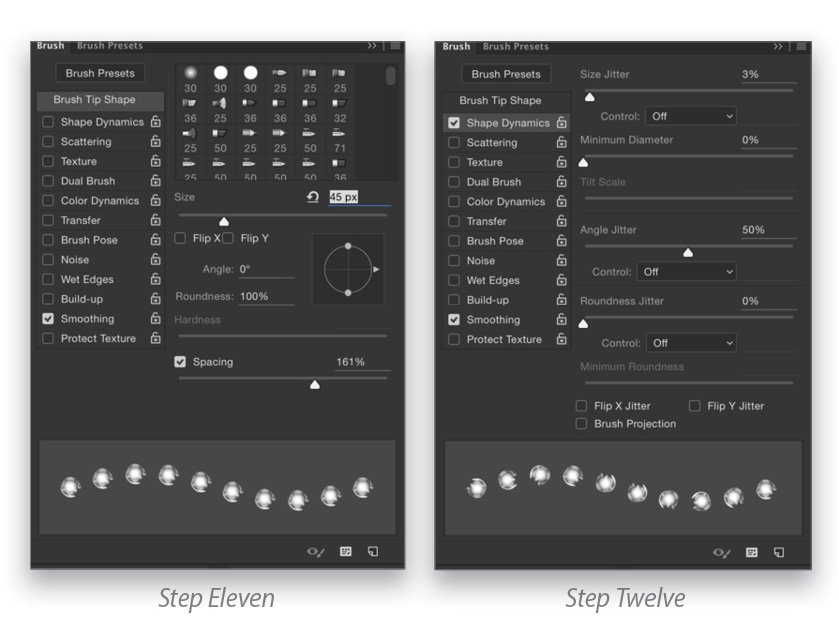
Step Eleven:
Select the Brush tool (B) in the Toolbox, click on the brush preview thumbnail in the Options Bar, and locate the bulb brush that we created at the beginning of this tutorial; it should be at the very bottom of the Brush Preset Picker. Open the Brush panel (Window>Brush), and in the Brush Tip Shape section, set the brush Size to around 45 px and then set the Spacing to around 160%.
Step Twelve:
Activate Shape Dynamics on the left side of the Brush panel, set the Size Jitter to 3% and the Angle Jitter to 50%. The preview at the bottom of the Brush panel will give you a good idea of how the brush will work.
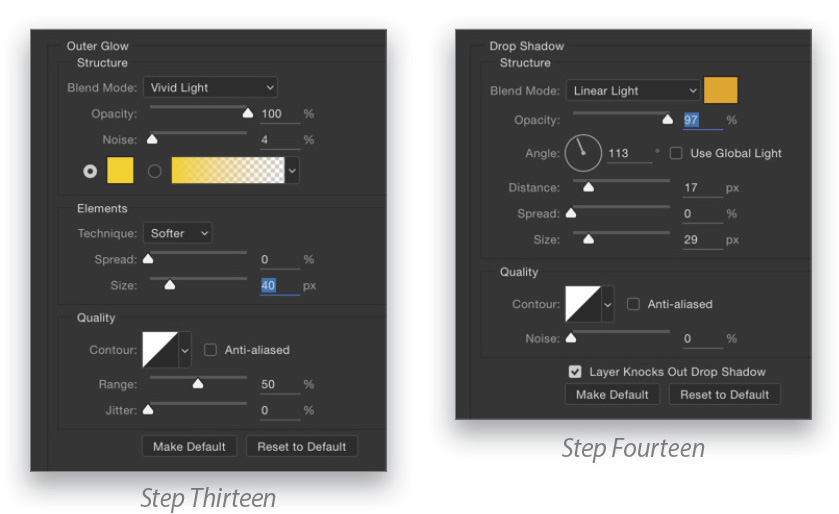
Step Thirteen:
Click on the Create a New Layer icon at the bottom of the Layers panel to create a new layer at the top of the layer stack. Go into the Add a Layer Style menu at the bottom of the Layers panel and choose Outer Glow. Set the color to a bright yellow and then use the other settings shown here. Don’t click OK yet.
Step Fourteen:
Next, activate Drop Shadow. We’ll use this to enhance the glow. Choose another yellow color that has a bit more orange in it. Then use the other settings shown here. Be sure to experiment with sizes and even Blend Modes to get different looks. Now, click OK to close the dialog.
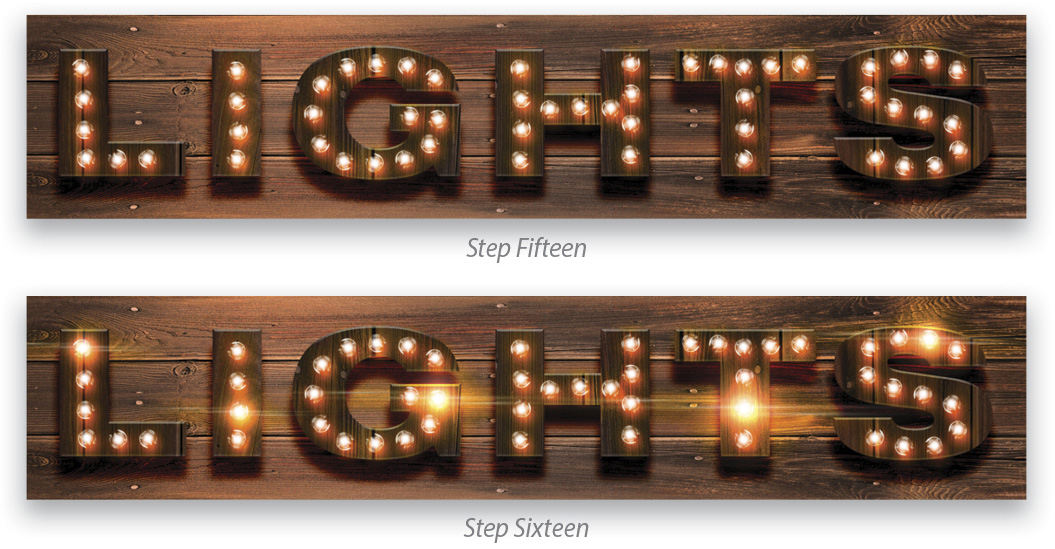
Step Fifteen:
Press D then X to set the Foreground color to white, and then just paint the bulbs in the area of the letters as you see here. The layer style will give the effect of the bulbs emitting light. Again, you can adjust the intensity of the layer styles at any time by simply double-clicking on their names in the Layers panel.
Step Sixteen:
Once you have the lights done, load the flare brush that’s also provided in the download files, or you can use your own custom brush. To load the brush, simply double-click the Flare Brush.abr file in the Finder (PC: Windows Explorer). Once loaded, you’ll find it at the bottom of the Brush Preset Picker. Just dab the flares on a few random bulbs on the same layer. This will add a little variance to the lights.
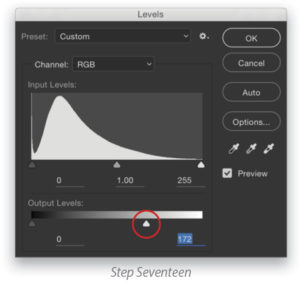
Step Seventeen:
Click on the original background wood layer in the Layers panel to make it active, and press Command-L (PC: Ctrl-L) to open the Levels dialog. Push the highlight Output Levels slider near the bottom to the left to darken the overall texture, and click OK.
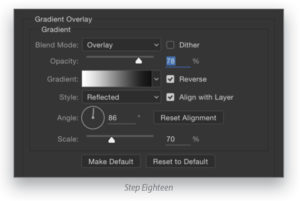
Step Eighteen:
Next, add a Gradient Overlay layer style to enhance the lighting. Click on the Gradient preview; select the Black, White preset; click OK to close the Gradient Editor; check on the Reverse box; and set the Style drop-down menu to Reflected. You can use the other settings shown here or experiment to get different looks. Click-and-drag directly in the document to position the brightest part of the gradient over the letters. Click OK
when done.
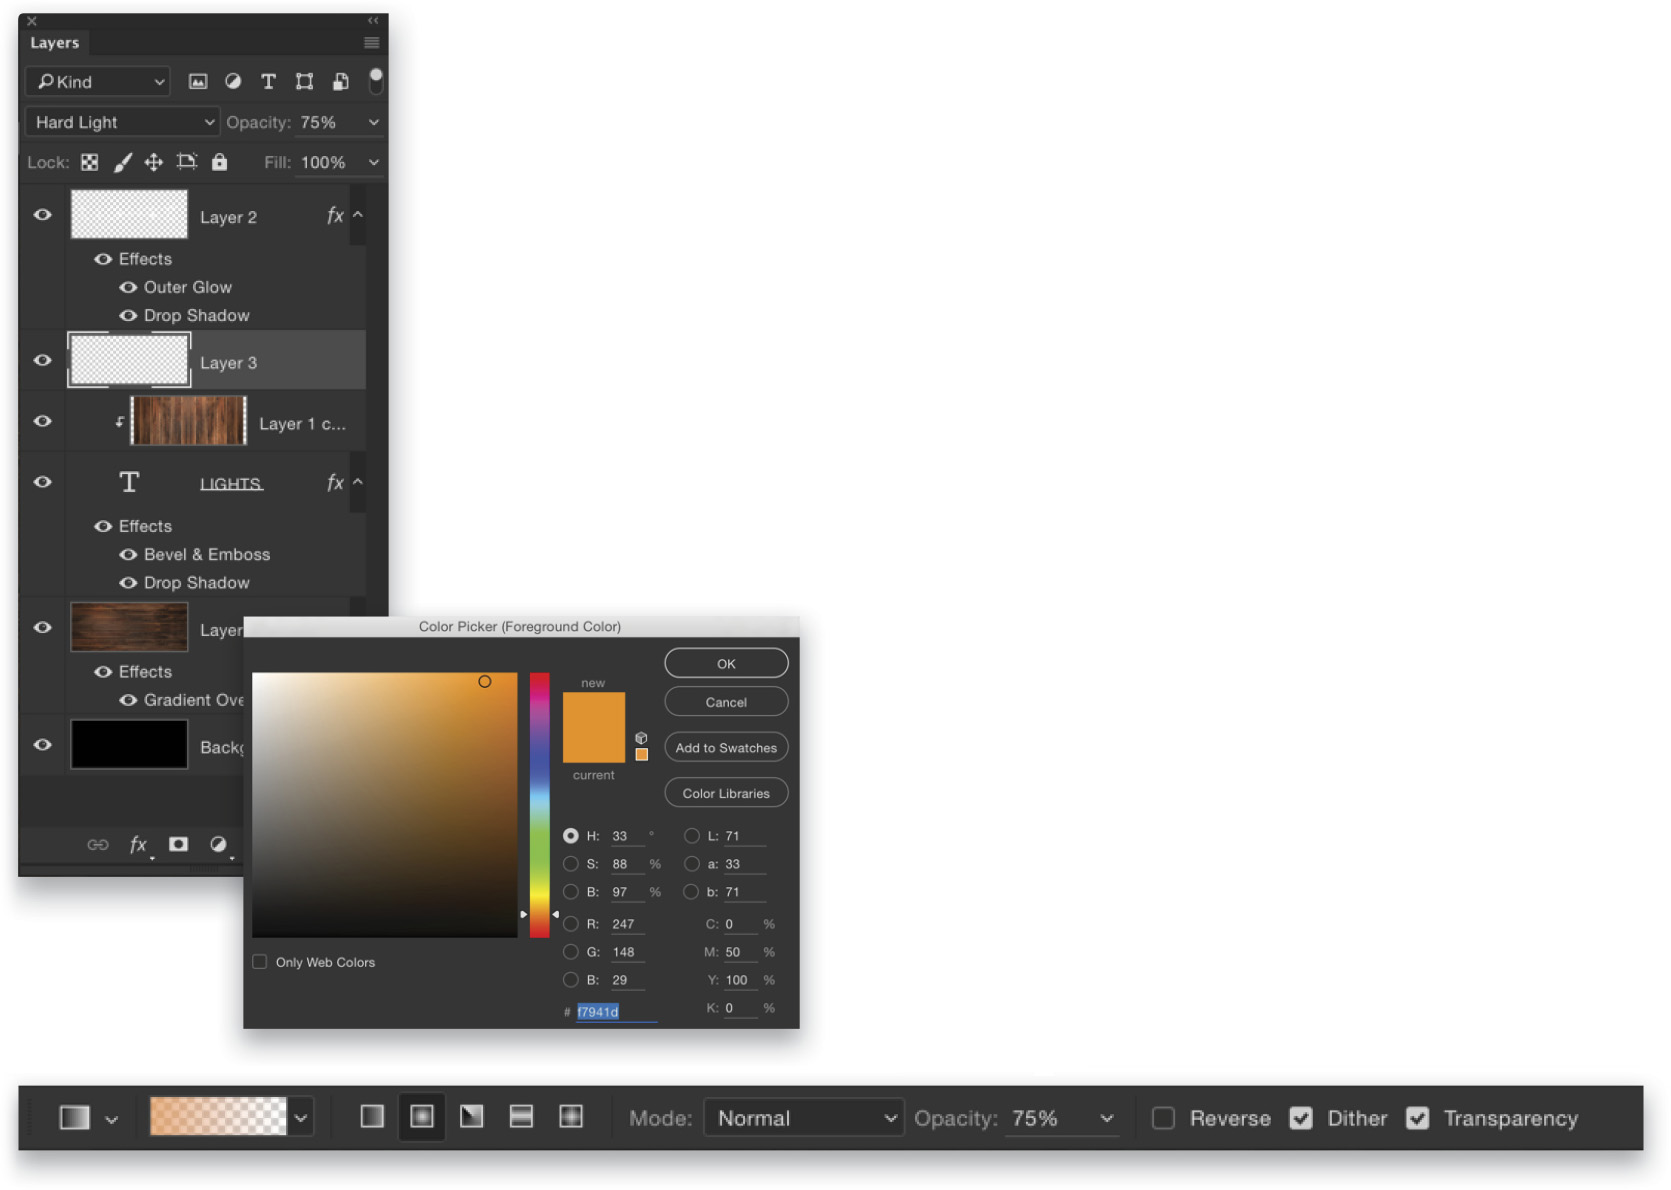
Step Nineteen:
Create a new blank layer and place it between the clipped wood layer and the bulb layer. Set the layer blend mode near the top left of the Layers panel to Hard Light and the Opacity to 75%. Next, grab the Gradient tool (G) in the Toolbox. In the Options Bar, click the Radial Gradient icon, then click on the gradient preview thumbnail, choose the Foreground to Transparent preset, and click OK to close the Gradient Editor. Click on the Foreground color swatch near the bottom of the Toolbox, choose an orange color like the one shown here, and click OK.
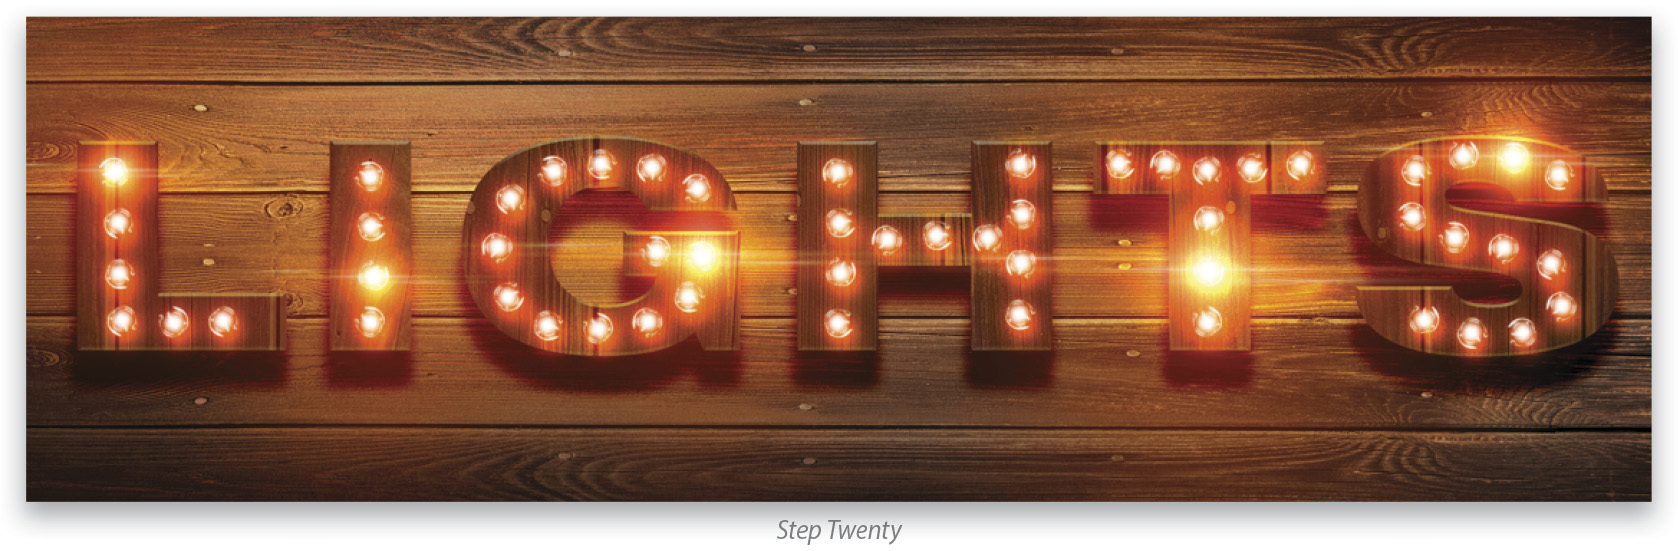
Step Twenty:
Now just draw a few gradients starting in the bright areas where you added the flares and dragging out a little ways. This puts an enhanced glow around the text as if it’s coming from the bulbs.
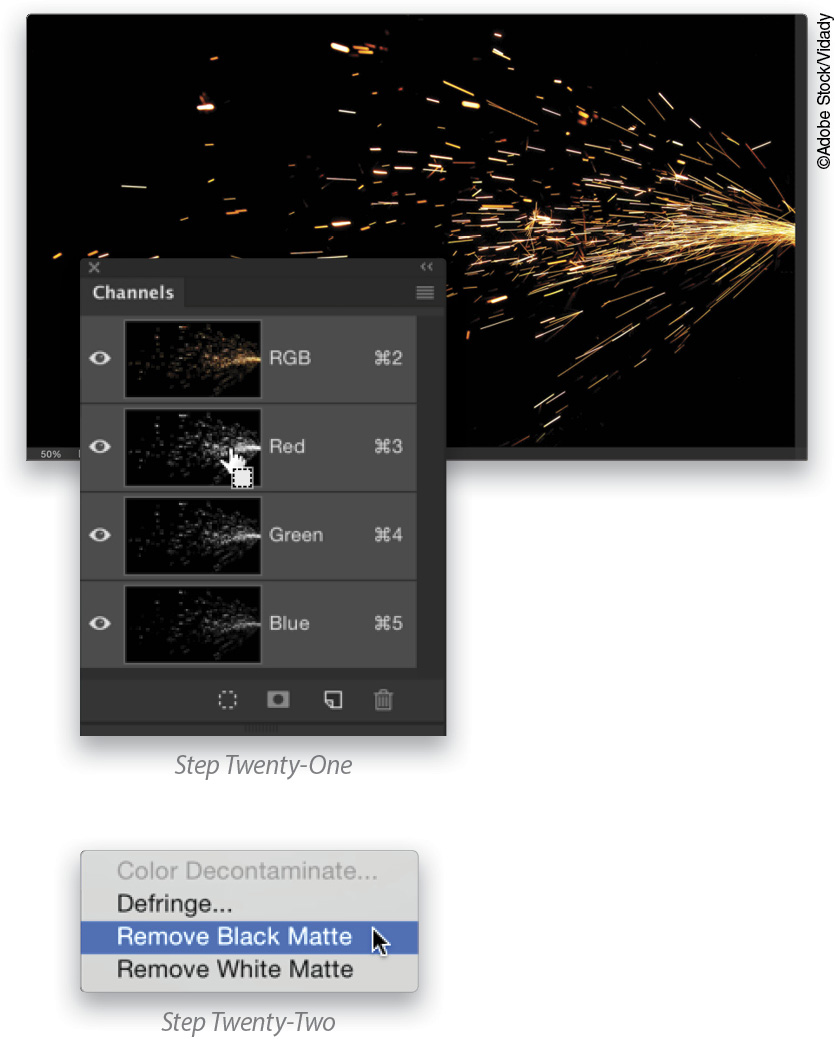
Step Twenty-One:
At this point you could call the effect done, but why stop here? Here we have an image of sparks (in the download files) that would look cool if they were added to the bulbs as if there were some kind of power overload. Since the sparks are on a black background, they’ll be easy to extract. Just open the Channels panel (Window>Channels) and Command-click (PC: Ctrl-click) on the Red channel thumbnail to load the bright areas as a selection. Then, press Command-J (PC: Ctrl-J)
to copy the selected area to a new layer.
Step Twenty-Two:
Go under the Layer menu to Matting and choose Remove Black Matte to clear the dark edge around
the sparks.
Step Twenty-Three:
Using the Move tool (V) click-and-drag the sparks into the bulb image. Then, use Free Transform to scale and rotate them around one of the bulbs as you see here. Now you have an old wood lighted sign with a bad short.
This tutorial originally published in the March, 2016 issue of Photoshop User magazine.


