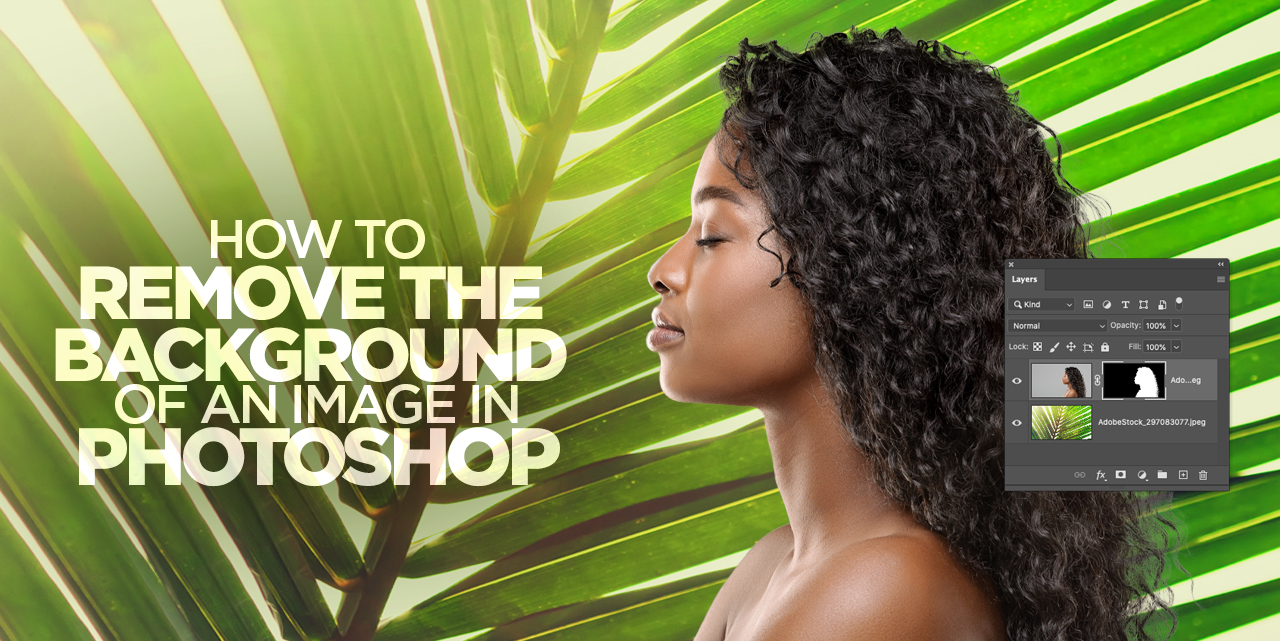
One of the most common uses of Photoshop is taking an image off of its background and placing it on a different image. Follow along with Lesa Snider as she walks you through this tutorial on Selections and Masks!
Selecting a subject with hair or fur is no simple task; however, the new features in Photoshop 2021’s Select and Mask workspace make it easier than ever before.
In this column, you’ll learn how to use the features in that incredibly useful workspace—new and old alike—to select a subject in order to swap backgrounds.
Step One:
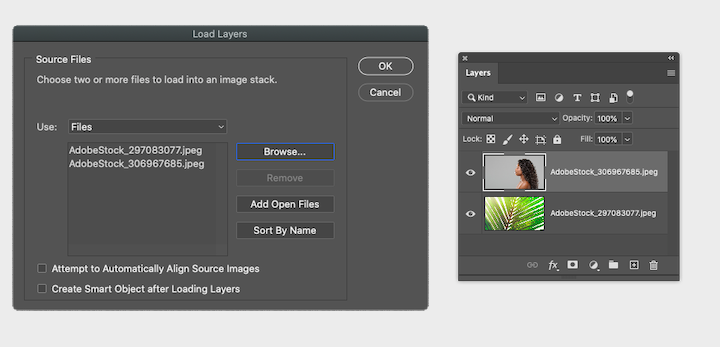
Choose File>Scripts>Load Files Into Stack. In the resulting dialog, click Browse, navigate to where your subject and background images live on your hard drive, select them, and click Open. Click OK in the Load Layers dialog. In your Layers panel, drag the subject photo to the top of your layer stack.
Tip: If you’re starting in Lightroom, Shift-click the two thumbnails in the Library module and then choose Photo>Edit In>Open as Layers in Photoshop.
Step Two:
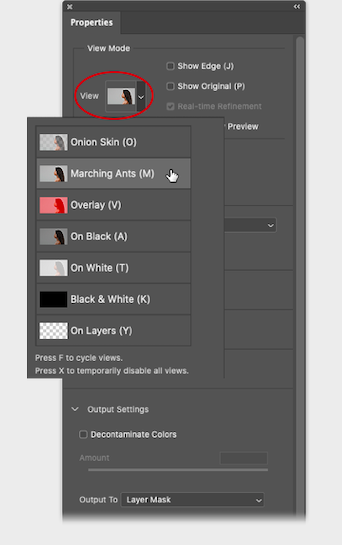
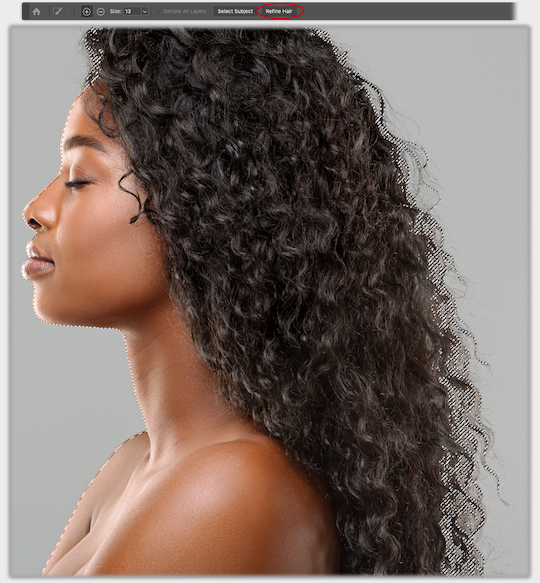
With the top layer active in your Layers panel, choose Select>Select and Mask. From the View menu in the Properties panel (circled), choose how you’d like to preview the selection you’re about to make. For this example, choose Marching Ants (M) so you can see the selection change as you tweak it.
Other options in this menu include Onion Skin (preview areas around the selection as partially transparent atop any layers below it, or the checkerboard pattern of transparency if no other layers), Overlay (preview selection as a transparent red overlay, like Quick Mask mode), On Black (preview selection on black), On White (preview selection on white), Black & White (preview selection as a black-and-white layer mask), and On Layers (preview selection atop the layer below in your Layers panel; also discussed later).
Tip: You can cycle through the views by tapping F on your keyboard.
Other options in the View mode section include Show Edge (discussed later), Show Original (hides the marching ants), Real-time Refinement (shows a live preview of the selection as you’re refining it, also new in Photoshop 2021), and High Quality Preview (displays a higher quality preview but may slow your machine).
Step Three:
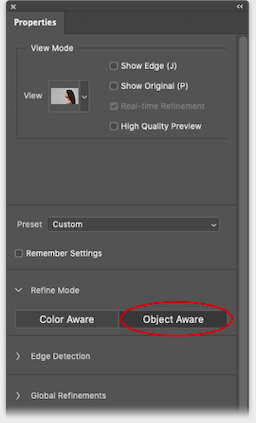
In the Properties panel, expand the Refine Mode section to see the two mode options. Turn on Object Aware mode (new in Photoshop 2021), which is better for complex selections involving hair or fur—the button is dark when it’s turned on. (Use Color Aware for simpler selections with good color contrast between selection area and surrounding pixels.)
Step Four:
Step Four: In the Options Bar, click Select Subject (circled). You should now see marching ants around the subject.

Step Five:
Also in the Options Bar, click Refine Hair (new in Photoshop 2021). Notice the difference in the marching ants from the previous step, shown here zoomed in. As you can see, the selection now goes much deeper into the model’s hair where the original background showed through.
Tip: To zoom in and out of your image, press Command-+ (PC: Ctrl-+) or Command- – (PC: Ctrl- –), respectively, and then Spacebar-drag to reposition the image onscreen.
Step Six:
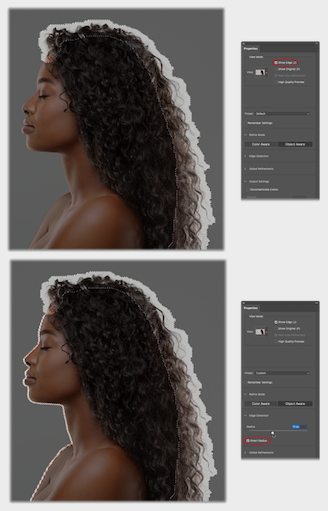
Near the top of the Properties panel, turn on Show Edge (circled). This shows the areas of the selection that Photoshop is controlling, which is her hair (top image shown here). Next, expand the Edge Detection panel and turn on the Smart Radius checkbox (also circled) so Photoshop adjusts the radius for both hard edges (her face, neck, and shoulders) and soft edges (her hair). Now drag the Radius slider rightward to about 10 pixels to widen the area Photoshop examines as it attempts to find edges (try 1–2 pixels on the Adobe Stock preview image). Notice Photoshop is now controlling the entire selection (bottom image shown here).
Step Seven:
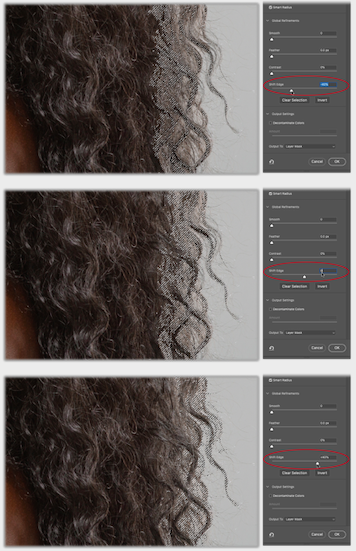
Turn off Show Edge so you can see the marching ants again and then expand the Global Refinements section. The Smooth slider smooths the selection so it isn’t so jagged. When you’re dealing with hair, though, leave it at 0 or at a very low setting; otherwise, it will remove tiny strands of hair from the selection.
Set Feather to 0 px (softens the selection edge so it blends into surrounding pixels) and Contrast to 0% (hardens the selection edge). The Shift Edge slider (circled) lets you shift the selection edge inward (drag left) or outward (drag right), as shown in the close-ups here: –40% is shown at top, 0% is shown at center, and –40% is shown at bottom. A setting of +10% was ultimately used on this image (try +1% on the Adobe Stock preview image).
Tip: Change the View menu to On Layers (simply press Y on your keyboard) and then experiment with the Shift Edge setting to see what works best on your new background.
Shifting the edge inward can help eliminate remnants of the original background color on your subject layer along the selection edge, and previewing the selection in this way lets you know if that’s an issue or not.
Step Eight:
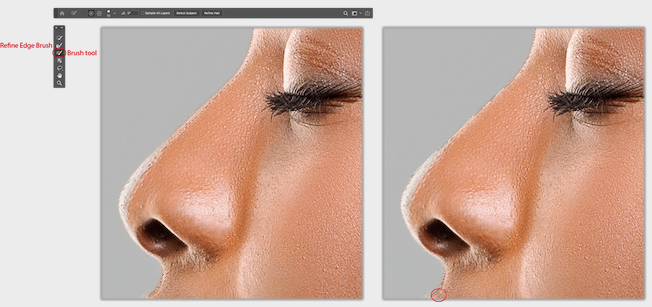
To add or subtract areas from the selection, use the Refine Edge Brush tool (somewhat automatic) or the Brush tool (manual). The Refine Edge Brush is good for refining complex, soft selections such as those in and around hair, leaves, and the like. When you use it, Photoshop reanalyzes the area you brush across and either adds or subtracts as it sees fit.
Our soft edges look good; it’s the hard edges that need adjusting. In that case, grab the Brush tool (circled) and use the Options Bar to set brush size (10 px was used here; try 5 px on the low-res preview). Drag across the bridge and tip of the nose to add them to the selection. You don’t have to do it all in one brushstroke: You can release your mouse button, reposition the image as necessary, and then continue dragging. To subtract from the selection, Option-drag (PC: Alt-drag) instead. Here’s a before and after of the nose area, with the brush cursor circled on the right.
Tip: You can also use the Left and Right Bracket keys on your keyboard ([ ]) to decrease or increase brush size, respectively.
Alternatively, you can refine your selection using the other items in the Toolbar, which include the Quick Selection, Object Selection, and Lasso tools.
Step Nine:
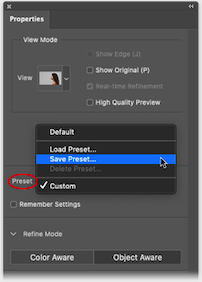
You’re almost done! If you’ll use these settings again (say, on the same model or one with similar hair), save them as a preset (also new in Photoshop 2021). To do that, click the Preset drop-down menu (circled) and choose Save Preset. Give the preset a name in the dialog that opens and click Save. From now on, that preset will be accessible in the Preset menu of the Select and Mask workspace.
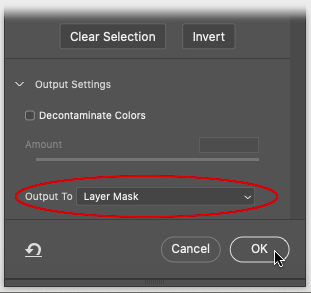
Step 10:
Last but not least, tell Photoshop what you want to do with the selection. Expand the Output Settings section at the bottom of the Properties panel. Turn off Decontaminate Colors, which recolors pixels along the selection edge to match those nearby; the Amount slider beneath the checkbox lets you set width of the area that’s affected (it’s only active when Decontaminate Colors is turned on). From the Output To drop-down menu, choose Layer Mask. Click OK and Photoshop masks the active layer with your selection, so you can see through to the new background on the layer below.
Step 11:
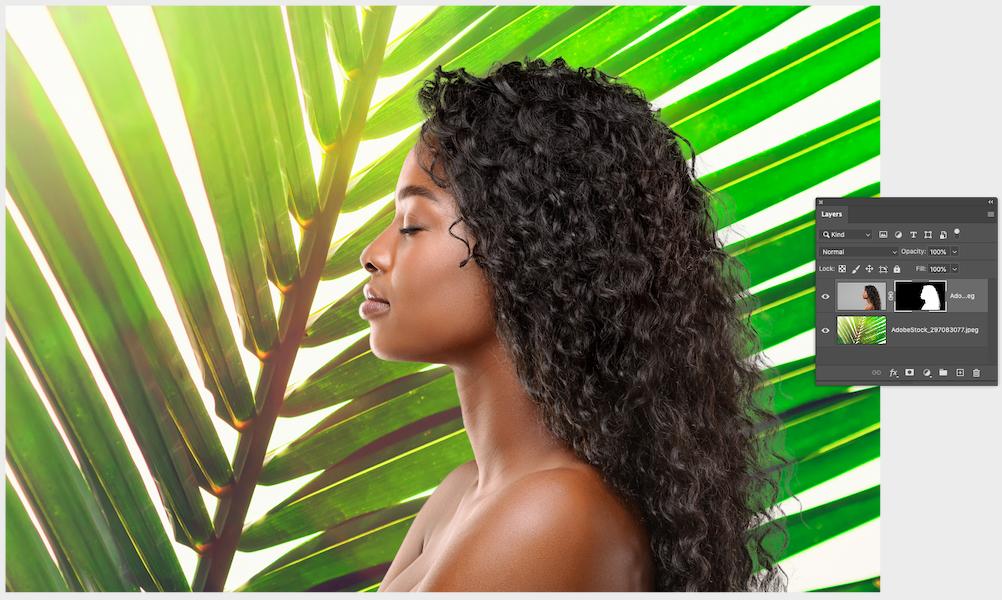
Choose File>Save As and pick Photoshop from the Format drop-down menu so your layers remain intact. If you started in Lightroom, choose File>Save instead. Here’s the final result.
As always, the goal is for Photoshop to do as much of the work as possible, leaving you very little of the selection to fine-tune manually. Happily, the new features in Select and Mask in Photoshop 2021 make that a reality. Until next time, may the creative force be with you all!


are the example images provided somewhere to download?
You can find the Adobe stock files to preview and download here: https://stock.adobe.com/images/profile-portrait-of-beautiful-african-american-woman-with-curly-long-hair/306967685 and https://stock.adobe.com/images/the-sun-rays-shine-through-the-palm-leaves-view-from-below/297083077