Spoiler alert! This isn’t a technical, detailed step-by-step, how-to article on how to enhance your images in Photoshop. Rather, it’s more of a philosophical homily on how Photoshop can help you create the images you see in your mind’s eye.
I had other titles in mind for this article: “Awaken the Artist Within with Photoshop,” “Don’t Delete,” “Reality Leaves a Lot to the Imagination,” and “Before-and-After Adventures in Photoshop.” But “Got Questions? Photoshop Has the Answers!” won out.
Here’s the basic idea: After you open an image and before you start playing with all the cool sliders in Photoshop, ask yourself the following questions:
- What don’t I like about this image?
- How can I rescue overexposed highlights and blocked-up shadows?
- Would changing the mood help?
- How can I get rid of that distracting background or change that background?
- Can this shot be saved?
- Is there an image within the image?
If you take your time and use what Ansel Adams called your best photo accessory (the 12 inches behind your camera), I’m confident, due to the power of Photoshop, that you’ll wind up with more creative images and a higher percentage of keepers.
WHAT’S THE FIX?
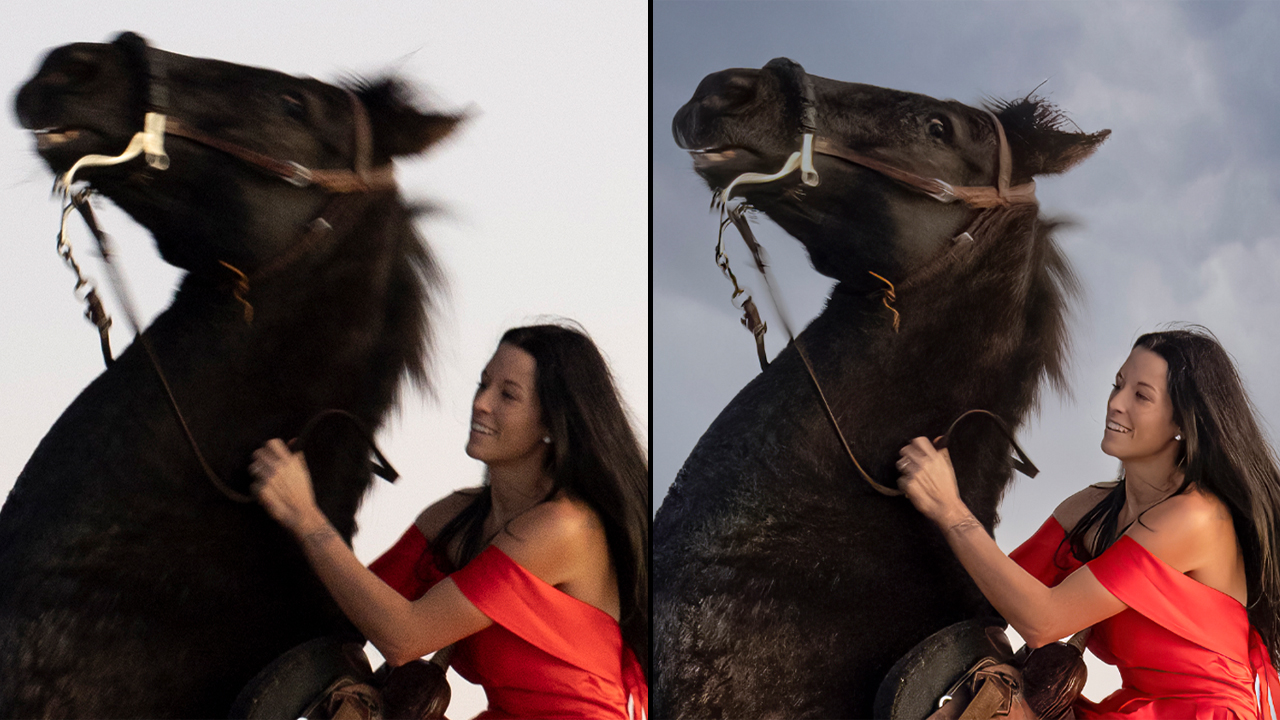
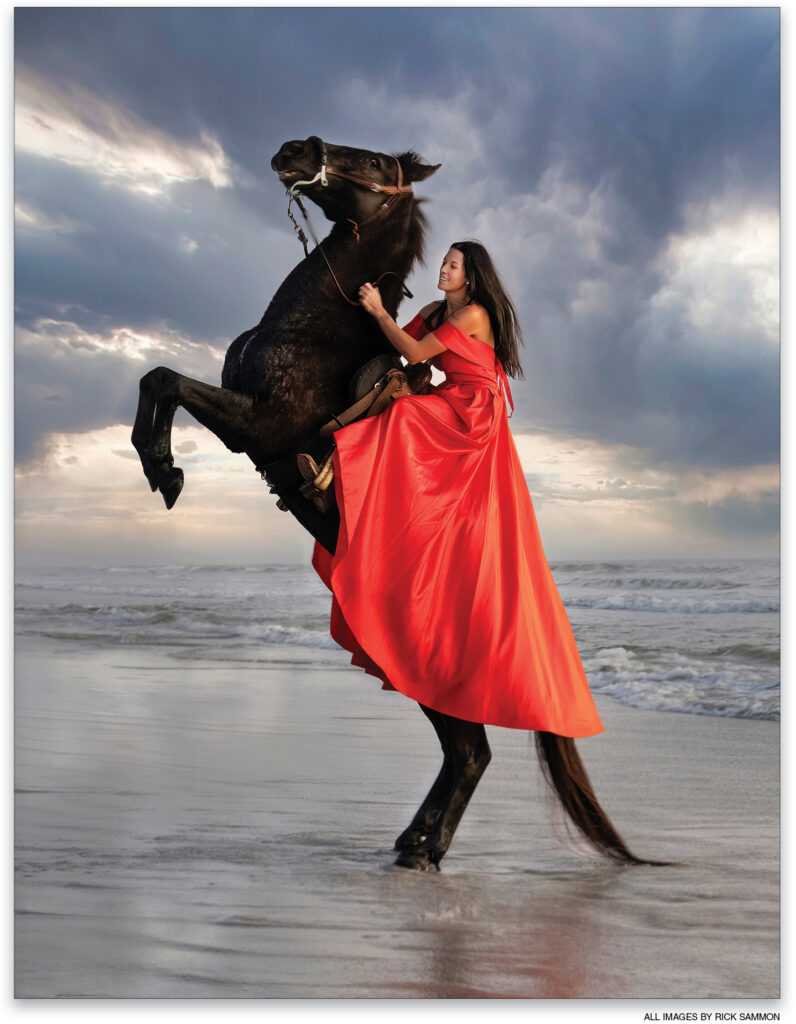
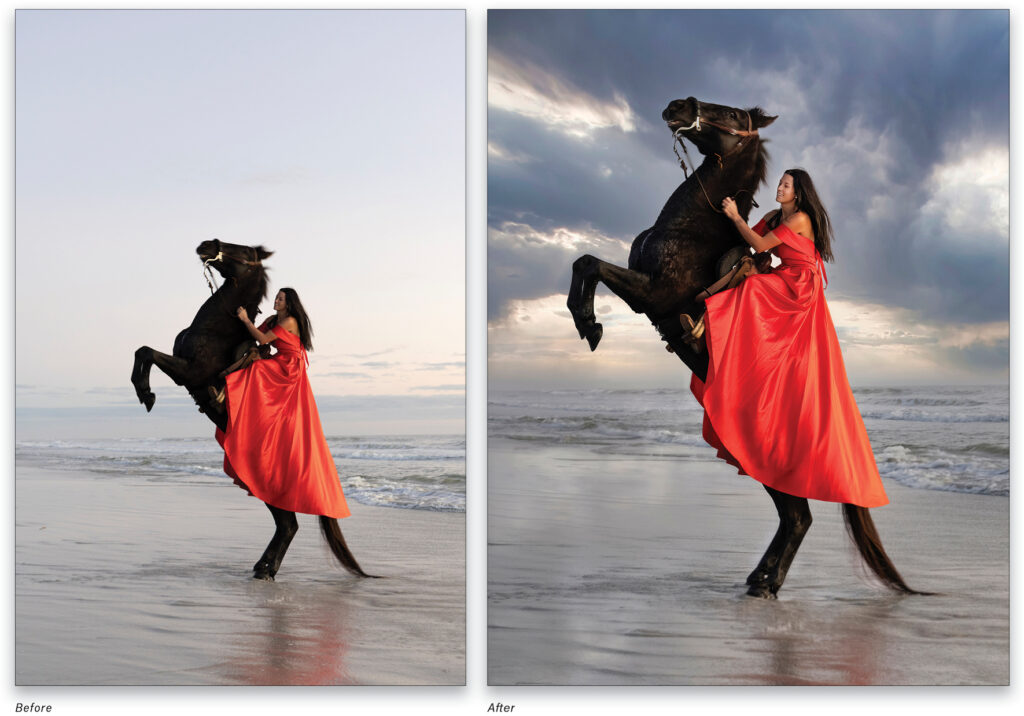
The photo, taken in St. Augustine, Florida, that opens this article is an example of questioning myself when I opened the original image on my computer. Here’s the original image.
I succeeded in capturing the peak of action, as well as a nice expression on the rider’s face but, because the action happened in low light (before sunrise), and because I was so excited about the shoot that I mistakenly shot at too slow a shutter speed (1/50th of a second), both the horse and rider’s heads have motion blur. The photo also had a bit of noise, due to the low light.
I asked myself, “What’s the fix?” Well, the quick fix was to apply two Photoshop plug-ins, Topaz DeNoise AI and Topaz Sharpen AI. These before-and-after closeups show the results of running those plug-ins, plus everything I discuss in the list below.
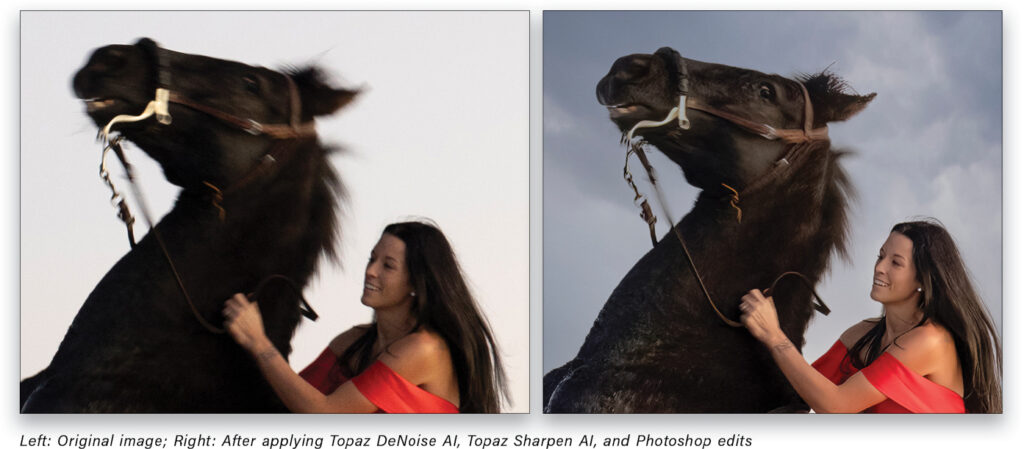
The image had other problems:
- The rider’s face was too dark, which I fixed by using the Dodge tool (O).
- I couldn’t see the hair on the horse’s body because the shadows were blocked up, which was remedied by applying Clarity and Texture
in Adobe Camera Raw to those areas using the Brush in the Masking tools. - The sky was beyond boring, so I replaced it using one of the stock sky choices in Photoshop’s Sky Replacement feature (found under
the Edit menu). I know! Using a stock sky isn’t the best option, as other photographers may use the same sky. Rather, it’s best to use one
of your own sky photographs. I used the stock sky, for now, because I don’t have a sky that fits the color and mood of the original image. So, Scott Kelby, please forgive me for usingthe stock sky. ☺ - Finally, I cropped the image for more impact.
HOW CAN I ISOLATE THE SUBJECTS?
This is one of my favorite images from a recent shoot at Myakka River State Park in Florida. The scene would have been impossible to reproduce on film.
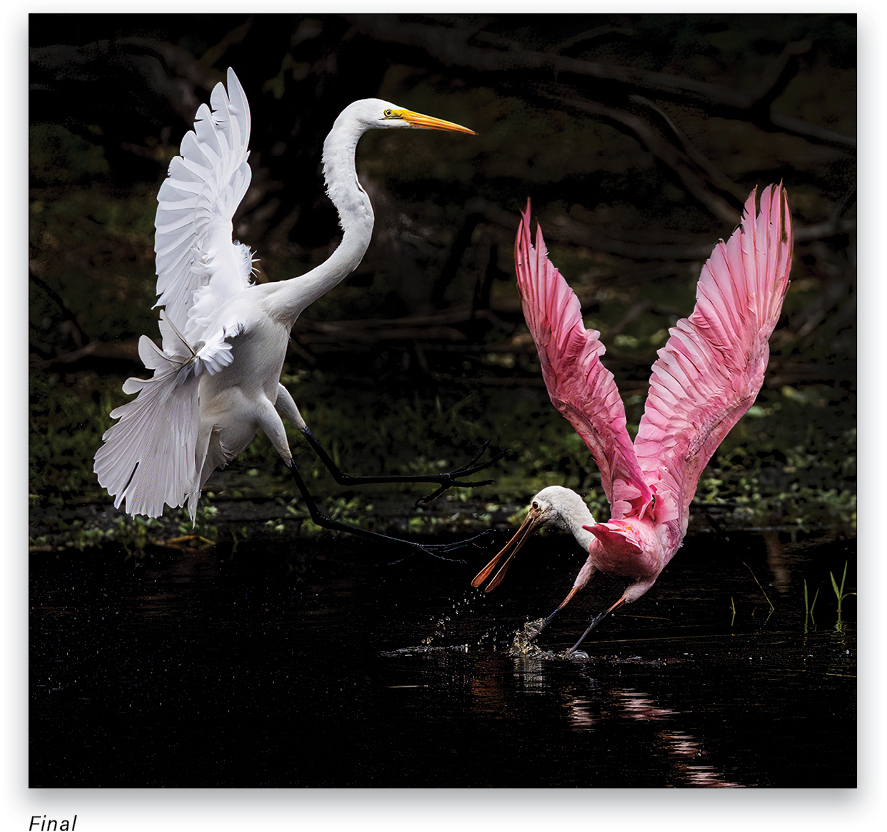
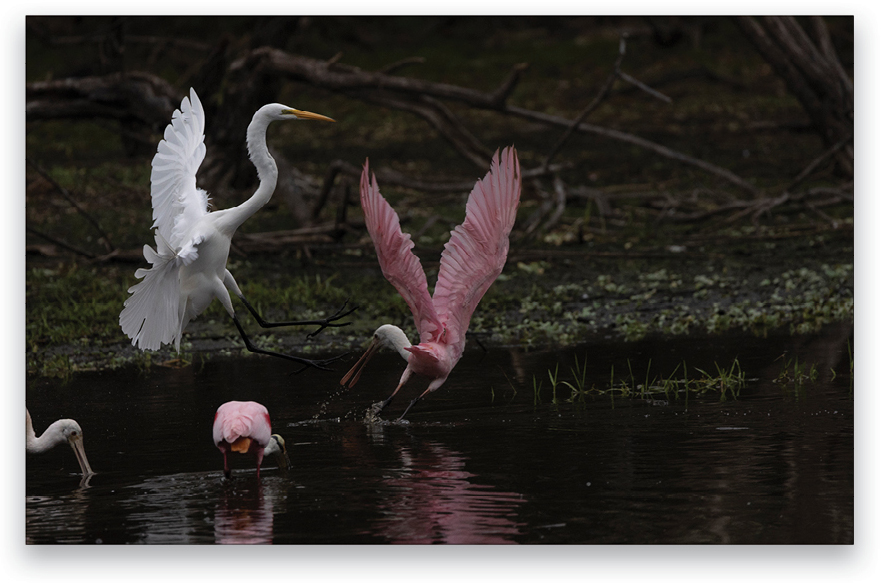
Below is the original image. My main questions: How can I isolate the two beautiful birds, an egret and roseate spoonbill, from the distracting background; and how can I get rid of the small spoonbill’s butt and the other bird’s chopped off head in the foreground? Cropping and cloning would eliminate the smaller birds, but let’s take a closer look at how I fixed the background and made the two main subjects stand out. The basic idea was to increase the contrast range.
STEP ONE: First, I used the Object Selection tool (W) set to Lasso Mode in the Options Bar to draw a loose selection of the egret. Photoshop’s AI then worked its magic to select the egret. If you have Object Finder turned on in the Options Bar, Photoshop automatically tries to determine all the subjects in the image. Once it’s done (it can take a few seconds), if you hover your cursor over a subject, it will be highlighted in blue. So all I had to do to add the spoonbill to the selection was hold the Shift key and then click once on the spoonbill.
As you can see in the screenshot below, the lower part of the egret’s legs, as well as the water between the spoonbill’s legs, weren’t selected. That wasn’t a big deal, as those areas were dark anyway, and I knew that, by using a small brush size, I could work on them independently.
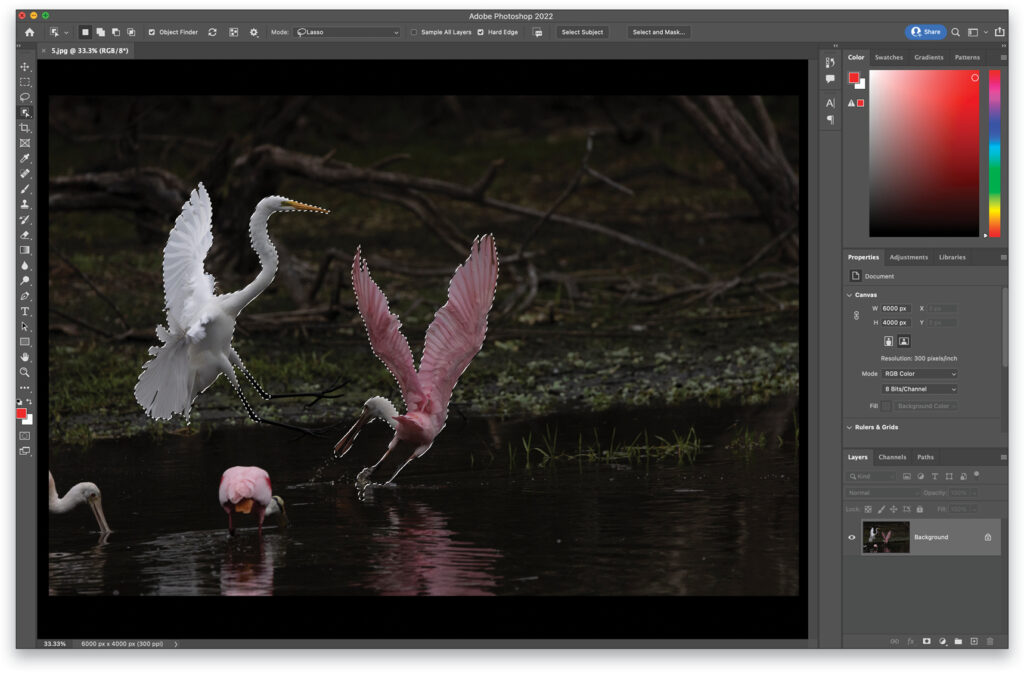
STEP TWO: Next, I went to Select>Select Inverse so the background was selected instead of the birds. Once selected, I reduced the exposure on the background using a Curves adjustment layer (Layer>New Adjustment Layer>Curves), which used the selection to create a mask. In the Properties panel (Window>Properties), I pulled the center of the curve down toward the bottom-right corner. Just a small adjustment makes a big difference.
STEP THREE: Then I wanted to apply a Gaussian Blur (Filter>Blur>Gaussian Blur) to create a depth-of-field effect. I clicked back on the Background layer in the Layers panel to make it active, pressed Command-J (PC: Ctrl-J) to duplicate it, and then Command-clicked (PC: Ctrl-clicked) the layer mask thumbnail on the Curves adjustment layer to reload the selection. At that point, I could apply the Gaussian Blur just to the background.
STEP FOUR: As a final step, I inversed the selection again, used the Dodge tool to lighten the birds’ faces and necks, and applied a Hue/Saturation adjustment layer to boost the colors in the birds.
As long as we’re talking about questions and answers, I’d like to insert a Photoshop joke here: “How many Photoshop instructors does it take to change a lightbulb?” Answer: “Ninety-nine, and one to screw it in.” The point of this joke? There are many ways to reach the goals you want to achieve in Photoshop.
HOW CAN I CHANGE THE MOOD?
Here’s another “keeper” from my Myakka shoot. Honestly, I call this a “Dumb Luck” shot because of the ballerina-like position of the beautiful bird’s wings. (Scott Kelby calls this a “Getting Even Shot,” that is, getting even for all the times we go out as photographers and everything seems to work against us, such as light, weather, and subject.) What added to my “luck,” however, was being prepared with the right gear for fast-paced action (a Canon EOS R3 with a Canon RF100–500mm lens), and observing the bird’s behavior, which as KelbyOne instructors Juan Pons and Moose Peterson know is key to getting good wildlife photographs.

The original image has many of the same problems as the previous straight-out-of-the-camera shot. After I made similar adjustments, I found myself questioning the mood (due to the dull brownish water) of the image, as mood matters most in photographs.
To change the mood, I changed the Color Balance (Image>Adjustments>Color Balance) by boosting Blue and Cyan. Yes, the egret took on a bluish cast, which I like because the end-result picture looks as though it could have been taken at night.
As a final step, I used the Dodge tool to lighten the bubbles behind the magnificent bird.
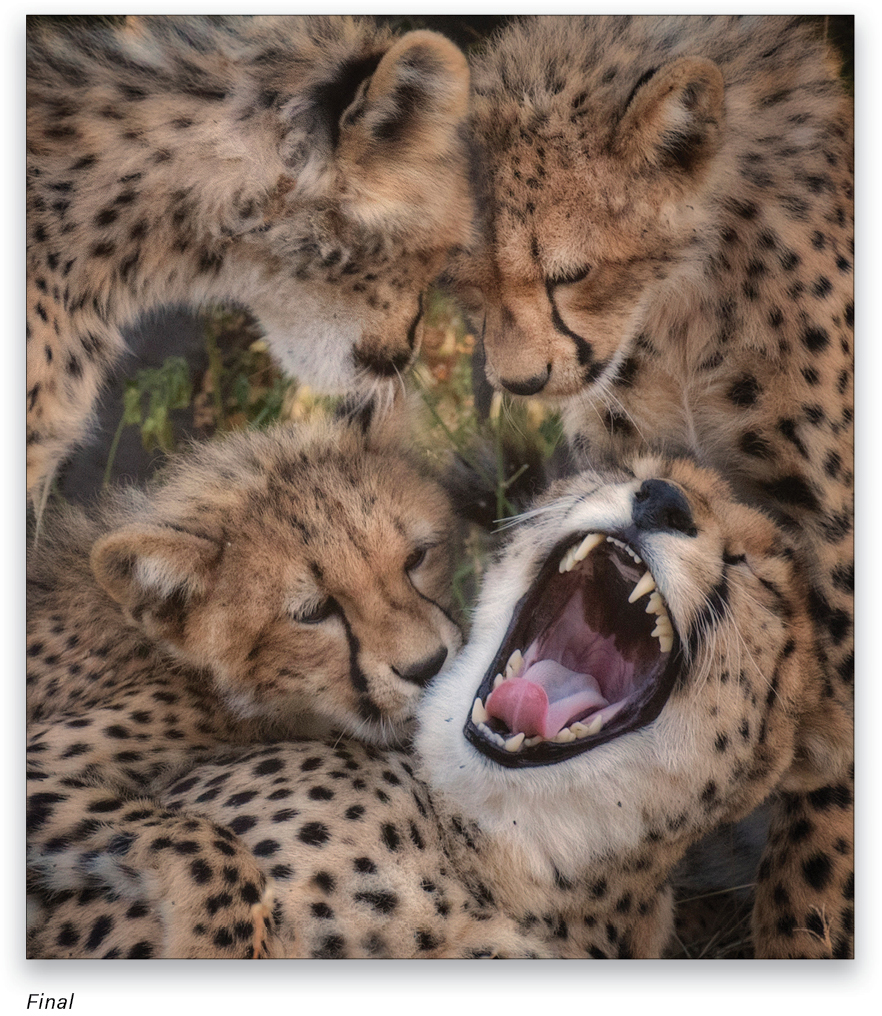
CAN THIS SHOT BE SAVED?
Here’s a favorite photo safari image. It captures an intimate moment between a mommy cheetah and her cute cubs.
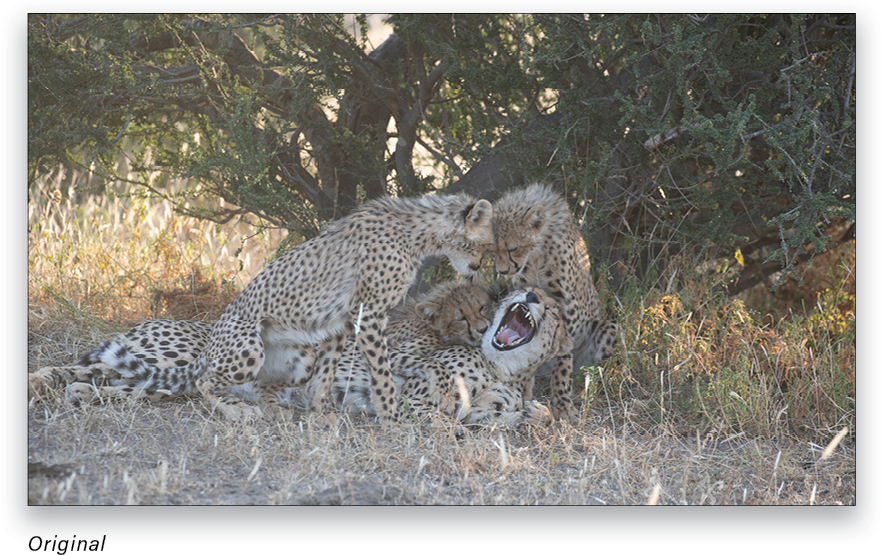
The original has one main problem: the animals are backlit and in the shade, resulting in a flat picture with little contrast and color.
In looking at the original I asked myself these questions:
- How can I convey that intimate moment most effectively? Cropping for a close-up was the answer.
- How can I fix the lighting? Adding Contrast and Vibrance in Camera Raw was the solution.
- How can I get a clearer image? Surprisingly, Dehaze in Camera Raw was the answer.
- How can I create a nice mood? Applying the Duplex filter in Nik Color Efex did the trick.
- How can I draw more attention to the animals? Applying the Darken/Lighten filter in Nik Color Efex let me achieve that goal.
Well, my friends, have fun working and playing in Photoshop. Don’t delete. Remember that reality leaves a lot to the imagination, so enjoy your adventures in Photoshop.
This article originally published in the April, 2022 issue of Photoshop User magazine.
About Photoshop User and KelbyOne
Photoshop User magazine comes out digitally 12 times a year and is part of KelbyOne, the leading educational resource for Photoshop, Lightroom, and photography. Pro members have access to more than 900 video courses and 100 back issues of Photoshop User. To learn more about KelbyOne, click here.


