Photographer, educator, and author Glyn Dewis was instructor of two classes at last year’s Photoshop World. In this tutorial from his class “Seriously? …Photoshop Can Do That?” Glyn shares invaluable tips and tricks on using Generative Fill in Photoshop. Watch the video here or follow along in the post below to learn how to expand your images seamlessly with the best possible resolution, optimize your post-processing workflow, and create stunning panoramic shots.
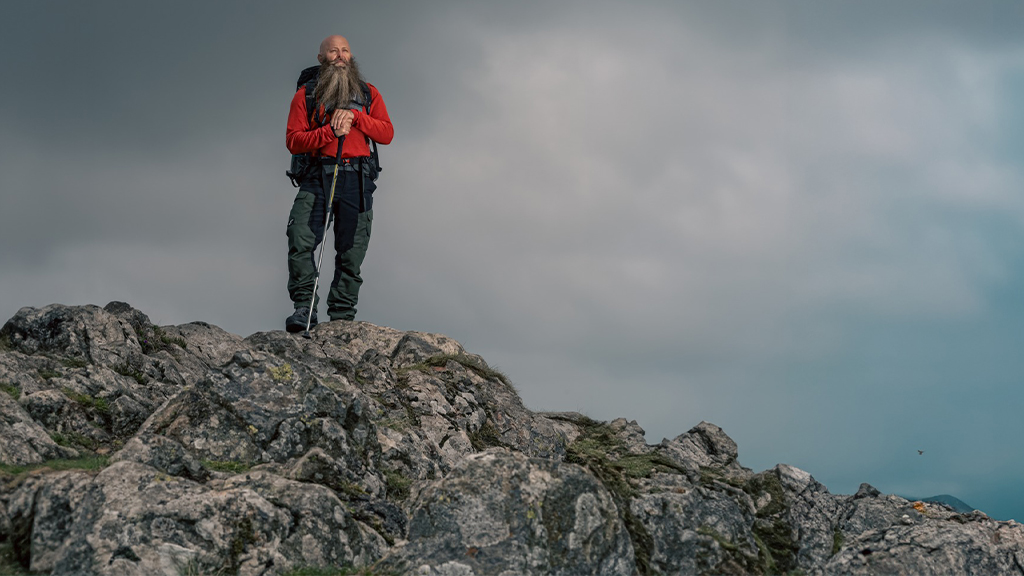
This is a picture of my friend Dai O’Tool. I took this picture of him when me and my friend Anthony went to West Wales to photograph him up this particular mountain. This is a behind the scenes picture:
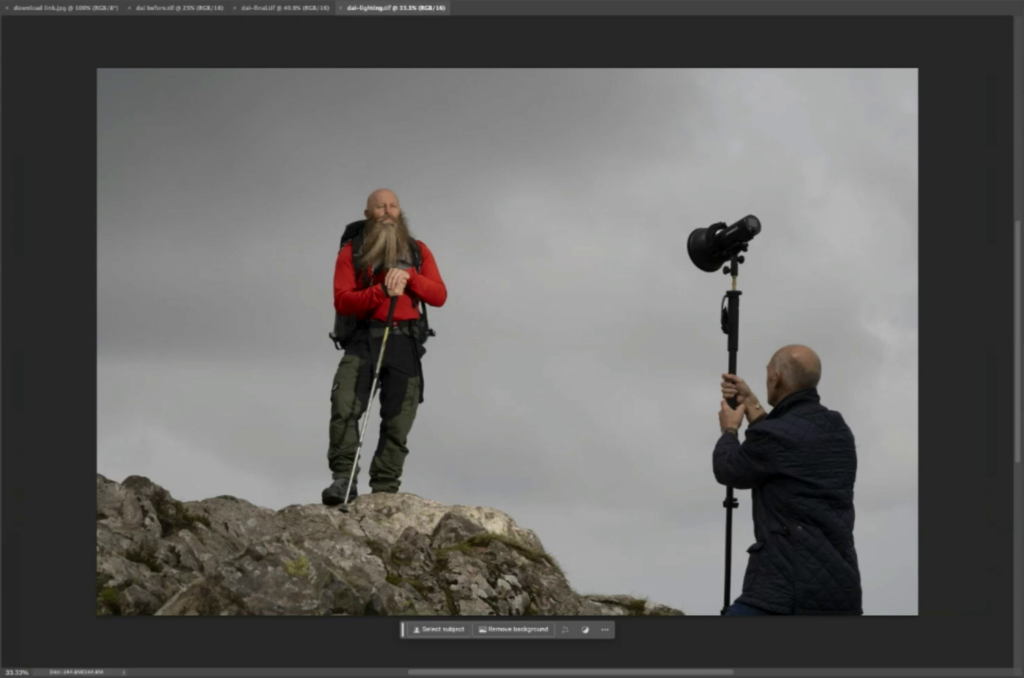
So you can see my friend Anthony. We lugged up some lighting up onto this mountain to light Dai for the portrait.
This is my final image:

However the reality was this:
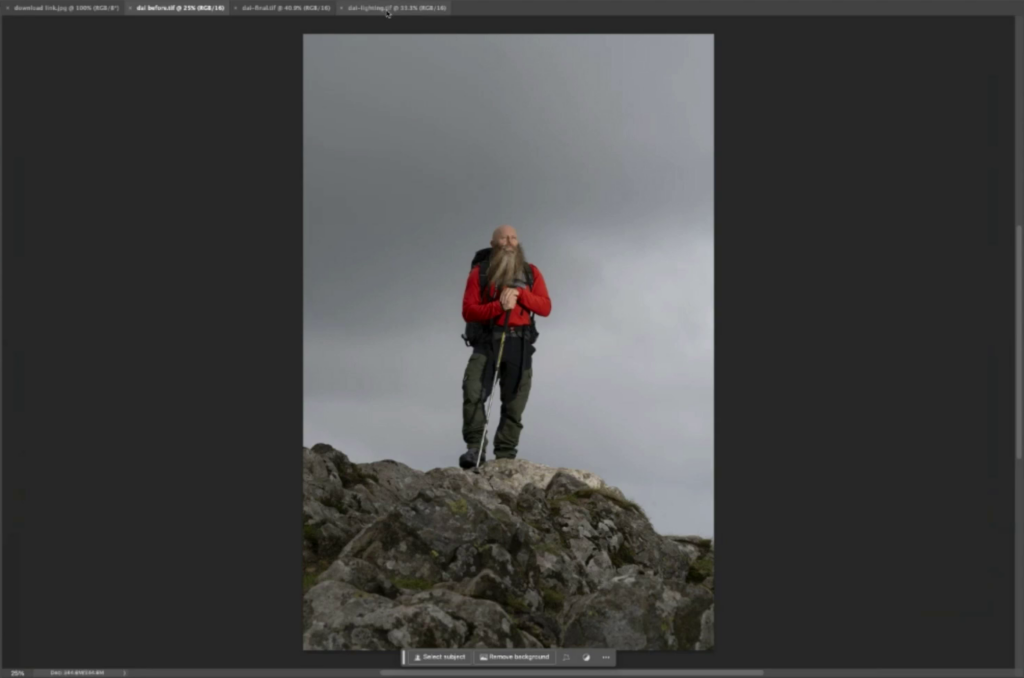
This was the out of camera image before I then worked on it. The reason I shot it this particular way was, to the left hand side of where Dai stood, there was a family who just happened to follow us up this mountain, as they do, and they were having a picnic and their young kid was flying a drone. To the right hand side of where Anthony was holding the light, the actual rocks just leveled off and there was a plain, boring, flat, grassed area. So, it wouldn’t have looked dramatic. There’s also the fact that I couldn’t go any further back because if I had, I’d have gone flying. It was a long drop. So I had to do it in portrait orientation and then work on it.
We had to try and match the lighting because it was very overcast, we used a hard light, slightly aimed off Dai, so the soft side of it was hitting him, so you get a nice softish light, but obviously you still get the shadows.
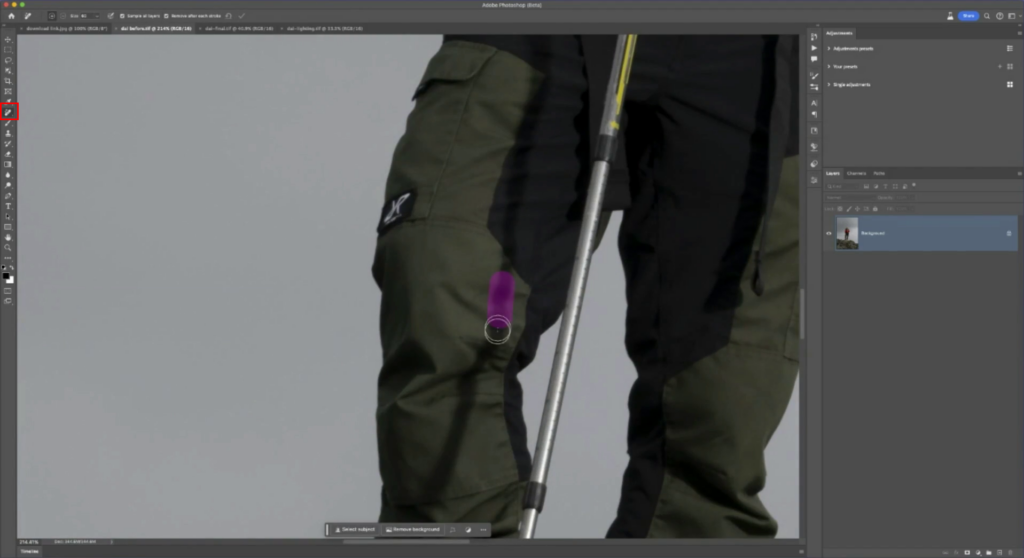
Here’s a tip. For my final image I used the Remove tool, which worked wonders to remove this particular shadow that was cast from this walking cane onto his leg. It removed the actual shadow, but kept all the texture and stuff in his trousers, which kind of blew me away. Try that yourself sometime.
Why Generative Expand Isn’t The Best Choice for This
Let’s have a look at how I created the actual wider picture because there are options, obviously.
We know that we’ve got the crop tool and nowadays it has this Generative Expand option.
If I want to make this a bit of a wider, panoramic, landscape-y kind of shot, we’ll just unlock the background layer, drag out with the crop tool to the desired width, then press Enter, and automatically Photoshop’s Generative Expand kicks into action and it will start to make the image wider.

But the problem with that is, if you looked at the resulting image on Instagram, you might think that looks pretty cool until you zoom in. That is the current issue with the Generative Fill technology. What we’re getting out of Generative Fill is low resolution, 1024 x 1024 pixels. When I zoom in, this area on the right hand side is the original image, then we have the image that’s been generated on the left and you can see a marked difference. It’s blurry. It’s out of focus, because it is such a low resolution.

So let’s just revert this back to normal (File > Revert), back to the original image of Dai. If we look at the actual image size of this, the height of this actual picture is 9,504 pixels.

When we talk about Generative Fill only being at the best resolution when you create a square area of 1024 pixels x 1024 pixels, just to do the height in one strip would take eight selections roughly all the way up the top, just to do a slight area on one side. To get this image nice and wide is going to take a LOT of 1024 x 1024 selections. Here’s a workaround that we could use to make that easier.
Getting the Best Possible Results Out of Generative Fill
First, I’ll unlock the background layer.
Next, go to Image > Canvas Size. And here we have the width and the height. And what I’m going to do with this is I’m going to increase the left. I’m going to anchor the picture by clicking on the right hand side of the squares in the dialog. That indicates to Photoshop, look, don’t increase anything on this side. I want it only to increase on the other side. And it’s only the width that I want to work on, so don’t change the height.
I said that the Generative Fill is the best at 1024 x 1024. It’s always best to have a bit of an overlap so that the technology can see what it’s got around it and it can help to blend it all together.
Although I want to expand this image, I’m not going to do it to the full size of what the Generative AI will be good at. I’m going to do it slightly less. So I’m going to make the width 1014 pixels wider. Which means when I use the AI, It’ll overlap by 10 pixels, which will help it do a better job.
So let me just zoom out. So I go for the width at 1014 and click OK.

So that now has given us extra canvas area on the left. Now we want to create a selection. It’s got to be a square selection. So I get my rectangular marquee tool and I’m going to hold down the Shift key, and when I do, we get a square selection.
But how on Earth do I make it 1024 pixels x 1024 pixels? That’s very difficult is the answer, but there is a very easy workaround.
Go to the toolbar and come down to where we have the shapes. We’ve got rectangle, ellipse, triangle, polygon and line tool. We’ll choose the rectangle. Be sure Shape is selected in the Options bar.

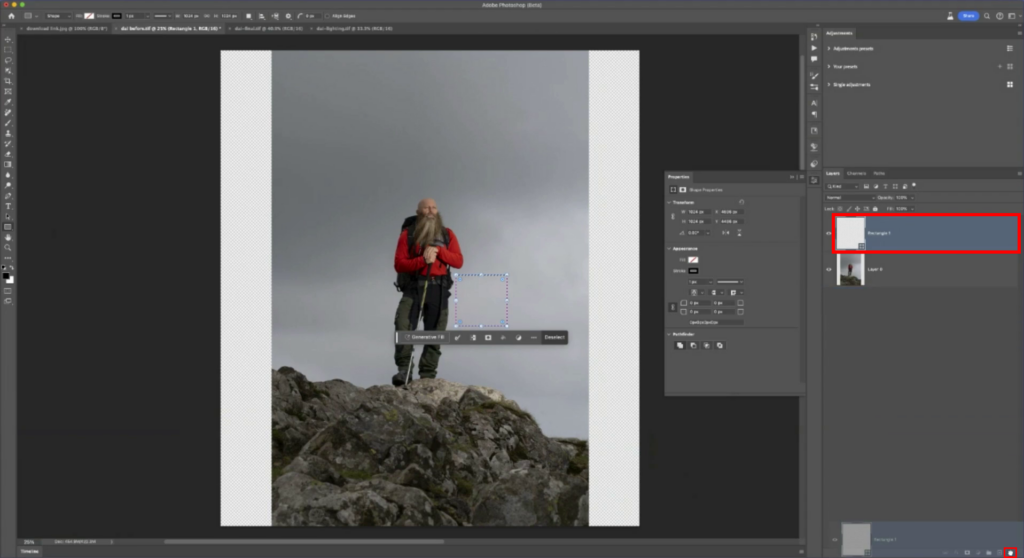
All I do then is bring my cursor on top of the actual image And tap down. Then we get this dialog box appear and all I’ll type in is 1024 width and 1024 height. And then click OK. And that gives us this shape here that is 1024 x 1024.

Now, we don’t want the shape, we want a selection. So I’ll hold down the Command key or Control key and press down and tap on the thumbnail of that layer. And now you can see we’ve got an active selection just there. Now that we’ve got that, we don’t need the shape. So we’ll drag and drop the shape layer away into the trash at the bottom of the layers panel.

Let’s start filling in within this new area on the left hand side. You might think, I’ll get my move tool, and we’ll drag the selection across. But that would cut the selected area out, which we don’t want.
To move this active selection, we’ll go to Select > Transform Selection. Then I can drag it across.

As I drag the selection over to this area, and snap it to the left hand side, it snaps there. See how it’s overlapping? That’s a 10 pixel overlap. So now that we’ve got that, we press Enter.

We’ve now got the active selection. Using the Contextual Task Bar, click on Generative Fill, type no words, and then click on Generate.
We give that roughly 10 to 12 seconds, something like that, to see what it does. You can see how the quality now is the same going from the original image over to this newly generated area on the left. There’s some loss of quality at the edge already, but that was because the depth of field used on the lens. You can see that this is much better than the original expansion result (with generative expand).

Let’s go over to the right side here where that is nice and sharp. Let’s increase that side of the image as well. Let’s go to Image > Canvas Size. We only want to expand this side over on the right. So we’ll lock the left hand side by tapping on the left center square in the dialog. And we’ll type in width 1014 pixels, so we allow for that 10 pixel overlap, and we click OK.

Now we’ve increased the canvas size on the right. I’m going to open up my Actions panel. And in here, I’ve got an action called 1024px Generative Fill AI. When I press play for that action, it automatically creates the active selection in the middle, 1024 x 1024.

I’ve also got a keyboard shortcut where I can drag the selection over nice and quick. I’m going to show you how to do that in a second. But, I’ll drag that selection, snap it to the right hand side. We’ve got that 10 pixel overlap. We press Enter to commit it. So now we see the active selection.
Click on Generative Fill and we click on Generate, wait roughly 10 to 12 seconds for that to process. You’ll see below that the quality is really good. Nice and sharp, it continues through the grass bits here.

Fantastic.
Let me show you how we can create that action.
Recording The Action That Makes This Workflow Easier
We are going to repeat the process I showed above, but record it this time as an action. I’ll go to my Actions panel and I will click to add a new action. In the dialog that pops up, let’s name this one 1024 square. I could also assign a function key and a color to this, but I won’t do that just yet. And then I’ll click record.

Go over to the toolbar, and choose the rectangle tool. Be sure Shape is selected in the Options bar. Then, come over the image, and all I do is tap down. That brings up this dialog here. I type in 1024 pixels for the width and 1024 pixels for the height. Click OK. We now have that shape. We don’t want the shape, we just want a selection of that shape.

Hold down the Command key or Control key, click on the thumbnail of the rectangular shape in the Layers panel, and press down to load it as a selection. Then we move that actual shape layer into the trash can so that we’re left with the active selection.
So that’s all the steps that we need. Let’s go back to the Actions panel and stop recording.
And Deselect. So we’ve got this new action, 1024 Square. Let’s see if it works.

We’ll press Play. And there you go, there is our action.
Set Up Keyboard Shortcuts to Automate These Tasks
Once everything is automated, that really helps this technique go faster. It’s gonna take a bit of time to build these squares up, but we can speed part of the process up with these keyboard shortcuts.
I’ve got this set up so that to play the action, all I do is hold down the Shift key and press F19. Straight away, there is the active selection. Then, rather than me going to the Select menu and Transform Selection, I’ve set that up as a keyboard shortcut. My keyboard shortcut is Option-Command-F (but you can use what works for you).
Let me show you how. When you’ve got your action prepared in the actions panel, go to the hamburger menu (the three horizontal lines at the top right of the panel) and tap on that. Then choose Action Options. That’s where you can fill out the dialog to tell Photoshop, to start the action, we’ll choose F18 and I have to press the Shift key.

From then on, when you hold down the Shift key and press F18, it’ll run that action really quickly for you.
I’d also suggest creating a keyboard shortcut rather than going to Select > Transform Selection. To set this just go to Edit > Keyboard Shortcuts.

You can see mine below. In the Select menu, if I scroll down to Transform Selection, you can see there: Transform Selection, Option-Command-F.

Alright, that’s that on Generative Fill. Amazing technology. It’s always good to have these little workarounds and have these extra little tools and tips and tricks in our bag. I hope you’ve enjoyed this tutorial from last year’s Photoshop World, and you’ll join me for this year’s event September 24-26!
Join us at Photoshop World 2024 and immerse yourself in an event packed with innovative sessions and inspiring content. Experience top-quality sessions that will push your limits, provide fresh insights, and elevate your photography and design skills.


