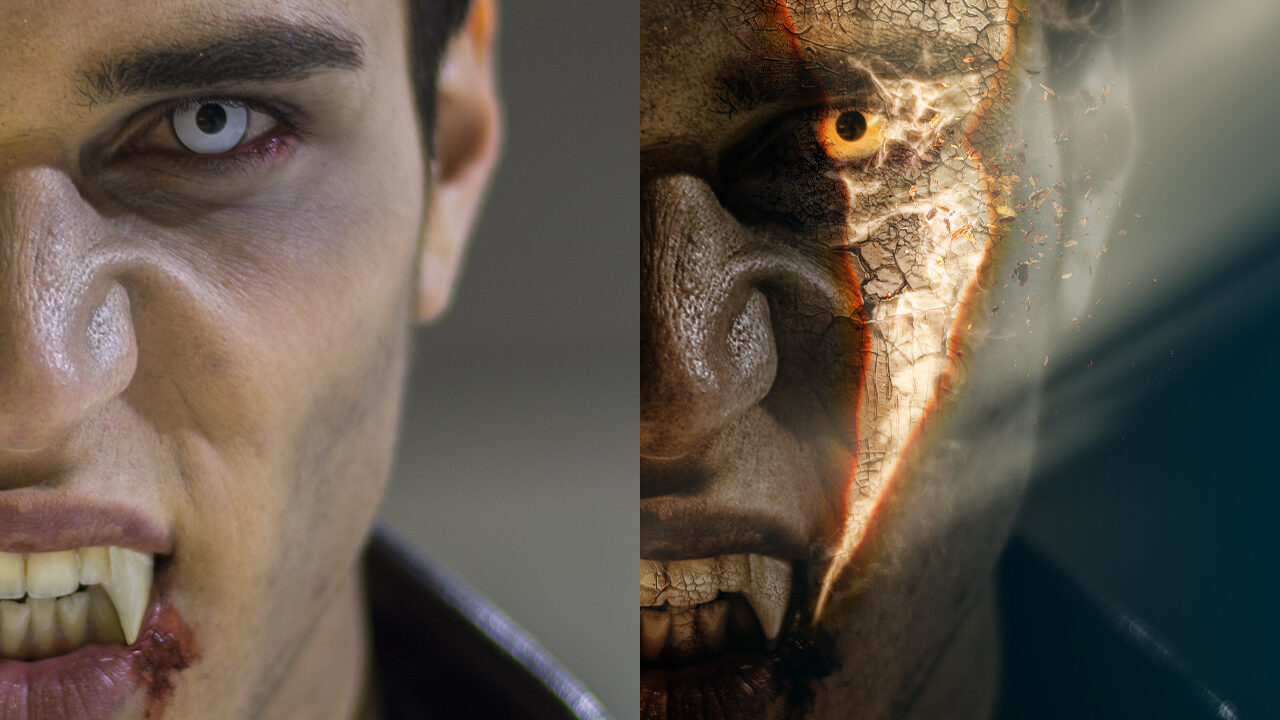
So it’s that time of year when we all get a little silly and dress up for Halloween. Have you ever thought about what you could do if you took photos of yourself, friends, or family in their favorite cosplay and enhanced them with special effects in Photoshop, maybe to create a poster, an invitation to a Halloween party, or maybe just for fun? Here are some tricks and treats you can do to make your cosplay photos a little more sinister for Halloween.
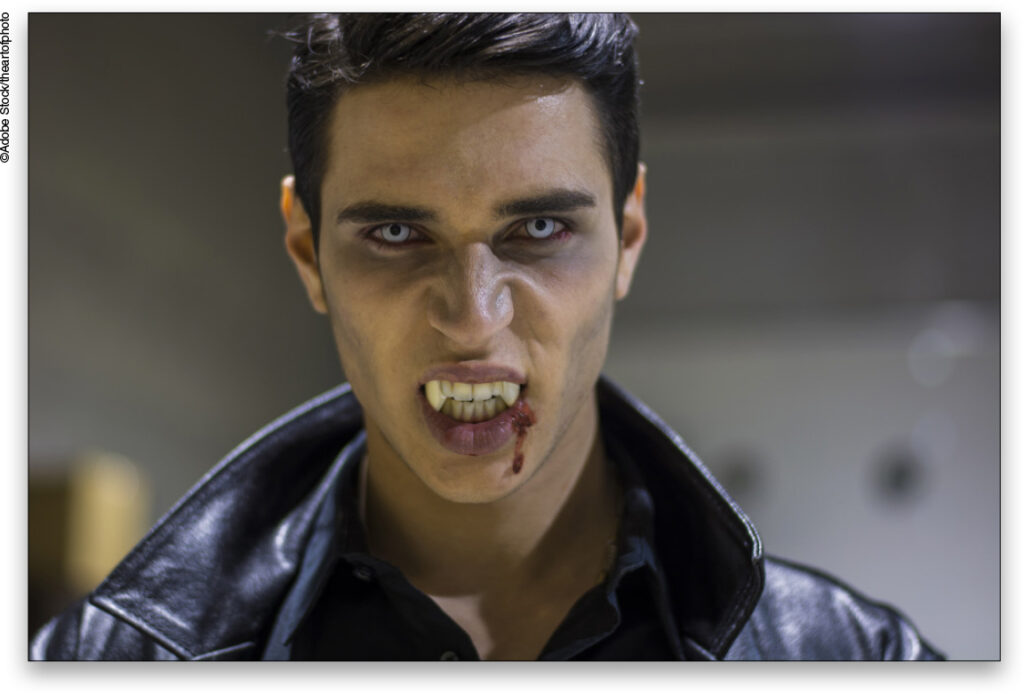
STEP ONE: Let’s begin by opening an image in Photoshop. Whether it’s a stock image or one right off your phone, choose a cosplay shot to which you want to add some effects.
If you’d like to download the low-res watermarked versions of this image to follow along, click this link log in with your Adobe ID, and click the Save to Library button. Right-click the image in the Libraries panel (Window>Libraries) and choose Edit to open it in Photoshop.
To make it easier to work with the image, increase the resolution of the practice file. (We normally don’t recommend enlarging images, but this is only for practice purposes.) Go to Image>Image Size, turn on the Resample checkbox, select Preserve Details 2.0 from the Resample drop-down menu, set the Width to 3,000 pixels, and click OK.
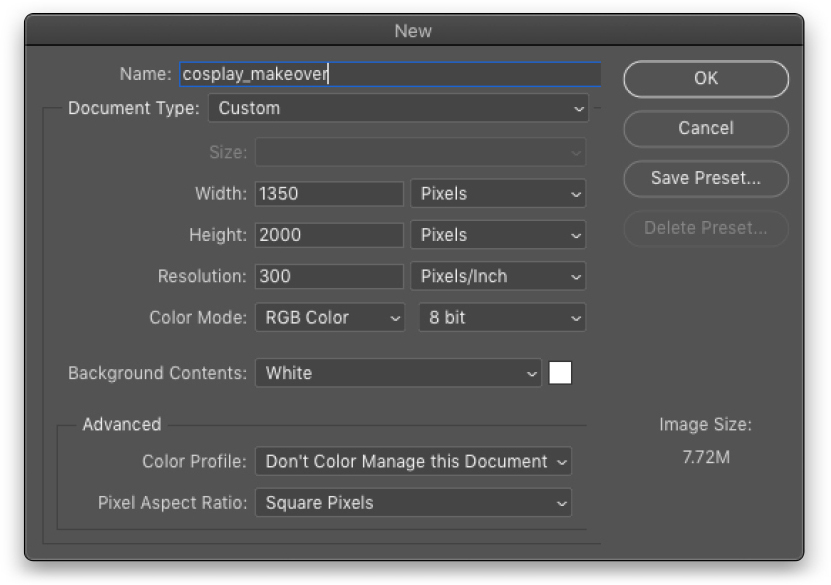
STEP TWO: We need to create a new Photoshop document in which to build the final design, so go under the File menu and choose New. Use the dimensions shown here to build a movie poster-style format. Click OK or Create when done.
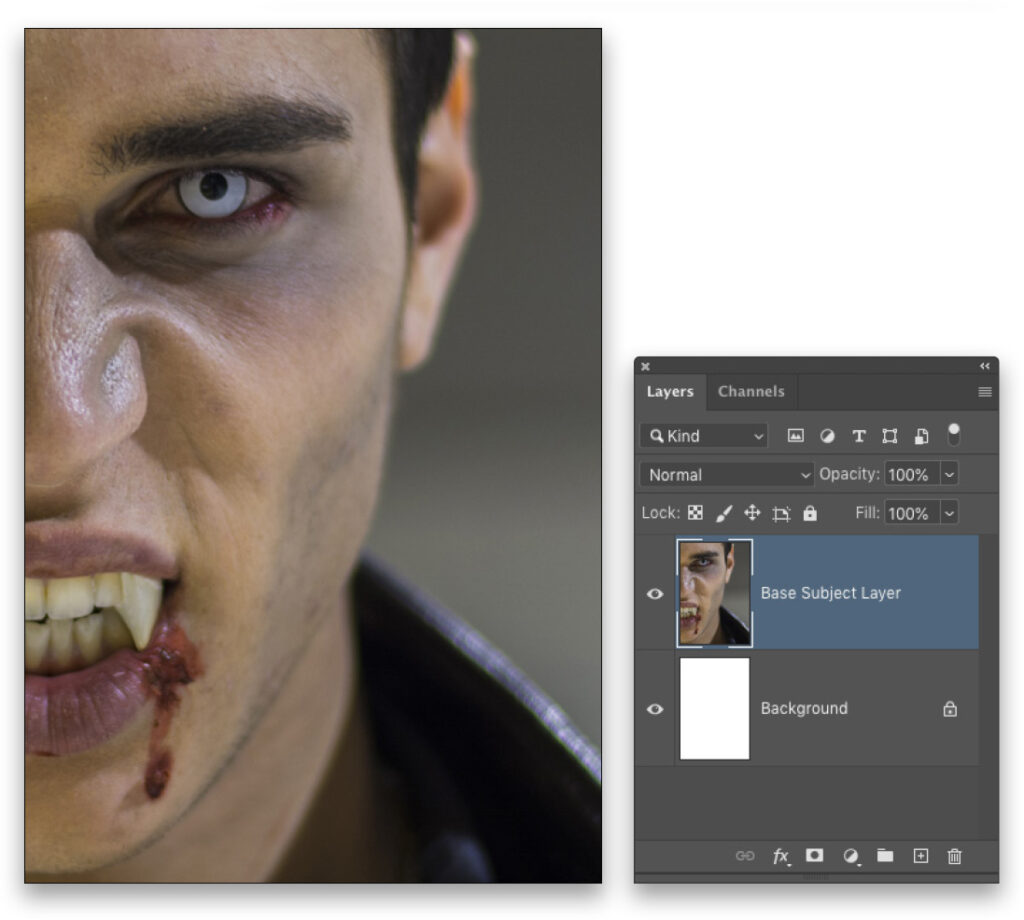
STEP THREE: Use the Move tool (V) to drag-and-drop your photo into this new canvas. Use Free Transform (Command-T [PC: Ctrl-T]) to scale and position the subject close up in the composition as shown here for a really dramatic effect and to better see the effects that we’re going to apply on the skin. Once in place, press Enter to commit the transformation. Double-click the layer’s name in the Layers panel and rename it “Base Subject Layer.”
STEP FOUR: We want to draw a path that we can use to create a piercing beam of sunlight, and we want it to mimic the shape of a fang. So select the Pen tool (P) in the Toolbar and, in the Options Bar, make sure the Tool Mode is set to Path.
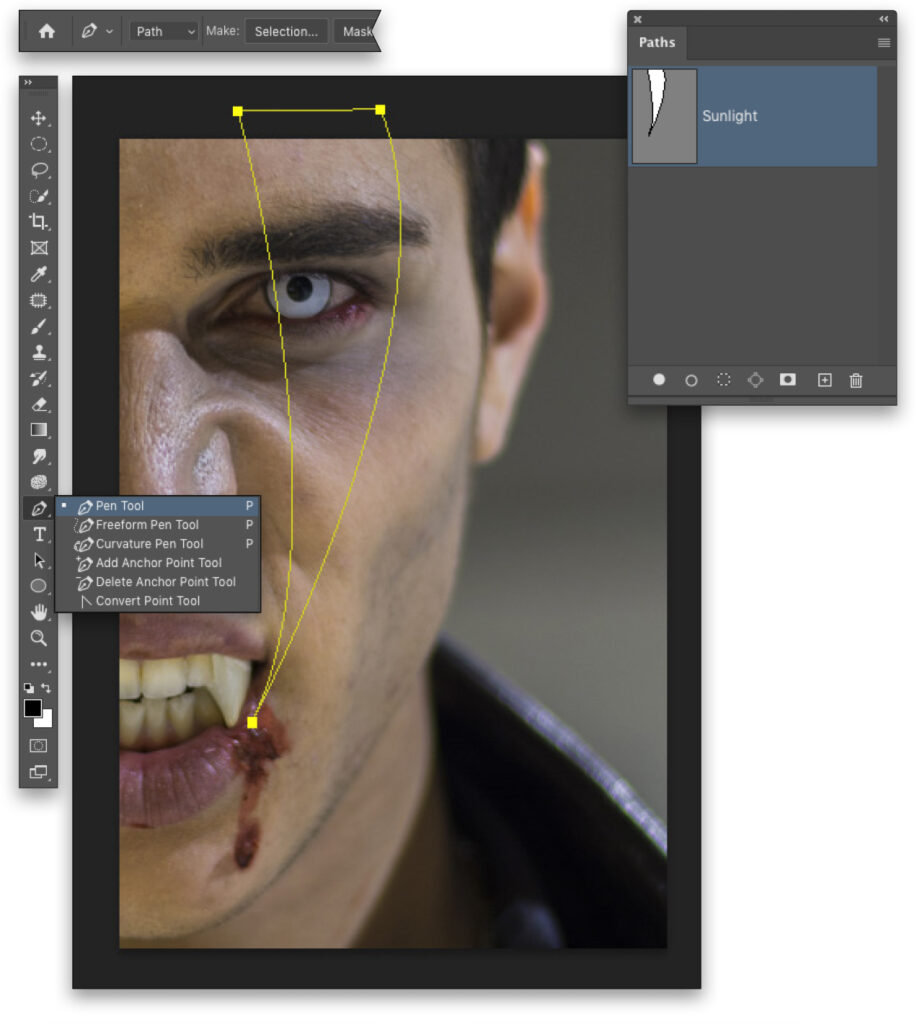
Click outside the top of the document just to the left of his eye to add the first point of the path. Move your cursor to the right and click to add the second point. Click-and-drag to add a point just below the corner of his mouth; dragging the point will create a curve along the path segment you just drew. Option-click (PC: Alt-click) the point you just added to remove one of its control arms (otherwise the next path segment you draw will be wonky). Now click-and-drag on the starting point to create the final curved segment and close the path.
In the Paths panel (Window>Paths), double-click the Work Path, rename it “Sunlight” in the Save Path dialog, and click OK.
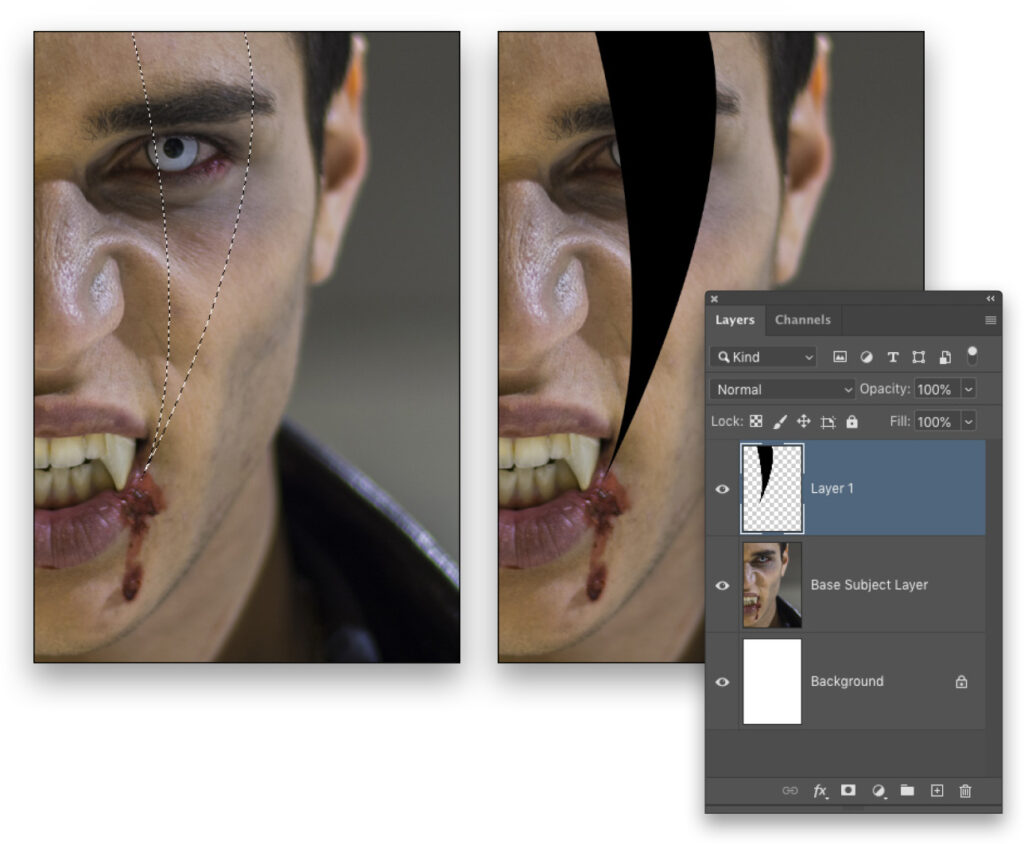
STEP FIVE: With the Sunlight path active, click the Load Path as a Selection icon (dotted circle) at the bottom of the Paths panel to convert the path to an active selection. Back in the Layers panel, create a new blank layer above the Base Subject Layer. Press D to set the Foreground color to black, and then press Option-Delete (PC: Alt-Backspace) to fill the active selection with black. This will give you the fang shape on the layer. Press Command-D (PC: Ctrl-D) to deselect.
STEP SIX: Go under the Filter menu and choose Liquify. In the Liquify workspace, go to the bottom of the Properties panel on the right and turn on Show Backdrop. Set the Use drop-down menu to the Base Subject Layer, the Mode drop-down menu to Behind, and the Opacity to 75%. Make sure the Show Mesh, Show Mask, etc. checkboxes are turned off.
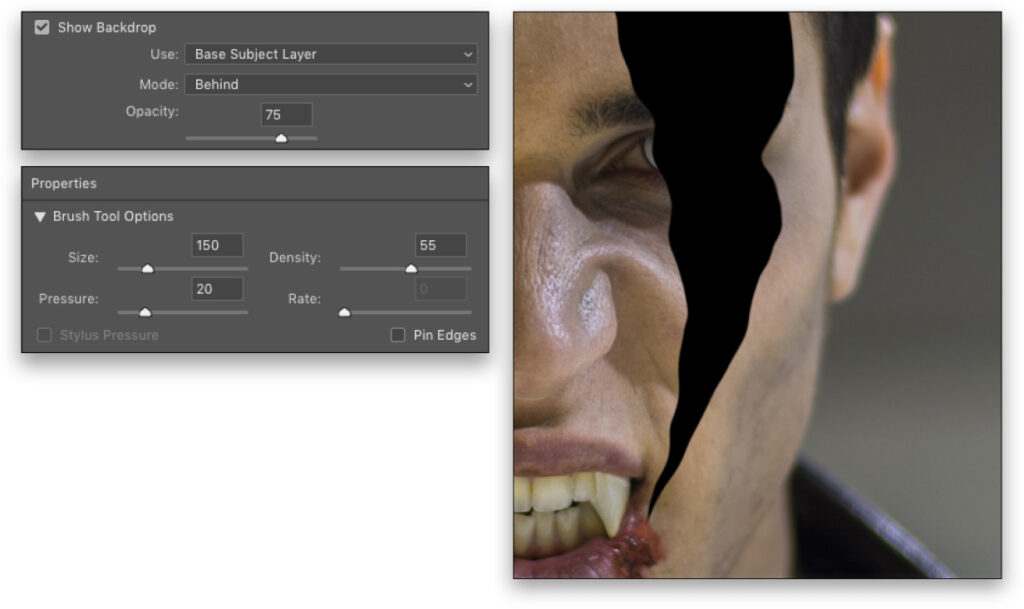
Next select the Forward Warp tool (W) in the Toolbar on the left. At the top of the Properties panel are the Brush Tool Options. Set the Size to around 150, Pressure to around 20, and Density midway around 55%. Turn off Pin Edges.
Click-and-drag to push the edges of the shape to conform to the curves of the subject’s face. Do this all the way around the shape but don’t obsess about it being perfect; just get the general shape to conform to the face and it will be fine. Click OK when done.
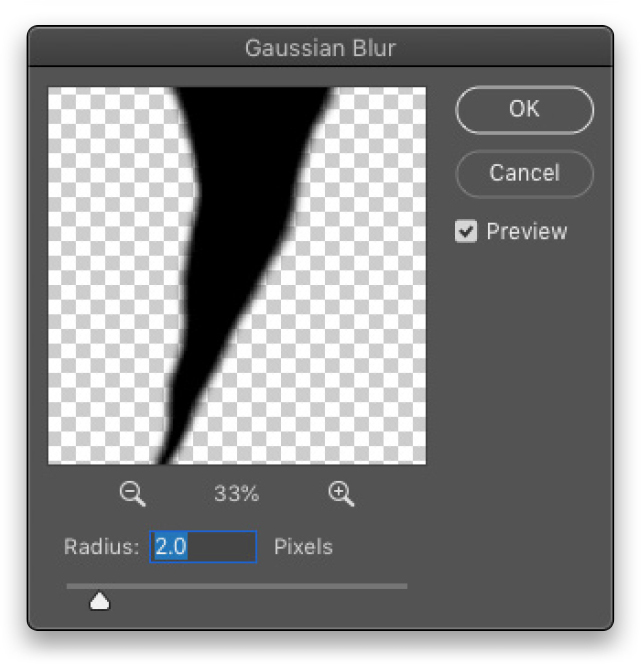
STEP SEVEN: Next, we want to run a quick blur to soften the edges a little, so go under the Filter menu, to Blur, and choose Gaussian Blur. Set the Radius to 2.0 and click OK.
STEP EIGHT: Hold down the Command (PC: Ctrl) key and click the light fang layer’s thumbnail in the Layers panel to load it as a selection. Turn off that layer for now by clicking its Eye icon. Create a new blank layer, and place it below the light fang layer in the Layers panel. Go under the Select menu and select Inverse. Press D to set the Foreground color to black, and then press Option-Delete (PC: Alt-Backspace) to fill the active selection with black. Press Command-D (PC: Ctrl-D) to deselect.

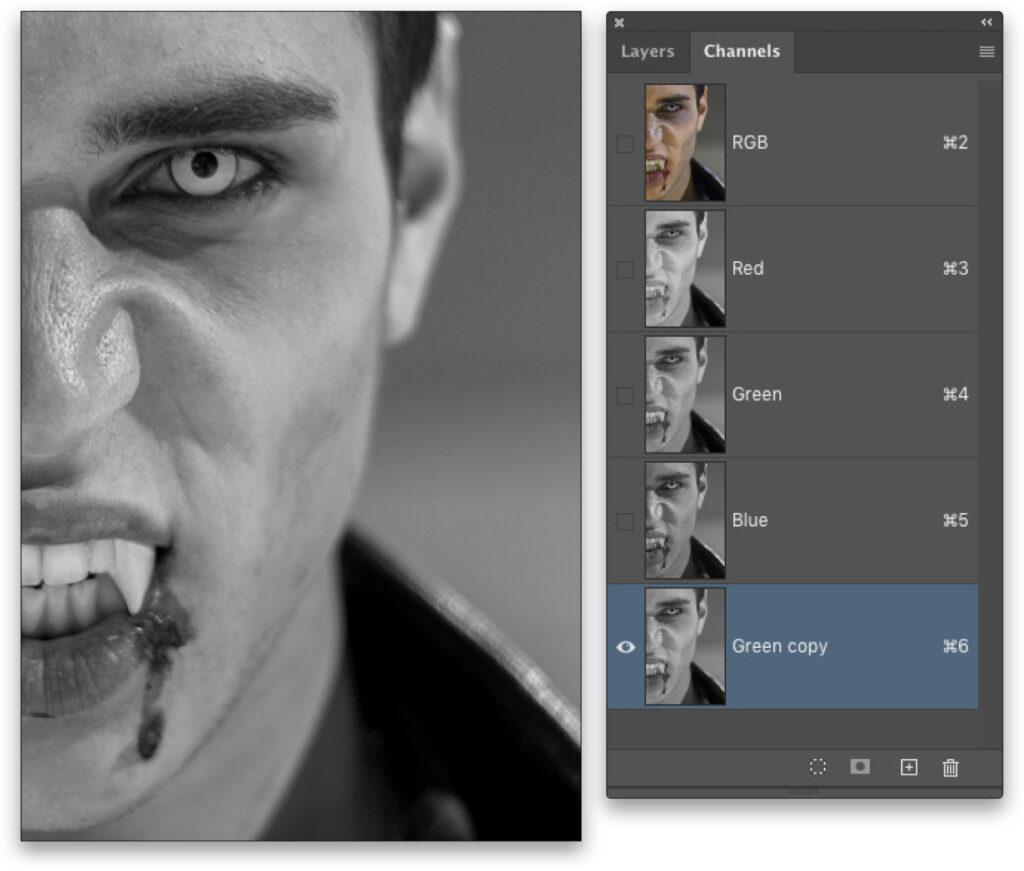
STEP NINE: Option-click (PC: Alt-click) the Eye icon of the Base Subject Layer in the Layers panel to turn off all the layers except that one. Open the Channels panel (Window>Channels). We need to find the channel that has a good balance of light and shadow areas. In this case, it’s the Green channel, so grab that channel and drag it to the Create New Channel icon (+) at the bottom of the panel to make a duplicate channel. If needed, you can adjust the contrast of the duplicate channel with a simple Levels adjustment (Command-L [PC: Ctrl-L]).
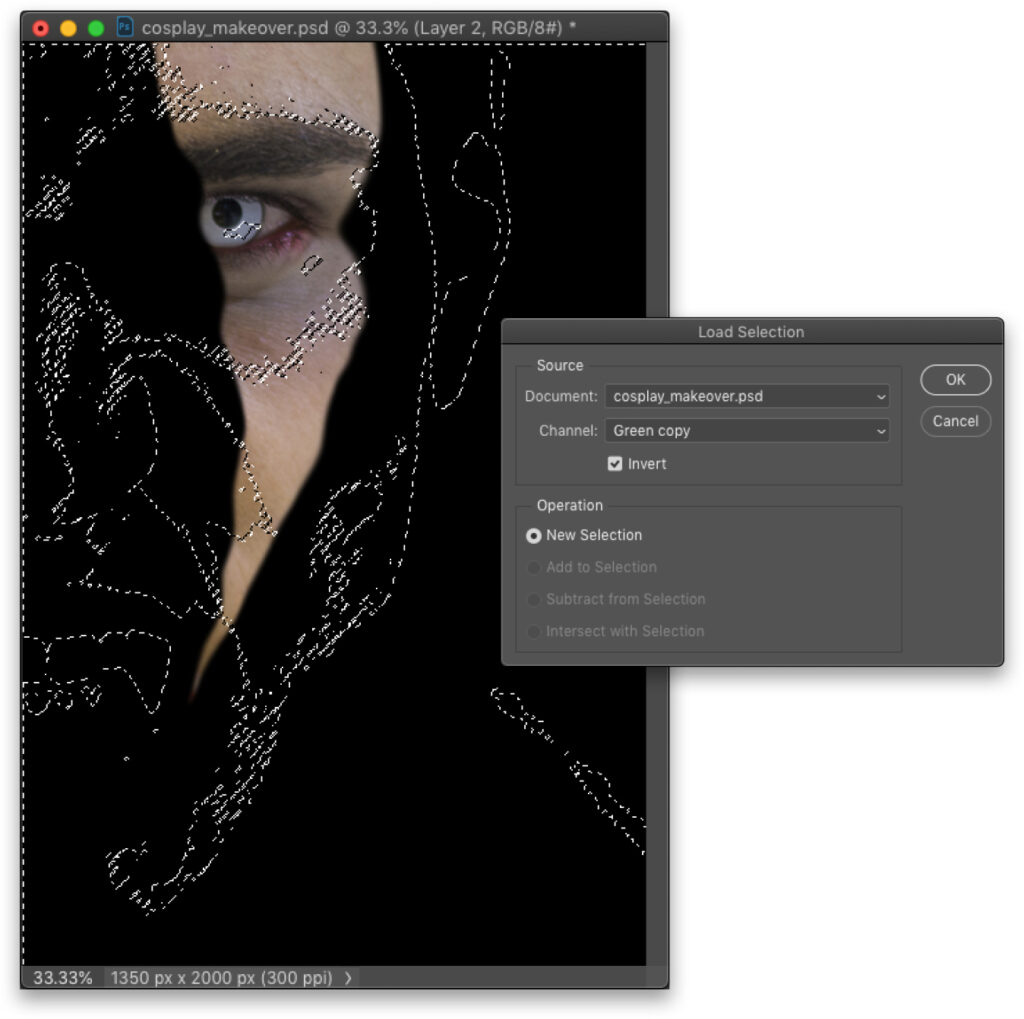
STEP 10: Reactivate all channels by clicking on the RGB channel. Go back to the Layers panel, click on the layer we created in Step Eight (Layer 2) to make it active, and click where its Eye icon used to be to turn it back on.
STEP 11: Go under the Select menu and choose Load Selection. In the Load Selection dialog, set the Channel drop-down menu to Green copy, check on Invert, and click OK. This applies the inverse of the channel as an active selection.
STEP 12: Click the Add Layer Mask icon (circle in a square) at bottom of the Layers panel to create a mask based on the selection. This will result in a darkening effect around the light fang that’s starting to look a little like shadows.

STEP 13: You can enhance the mask a bit by adding some simple gradients. Grab the Gradient tool (G) and click on the gradient preview thumbnail in the Options Bar to open the Gradient Editor. In the Basics set, select the Foreground to Transparent preset, and click OK. Back in the Options Bar, click on the Linear Gradient icon, and set the blend Mode to Overlay.
With the Foreground color set to black and the layer mask thumbnail active in the Layers panel, drag a short, horizontal gradient starting from the left edge of the document to light up his face on that side a bit more. Then, press X to set the Foreground color to white, and drag a short, horizontal gradient starting from the right side this time to darken the area behind him.

STEP 14: Add another new layer below this layer (Layer 2) and above the Base Subject Layer. Change the blend mode from Normal to Soft Light near the top left of the Layers panel and set the layer Opacity to 55%. In the Options Bar, change the blend Mode of the Gradient tool back to Normal, and then with it still set to the Foreground to Transparent preset and the Foreground color set to black, drag a gradient from the left edge toward the center of the image and then another gradient from the bottom toward the center. This will enhance the contrast in the shadows a bit more.
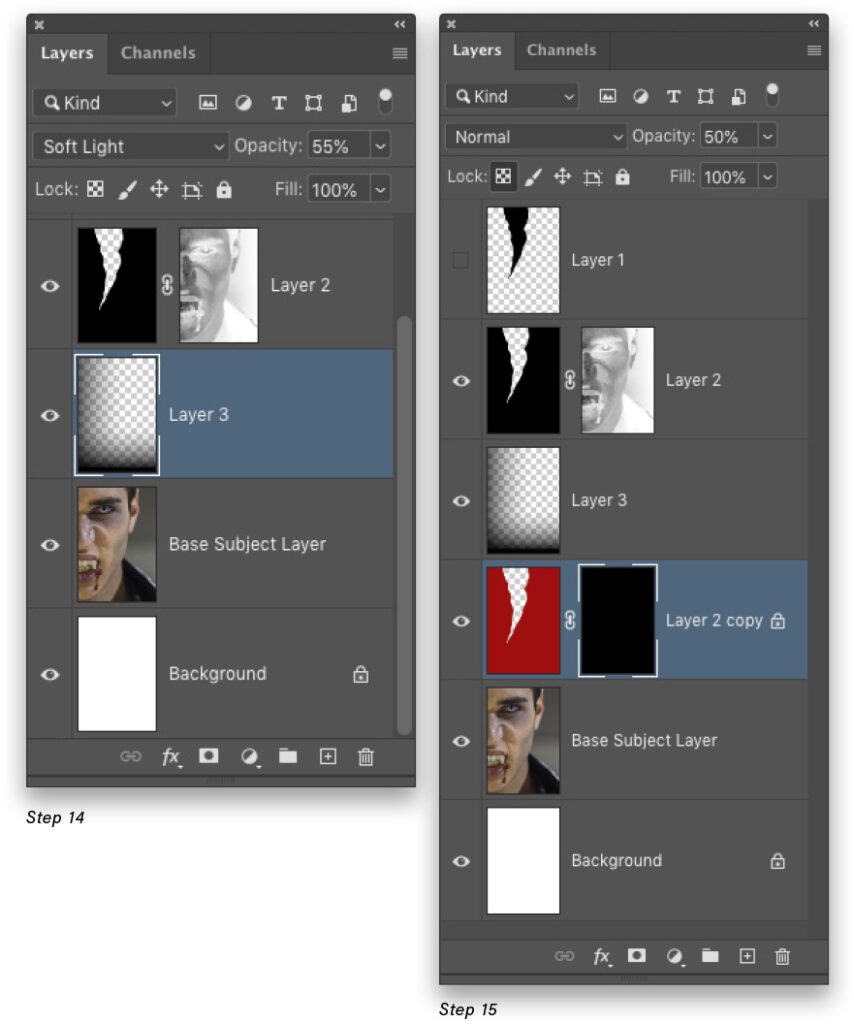
STEP 15: Make a duplicate of the shadow layer (Layer 2) by clicking on it in the Layers panel to make it active and pressing Command-J (PC: Ctrl-J). Place this duplicate layer directly above the Base Subject Layer, and set its Opacity to 50%. Click on its mask thumbnail to make it active, and with the Foreground color set to black, press Option-Delete (PC: Alt-Backspace) to fill the mask with black to hide the layer. Click back on the layer thumbnail to make it active instead of the mask.
In the Layers panel, click the Lock Transparent Pixels icon (it’s the first one to the right of the word “Lock”). Click on the Foreground color swatch, pick a dark-red color (R: 158, G: 11, B: 15) in the Color Picker, and click OK. Press Option-Delete (PC: Alt-Backspace) to fill the layer with red. The light fang should not fill with the red color since you locked the transparent pixels.
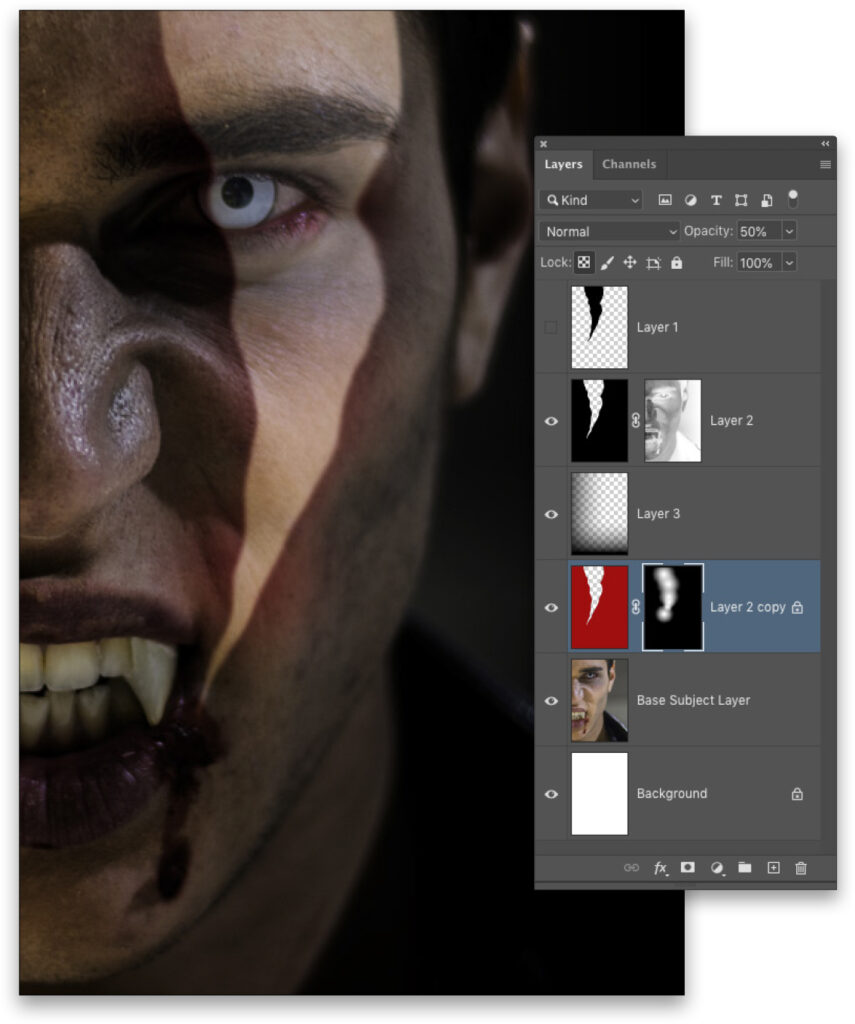
STEP 16: Select the layer mask thumbnail again and grab the Brush tool (B). In the Options Bar, click on the brush preview thumbnail to open the Brush Preset Picker, select the Soft Round brush in the General Brushes set, and set the Size to 600 px. Press D to set the Foreground color to white.
Click once at the top of the light fang shape, press the Left Bracket key ([) on your keyboard to decrease the brush size by 100 px, and then click just below your previous brush click. Repeat this all the way down the light shape to reveal the red just outside the edges of it. This starts to build the irritation the skin is getting from the light.
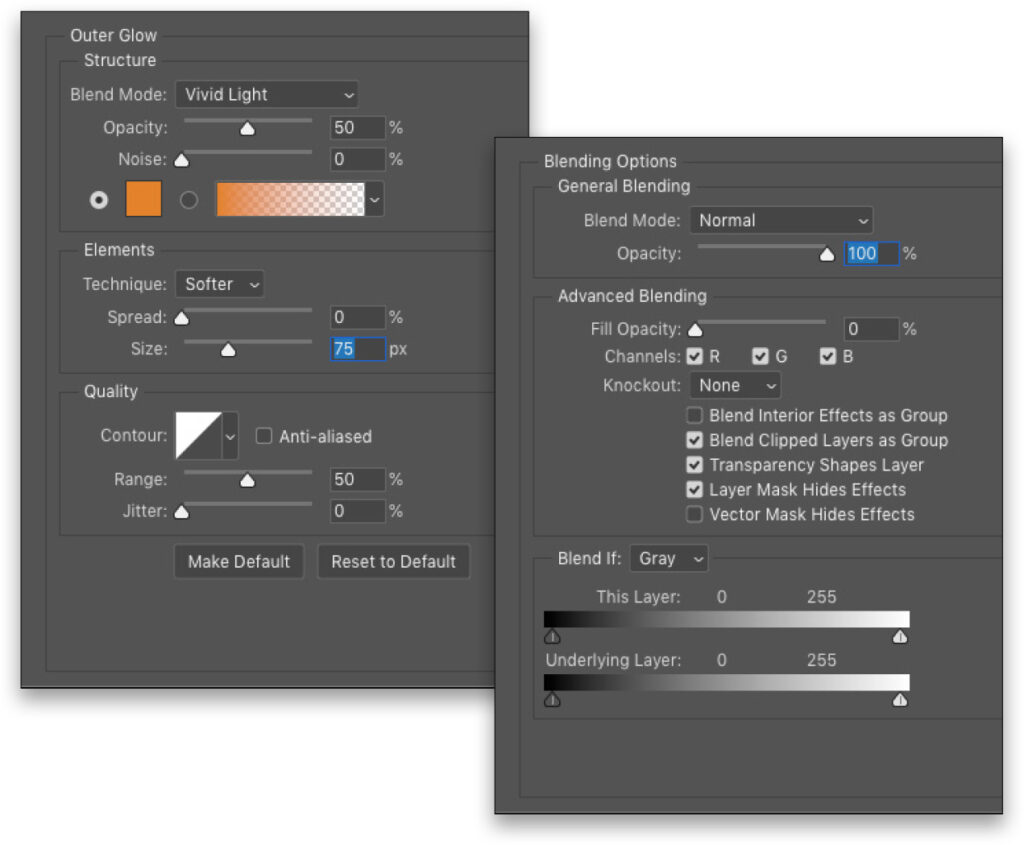
STEP 17: In the Layers panel, click on the original light shape layer (Layer 1) and make it visible again. Click the fx icon at the bottom of the Layers panel, and choose Outer Glow. You can start with the settings shown here but the color and size may vary on different images. Don’t click OK yet.
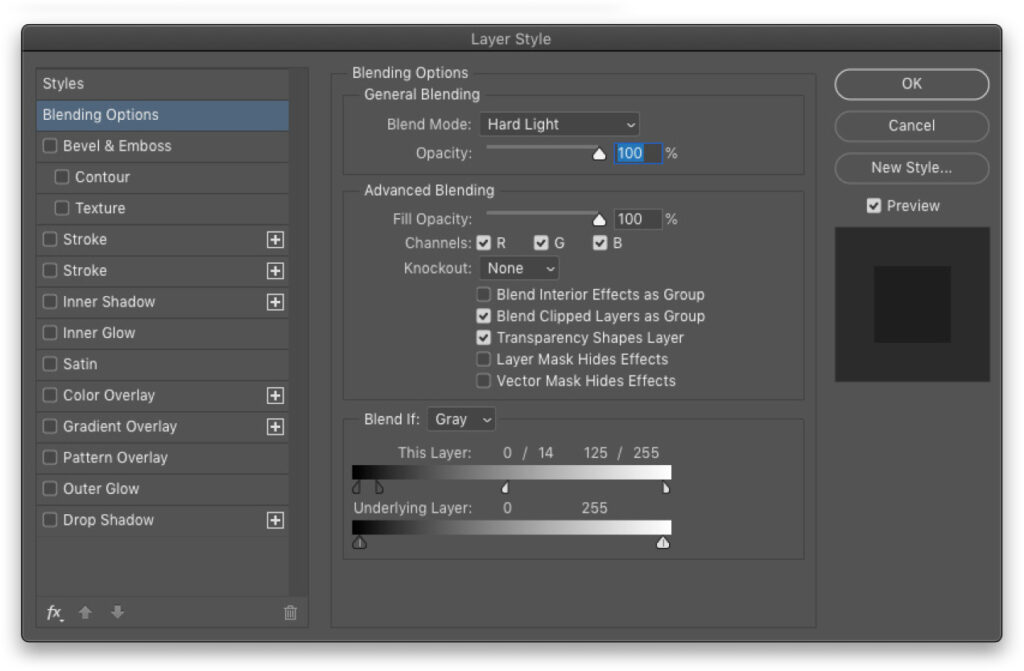
STEP 18: Next, click on Blending Options near the top of the list on the left side of the Layer Style dialog. Under the Advanced Blending section, set the Fill Opacity to 0% and check on Layer Mask Hides Effects. Click OK when done. This will simulate a colored edge glow on the light.
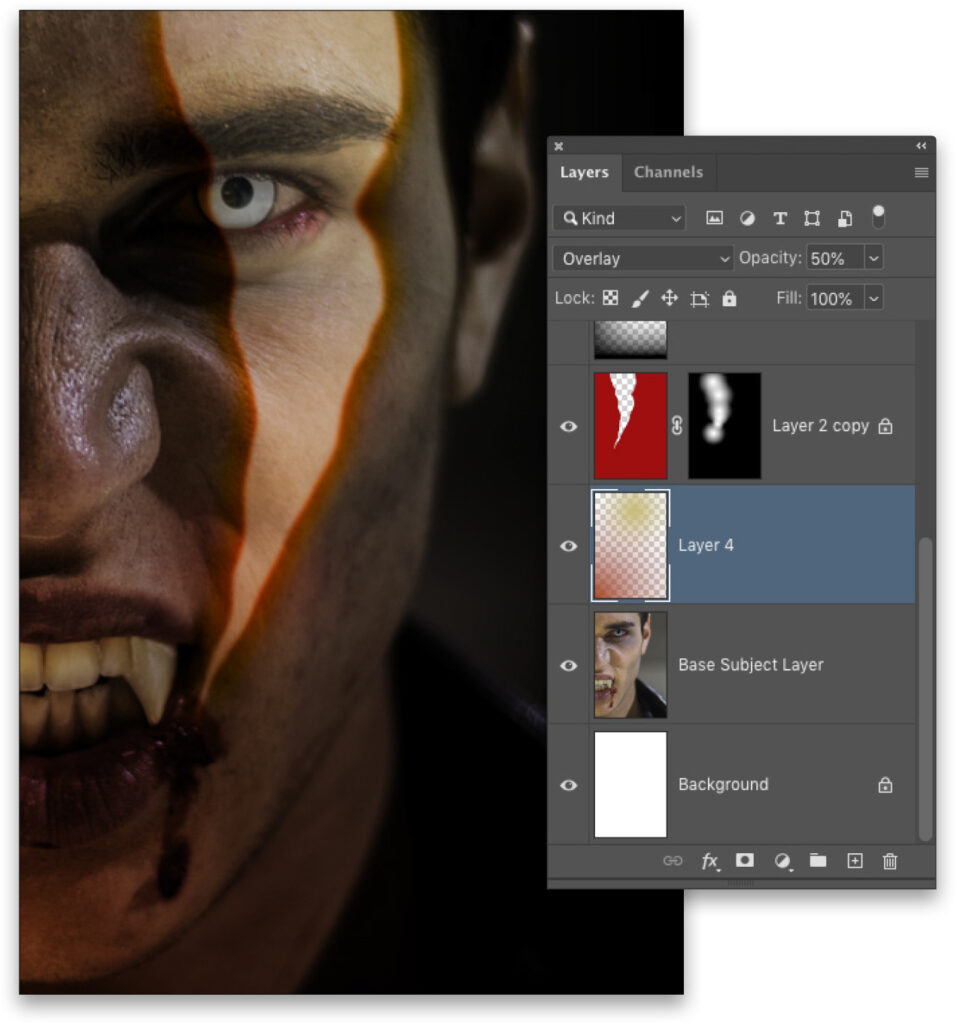
STEP 19: Create a new blank layer and again place it directly above the Base Subject Layer. With the Gradient tool active and still set to the Foreground to Transparent preset, click on the Foreground color swatch, select an orange-red color, and click OK. In the Options Bar, click on the Radial Gradient icon. Now draw a radial gradient in the shadow area starting from the bottom-left corner of the image up to his ear.
Set the Foreground color to a light yellow and draw a smaller radial gradient in the light area starting from the right edge of his pupil to the outer edge of his ear. Set the layer blend mode to Overlay and lower the Opacity to 50%. This will add some warmer areas to the shadows.
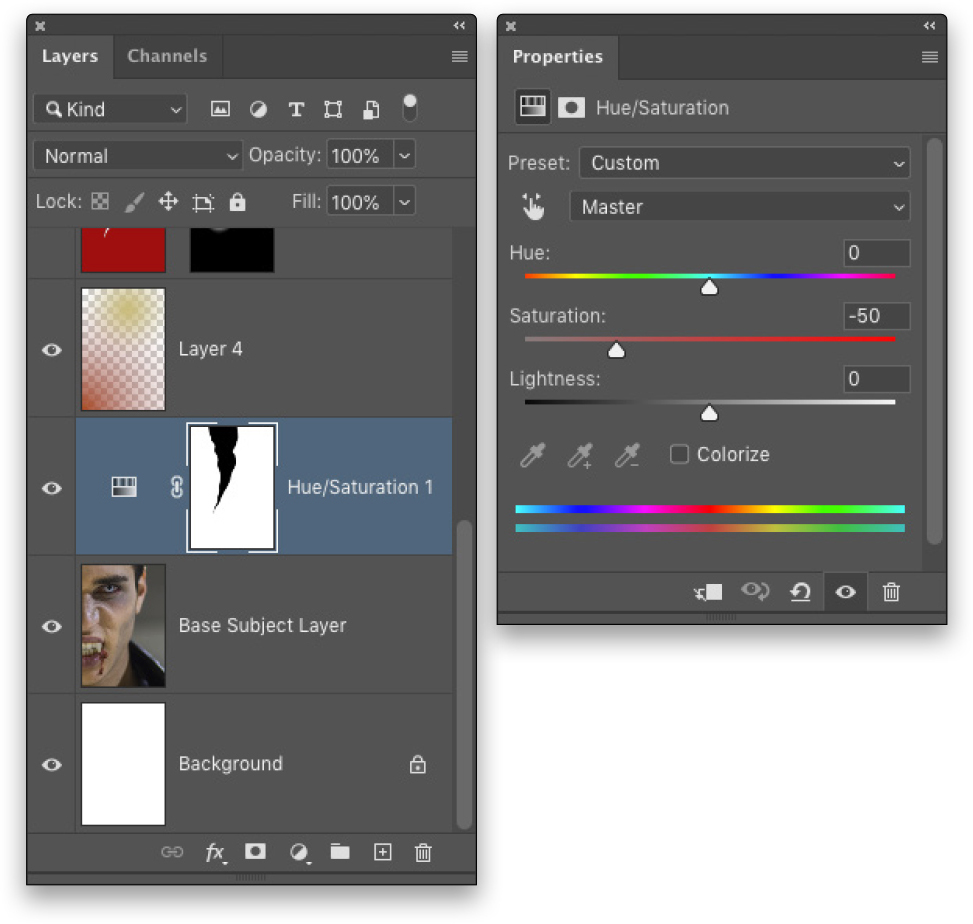
STEP 20: Hold down the Command (PC: Ctrl) key and click the layer thumbnail of the light fang shape layer (Layer 1) to load it as an active selection. Once the selection is made, click on the Create New Adjustment Layer icon (half-black, half-white circle) at the bottom of the Layers panel, and choose Hue/Saturation. Photoshop will use the selection to create the mask for the adjustment layer. Press Command-I (PC: Ctrl-I) to invert the colors on the mask. Again, place this layer directly above the Base Subject Layer. In the Properties panel, reduce the color Saturation to –50 to give more depth to the shadow areas outside the light shape.
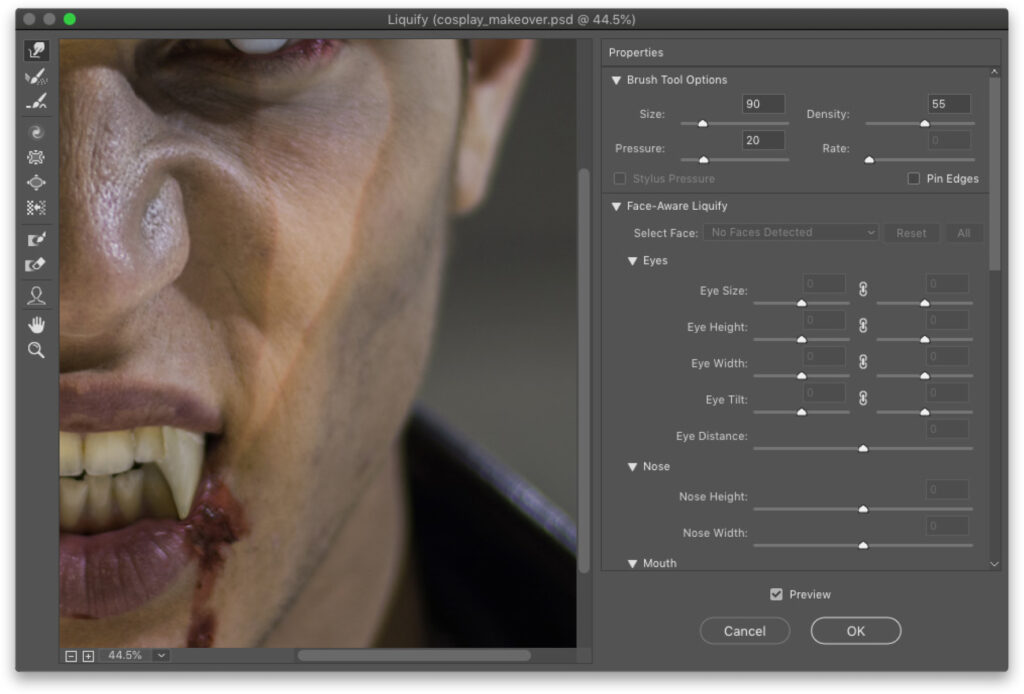
STEP 21: Just to make it more sinister, click on the Base Subject Layer in the Layers panel, go to Filter>Liquify, and use the Forward Warp tool to stretch his “real” fang to make it a little bit sharper. When you click OK, you won’t be able to see the change because the shadow layer (Layer 2) is covering it up. So click on the layer mask thumbnail on the shadow layer, grab the Brush tool, press X until the Foreground color is black, and then paint over the tooth to reveal the new sharper tooth.
STEP 22: Now let’s have some fun with textures. What we want is for the vampire skin to crack and fall apart in the sunlight. This cracked paint texture from Adobe Stock is perfect for blending into the skin for that effect. Always think about how to use textures in different ways. You can find the texture we’re using by clicking here.
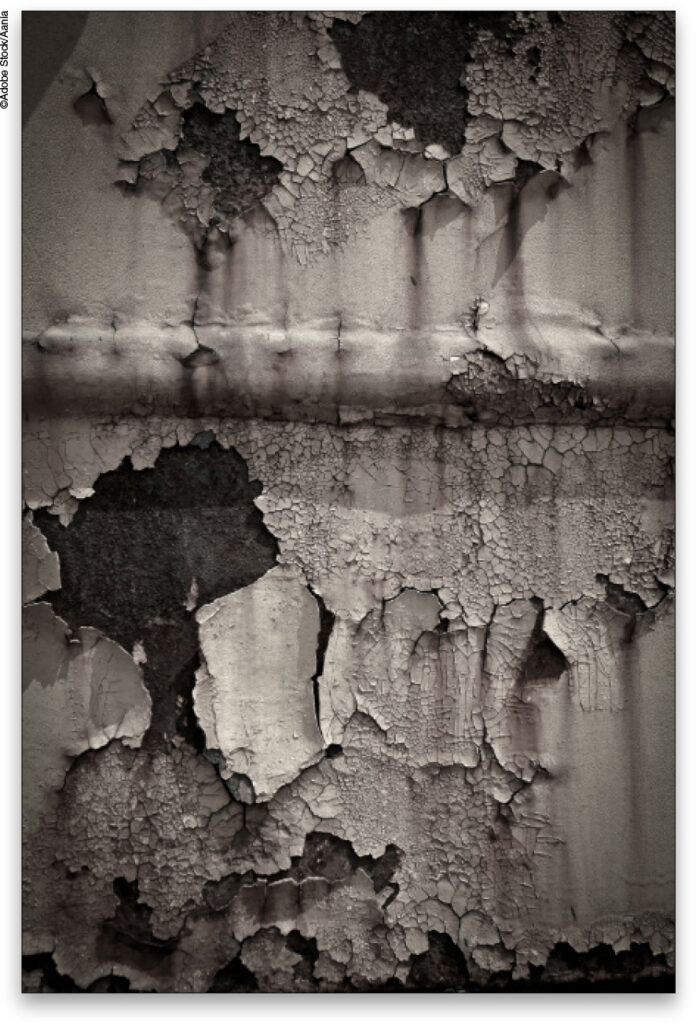
STEP 23: Bring the texture into the main image by copying or dragging it. If you downloaded the low-res version of the texture from Adobe Stock, drag it from your Libraries panel into the main image. Temporarily lower the texture’s layer Opacity so you can see the vampire’s face, and then position and scale the texture wherever it looks best in the light fang area of the subject’s face. When done, press Enter to commit the image, return the layer Opacity to 100%, and drag it to the top of the layer stack.
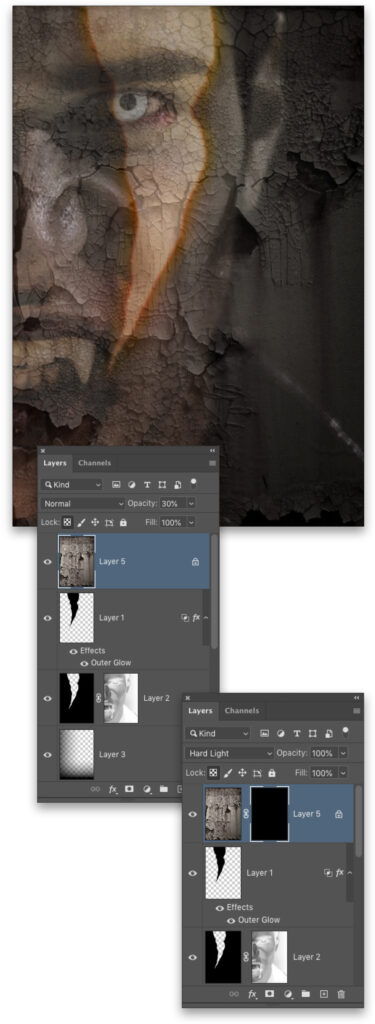
STEP 24: Set the layer blend mode to Hard Light (above), and then hold down the Option (PC: Alt) key and click the Add Layer Mask icon (circle in a square) at the bottom of the Layers panel. Holding the Option (PC: Alt) key will fill the mask with black so it hides the texture.
STEP 25: Switch to the Brush tool, and set the Foreground color to white. Using a Soft Round brush, paint in the area of the light to reveal the texture, giving the effect of the skin reacting to the light. Notice we went beyond the edge of the light just a little bit in some areas. If you paint in any texture where you don’t want it, press X to switch the Foreground color to black, and paint the texture away.

STEP 26: Double-click just below the texture layer’s name in the Layers panel to go to the Blending Options again in the Layer Style dialog. Go to the Blend If section at the bottom and use the sliders under This Layer to enhance the mixing of light and dark areas of the texture with the subject’s face. You can split the sliders by Option-clicking (PC: Alt-clicking) them so you can adjust the two halves separately for a smoother transition. Click OK when done.
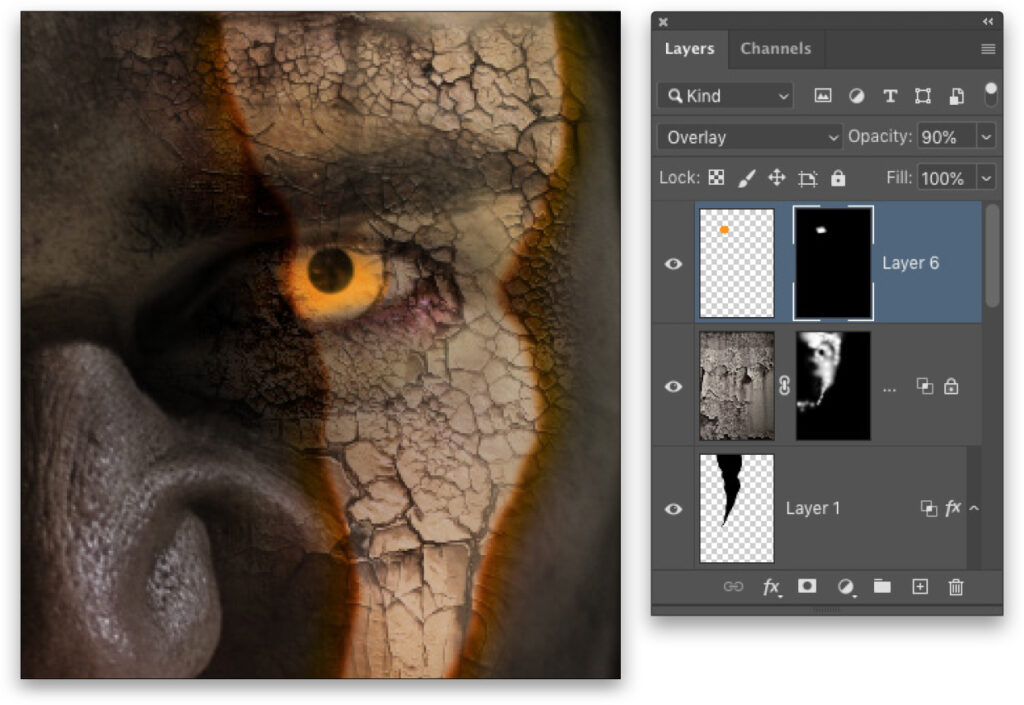
STEP 27: Create a new blank layer above the texture layer. Using the Elliptical Marquee tool (nested below the Rectangular Marquee tool [M] in the Toolbar), hold the Shift key and draw a circle around the iris of the subject’s eye (as you’re drawing the selection, you can press-and-hold the Spacebar to reposition it). Click on the Foreground color swatch, choose an orange color, and click OK. Press Option-Delete (PC: Alt-Backspace) to fill that selection with that color. Change the layer blend mode to Overlay, lower the Opacity to 90%, and press Command-D (PC: Ctrl-D) to deselect.

To add a fade to the edge of the orange circle, hold down the Option (PC: Alt) key again while clicking the Add Layer Mask icon. Then switch to the Gradient tool, and set the Foreground color to white. Now draw a Foreground to Transparent radial gradient outward from the center of the eye to fade the color.
STEP 28: Now let’s add some smoke effects. Here we have a set of different smoke elements from Adobe Stock. You can click here to download the low-res version of this image to your Libraries panel. Once it’s downloaded, Right-click on it in the Libraries panel, and select Edit to open it in Photoshop. Increase its image size as we did in Step One.
This image has a nice variation of smoke but we need to extract them first. Open the channels panel (Window>Channel). Since the image is black-and-white, hold down the Command (PC: Alt) key and click on the RGB thumbnail in the Channels panel. This loads the luminosity of the image (the smoke) as a selection.
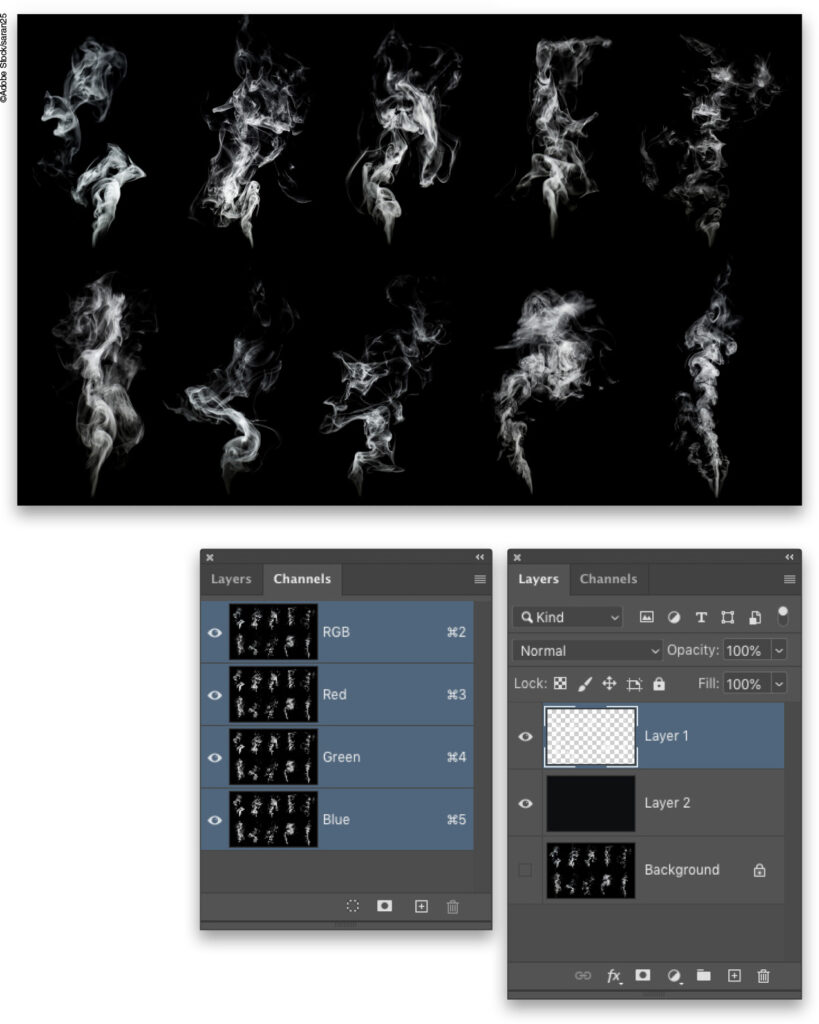
STEP 29: Once the selection is made, create a new blank layer and fill the selection with white. Press Command-D (PC: Ctrl-D) to deselect. Now the smoke has been cleanly extracted onto a transparent layer. You can add a color-filled layer below it so you can see them better if you wish.
STEP 30: Using the Lasso tool (L), draw a selection around one of the smoke elements, and then use the Move tool to drag that element to the main working image.
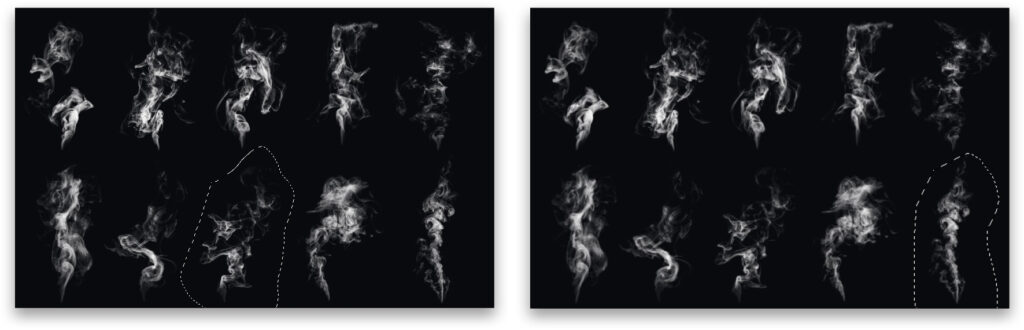
STEP 31: Press Command-T (PC: Ctrl-T) for Free Transform, and scale, rotate, and position the smoke over the light and damaged area near the subject’s eye. Bring in a second smoke element and place it in the lower area of the light area. We’re only using two smoke layers here, but you might need to use more smoke elements depending on your image.
STEP 32: With the top smoke layer active in the Layers panel, Shift-click the other smoke layer so they’re both selected. Press Command-G (PC: Ctrl-G) to place them in a layer group folder. Double-click the name of the folder and rename it “Smoke.”
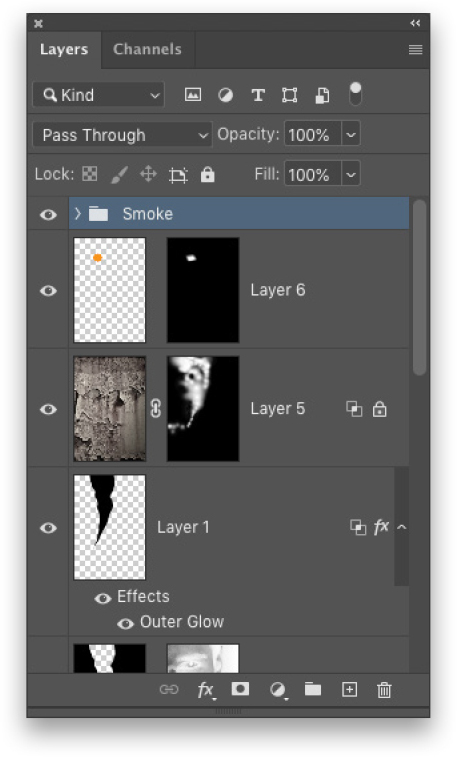
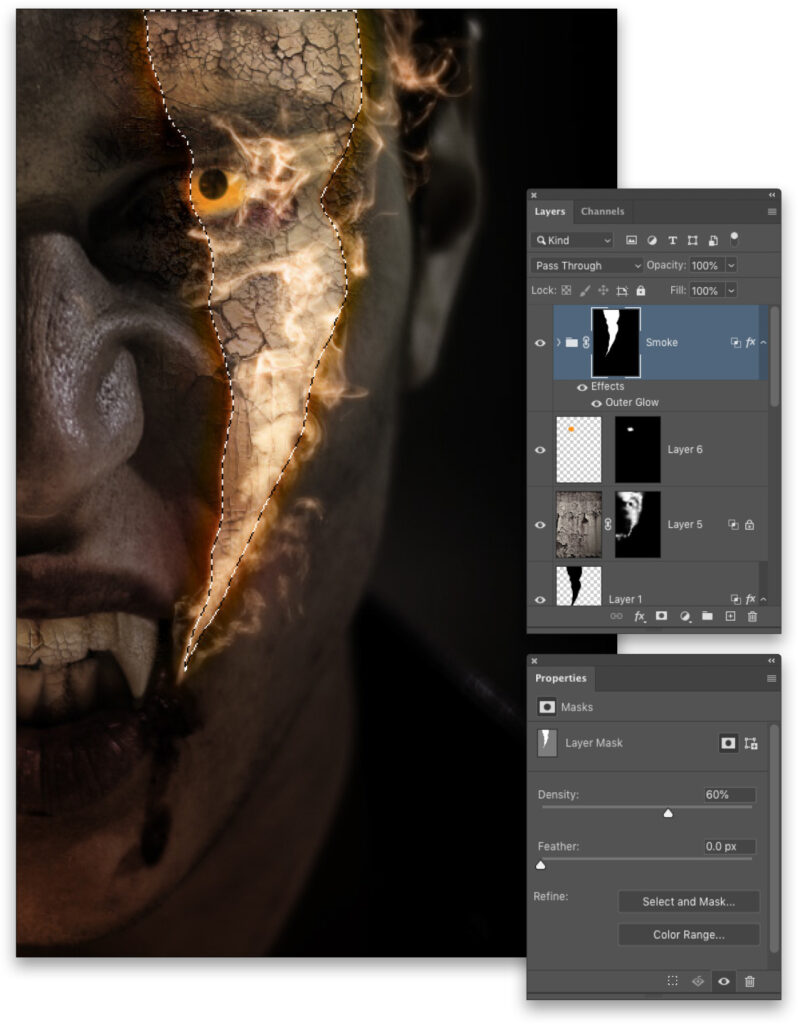
STEP 33: With the Smoke layer group active in the Layers panel, click the Add a Layer Style icon (fx) at the bottom of the Layers panel and choose Outer Glow. Again, you can start with the settings shown here but the color and other settings may vary for different images. Go to the Blending Options section of the Layer Style dialog and check on Layer Mask Hides Effects under the Advanced Blending section. Click OK.
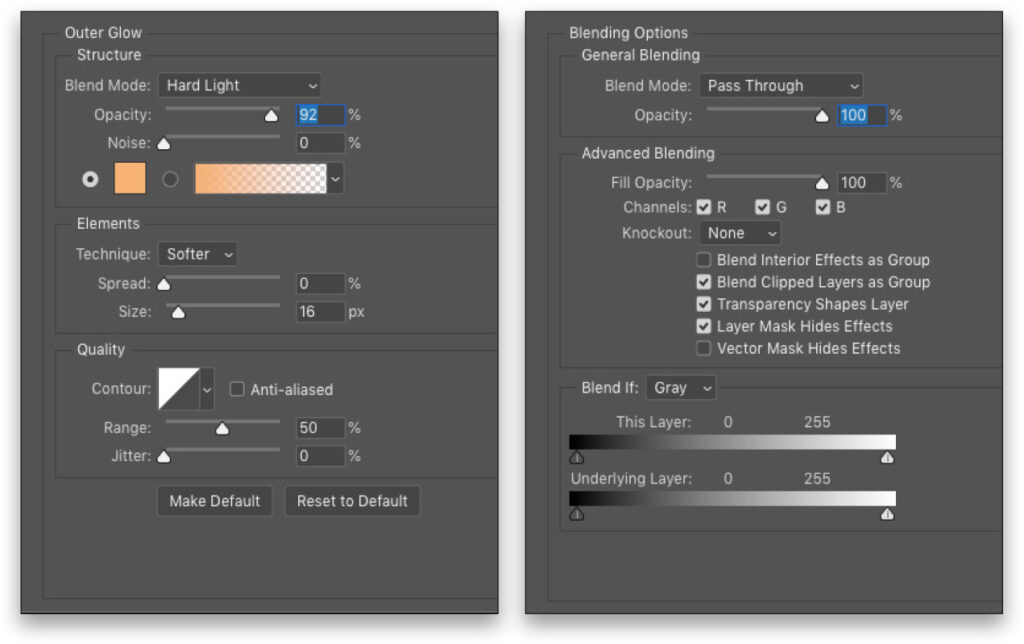
STEP 34: Command-click (PC: Ctrl-click) the layer thumbnail of the original light shape layer (Layer 1) to activate it as an active selection. With the layer group folder active, click the Add Layer Mask icon to apply the selection as a layer mask. Now this does hide the smoke outside the light area, but we’d normally still see smoke even in shadow.
Double-click the layer mask thumbnail on the layer group to open the Properties panel, and set the Density to 60%. This will lighten the darker area of the mask allowing the smoke to show through a little, creating a convincing illusion that the smoke is in shadow.
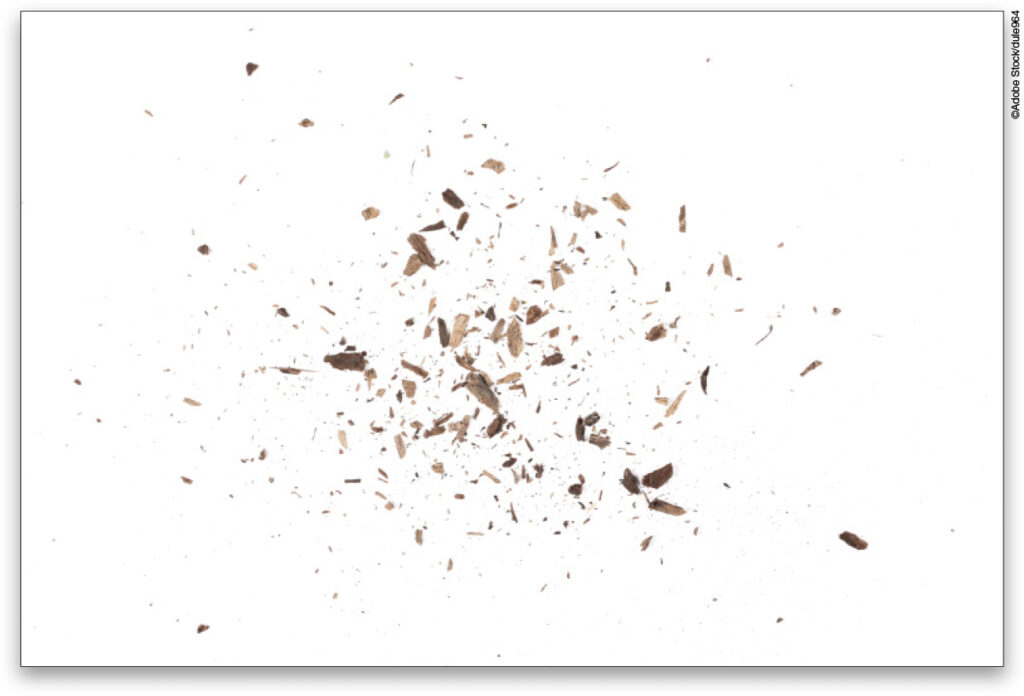
STEP 35: We have one final element to add. We want to have some particles falling off the subject and drifting away. I found this Adobe Stock image of some wood chips tossed on a white background, which will actually work great. You can find and download the low-res version of this image by clicking here. Open it in Photoshop and increase its image size as described with the previous Adobe Stock images.
We just need to do a quick extraction by opening the Channels panel, and Command-clicking (PC: Ctrl-clicking) the RGB channel to load the white background as a selection. Go under the Select menu and choose Inverse. Press Command-J (PC: Ctrl-J) to copy the chips to a new layer.
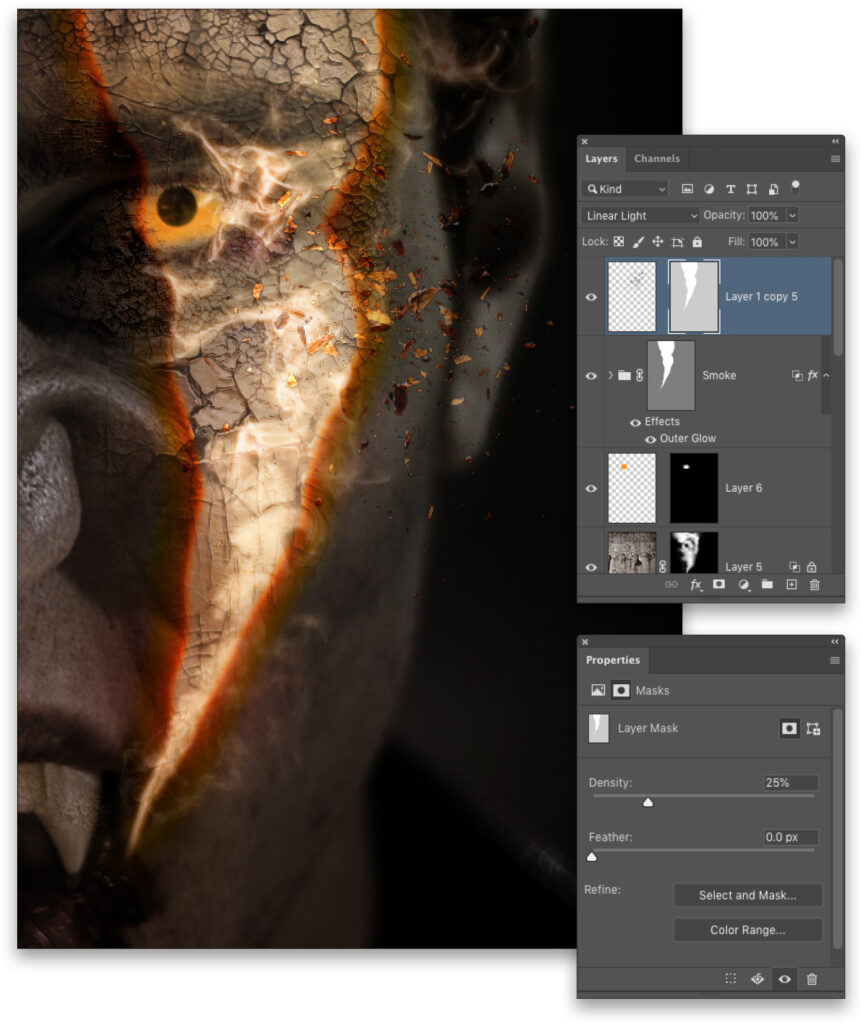
STEP 36: Using the Move tool, drag the extracted elements into the main image file. Use Free Transform to scale, rotate, and position them around the subject’s eye and the edge of the light shape. Place the layer above the layer group folder in the layer stack and change the layer blend mode to Linear Light.
Hold down the Option (PC: Alt) key, click on the group folder’s layer mask thumbnail, and drag it to the particle element layer to copy the mask to that layer. Then go back to the Properties panel and lower the Density for this mask down to 25%.
STEP 37: I did a really cool HDR Toning trick to enhance the texture and contrast then added some other finishing elements to get the final result shown here. You can click here to watch a short video on creating these finishing effects.
Once those finishing effects were in place, I added a simple blue-to-transparent radial gradient on the right side, and set the blend mode to Screen and the Opacity to 55% to add a hint of coolness. I then finished the image by adding some text.
This article originally published in the October, 2021 issue of Photoshop User magazine.
About Photoshop User and KelbyOne
Photoshop User magazine comes out digitally 12 times a year and is part of KelbyOne, the leading educational resource for Photoshop, Lightroom, and photography. Pro members have access to more than 900 video courses and 100 back issues of Photoshop User. To learn more about KelbyOne, click here.


