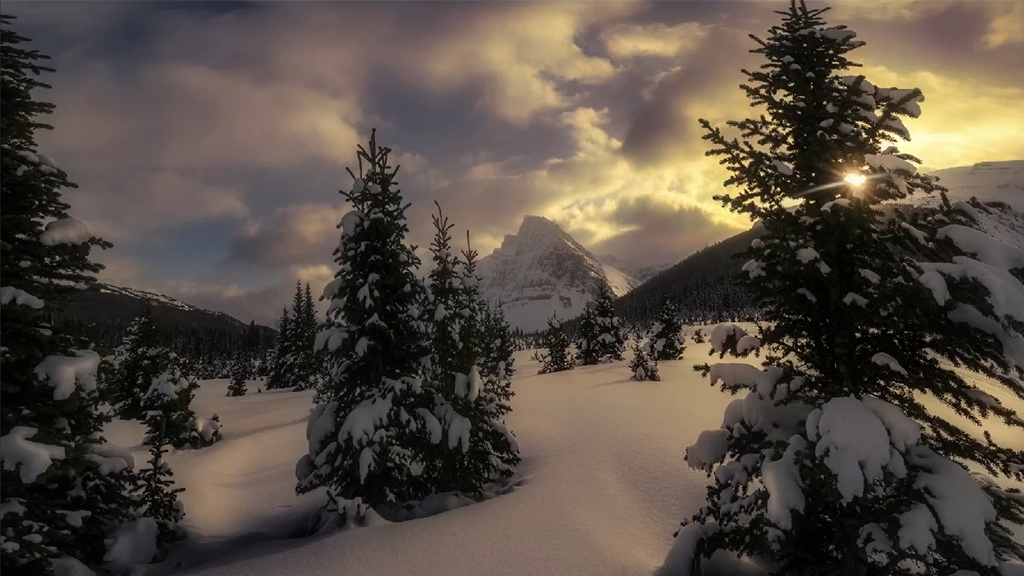
At last year’s Photoshop World, Ramtin Kazemi taught a class called “How to Post-Process Award Winning Landscapes in Photoshop.” In this excerpt from the class, Rammy shows how easy it is to create an Orton Effect. Click below to watch the clip on our YouTube channel, or follow along in the rest of this post.
Achieving the dreamy, soft-focus look of the Orton Effect is a fantastic way to enhance your photo’s visual appeal. This effect can add a magical glow to landscapes, portraits, and various other types of shots. In this tutorial, we’ll walk you through, step-by-step, how to create this effect using Photoshop’s Camera Raw filter.
Create a New Merged Layer
First, we need to create a new merged layer on which to apply the effect.
1. Press `Ctrl-Shift-Alt-E`. This shortcut command creates a new layer of everything you have so far in your project.
2. Name this new layer “Orton Effect”. Creating this layer allows us to work non-destructively.

Apply Gaussian Blur
To get that soft, out-of-focus glow, we’ll use Gaussian Blur.
1. Navigate to Filter > Blur > Gaussian Blur.

2. Adjust the pixel radius according to your file size. The goal is to make details indistinct but still retain some contrast so the effect does not completely wash out the image.

3. For this image’s size and resolution, around 127 pixels works well, but this will vary.
4. Click OK after setting the blur.
Adjust Opacity
Tweaking the opacity helps blend the effect smoothly.
1. Bring the opacity of the blurred layer down to around 10%. You can adjust this as per your preference, commonly between 8% to 10%.
2. Initially, keep the opacity at 100% for better visualization as you proceed to the next step.
Camera Raw Color Grading
Next, we take the blurred layer into the Camera Raw Filter for further processing. We’ll enhance the warm tones and vibrancy of our photo through Color Grading. The aim here is to add luminance and color to the highlights of the blurred layer.
1. Go to `Filter > Camera Raw Filter`. This opens up the Camera Raw interface.

2. In the Camera Raw interface, navigate to the Color Grading section.
3. Add a nice tone to the highlights. This will give depth and color to the areas that are too washed out.

4. Increase the balance to make the effect subtle but noticeable.

Adjust Basic Settings
Now let’s fine-tune the overall brightness and color balance.
1. Go to the Basic section in Camera Raw.
2. Increase the whites significantly to boost the luminosity.

3. Revisit the Color Grading section, if necessary, to tweak the color and balance it to your liking.

Fine-Tuning Opacity
With the Camera Raw adjustments done, now it’s time to set the final opacity.
1. First, set the opacity of the Orton Effect layer to zero.
2. Gradually increase the opacity to see how it integrates with your photo. This allows you to find the ideal setting that adds the soft-focus glow without overwhelming the image. Somewhere around 16% works beautifully with this image.

3. Compare the before and after views to see the difference. You should notice a soft tone with enhanced color and brightness.


Final Thoughts
The Orton Effect, when done right, adds a soft, ethereal glow to photos. Utilizing the Camera Raw Filter in Photoshop allows you to further fine-tune this effect, adding depth and vibrancy that can significantly enhance your photography. Don’t hesitate to experiment with different settings to see what works best for your specific images. Remember, the key is subtlety. Too much blur or too high an opacity, and the effect can overpower the details. But done correctly, it adds a professional, dreamy quality that can take your photos to the next level.
Join us at Photoshop World 2024 and immerse yourself in an event packed with innovative sessions and inspiring content. Experience top-quality sessions that will push your limits, provide fresh insights, and elevate your photography and design skills.