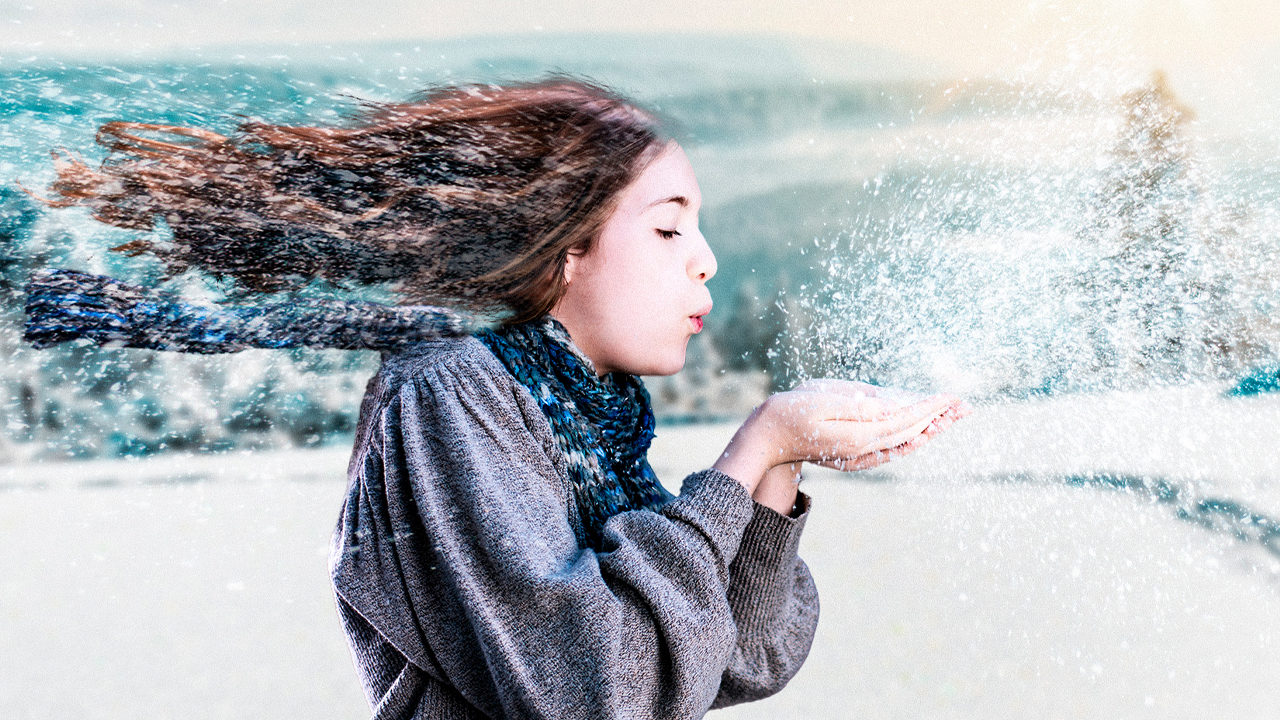
One of the greatest forms of inspiration an artist can find is watching the work of other artists, especially artists of different media and industries. The special-effects industry is particularly fascinating and offers a plethora of ingenious ideas for fun effects. For example, most of the snow seen in major movies isn’t really snow. One substitute that’s commonly used is instant potato flakes! Hence the idea to create a windblown snow scene, borrowing from the idea of things looking like something they’re not.
In this project, we had a model simply blow a handful of potato flakes into the air for one shot. Then we also had her lie down on an elevated bench with her hair hanging down for another shot, so we could composite the shots together to give the appearance of a winterly windblown portrait—all done during a warm fall afternoon with no snow in sight.
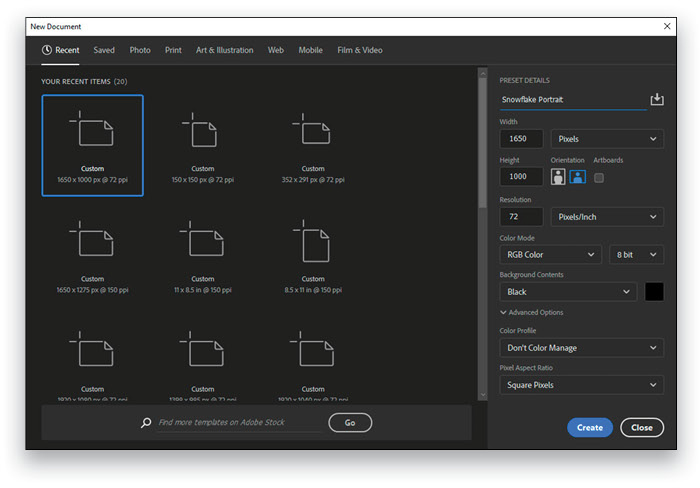
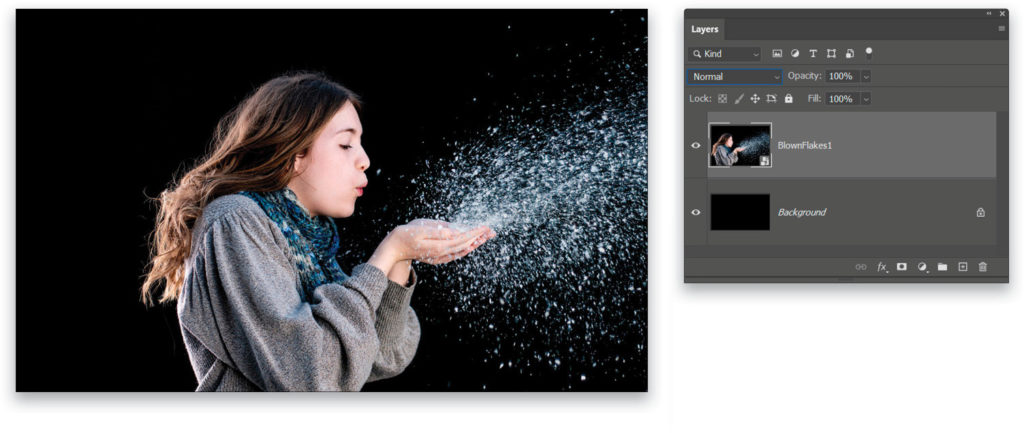
Step One: In Photoshop, go to File>New and set the new document Width to 1650 px, the Height to 1000 px, and the Background Contents to Black. After clicking Create, go to File>Place Embedded, navigate to the image BlowFlakes1.jpg, and click place. (KelbyOne members can download the images of the model by clicking here.) Resize and position the image so the girl’s face is in the center of the composition, which will leave a blank area to the left. Press Enter to commit the image.
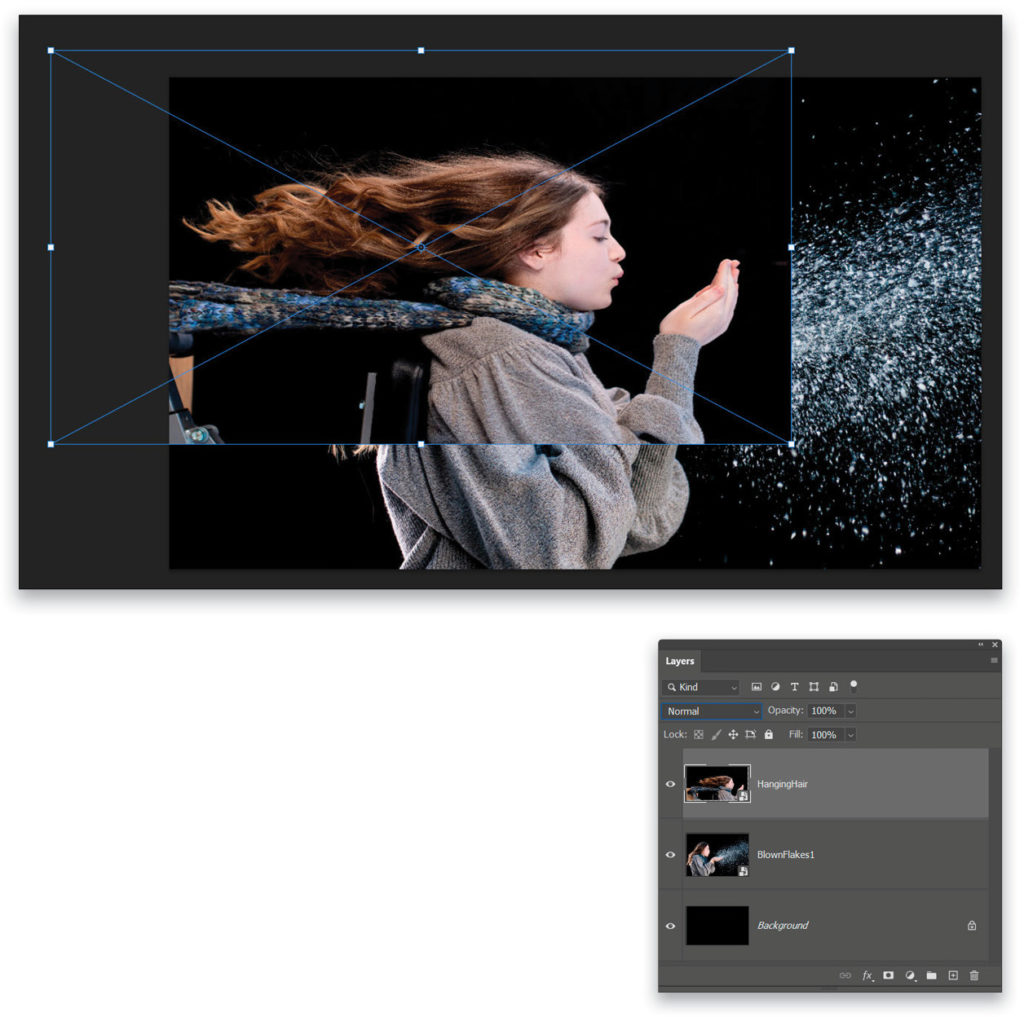
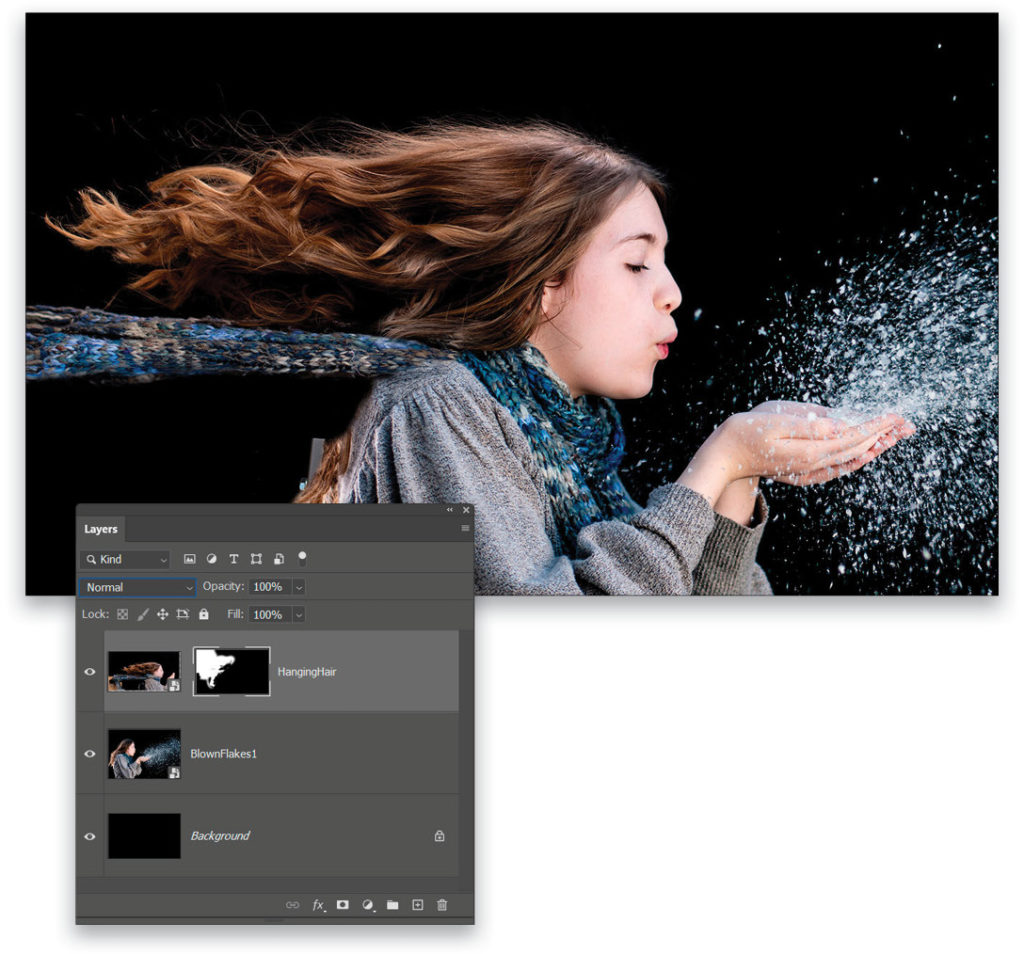
Step Two: Use File>Place Embedded again to place the file HangingHair.jpg. Click-and-drag outside the bounding box to rotate the layer sideways so the model’s hair appears to be streaming out behind her. Before committing the transformation, reduce the layer Opacity to about 50% and scale the layer up so the proportions match with the first layer.
Shift-drag the left-center control point out to the right to stretch the layer sideways a bit to elongate the blown hair even more. If you can’t see the entire bounding box, press Command-0 (PC: Ctrl-0), and Photoshop will zoom out to reveal the entire box. After elongating the hair, click-and-drag the bounding box back to the right to align it with the layer below. Press Enter to commit the transformation, and restore the Opacity to a full 100%.
Step Three: Hold down the Option (PC: Alt) key and click the Add Layer Mask icon (circle in a square) at the bottom of the Layers panel. This adds a mask filled with black, which completely hides the layer. Press D to set the Foreground color to white. Grab the Brush tool (B), click on the brush preview thumbnail in the Options Bar to open the Brush Preset Picker, and select the Soft Round brush. Paint on the layer mask to add the blown hair and scarf back into the composition. If you paint in too much, press X to switch the Foreground color to black, and paint to hide those areas again. Tip: Use the Bracket keys ([ ]) on your keyboard to quickly change the size of your brush.
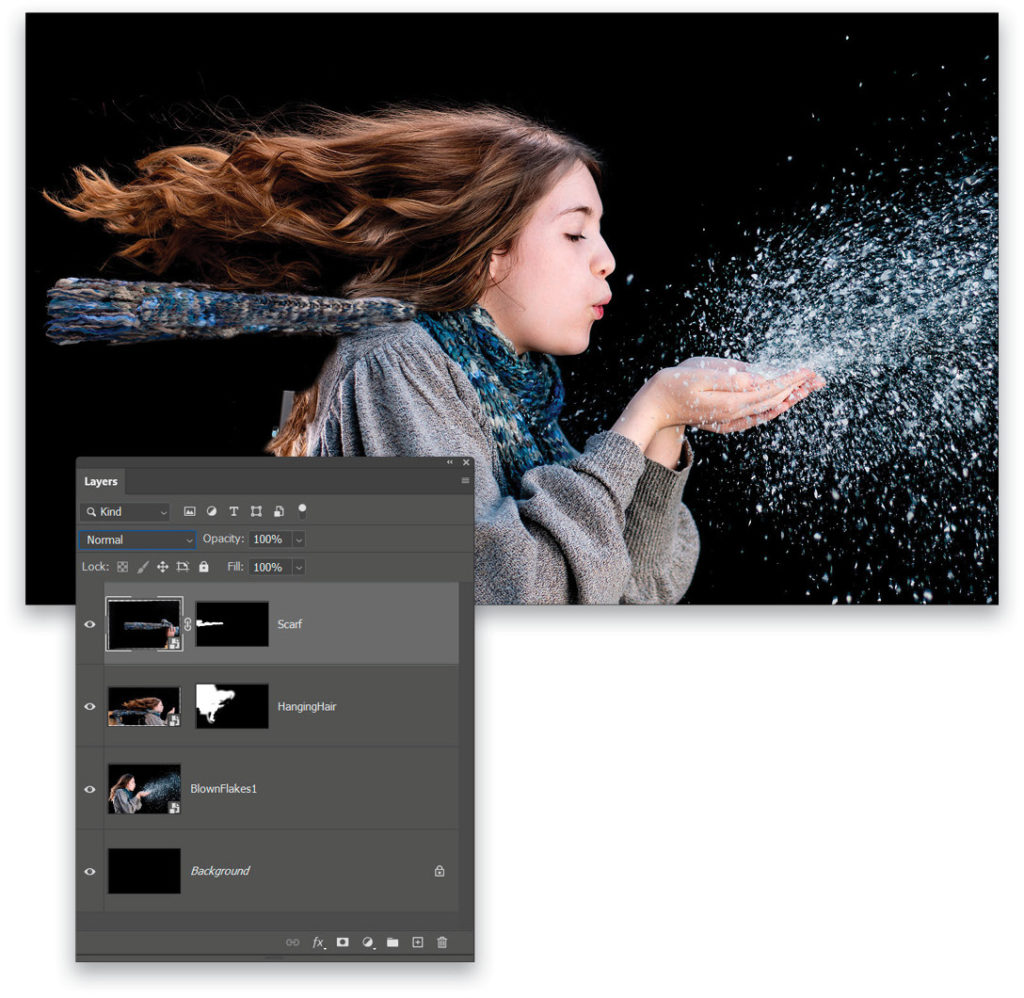
Step Four: Next, place the Scarf.jpg image and repeat the positioning and masking process to blend this scarf in with the underlying one. Pay close attention to where the scarf sits along her shoulder.
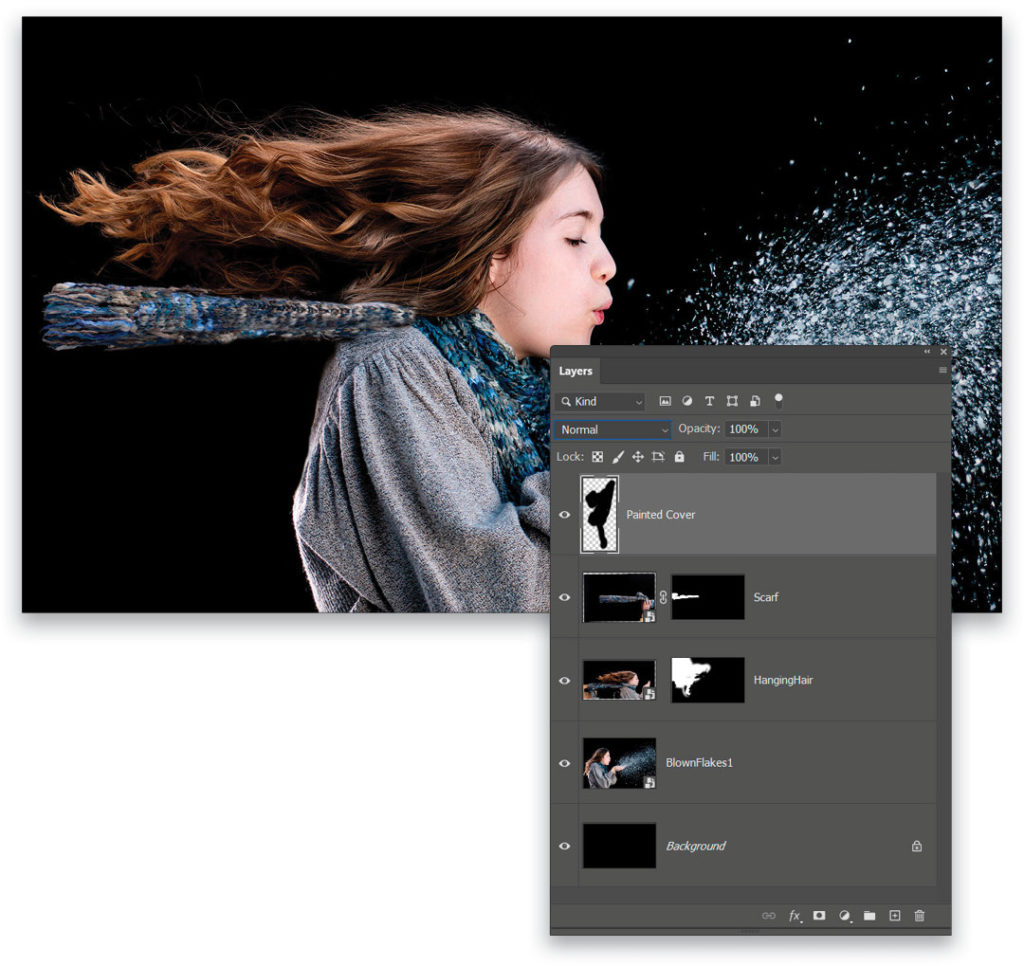
Step Five: Add a new layer above the scarf layer, double-click its name in the Layers panel, and rename it “Painted Cover.” Press D to set the Foreground color to black and in the Brush Preset Picker increase the Hardness of the Brush tool to about 80%. Paint over the area on the back of her sweater where the original hair or the bench she was lying on may still be visible.
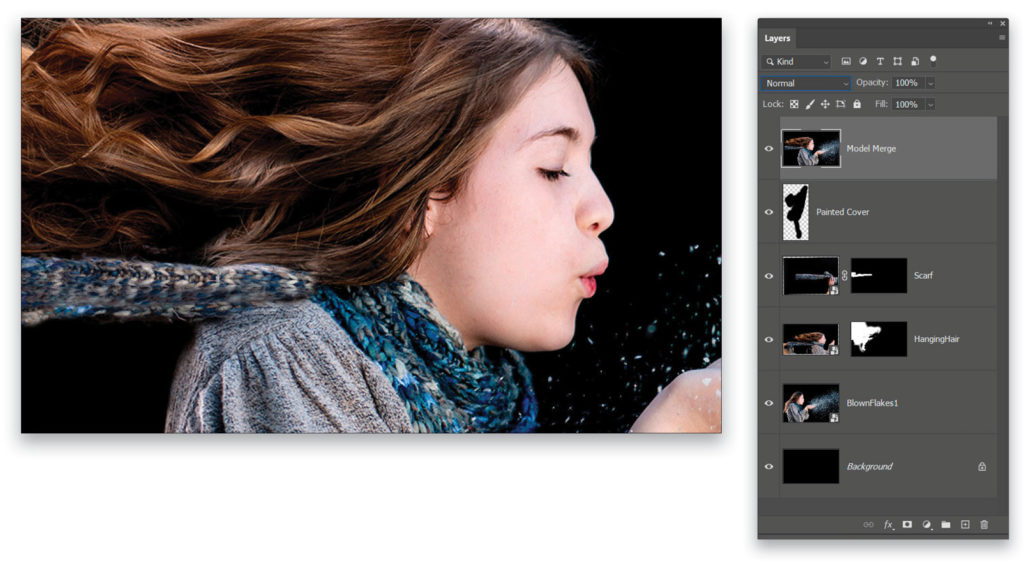
Step Six: Hold down the Option (PC: Alt) key and go to Layer>Merge Visible to create a merged layer at the top of the layer stack. Rename this layer “Model Merge.” Conceptually, if there was enough wind to blow her hair back like we have in the image, there wouldn’t be any hair sitting gently upon her face. So grab the Spot Healing Brush tool (J) and use it to remove the stray hairs just in front of her ear.
Step Seven: Open the Brushes panel (Window>Brushes) and look in the Special Effects Brushes folder for the brush named Kyle’s Concept Brushes – Scratch Blend (you can also type “Scratch Blend” in the search field near the top of the panel). Notice this brush uses the Smudge tool.
Open the Brush Settings panel (Window>Brush Settings) and set the Brush Size to 50 px and the Angle to 90°. Uncheck the Scattering and Transfer options on the left.
In the Shape Dynamics area, set the Angle Jitter to 0%. Then in the Options Bar at the top of the screen, set the Strength to 50%. Now use this smudge brush to comb back her hair and give it a windswept look.
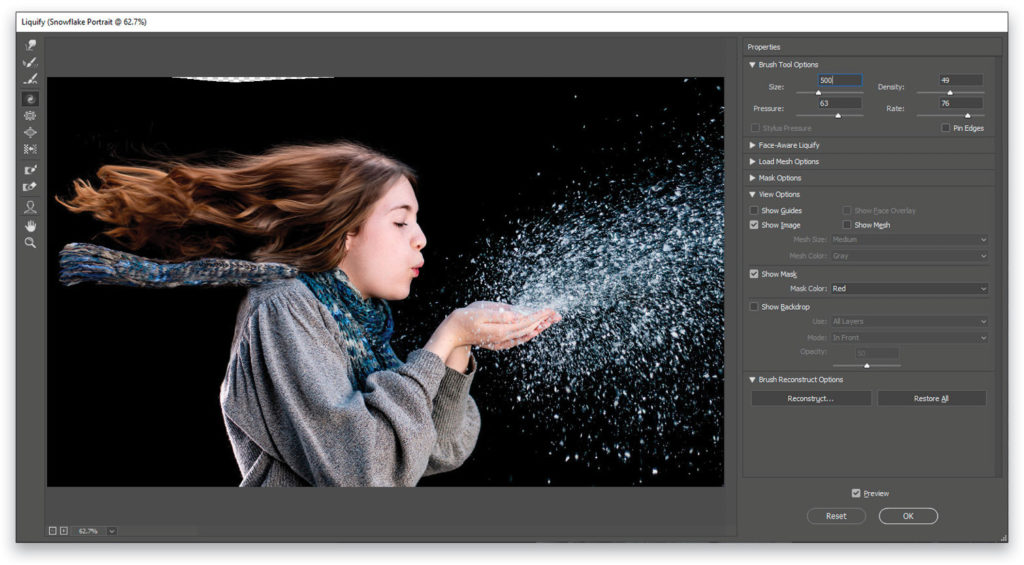
Step Eight: Go to Layer>Smart Objects>Convert to Smart Object and then run Filter>Liquify. Turning the layer into a smart object first means the filter settings remain live and can be revisited if needed. Use the Twirl Clockwise tool (C) to gently add some turbulence to her extended hair and scarf. Just click-and-hold to warp the image in a clockwise direction; hold the Option (PC: Alt) key to warp in the opposite direction. When happy with how the effect looks, click the OK button to return to the regular Photoshop interface.
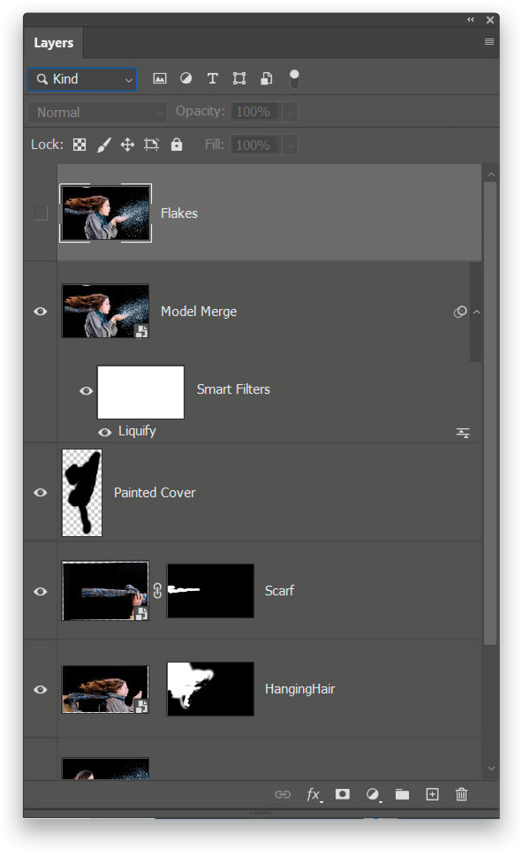
Step Nine: Press Command-A (PC: Ctrl-A) to select the entire canvas area. Then, press Command-J (PC: Ctrl-J) to copy the selected area to a new layer. Rename this new layer “Flakes,” and hide it by clicking on the Eye icon next to its layer thumbnail in the Layers panel.
Step 10: Click on the Model Merge layer again to make it the active layer. Go to Select>Subject and let Photoshop work some AI magic in attempting to select just the girl. Then go to Select>Select and Mask to launch that workspace. Set the View Mode to On White (T) with the Opacity at 100%. Use the Quick Selection tool with the Add and Subtract modes to make sure the girl is fully selected, and no other areas are visible. Then click on the Refine Hair button to let Photoshop create a better selection around her hair.
Finally, if there’s a black outline around her sweater, pull back on the Shift Edge slider in the Global Refinements section by 1–2% (so it’s a negative amount) until it disappears. After all that, be sure the Output To drop-down menu in the Output Settings is set to Layer Mask and click OK.
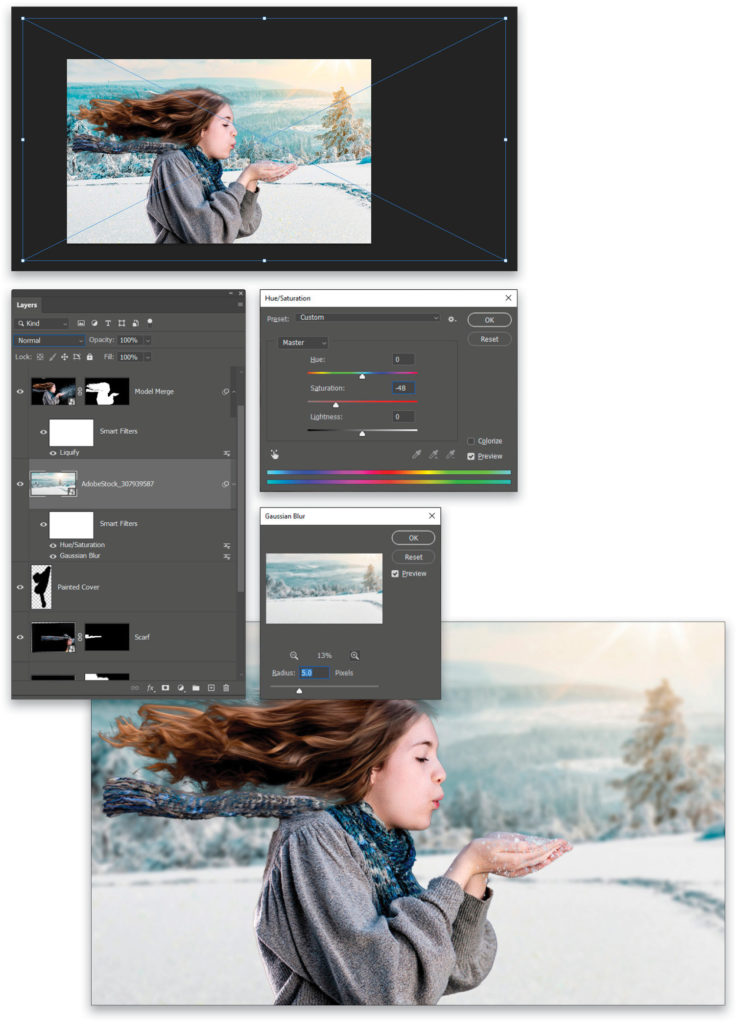
Step 11: Now let’s place a background image. If you’d like to download the low-res watermarked version of this image to follow along, click this link, log in with your Adobe ID, and click the Save to Library button. Drag the image from your Libraries panel (Window>Libraries) into the working file, and then drag it beneath the masked Model Merge layer. Press Command-T (PC: Ctrl-T) for Free Transform, and then Right-click inside the bounding box and select Flip Horizontal. Scale the image up as shown here, and press Enter.
Then go to Image>Adjustments>Hue/Saturation and reduce the Saturation to –48. Then go to Filter>Blur>Gaussian Blur and use a Radius of 5.0 Pixels. Click OK.
Step 12: At this point, zoom in and carefully inspect the edges of the masked layer to check for any bleed through or inconsistencies. Either correct problem areas by hand-painting on the mask with the Brush tool (black conceals and white reveals), or return to the Select and Mask workspace to make larger adjustments.
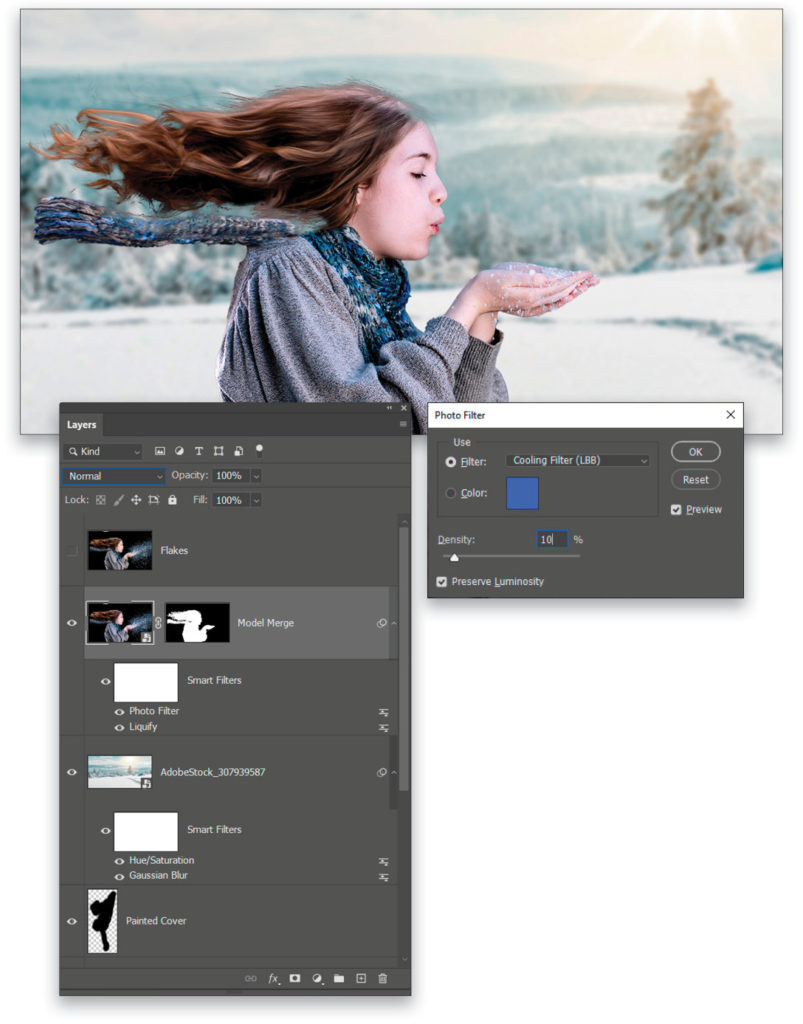
Step 13: The model is a bit warm in color for such a cold scene. Make sure the Model Merge layer thumbnail is the active focus (not the layer mask) and go to Image>Adjustments>Photo Filter. Choose the Cooling Filter (LBB), reduce the Density to 10%, and click OK.
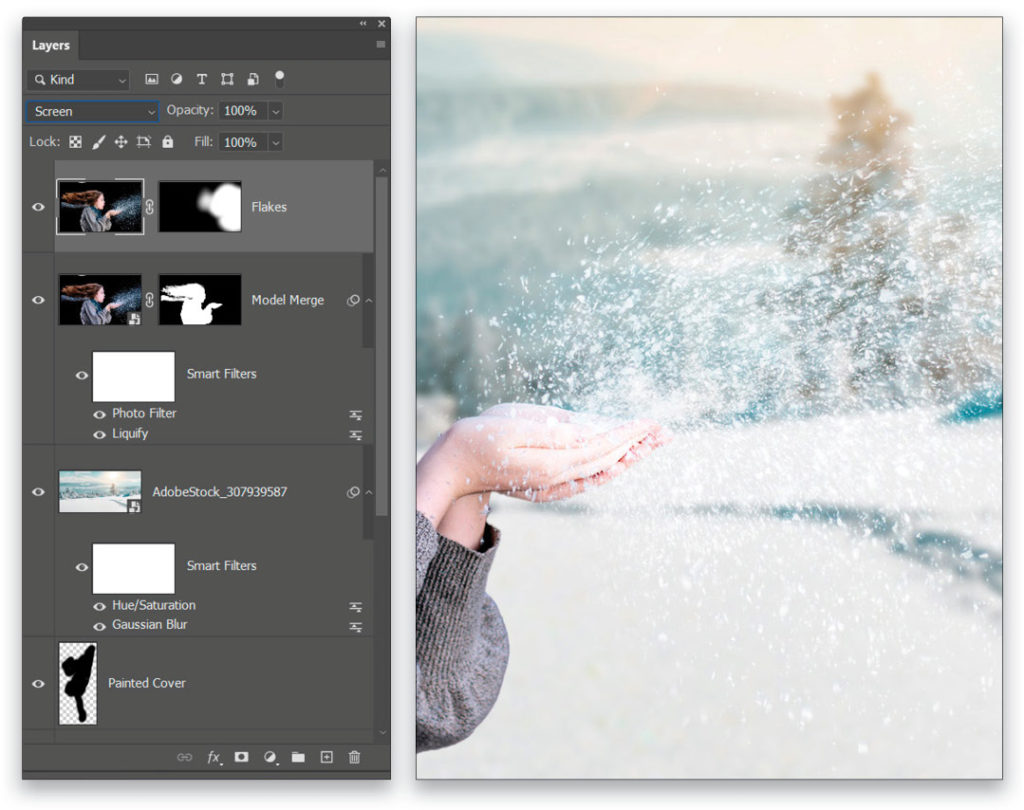
Step 14: Remember that hidden Flakes layer? Now is the time to reveal it! Set its layer blending mode to Screen to knock out all the black pixels. Then, add a black-filled layer mask to this layer (remember this is done by holding down the Option [PC: Alt] key when adding the mask). Use the Soft Round brush again with white paint on the mask to reveal the cloud of blowing snowflakes.
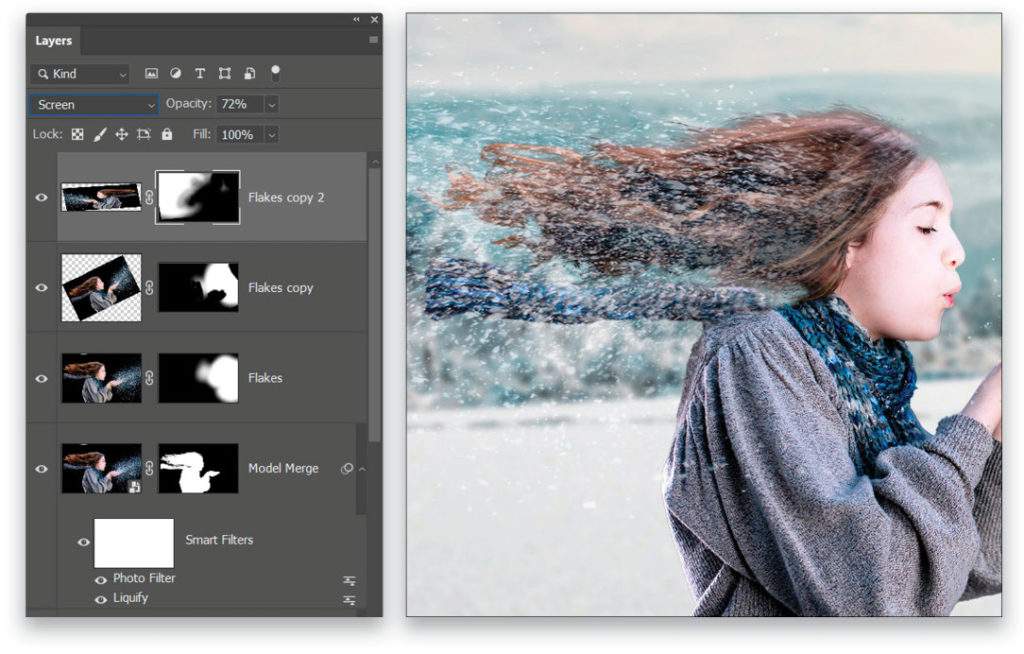
Step 15: Duplicate the Flakes layer twice. Hide the top copy and use Free Transform to rotate and position the first copy so it’s angled slightly higher than the original position. This will simply help fill out the cloud of flakes blowing from her hand. If needed, touch up the mask on this layer so there’s no ghosted image of her face and hands.

Step 16: Make the second duplicate of the blowing flakes visible and active. Use Free Transform to flip it horizontally, and then position and scale it so it’s blowing back along with her hair. You can rotate it and stretch it as needed. This helps accentuate the idea that there are flakes all over the place in this wintry scene. Again, check the masking to make sure there’s no accidental ghosting of her face and hands. If the effect is too strong, reduce the layer Opacity to around 70%.
Step 17: Create another merged copy at the top of the layer stack and name it “Camera Raw.” Turn it into a smart object and run Filter>Camera Raw Filter. In the Basic panel, increase the Clarity to +30 and the Vibrance to +21. In the Effects panel, set the Grain to 19 and the Vignette to +11. Then click OK to apply the filter.
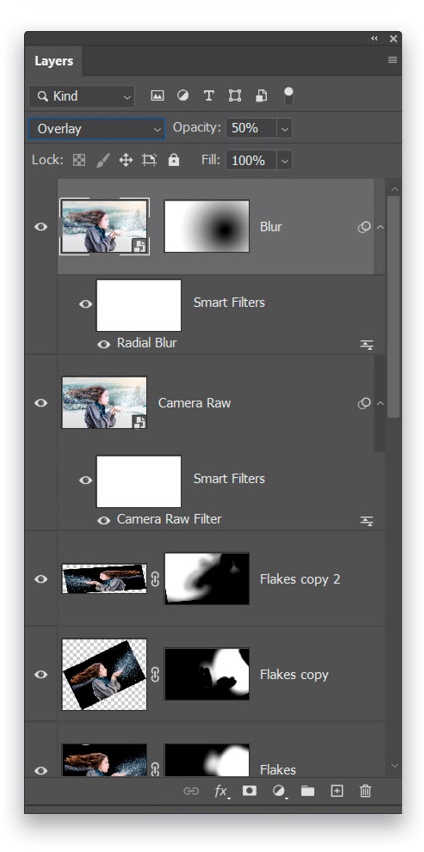
Step 18: Create another copy by using the Command-A (PC: Ctrl-A) and Command-J (PC: Ctrl-J) technique (making a selection first creates a copy of the layer without duplicating any smart filters that are attached to it). Call this new layer “Blur” and convert it to a smart object, as well. Go to Filter>Blur>Radial Blur, set the Amount to 5, and the Method to Zoom. Move the Blur Center to align with her hands, and click OK. If the center seems off, reopen the smart filter and adjust as needed. Then set the layer’s blending mode to Overlay and the Opacity to 50%.
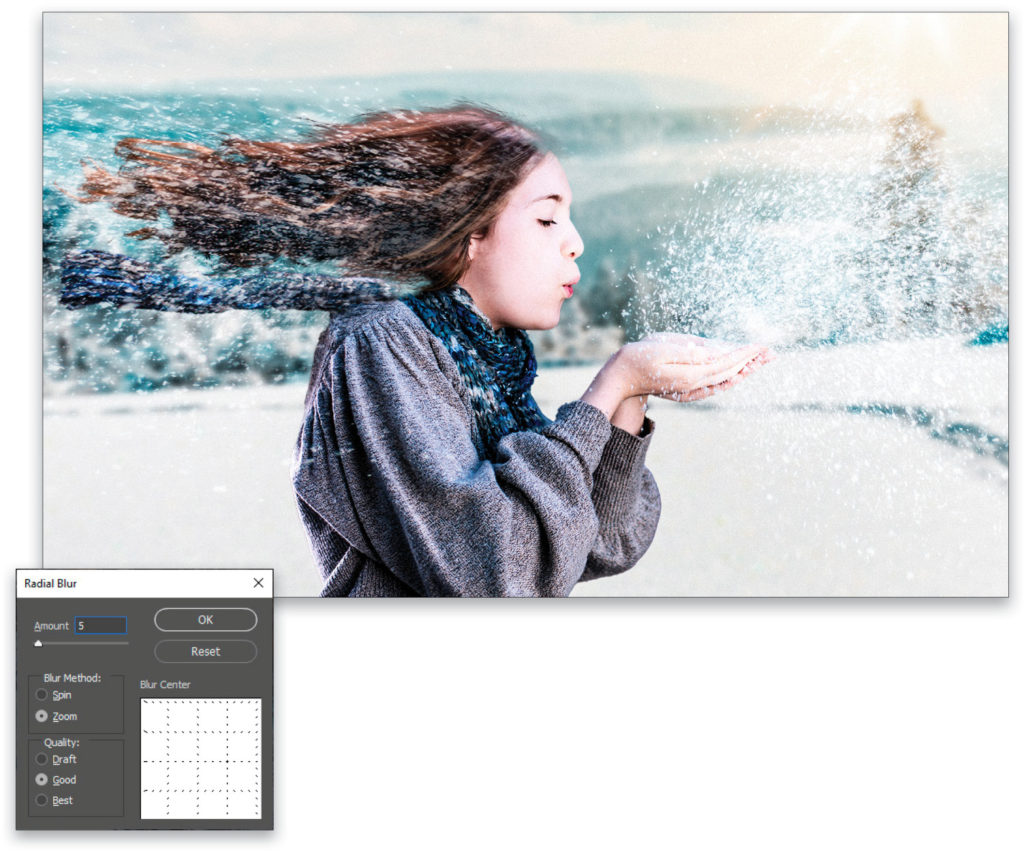
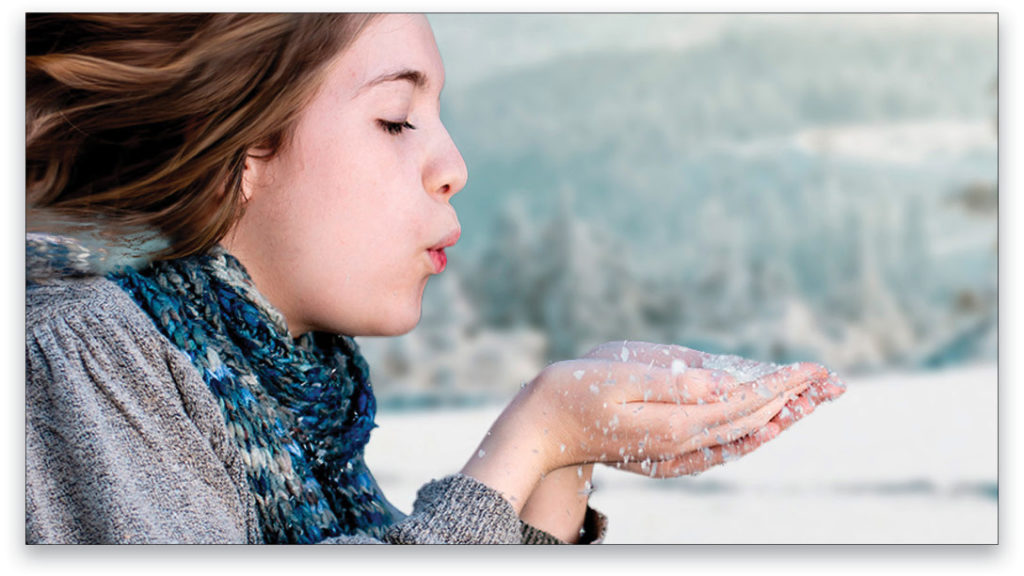
Add a layer mask and grab the Gradient tool (G) from the Toolbar. Click on the gradient preview in the Options Bar to open the Gradient Editor, and select the Black, White preset. Click OK to close the Gradient Editor, and select the Radial Gradient icon in the Options Bar. Start the gradient at her hands and drag it out to the bottom-right corner of the canvas to make the effect invisible at her hands and gradually appear stronger toward the edges. Then enjoy your fun wintry scene!
The idea of borrowing techniques from practical movie effects opens up a lot of new potential for interesting digital artwork. The best lesson to learn from projects like this is to think creatively on different ways to achieve the effect you’re working toward. Be inventive and try new approaches. Even if the attempt doesn’t work well at first, you’ll still have learned from the process. That’s the best reward, to learn and grow as an artist.
This article originally published in the December, 2020 issue of Photoshop User magazine.


