Are Lightroom users getting the most out of their RAW files and can they be sure the RAW-processing software they use is as good as Lightroom’s leading competitor? It’s a worrying thought, yet this is the claim being made by some reviewers in head-to-head comparisons between Adobe Lightroom and Capture One Pro. If you were to count up all the hours you’ve spent processing your files in Lightroom, you’d want to be reassured your creative efforts haven’t been wasted. So earlier this year I spent some time comparing the RAW-processing controls in both programs in detail. From this, I concluded Capture One is indeed a solid RAW processor that has a number of unique features that are missing in Lightroom; however, these don’t include better sharpness and color/tone rendering. This article takes a close look at the image processing in Capture One and Lightroom and shows how the two programs are actually more similar than you might think. Although the comparisons shown here were done in Lightroom, you’ll see the same kinds of results if you work in Adobe Camera Raw.
How Sharpness Is Defined
The reason why Capture One is perceived to be sharper than Lightroom is mainly due to the default settings used. By default, Lightroom applies a 25 Amount sharpening to all RAW images (on a scale of 0–150). The actual amount of underlying sharpening that’s applied varies from camera to camera, but Adobe’s aim is to apply a base-level amount of sharpening that makes all RAW files appear equally sharp at a 25 setting. It’s actually a rather conservative amount, and all images will benefit from having at least this much sharpening without the risk of seeing ugly artifacts. The intention is to let photographers decide how much further they wish to adjust the Amount, Radius, Detail, and Masking sliders to fine-tune the sharpening effect.
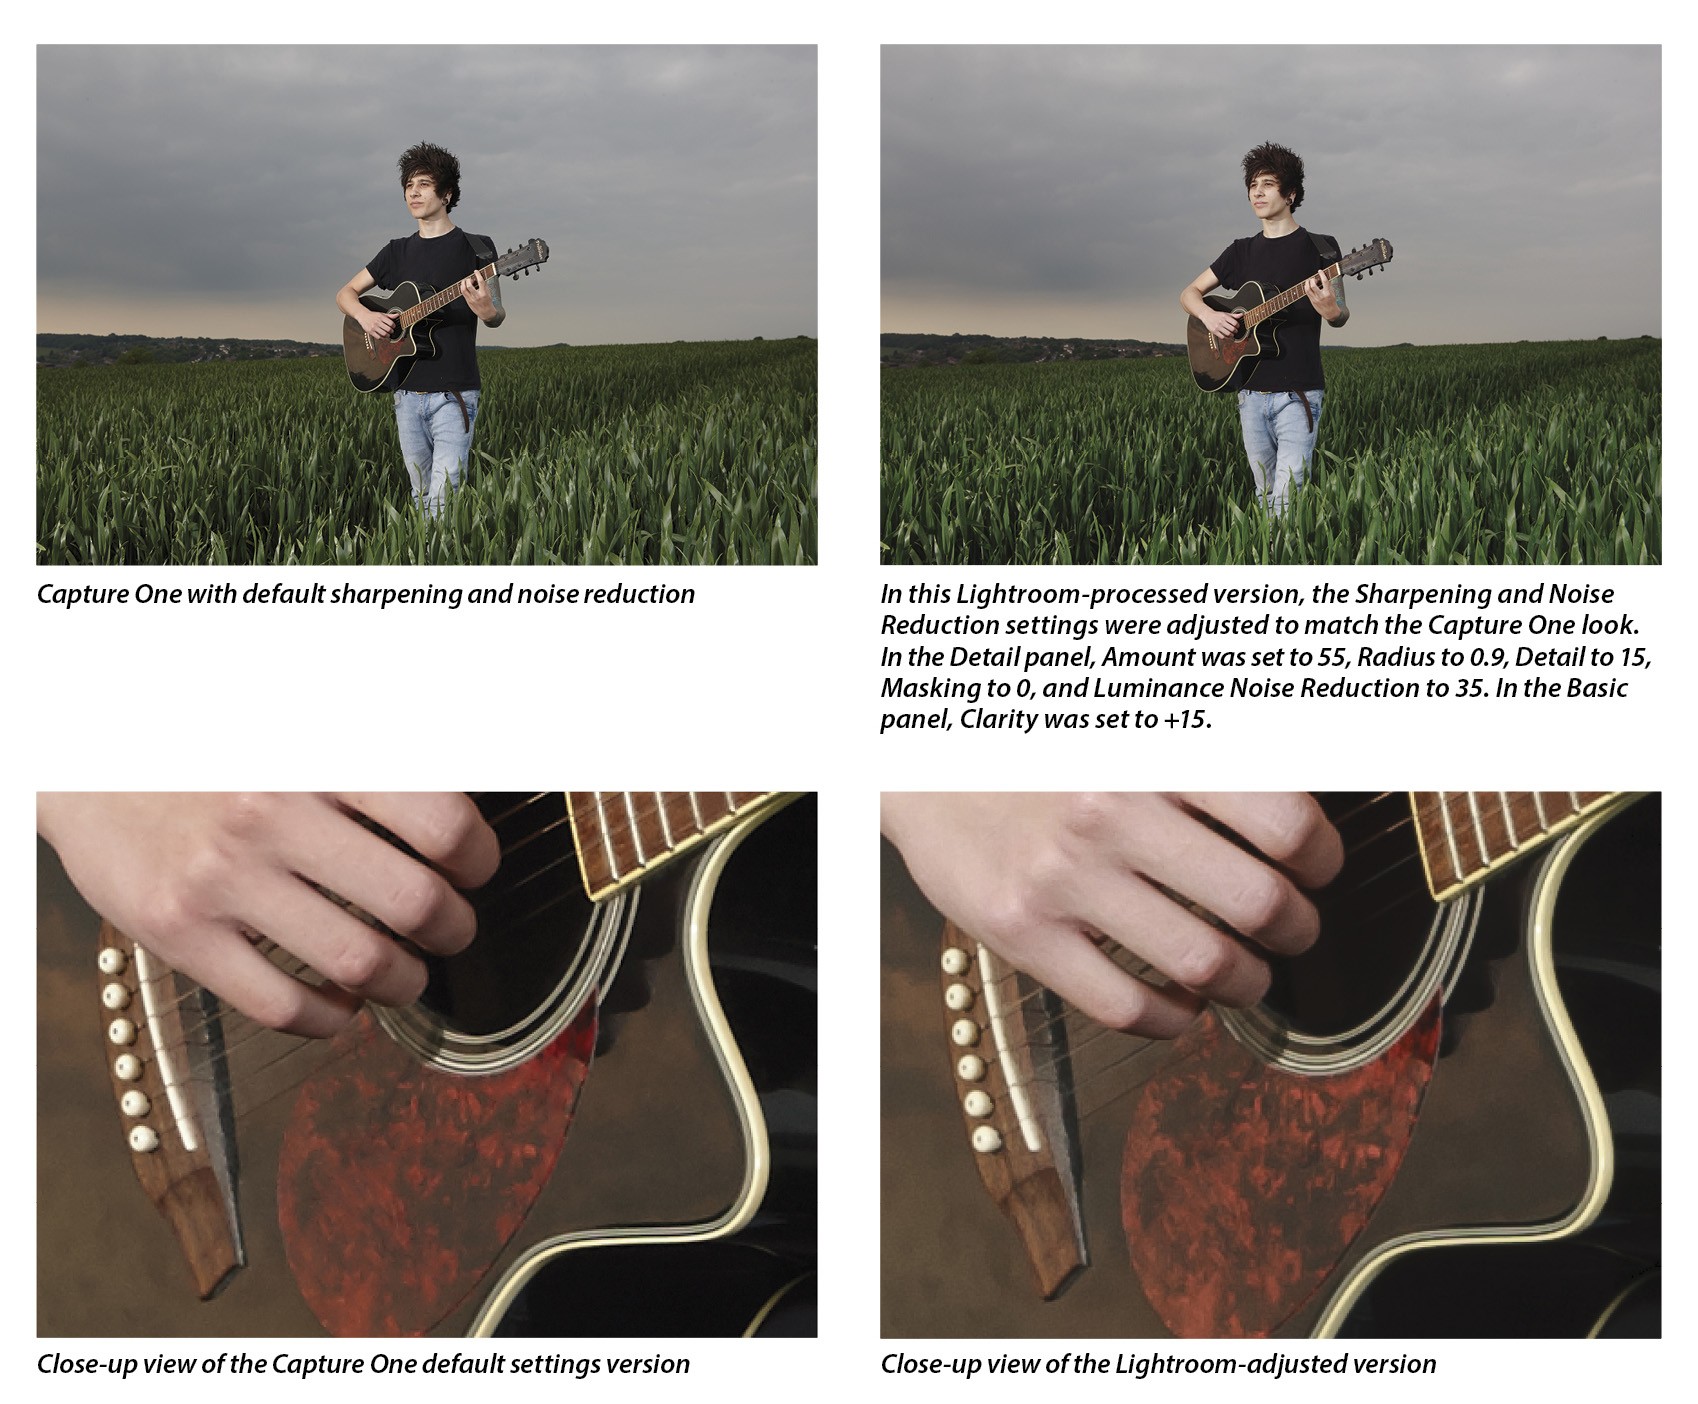
Capture One meanwhile, applies higher default sharpening settings, where the indicated values vary from camera to camera. With Canon sensors, the default Amount setting is usually 180 (on a scale of 0–1,000), while for the Fujifilm X-Pro1, the default Amount is 140. In all cases, the Capture One sharpening setting is roughly double that applied by Lightroom. If you increase the Amount sharpening slider in the Detail panel in Lightroom to around 45–55, you’ll see a closer match in sharpness. In case you think this is cheating, you can check to see what happens when the sharpening is disabled. At a zero setting, images appear equally unsharp in Capture One and Lightroom. Increase the sharpening settings in Lightroom and most images will appear to be just as sharp. [Note: All the close-up views throughout this article were taken at a magnification of 800% on a HiDPI display.]
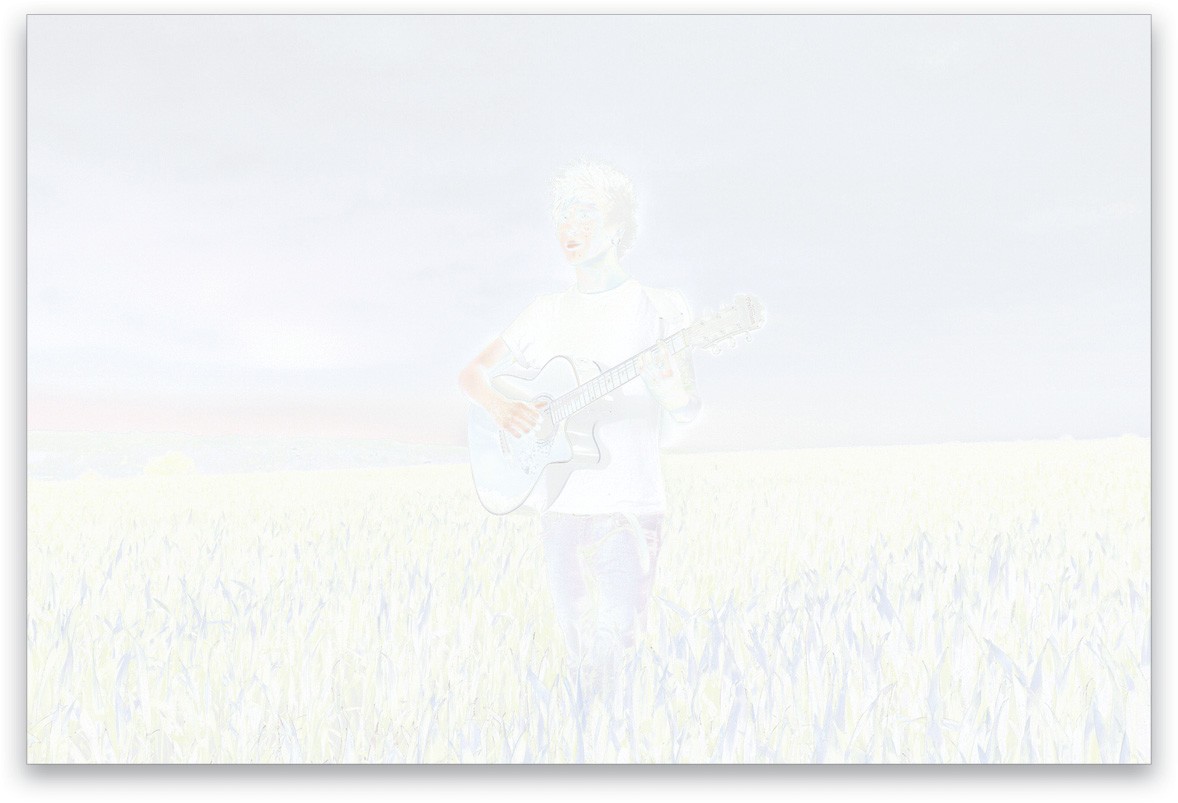
This next image (above) shows a comparison of the Capture One and Lightroom renderings. In Photoshop, I placed the Lightroom-adjusted rendered version as a layer above the Capture One default rendered version and set the blend mode to Difference near the top left of the Layers panel. I then added an Invert adjustment layer (Layer>New Adjustment Layer>Invert), plus a Levels adjustment layer (Layer>New Adjustment Layer>Levels) set to Auto (to amplify the difference). This emphasized the difference in edge detail such as on the contours of the guitar.
There are other factors to consider here though. Capture One appears to apply what can best be described as a wide-edged, Clarity-type enhancement that can make the high-contrast edges stand out more. This isn’t always evident, but is most noticeable on certain types of images, such as in the photo here of the guitarist, where the contours of the guitar had slightly better definition in the Capture One rendered version. This can be matched to some extent in Lightroom by adding a small amount of Clarity.
It so happens that Capture One applies by default a 50 Luminance Noise Reduction, whereas the default in Lightroom is zero. Because Capture One applies a more aggressive sharpening, the Luminance Noise Reduction is most likely necessary to prevent noise artifacts from being sharpened. Compared to Lightroom, the Capture One Luminance Noise Reduction produces smoother results; therefore, there’s a slight loss of fine-detail texture, as can be seen in close-up views of this pine forest image below.
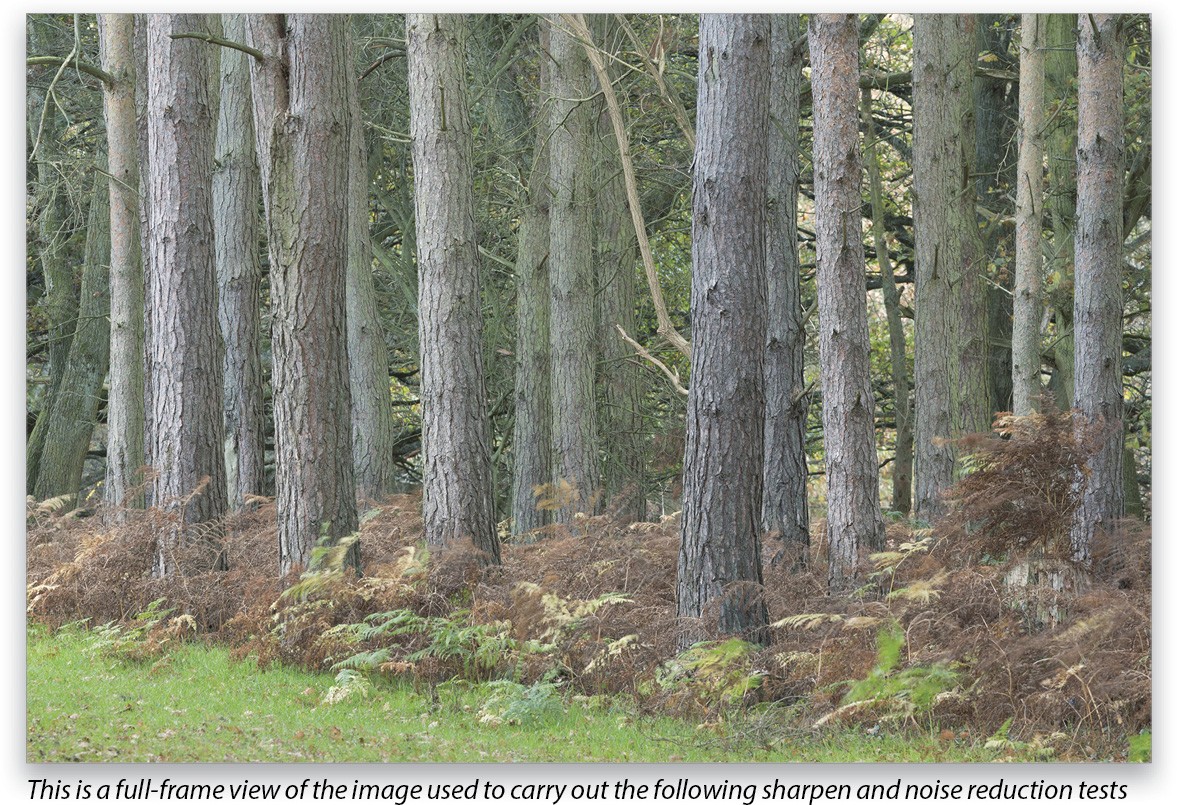
When the sharpening and noise reduction are zeroed, there’s very little difference and both appear equally unsharp. When the default sharpening and noise reduction settings are compared, the Capture One version appears to be sharper; however, when the Lightroom Detail panel controls are adjusted to match the Capture One default settings, and a small amount of Clarity is added, the Lightroom version matches the sharpness of the Capture One version more closely.
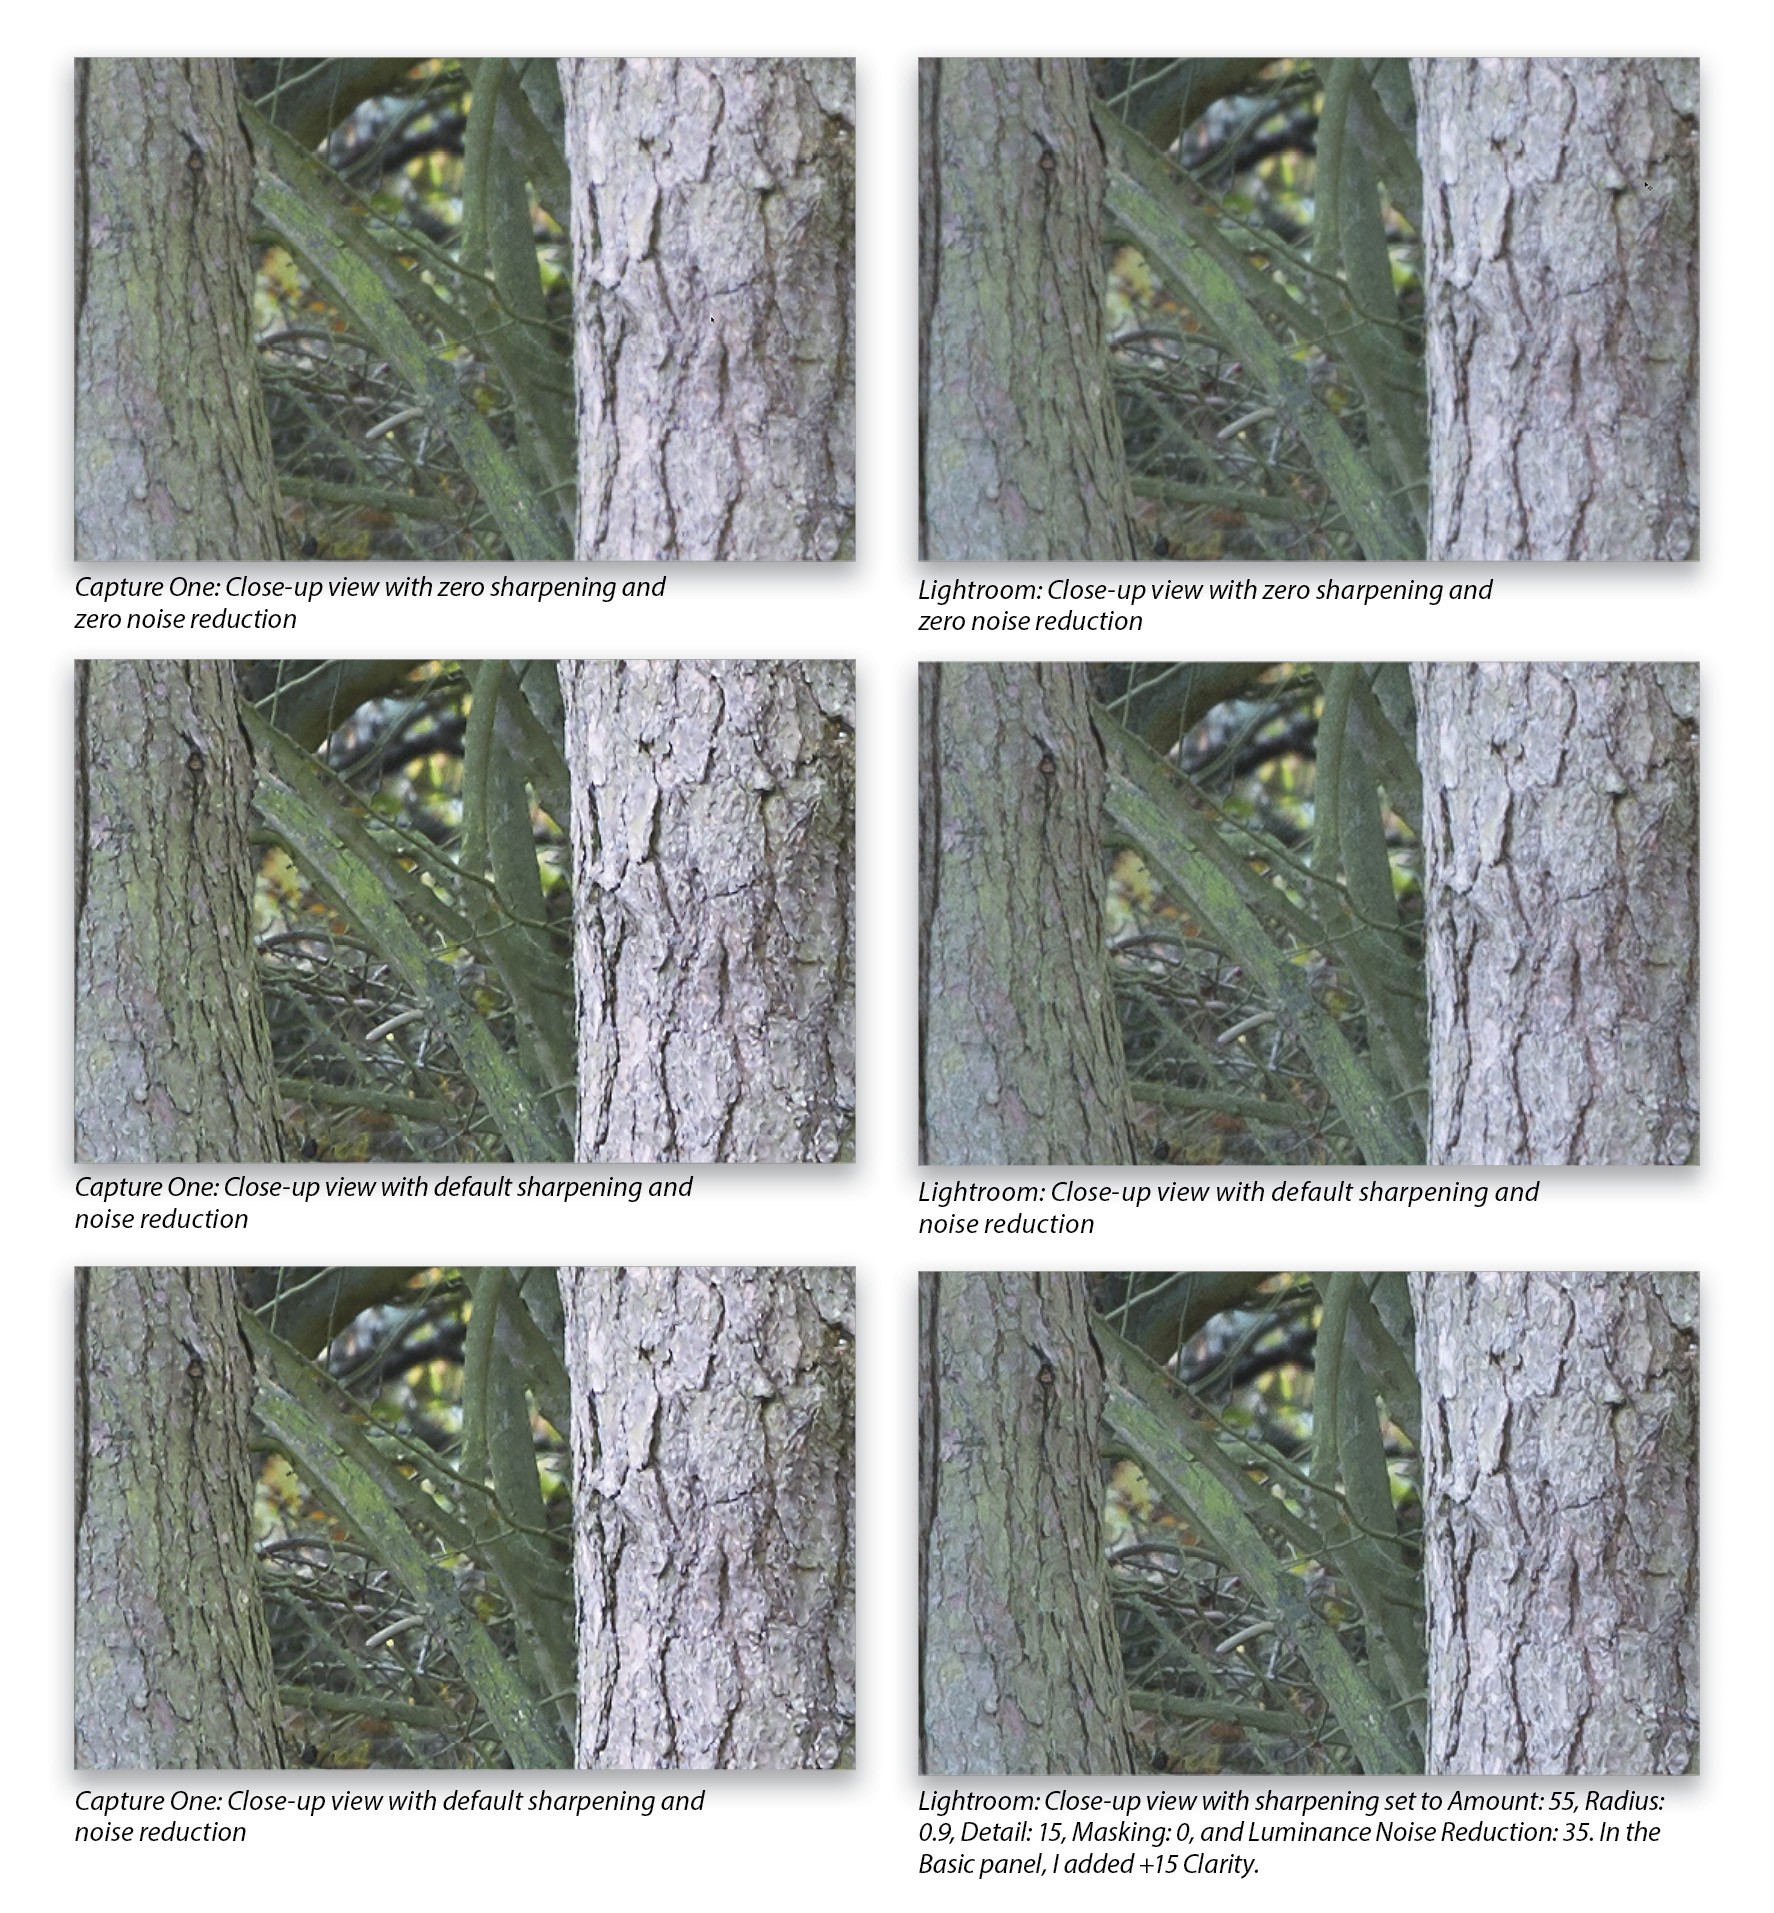
Essentially, the Capture One approach applies a stronger, more aggressive sharpening and adds a small amount of Luminance Noise Reduction to compensate for any noise increase. Once you balance out these differences by increasing the sharpening, noise reduction, and midtone contrast in Lightroom, it’s apparent that the Lightroom approach seems to preserve more micro detail. So while Capture One processing can produce images where the contrast edge detail is enhanced, this is done at the expense of fine-detailed texture. These differences are very minor, though, and you have to go pixel peeking to really appreciate them. Most of the time the extra sharpening that’s applied by Capture One is pleasing, and where it’s too strong, can be tamed by reducing the sharpening settings.
Capture One has Amount, Radius, and Threshold sliders to control the sharpening, whereas Lightroom has Amount, Radius, Detail, and Masking sliders. The Detail slider in Lightroom is excellent for enhancing the sharpness (especially with low ISO captures), and the Masking slider is useful for concentrating the sharpness on the sharp edges only. These extra controls provide Lightroom users with additional scope to fine-tune the sharpening in ways Capture One can’t.
Color Rendering
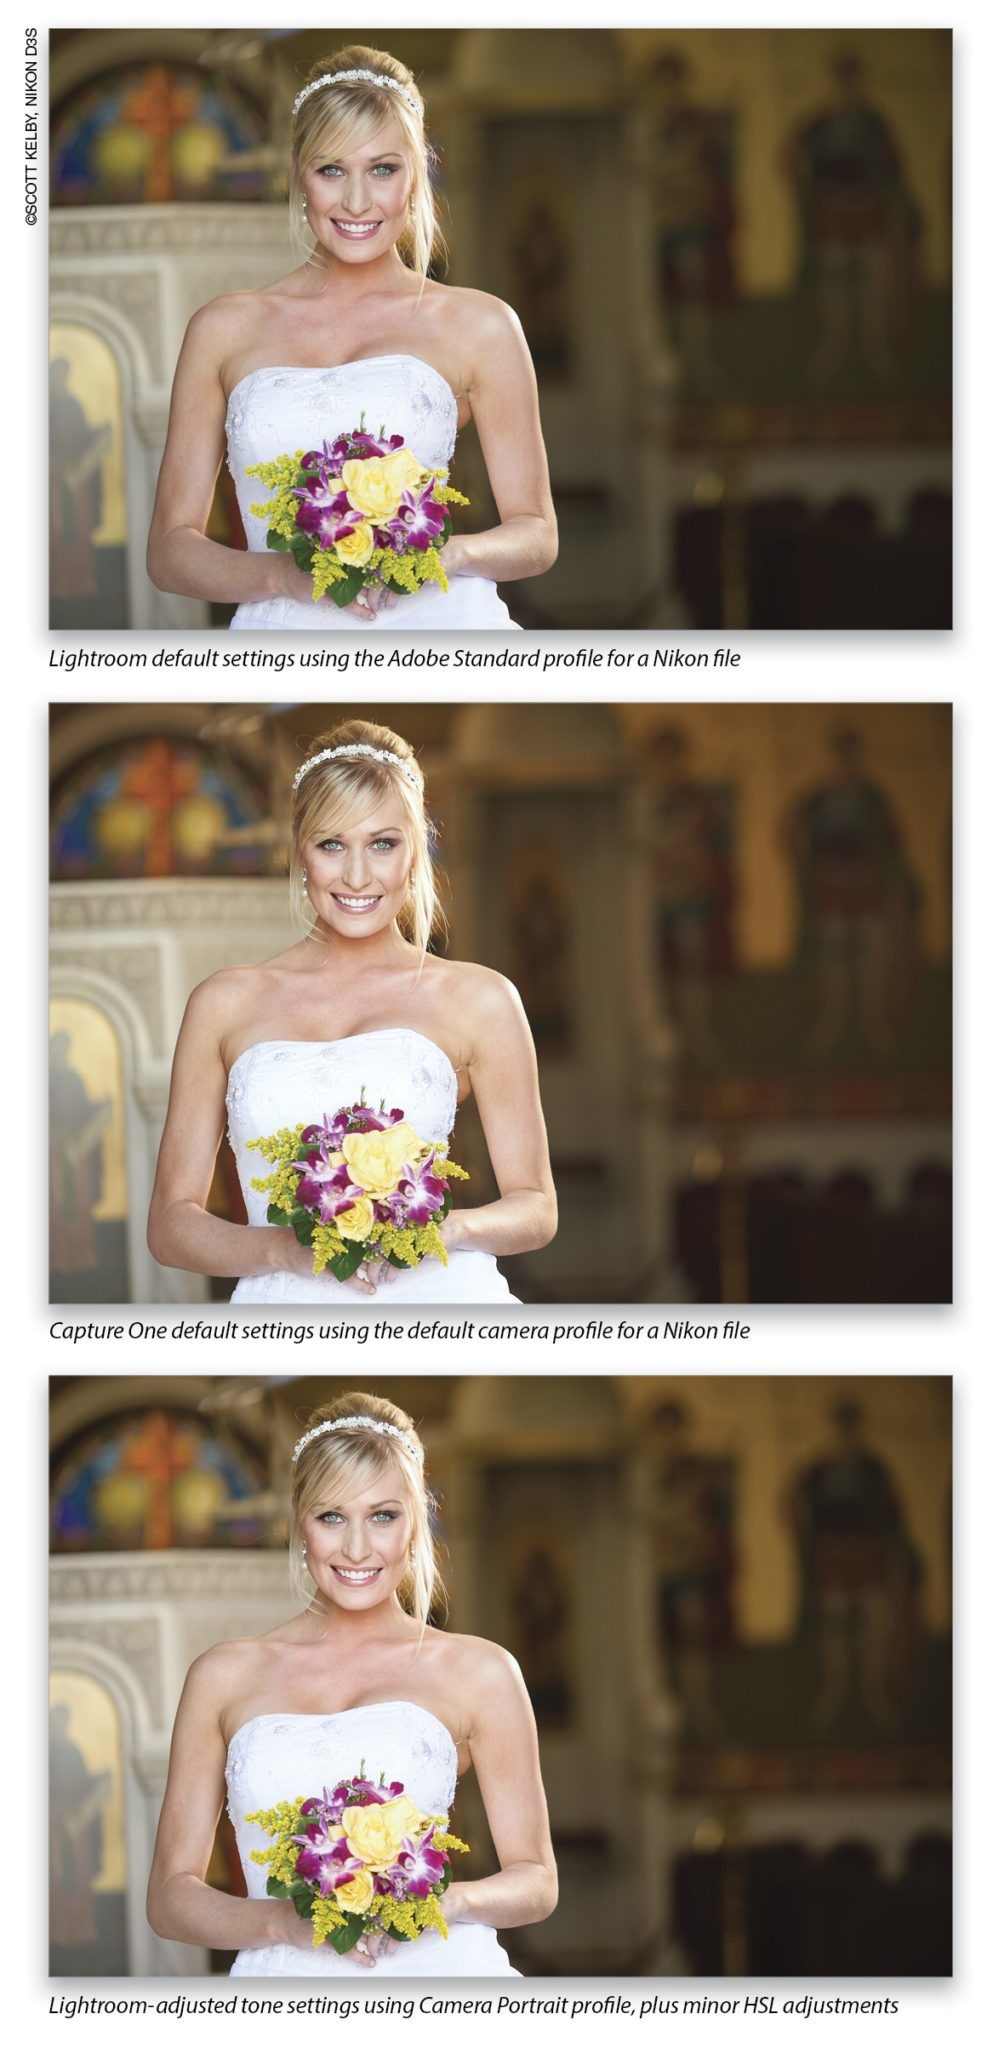
The color appearance is determined by how the RAW processing software interprets the color data. When you shoot in JPEG mode, the camera processor converts the colors to whatever color look or picture style you’ve chosen in the camera settings menu. When you shoot in RAW mode, you have the option to select the type of look you prefer afterwards via Lightroom’s Camera Calibration panel before applying any further color edits. If you have never before explored this menu option, it’s worth checking out the different color looks you can apply, including Camera Standard (which will match the
camera JPEG color rendering). The point is that any of these options can be considered a suitable starting point. Which you should choose depends on whether you’re looking for color fidelity, a saturated color look, or something else. By default, Lightroom applies the Adobe Standard camera profile to all newly imported images. This is designed to provide the best color accuracy and is created from images shot of X-Rite color targets.
The Capture One color rendering differs from Lightroom’s in a number of respects. With some cameras, such as Canons, the colors will appear notably warmer and the skin tones richer in color. While the Adobe Standard profile in Lightroom will achieve a fairly good match when processing Phase One and Fuji files, the Adobe Portrait profile generally works best for Canon and Nikon files. To achieve a more exact match, it’s often necessary to tweak the HSL panel controls. Basically, if you want an image processed in Lightroom to precisely match a Capture One look, you’ll also need to use the HSL panel. It can be done, but it’s more likely users will want to stick with the default color look and use this as the base starting point from which to make further color edits.
Tone Editing
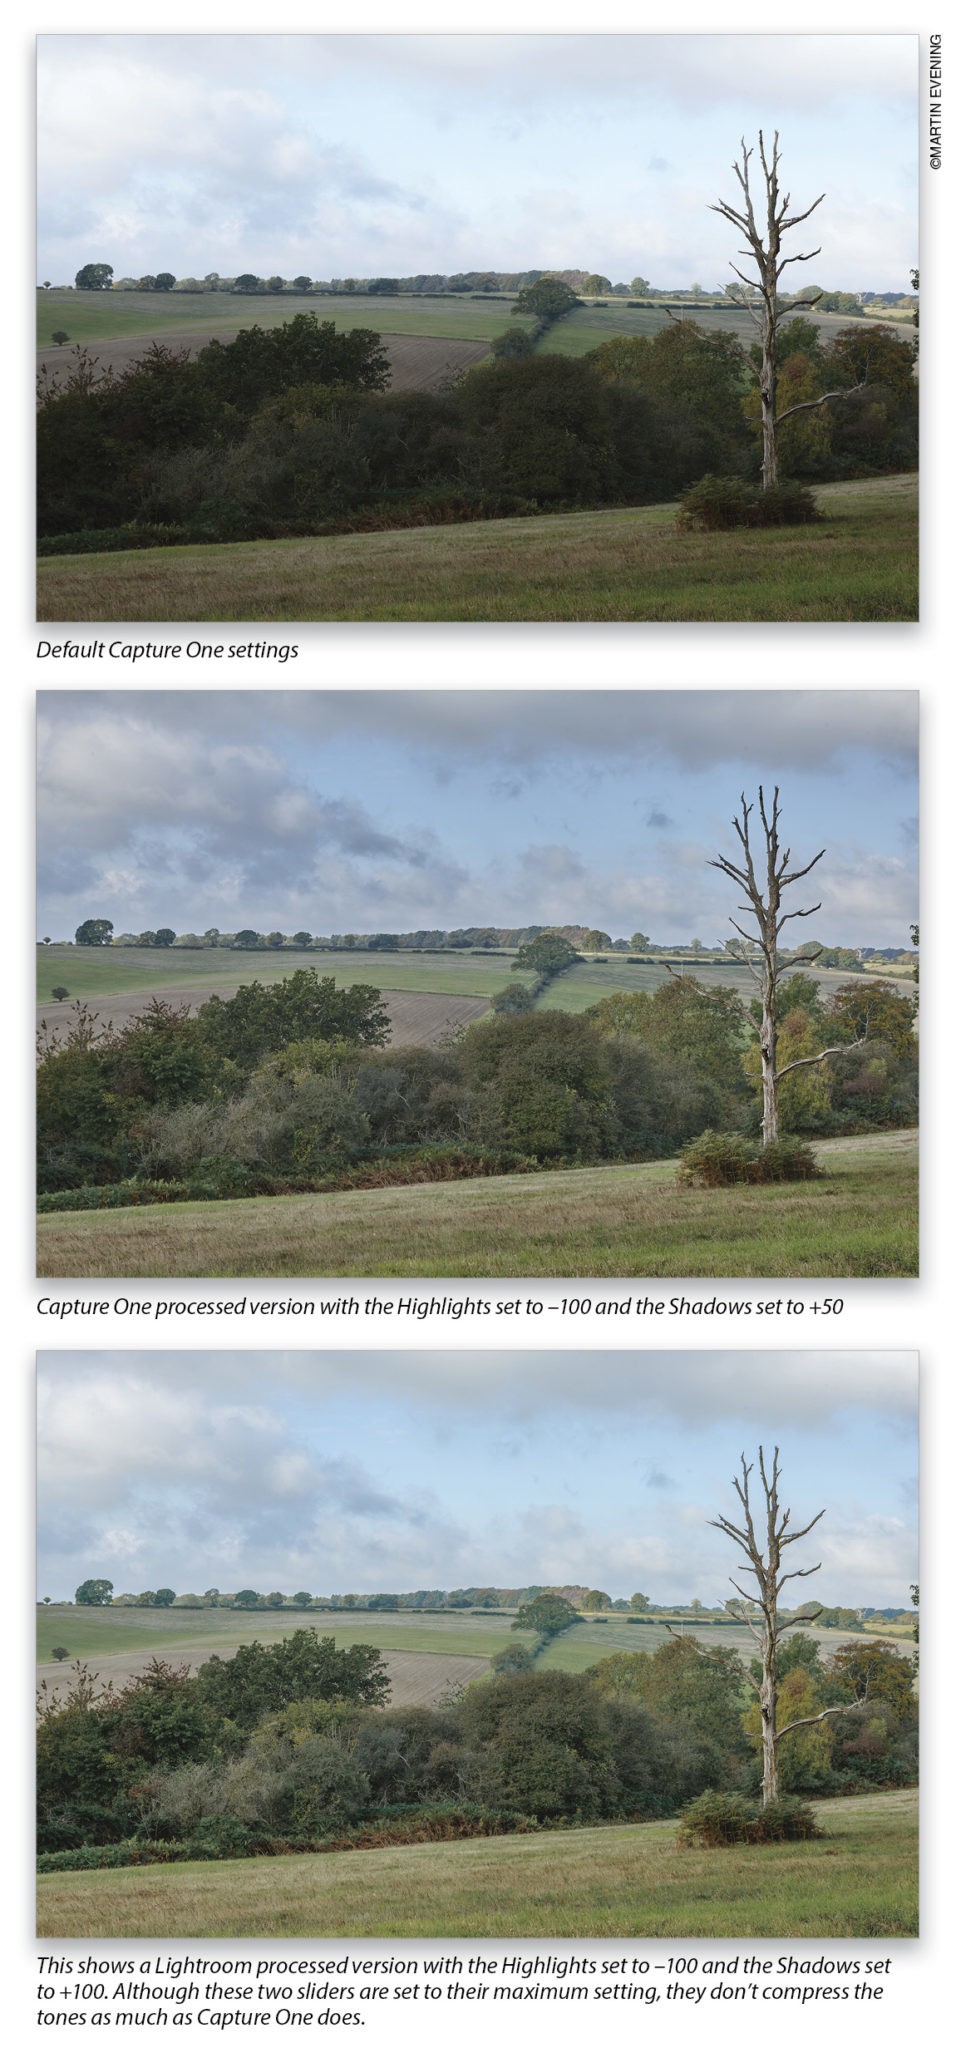
The interesting thing about Capture One is how the tone settings are adaptive. For the most part, Capture One applies an extra amount of contrast that adds more of a kick to the shadows compared to Lightroom’s default Linear Tone Curve setting. I would describe Capture One’s contrast setting as producing a more film-like look. When Capture One encounters high-contrast subjects, however, it adaptively applies a softer contrast curve. This is kind of similar to the way the Auto tone function in Lightroom works, except when you click Auto, the tone adjustments in Lightroom can sometimes work well, but other times look awful. Capture One appears to have a built-in auto contrast adjustment that is, by comparison, tamer and more often than not spot on. That said, the default option is to apply a fairly strong tone curve, one that’s similar to selecting a Medium Contrast setting in Lightroom’s Tone Curve panel. This is why comparison tests tend to show Lightroom images looking softer and less punchy.
With the Exposure slider adjustments, I noticed Capture One allows the highlight tones to compress as you increase the Exposure. Lightroom does this too, but does a better job of preserving the tonal separation in the highlights without requiring a separate Highlights slider tweak.
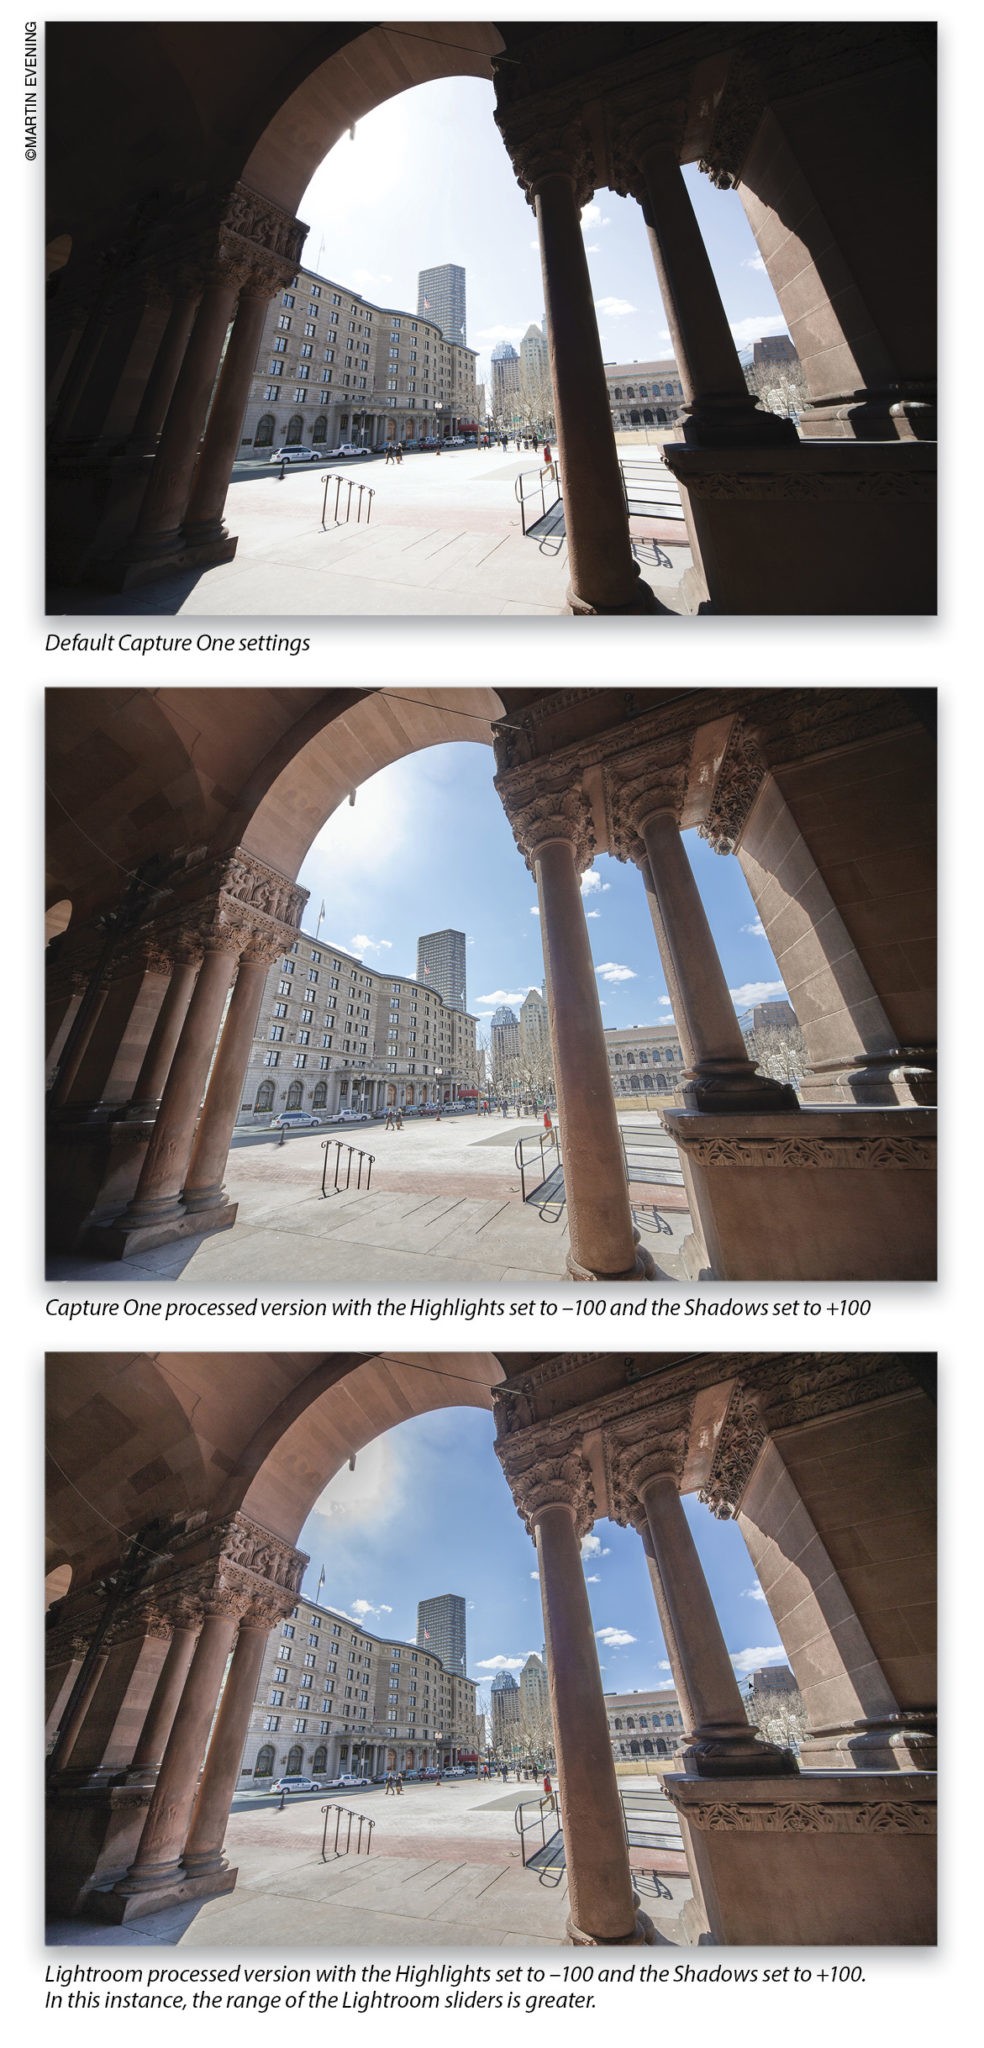
A more obvious difference between Capture One and Lightroom tone adjustments is the way the Highlights and Shadows sliders respond and the types of halos they generate. In the accompanying examples, you’ll notice how when editing a regular image, the tone width range for the Capture One controls is narrower (which can lead to less flattening of the midtone contrast). With this type of image, the Capture One Highlights and Shadows sliders are more effective at darkening the highlights and lightening the shadows. If you take an image that features a wider dynamic range scene, the Lightroom sliders have a more concentrated lightening and darkening effect compared to Capture One.
How to Get the Capture One Look
As you’ve seen, it’s possible to tweak the settings in Lightroom to achieve results that are more like the Capture One default look. You can do this by adjusting the Develop module settings each time you open an image, but you can best do this by making Develop presets, or creating new default settings. The actual settings will vary from camera to camera, but as a rough guide, I suggest you try the following:
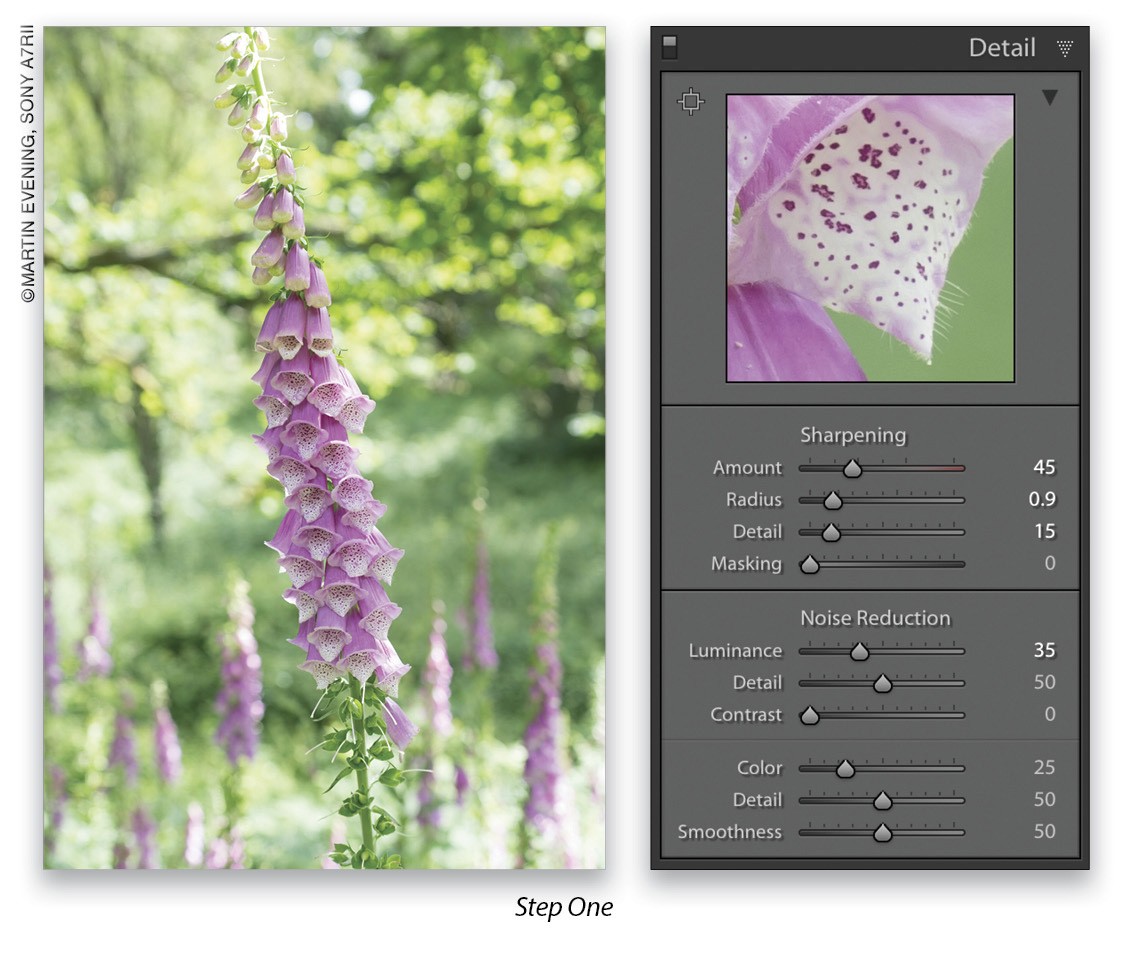
Step One: In the Detail panel, increase the Sharpening and Luminance Noise Reduction settings. Set the Sharpening Amount slider as follows: Nikon: 75, Canon: 55, and Sony and Fuji X-Trans: 45. Set the Radius slider to 0.9 and the Detail slider to 15 and leave the Masking slider set to 0. In the Noise Reduction section, set the Luminance slider to 35.
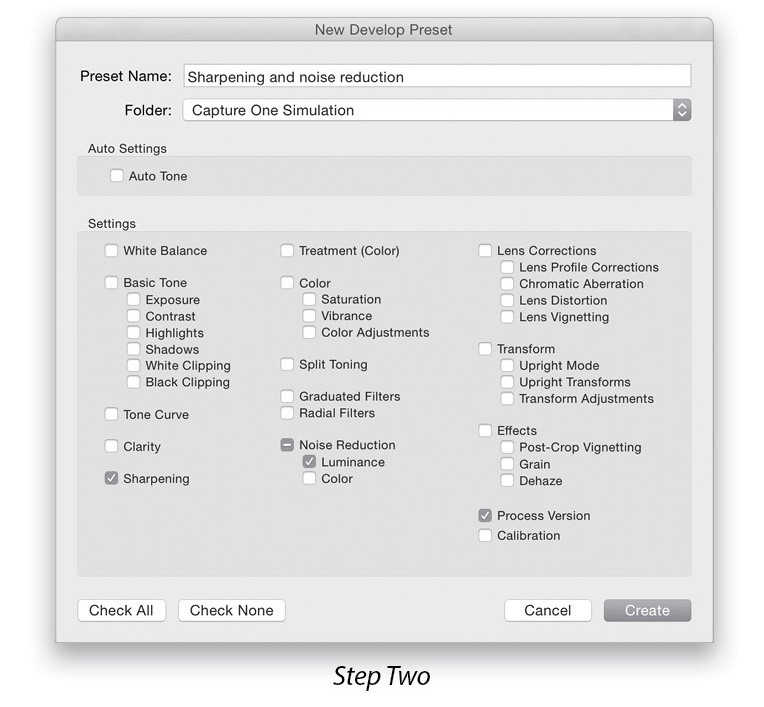
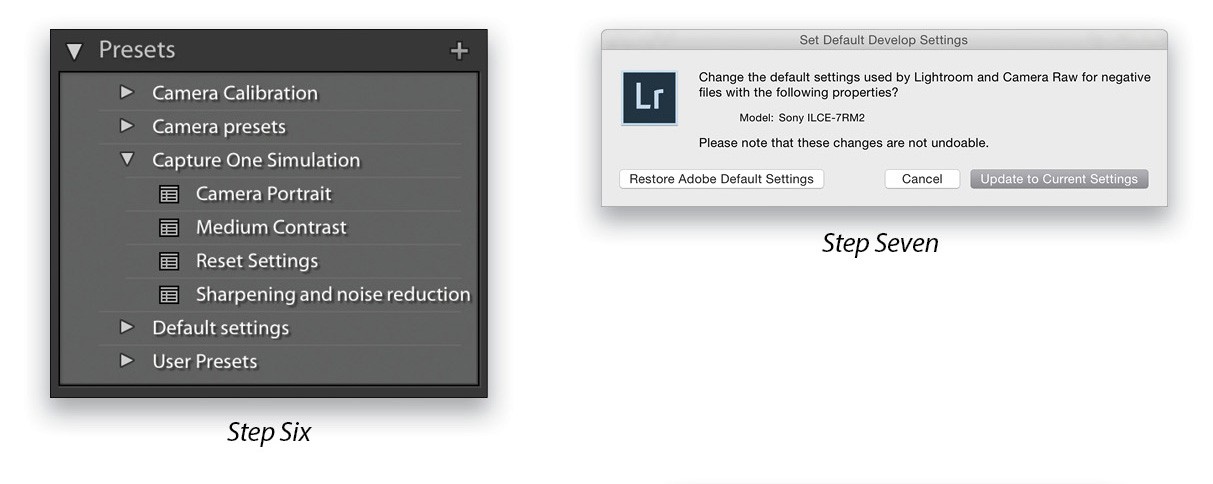
Step Two: Now, go to the Presets panel and click on the plus icon to create a new preset. Click Check None; check on only the Sharpening, Luminance Noise Reduction, and Process Version boxes; and click OK to create a new “Sharpening and noise reduction” preset. You’ll notice I also created a “Capture One Simulation” folder to which to save the preset. Just click on the Folder drop-down menu, select New Folder, name your folder, and click Create in the New Folder dialog. Click Create again to close the New Develop Preset dialog.
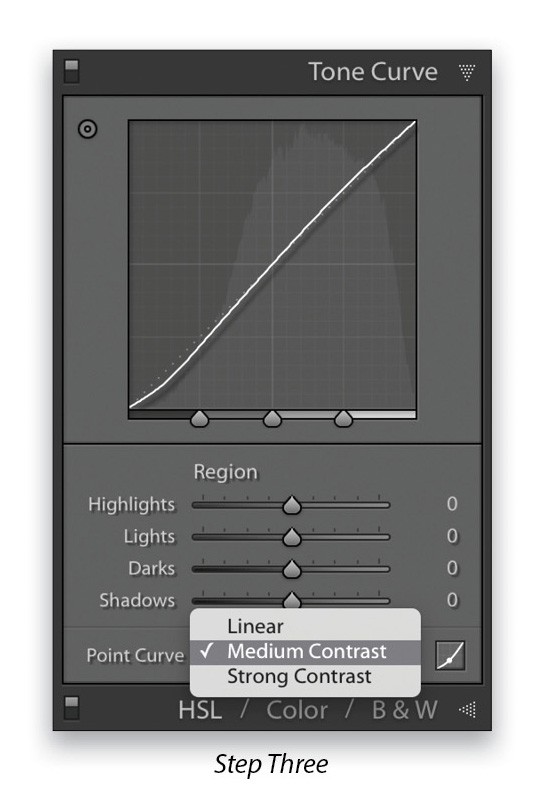
Step Three: Next, go to the Tone Curve panel and select Medium Contrast from the Point Curve drop-down menu. Repeat Step Two, but this time only check the Tone Curve and Process Version boxes and save as a “Medium Contrast” preset to the same Capture One Simulation folder.
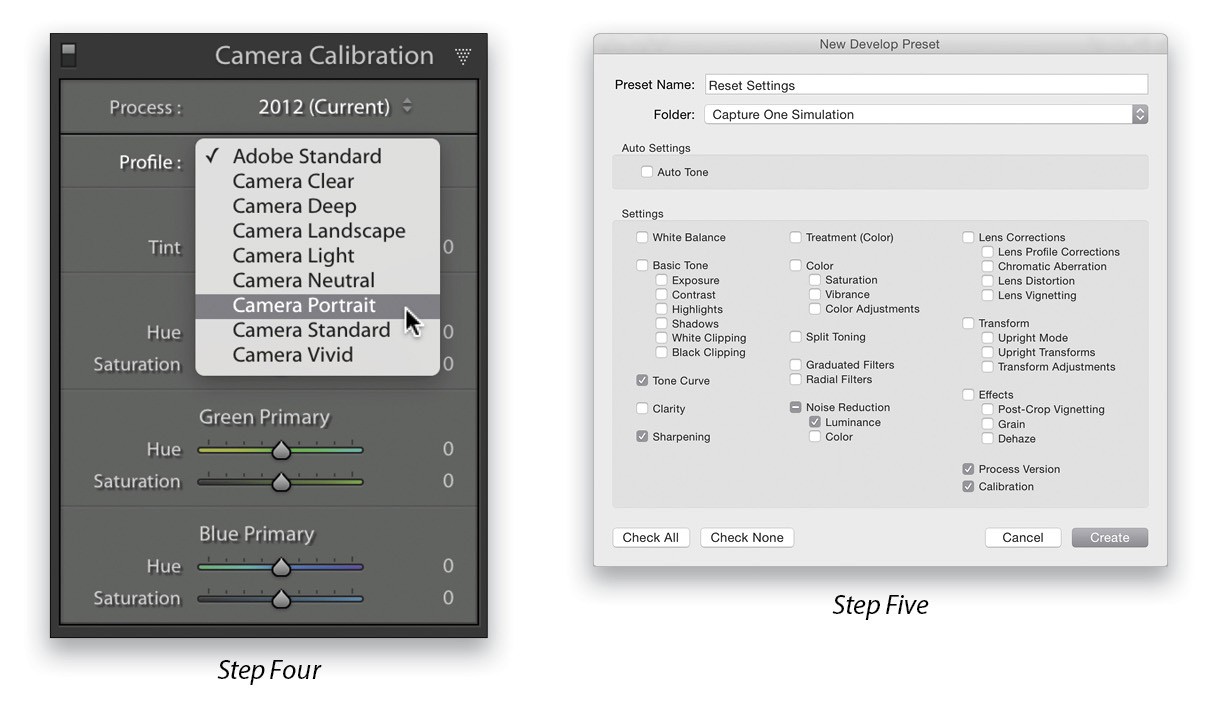
Step Four: Go to the Camera Calibration panel and select Camera Portrait from the Profile drop-down menu. Once again you’ll want to create a new preset. Check the Calibration and Process Version boxes only and save as “Camera Portrait” to the same Capture One Simulation folder.
Step Five: Having done that, reset all of the above settings to their defaults and save as a “Reset Settings” preset. You’ll need to check all the items shown here in the New Develop Preset dialog. This preset can be used to reset the Detail panel sharpening, noise reduction, Tone Curve panel, and Calibration panel settings.
Step Six: Now open an image and click to apply each of the presets in turn to see which combination improves the appearance of the image. If necessary, click the Reset Settings preset to start over, especially since not all images will benefit from a contrast boost or Camera Portrait profile.
Step Seven: There’s also the option to save any of the above adjustments as a default setting. In the Develop module Develop menu, choose Set Default Settings. This opens the dialog shown here where the currently applied settings will become the new default for this particular camera. It’s important that no other settings are applied other than those you wish to make the defaults.
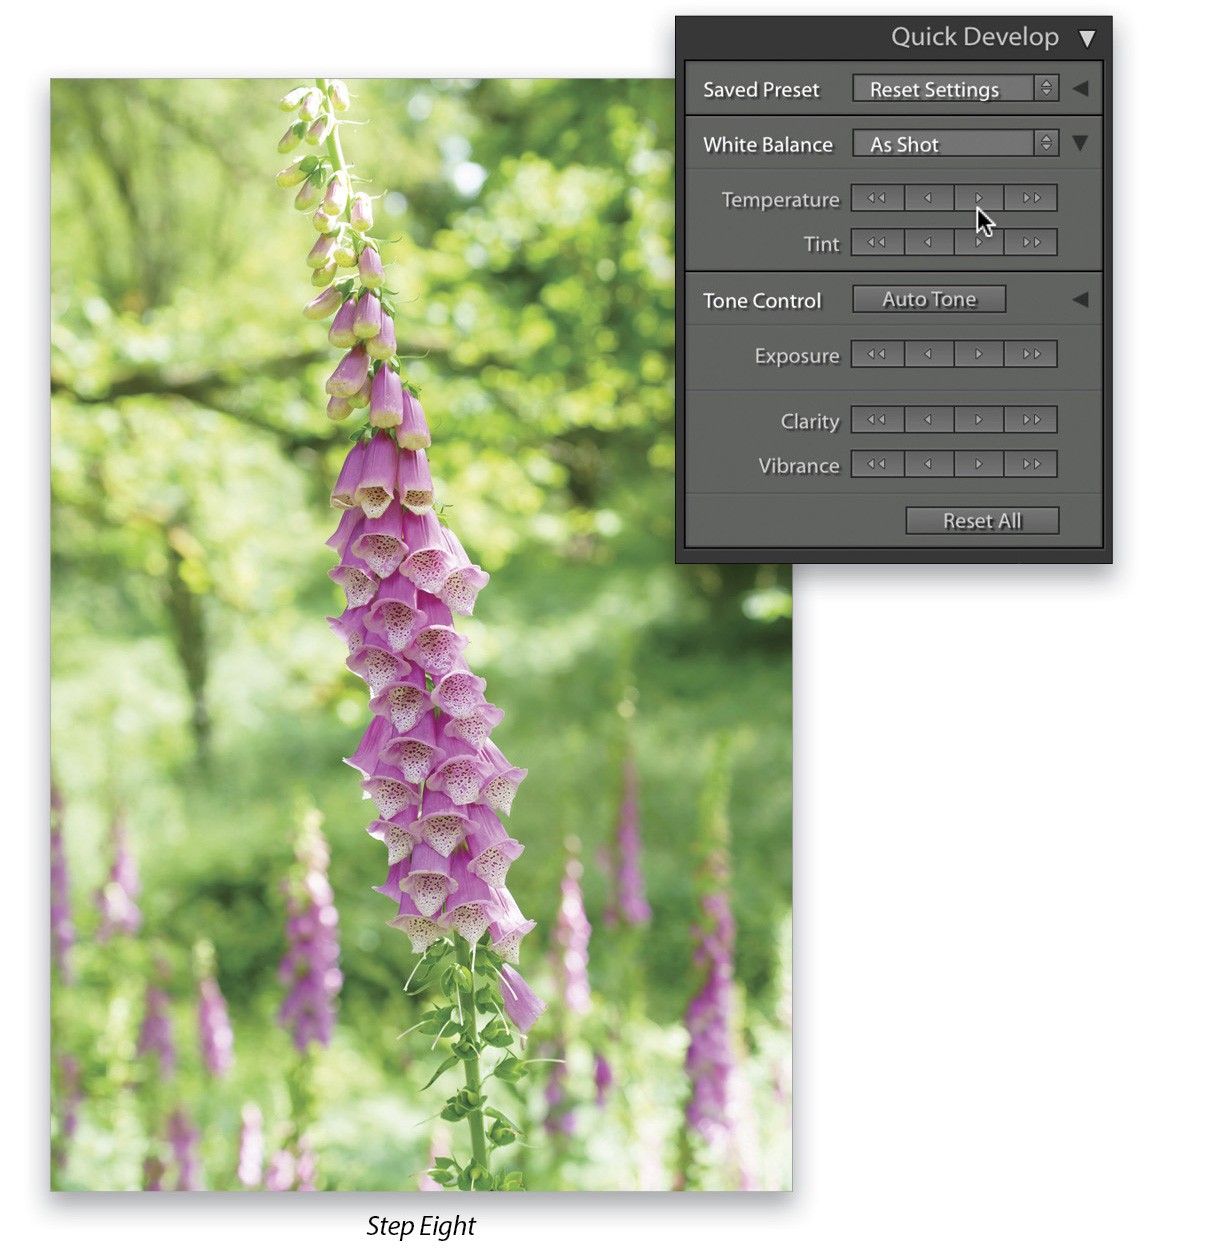
As an optional step, go to the Quick Develop panel in the Library module and click on the Temperature single-right-arrow button. This will apply a small warming white balance adjustment relative to the current white balance setting.
These suggested settings are a guide to the kind of settings needed to simulate the Capture One look. I’ve found Capture One’s default sharpening settings for Nikon to be more aggressive than the amount applied for other cameras, so I’d suggest using a 55 Amount sharpening setting. For images that are already quite contrasty, I suggest leaving the Tone Curve setting as is. You could also include a Basic panel +10 or +15 Clarity adjustment. In some instances, this can help match the Capture One look, but this adjustment doesn’t suit all images, and I recommend you manually add Clarity only where you feel it’s necessary to do so.
Two Different Philosophies
In conclusion, if you simply compare default settings, the results will look different. If you go beyond the basics and actually edit in Capture One or Lightroom, you can make your photos look similar, or make them look however you want. Having worked in Capture One, I have full confidence in the program’s image-editing controls, just as I have in Lightroom. The perceived wisdom that Capture One is sharper is mostly based on a superficial analysis of the default settings.
Capture One does outshine Lightroom in some respects though. The color editing sliders offer better fine-tuning control, particularly for skin tones. The Shadows and Highlights sliders have a greater range of tone control when editing regular dynamic range images. The new Luma Curve is useful for precise control of luminance and color contrast. The global moiré removal is faster, and the black-and-white conversion process is good at suppressing halos along areas of color contrast.
Lightroom, meanwhile, has extra controls to fine-tune the sharpening and noise reduction. The Vibrance slider offers better control over the color saturation. GPU support means Lightroom’s Develop sliders are more responsive. Lightroom has superior retouching tools, plus more effective lens correction and perspective controls. It also has fully integrated DNG support to enable things such as Panorama and HDR Photo Merges.
The biggest difference between the two programs, though, is a difference in philosophy. Lightroom aims for a standardized result where the tone and color rendering is deliberately made more conservative. This reminds me of the time I spent at art school learning to print in black and white. I was taught to produce the contact sheets on a soft-contrast grade of paper, because this would reveal the full extent of tones captured by the negative. In Lightroom, the initial rendering is meant to be a starting point, and Lightroom provides the color, tone, and sharpening controls you need to realize your vision.
Capture One’s philosophy is to produce a more optimized look that doesn’t necessarily require further editing. This may have led to the perception that Capture One is sharper and punchier, but in reality neither program is inherently better than the other when it comes to actually working on your images and adjusting the settings to suit individual tastes.
I am disinclined to criticize Capture One’s approach. If Capture One customers find the optimized approach gives them the end result they’re after quicker, are they wrong if they happen to like what they see? Capture One certainly has the professional-level tools to produce great-looking images, but Lightroom users shouldn’t be sidetracked by claims for Capture One’s superiority. Fundamentally, the two programs aren’t as different as some might have you believe.
This article originally published in the September, 2016 issue of Photoshop User magazine. To learn more about Lightroom or Capture One, check out our full length classes.

