Are you ready to take professional-quality photos with your iPhone? That device in your pocket can do more than you think! Apply these 7 tips to your iPhone photography and behold the difference.
Take Amazing iPhone Photos with These 7 Tips
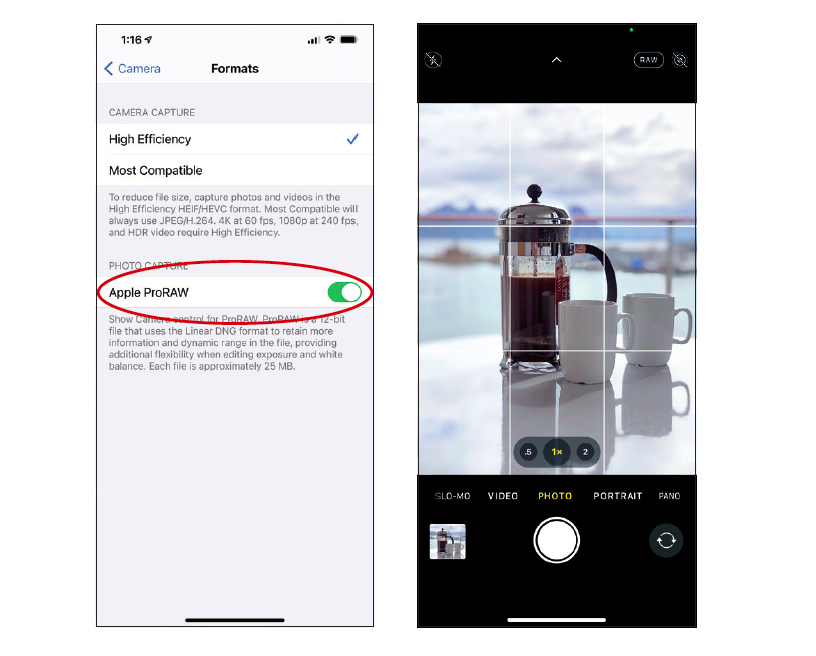
TIP 1: Shoot in Apple’s Own RAW Format
For many years, if you wanted to shoot in the higher-quality RAW format, you had to use a third-party app (like Adobe’s Lightroom Photo Editor’s built-in camera), but now you can shoot in RAW right from Apple’s own Camera app. If you have an iPhone 12 Pro, Pro Max, or higher, you just have to turn that feature on (you won’t see this feature if you don’t have a supported model).
To do that, go to the Settings app, tap on Camera, then tap on Formats, and under the Photo Capture section, turn on Apple ProRaw.

TIP 2: Create Depth in Your Images Using Layers
If you’re shooting landscapes or cityscapes or any kind of big, sweeping scene, you can use a technique pro photographers use to help draw the viewer into the image, and that is they create layers in their image. You start off with something right in front of the camera.
If it’s a landscape, it might be a piece of driftwood down right in front, or a rock at the water’s edge, or a little puddle—doesn’t so much matter what it is, just as long as you have something interesting in the foreground. That starts your viewer’s eye along a path into your image.
Then, you need a middle ground— literally, the middle of your photo (probably your subject. So, if it’s a lone tree on a grassy hill, that’s your middle ground). Behind that, you might have a soaring mountain, and behind that in the background, an interesting cloud-filled sky.

TIP 3: Where to Focus for Portraits
This one is easy. You focus on your subject’s eyes. If they are turned a bit to the side, then focus on the eye that is closest to the camera. So, tap on the screen directly on one of their eyes because if their eyes aren’t in focus, the whole image will look a bit soft.

TIP 4: Shooting High Dynamic Range Shots (HDR)
When you see smooth water cascading gently over the rocks in a stream, or silky-looking water falling from a waterfall, or smooth-looking water on the lake, you’re seeing a camera’s long exposure technique at work. This is when you force the camera to keep its shutter open for a long period of time, so the moving water, which would normally be frozen in place (which looks kinda amateurish for lack of a better term), now looks smooth and silky and more professional-looking.
With a DSLR or mirrorless camera, you’d need to use a special filter attached over the lens to artificially darken the scene in front of you, which forces the camera to leave the shutter open longer than it normally would.
But, with our iPhones, we can avoid buying, carrying, and using all that extra stuff thanks to a built-in feature that creates the long exposure effect for us.
So, the next time you’re standing in front of a waterfall, or a mountain stream, or a fountain, or anything with moving water, all you have to do is (1) turn on the Live Photos feature in your Camera app (tap on the round icon up in the top-right corner), and then just tap the shutter button once. Even though you just tapped it once, in the background, your iPhone is taking a series of shots which it’ll use in the next step. (2) Open your Photos app, tap on the photo you just took, and then swipe up to reveal the Effects options, which will appear below your photo (as seen above).
Scroll to the left until you see Long Exposure, and you’ll see a preview that shows your now silky, non-frozen, awesome-looking water. Tap on that effect, and now you’ve got that silky water all without jumping through a bunch of hoops. Sweet!
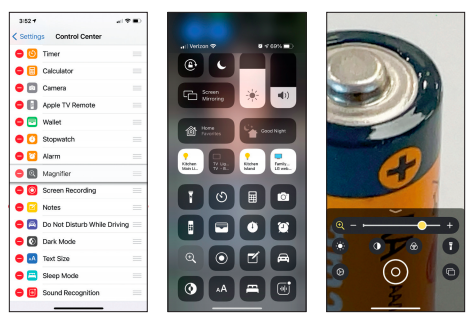
TIP 5: Getting a Super-Crazy Closeup Shot
If you want to get really, really close to your subject, there’s a trick you can try that can get you super-crazy close. Go to your iPhone’s Settings app, and then scroll down and tap on Control Center (depending on your iPhone’s model, you may also have to tap on Customize Controls). Once you’re in there, make sure Magnifier appears within the Included Controls section (if it doesn’t, you’ll find it below, under More Controls. Just tap on the + [plus sign] icon to its left to include it), and now you’re set up to do this trick. When you want to get crazy close, swipe down from the top-right corner of your screen (or swipe up from the bottom on the 2nd generation iPhone SE or iPhone 8, 8 Plus, or older) to get to the Control Center.
Tap on the magnifying glass icon and it brings up a special camera that is super-crazy, zoomed-in tight. Use the slider to zoom in as tight as you want (hold the camera super-still), and then take your shot with the shutter button that’s right there at the bottom of the screen. TIP: If you zoom in really close, it’s tripod time because holding your camera steady enough when it’s zoomed in super-tight like this is really tough. If you don’t have a tripod handy, just be prepared to take a number of shots until you get one that’s sharp and in focus.
However, our camera doesn’t have the amazing tonal range of our eyes, so it’s either going to make the restaurant look good, or the view outside the windows look good—it can’t do both. It just can’t capture that wide a range of light, so you wind up with a nice-looking restaurant interior shot, but everything outside of the windows is totally blown out to solid white—you don’t see the beach or the ocean or anything. That’s why your iPhone’s HDR (High Dynamic Range) feature is so awesome. When we shoot in HDR mode, what we get from our camera is more like what we saw with our eyes.
It pulls off this bit of mini-magic by taking three shots (behind the scenes, really fast) when you tap the shutter button: one-shot is the normal shot, but then it takes a much brighter version of the same shot, and then a much darker version, as well. It then automatically combines the best parts of all three into a single HDR image, with a tonal range that is beyond what it normally could capture, and I might add, it does a pretty incredible job of it. Now you can see both inside the restaurant and outside to the beach, all in the same shot. Best of all, this automatically kicks in when it’s necessary…as long as you have this feature turned on (it should be, by default). Go to your Settings app, scroll down and tap on Camera, and at the bottom of the Camera screen, make sure Smart HDR is turned on. That’s all there is to it, and now it will turn this feature on when it senses a wide tonal range.
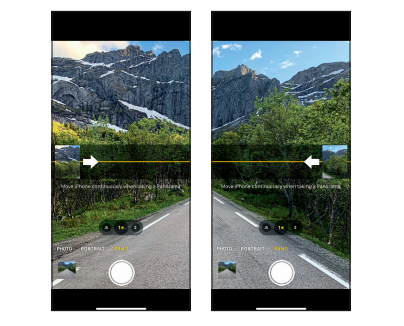
TIP 6: How to Shoot a Backward Pano
This is a quick tip for when you’re shooting panos. By default, your iPhone’s camera wants you to take your pano from left to right, which is why the large, white arrow appears on the far left, aiming to the right (as seen above left). But, you can actually swap that arrow, so your pano goes in the opposite direction (from right to left) by tapping on that white arrow. Do that, the arrow flips (as seen above right), and now you can take your “backward” pano.

TIP 7: The Photos App Can Suggest Editing Ideas
There’s a pretty cool little feature that’s kinda hidden in the Photos app, and what it does is it suggests effects that it thinks might make your image look better. They are just suggestions, so you don’t have to use them, but they’re usually worth at least considering. To find the images that the Photos app feels could benefit from having an effect added, at the bottom of the screen, tap on For You, and then swipe up until you see Effect Suggestions (as seen above left). In this case, it’s suggesting that I brighten this portrait by using the Studio Lighting effect.
Luckily, it’s not only making this suggestion, it’s ready to apply that effect for you. Just tap on that image, it comes up in a larger view (as seen above center), and in the top-left corner it says which effect it’s about to apply (in this case, a Portrait mode lighting effect). To see the actual effect applied, first tap Apply to Original at the bottom of the screen. A message will appear saying the effect has been applied to the original, and then finally the effect appears (as seen above right). If you like how the effect looks, just tap on For You at the top left to return to the For You screen and your changes are saved. If you don’t like the look, tap on Revert at the bottom of the screen, and it returns the photo to how it looked before you applied the effect.
Of course, even after you applied this effect (even a year later or more), you can always revert back to the original by just tapping on the photo, tapping on Edit, then tapping on Revert at the bottom right, and it returns the image to how it looked when you first took it.
Dive into iPhone Photography for 2 Full Days of Learning
iPhone owners—Did you know you’re holding one of the most powerful photography tools you can own, all in one device?!
Don’t let all of those features go to waste. Stop taking basic, boring, flat photos with your phone! We got you covered—come to the iPhone Photography Conference on June 29th and 30th, 2021!
What’s the best iPhone photography tip you’ve ever heard? Share it with us in the comments!