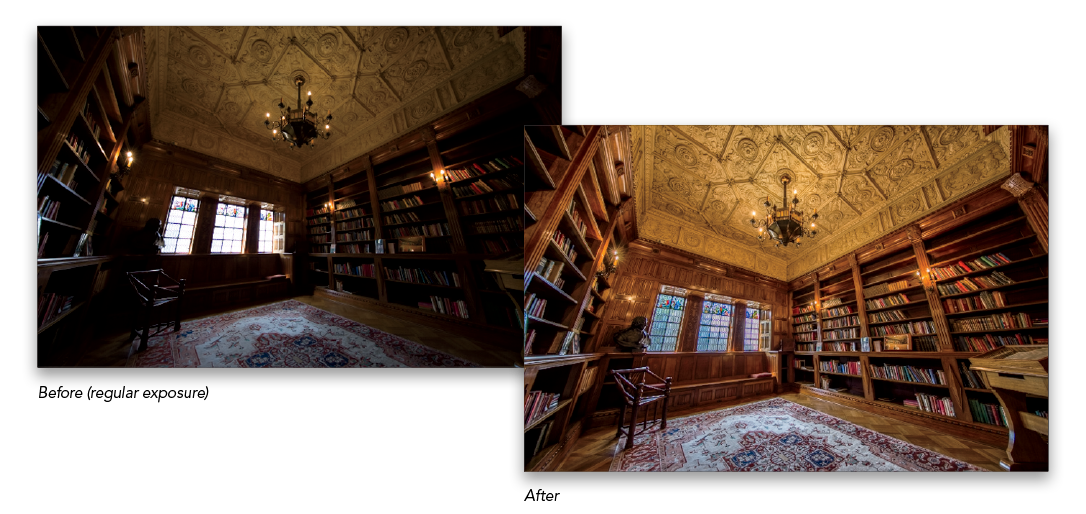
Camera Raw lets you take a series of shots that were bracketed in-camera and combine them into a single 16-bit HDR image (something we used to have to jump to Photoshop for in the past). But, I want to tell you upfront—it doesn’t create the traditional tone-mapped HDR “look” (like Photoshop’s HDR Pro does). In fact, the 16-bit HDR will look a lot like the normal exposure. But, when you edit it, this 16-bit image has increased highlight range and better low noise results when you really have to open up the shadows, so the image has a greater tonal range overall to work with from the start. Plus, the final HDR image is a RAW image.
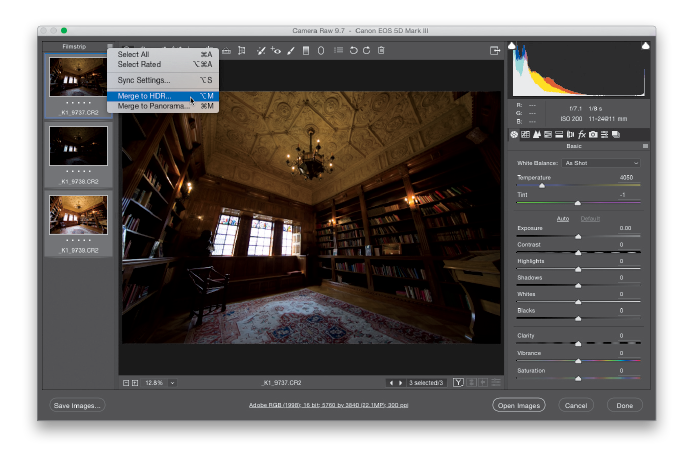
Step One: Select your bracketed shots in Bridge, and then press Command-R (PC: Ctrl-R) to open them in Camera Raw. Here, you’ll see that I selected three shots: the regular exposure, one shot that is two stops underexposed, and one shot that is two stops overexposed. Now, click on the little icon to the right of Filmstrip (up in the top left) and choose Select All (or just press Command-A [PC: Ctrl-A]) to select all three images. Then, go back under the same menu and choose Merge to HDR (as shown below; or just press Option-M [PC: Alt-M]).
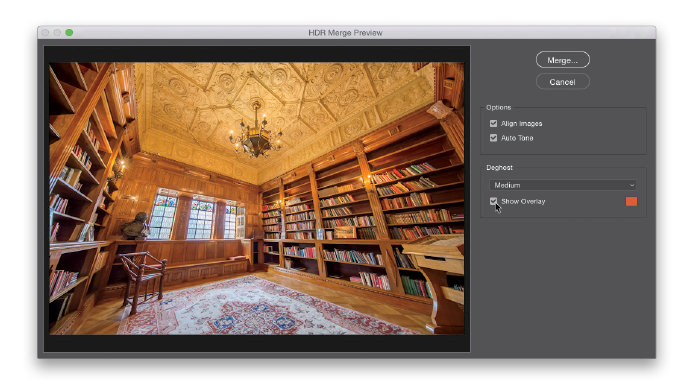
Step Two: After 20 or 30 seconds (or so) the HDR Merge Preview dialog will appear (as seen below) with a preview of the combined HDR image. Like I said in the intro, it’ll probably look very much like the normal exposure. But, depending on the image, it can have more detail or it can look brighter in the shadow areas, but it won’t look a whole lot different (with Camera Raw’s brand of 16-bit HDR, you don’t really see the benefits until you “tone” the image back in Camera Raw).
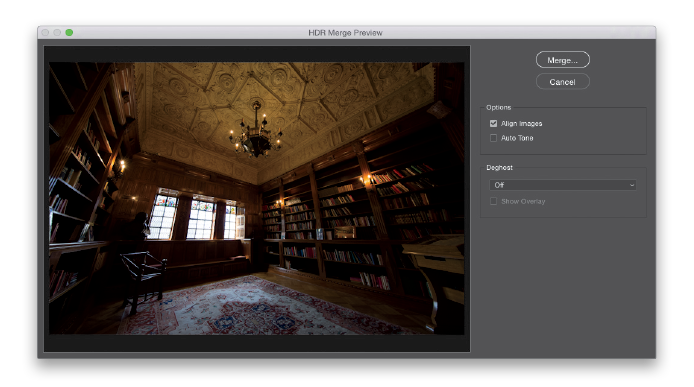
Step Three: Before you click Merge, I recommend turning the Auto Tone checkbox on/off to see how it looks (this is the same Auto option found in Camera Raw’s Basic panel, and covered in Chapter 1). In nearly all the HDR images I’ve tested (and it’s a bunch), Auto Tone has looked at least a little, if not a lot, better, so it’s worth toggling it on/off to see what you think. You can see the difference here between this auto-toned image and the one with Auto Tone turned off in Step Two. If you ask me, this one looks quite a bit better (and I usually leave Auto Tone turned on when I’m processing my own HDR images). While we’re talking checkboxes, the Align Images checkbox is on by default, but what it helps with (mostly) are shots you handheld while bracketing. If the alignment is off a little (or a lot), it’ll fix that automatically. If you shot your HDR on a tripod, it doesn’t need to align anything, so you can skip it and it’ll process faster.

Step Four: The Deghost feature helps if something was moving in your photo (like someone walking in your frame, who now appears like a semi-transparent ghost, but it doesn’t look cool, it looks like a mistake). By default, Deghost is turned off (only turn it on if you have visible ghosting). To turn it on, from its pop-up menu, choose either Low (for mild deghosting), Medium (for more), or High (if there’s a lot of ghosting in the image), and it does a pretty amazing job of basically pulling a non-moving area from one of the three bracketed exposures and seamlessly displaying it, rather than the ghosted movement. I always start with the Low setting and only move up to Medium or High if the ghosting is still visible. By the way, when you turn this on, it has to rebuild the preview again, so it’ll take a few seconds (and you’ll see an exclamation point icon in the top right of the image).
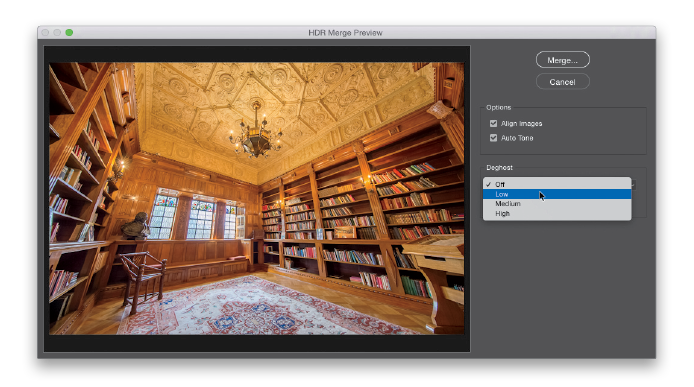
Step Five: If you want to see the areas that are being deghosted in your image, you can turn on the Show Overlay checkbox (beneath the Deghost pop-up menu) and after a few seconds (it has to rebuild a new preview), the areas that are being deghosted will appear in red (there isn’t anything moving in this image, which was shot on a tripod, so I turned the Show Overlay checkbox back off, and then chose Off from the pop-up menu, again).
TIP: Less Bracketed Images Is More—For the type of math Camera Raw’s Merge to HDR does, you don’t need a lot of bracketed images. In fact, according to Adobe, not only are three bracketed images enough (one normal, one two stops under, one two stops over), you can even skip the normal exposure and just use two images and have lots of detail (versus using more bracketed images). Pretty wild, I know.
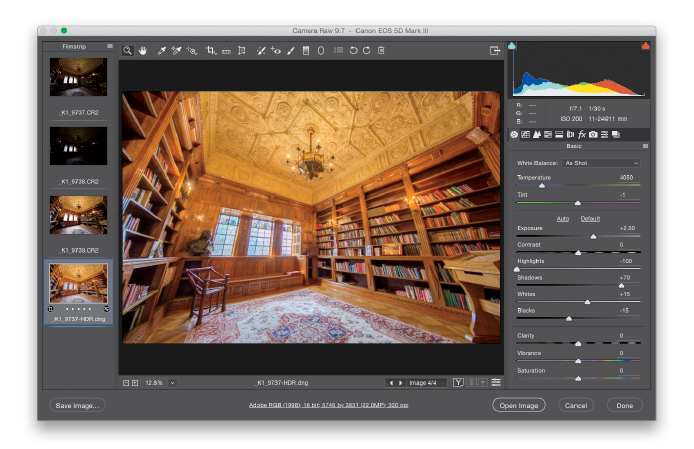
Step Six: So far, you’re looking at a preview of how your merged HDR will look, but it’s just a preview. When you’re finished making your checkbox choices, click the Merge button, it’ll ask you where you want to save your image, and then it starts processing the actual HDR image. It takes a minute or so (depending on how many bracketed images you used, the size of your images, the speed of your computer, etc.). When it’s done merging, this new 16-bit HDR appears as a RAW DNG file in Camera Raw’s Filmstrip (as seen below; you read that right—your combined HDR image is a RAW file, which is pretty amazing unto itself).
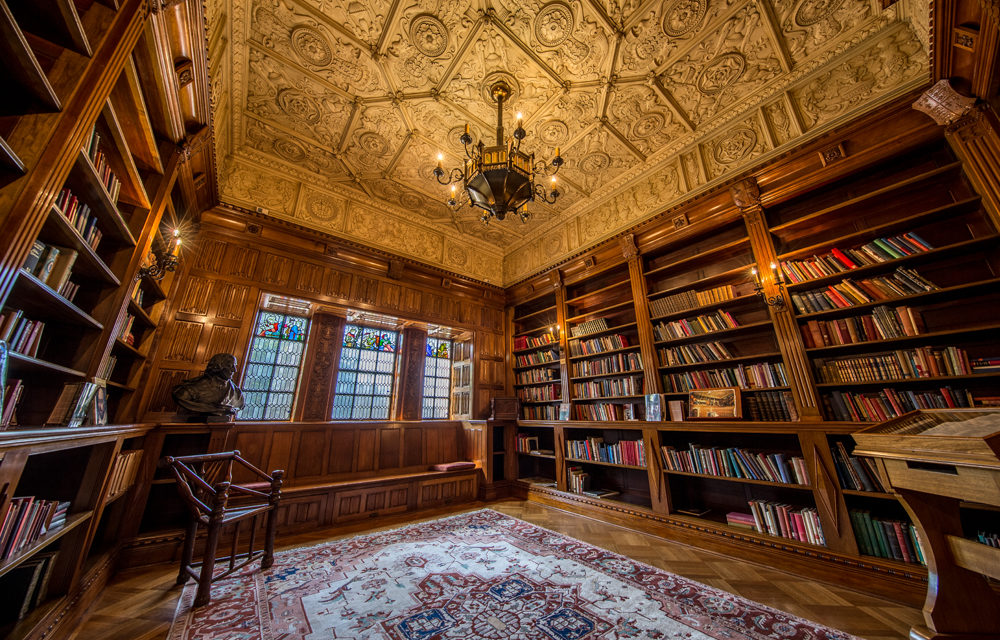
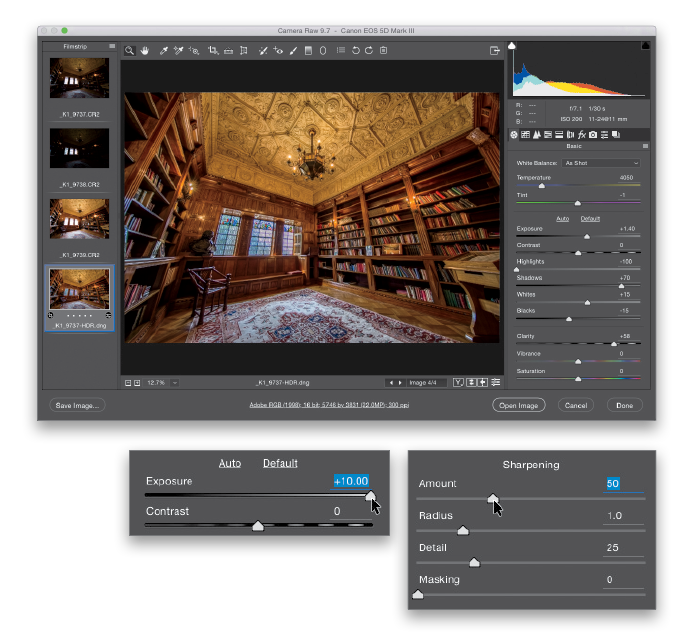
Step Seven: Now, normally, you can drag the Exposure slider to +5.00 or –5.00. Well, because of the hugely expanded tonal range in 16-bit images, that range is now +10.00 (as seen below on the left) or –10.00. Hopefully, you’ll never take an image whose exposure is off by 10 stops, so I’m just letting you know the 16-bit HDR image has a greatly expanded range, and that helps us by giving us some highlight headroom and better results when it comes to noise when you open up the shadow areas a lot. Okay, now we can start toning the image, and in this particular image, there’s just not that much to do (especially since we already applied an Auto Tone earlier). All I did here was lowered the Exposure to +1.40 because it was a bit too bright, cranked up the Clarity amount to +58 (wood loves clarity—it really makes it “pop”), then I went to the Detail panel, and in the Sharpening section, I increased the Amount to 50 (as seen below on the right). That’s it, your first 16-bit HDR image in Camera Raw.
Excerpt from Scott’s new book, The Adobe Photoshop CC Book for Digital Photographers. It’s in stock now (in print and eBook formats) at Barnes & Noble, Amazon, and wherever Photoshop books are sold.


Wow!! You did a great job on the website. I am thinking of renewing again.
That’s great, Joseph! We’re happy to hear that you’re enjoying the site. 🙂
Love this way just because of another piece I do. I have used the Camera Raw with Photoshop, I know there are settings a bunch and I have to know the thing about If I doing HDR, is it necessary to take multiple shots? Thanks for the tutorial.
Well image hdr image created technique here you published . I have seen this post . Liked and appreciate it , thanks .
Hello Kim Doty, I got a clear idea of how to create 16-Bit HDR Images in camera raw, I was so confused until i read your article, I really appreciate.
This is a very important technique to merge the image. Also, your exposure adding technique was good.
Good explanation….I read your article, I really appreciate…thanks.
Wow, pretty cool tips. I really appreciate your post. I definitely visit this blog again