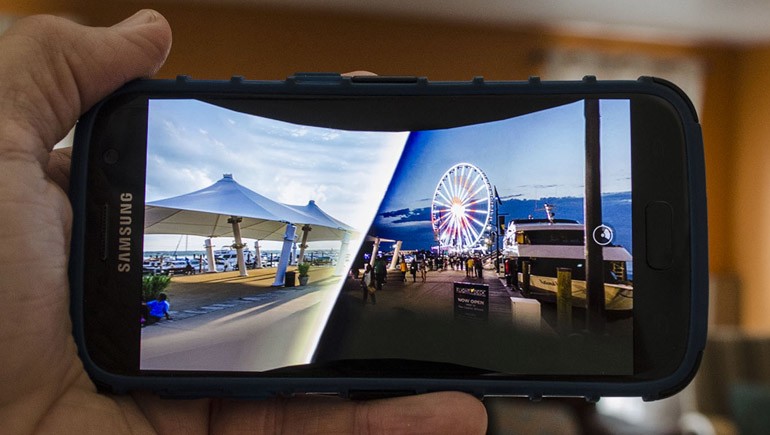
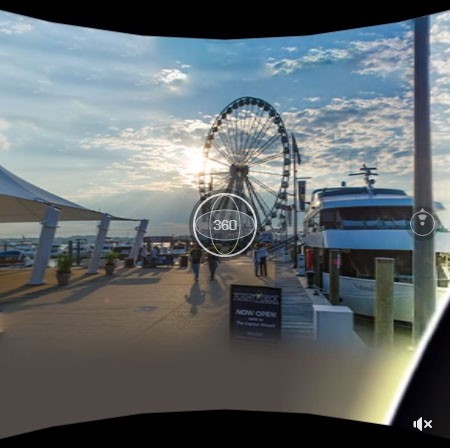
One of the most exciting new technologies is the advent of 360° video. These videos present a full wrap-around panorama that can be explored interactively with the correct viewer. Facebook includes an easy way to use this viewer simply by marking a video as 360°. It allows viewers to physically turn around and explore the video with their mobile device, as if their phone was able to let them see into a separate virtual realm that surrounds them!
Creating a full 360° video usually requires a special (and expensive) camera, but by using a simple DSLR and a bit of Photoshop know-how, we can create our own 360° panorama that can be animated and exported as a video. In this tutorial, we explore that idea as we create a full wraparound panorama that transitions from day into night.
Step One:
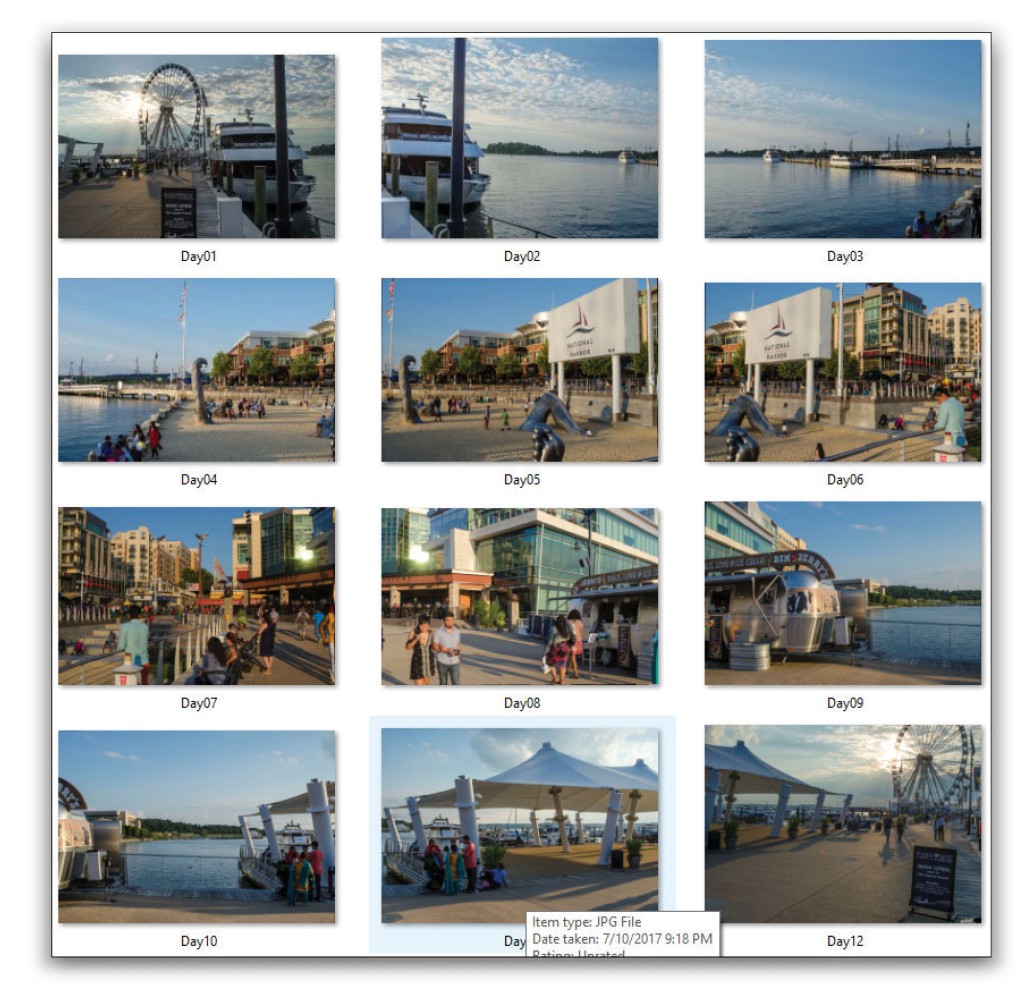
Selecting a visually interesting location is one of the most important decisions in this project. The location should have a high degree of contrast between night and day, but still be visually engaging during both times. Select a spot and find a way to mark it, unless you intend to leave a tripod set up for hours while waiting for day to turn into night. Take a series of shots, turning the full 360°. Be sure that each photo overlaps its neighbor by at least 40%; otherwise, Photoshop will struggle to merge the images together.
Step Two:
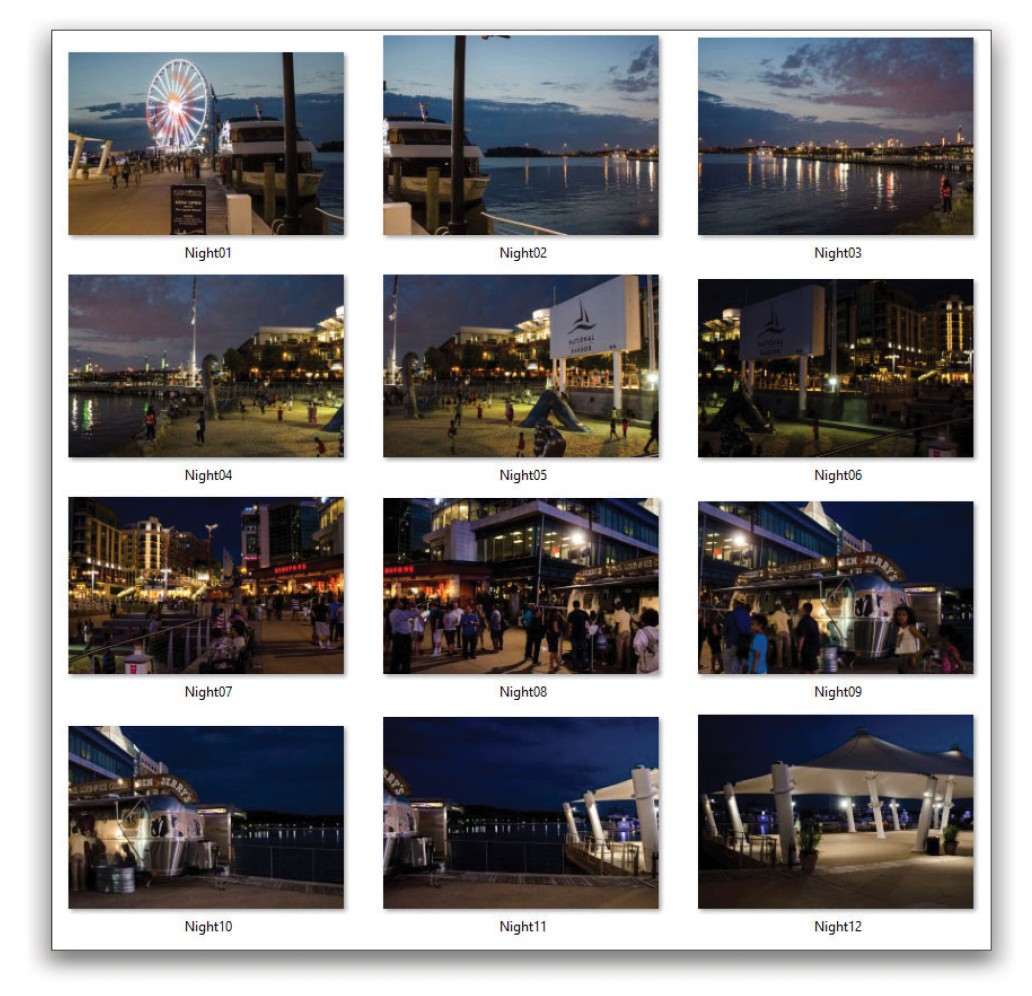
Wait until night falls and repeat the process. Be sure to use the same zoom setting as with the daytime shots or the two sets will be difficult to match up. While waiting for the hours to pass, consider trying a few different vantage points at your chosen location. That way, if the initial location doesn’t work well, you have alternates with which to try to work. While shooting the nighttime series of photos, try to use the same visual markers for the shots as you did for the daytime series; this will help the two sets align better later in the project.
Step Three:
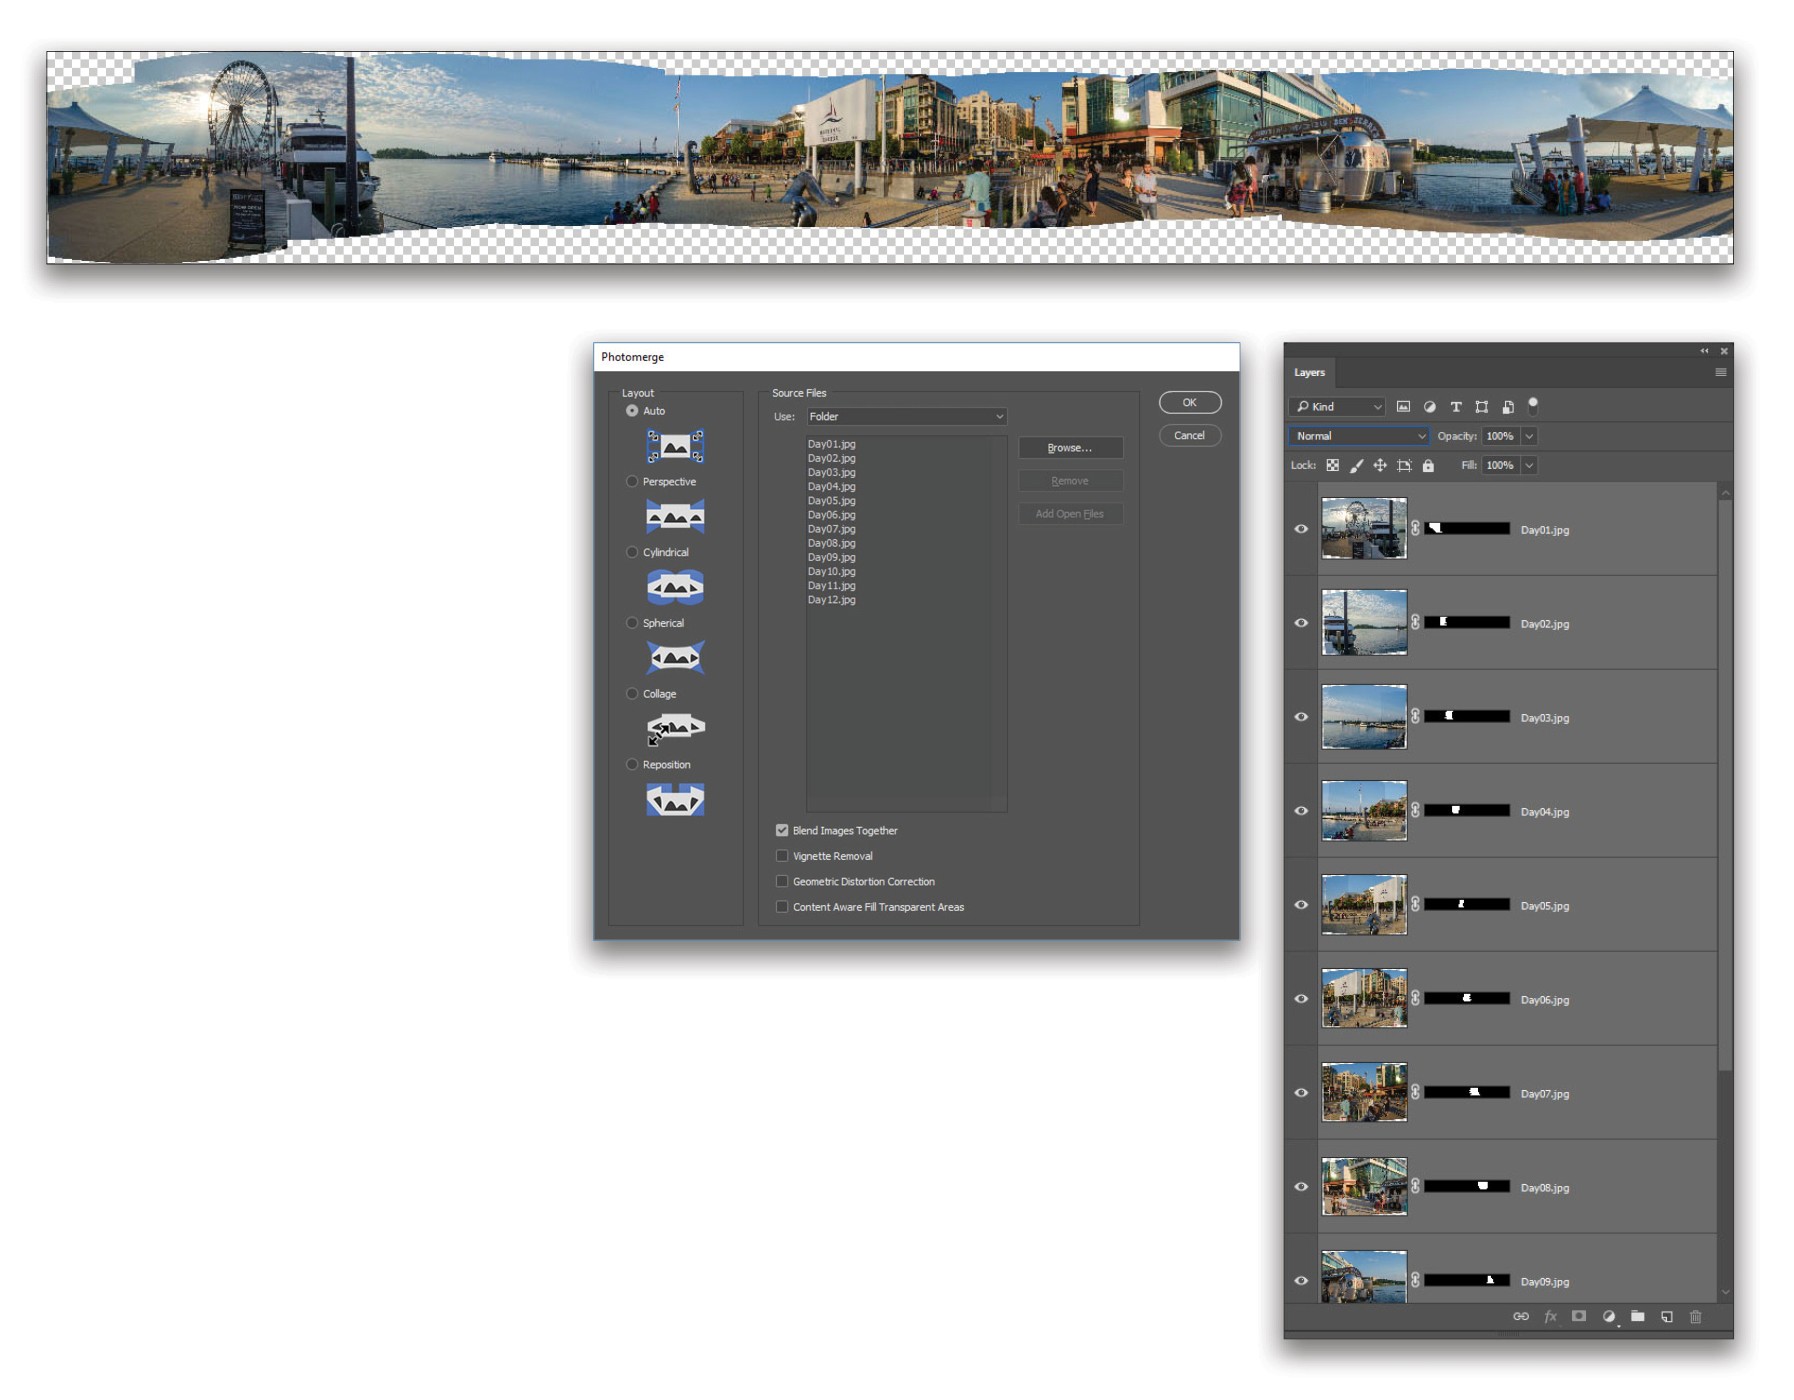
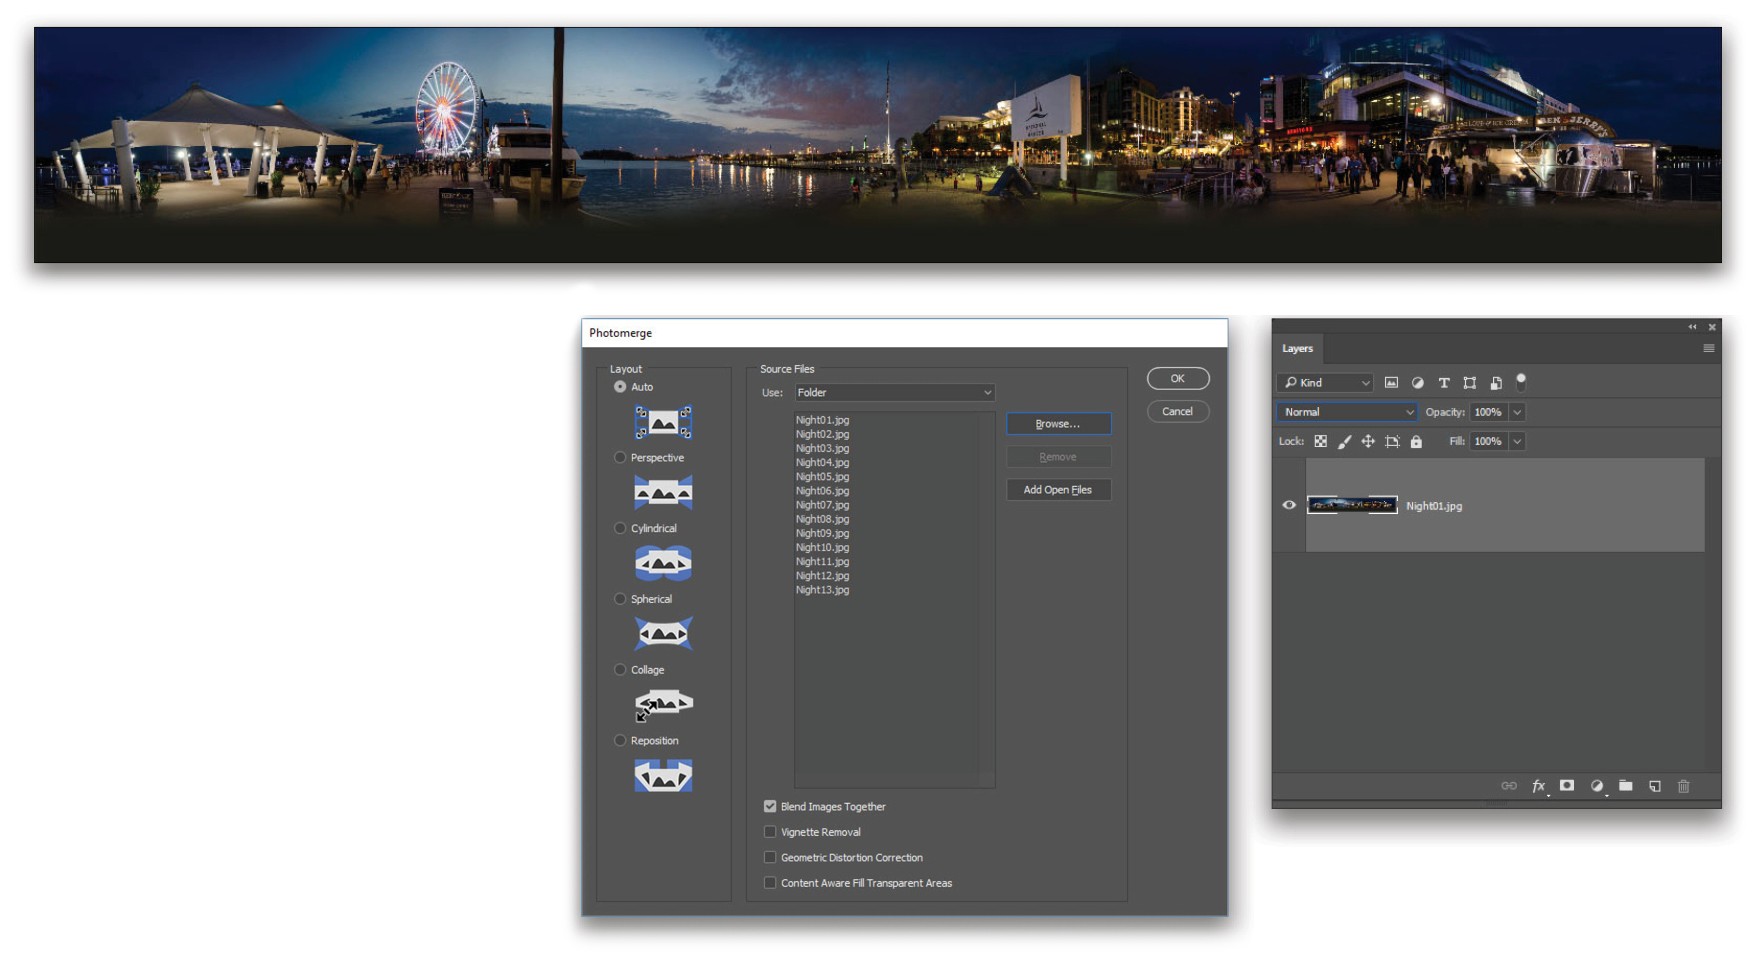
Separate the two sets of photos into different folders then launch Photoshop. Go to File>Automate>Photomerge, set the Use drop-down menu to Folder, use the Browse button to navigate to the folder containing the daytime set of images, and click Open. Make sure the Layout is set to Auto and the Blend Images Together option is checked. Click the OK button and let Photoshop cook the panorama for several minutes.
Step Four:
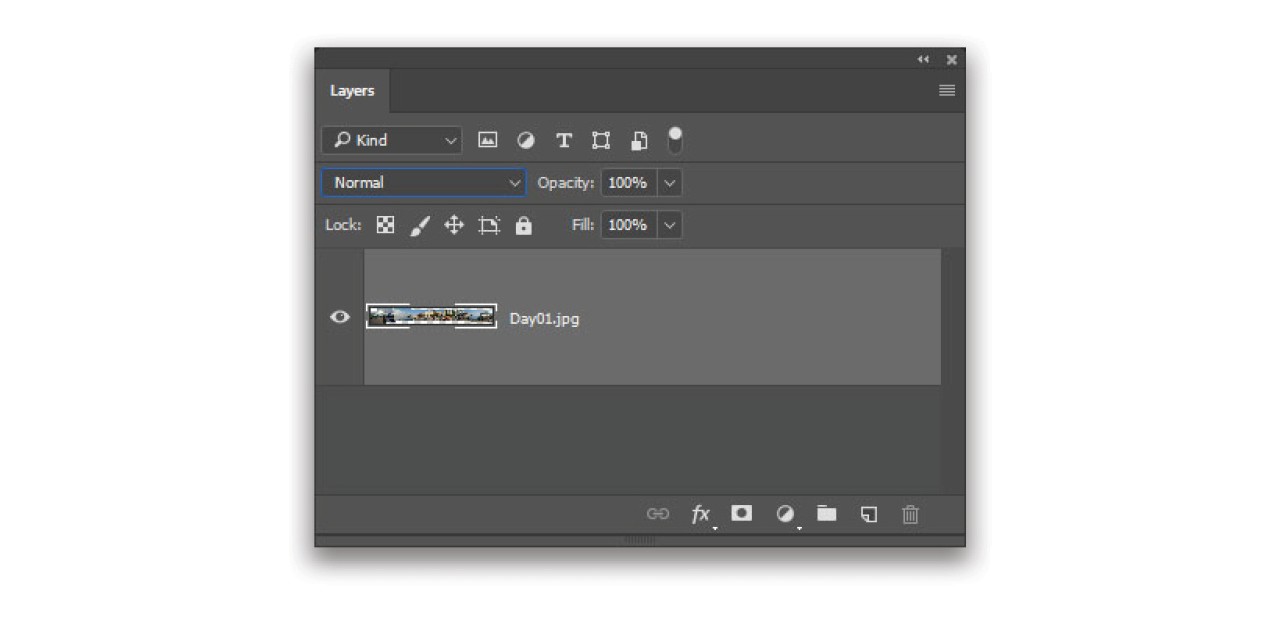
Photoshop combines the images into a single, very wide, full panoramic image. You’ll notice that each individual image is represented as a layer with an associated layer mask. It almost feels bad to ignore all this work that Photoshop did, but all those layers need to be merged into a single layer. Go to Layer>Merge Visible to press them all into one single layer.
Step Five:
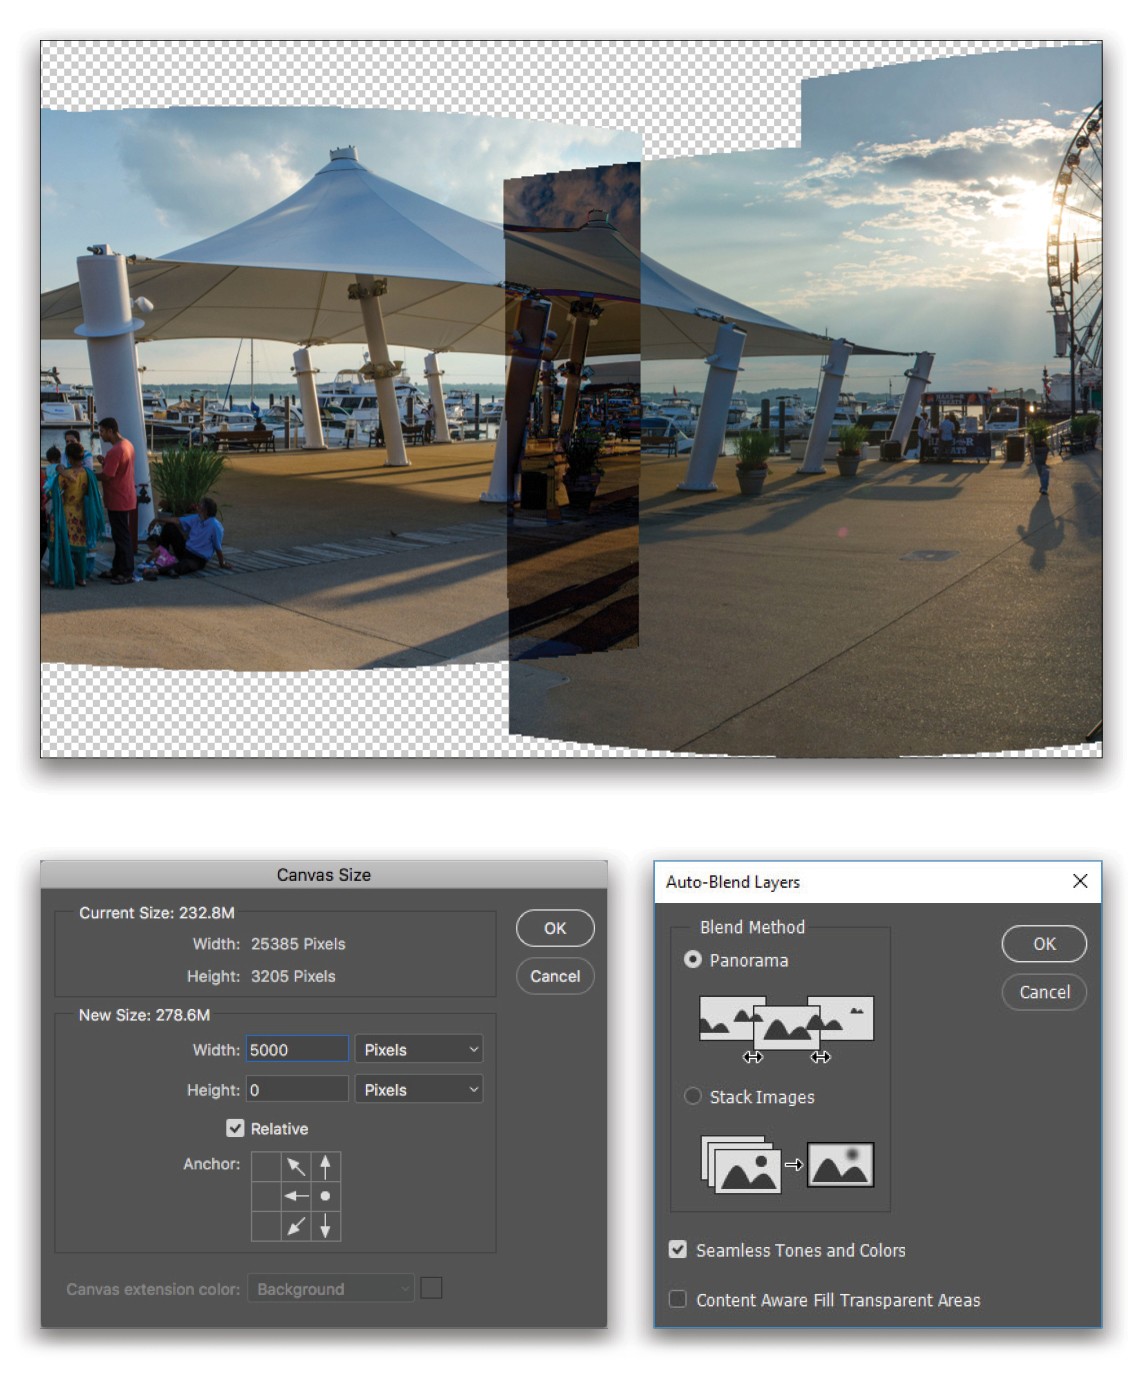
Duplicate the layer with Command-J (PC: Ctrl-J). Go to Image>Canvas Size, click on the Relative checkbox, click the right middle square in the Anchor grid, set the Width to 5,000 pixels, and click OK. This will add some space to the left side of the pano.
Use the Move tool (V) to slide the duplicate to the far left so its right edge aligns with the original layer’s left edge. Setting the top layer’s blend mode to Difference near the top left of the Layers panel will help with the alignment. This mode renders pixels that match as black, and pixels that don’t match as a bright color. Use the Arrow keys on your keyboard to nudge the layer around until it matches the underlying layer as closely as possible.
Now, return the blend mode to Normal, Shift-click the original layer in the Layers panel so both layers are selected, and go to Edit>Auto-Blend Layers. Select the Panorama Blend Method, and click OK.
Step Six:
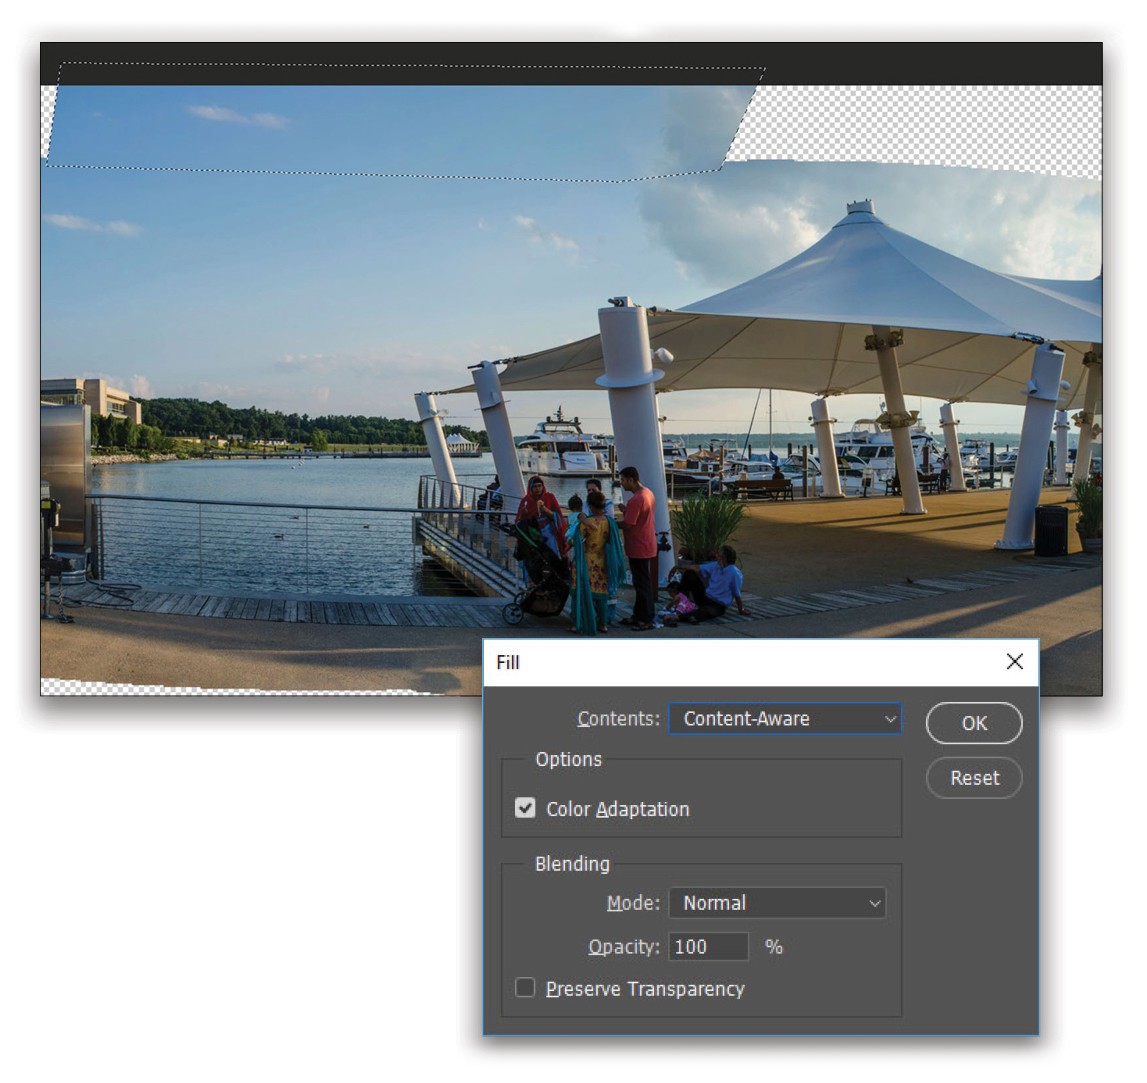
Merge the two layers together using Command-E (PC: Ctrl-E). Use the Lasso tool (L) to create a selection around a small portion of the transparent area above the sky in the stitched photo. Make sure to include a little bit of the sky in the selection. Then go to Edit>Fill and set the Contents drop-down menu to Content-Aware, with the Color Adaption option enabled, and click OK. Photoshop fills in the empty area with more sky! If the process created some strange results, try redoing the selection and run the Fill again until you’re happy with how it looks.
Continue using the Content-Aware Fill to populate all the empty areas, plus repair any spots where the Photomerge created distortion or odd compositing. Don’t worry about getting too precise with trying to re-create parts of buildings or people; just fill in the spaces with similar colors.
Step Seven:
Use the same Photomerge procedure now for the nighttime shots. Once the nighttime panorama is formed, go through the same process as with the daytime image: merge into a single layer, create a duplicate layer, add canvas space, align the edges, then use Content-Aware Fill to fill in the empty pixels.
Step Eight:
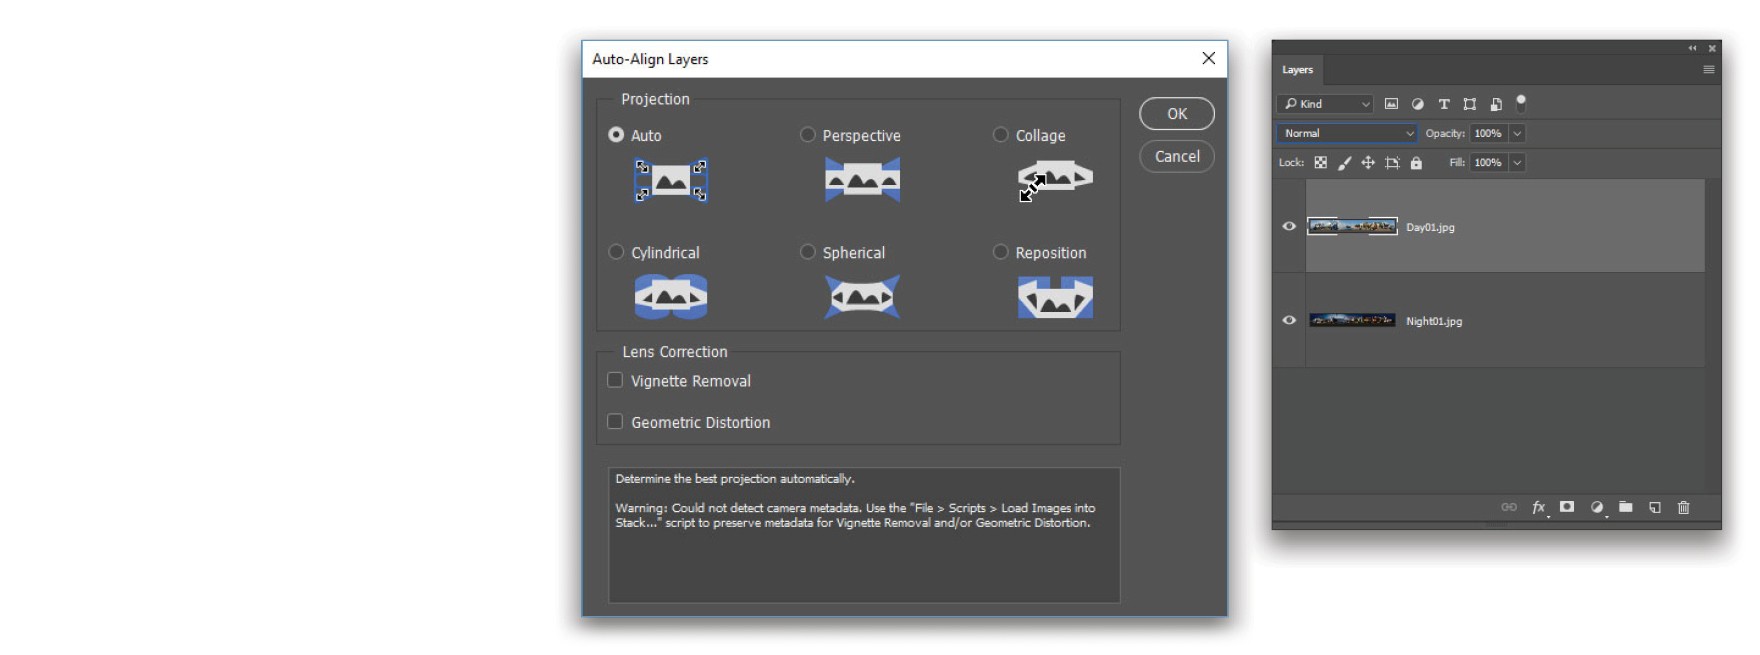
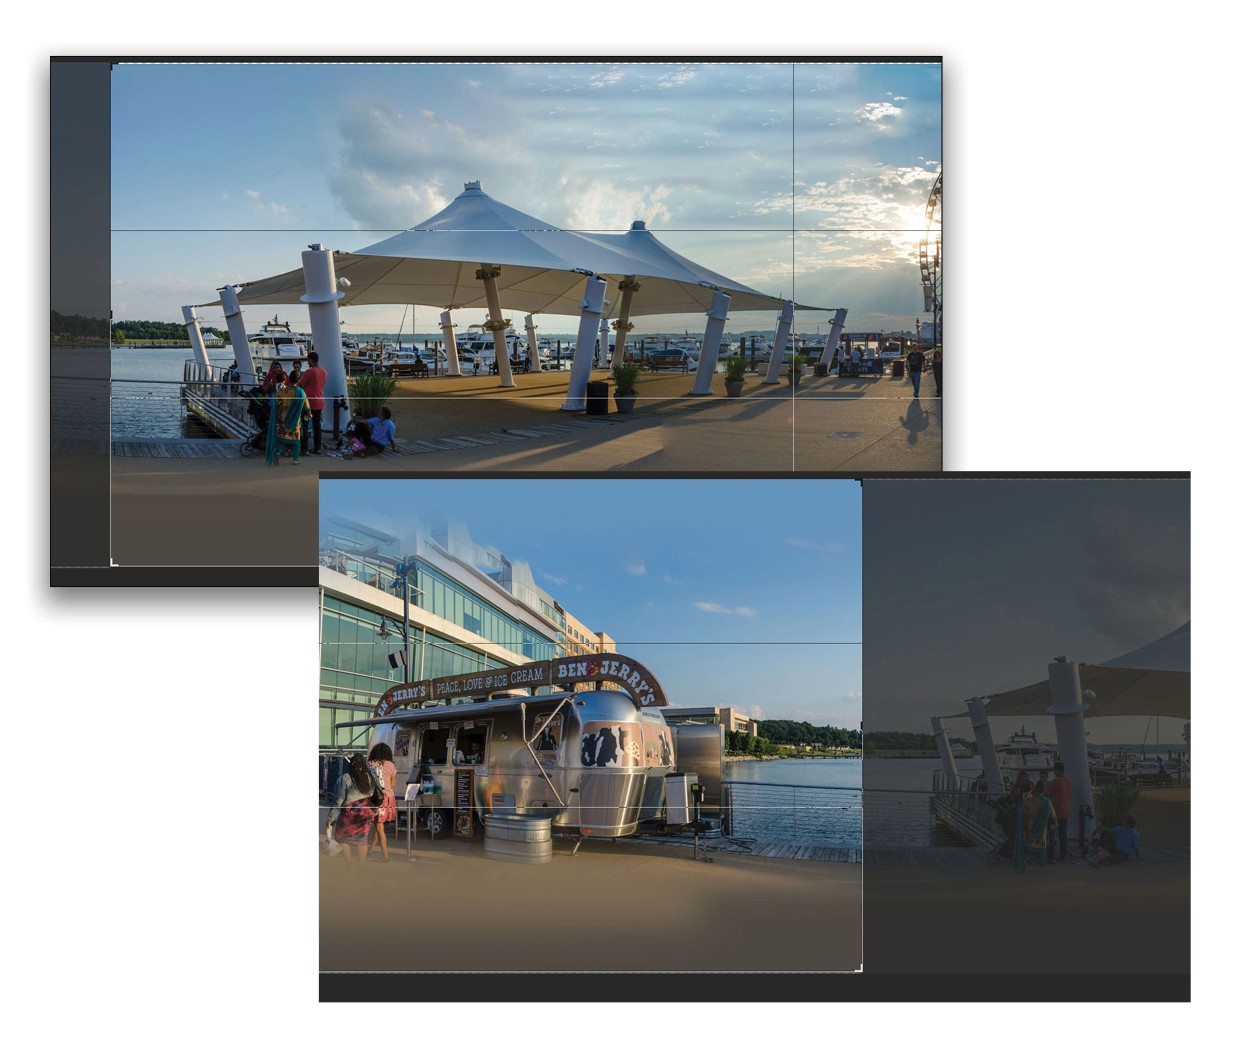
At this point we have two separate panoramic images: one daytime, one nighttime. Using the Move tool, hold the Shift key and drag-and-drop the daytime image over onto the nighttime image, to deposit it as a layer. Depending on how the Photomerge feature assembled the images, you may be able to use Edit>Auto-Align Layers to align the two panoramas. If that doesn’t work, use the Difference mode trick to align them manually.
Step Nine:
Select a logical point within the image to create the “wrap point”; that’s where the two edges of the panorama will meet to create a seam. This needs to be along an area that’s repeated so the visual flow isn’t interrupted (that’s another reason we expanded the canvas and moved the duplicated layer over in Step Five so we’d have areas that repeated at both ends of the panorama). In the example here, the fence post overlooking the water makes a good transition point due to the lack of highly detailed elements along it. Select the Crop tool (C), activate the Delete Cropped Pixels option in the Options Bar, and crop the image horizontally so both edges are on that transition line at opposite ends of the image. Then hit Enter to crop the image.
Step Ten:
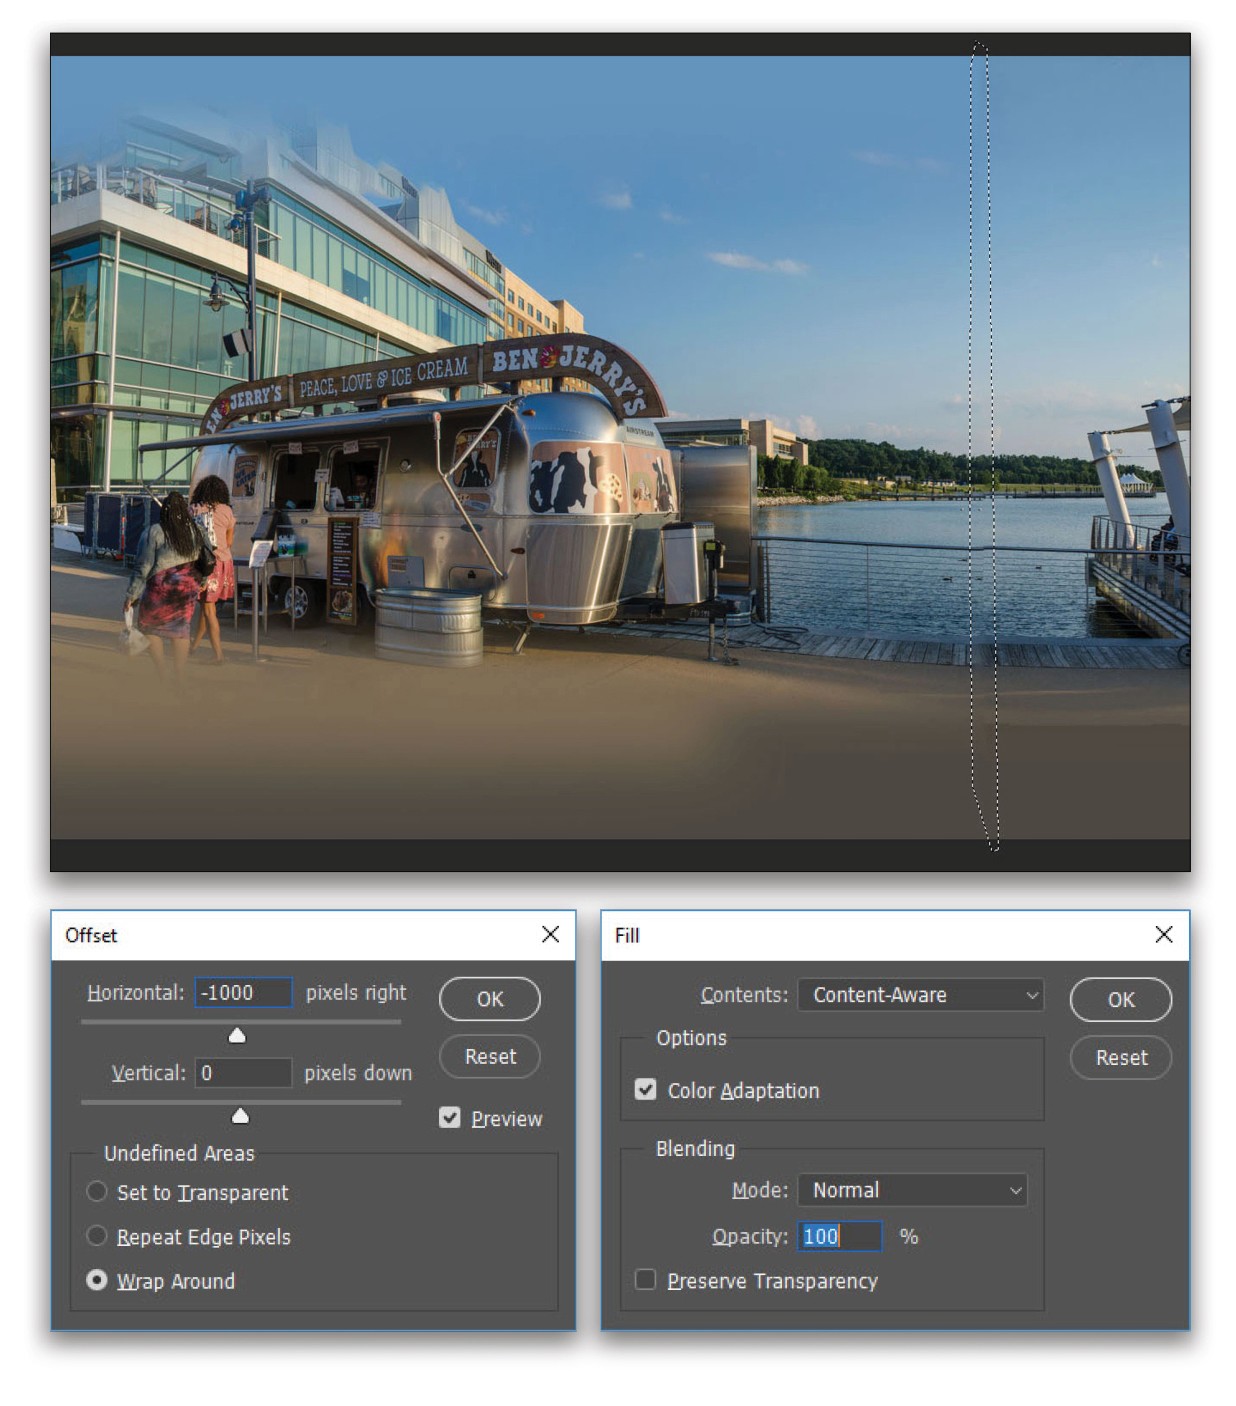
There’s an easy way to check and see if the image seam lines up properly. Go to Filter>Other>Offset. Enter –1000 for the Horizontal setting and Photoshop slides the entire image to the left and wraps the left edge around to the right side of the image. If the area where the edges of the image meet (as shown in the selected area here), select that area with the Lasso tool, and use the Content-Aware Fill to treat the seam so it has a smooth visual transition. Then click the daytime panorama’s Eye icon in the Layers panel to hide it and do the same process for the nighttime image, making sure to use the exact same setting of –1000 in the Offset filter so everything still lines up nicely.
Step 11:
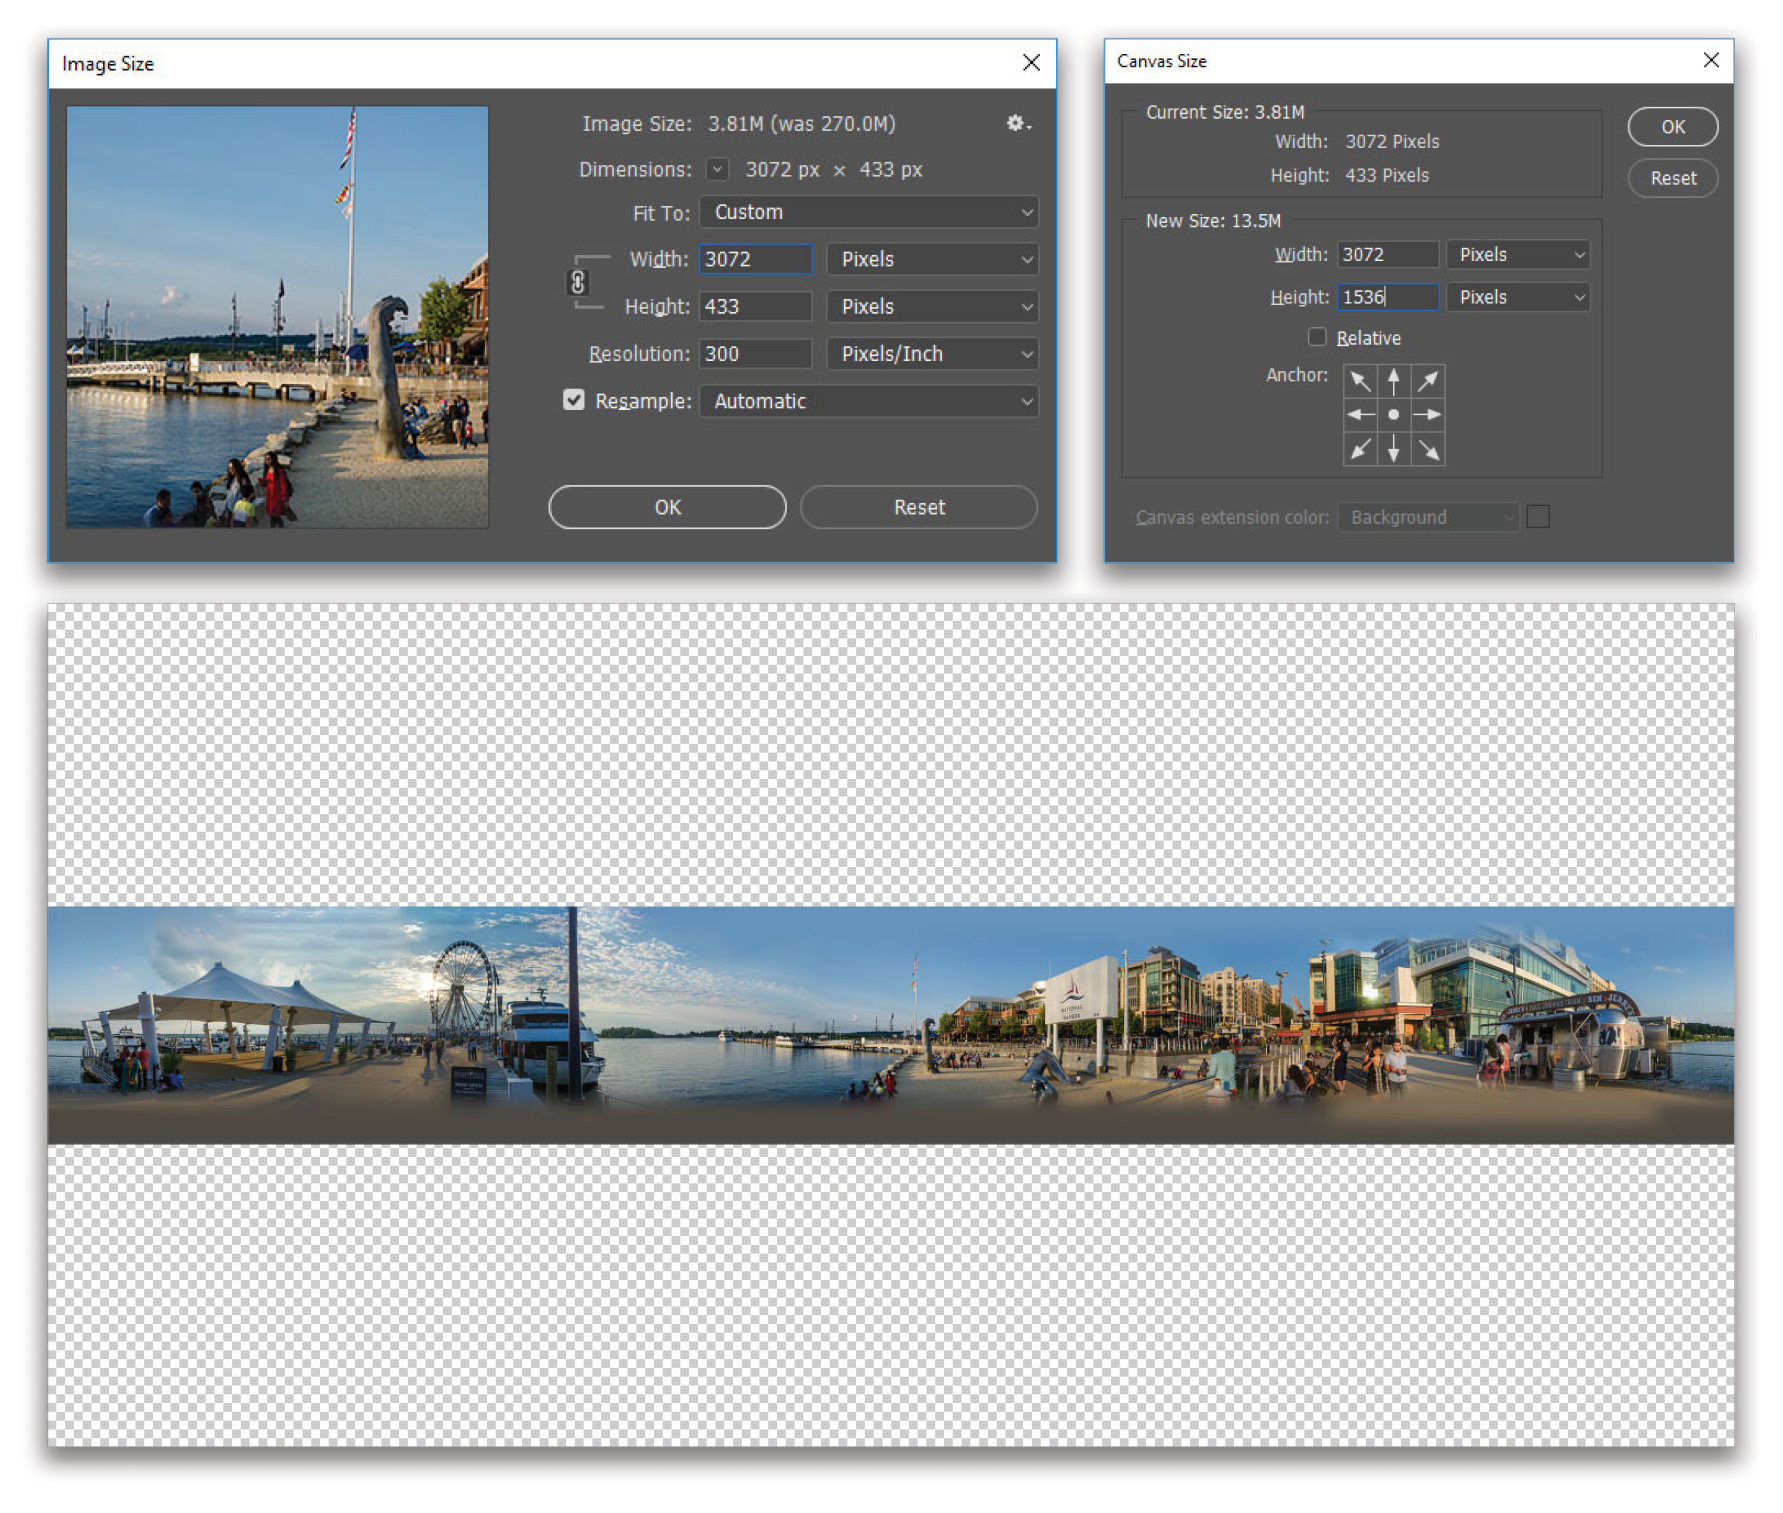
In order for the 360 video feature to work, the video needs to have a strict 2:1 image ratio, and a maximum size setting. Our current panorama project fits neither of those criteria, so let’s deal with the image size first.
Go to Image>Image Size and set the width to 3072 pixels and click OK. After Photoshop resizes the image, go to Image>Canvas Size, set the image Height to 1536 pixels (which is half of the width), and click OK.
Step 12:
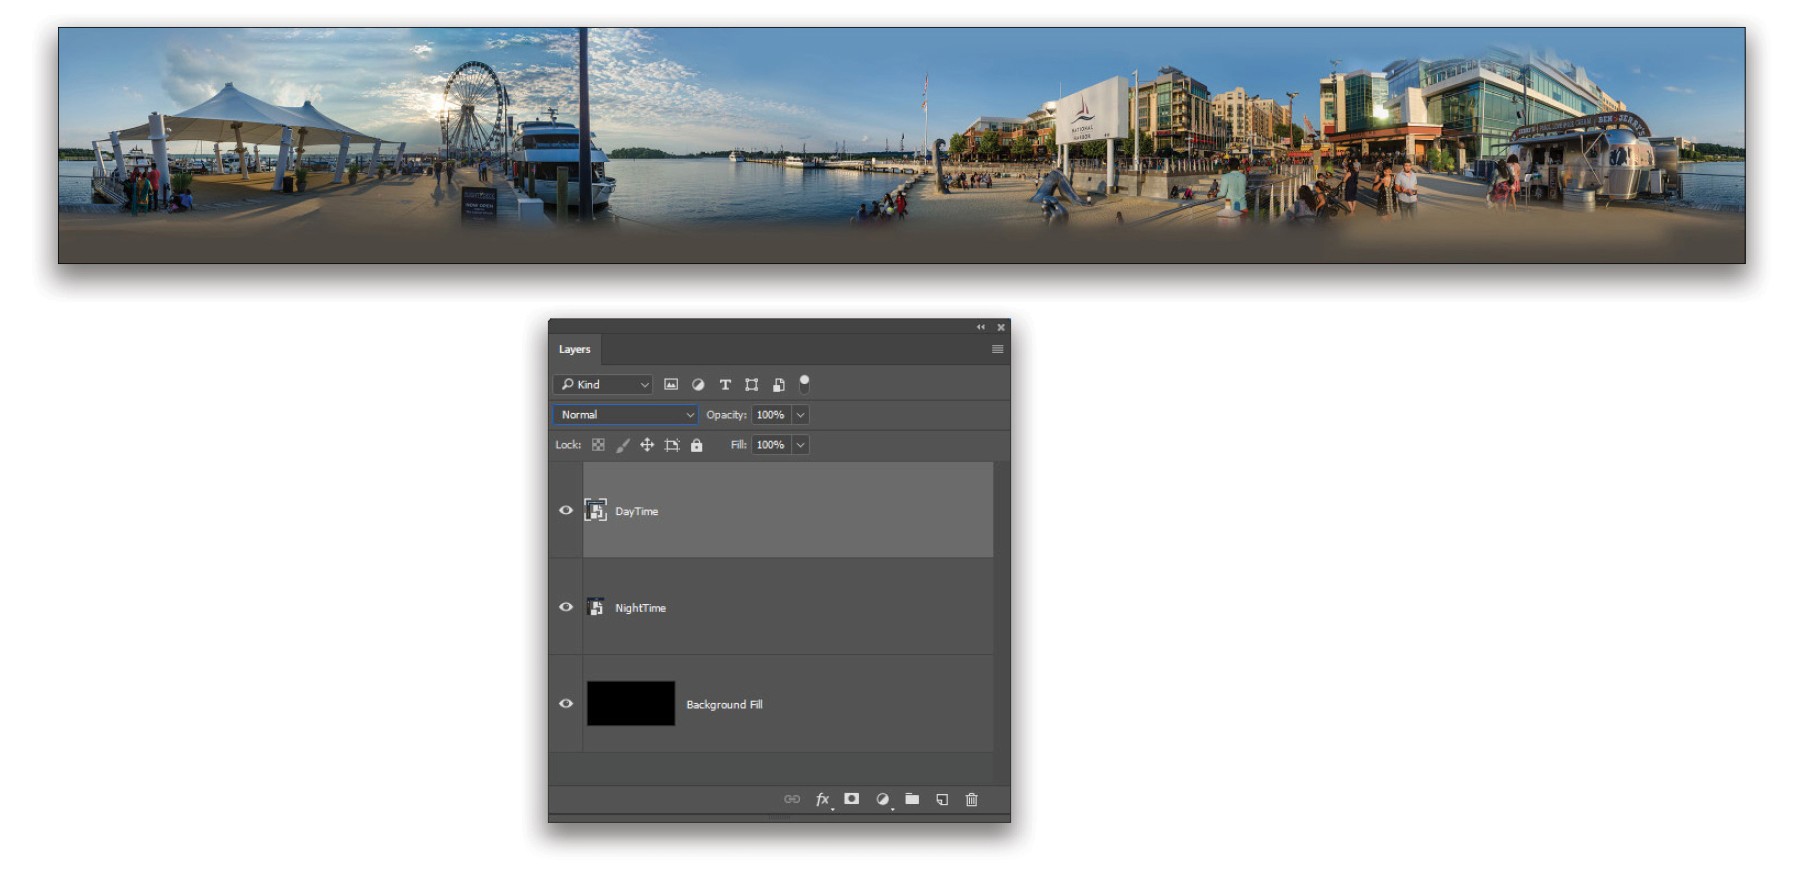
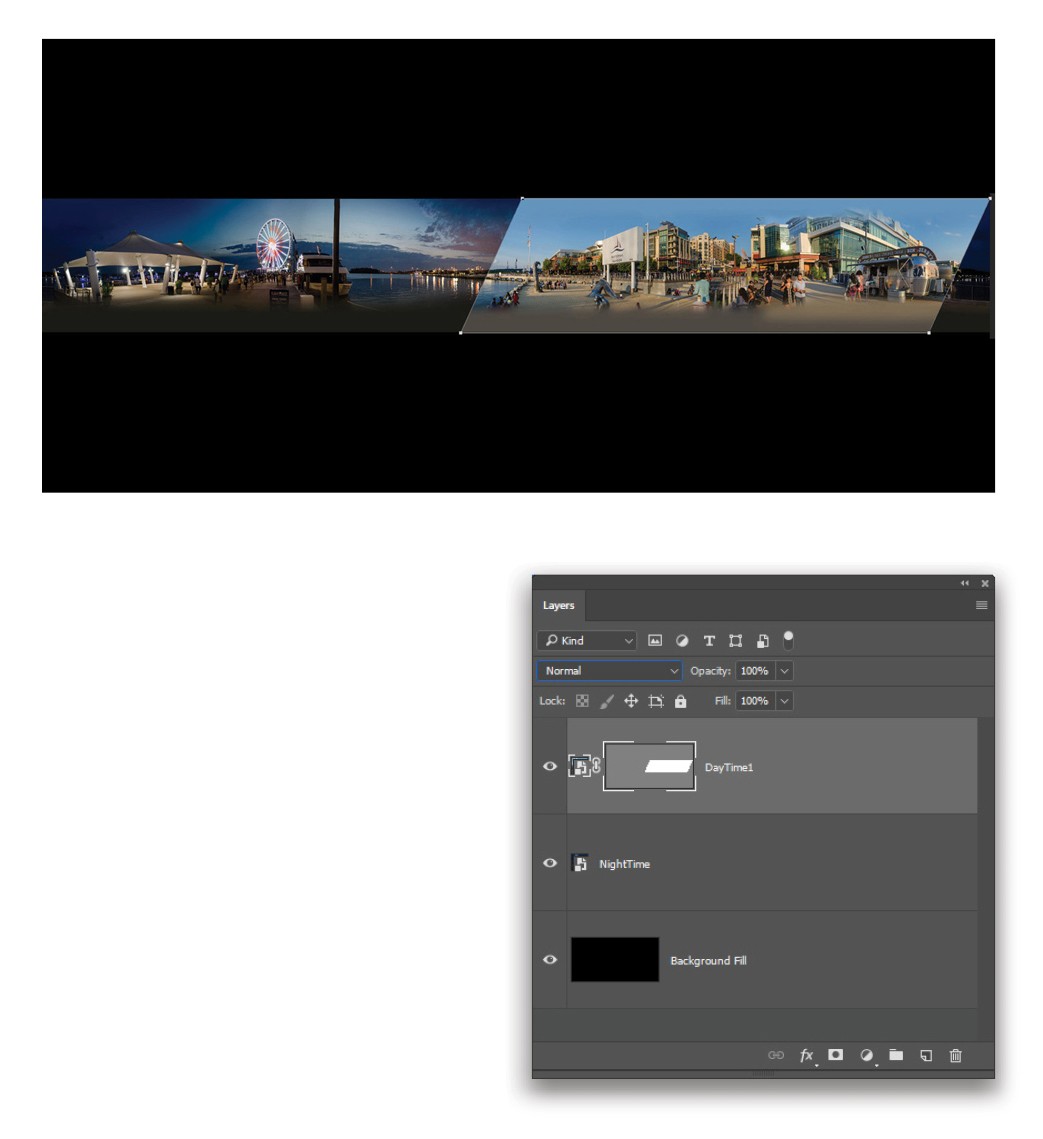
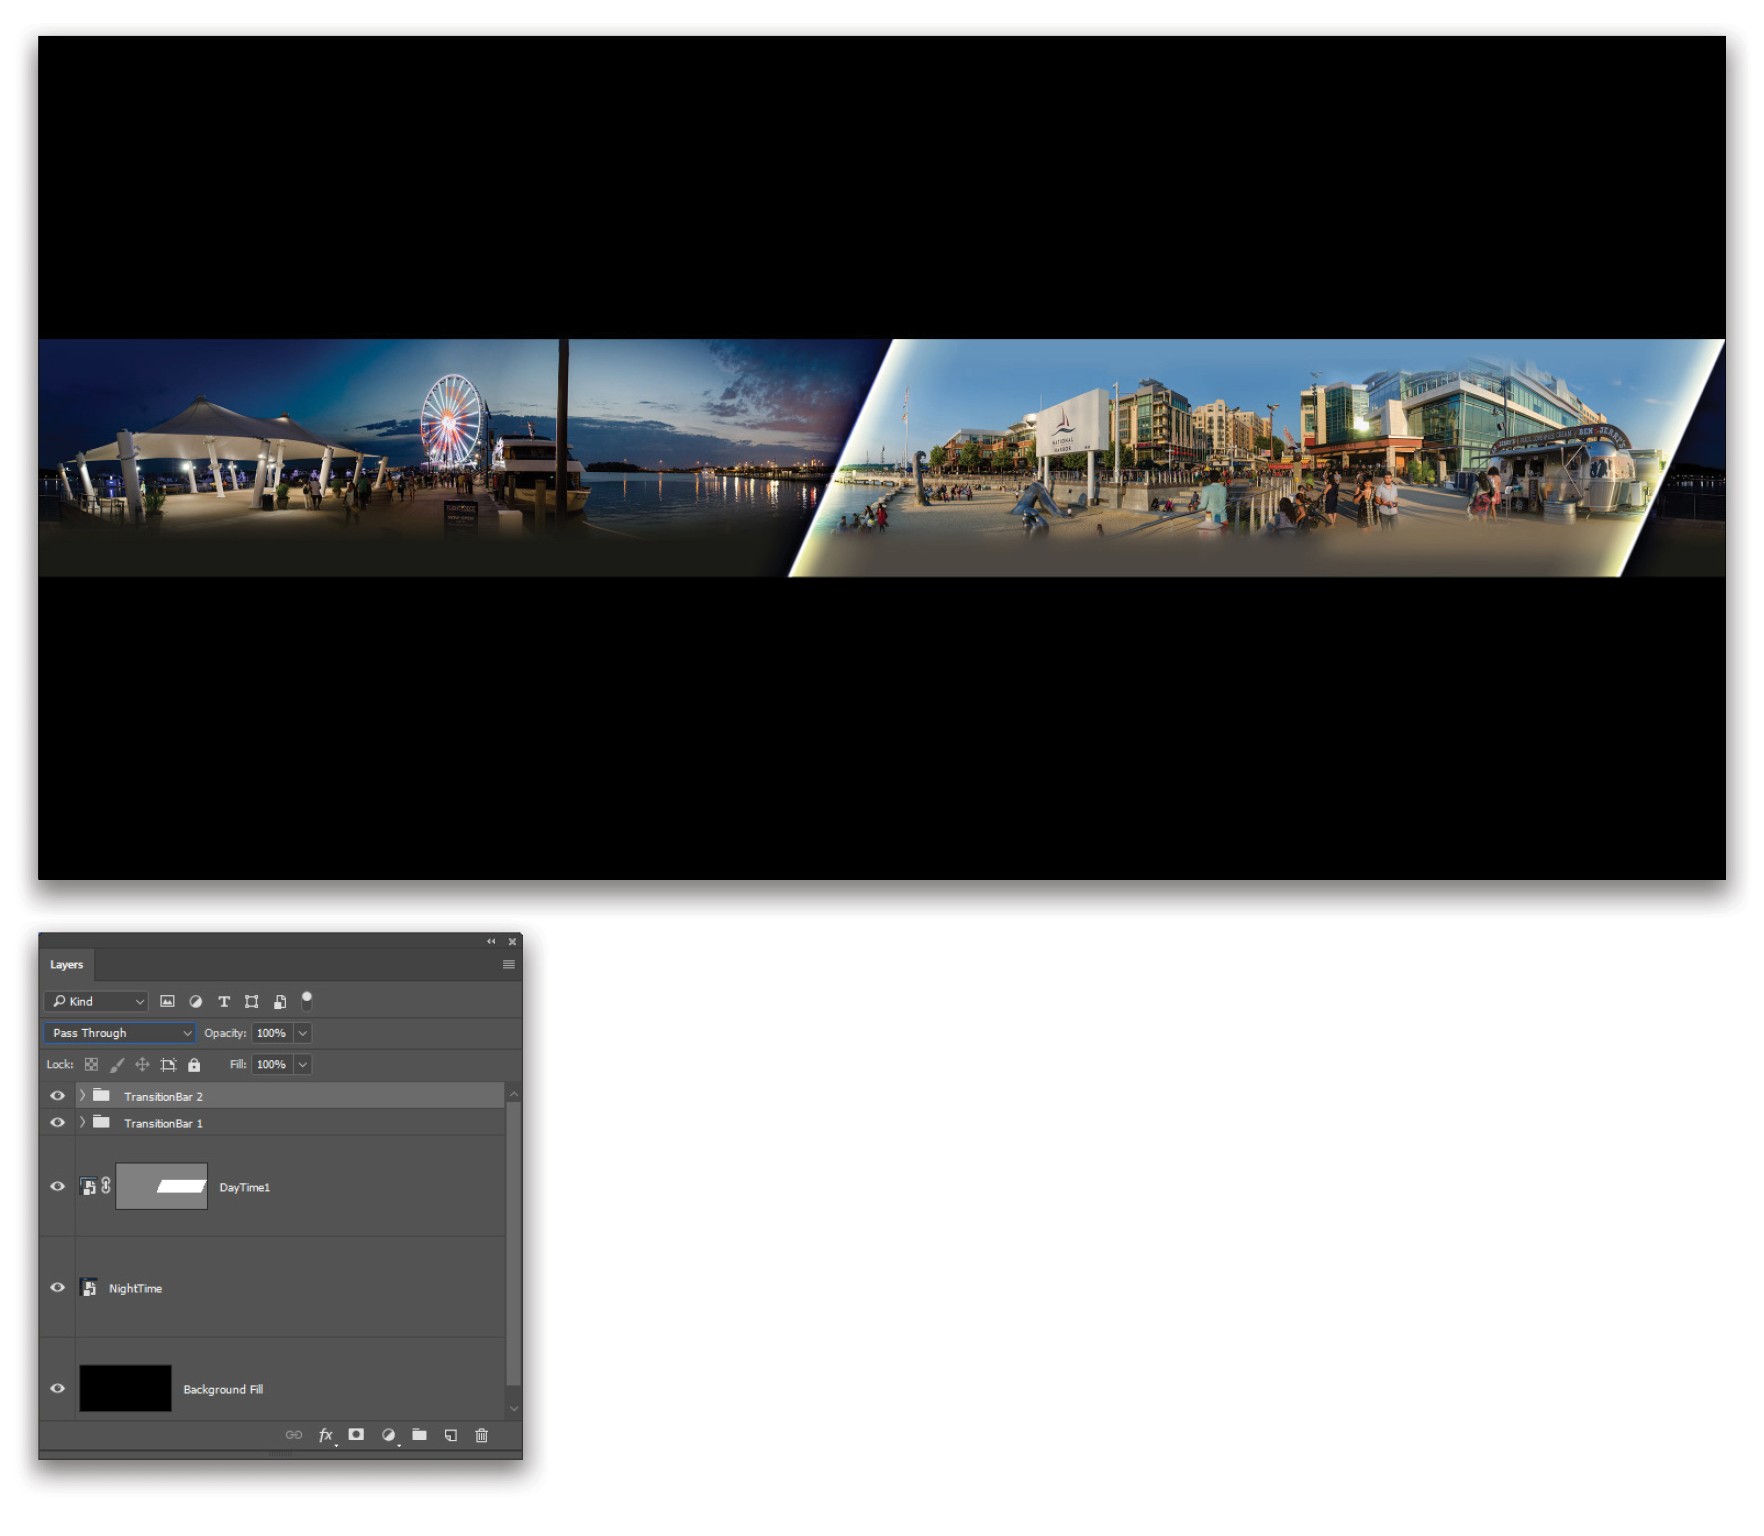
Add a new layer with Layer>New>Layer, name it Background Fill, and click OK. Then tap the D key to set the Foreground color to the default black. Press Option-Delete (PC: Alt-Backspace) to fill the layer with black. Drag this layer to the bottom of the layer stack in the Layers panel. If the top and bottom edges of the panoramas are distracting due to image distortion or poor results from the Content-Aware Fill, consider adding a blank layer over each panorama and using the Brush tool (B) with a Soft Round brush tip. Hold down the Option (PC: Alt) key to sample a color from the sky or ground and then gently create solid color brush strokes to cover up the poorly rendered pixels. (Tip: Command-click [PC: Ctrl-click] the layer thumbnail of the panorama to select it so you don’t paint outside the lines.) Then select the painted layer along with the image layer in the Layers panel and go to Layer>Smart Objects>Convert to Smart Object. Do this for both panoramas.
Step 13:
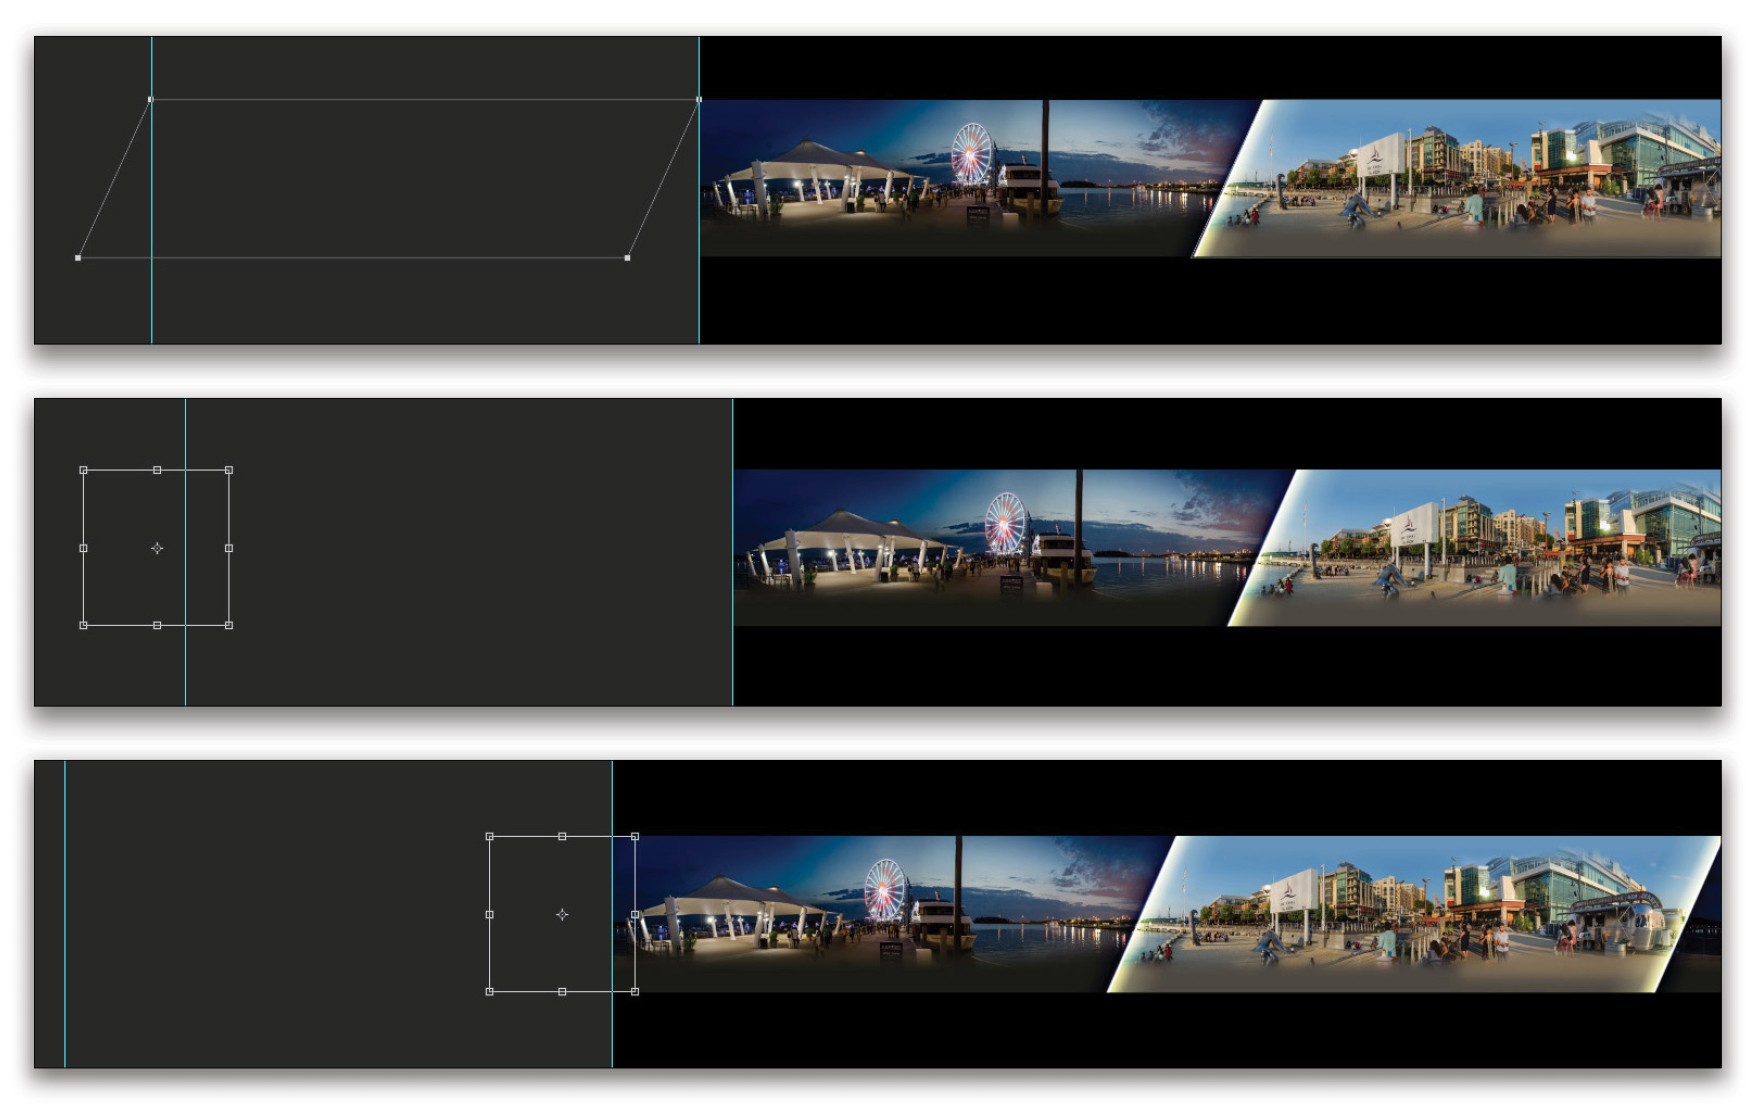
Grab the Rectangle tool (U). Up in the Options Bar, set the tool’s mode to Path (as opposed to Shape), and draw out a rectangle to cover the right half of the image. (Tip: Press-and-hold the Spacebar while drawing the path to reposition it as needed.) Then be sure the daytime smart object is the currently active layer and go to Layer>Vector Mask>Current Path to use the rectangle as a mask for the daytime panorama. Switch to the Direct Selection tool (nested under the Path Selection tool [A] in the Toolbar) and click away from the path to deselect it. Click the bottom-right corner to make that point active (it should turn a solid white). Hold the Shift key, then click-and-drag the bottom-left point and drag it to the left to create an angled transition between the day and night (the two bottom points should move at the same time). Be sure that the top-right control point for the mask is at the far right of the image.
Step 14:
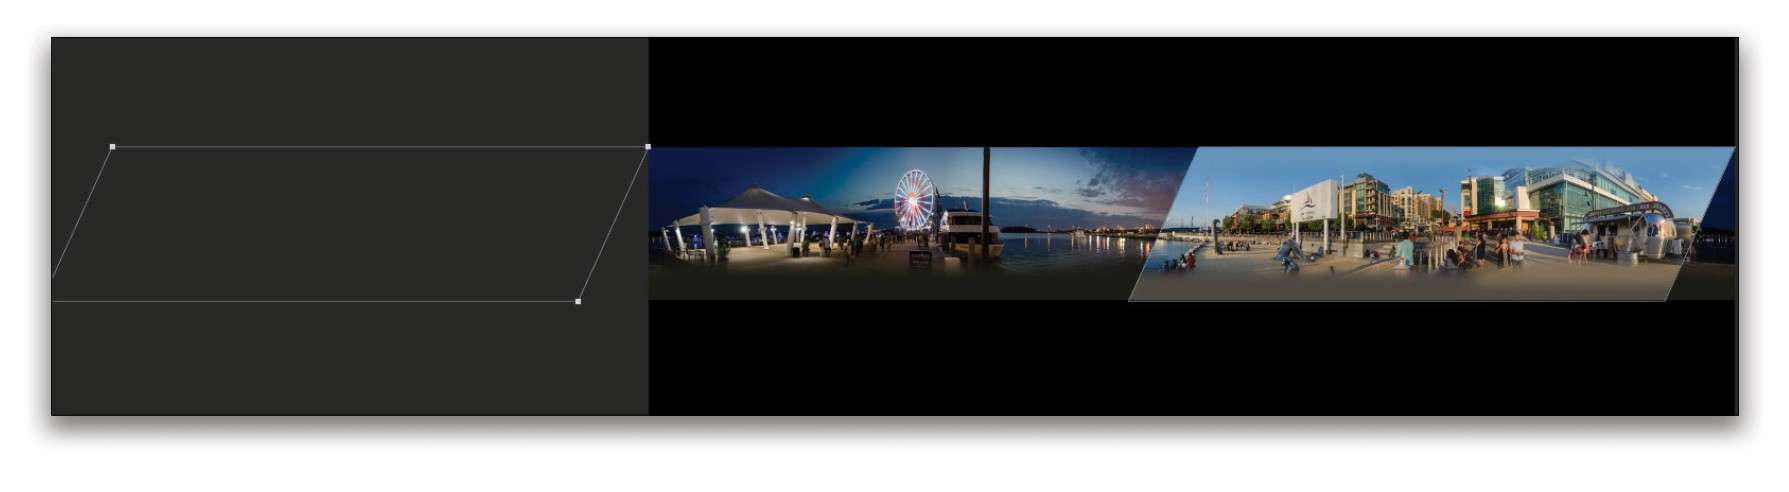
Use the Path Selection tool to select the vector mask shape. Press Command-C (PC: Ctrl-C) to copy the path then press Command-V (PC: Ctrl-V) to paste the path onto itself. Click-and-drag the newly pasted path over to the far left so that the top-right control point aligns with the top left of the image (add the Shift key after you start dragging to maintain horizontal alignment). This will help ensure seamless looping once the image is animated.
Step 15:
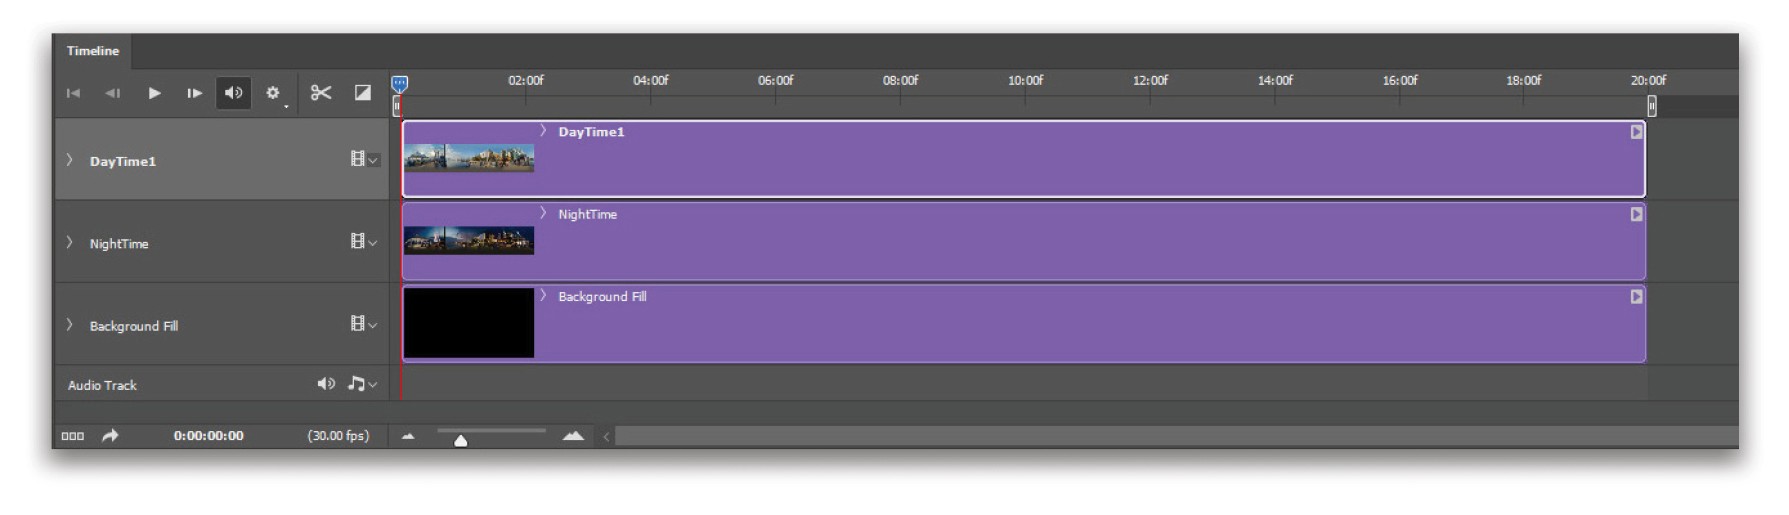
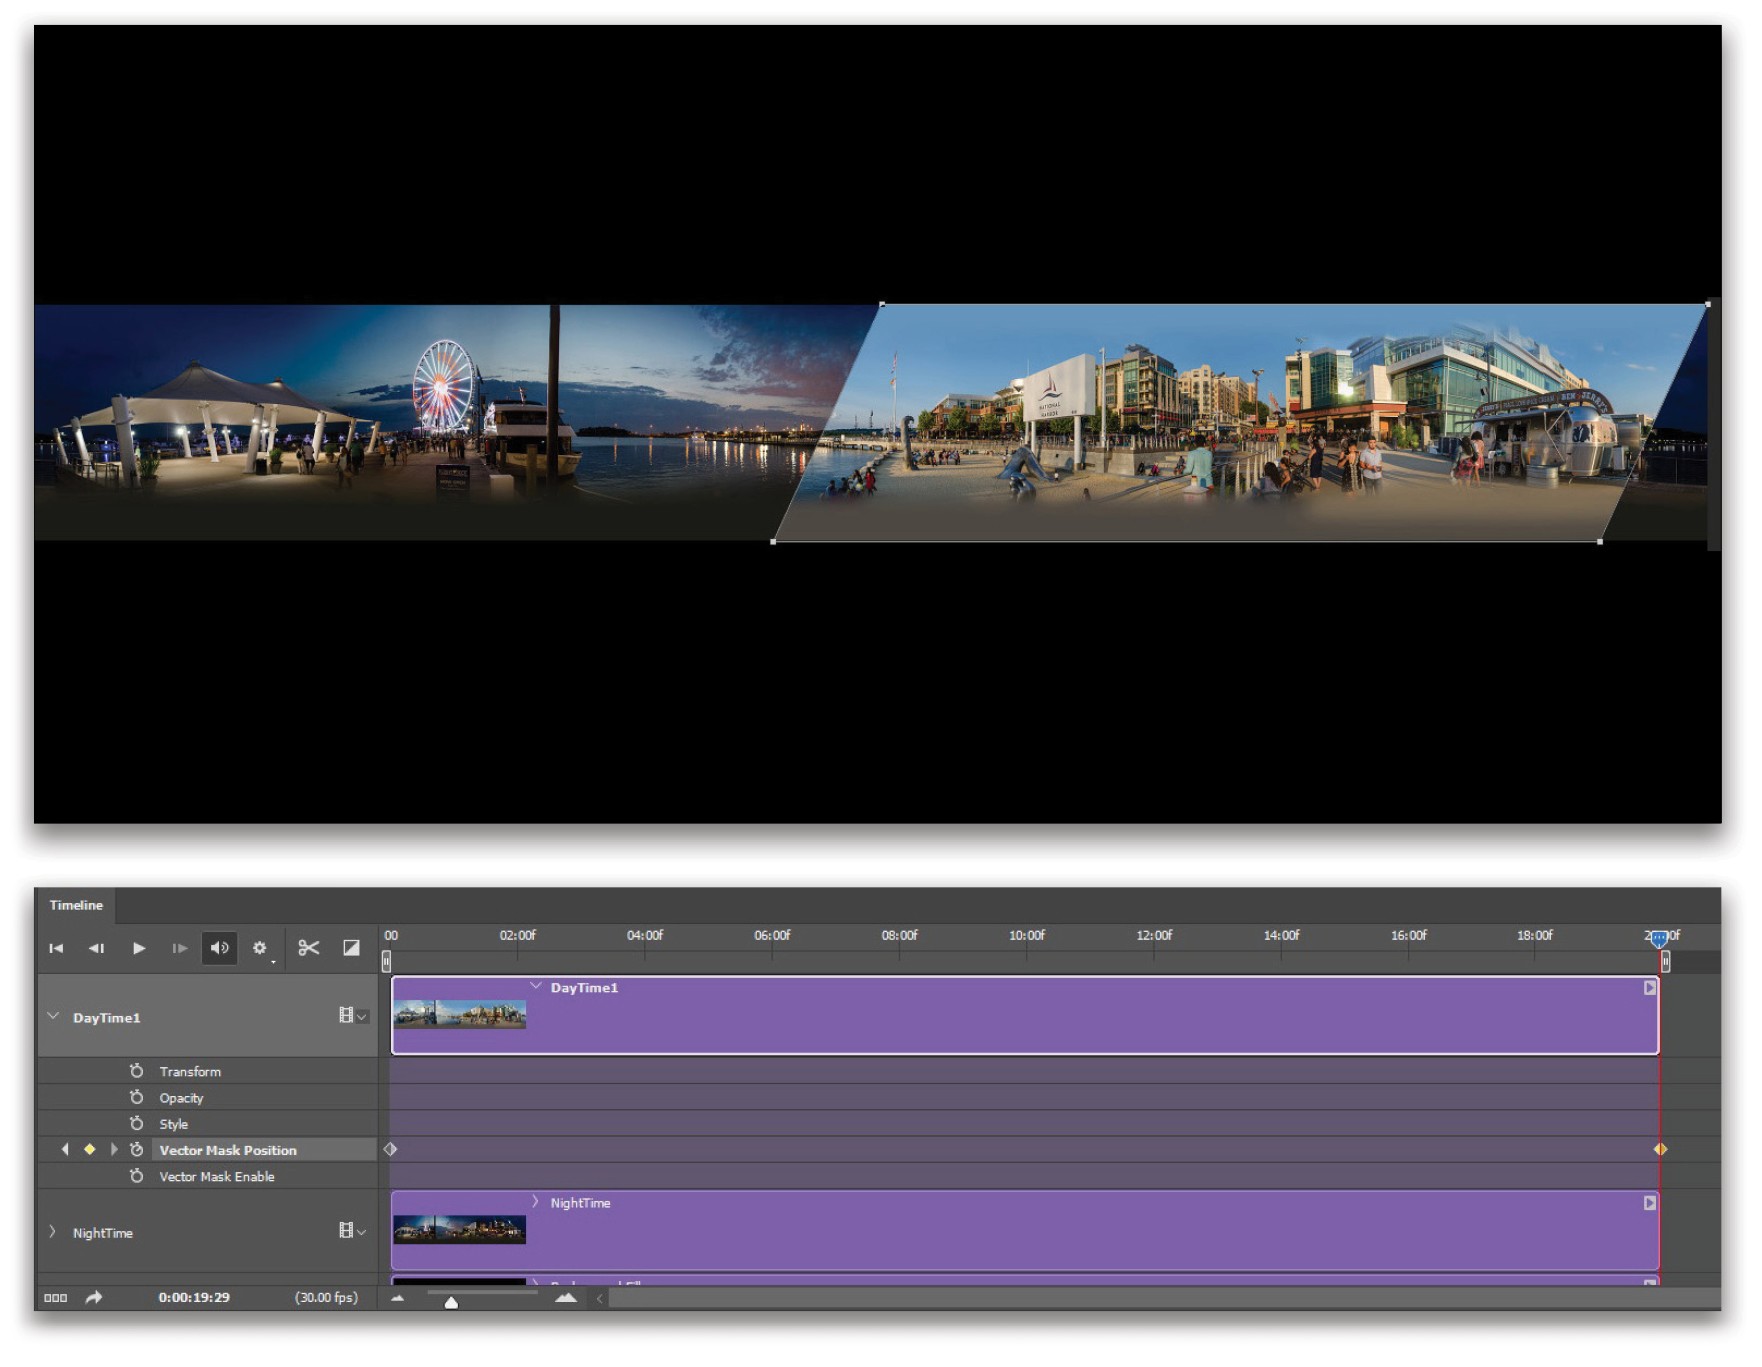
Open the Timeline with Window>Timeline, and click on the Create Video Timeline button that appears in the middle of the panel. Grab the far-right edge of the purple bar representing one of the layers, and drag it out to 20 seconds, which increases the length of the animation. You may need to use the magnification slider at the bottom of the Timeline panel to shorten the length of the layers in the timeline so you can see them in their entirety. Then, drag out the other layers to match that one.
Step 16:
Expand the daytime layer in the Timeline and look for the Vector Mask Position property. Make sure the playhead is at 0:00:00:00, and click the stopwatch icon next to the Vector Mask Position. This adds a keyframe on the timeline for this property at the current position of the playhead. Then drag the playhead to the end of the timeline (0:00:19:29).
With the Path Selection tool and the layer mask active for the daytime panorama, click on one of the shapes and then Shift-click the other shape so they’re both selected. Start dragging both shapes of the vector mask to the right. After you start dragging, press-and-hold the Shift key to maintain the horizontal alignment, and drag until the left shape matches the original position of the right shape. This will automatically add a second keyframe at the playhead’s position. Press the Play button to preview the movement.
Step 17:
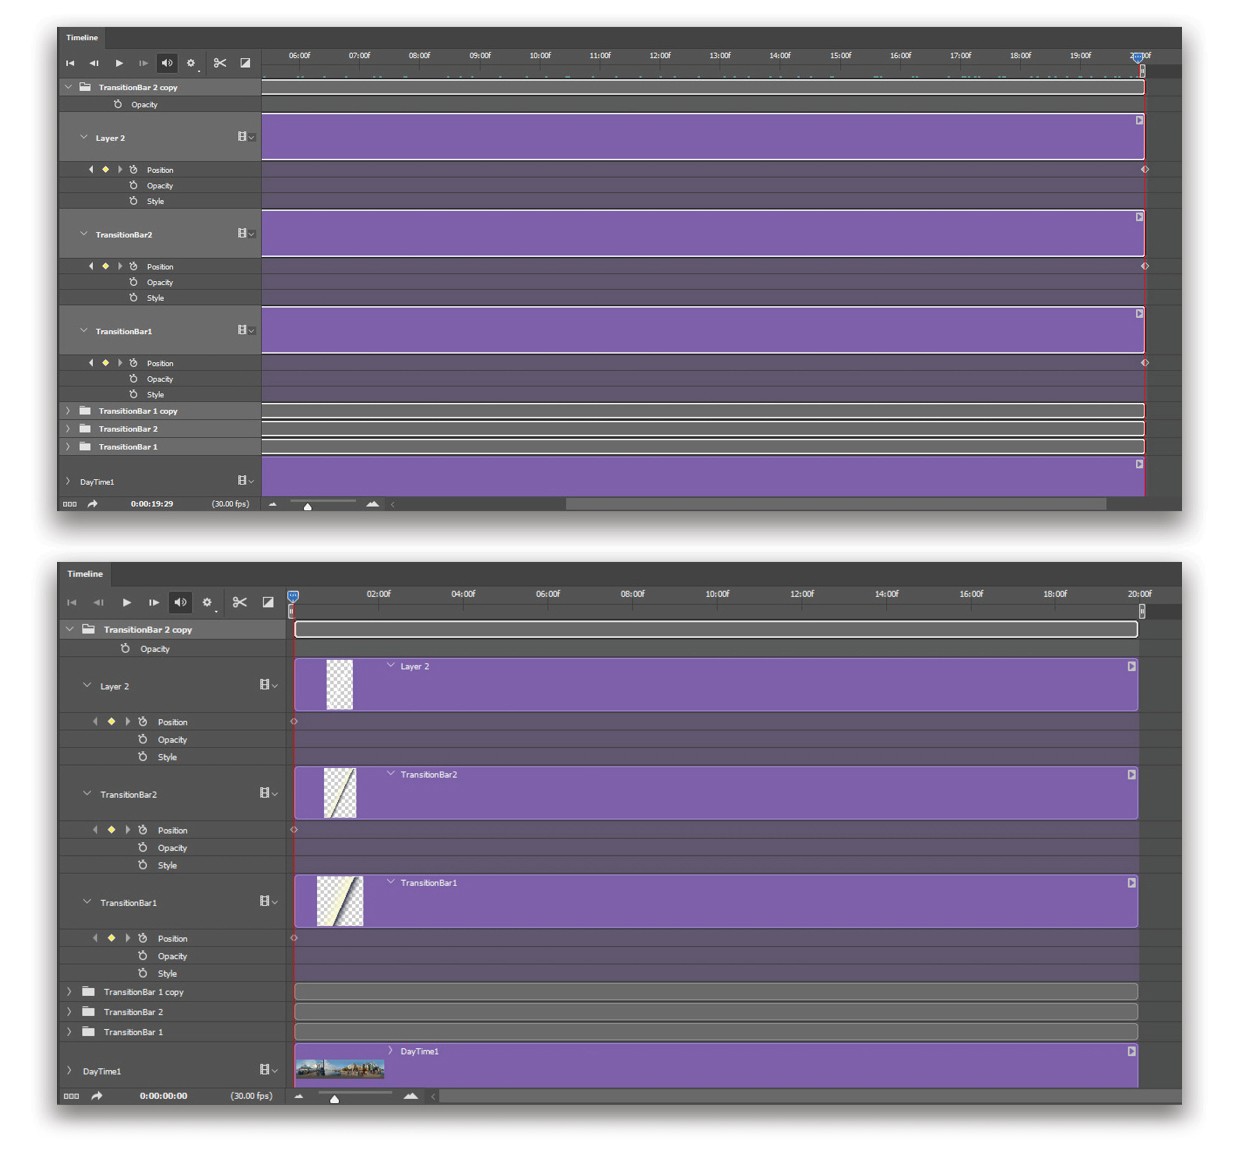
Open the TransitionBars.psd file in the download files to find two layer groups containing angled gradients. These graphics are designed to mark the transition between night and day. They are reverse images of each other, one for each side of the transition shape.
Using the Move tool, drag the graphic groups onto the panoramic file. Move the playhead to the beginning of the timeline so you can see the right shape in the image. Use the Move tool to place the gradients along the lines of the vector mask so the brighter gradients feed into the daytime image and the darker gradients extend into the nighttime image. If the angle of the transition strip doesn’t match your mask, then Use Free Transform with Command-T (PC:Ctrl-T) to scale or rotate the graphic to match up. Press Enter to commit the transformation.
Step 18:
The vector mask has two shapes, each with two angled sides. This means we need two more transition (gradient) strips. Create duplicates of each of the TransitionBar layer groups by making them active in the Layers panel and pressing Command-J (PC: Ctrl-J).
We need to place these duplicates along the outer edges of the left shape, which is currently “offscreen,” so we need a way to know where the edges of the mask are. Turn the rulers on first with View>Rulers. With the Path Selection tool active, click on the layer thumbnail for the daytime panorama so you can see the edges of the left vector mask, then drag out guides to mark the location of its top corner points. Now you know where to place the transition graphic.
Switch to the Move tool, turn on Show Transform Handles in the Options Bar so you can locate the transition strips once you drag them off the canvas, and Shift-drag them to the appropriate positions. Use the Arrow keys to nudge them into place as shown here.
Step 19:
Unfortunately, the transition bar groups cannot be animated at the group level. This means that the position of all three layers within each of the four layer groups will need to be animated. If your positioning of the transition bar graphics was on target, you can animate them all at the same time the same way we animated the mask.
First, set a keyframe at the first frame by clicking the stopwatch icon for the Position property for each of the three layers within each of the four groups in the Timeline panel. Next, move the playhead to the last frame, select all four layer groups in the Layers panel, and use the Move tool with the Shift key to slide all the graphics over to the right so they match the movement of the mask. The layers within the group are animated all at once.
Step 20:
Play through the animation a few times to make sure you’re happy with the movement, and make any adjustments that are needed. For example, my far left transition bar was slightly off to the left, so I moved the playhead to the beginning of the timeline, nudged the transition bar to the right slightly so it would be in the correct place at the beginning of the animation, moved the playhead to the end, and then nudged it so it was in the correct place at the end of the animation.
Go to File>Export>Render Video. The important settings here are the Format, which should be set to H.264, and the Size, which should be set to Document Size. The larger the Frame Rate, the smoother the animation will be, but also the larger the file: Either 15 or 30 fps will work well. Then hit the Render button and let Photoshop do its thing!

Step 21:
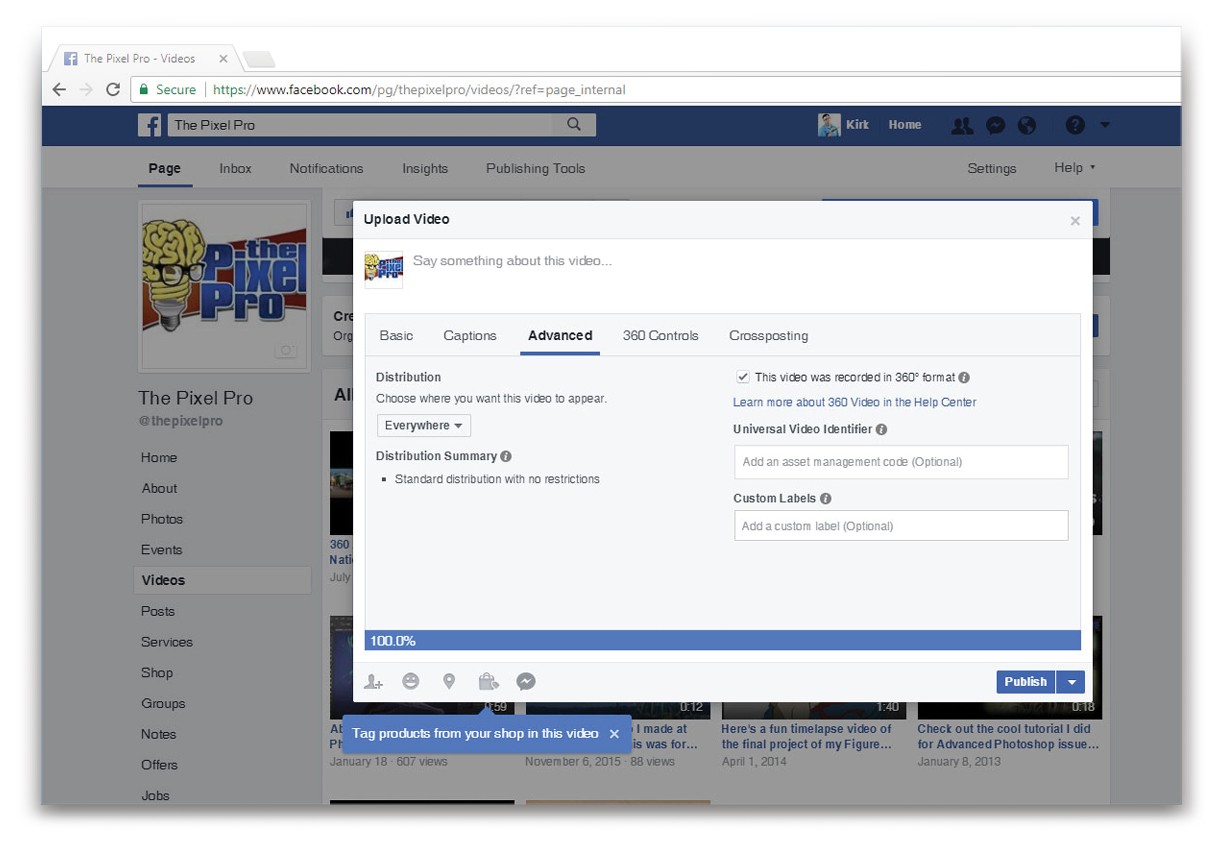
Finally, upload the video to your Facebook Page. In the Upload Video dialog, go to the Advanced tab and check the “This video was recorded in 360° format” option (note that the Advanced options are only available for a Facebook Page and not a regular account). This tells Facebook to display the video in its 360 mode. Once the video is published, Facebook adds an animated “360” icon to the video so viewers know it’s not a standard video. If they view it on a mobile device, they can physically turn around to explore the animation as if they were standing there at National Harbor!
While the 360 video technology is still very new and there’s a lot of room for it to grow and mature, the very concept of it is exciting. With a bit of know-how, you can participate in this exciting new trend with the gear you already have. This opens new possibilities for visual storytelling in a more immersive medium than ever before.
Click here to see the final result on Facebook.
This article originally published in the August, 2017 issue of Photoshop User magazine.


