If anyone reading this has attended or watched any of my classes, you know that I believe in working smarter, not harder, when it comes to Photoshop. That’s why I believe wholeheartedly in actions and what they can do to send your retouching into hyperdrive! Incorporating actions into your portrait workflow can make your retouching so much quicker. Actions not only do things faster and with less work from you, but they can also create an outline so that you don’t get sidetracked, thus keeping you productive.
If you’ve never heard of actions before, they’re actually little recordings of the steps that you take in Photoshop. You can use an action to do something as simple as creating a new layer, or as detailed as creating an entire portrait-retouching outline, all by clicking only one button. (I’ll be giving some free actions at the end of this article too, so be sure to keep reading!)
For those of you who are aware of actions, I hope you’re using them in your workflow. You may feel like actions are a one-trick pony, but the true beauty of actions lies in when we create ones that can be customized while they’re playing. Immediately, this opens a whole new world when it comes to actions, making them even more valuable to your everyday retouching. We’ll learn how to do this in this article.
Best Practices
Before we jump in with both feet to explore actions, let’s talk about some of the best practices while creating them. Actions don’t respond well to freehand brushstrokes or drag-and-drop movements, so those won’t be recorded by your action and will mess it up. When I’m creating an action, I try not to use a tablet pen (or mouse); I only use my trackpad. This seems to prevent me from mistakenly making movements that may not be recorded by the action. Also, don’t click-and-drag your layers to rearrange them in your Layers panel. Again, the action won’t record this move. Instead, select the layer you want to relocate by clicking on it once in the Layers panel, and then use the following keyboard shortcuts to move it in the layer stack: Command-Left Bracket (PC: Ctrl-Left Bracket) to move your selected layer down, and Command-Right Bracket (PC: Ctrl-Right Bracket) to move it up.
The Actions Panel
If you can’t locate the Actions panel in Photoshop, simply click on Window at the top, and then click on Actions in the drop-down menu, which will put a checkmark next to it. This means the window is now visible within Photoshop.
You’ll see a few buttons at the bottom of the Actions panel. To the left of the Trash icon is the Create New Action icon (it looks just like the Create a New Layer icon that’s in the Layers panel). Clicking this icon will always be your first step when creating an action. Once you’ve named your action and it shows up in the actions list, you’re ready to start recording.

Create a Simple Action
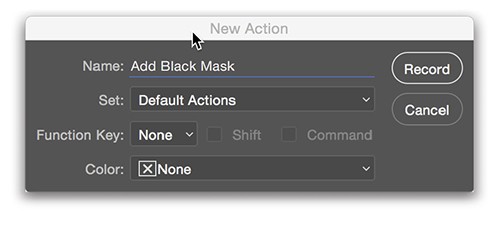
Let’s start by creating a simple action. In this action, you’ll create a black layer mask on whatever pixel-based layer (non-adjustment layer) is highlighted in your Layers panel.
Step One:
With your document open, and the requisite layer selected, click the Create New Action icon at the bottom of the Actions panel. Let’s name this action “Add Black Mask” in the New Action dialog and house it in the Default Actions Set. Click Record to start recording.
Step Two:
Without clicking on any of the layers in the Layers panel, hold down the Option (PC: Alt) key and click the Add Layer Mask icon (circle in a square) at the bottom of the Layers panel. This will automatically create a black mask over whichever layer was selected in your Layers panel.
Step Three:
Back in the Actions panel, click the Stop Recording icon (square). Congratulations, you’ve created your first action!
Step Four:
Look at your Layers panel and you’ll see the black mask that you created. To test your action to see if it works, you’ll first need to delete this layer mask: Simply click-and-drag the black mask layer thumbnail to the Delete Layer icon (trash can) at the bottom of the Layers panel, and then click the Delete (not Apply) button in the resulting dialog.
Step Five:
Now that you’re back to the beginning, you can test your action. Go to the Actions panel, click on the Add Black Mask action, and click the Play Selection icon at the bottom of the Actions panel. This should automatically create a black layer mask on the layer that was active when the action was told to start playing. In one quick step, you were able to create a black mask on the current layer that you were working on.
Let’s Get Advanced
Let’s move on to the advanced section of this article where the true beauty of actions lies. We’re going to create an action that will make our client’s eyes look amazing in his/her portrait, but we’re going to create it in a very smart way, which will let us use this same action no matter what color the client’s eyes are in the current image (and every future image on which we run this action). But to be able to do that, we need to instruct the action to ask for input from the action user. Photoshop isn’t smart enough to know what color our client’s eyes are, so we need to give it a little help. Let’s get started.
Step One:
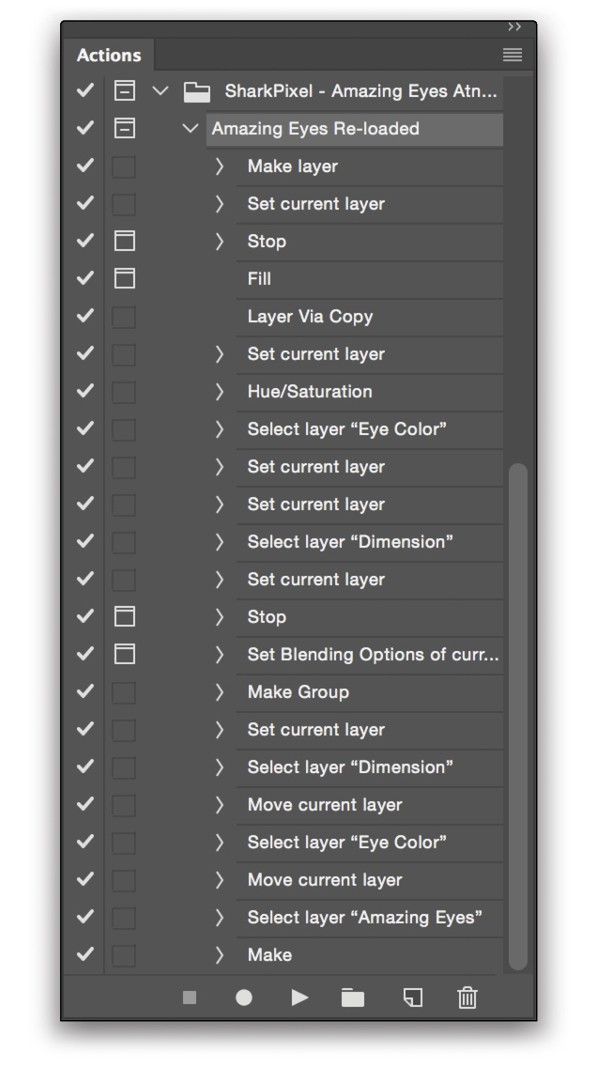
As before, we’ll start by clicking the Create New Action icon at the bottom of the Actions panel. Let’s name this action “Amazing Eyes” and click the Record button.
Step Two:
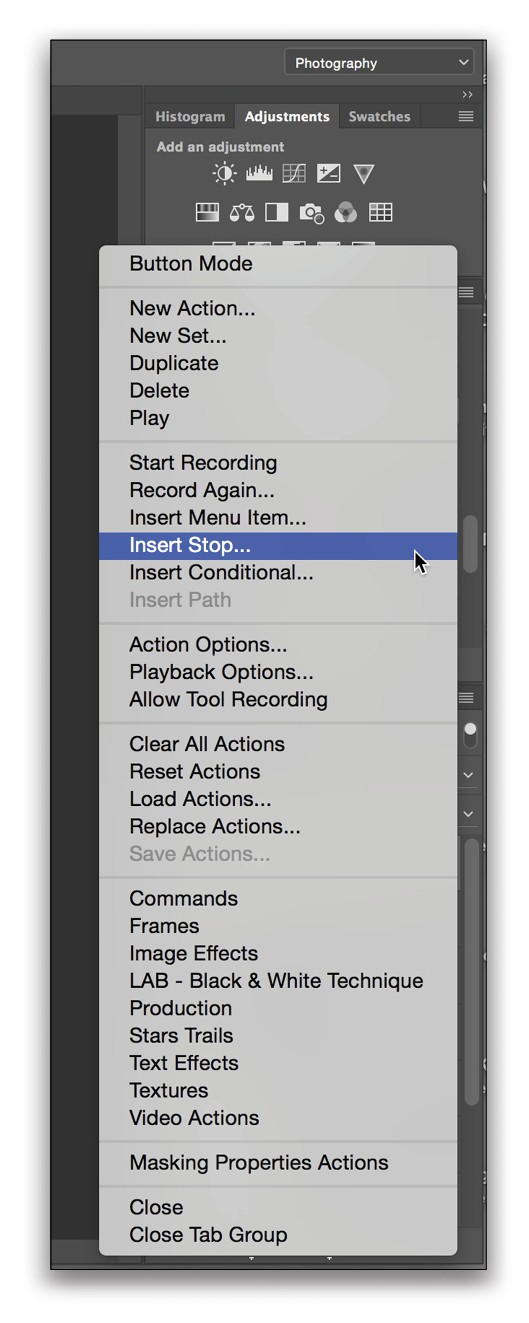
With your portrait image open, click on the Create a New Layer icon, double-click the new layer’s name in the Layers panel, and label it “Eye Color.” Next, go to the flyout menu located in the upper right of the Actions panel and choose Insert Stop. In the Message section of the Record Stop dialog, write yourself a little note, something like, “Fill next area with exaggerated version of subject’s eye color.” Check on Allow Continue at the bottom of this dialog and click OK.
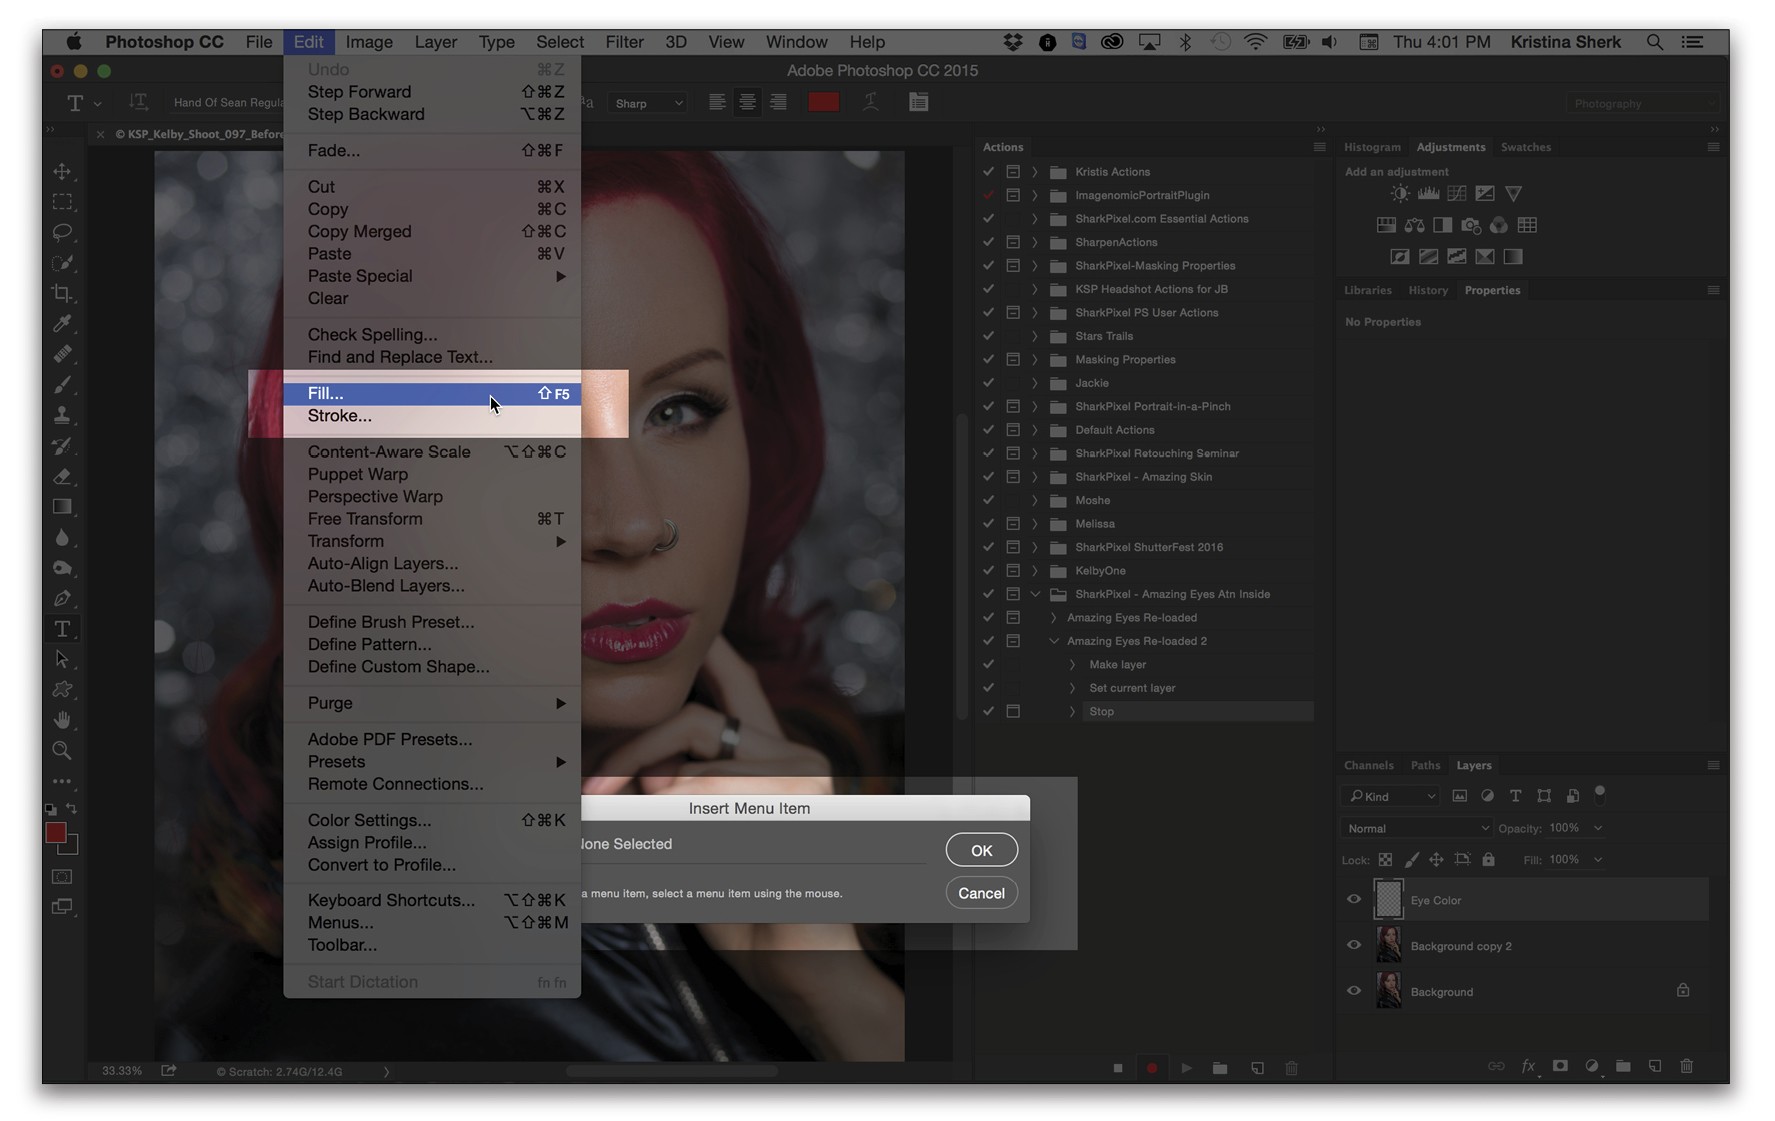
Step Three:
Go back to the same flyout menu and choose Insert Menu Item. With the Insert Menu Item dialog open onscreen, go to the Edit menu and choose Fill. The Fill dialog won’t actually open, but you’ll see that menu item appear in the Insert Menu Item dialog. Click OK in the Insert Menu Item dialog to close it. This means that when you play the action, it will pause at this point so you can choose the correct eye color—no matter what color eyes your client has. This makes this action more valuable because now you can use it on a client with blue eyes one day, and on a client with brown eyes the next.
Step Four:
Here’s where it gets tricky—so please pay attention. Press the Stop Recording icon at the bottom of your Actions panel. Now, click on your Eye Color layer in the Layers panel to make sure it’s active, and then actually fill it with color using the Edit>Fill command. This part should not be recorded in the action. Once the layer is filled with color, you can start recording your action again, so click the Begin Recording icon (circle) at the bottom of the Actions panel.
Step Five:
Make sure your Eye Color layer is still active and press Command-J (PC: Ctrl-J) to duplicate it. Double-click this new layer’s name and rename it “Dimension.” Press Command-U (PC: Ctrl-U) to bring up the Hue/Saturation dialog, and set the Saturation to –100 to desaturate the layer.
Step Six:
Click back on your Eye Color layer and change its Layer blend mode (near the top left of the layers panel) from Normal to Overlay. Then decrease the Opacity of your Eye Color layer to 40%. Next, click on the Dimension layer and change its blend mode to Color Dodge.
Step Seven:
For this next section, Photoshop will need a little help from you again, so let’s insert another Stop by clicking the flyout menu located in the upper right of the Actions panel and choosing Insert Stop.
Step Eight:
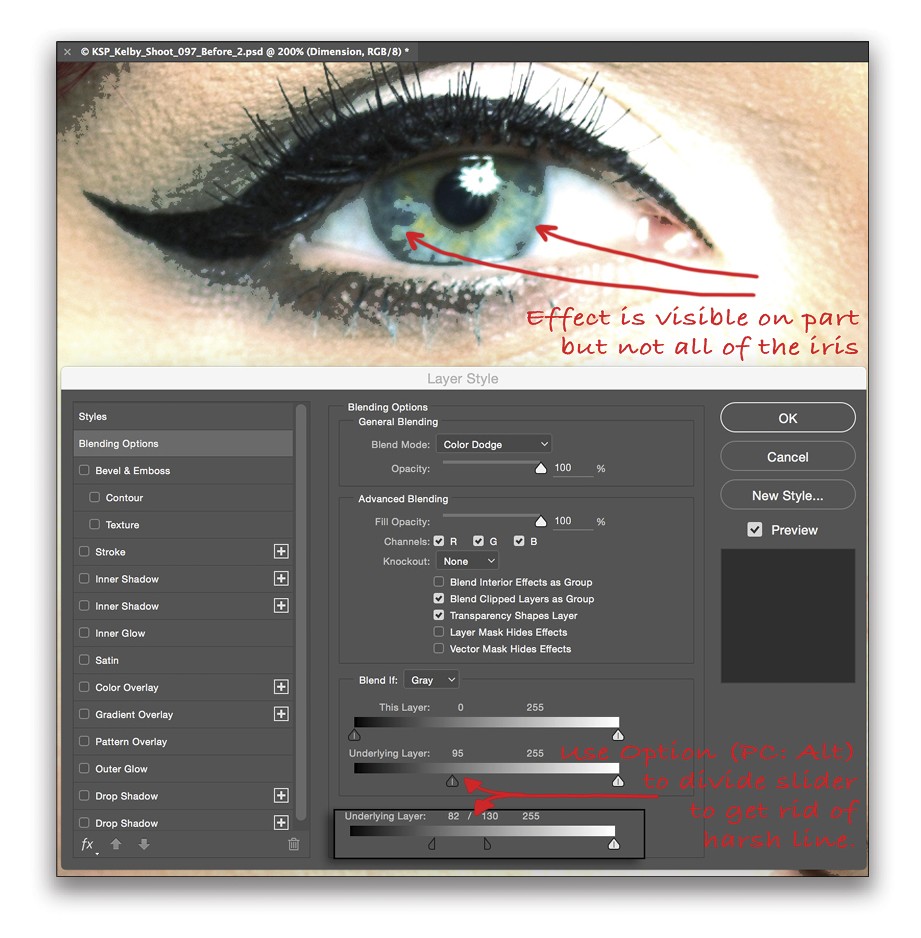
Write yourself another note in the Message section. Here’s what my note looks like: “Photoshop needs a little more help from you! In the bottom section of the Layer Style dialog (coming up in the next screen), you’ll see the Blend If sliders. On the Underlying Layer bar, drag the black arrow to the right until you begin to see the dimension effect on some of your client’s iris, but not all of it. Then, hold down the Option (PC: Alt) key and click on the same black arrow to split it down the middle. Pull the right portion of the arrow to the right about 20, and pull the left portion of the same arrow to the left about 20, widening the space between the two sides of the black arrow.” After you enter you message, click the Allow Continue checkbox, and then click OK.
Step Nine:
Next, go up to the same flyout menu and choose Insert Menu Item. With the Insert Menu Item dialog open onscreen, go to the Layer menu at the top and choose Layer Style>Blending Options. Then click OK in your Insert Menu Item dialog. Now you’ll need to stop recording your action again, so that you don’t actually record the Blend If slider settings that you’re about to input. Note: Remember, you want this action to work on all eye colors and lightness/darkness values. This is complicated; but it will be worth it in the end.
Step Ten:
Press the Stop Recording icon at the bottom of your Actions panel and then double-click the empty space to the right of the Dimension layer’s name in the Layers panel to open the Blending Options in the Layer Style dialog. Adjust the Blend If Underlying Layer black arrow slider just as the note instructs in Step Eight above. This part should not be recorded in the action. Once you’ve changed the sliders and clicked OK in the Layer Style dialog, then you can keep recording your action, so click the Begin Recording icon at the bottom of the Actions panel.
Step Eleven:
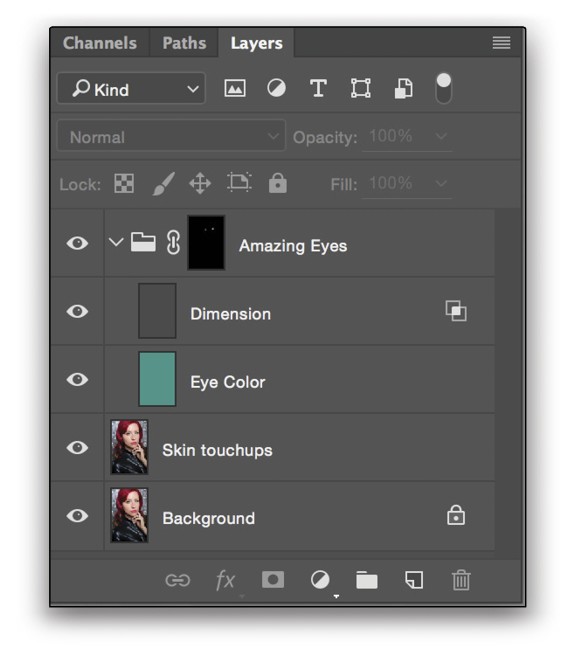
We’re almost finished. Great job so far! Now, we’ll create a layer group using the Create a New Group icon (folder) at the bottom of the Layers panel, and name it “Amazing Eyes.” Click on the Dimension layer and press Command-Right Bracket (PC: Ctrl-Right Bracket) to move the layer into the layer group. Then do the same thing for the Eye Color layer.
Step Twelve:
Lastly, click on the Amazing Eyes layer group folder, hold down Option (PC: Alt), and click the Add Layer Mask icon at the bottom of the Layers panel. This will hide both layer effects under a black mask. You can now stop your recording at the bottom of the Actions panel. Finally, you’re finished with the action!
Step Thirteen:
To reveal the effect, just paint over the subject’s eyes with the Brush tool (B) set to white (press X until the Foreground color is white) and 0% Hardness. If the effect is too strong, simply click on the Amazing Eyes folder in your Layers panel and decrease the Opacity. Now you can play your Amazing Eyes action on any image, follow the prompts to pick your eye color and Blend If settings, and simply paint on the mask and lower the Opacity to create amazing eyes.
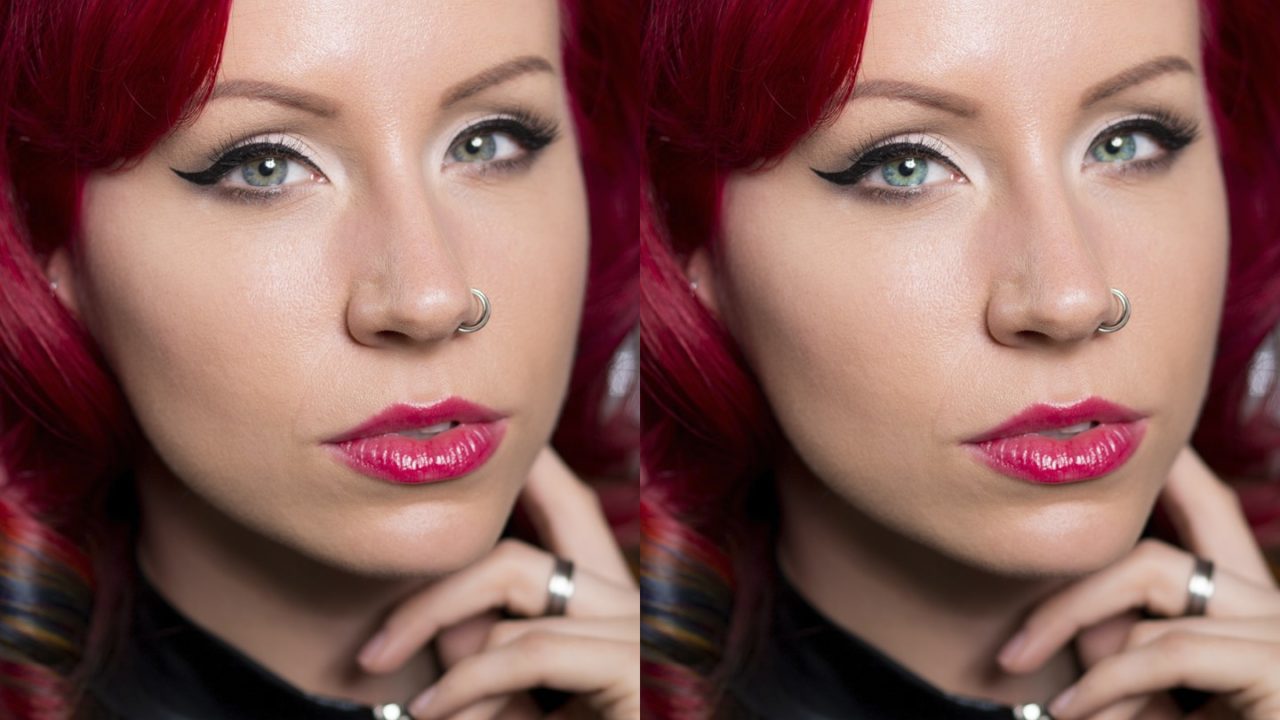
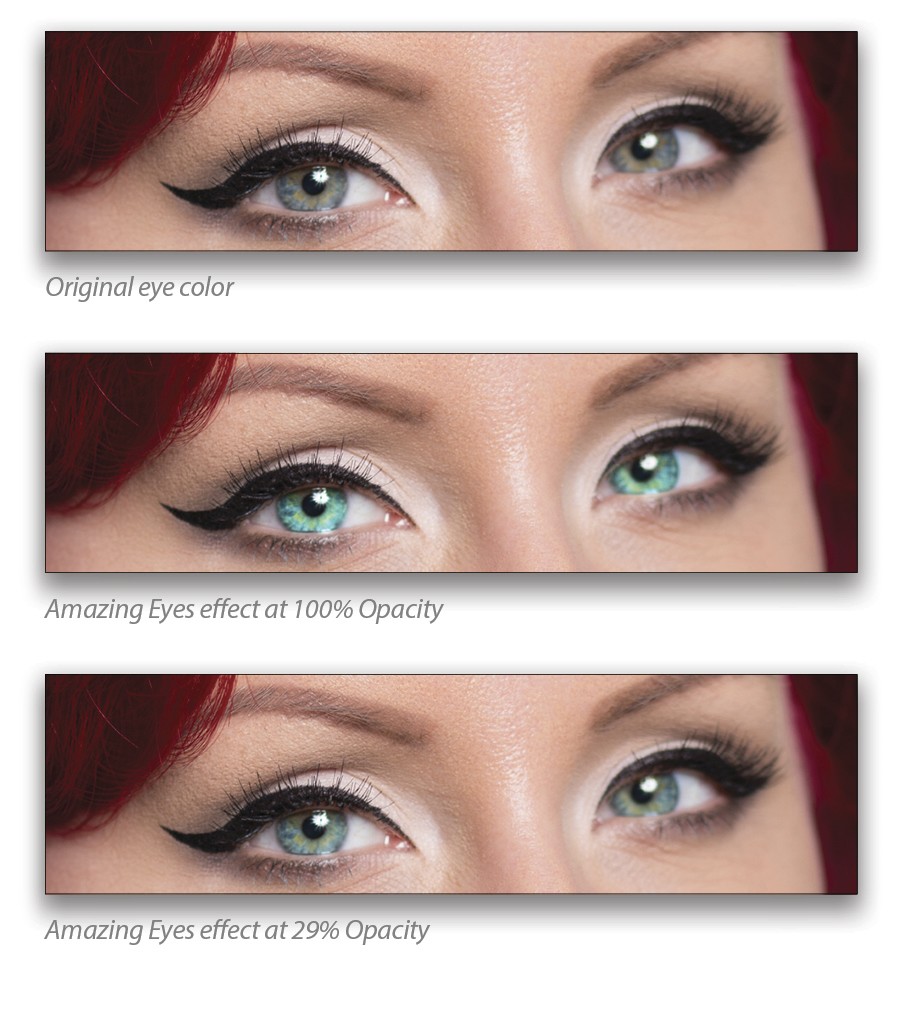
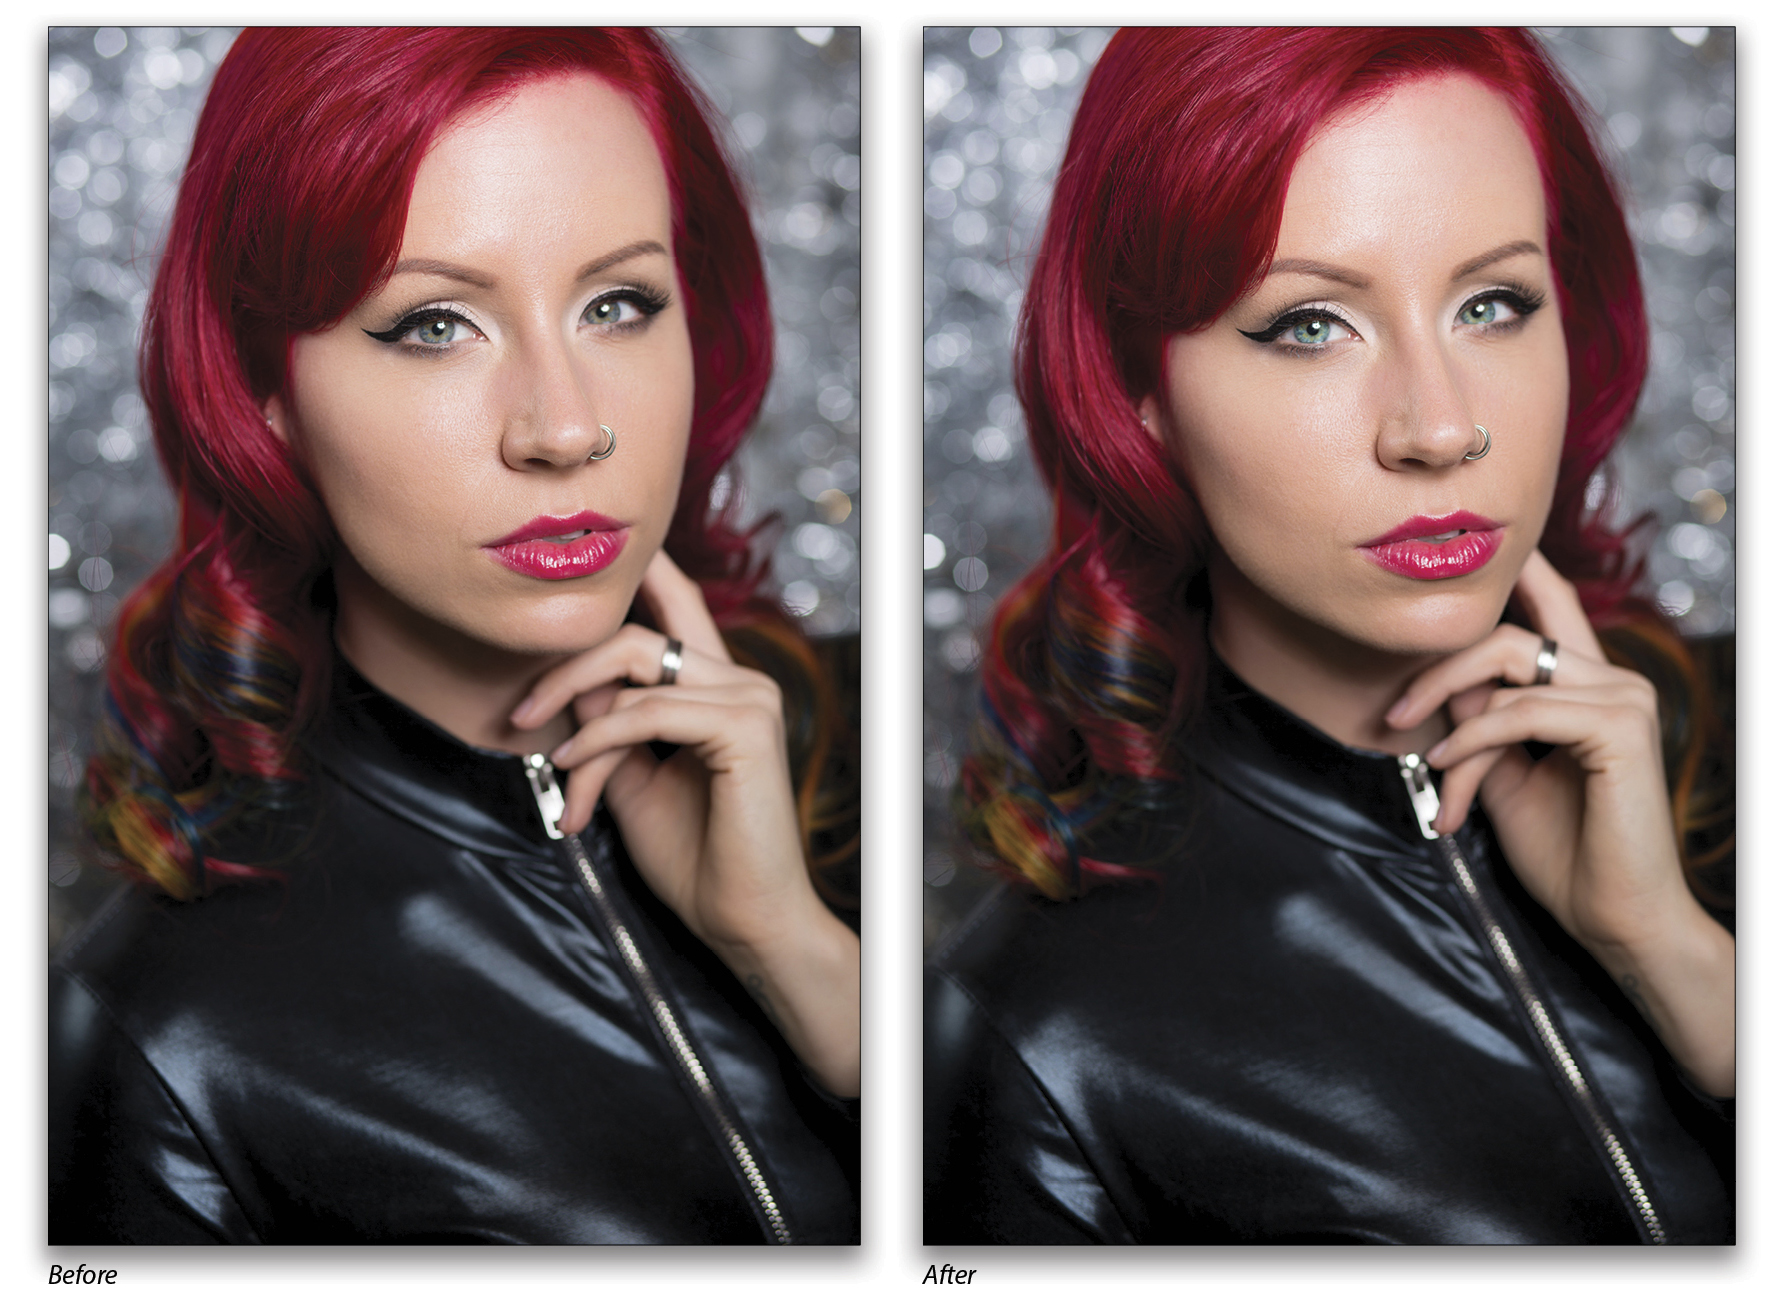
The Final Look
To the left, you’ll see three close-up versions of the same image: the original eye color, the eyes with the Amazing Eyes effect at 100% Opacity, and the eyes with the Amazing Eyes effect at 29% Opacity, which I thought looked good.
If you take the time to really learn more than just the basics of actions, they can become an exceptionally powerful part of your retouching workflow. If you’d like some free, awesome actions and presets, check out SharkPixel!
This article originally published in the July/August 2016 issue of Photoshop User magazine.


