
Lightroom’s catalog is simply a database of information about our photos. Learning how to edit and add to that information can help us manage, find, and organize our photos over time.
Metadata is information about your photos. Some metadata is created and applied to your photos at the moment the shutter is pressed—this is called EXIF metadata. This includes information like shutter speed, ISO, aperture, capture date/time, and so on. This EXIF metadata is automatically added to the catalog during import. Beyond this EXIF metadata, Lightroom also gives us the ability to add more information about each photo, such as keywords, titles, captions, star ratings, flags, and a host of other data points. The more data we add to the catalog (which is a database after all), the more we can leverage that data in our workflows.
The Metadata Panel
This information is so important that Lightroom displays it in a variety of ways. The most well-known location, and where you can find the most data in one place, is the Metadata panel. Located in the Library and Map modules, the Metadata panel can be set to display the information about a selected photo in a dozen different ways. At the top of the Metadata panel is a drop-down menu that provides access to the different views.
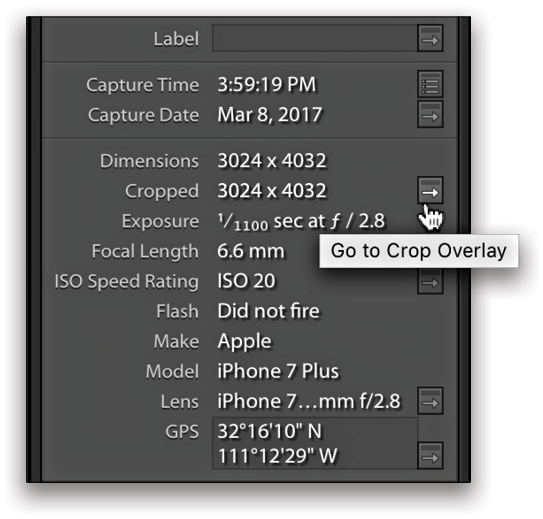
We’re probably most familiar with the Default view, which includes the most useful EXIF metadata, along with fields for entering information like title, caption, copyright, and more. At the top of this view is the File Name field, which is an editable field that can be used to rename the selected photo if needed. Some of the fields, here, are editable, but most are not as it really depends on the type of information.

To the right of some fields is a small icon with a right-facing arrow, which when clicked can perform a specific task. Place your cursor over each button to see a tooltip describing what it will do for each data point. For example, the icon associated with the Folder field will open the folder containing the selected photo in the Folders panel (in the left side Panels area), while the icon associated with the Cropped pixel dimensions will bring the selected photo over to the Develop module with the Crop Overlay tool in place.
In cases where the data could be applied to a large number of photos (or even all photos), then you might consider creating a Metadata preset to make it easier to apply that information quickly and consistently. I find that the Copyright, Copyright Status, Creator, Rights Usage Terms, and Copyright info URL fields are good candidates for including in a preset. Here’s how:
Step One: Click the Preset drop-down menu at the top of the Metadata panel and choose Edit Presets (or go to Metadata>Edit Metadata Presets).
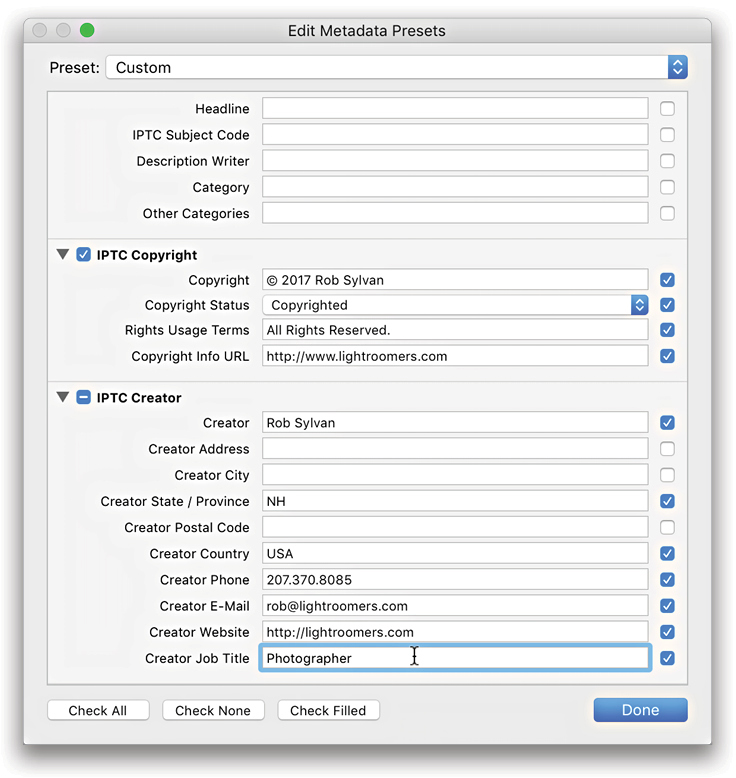
Step Two: In the Edit Metadata Presets dialog, enter the relevant information for the fields you want to include in the preset. In my case, I populated the fields related to copyright and contact information.
Step Three: Make sure a checkbox is turned on to the right of any field for which you want to insert your own data (like the above mentioned fields), and uncheck any blank fields (unless you want to wipe the information contained in the photo’s own metadata for that field).
Step Four: Click the Preset drop-down menu at the top and choose Save Current Settings as a New Preset, then give the preset a meaningful name to complete the process.
That metadata preset can now be applied as a batch operation to any number of selected photos, or you can configure it to be applied as part of the Import process. Let’s switch over to the Import window to see what metadata can be entered from there.
During Import
In the Import window, whether you’re using one of the copy options, move, or add, you will always see the Apply During Import panel on the right. Within this panel, you can apply a Develop Settings preset, a Metadata preset, and keywords. Any of these things can always be applied after import, but choosing to apply them at the moment of import can make the process more efficient.
I personally don’t tend to apply a Develop Settings preset at this stage, but I do always apply the Metadata preset I created that contains my copyright and contact information. Clicking the Metadata drop-down menu will reveal any previously created presets, or you can choose the New option to create one from here.
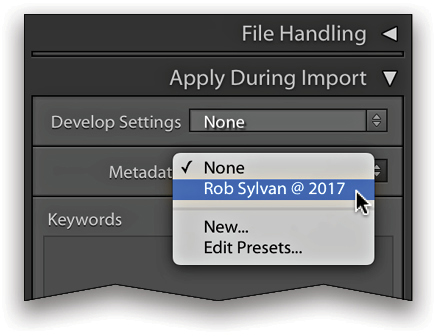
It is critical to remember that anything you select in this panel will be applied to all photos being imported at the time. This isn’t a problem for my Metadata preset, since I created that with all photos in mind. However, if you choose to apply keywords at this stage, you need to choose tags that apply equally to all photos being imported. After import, any applied keywords will be displayed in the Library module’s Keyword List panel and any applied metadata will appear in the Metadata panel.
Displaying Metadata
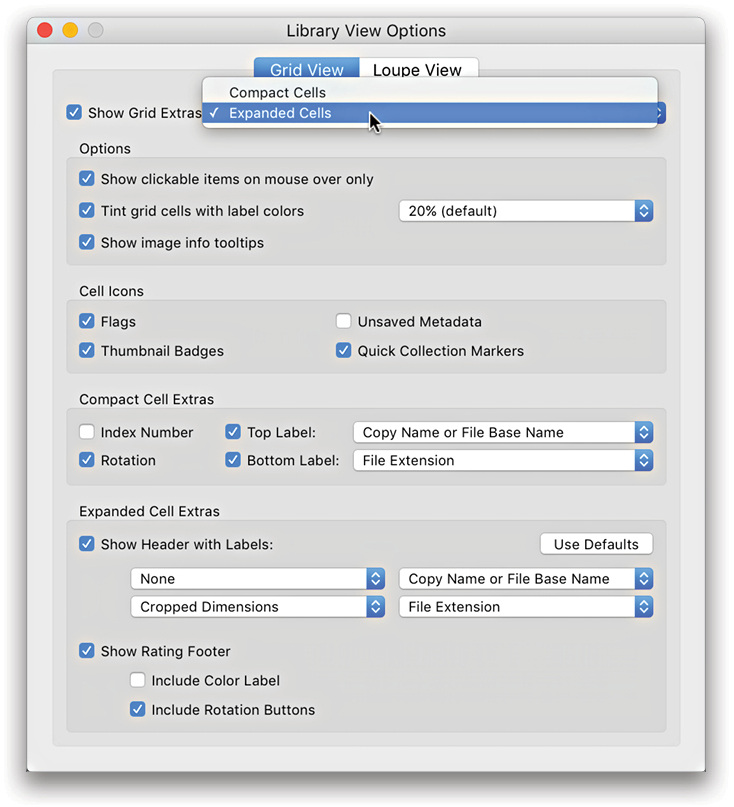
It isn’t always desirable or practical to call up the Metadata panel when you want to see a specific bit of data, but thankfully you have options. One of the most convenient ways to display various combinations of metadata is on the thumbnails in the Library module’s Grid view. There are three different Grid view styles, and all of them can be customized via the View>View Options menu.
With the Grid View tab active, you can choose which Grid view style will be used and what information (if any) will be displayed. The cleanest option is Compact Cells with all options turned off, which simply displays the thumbnail without information. However, even in that mode, you can check the Show Image Info Tooltips box in the Options section to activate a small tooltip display of metadata when you hover your cursor over a photo. Checking the Show Grid Extras box (at the top) opens up the possibility to display a few bits of metadata above and below the thumbnail, and you can configure the types of data via the Compact Cell Extras section. Switching from Compact Cells to Expanded Cells via the drop-down menu (at the top) displays the most information, which is configured in the Expanded Cell Extras section. Once you configure your preferred options for each view, you can close that dialog and cycle through the different styles by pressing the J key.
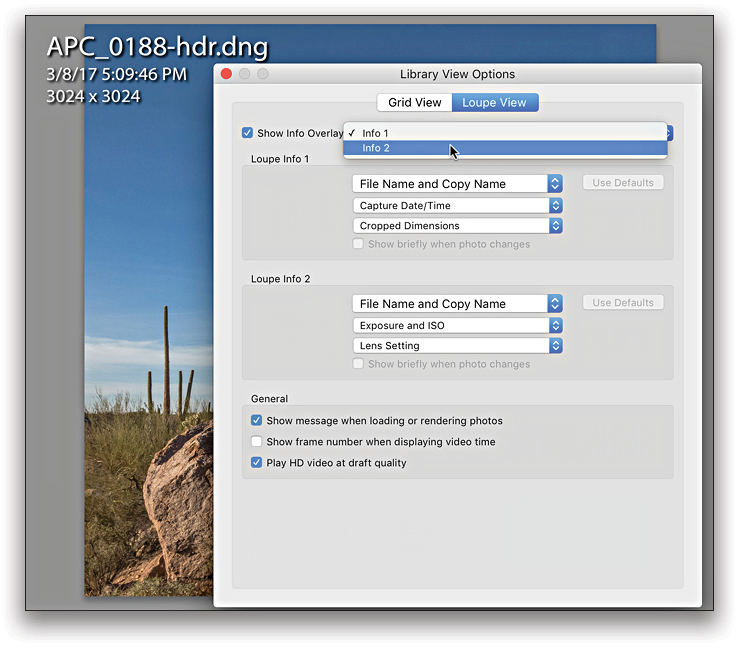
Switching over to the Loupe View tab of the Library View Options dialog, you can customize the display of metadata that appears as an overlay when viewing photos in Loupe view. There are two different info overlays that can be customized to display the metadata of your choice. While in Loupe view, you can cycle through these two overlays or no overlay by pressing the I key. The active info overlay is also what is displayed in that tooltip that appears when you hover your cursor over a thumbnail in Grid view or the Filmstrip.
We also have a small subset of metadata on display at the bottom of the Histogram panel in both the Library and Develop modules.

Edit Capture Time
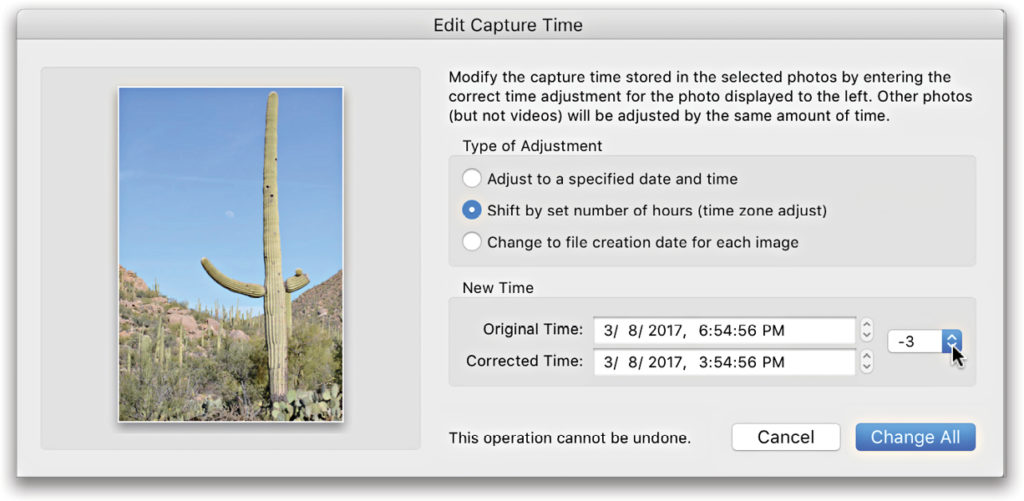
A handy metadata-related function that isn’t easy to find is the ability to alter the capture time of a photo (or batch of photos). For example, on a recent trip to a state in a different time zone than my home, I forgot to change the date/time in my camera, so all my photos from that camera are three hours ahead of time. I was also taking photos with my phone, which was set to the right date/time, so when I sort the contents of the folder containing the photos from both cameras by Capture Time, the photos don’t line up in the correct order. While this isn’t a huge deal for this trip, it is an easy fix.
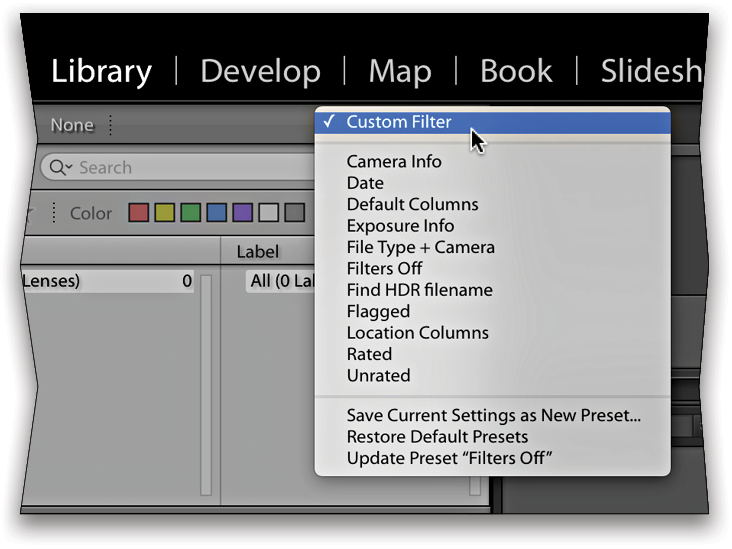
To make it easy to find and select all photos from my DSLR, I can use the Library Filter bar that appears above the thumbnails in Grid view. The Library Filter is a great way to leverage all of that metadata associated with your photos. Whether it’s EXIF metadata, such as camera name, exposure info, date/time, etc., or information you’ve applied, such as star ratings, flags, color labels, or keywords, you can create filters on any combination of this information to display just the photos you want to see.
A number of preset configurations are accessible via the filter drop-down menu on the right side of the Library Filter bar. For my purposes here, I selected the Default Columns preset, which loaded four columns to display Date, Camera, Lens, and Label. I didn’t need all that info for this task, but it was a quick way to get to what I wanted. You can customize what columns and settings are used, and then save that as a custom filter preset by clicking on that same drop-down menu and choosing Save Current Settings as a New Preset. Tip: Press-and-hold the Command (PC: Ctrl) key while clicking to combine Text, Attribute, and Metadata filters.
With that information displayed, I can click on the camera I want to correct to filter the current view to show only photos from that camera. Then it’s as simple as pressing Command-A (PC: Ctrl-A) to Select All the photos and going to the Metadata>Edit Capture Time menu. This opens the Edit Capture Time dialog where I can select Shift by a Set Number of Hours (Time Zone Adjust) to easily shift the capture time of all the selected photos—three hours.
I can turn off the filter by pressing Command-L (PC: Ctrl-L), and now all my photos are sorted by the correct time along with the photos taken with my phone.
Leveraging Smart Collections
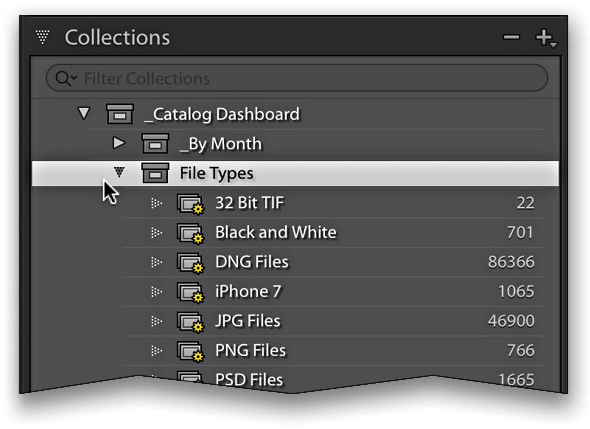
We can also create special types of collections, called smart collections, to automatically gather photos based on specific criteria that we choose. This works in a similar fashion to the Library Filter, except smart collections are automatically running all the time and we can configure them to only look at specific sources or the entire catalog, whereas the Library Filter only works on the currently viewed source. I’ve created a collection set I call my “Catalog Dashboard,” and within this, I have all kinds of smart collections that gather photos based on criteria such as file type, whether a photo has copyright applied or not, or whether a photo has been flagged as a reject.
For me, this just gives me a very quick way to find groups of photos, and to see how many photos I have that fall into any one of those categories. For example, my smart collection missing copyright info tells me if I forgot to apply my copyright metadata preset at some point in time, and gives me an easy way to fix that. Here’s how to create this type of smart collection:
Step One: Click the + (plus sign) icon in the right side of the Collections panel’s header and choose Create Smart Collection to open the Create Smart Collection dialog.
Step Two: Give the smart collection a meaningful name, and choose if you want it to go into an existing collection set or not.
Step Three: Set the Match drop-down menu to All.
Step Four: Click the rule drop-down menu and choose Copyright Status, found under Other Metadata.
Step Five: Set the conditions to Is Not and Copyrighted.
Step Six: Click Create.

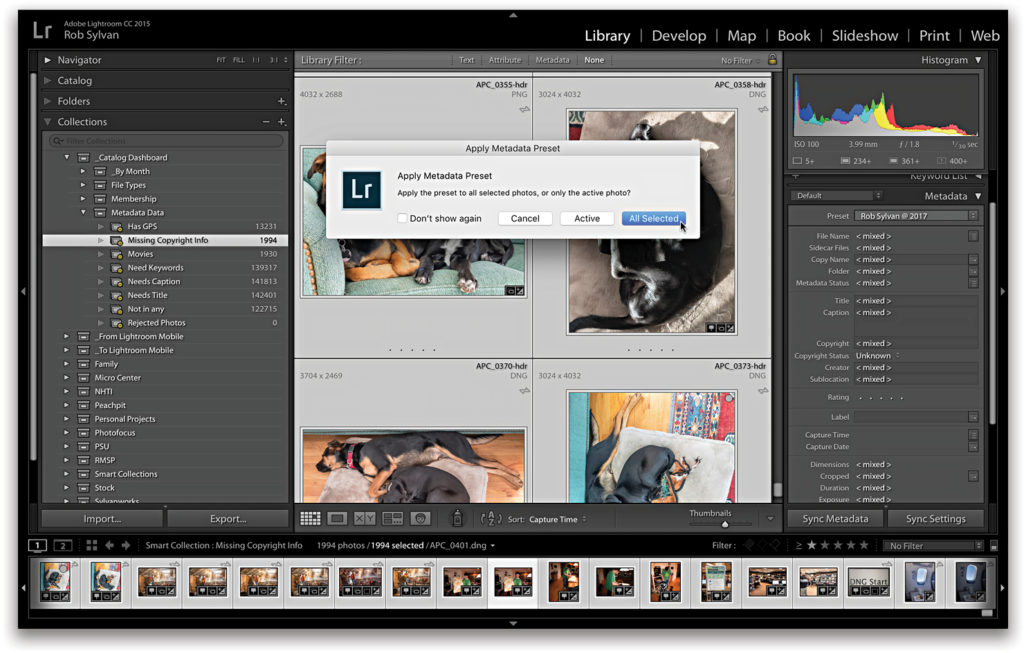
In my case, I found that there were 1994 photos missing this information for various reasons. To fix this, I can click on that smart collection to load up those 1994 photos, select them all, and then expand the Metadata panel and choose my Metadata preset I created earlier from the Preset drop-down menu. If prompted, choose All Selected in the Apply Metadata Preset dialog that appears. As soon as I apply that preset to those photos, they are automatically removed from that smart collection because they no longer match that criteria. This is the key to understanding smart collections, which is that photos can only be added to a smart collection when they meet the criteria, and they can only be removed when they no longer meet the criteria.
Smart collections and library filters can even be used in conjunction with each other. There are so many ways these tools can be incorporated into your workflow to make your life easier, to find photos faster, and to work a lot smarter. Hope that helps!
This article originally published in issue 30 of Lightroom Magazine.


