Speedy Retouching that Keeps Getting Better
Review by Jessica Maldonado
As a Photoshop user and aficionado, naturally that’s my gold standard for retouching portraits. But who doesn’t like a quality shortcut? Each time I have an opportunity to test and review PortraitPro from Anthropics (this time, PortraitPro Studio Max), I get excited to see what improvements they’ve made to what I know is already a great piece of software.
Photographers, designers, and photo editors know that it can take many hours (and layers) to do a soup-to-nuts portrait retouch. Simply opening an image in PortraitPro can get you halfway there. Working your way through the controls and sliders, combined with the sophisticated AI facial recognition and algorithms, gives you such intricate control over your images and so much potential for different looks and professional-looking final images that it feels like a waste of time and effort to do it “the right way” for all, but perhaps the most high-paying (read, demanding) clients. So let’s take a peek at what’s been added to the PortraitPro 22.
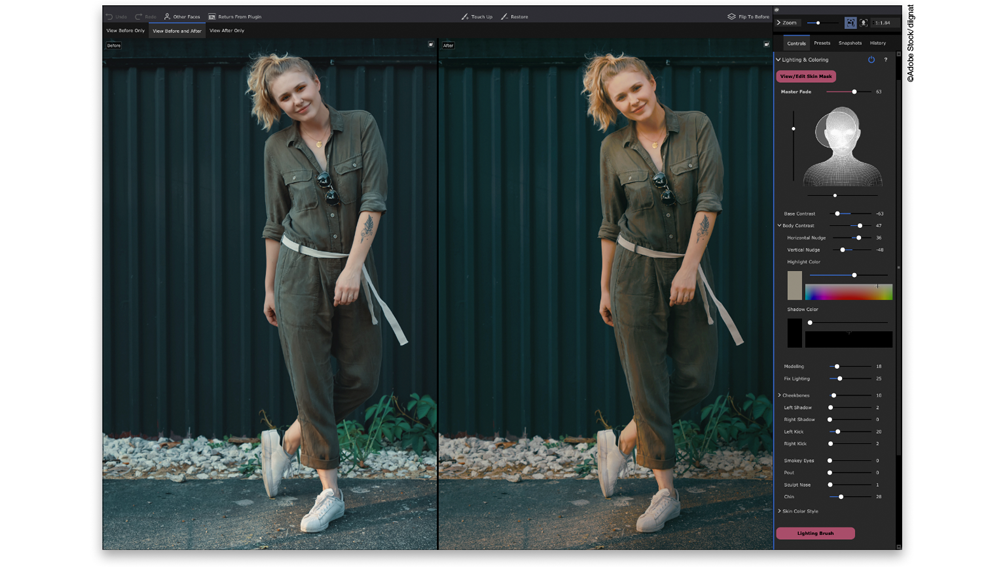
The Lighting Brush (which works like dodging and burning) has moved from the Tools panel to Lighting & Coloring where it really belongs. To help give more control over body lighting, there’s now a Body Contrast slider that works with the masking controls (if you don’t have Automatically Find Background on in your preferences, you’ll need to turn on the Layers panel and give the background mask a little help). This slider can add or subtract body contrast, and you can toggle down to additional sliders that move the body lighting effects relative to the lighting position set in the lighting direction control, or adjust the hue and brightness of your highlights and shadows. The Body Contrast slider didn’t make a ton of difference in the images on which I tested it, but if you were making dramatic image-lighting adjustments, it would be helpful in conjunction with the Lighting Brush. Also added to this panel is a Chin slider, which will darken under the chin for a slimming effect, and works well with the new shaping capabilities for neck and shoulders.
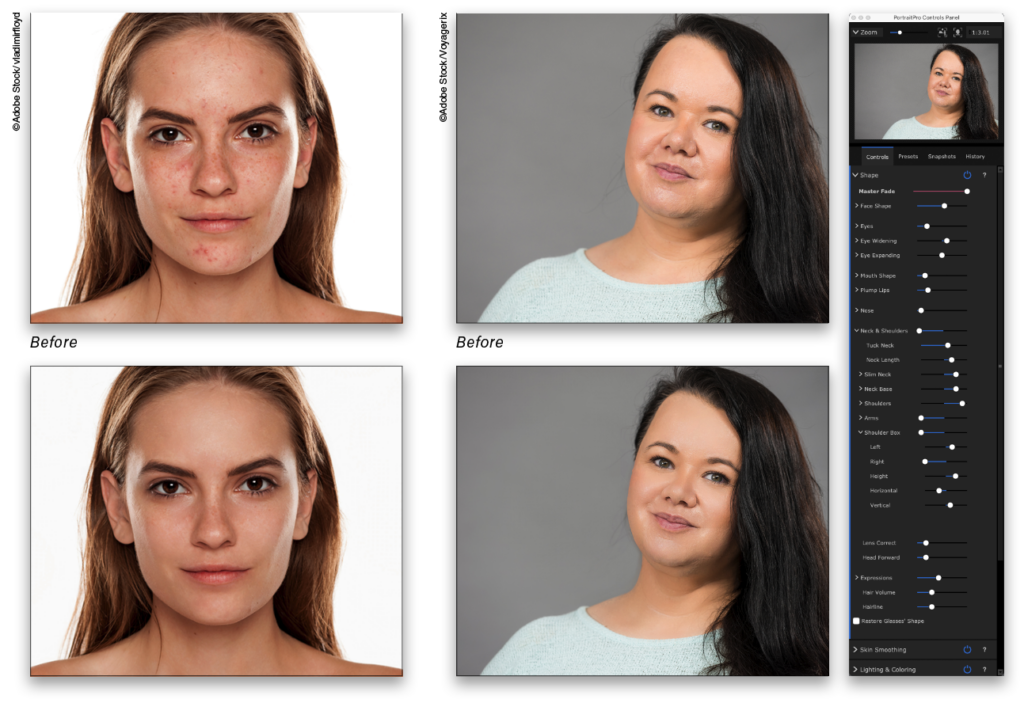
Neck & Shoulders controls (in the Shape controls) automatically detect the subject’s neck and shoulders, providing additional controls for the “Shoulder Box” to tweak the area affected. This is especially handy when there’s one shoulder out of view, or more than one subject in the image. You’ll find sliders for tucking, slimming, and lengthening the neck; and slimming the arms and shoulders (left, right, or individually). Typically, I’d use Liquify in Photoshop for neck and shoulder slimming; it’s definitely faster here.
Hairline Correction, also under Shape Controls, shifts hair down to shape and reduce an overlarge forehead, or improve a slightly receding hairline. Don’t expect it to help out your balding uncle, though. 😉
Virtually every tool and feature has seen some improvement. I appreciate the extra attention to makeup and hair colors. Hair recoloring looks more realistic than it ever has (even fantasy colors and changing up dark hair), and that’s difficult to pull off, even in Photoshop.
If you find yourself behind in your Photoshop training or you’re just short on time, PortraitPro is an amazing tool to add to your workflow. I’d definitely suggest downloading the free trial to check out the software’s embedded tutorials and give the AI and sliders a test drive. Once you’re convinced, all three editions of PortraitPro 22 can be used as a standalone application, but you’ll want to spring for Studio or Studio Max editions to gain Photoshop and Lightroom integration, RAW and DNG support, and various color spaces. If you require batch processing, you’ll need the Studio Max version.
Portrait retouching with PortraitPro 22 can save you loads of time and get you the gorgeous results you and your clients desire with ease and finesse. Take it for a whirl! ■