
Doodling on a photo is a great way to add whimsy and visual interest, and you don’t have to be an artist to give it a whirl. Today you’ll learn how to outline your subject’s clothes, how to isolate your subject so you can put doodles behind her, as well as how to doodle using Photoshop’s Custom Shape tool. Read on!
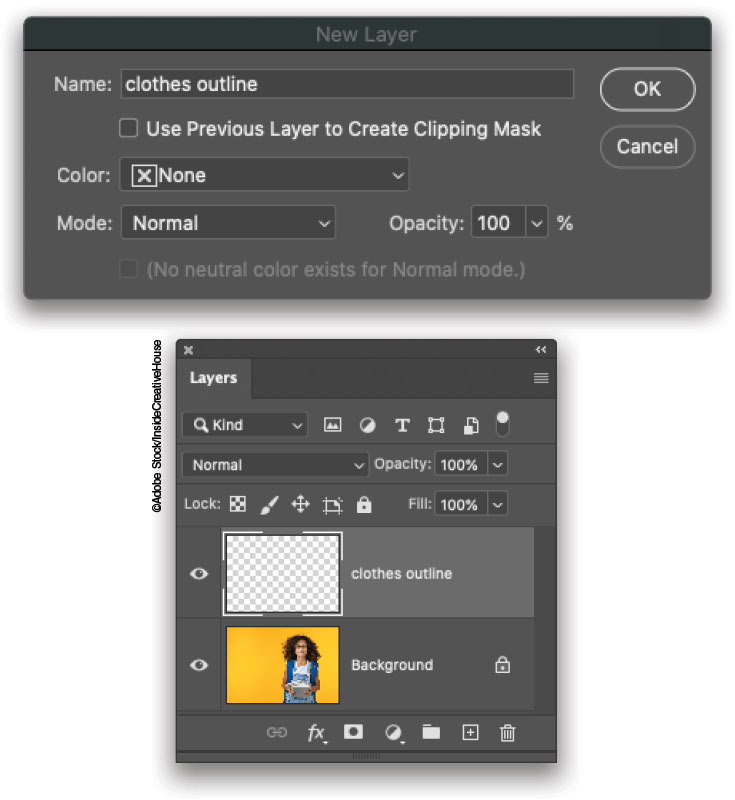
Step One: Open a photo in Photoshop; the more details in the clothing—pockets, buttons, clothing layers, etc.—the better. (If you’re starting in Lightroom, select a thumbnail in the Library module and then choose Photo>Edit In>Adobe Photoshop 2020.) Choose Layer>New>Layer and in the resulting dialog, enter “clothes outline” in the Name field, and click OK.
If you’d like to download the low-res watermarked version of this image to follow along, click this link, log in with your Adobe ID, and click the Save to Library button. Double-click the image in the Libraries panel (Window>Libraries) to open it in Photoshop. To make it easier to work with the image, increase the resolution of the practice file. (We normally don’t recommend enlarging images, but this is only for practice purposes.) Go to Image>Image Size, turn on the Resample checkbox, select Preserve Details from the Resample drop-down menu, set the Width to 2,000 pixels, and click OK. Create a new layer and name it “clothes outline” as described above.
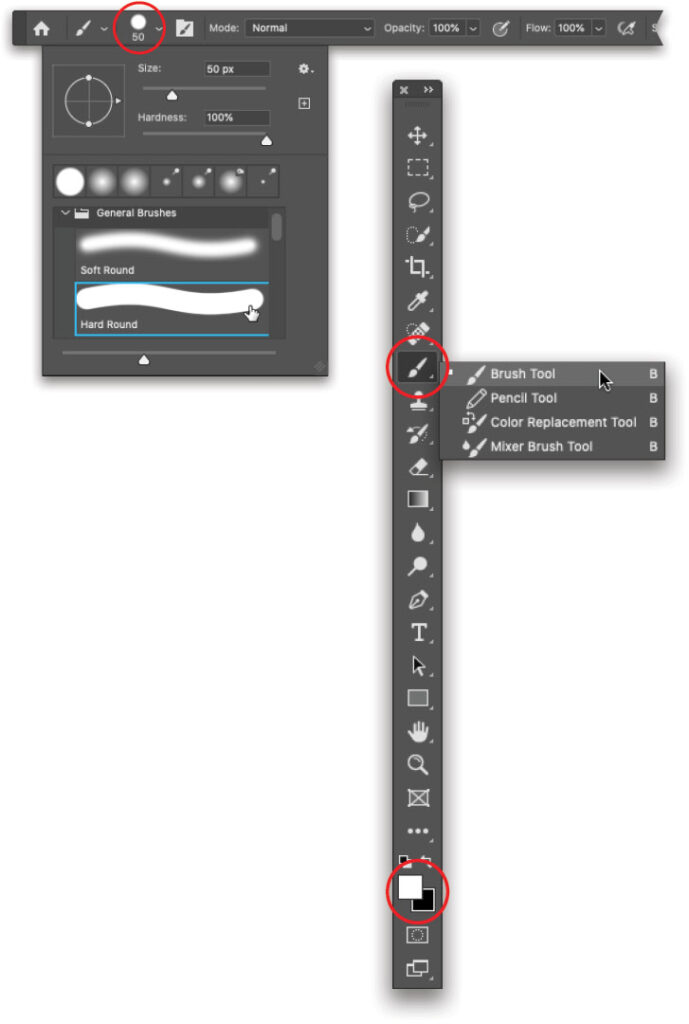
Step Two: Press B to grab the regular Brush tool (circled). In the Options Bar, click the Brush Preset Picker (also circled), and from the General Brushes category, pick the Hard Round brush. Set brush Size to around 50 pixels for a high-resolution image (try 15 pixels for the Adobe Stock preview image). Also in the Options Bar, ensure the Mode menu is set to Normal and that Opacity and Flow are both 100%. Take a peek at the color chips at the bottom of the Toolbar (circled) and press the D key on your keyboard to reset them to the default colors of black and white. Then press the X key on your keyboard to flip-flop them so white is on top.
Step Three: In the image, click-and-drag to outline the bulkiest item, which is the backpack here. The brush cursor is circled in red here. If you mess up, press E to grab the Eraser tool and drag back over the error, then press B to switch back to the Brush tool. Remember, you’re doodling; it’s not supposed to be perfect!
Tip: If necessary, you can press Command-+ (PC: Ctrl-+) to zoom into the image and Spacebar-drag to reposition the image onscreen.
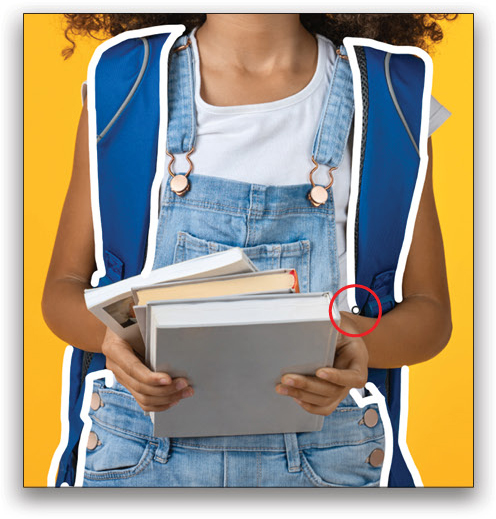
Step Four: Decrease the brush size, and outline smaller details such as her overalls (a size of 40 pixels was used here; try 10 pixels for the low-res file). You can use the Left and Right Bracket keys ([, ]) on your keyboard to decrease or increase brush size according to what you’re outlining. Decrease brush size again (say, 30 pixels or 8 pixels for the low-res file) and outline the seams and buttons. Decrease brush size yet again (say, 20 pixels or 5 pixels for the low-res file) and draw across fabric wrinkles.
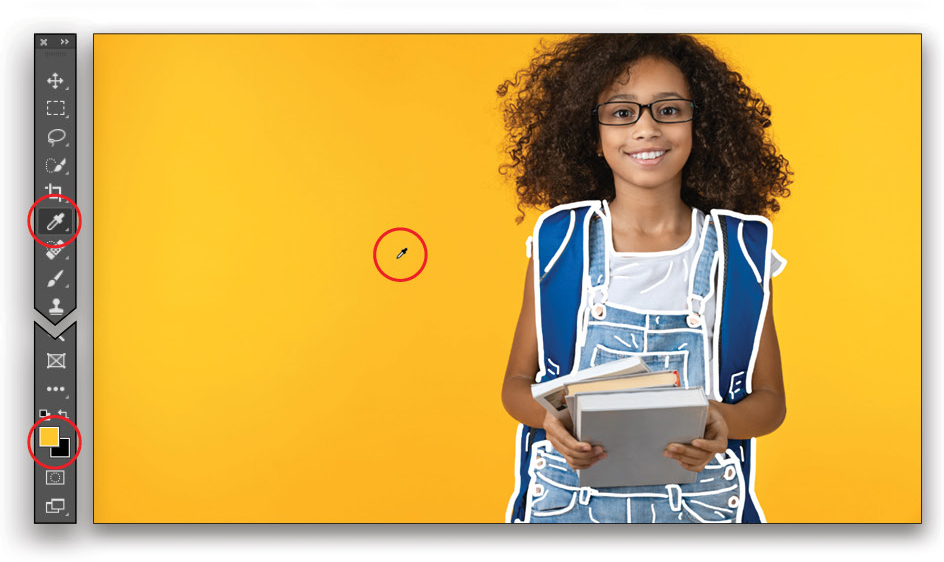
Step Five: Soon we’ll hide the photo’s original background so we can put doodles behind our subject, meaning we need a new background. In this example, we’ll simply re-create the original, orange background. To do that, press I to grab the Eyedropper tool (circled), mouse over to the image, and click the orange background to load that color as your Foreground color chip (also circled).
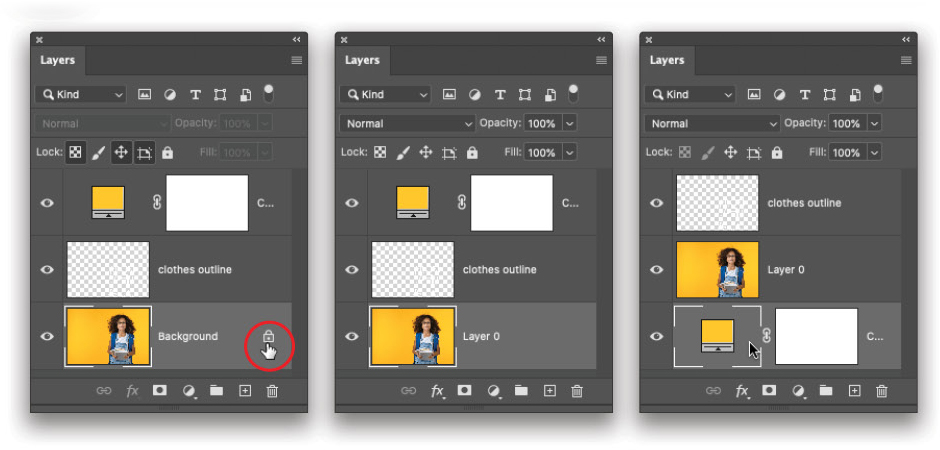
Step Six: Click the half-black/half-white circle at the bottom of the Layers panel and choose Solid Color (or choose Layer>New Fill Layer>Solid Color). The Color Picker will open set to your Foreground color chip, so just click OK to close it. In the Layers panel, see if the image layer has a padlock to its right (circled). If it does, click the padlock to unlock the layer, and then drag the new orange Color Fill layer below it.
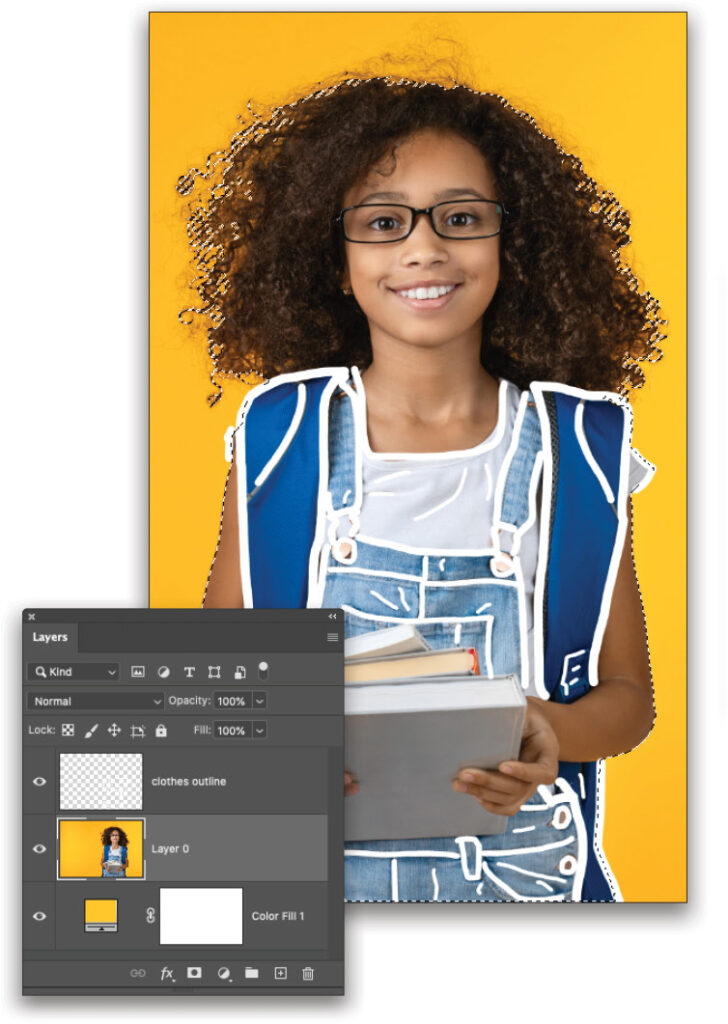
Step Seven: In the Layers panel, click to activate the image layer. If there’s good contrast between the subject and background, choose Select>Subject. Photoshop puts marching ants around the subject.
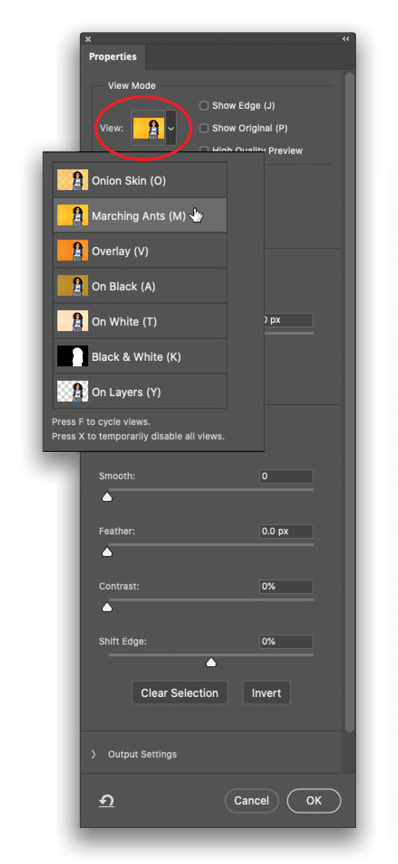
Step Eight: If the selection needs fine-tuning, choose Select>Select and Mask. In the workspace that opens, click the View menu in the Properties panel (circled) and pick a view that lets you see edges that aren’t included in your selection. You can cycle through the views by tapping F on your keyboard. In this case, Marching Ants works well. Click outside the View menu to close it.
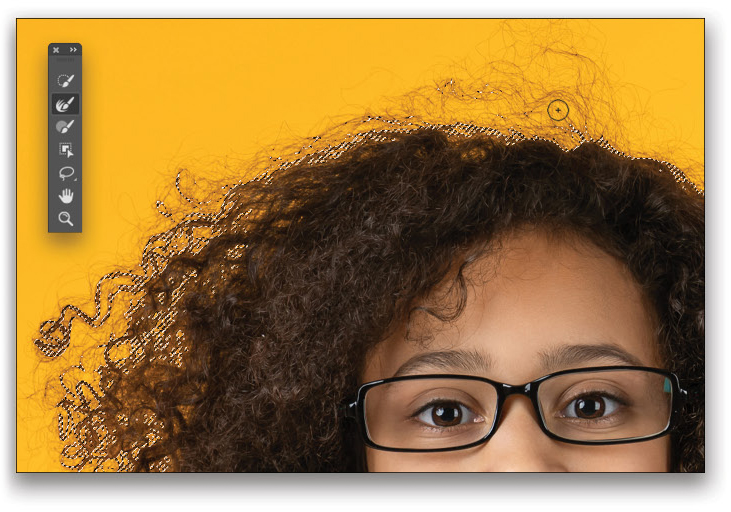
Step Nine: This selection is pretty good; though, to include more hair in the selection, press R to grab the Refine Edge Brush tool (circled) and then brush over any hair strands that aren’t yet selected (the brush cursor is also circled in red). Zoom in if you need to by pressing Command-+ (PC: Ctrl-+), and reposition the image onscreen by Spacebar-dragging. Again, use the Left and Right Bracket keys on your keyboard ([, ]) to adjust brush size (a size of 60 pixels was used here; try 20 pixels on the Adobe Stock preview image).
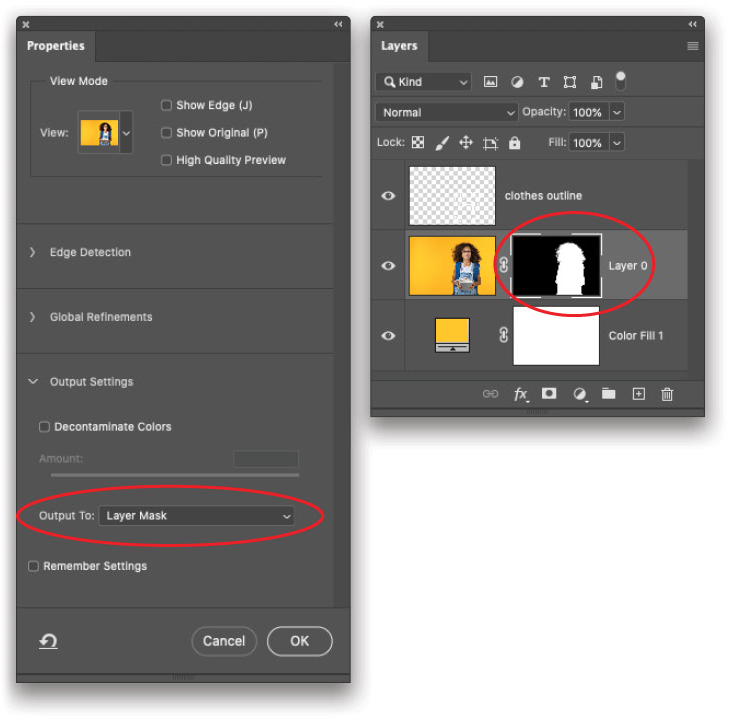
Step 10: When the selection looks good, scroll down the Properties panel and expand the Output Settings section. Turn off Decontaminate Colors, which tries to remove any remaining background pixels that may be loitering in the selection—not a problem here because our new background is the same color as the original—and from the Output To menu, choose Layer Mask (circled). Click OK to close the Select and Mask workspace. Back in your document, Photoshop hides the original background with a layer mask (also circled).
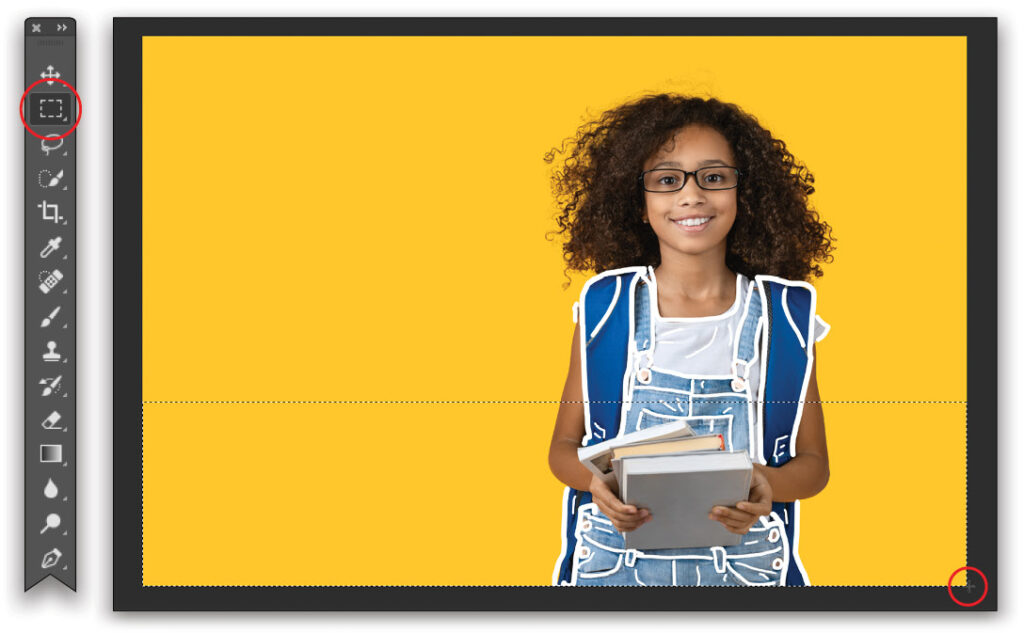
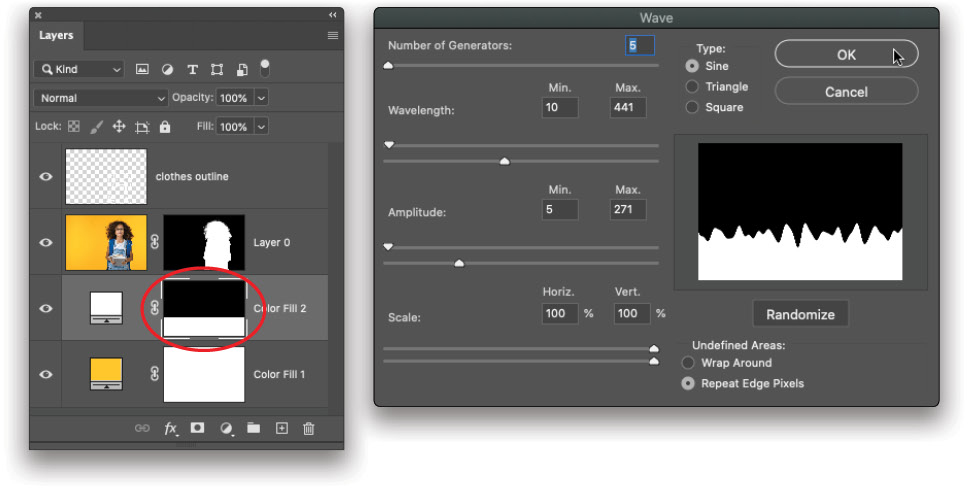
Step 11: Let’s add more interest to the background by making part of it white. To do that, press M to grab the Rectangular Marquee (circled) and draw a rectangular selection around the bottom third of the document. The cursor is also circled.
Tip: While drawing a selection, press-and-hold the Spacebar to reposition it.
Step 12: Click the half-black/half-white circle at the bottom of the Layers panel and choose Solid Color again (or choose Layer>New Fill Layer>Solid Color). In the Color Picker, enter FFFFFF into the # field (circled) for white. Click OK.
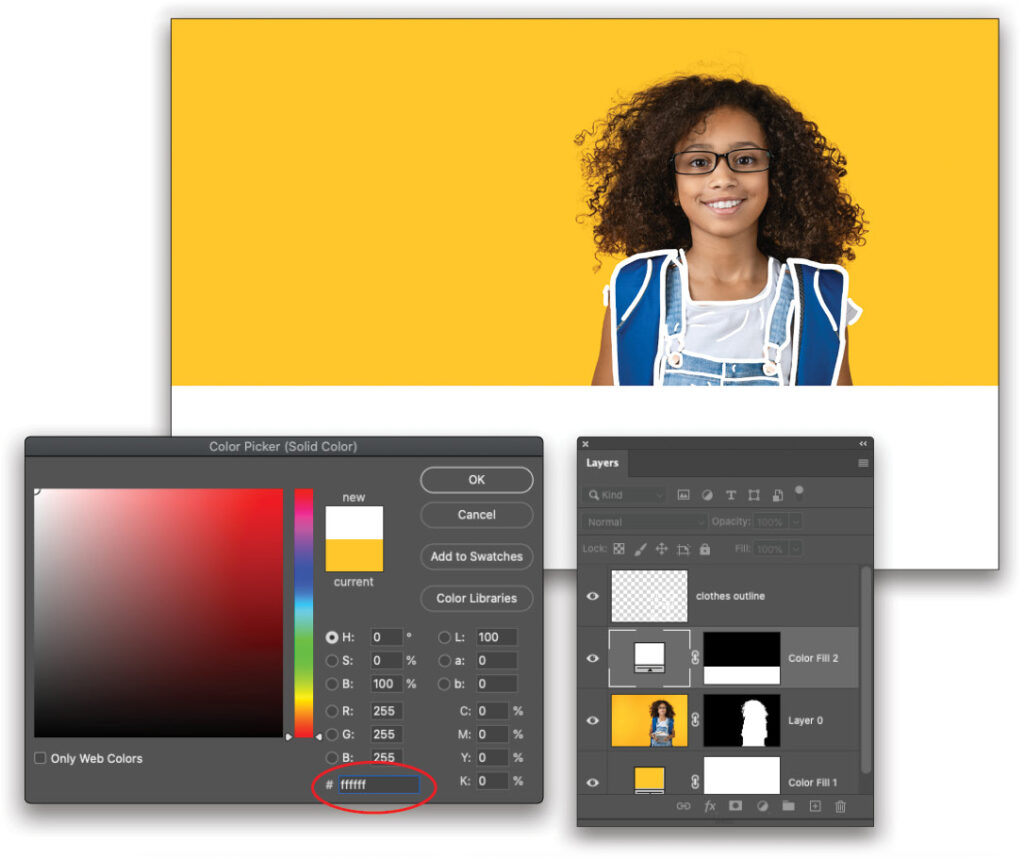
Step 13: Drag the new white Color Fill layer beneath the image layer and click to activate its layer mask (circled). Choose Filter>Distort>Wave. In the dialog that opens, set the Wavelength Max field to around 441 and the Amplitude Max field to around 271 (try around 180 and 100 on the Adobe Stock preview image), and click OK.
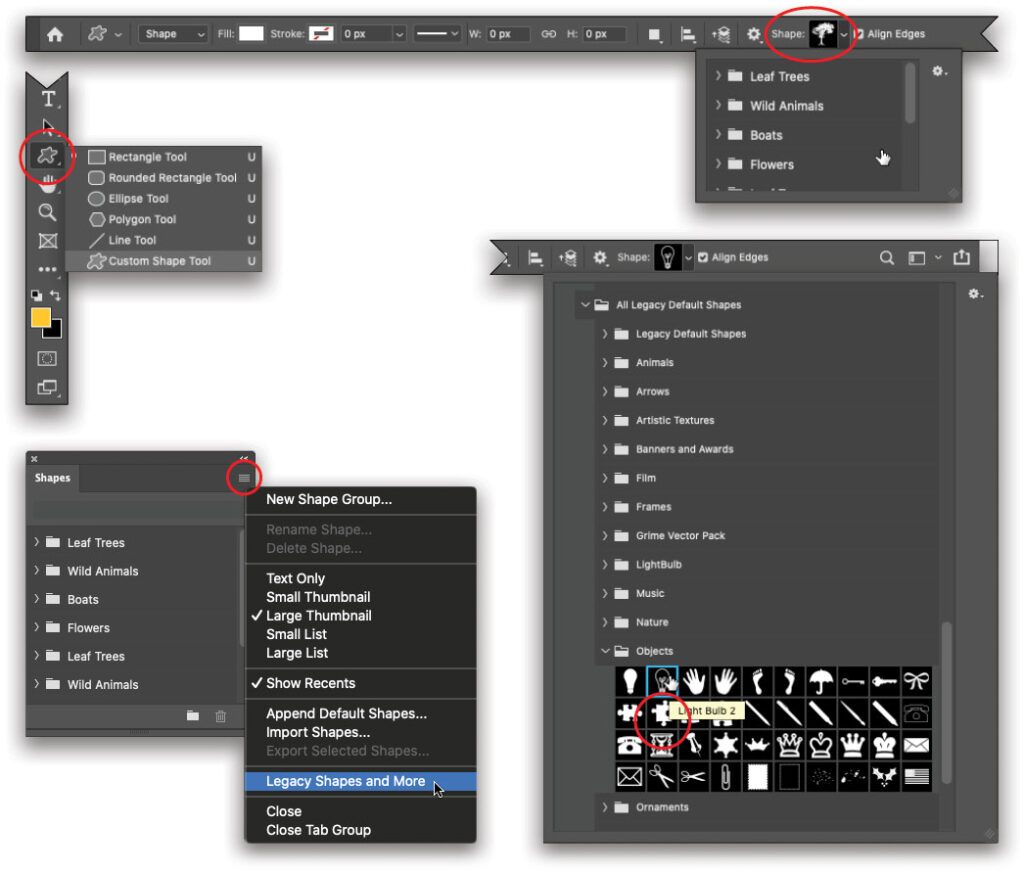
Step 14: Now let’s add more doodles. Press-and-hold the Shift key, and tap U until you have the Custom Shape tool (circled) in the Toolbar. In the Options Bar, set the left-hand drop-down menu to Shape and set the Fill color to white. Click the Custom Shape picker (also circled) and then click the shape you want to use.
If your only options are Leaf Trees, Wild Animals, Boats, and Flowers, you need to load more. To do that, choose Window>Shapes to open the Shapes panel, and from its flyout menu (circled), choose Legacy Shapes and More. Back in the Custom Shape Picker, expand Legacy Shapes and More, and then expand All Legacy Default Shapes. Scroll through the categories and expand Objects. Click the shape named Lightbulb 2.
Tip: To expand all the categories at once, Command-click (PC: Ctrl-click) one of them.
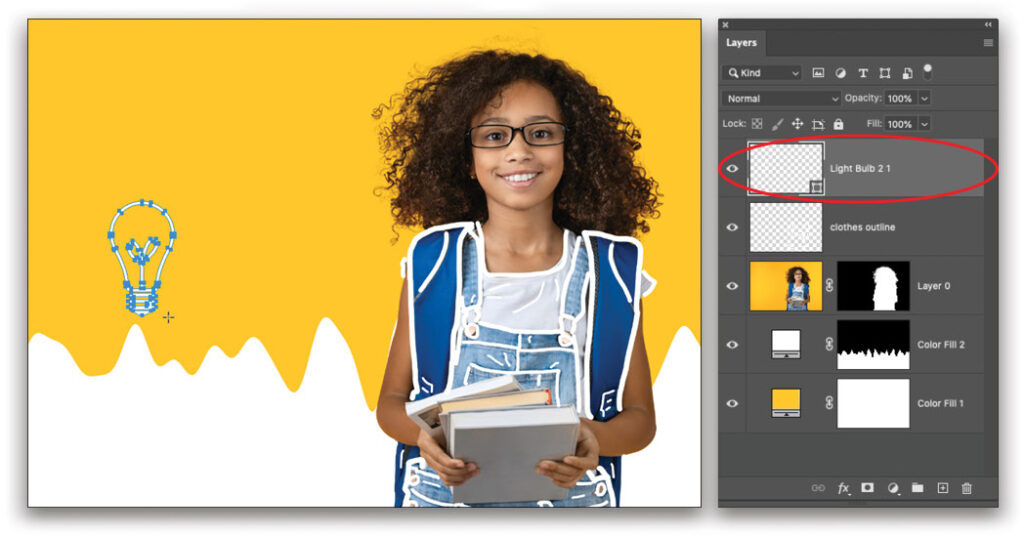
Step 15: Mouse over to the image and Shift-drag to draw the shape; don’t worry about the size because you can change it later. When you release your mouse button, Photoshop adds a shape layer. Drag this layer to the top of your layer stack (circled).
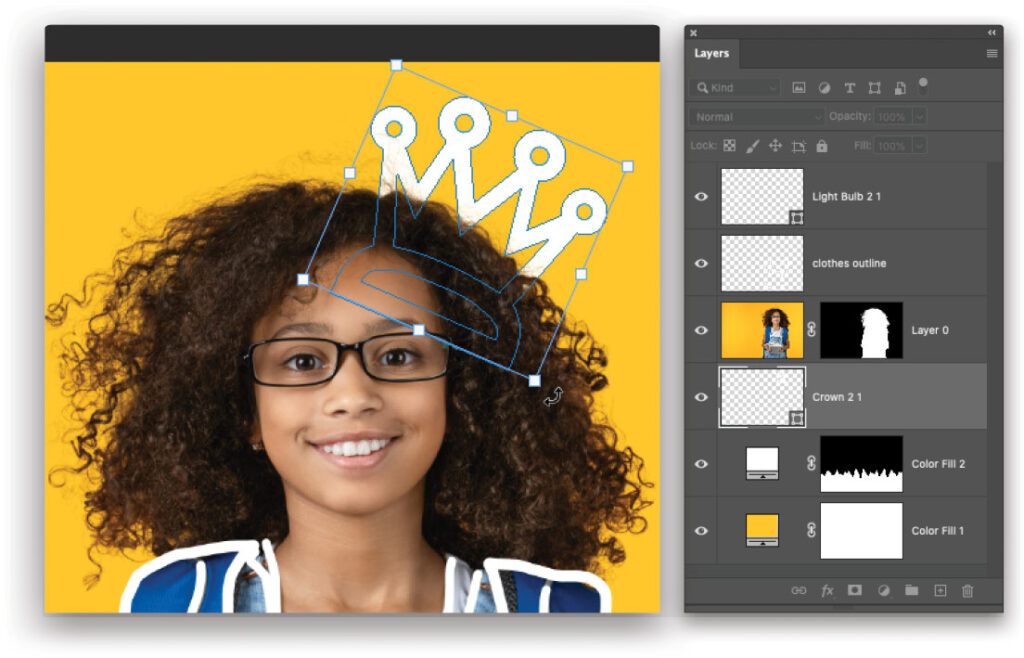
Step 16: In the Options Bar, reopen the Custom Shape Picker, go back to the Objects folder in the All Legacy Default Shapes folder, and pick one of the crowns. Start drawing the crown near her head and then add the Shift key to maintain proportions (if you hold the Shift key before you start drawing, the crown will be added to the light bulb layer).
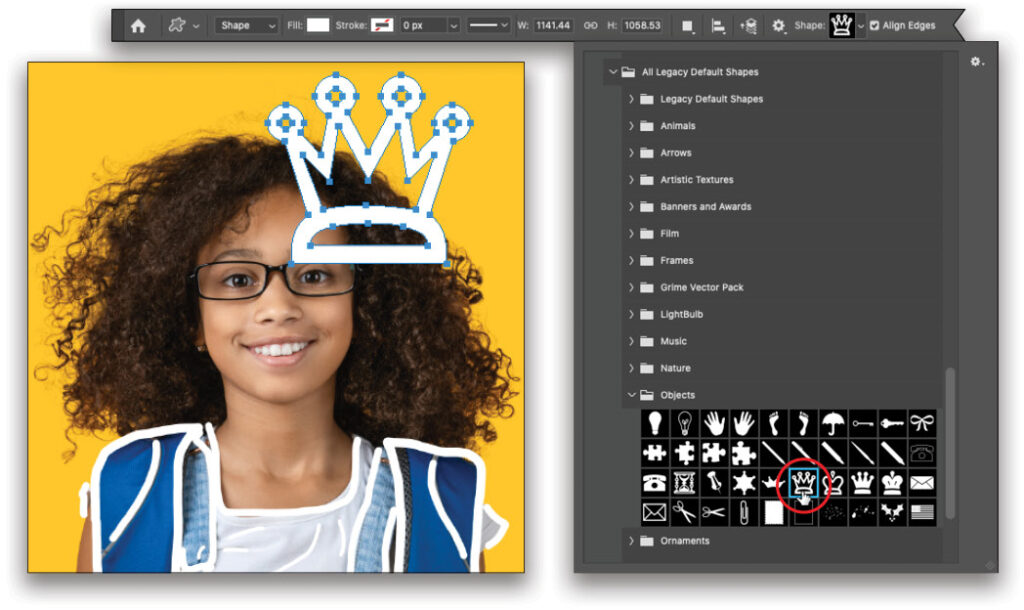
Step 17: Drag the Crown layer beneath the photo layer so it appears behind her hair. Press Command-T (PC: Ctrl-T) to summon Free Transform and a resizing box appears around the shape. Position your cursor just below the white square handle on the bottom right, and when your cursor turns onto a curved double-sided arrow, drag to rotate the crown. To resize the crown, click the same handle and drag inward to make it smaller or outward to make it bigger (no need to Shift-drag). To reposition the crown, click inside the bounding box and drag. When you’re finished, press Enter.
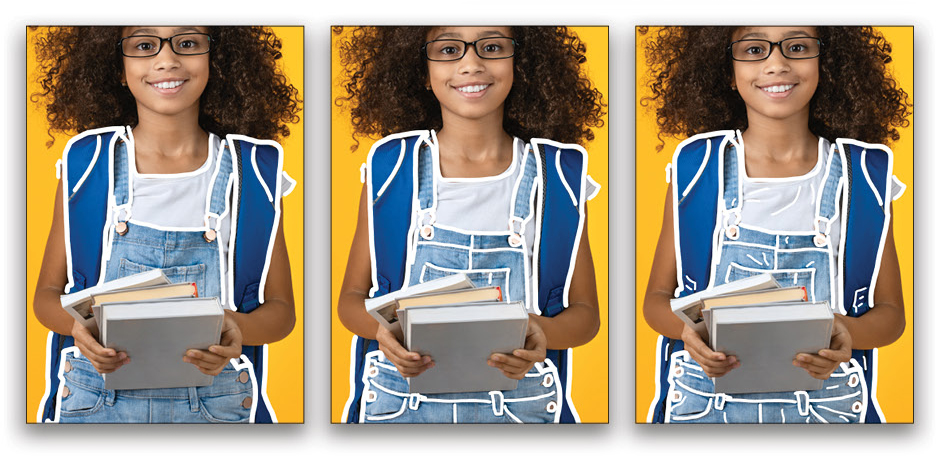
That’s the basics of using shapes. You can also duplicate a shape by activating that layer in the Layers panel and pressing Command-J (PC: Ctrl-J). Move a shape by activating that layer, pressing V to grab the Move tool, and then dragging the shape.
In our final image, we duplicated the Light Bulb layer several times and each layer was rotated using Free Transform to form a rainbow. To make some light bulbs appear behind the subject, we dragged those layers beneath the photo layer. We also used built-in cloud and confetti shapes (they’re at the top of the Layers panel, out of view).
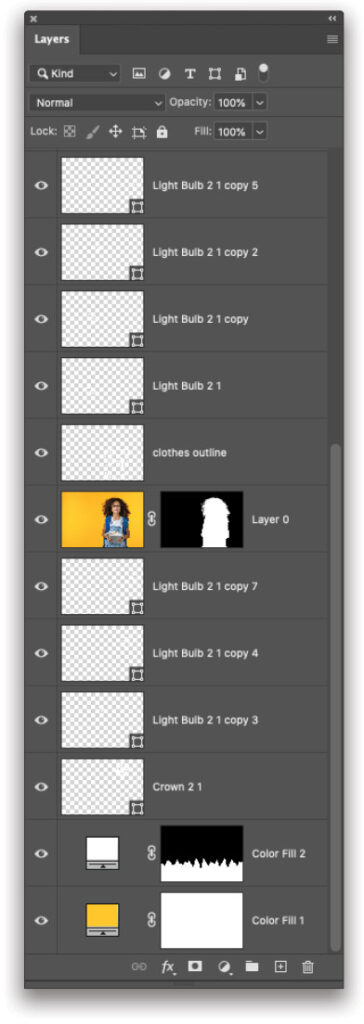
And if a shape looks too perfect, activate that layer in the Layers panel and run a filter on it (say, Filter>Distort>ZigZag). Obviously, you don’t have to use built-in shapes; if you’re skilled with the Brush or Pen tools, by all means, draw your own doodles. Until next time, may the creative force be with you all!

This article originally published in the October, 2020 issue of Photoshop User magazine.
About Photoshop User and KelbyOne
Photoshop User magazine comes out digitally 12 times a year and is part of KelbyOne, the leading educational resource for Photoshop, Lightroom, and photography. Pro members have access to more than 900 video courses and 100 back issues of Photoshop User. To learn more about KelbyOne, click here.


