Knowing where to start when you’re interested in incorporating off-camera flash to your photography can be a daunting prospect for the uninitiated. There are so many brands, so many modifiers, and so many techniques that it can seem downright dizzying. My advice is always to start with just one light. Even seasoned multi-strobe owners are consistently surprised at how much can be accomplished using just one light.
Despite having 10 strobes in my arsenal of studio and location lights, I make it a practice to see what I can accomplish using just one light, and then add additional lights one at a time, as needed. This reductive one-light approach serves multiple purposes: It helps keep things simple technically; it keeps you mobile and light on your feet; it’s infinitely easier on your wallet when you’re starting out; and, unlike using multiple lights, it also makes it much easier to assess the contribution being made by just one light to the overall exposure. When you have multiple strobes firing at the same time, judging the contribution that each is making gets more complicated. So let’s keep it simple and look at the wonderful world of possibilities using just one light!
FOUNDATION
Whether you’re working with one strobe or many, the four foundational principles governing light remain the same. Let’s look at each one:
Quantity of Light: The amount of light contributed by your strobe(s) is determined by the power setting on the strobe. You can handle this manually by simply dialing in the desired amount of power, or you can rely on TTL metering to do it for you. When using TTL (supported by most leading strobe manufacturers), once the initial exposure has been determined, you’ll likely want to adjust your camera’s aperture, flash exposure compensation, and shutter speed settings to tailor the lighting effect to your taste.
Quality of Light: Varying the softness and hardness of a strobe’s light is done with lighting modifiers. These umbrellas, softboxes, beauty dishes, scrims, reflectors, and subtraction panels each shape and control light differently, resulting in a variety of lighting effects. From simple to complex, inexpensive to expensive, modifiers are the go-to tools for creating different qualities of light. Generally, the larger the modifier, and the closer it is to what you’re photographing, the softer the resulting quality of light. Conversely, the smaller and further away a modifier is from the subject matter, the harder the quality of light created.
Note: Soft light is defined by slow transitions between shadows and highlights; while hard light is the opposite, with rapid transitions between shadows and highlights.
Other factors determining quality of light include the interior finish of the modifier being used: For a low-contrast effect, choose a white interior, and for a high-contrast lighting effect, opt for silver. The orientation of the strobe in relationship to the modifier also plays a role. For example, modifiers that orient the flash facing away from the subject produce a softer quality light, while modifiers with the flash facing the subject produce a brighter and potentially harder light. Lastly, the amount of diffusion a particular modifier has will impact the softness or hardness of the light. Therefore, modifiers with a double layer of diffusion fabric and a strobe facing away from the subject will create a softer quality of light.
Distance of Light: The distance between your light and subject will also impact the quality of light. As stated above, the closer the light to the subject, the larger its perceived size, and the softer its light. Move the same light further away from the subject and the perceived size gets smaller, and the quality of light becomes progressively harder. If you find yourself photographing a group of people or objects placed in a staggered fashion, the further away the light is placed, the more even the lighting will be from front to back. This is because of a bit of counterintuitive physics known as the “Inverse Square Law.” It’s too complicated to get into here, but suffice it to say, if you want even lighting from front to back on a staggered group, move your light back.
Direction of Light: The height and angle of your light in relationship to the subject you’re photographing plays a direct role in the amount of shadows created. Say you have a strobe located above your camera position and your subject is directly in front of you, your lighting will be flat and virtually shadowless.
Now, add a fill reflector below your subject, and you’ve created the two light patterns known as Clamshell lighting, often used in beauty and glamour photography.
Take that same light and move it to the left or right of your subject, and you’ll progressively introduce more shadows. As the light moves around, you’ll be creating Loop and Rembrandt lighting patterns. Keep in mind that shadows are your friends; they add a sense of volume, dimension, and drama. As I explain below, you can modulate them easily using reflectors.
Which Modifier(s) Should I Start With?
When you start out building your strobe lighting kit, budget constraints may allow you only one light and one modifier. If that’s the case, don’t worry: I’ve got you!
I recommend starting with a convertible umbrella. They’re as versatile as they are lightweight, compact, and inexpensive. You can get a convertible umbrella for less than $100, configured for shoot-through or bounce-back lighting, and they come with a variety of interior fabrics from white to silver. Many also include front-facing diffusion material that can turn the humble umbrella into an octabank on the fly. One of my favorites is the Lastolite 41″ 8-in-1 Umbrella, and the Photek SoftLighter II is also a worthy contender.
Following are three sample images created in the studio, which demonstrate just how versatile convertible umbrellas can be. Each image was created using only one light and the same convertible umbrella, yet each image has a considerably different quality of light.
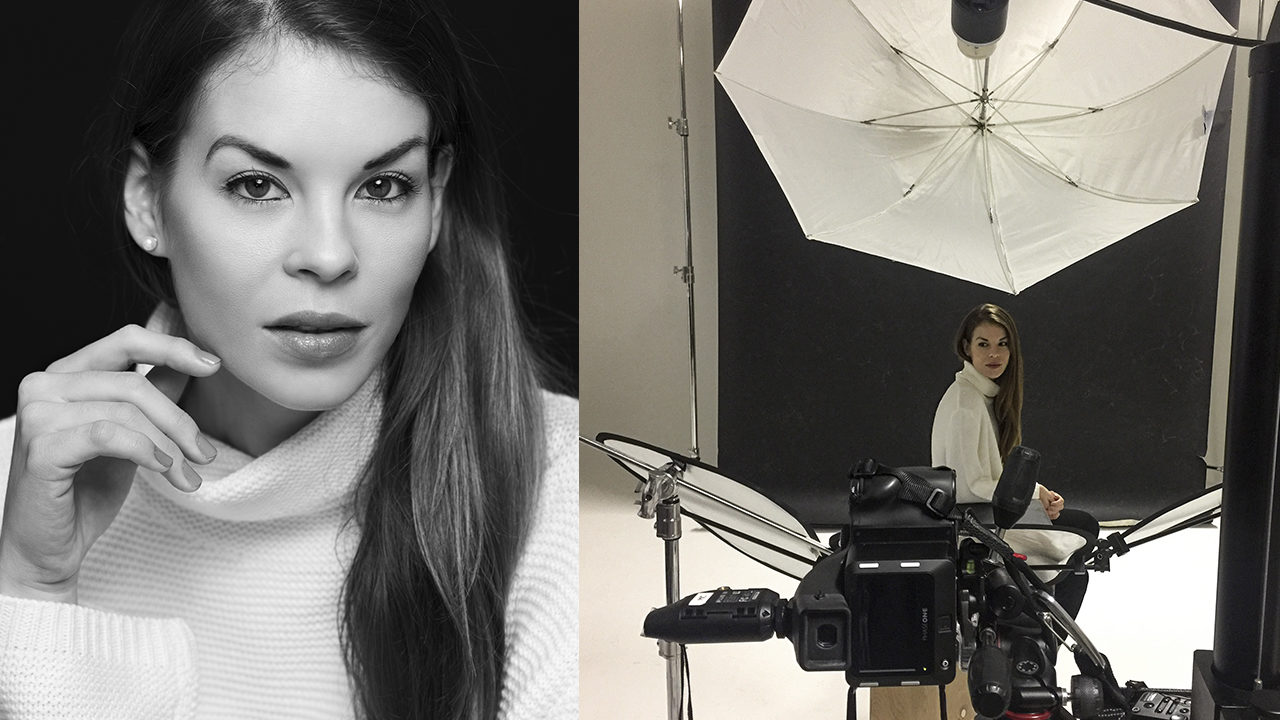
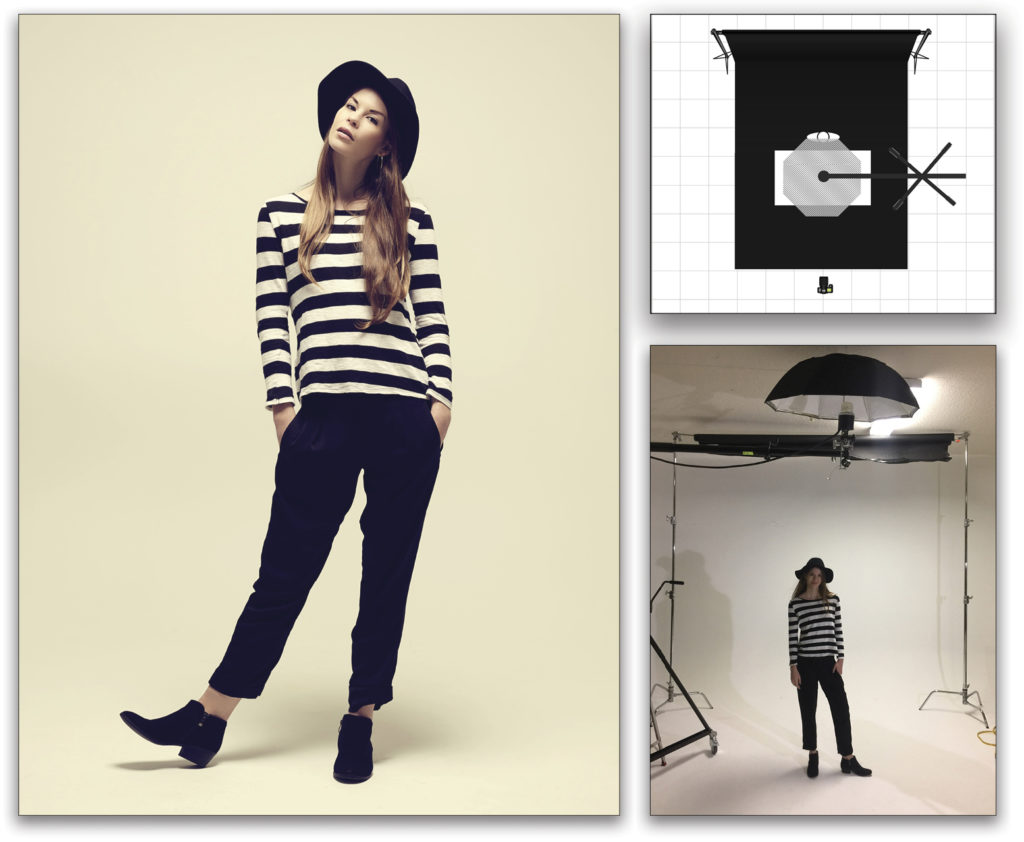
Bounce-back Lighting: Using a bounce-back umbrella overhead creates a dramatic lighting style with enough coverage to shoot full figure and illuminate the background. If you’re shooting on a white or gray background, simply move the key light and model closer or further away from the background to control the brightness. Umbrellas also don’t discriminate; they’re as compatible with speedlights as they are with strobes.
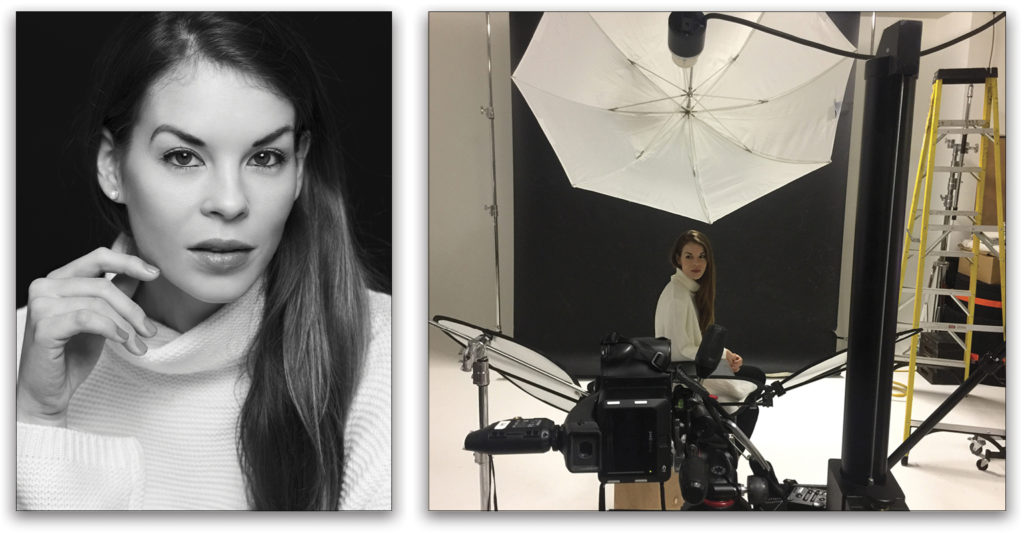
Clamshell Lighting with Umbrella and Reflectors: To create virtually shadowless beauty light, I simply positioned a convertible umbrella set up as a shoot-through above the camera position. A reflector was placed below the model to provide fill light (see above right). This is known as Clamshell lighting.
Umbrella with Front-facing Diffusion and Reflectors: Positioning the light to the side of your subject introduces shadows. Here I’ve used one light and a convertible umbrella in a bounce-back configuration with front-facing diffusion fabric, essentially creating an octabank. The effect is soft and beautiful. Reflectors below and to the side of the subject were used to fill in the shadows.
You don’t always need to change your lighting to change its effect. Still using the exact same setup as the previous image, simply having the model change her position and face away from the key light creates a different quality of light.
Other modifiers worth owning for one-light work (when budget permits) are a beauty dish such as the Mola Softlights Demi, a small octabank—my preference is the Elinchrom 27.5″ Rotalux Deep Octabox—and reflectors, diffusion panels and scrims in a variety of sizes. Lastolite offers many affordable and portable solutions. These are indispensable tools in the studio and on location.
One Light In The Studio
There are many similarities to the way that a strobe works in the studio and on location. Unlike location photography, however, where we have two sources of light (ambient and flash) to balance, in the studio we have only flash contributing light to the exposures. That’s why shutter speed, which governs the amount of ambient light contributed to exposures, plays a very limited role in the studio. Most of the time you’ll just want to set your speed to your camera’s flash sync speed and forget it—on my cameras that’s 1/125th second, but yours may vary. On the other hand, the strobe’s power setting and the aperture you choose both play dominant roles in the studio. Remember that a studio can be your living room, a garage, or a dedicated studio space; the same rules apply for each.
The first step is deciding which aperture you want to use: the higher the number and smaller the aperture, the deeper the focus from front to back, and the more detail you’ll capture. Also the higher the aperture setting, the more power you’ll need from your strobe to provide enough light for that aperture. I typically end up somewhere between f/8–f/16. Working with a handheld flash meter makes all of this a very simple affair. Simply dial in your desired ISO, shutter speed, and aperture (matching your camera’s settings), and the flash meter will measure the light from your strobe. Then, just dial the flash power up or down until the meter confirms that there’s enough light for the aperture with which you’ve chosen to shoot. Simple, fast, zero guesswork!
Even when you’re working with one strobe, it’s still possible to create sophisticated, layered lighting that looks as though multiple strobes were used. In the studio this is done using reflectors. These indispensable and inexpensive tools help you squeeze as much light as possible from one strobe. For example placing a reflector opposite your key light with a model between them creates a cross light pattern that fills in the shadowed side of the model. The closer the reflector is to the model and the key light, the more the fill light provided. You can season the amount of fill to taste by simply adjusting the distance of the reflector. The reflector’s fabric also plays a role; use white for a subtle lower contrast effect and silver for a brighter, punchier effect with more contrast.
In the studio, two large 4×8′ sheets of reversible white or black foam core are taped together and used as reflectors or subtraction panels (known as v-flats). I recommend them! Scrims, or diffusion fabric stretched over a frame, are another super useful tool used to broaden, diffuse, and soften the light from strobes. I use them often.
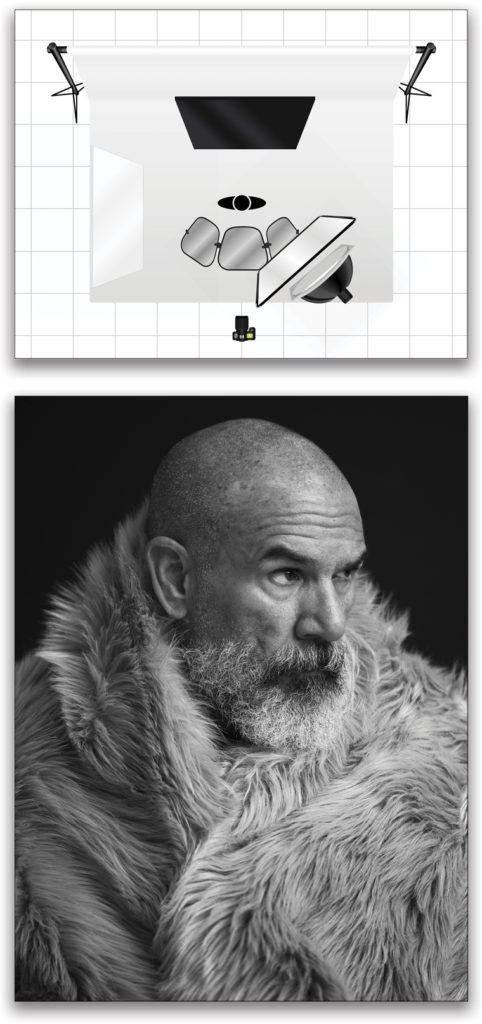
Here’s an example where I used one strobe and a beauty dish. To allow a wide aperture to be used, I set the strobe at a low power setting and fired it through a neutral-density gel and two layers of diffusion fabric, one belonging to the beauty dish and the second a scrim placed directly in front of the key light. Reflectors below and to the side of the subject were used to fill in the shadows.
One Light On Location
Even using just one strobe when you’re shooting on location in mixed-light scenarios, you have two independent sources of light to balance: flash and ambient. Each is controlled using different settings and techniques. The basic rule of thumb is that aperture, along with the strobe power setting, controls the amount of flash contributed to an exposure, while shutter speed controls the amount of ambient light contributed to the exposure. It follows that, if you want more ambient light in your exposure, you should use a slower shutter. Conversely, if you’re looking to knock down the sunlight and create a more moody look with dramatic dark skies, you should use a faster shutter speed.
Many of today’s speedlights, mono heads, and pack-and-head strobe systems have built-in, high-speed sync (HSS) capability. This HSS makes it possible to shoot using shutter speeds beyond your camera’s native flash sync speed, in many cases up to 1/8000th second! Working this way not only gives you the ability to reduce ambient light and create dramatic-looking lighting, but also provides the flexibility to shoot with much wider apertures. By doing this, you reduce background distractions, create a narrow depth of field, and focus attention on the subject in the foreground.
My preferred method is to set the desired aperture and establish the ambient light exposure using shutter speed before turning on any strobes. Once the ambient light has been set to my liking, I’ll add strobe. Most often, I either work intuitively or use a handheld flash meter to set the power for the strobe.
Also, TTL flash metering is a great option with compatible gear. In this case, start by selecting the desired aperture, turn on your strobe, and make your first exposure. This allows the camera and flash to communicate and determine what is the correct exposure, which gets you a solid starting point right out of the gate. (TTL is a great way to work when you need to work quickly and when your off-camera flash is handheld, causing its distance to vary.) Once the initial exposure has been established you can use flash exposure compensation to adjust the amount of flash being contributed, and shutter speed to increase or decrease the amount of ambient light overall.
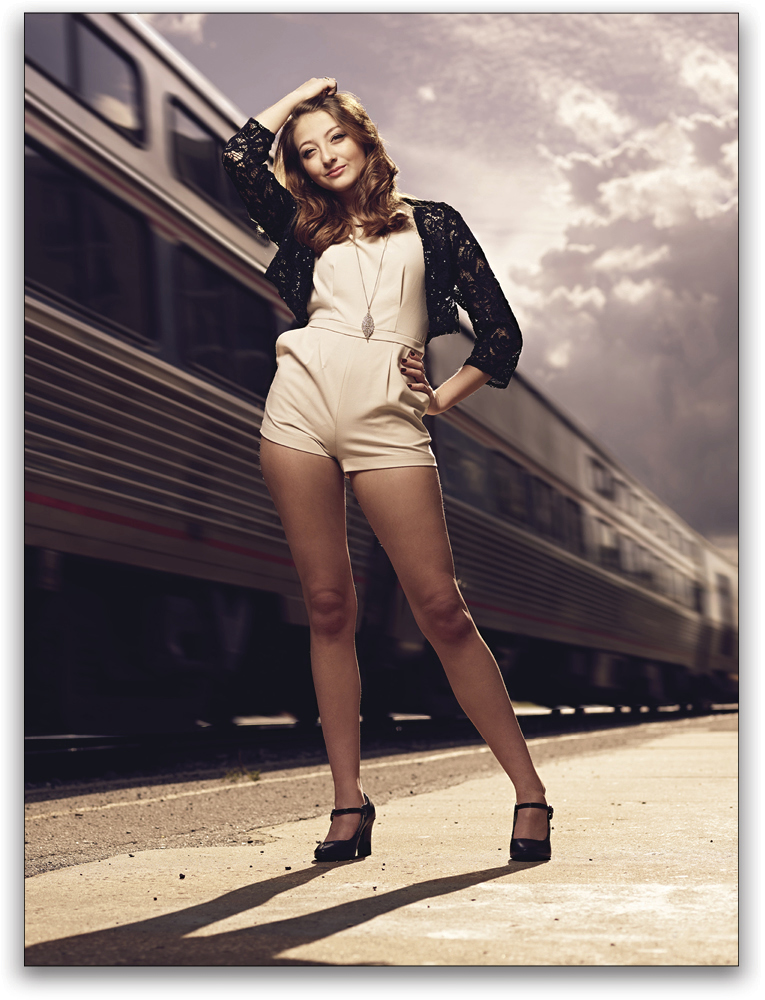
Balancing Ambient and Flash: Here are a couple of examples where I balanced ambient and flash light: For the first image, I used a fast shutter speed, knocking down the ambient light, and a wide aperture that focused attention on the foreground. Note the sun’s position behind the subject’s left shoulder, diagonally opposite the key light, creating a classic cross-lighting effect.
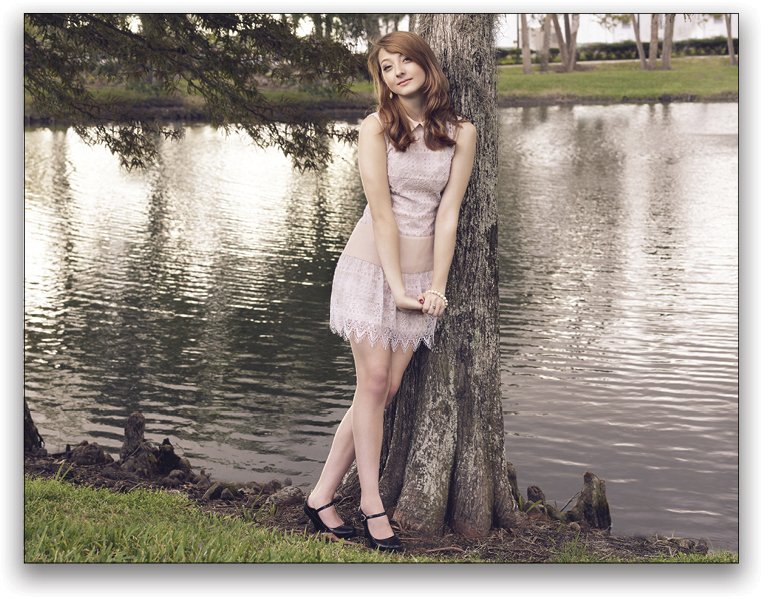
Compare it to this image of Daniella where I used a slower shutter speed with just a kiss of strobe to fill in the shadows and create a natural, non-flashy lighting effect.
Sun as a Backlight: Just as we use a reflector in the studio, on location we have the sun to use as a second source of light. For example, I love to place the afternoon sun behind my subjects, opposite my key light, creating a beautiful, warm-toned, accent/rim light behind them while my key light illuminates them from the front. This is classic cross lighting, and it couldn’t be easier or cooler looking! Tip: If the sun isn’t where it needs to be for this technique, simply use a gold reflector in its place and you’ll get pretty close to the same effect.
Scrims and reflectors are just as valuable on location as they are in the studio. Scrims are wonderful tools for controlling harsh overhead sunlight or diffusing the light from a strobe, while reflectors fill in shadows, provide accent light, and create the appearance of more than one light.
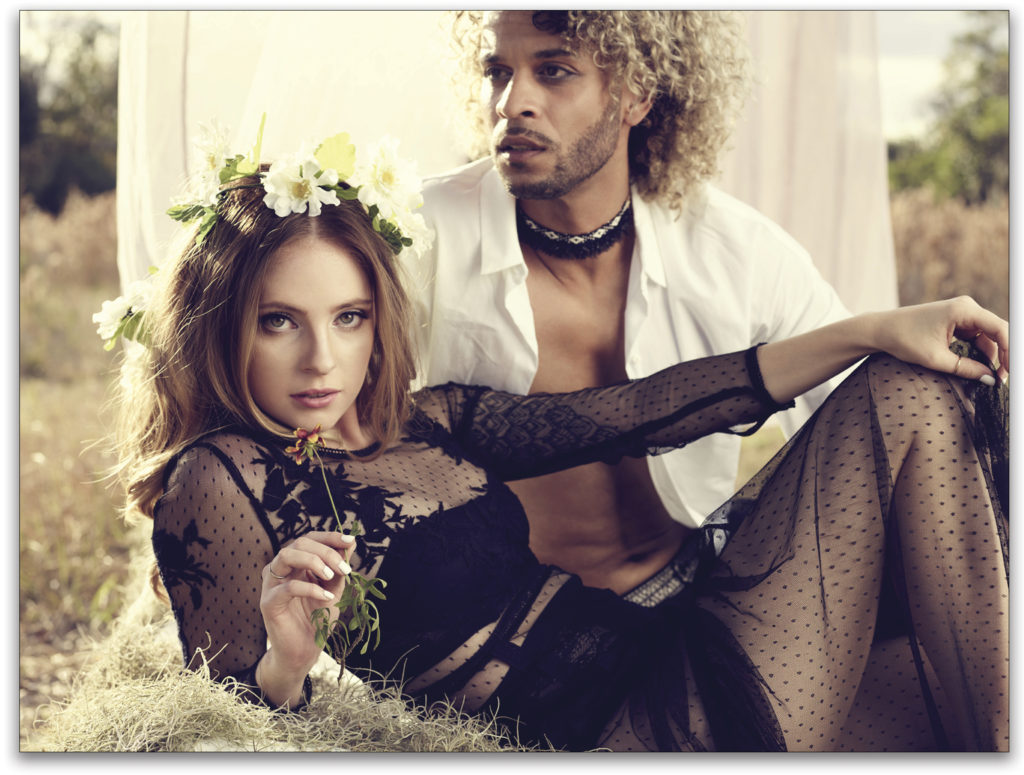
In the image above, one strobe with a large octabank is used camera right as the key light and the subjects are positioned with the sun behind them so that it provides accent/trim light.
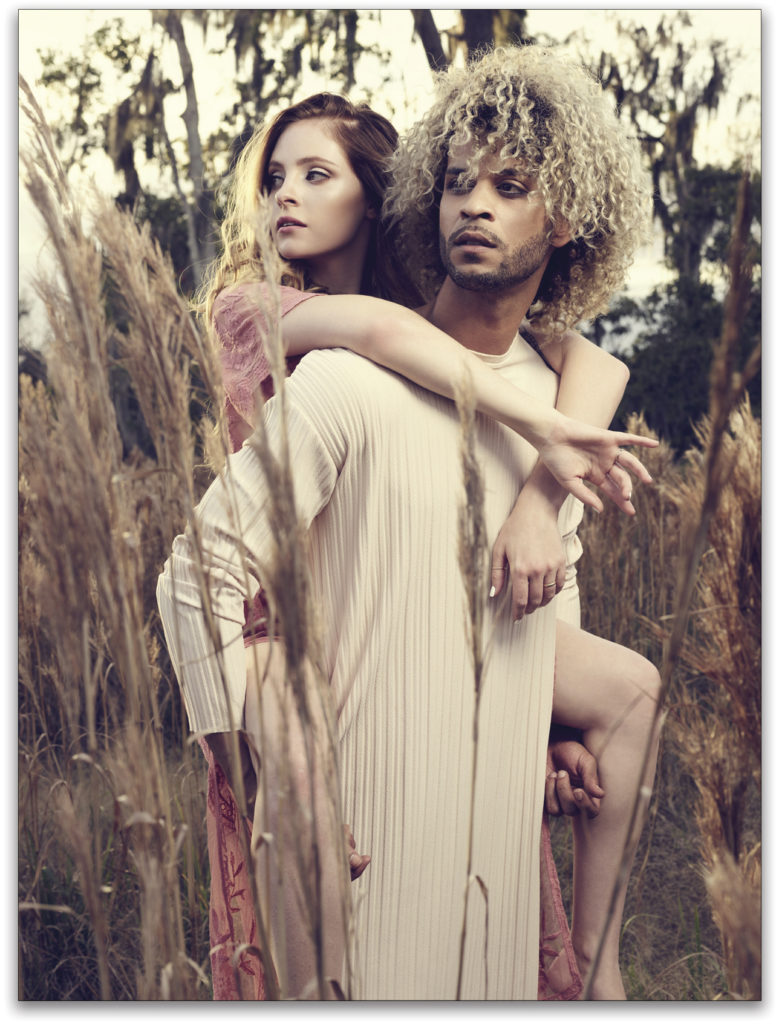
In the image above, I used one strobe with a small octabank camera right as the key light, again with the sun behind the subjects.
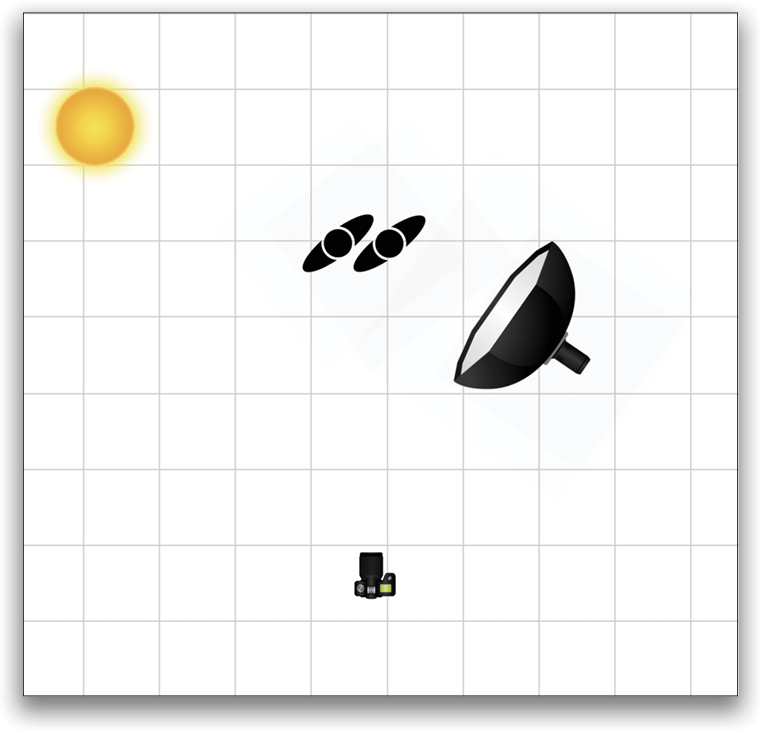
The diagram on the previous page shows that positioning the sun behind your subjects, opposite the key light, creates a cross-lighting pattern, where the main light is your key and the sun is an accent/trim light.
As you can see, whether you’re in the studio or on location, there’s a lot that can be done with just one light. Don’t ever feel held back by a limited amount of gear. Grab a speedlight or a strobe, use it off camera, experiment with different kinds of modifiers, throw in reflectors and scrims where necessary, and I guarantee you’ll be pleasantly surprised at how much you can accomplish using one light!
This article previously published in Issue 42 of Lightroom Magazine.


Excellent advice. Thank you!