“I want to make images with impact.” That’s what one of my photo workshops students, and now good friend, Gary Potts, said when I asked him to share his goal for the workshop. In other words, Gary wanted to make dramatic pictures that would immediately draw the viewer into the scene. I commended Gary on his goal, and offered some advice for making images with impact. Following are just a few suggestions, as a full list could fill this entire issue.
Strong Eye Connection
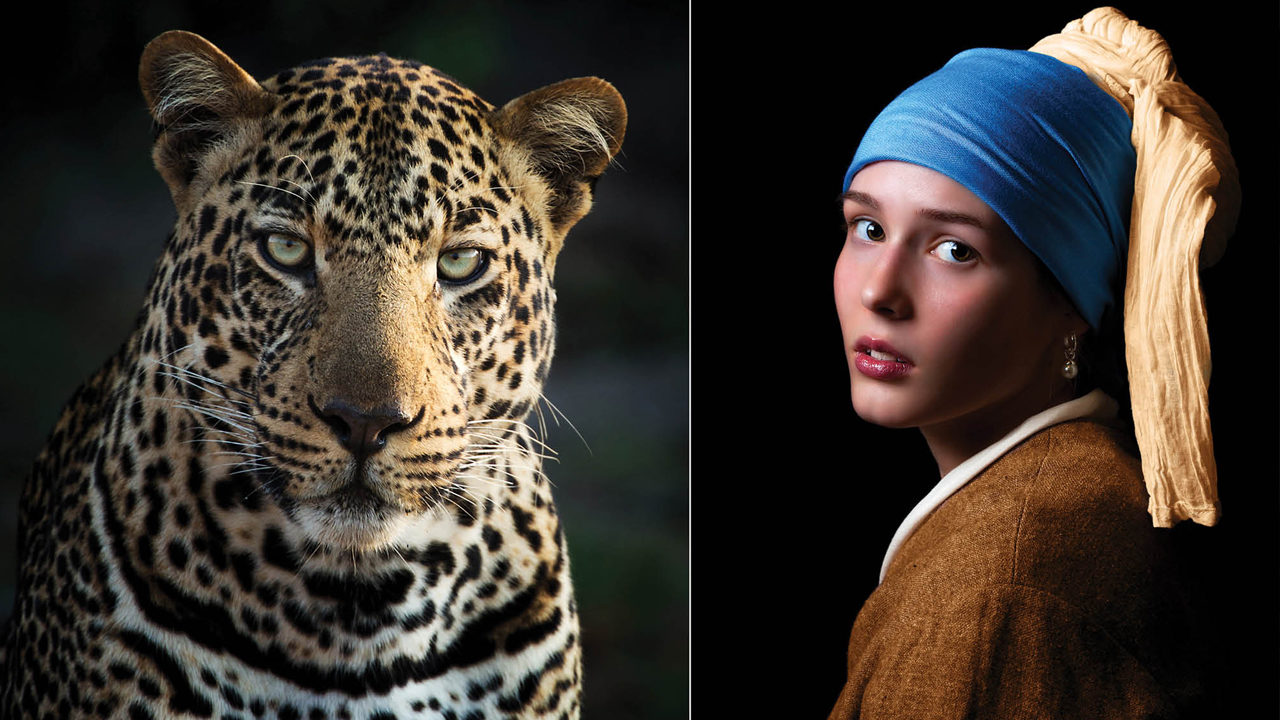
Strong eye connection helps the viewer of a photograph identify with the subject, be it a person or an animal.
Emotionally, the key to achieving this effect is to shoot at eye level and have the subject look directly into your lens.
Technically, the eyes must be tack sharp, which means placing the focus point in your viewfinder (or on the LCD monitor on the back of your camera) directly on one of the eyes. If the eyes aren’t on the same plane (same distance from the camera), place the focus point on the eye closest to the camera.
For the pair of photographs that open this article, I was lucky to get a strong eye connection with the leopard in Kenya on the left, and with a model that I worked with in my home studio on the right.
Details
A photograph that shows close-up details of a larger subject forces our brains, consciously and subconsciously, to not only look at the patterns and shapes in the photograph, but also to fill in the blanks and imagine a larger view of the subject—even one as familiar as a zebra.
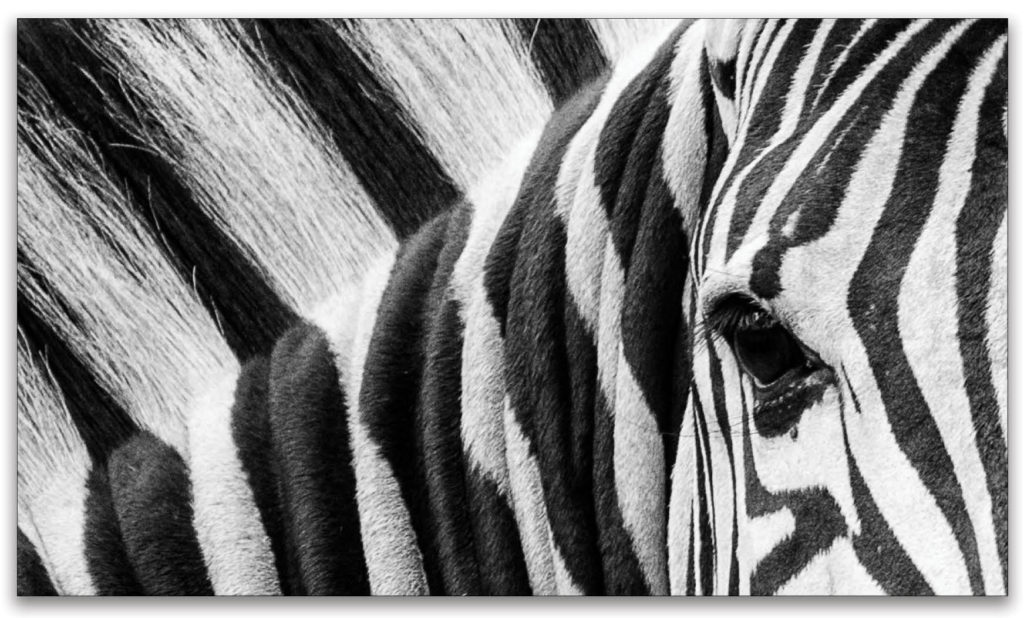
Good depth of field, which means shooting at a small aperture, is usually important in detail shots. Telephoto lenses will get you “closer” so you can capture smaller areas of a large subject.
Unique Angle/Perspective
Both of the photographs shown here—countless monarch butterflies on a tree in Michoacán, Mexico, and colorful tulips in Keukenhof, Holland—were taken with my camera very low to the ground and angled upward. It’s this viewpoint that adds impact to the scenes.
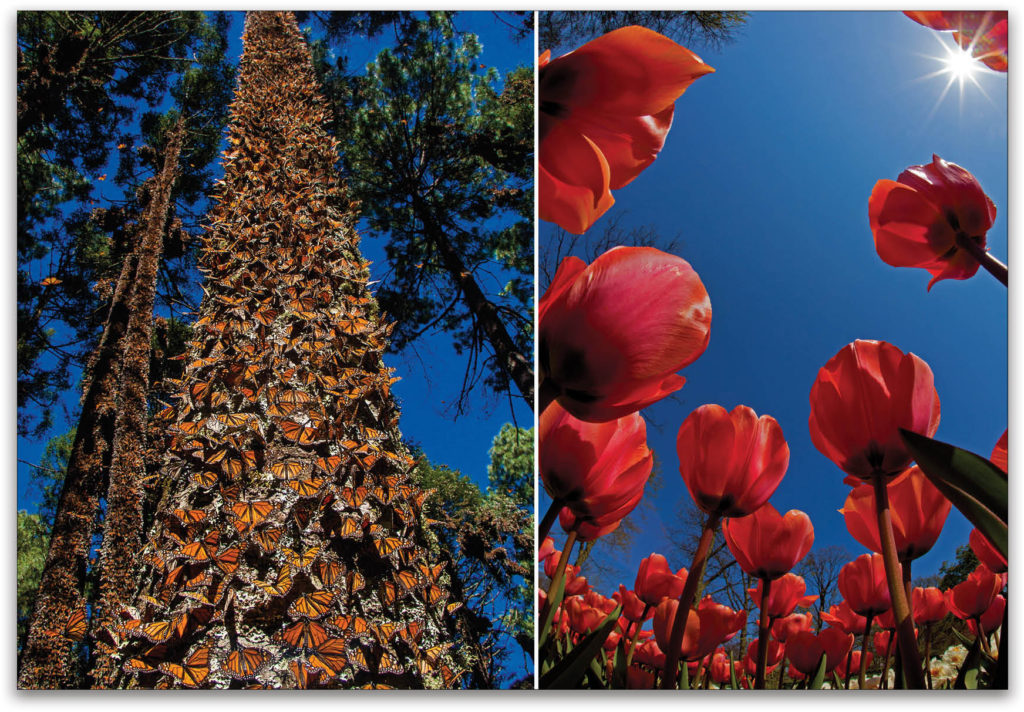
For low-to-the-ground viewpoints, use a Platypod (a metal plate with adjustable feet and a mount for a ball head). A camera with a flip-out screen will help you compose creatively when your camera is very low to the ground, and a wide-angle lens (24mm for the monarch photograph and 15mm for the tulip photograph) will help you get everything in focus—just set your lens at f/22 and set the focus a third of the way into the scene.
Peak of Action
A photograph of a subject or subjects taken at the very peak of action, such as these lions embroiled in a “lovers’ quarrel” on the Maasai Mara, has
more impact than when the same subject is photographed before or after that split-second moment.
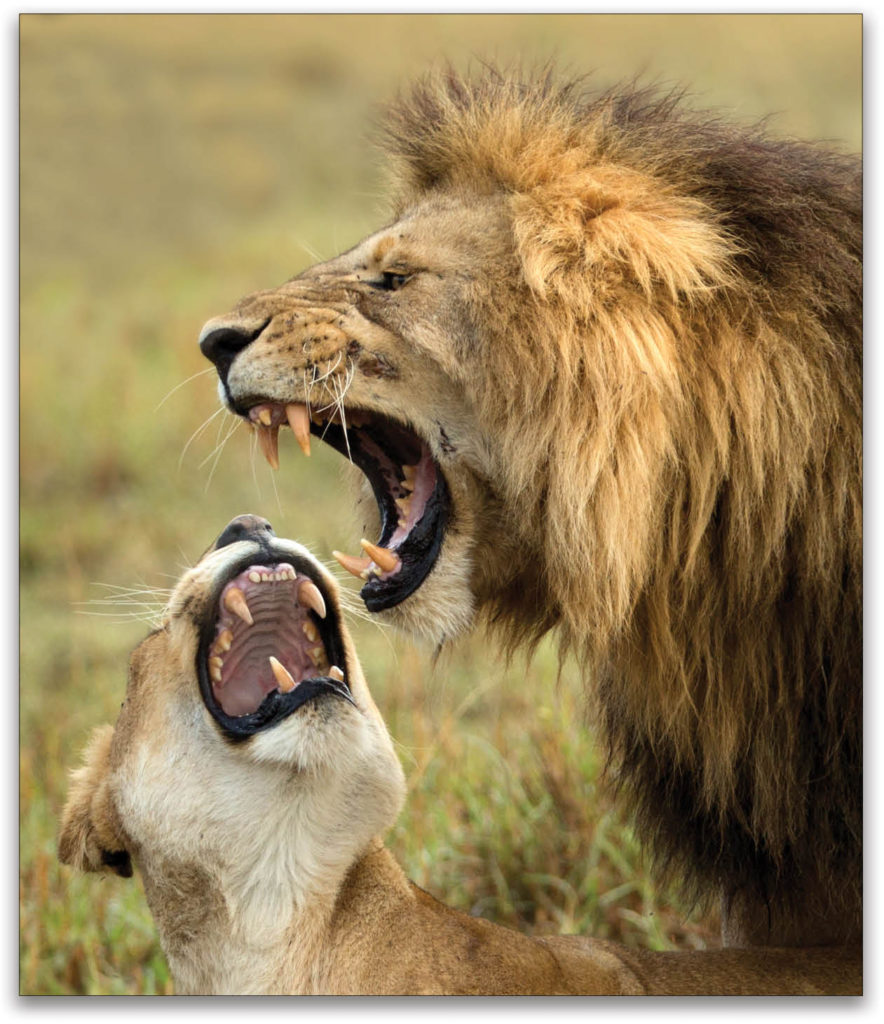
Anticipating the peak of action is key to getting the shot. Setting your camera at the highest frame rate will also help you capture that image with impact. That’s why pro sports and wildlife photographers use pro cameras or high-end mirrorless cameras, because they have faster frame rates than entry-level cameras.
Larger Than Life
A larger-than-life-size image, especially when it’s a big print, can have impact because we can see details that we can’t see with the naked eye, as
illustrated by this super-close-up photograph of a newly emerged butterfly.
For life-size and larger-than-life-size images, you need a true macro lens, such as the Canon 60mm Macro lens that I used for this photograph. So-called “macro” settings on zoom lenses are only close-up settings that don’t offer one - to - one or greater magnification of a subject.
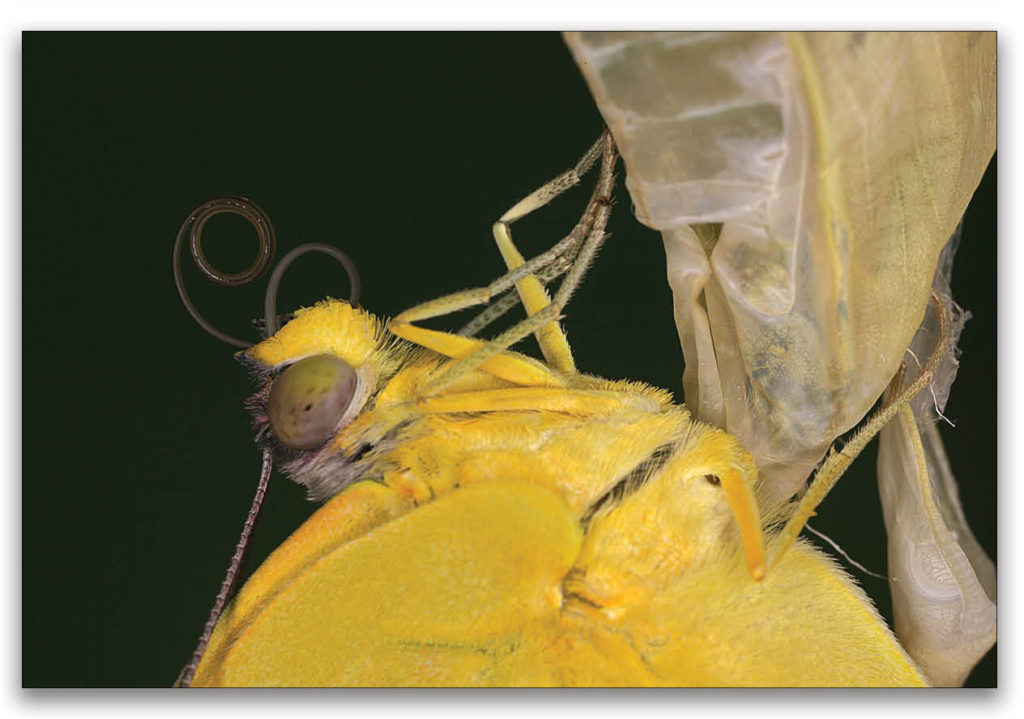
When using macro lenses, depth of field is super-important. For maximum depth of field, set the lens to the smallest aperture.
For added sharpness, use a ring light, which fits over a lens for even or ratio (because you can vary the output of the light around the ring) lighting.
Here’s a bonus tip, which is attributed to photographer Edward Weston [1886–1958]: “If you can’t make a good print, make a big print.”
HDR
High dynamic range (HDR) images show a very high-contrast scene with more detail than we can see with the naked eye. In a good HDR image, both shadow and highlight details are clearly visible. In this photograph of a classic Chevy, you can see details on the floorboard and you can see the subjects outside the car.
The key to a good HDR image is to create a natural-looking image; that is, one that doesn’t look like an HDR image (often, overly grungy with annoying haloes). To achieve that goal, you need to capture the entire dynamic range (darkest shadow areas and brightest highlight areas) of the scene. That could mean, as it did in the case of this Chevy image, taking a total of seven exposures under and over the recommended exposure setting.
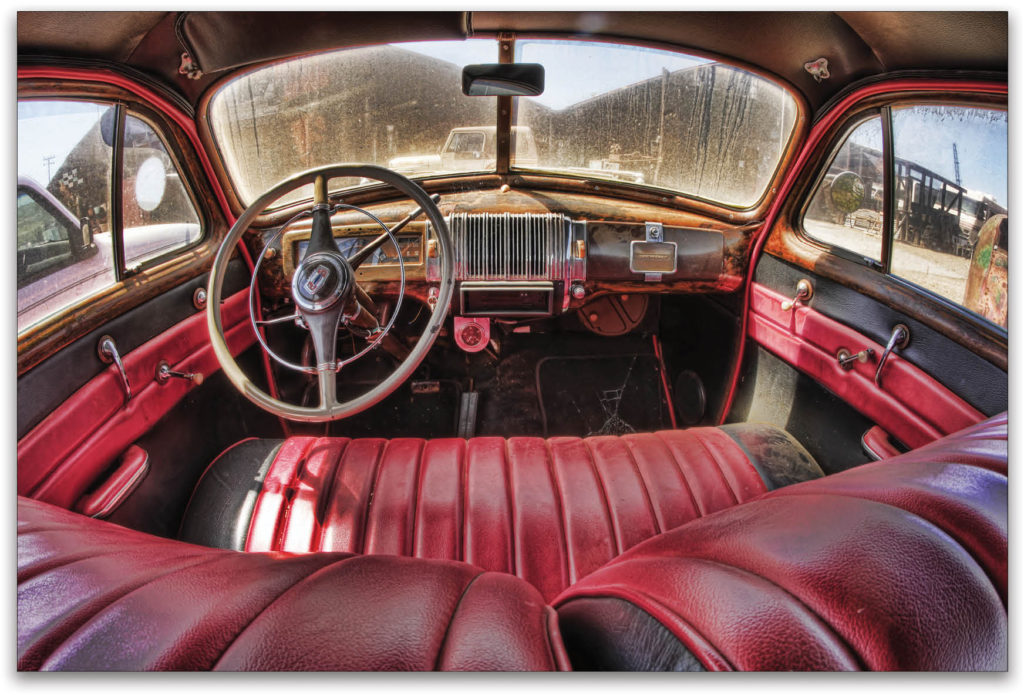
To create this HDR image, I used a 15mm fisheye lens on my Canon full-frame DSLR. To steady the camera during the different exposures, I used a tripod that I set up in the back seat of the car.
Sense of Mystery
There’s an old expression, “When you destroy the mystery of the photograph, you destroy the photograph.” I don’t agree 100% with that photo philosophy, but it’s food for thought.
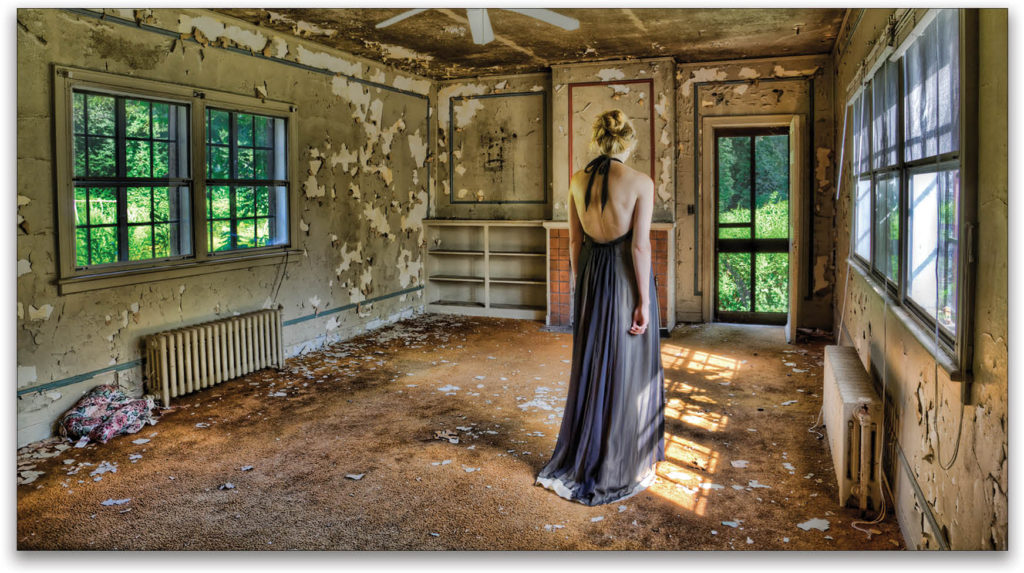
In this photograph, which I took in an abandoned building in Westchester County, New York, the model, wearing a sexy (and quite expensive) evening gown and a formal hairstyle, is looking away from the camera. You can’t see her face or know what she’s thinking. You may be wondering, “What’s she doing in the dilapidated building?” And you may also be wondering about the building itself: “What happened to it?”
The main message here is that you can create a sense of mystery in a photograph by not showing a subject’s face.
Black-and-White
When we remove the color from a scene, we remove some of the reality, and when we remove some of the reality, our pictures can, but not always, look more creative and artistic.
Black-and-white is one reason why Ansel Adams’ [1902–1984] images still have impact to this day. Another is strong contrast. When it comes to black-and-white images, contrast is king! As I suggest to my photo workshop students, “If you go back to some of your black-and-white images and boost the contrast a little, I think you’ll like the images a little better.”
Be aware, however, that if you boost the contrast too much, you could lose both shadow and highlight detail.
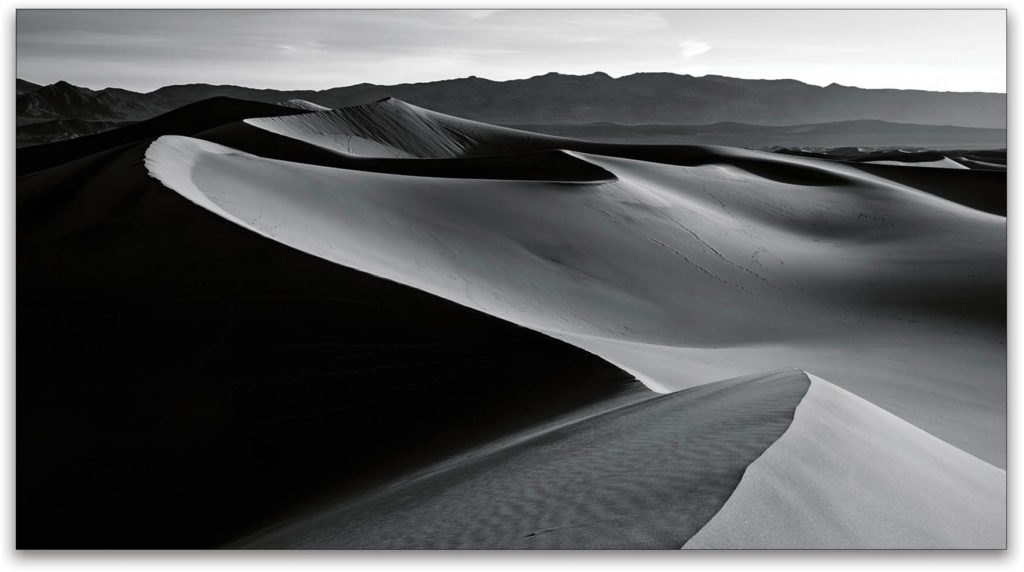
Another important element in black-and-white photography is shadows, as illustrated by this photograph that I took in Death Valley. Remember, light illuminates and shadows define, and shadows are the soul of the photograph. What’s more, shadows add a sense of depth and dimension to a photograph.
Altering Time
Slowing down time—by blurring water, moving cars, clouds, and so on—can create an image with impact because the image shows something we can’t see with the naked eye. The blurred effect is also soothing and calming to some. I say “to some” because not everyone likes the blurred effect.
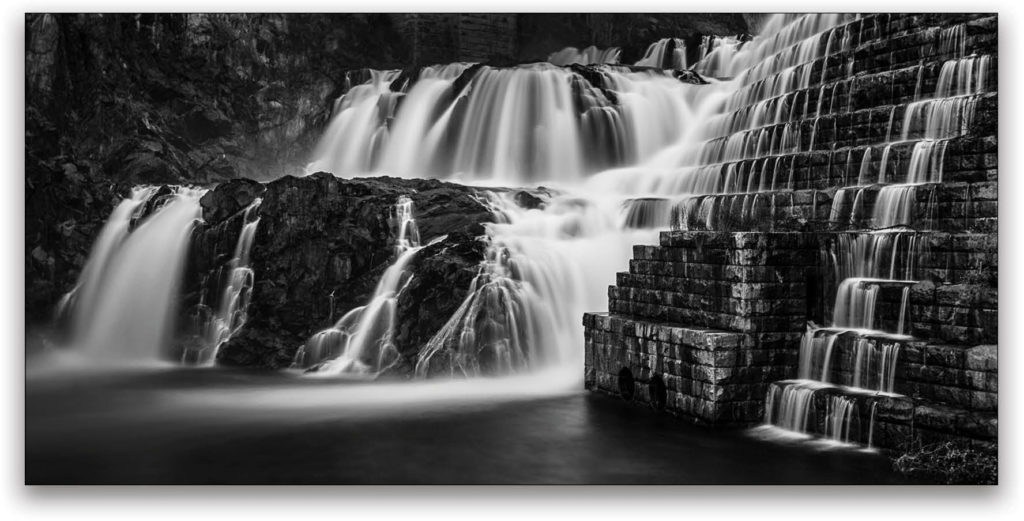
To create the blurred effect, you need to set your camera on a sturdy tripod and use a long exposure, which can range from 1/4 second (as illustrated in my photograph of a section of the New Croton Dam in New York at the bottom of the previous page) to several seconds or even minutes. In bright light, you’ll need to use a neutral density (ND) filter to reduce the amount of light entering your lens.
“Freezing” action is another way to alter time and get an image with impact, as illustrated in my photograph of the two lions shown earlier in this article.
Color
Vivid colors, too, can create an image with impact. Today, with the Saturation and Vibrance sliders in Photoshop and Lightroom, there’s a tendency to push the sliders too far to the right for super-strong colors. The danger with that technique is that you can oversaturate colors and lose detail in those areas of a scene.
Most pros I know use the Vibrance slider more than the Saturation slider. The Vibrance slider increases the saturation of the colors that aren’t already saturated, whereas the Saturation slider increases the saturation of all the
colors in the image.
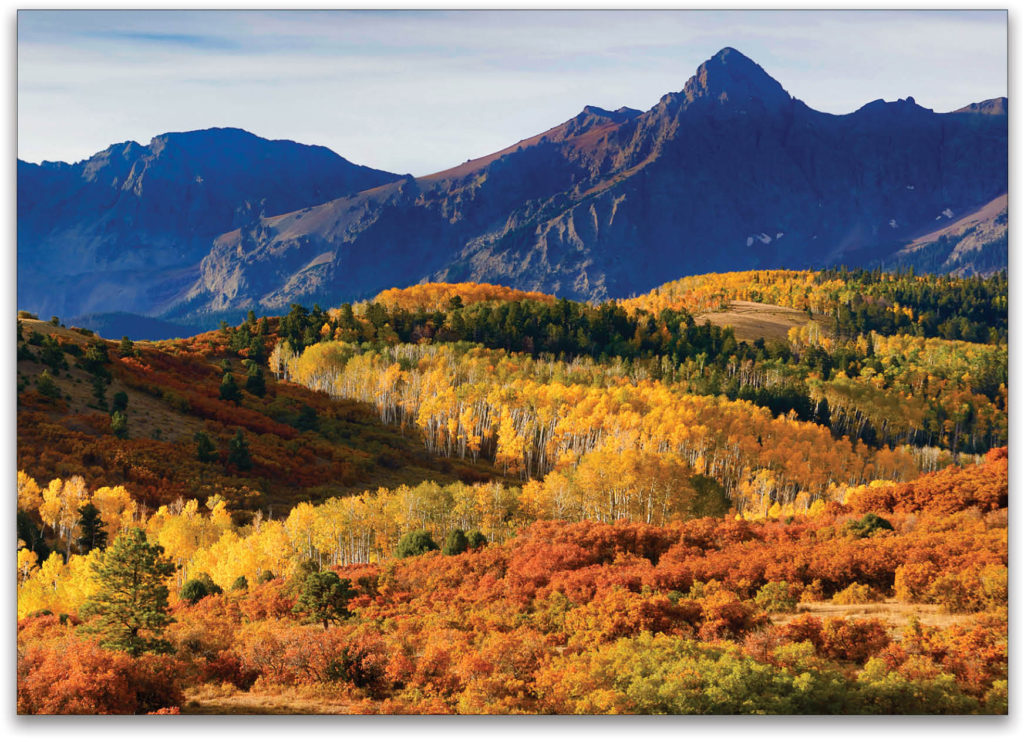
This photograph was taken from the parking lot that overlooks Ralph Lauren’s ranch near Telluride, Colorado. In addition to the vivid colors, notice the beautiful “S” curve created in the scene by the yellow trees. Using creative composition techniques (an “S” curve being just one) is another way to create an image with impact. For more on composition, see my KelbyOne class, 20 Time Proven Rules of Composition.
Panoramas
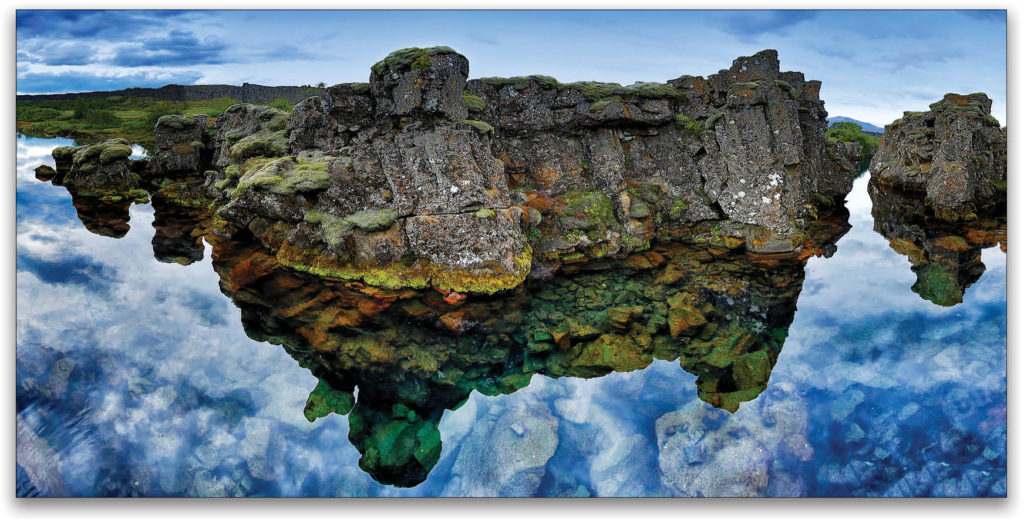
Panoramic images can often show scenes and vistas in more dramatic ways than a single full-frame shot, because panoramas take in more of the view. I took this five-shot panorama in Iceland. I include it here to illustrate that you can use panoramic photography for subjects that are near as well as for far-away subjects. Even with my 16mm lens, I couldn’t get the entire rock formation from edge to edge in a single shot. A panorama was the answer.
Panorama techniques:
- Hold your camera vertically.
- Meter the brighter part of the scene and set your camera to that setting.
- Set your camera to the manual exposure mode.
- Focus, and then set your camera to manual focus.
- Remove all filters.
- Use a tripod (pano heads are available) or hold your camera steady.
- Take a series of images, overlapping by about
one-third from left to right or vice versa. - When composing, leave a little extra room at the top and bottom of the frame, as you may lose important elements in the scene when your pano is stitched together.
- Keep the horizon line level.
- Process your set of images in Lightroom using the Photo Merge>Panorama feature.
Making Pictures
As a travel photographer, I’m big on making pictures, and not just taking pictures. If you take the time to make a picture—considering the foreground, background, light, subject, and the mood you want to create—the result can be an image with impact.
I made this photograph on one of my Oregon Coast photo workshops. We first selected the location: Face Rock on Bandon Beach. Then we selected the time of day: sunset. We hired a rider to go back and forth at least a dozen times so everyone in the workshop was able to get a good shot.
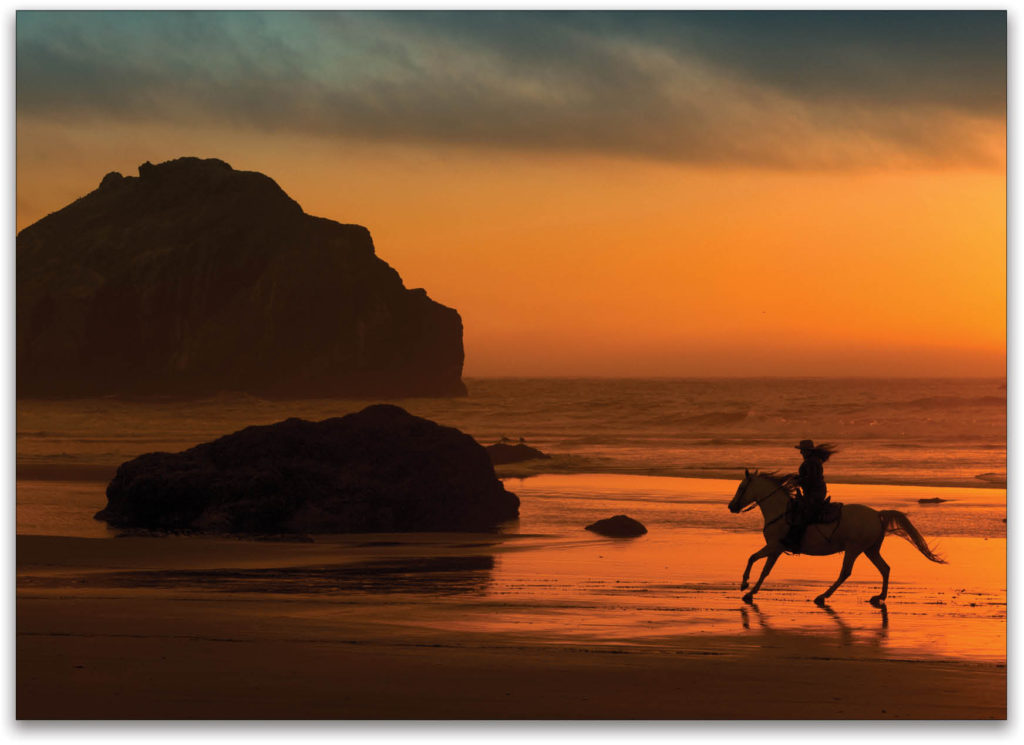
With a little bit of color enhancement as a final touch, I was able to create what the rider and I felt was an image with impact.
Bonus Tip: Silhouettes create a sense of mystery in a scene, which is why silhouettes add to the impact of an image.
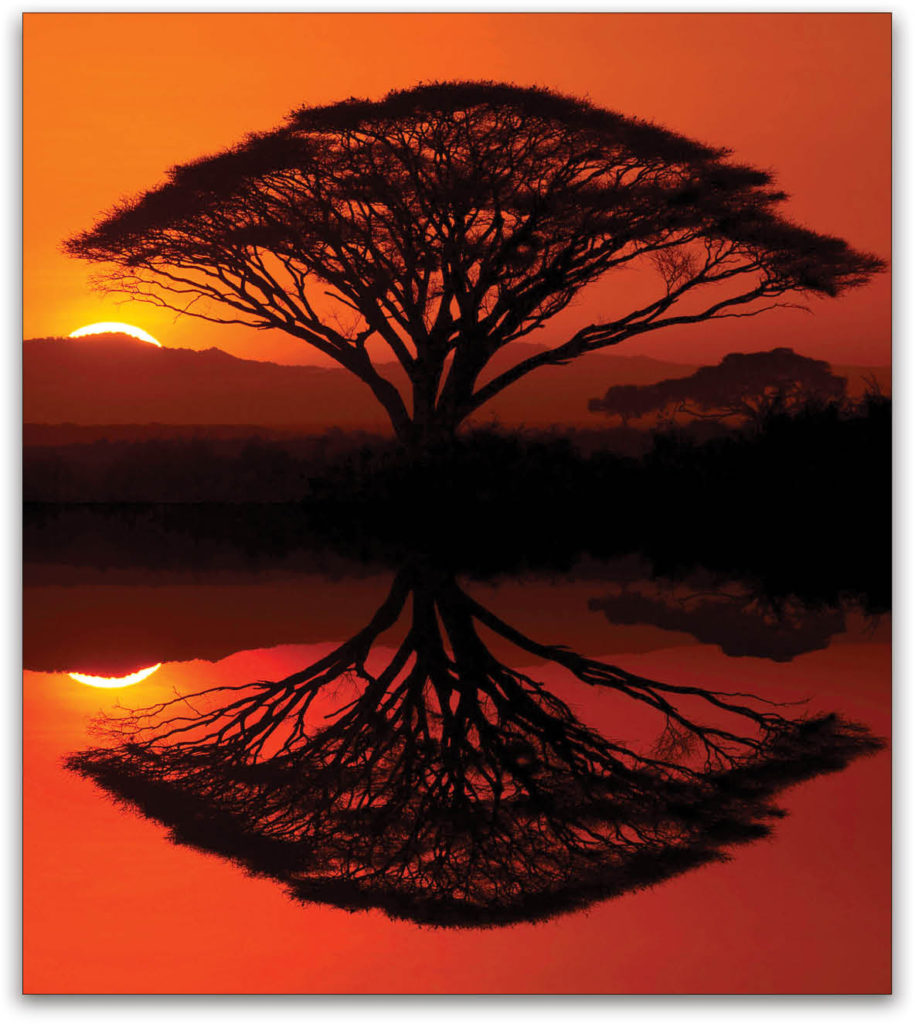
Reflections
For whatever reason, photographers, as well as non-photographers, love images that show reflections. When capturing reflections out in the field, be careful not to cut off the top of the reflected image in the bottom of the frame, which is easy to do if you wear glasses. At home, while working in Photoshop, we can create our own reflection images even if there’s no reflection in the scene, as I did here with one of my sunrise images from Tanzania. Here’s a link to a short video that shows you how to do it.
Emotion
A photograph that conveys emotion is perhaps the most effective way to make an image with impact—for the photographer. This is the last photograph I took of my dad before he suddenly died at age 92. For me, personally, the image has tremendous impact, because it stirs memories of my dad and of that day. Looking at the photograph often makes me cry. For you (and I understand completely), it may just be a snapshot of an old man.
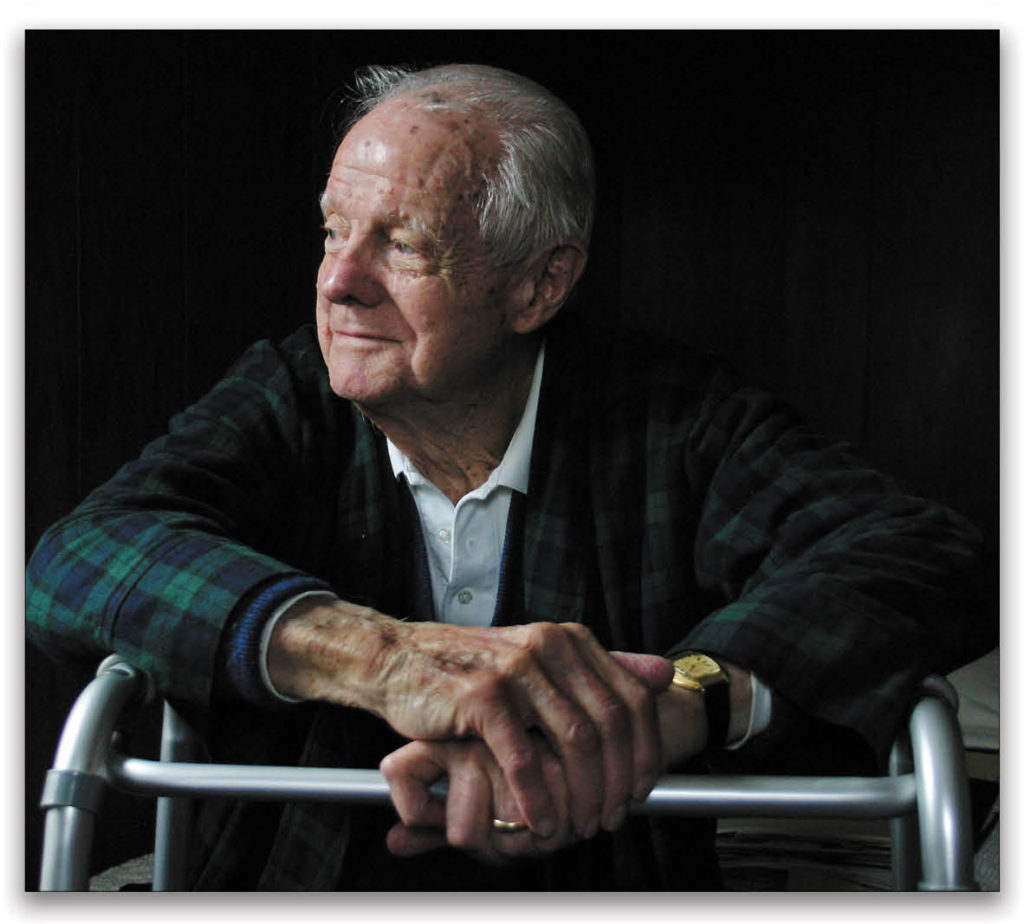
The main message here is: In addition to working hard to get the technically best image with impact, don’t forget to photograph your loved ones, the people who have made an impact on your life.
This article originally published in Issue 50 of Lightroom Magazine.


