
By Rob Sylvan
The Lightroom catalog file is where all the work you do in Lightroom is stored. There may be times when you need to create a smaller version of your main working catalog to take on a trip and continue working, or perhaps to show to a client on location, and then be able to merge that catalog back into your master catalog again. The same process can be helpful for anyone who may have created multiple catalogs for other reasons and now wishes to merge the data contained within them into a single catalog. All of these operations are possible thanks to Lightroom’s catalog export and import functionality.
Exporting a Smaller Catalog
I have one main catalog on my desktop computer that manages all of my photos and contains all of the work I’ve ever done in Lightroom; however, sometimes when I travel, I take a subset of images with me on my laptop, so that I can edit those photos and import new photos I create while away, and then be able to bring it all back into my main catalog when I return. Here’s how I do it:
Step One:
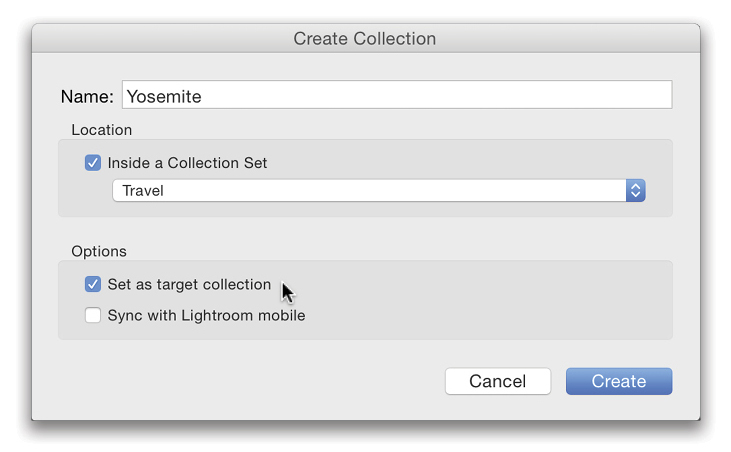
In the main catalog, create a new collection in the Collections panel and name it something that makes sense for your purpose (you might include the name of the place you’re going, the date, client name, etc.). Here’s a tip: When creating the new collection, check the box to Set as Target Collection, as this will make it super easy to add photos to the collection simply by selecting the photo and pressing the B key.
Step Two:
Add all the photos you want to bring with you.
Step Three:
Right-click the collection and choose Export this Collection as a Catalog.
Note: It’s not required to create a collection before exporting a catalog, as you can simply select any number of photos and go to the File>Export as Catalog menu to export a catalog; however, by creating a collection, it gives you a way to thoughtfully gather up the photos you want to bring, no matter where they may reside on your drives.
Step Four:
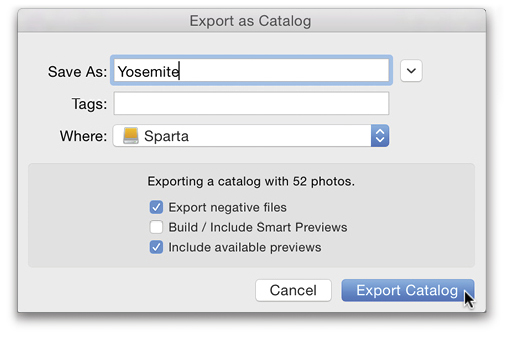
After choosing the Export as Catalog option, you’ll see the Export as Catalog dialog, where you’ll need to make some choices. Let’s go through the options. First, give your new catalog a meaningful name so that you know what it contains when you see it later. (I’ve named mine Yosemite.) Then you need to choose where on your system you want this catalog to be created. You can choose an internal drive for now and copy it to another drive later, or simply choose a location on an external drive that you can connect to your laptop and bring with you. In my case, I chose a connected external drive (Sparta).
Step Five:
Now you need to decide what you want to be able to do with the photos in this catalog while you travel. Do you want the ability to export copies, send a copy to an external editor for additional processing, use Lightroom’s Photo Merge options, be able to zoom to 100% in Develop, or to print? If so, then you should check the box for Export Negative Files, which tells Lightroom to include copies of all source photos in a folder alongside the exported catalog.
Step Six:
If you don’t need those types of output possibilities or need to zoom to 100% in Develop, then you can save some disk space and uncheck Export Negative Files and just use the Build/Include Smart Previews option instead. This tells Lightroom to include only smart previews for each of the source photos included in this catalog export. Smart previews allow you to use the Develop module (albeit with a potentially smaller version of the source photo) even though the catalog can’t access the original source photos. You can, of course, use all of the other functions for adding and editing metadata (keywords, flags, ratings, titles, captions, etc.) with smart previews, too.
In my case, I want the ability to send to an external editor, so I chose to include negative files, but skipped smart previews. Including available previews is a good way to avoid having to re-render them later. Once the dialog is configured to your liking, click Export Catalog (PC: Save) to start the process of creating the new catalog.
Working With the Exported Catalog
If you exported the catalog to an external drive, you can connect that drive to your laptop (or any other computer running Lightroom) and open the exported catalog into Lightroom via the File>Open Catalog menu. All of the work you do in that catalog while you’re away—from adding metadata to processing in Develop—is stored in that catalog, and can seamlessly be transferred later back to your main catalog.
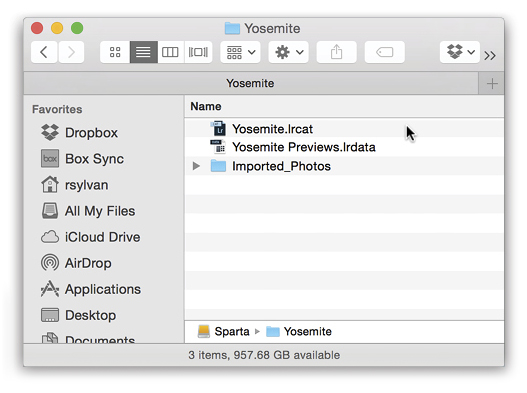
The catalog (.lrcat), the preview cache (.lrdata), and photos (if you opted to include negative files) are all stored in a folder with the same name you gave the catalog in the Export as Catalog dialog. You can move that folder to any other drive as needed to make it work for you. While on my trip, I’ll import any new photos I take into that same folder to keep things organized and easy for my return. It’s not necessary to add new photos to the collection you created earlier because when you get back you’re going to transfer all of the data back to the main catalog.
Bringing it all Home
Now that I’ve returned from my trip, I want to bring all of the changes I made to the original group of photos into my original catalog, as well as copy all of my new photos to my primary storage location. Here are the Steps:
Step One:
Connect the drive containing the exported catalog to the original computer.
Step Two:
Open your main working catalog into Lightroom.
Step Three:
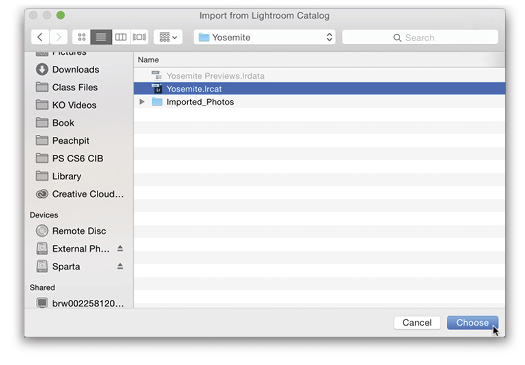
Go to File>Import from Another Catalog, navigate to the drive containing your travel catalog, select the previously exported catalog file, and click Choose.
Step Four:
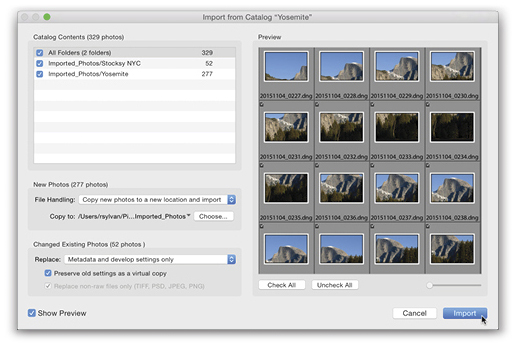
In the Import from Catalog dialog, you can decide what to do with any new photos, as well as how to handle existing photos that changed since exporting the catalog.
Step Five:
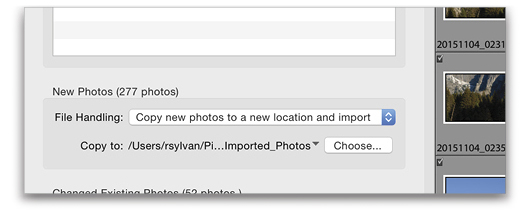
If you imported new photos into this catalog, they’ll show up under the New Photos section. In the File Handling drop-down menu you can choose to Add New Photos to Catalog without Moving them (helpful if you want to keep the photos in their current location and add them to the catalog), Copy New Photos to a New Location and Import (most likely choice), or choose not to import them at all (unlikely). I chose to copy them to a new location and import so that they can be stored with my other photos.
Step Six
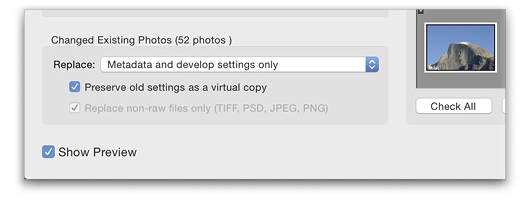
If you made any edits to the existing photos while you were away, you have some additional choices to make in the Changed Existing Photos section. You could choose to do nothing, but that seems unlikely if you went through the trouble of making the changes. The other two options are to replace Metadata and Develop Settings Only, or to replace Metadata, Develop Settings, and Negative Files. If you choose the option to replace negative files, an additional option is enabled below to limit the replacement to non-RAW files, which is really the only reason you’d need to replace negative files (such as making pixel-based changes to a PSD file in Photoshop while away).
Step Seven:
I opted to replace Metadata and Develop Settings Only. When you do this, you also have the option to Preserve Old Settings as a Virtual Copy via the checkbox below the Replace menu. This is really helpful if you’re not sure your new edits are better than what was there before (or you can’t remember and want to play it safe), but if you know the new work was intended to replace the existing settings, then leave that option unchecked and avoid creating unwanted virtual copies. When you’re happy with the settings, click Import.
Clean Up
Once all of the data has been imported into your main catalog and the new photos safely copied to a new destination (and backed up), you can go back and delete the exported catalog from the external drive (and any associated files) using your file browser. That catalog was intended to serve a temporary purpose, and now that the job is done and you’re home, you don’t want to waste space with those files or stumble on it later and not remember what it was for. Better to clean up now and be ready for your next adventure with a clean slate (drive).
Merging Multiple Catalogs Into One
I regularly encounter people who, for one reason or another, have created multiple catalogs when they were learning Lightroom and would like to have all of that work contained in a single catalog. The same exact process of importing the data from one catalog into another can be used to merge any number of catalogs into one; you just do it one at a time. Here’s the advice I give them (along with the Steps shown above):
- Be methodical in your approach.
- Outside of Lightroom, you may not know what any one catalog file contains. Open each catalog into Lightroom and make some notes about the contents of each catalog, its filename, and where it’s located on your system.
- Ensure you have a good backup before you start.
- Once all data has been imported into one catalog, you’ve confirmed all is well, and everything is backed up, go ahead and get rid of any catalogs (and associated files) you no longer need.
Originally published in Lightroom Magazine, Issue 20.


I followed these instructions for my travel catalog and now I have duplicate folders for my main images after I imported the catalog back to the original. Please advise