How Typekit Works
by Lesa Snider
[Originally published in Photoshop User magazine, July/August 2016]
One of the most under-utilized perks of a Creative Cloud subscription is access to Typekit, an online service Adobe acquired in 2011 that lets you access fonts for use on your computer and on websites. In this column, you’ll learn exactly how Typekit works and how you can access Typekit fonts in Photoshop.
Let’s start by discussing why you should care about Typekit and what you get. Typekit is a collection of fonts in both print and Web format that you can download and use in your print and electronic documents, as well as websites. This is exciting for designers because the same font can be used across print and online marketing materials for branding consistency. It’s exciting for everyone else because more fonts mean more fun!
While photographers may not set tons of text, Typekit fonts are useful if you design your own business cards, direct-mail pieces, sports-style templates, fine-art style prints, photo books, opening/closing screens in a video or slide-show project, and so on.
Typekit includes fonts from 60 or so foundries (remember, type used to be made of metal). Any kind of Creative Cloud subscription (even a single-app subscription) includes Typekit’s Portfolio Plan, which lets you use up to 100 fonts at a time. Unfortunately, each style or weight within a font family counts as a separate font (for example, Futura Semibold and Futura Heavy count as two fonts), so the actual number of font families you can use concurrently may be considerably smaller. And because Typekit is part of the Creative Cloud, you have access to all of its fonts from any computer that has Creative Cloud apps installed—simply log in with your Adobe ID and the fonts are available to you.
Typekit fonts come in two flavors: Sync fonts and Web fonts. Sync fonts (previously called “desktop use” fonts) behave almost the same as other fonts installed on your computer. They live on your hard drive and you can use them in any program that supports a font menu (even non-Adobe ones), you can embed them into PDFs, convert their characters to paths in Photoshop or Illustrator, and so on. You can’t, however, use a font-management program to enable or disable them, nor can you include Typekit fonts when packaging an InDesign document to have it printed elsewhere (the workaround is to send the printer a PDF with the font embedded into it). In other words, you can’t share Typekit fonts with anyone—ever. Because the font files are stored invisibly on your hard drive (weird but true), you simply can’t get at them, and neither can your font-management program. That said, if you need to share a Photoshop document that includes a Typekit sync font, the other person can open and print the document, but she can’t edit the text without encountering a font-substitution message. But if she has a standalone Typekit account of her own (or she has a Creative Cloud subscription), she can download those fonts from Typekit and then edit the text. If, for whatever reason, you stop paying for your Creative Cloud subscription, the fonts stop working.
Web fonts are stored on Adobe’s servers and delivered to Web browsers when visitors access the webpage. You can use them with any website-creation tool, including Adobe Dreamweaver, Muse, WordPress, and so on. There’s a limit of 500,000 page views for each domain where the fonts are used, so if your website goes viral, you have to upgrade to a paid Typekit plan, which starts at $50–$100 per year for 1,000,000 page views. And, like Typekit’s sync fonts, if you stop paying for your Creative Cloud subscription, Adobe won’t serve the Web fonts to your server so they no longer appear on your website (at which point your site substitutes a standard serif or sans-serif font instead).
Not all Typekit sync fonts are available as Web fonts, but many are. Keep this in mind if your goal is to use the same font in print as you do on the Web.
How to Access & Use Typekit Fonts
Below are the steps for adding Typekit fonts from within Photoshop, though the process is (roughly) the same in other Creative Cloud apps. You can’t download new Typekit fonts from inside Lightroom, but any Typekit fonts you download appear in Lightroom’s font menus, too (though without the cute green Typekit icon).
Step One:
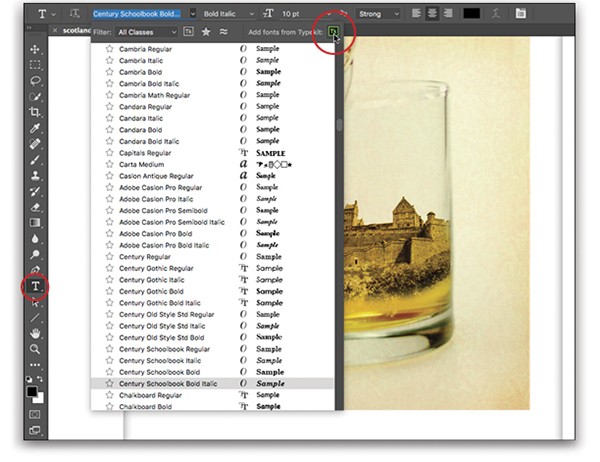
Create or open a document and press T to activate the Type tool. In the Options Bar, click the down-facing arrow next to the font family field and, from the panel that opens, click the green Typekit icon at the upper right.
Step Two:
Your Web browser springs open to the Typekit website, which offers several ways to find fonts. (If this is your first time visiting the site, you may see a welcome screen instead.) The buttons on the right let you filter your search by these parameters: Browse Mode (the Default or Japanese font sets and filters), Classification (Serif, Script, Decorative, and so on), Availability (Web and/or desktop use), Recommendations (Paragraphs or Headings), Properties (Weight, Width, and so on), and Language Support. Click any filter’s button to apply it (it turns green); click it again to turn it off. In this example, the Slab Serif, Web, Sync, Headings, and Weight filters are turned on.

Step Three:
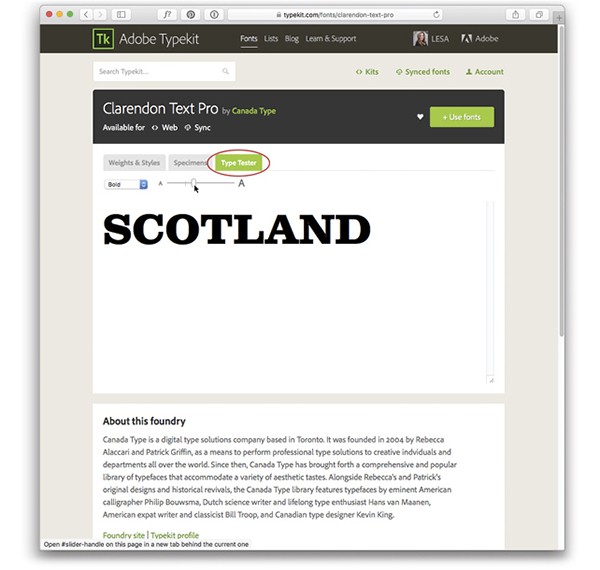
To see the font in use, click anywhere atop the thumbnail and a page opens showing the font used in a variety of weights and styles in sentence form. The Specimens tab on the same page displays the font in sentence and paragraph form at various point sizes. The Type Tester tab (shown here) lets you enter your own text; you can change styles and point size, too.
Step Four:
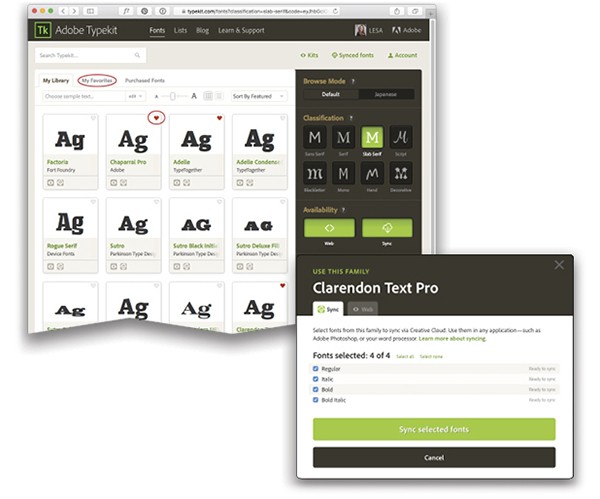
To return to the thumbnail grid of results, click your browser’s back button. When you find a font (or 20!) that you like, click the tiny heart at the thumbnail’s upper right to mark it as a Favorite (the heart turns red). To view your Favorites later on, click My Favorites at the upper left.
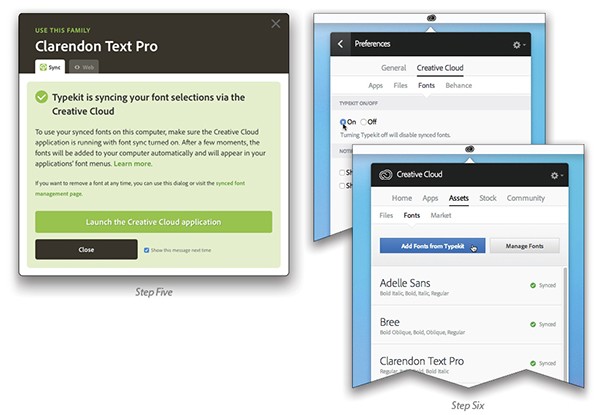
Step Five:
To download and use the font, point your cursor at the font’s thumbnail and, in the green menu that appears, click “Use fonts.” The resulting panel has two tabs: Sync and Web. Sync lets you pick which weights and styles (Regular, Italic, Bold, and so on) to install on your computer. (You don’t have to install them all; remember each style counts against your 100 fonts.) Turn on the checkboxes for the options you want and then click Sync Selected Fonts.
Step Six:
The next screen reminds you that, in order to download the fonts, you need to have the Creative Cloud app running and font syncing turned on (shown here at left). If you haven’t turned on font syncing, click the Launch the Creative Cloud Application button, and the app’s Fonts panel opens; follow the onscreen instructions to turn on font syncing. You can also turn on font syncing in the Creative Cloud app’s Preferences (shown here at top right). To access the Preferences, click on the gear icon at the top right. If you’ve already turned on font syncing and you click Launch the Creative Cloud Application, you’ll see all the fonts you’ve downloaded (shown here at bottom right). As you can see, you can also add fonts from Typekit using the Creative Cloud app. When you do, those fonts are available to all Creative Cloud apps.
Step Seven:
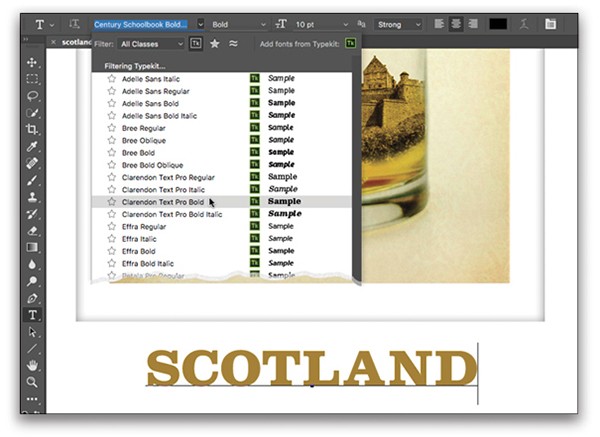
Either way, the new fonts instantly appear in Photoshop’s font family menu (complete with the green Typekit badge)—you don’t even have to restart Photoshop. To see only your Typekit fonts, click the Typekit icon to the right of the Filter field. To use the font in your document, click and then enter some text.
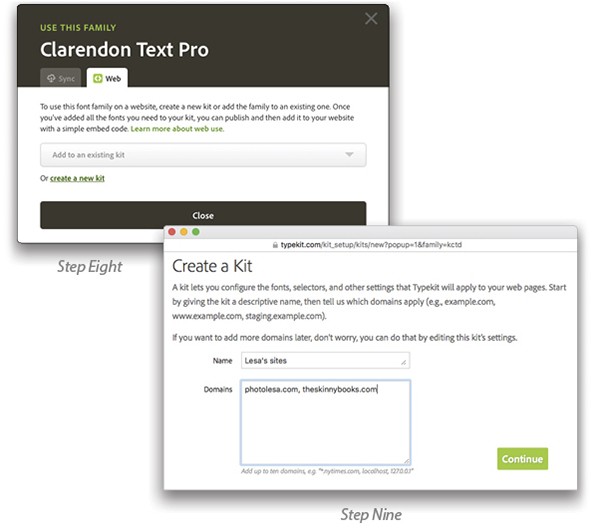
Step Eight:
Back in your browser, click the Web tab to use Typekit fonts on a website, and then click Create a New Kit. A kit is a collection of fonts designed for online use, along with the code that instructs Typekit to display those fonts when someone visits your site.
Step Nine:
In the screen that appears, name the kit something meaningful (it’s for your own use) and enter the domains on which you want to use the fonts (you can add up to 10 domains to a single kit).
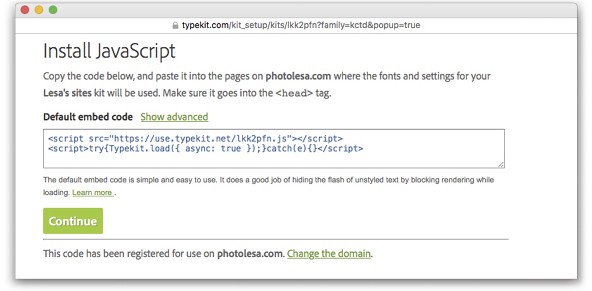
Step 10:
Click Continue and Typekit creates the kit and displays a few lines of JavaScript code for you to copy-and-paste near the top of the <head> tag in your website’s CSS or HTML code. When a person visits your website, the JavaScript tells Typekit to deliver your fonts to that person’s Web browser (this is also how Adobe counts your page views).
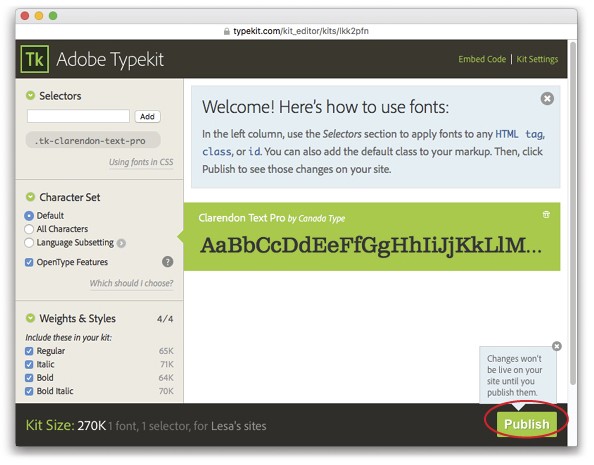
Step 11:
Click Continue again and you triumphantly arrive at the final options screen, where you can pick which font weights and styles to include (each weight or style increases the size of the font file that Typekit delivers to your viewer’s Web browser), as well as which languages you want to support. The Default option includes characters for English, Spanish, Italian, and Portuguese; to support any other language, choose All Characters (doing so significantly increases the size of the font file that Typekit serves to visitors). Click Publish and Typekit adds the kit to the domains you entered.
After making all these choices (whew!), you can use the fonts in your kit when designing webpages in Adobe Muse, Adobe Edge, Dreamweaver, or any other website-creation tool—even WordPress. Until next time, may the creative force be with you all!


