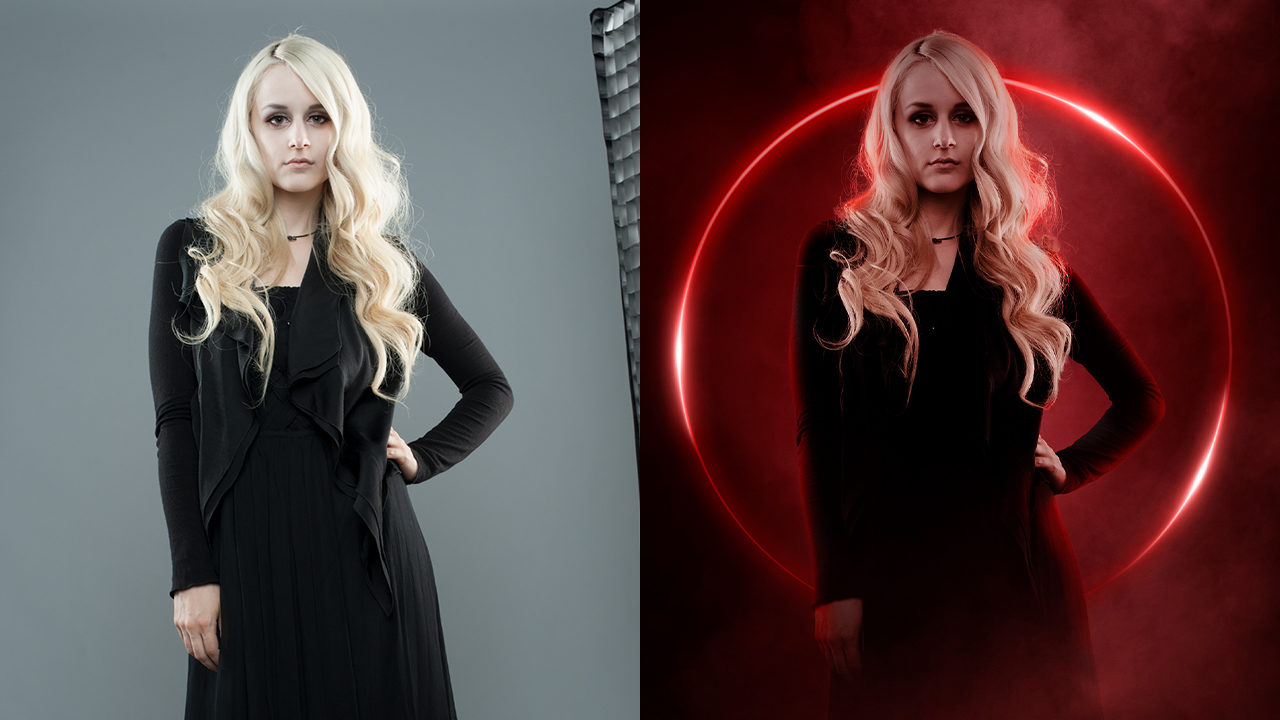
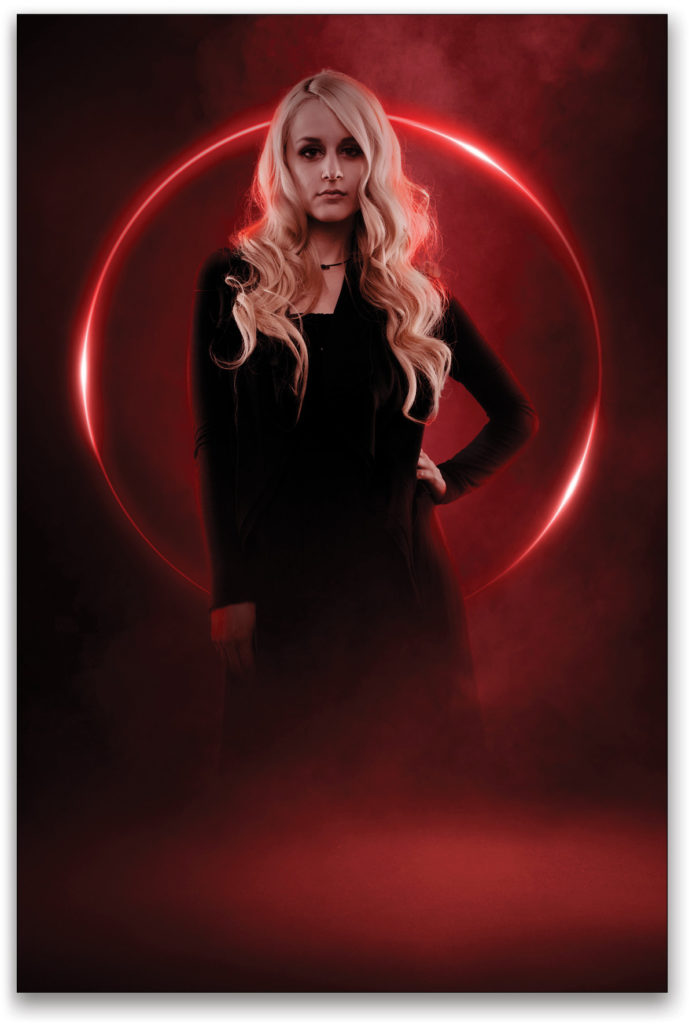
This time around, we’re going to create atmospheric light and glow effects using a simple studio shot. You may have seen this effect floating around online, but I have some useful tricks to create realistic edge lighting to help place the subject in the scene, as well as creating elements that look like they were part of the original shot!
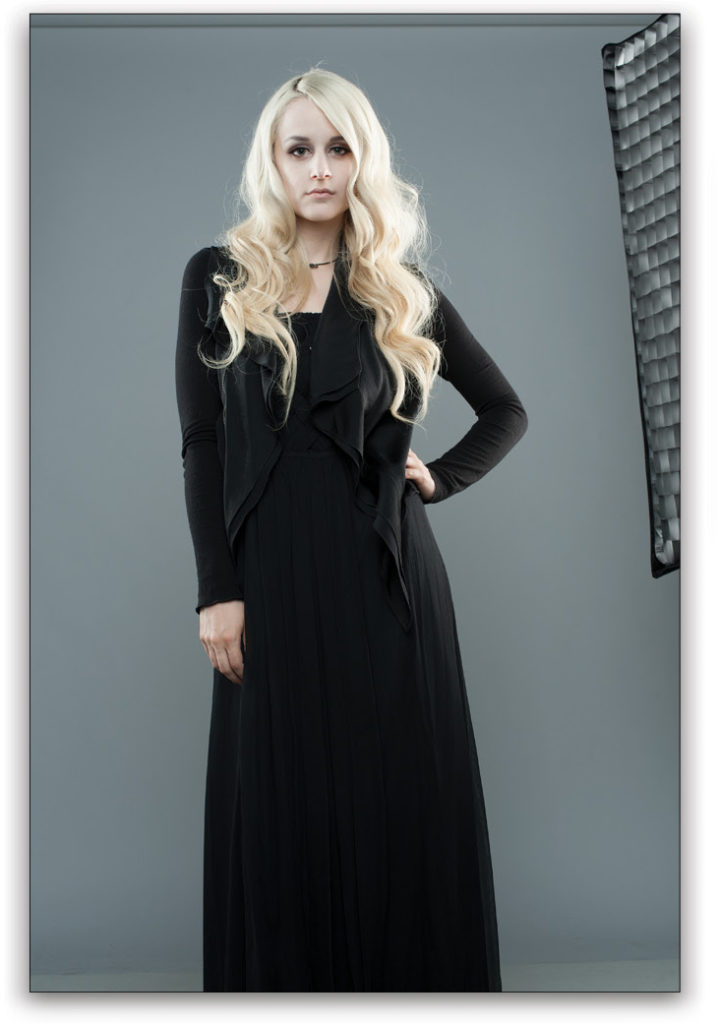
Step One: Start by opening the model image, which is a simple studio shot I did a while back that will work perfectly for this effect. Notice the subject is shot on a flat neutral background, which will make it much easier to extract. Yes, the softbox did creep into the shot a little on the right, but all we need is the subject anyway. [KelbyOne members can click here to download this image and follow along.]
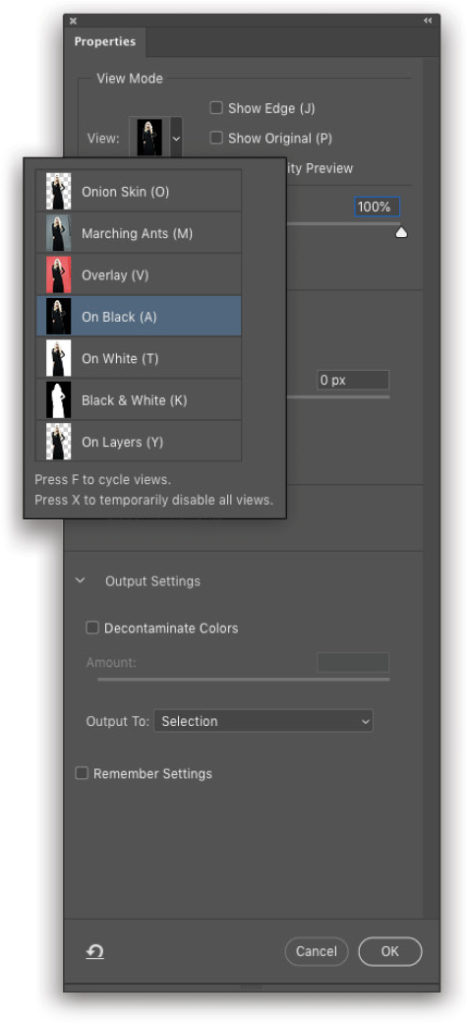
Step Two: Go under the Select menu and choose Subject to automatically select the subject. This feature has come a long way since its introduction, and it does a really good job right out the gate, but we still need to clean it up a little, so go to Select>Select and Mask.
In the Properties panel, click on the View drop-down menu, set it to On Black (A), and increase the Opacity to 100%. This will make it much easier to see any fringing from the original light-gray background.
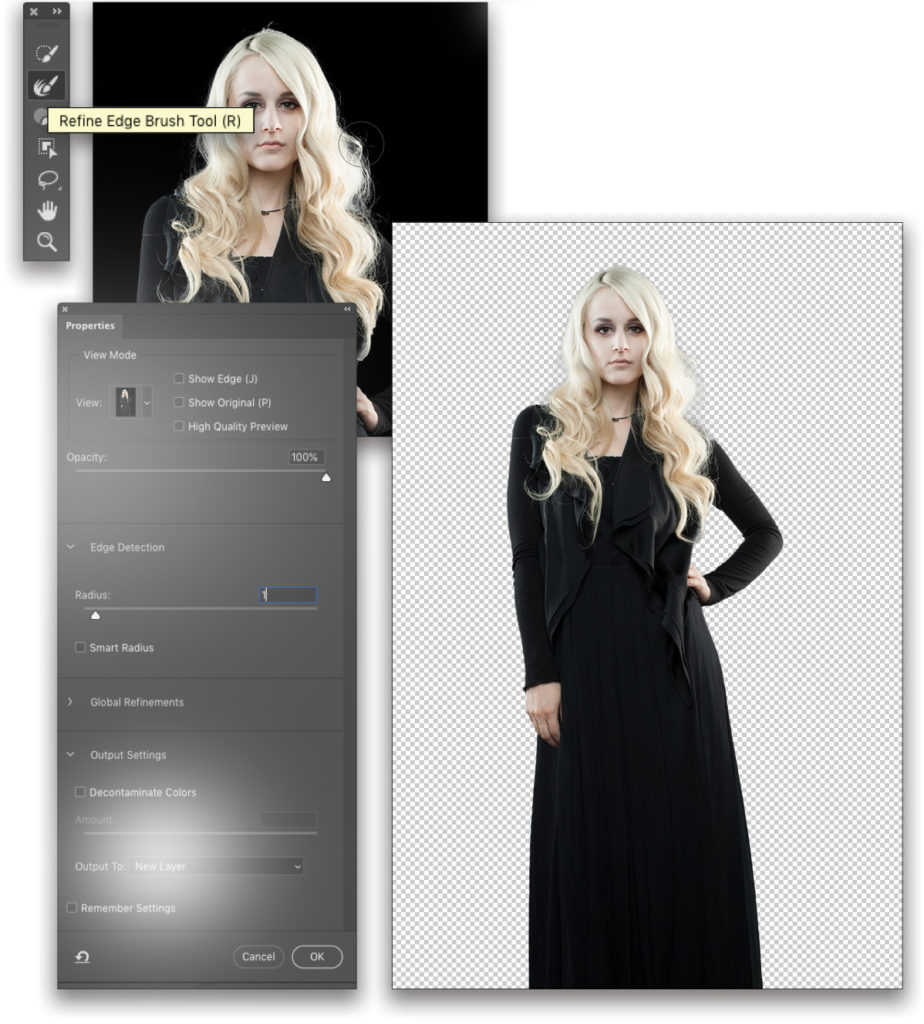
Step Three: Select the Refine Edge Brush tool (R) in the mini-Toolbar on the left, and use the Bracket keys on your keyboard to set the brush size as needed (we set it to around 90 pixels). As you can see, the initial selection did a really good job even around the hair, but there are a few small areas where you see some the gray background peeking through. I only noticed two or three small spots in this example. So just dab around those areas with the Refine Edge Brush tool.
When done, go back to the Properties panel, and set the Edge Detection Radius to 1. Then go down to the Output To drop-down menu, choose New Layer, and click OK.
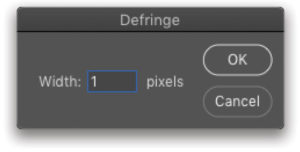
Step Four: Go under to the Layer menu, to Matting, and choose Defringe. Set the Width to 1 pixel and click OK. This will clean up any small remaining anti-aliasing around the edge of the subject. Click OK.
Step Five: Create a new layer and place it below the extracted subject layer. Press D to set the Foreground color to black, and then press Option-Delete (PC: Alt-Backspace) to fill the new layer with black.
Step Six: Go to File>New to create a new Photoshop file. Set the Width and Height to 1000 Pixels, Resolution to 300 ppi, and the Background Contents to Black. Click OK or Create, and then in the Layers panel, create a new blank layer.
Step Seven: Go to the Toolbar and select the Pen tool (P). Up in the Options Bar, make sure the Pick Tool Mode drop-down menu is set to Path. Near the bottom of the square black canvas, click near the left edge to start a path, hold down the Shift key, and click near the right edge to create a straight horizontal path going from edge to edge.
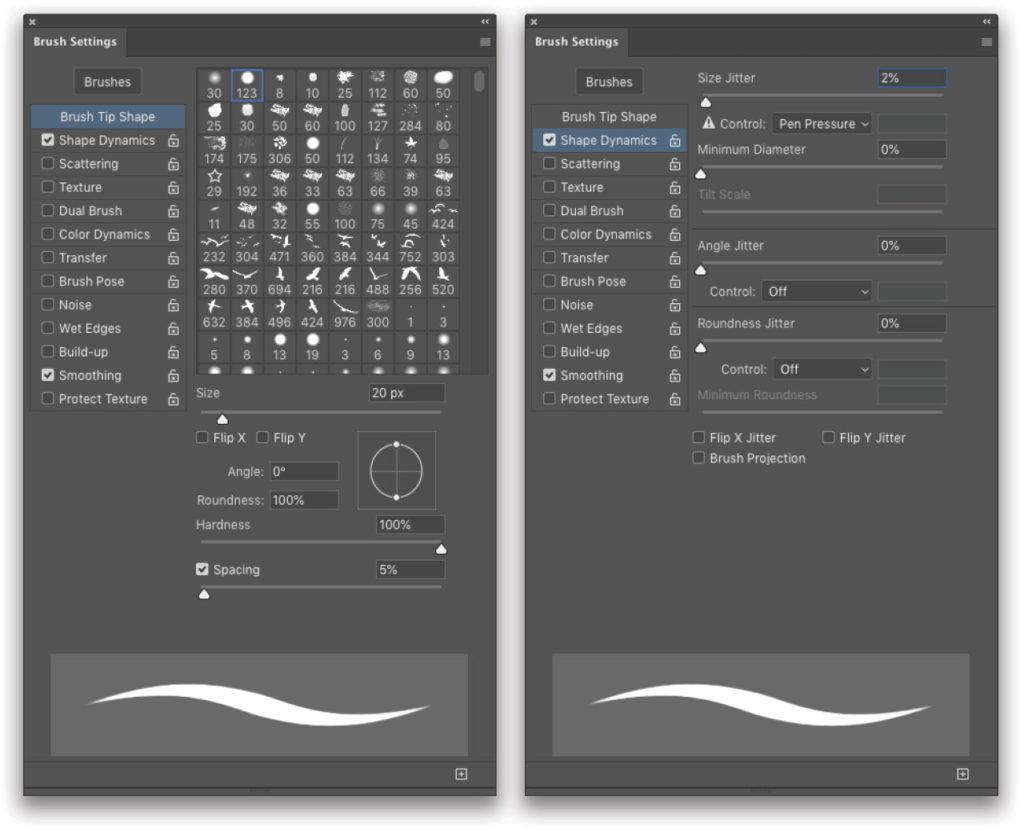
Step Eight: Select the Brush tool (B) in the Toolbar and open the Brush Settings panel by clicking the folder-with-brush icon in the Options Bar. Choose a standard round brush, and set the Hardness to 100%, the brush Size to around 20 px, and the Spacing to 5%.
Then activate Shape Dynamics near the top of the list on the left side of the panel. Under the Size Jitter slider, set the Control drop-down menu to Pen Pressure, even if you’re not using a pressure-sensitive tablet.
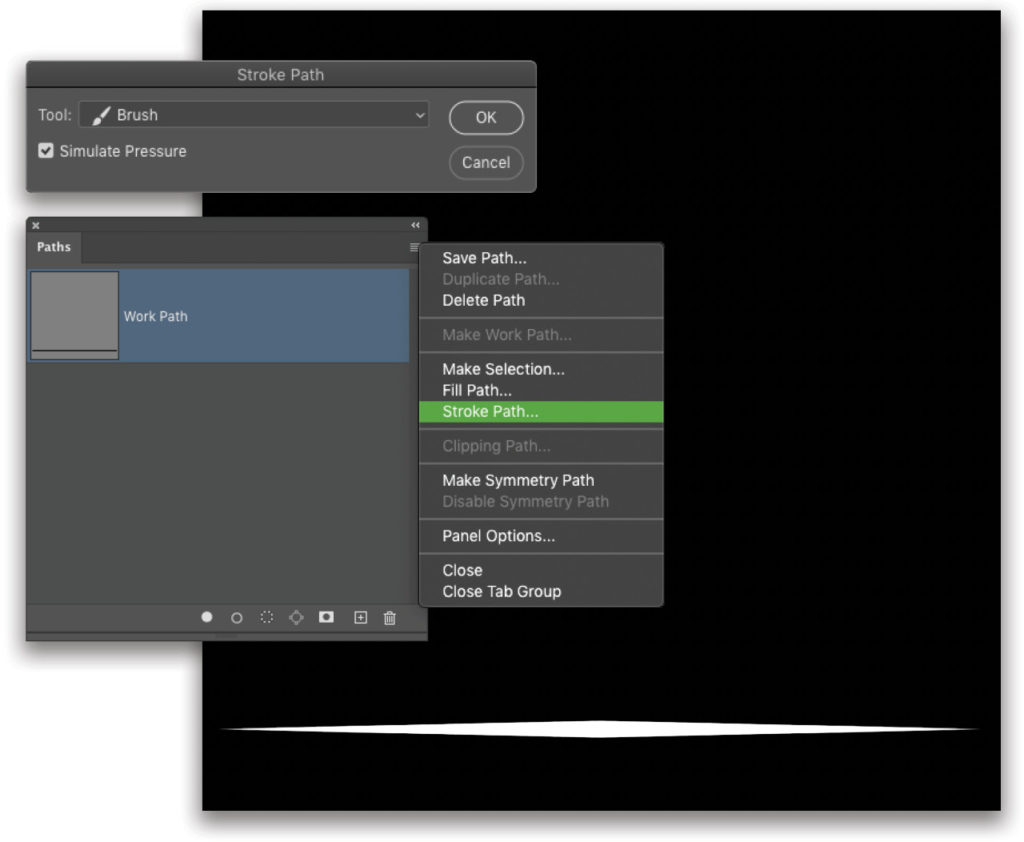
Step Nine: Press D then X to set the Foreground color to white. Open the Paths panel (Window>Paths), click on the panel’s flyout menu at the top right, and choose Stroke Path. Choose the Brush tool in the Tool drop-down menu, check on Simulate Pressure, and click OK. This will give you a tapered white streak at the bottom of the image along the path.
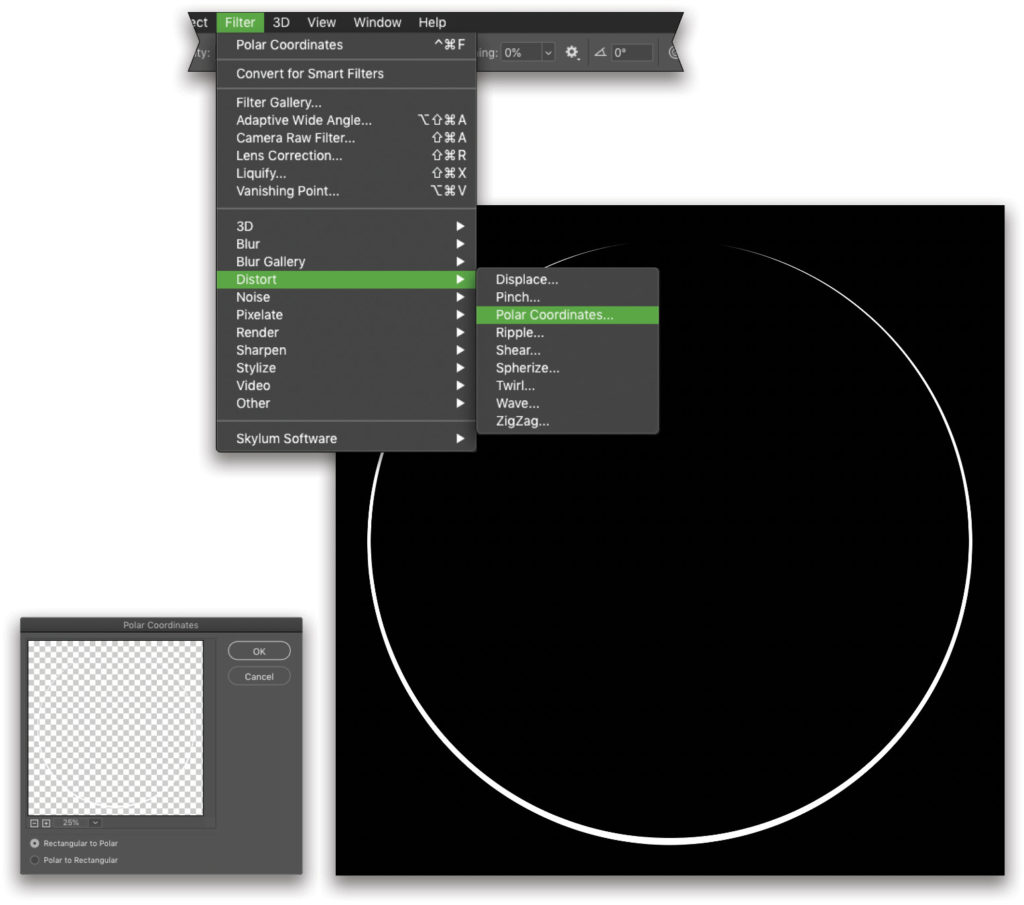
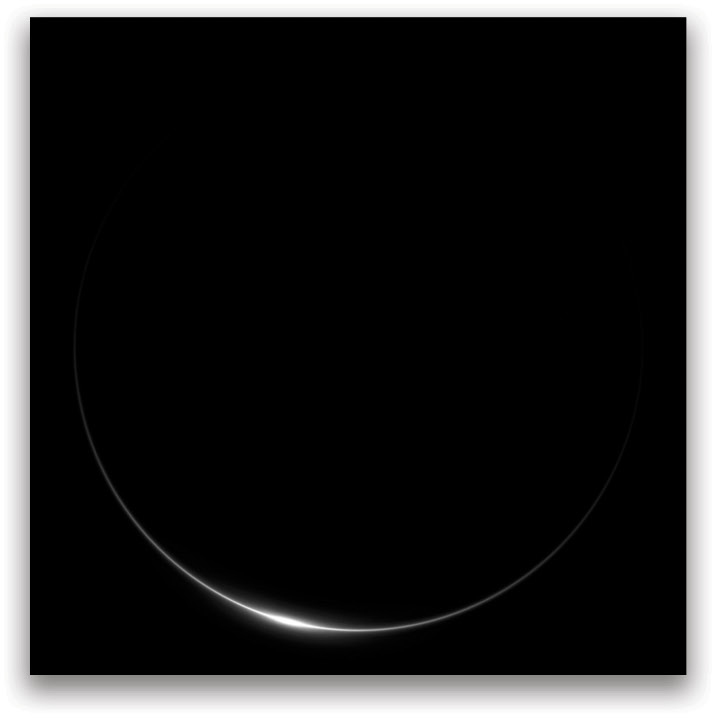
Step 10: Go under the Filter menu, to Distort, and choose Polar Coordinates. Select Rectangular to Polar and click OK. This will distort the stroke into a circle.
Note: Yes, you could just apply a stroke to a circular path; however, I like this method because it actually stretches the stroke into a circle, which creates a smoother transition from the thicker areas along the stroke to the thinner areas. As always, there are numerous ways to do the same thing in Photoshop.
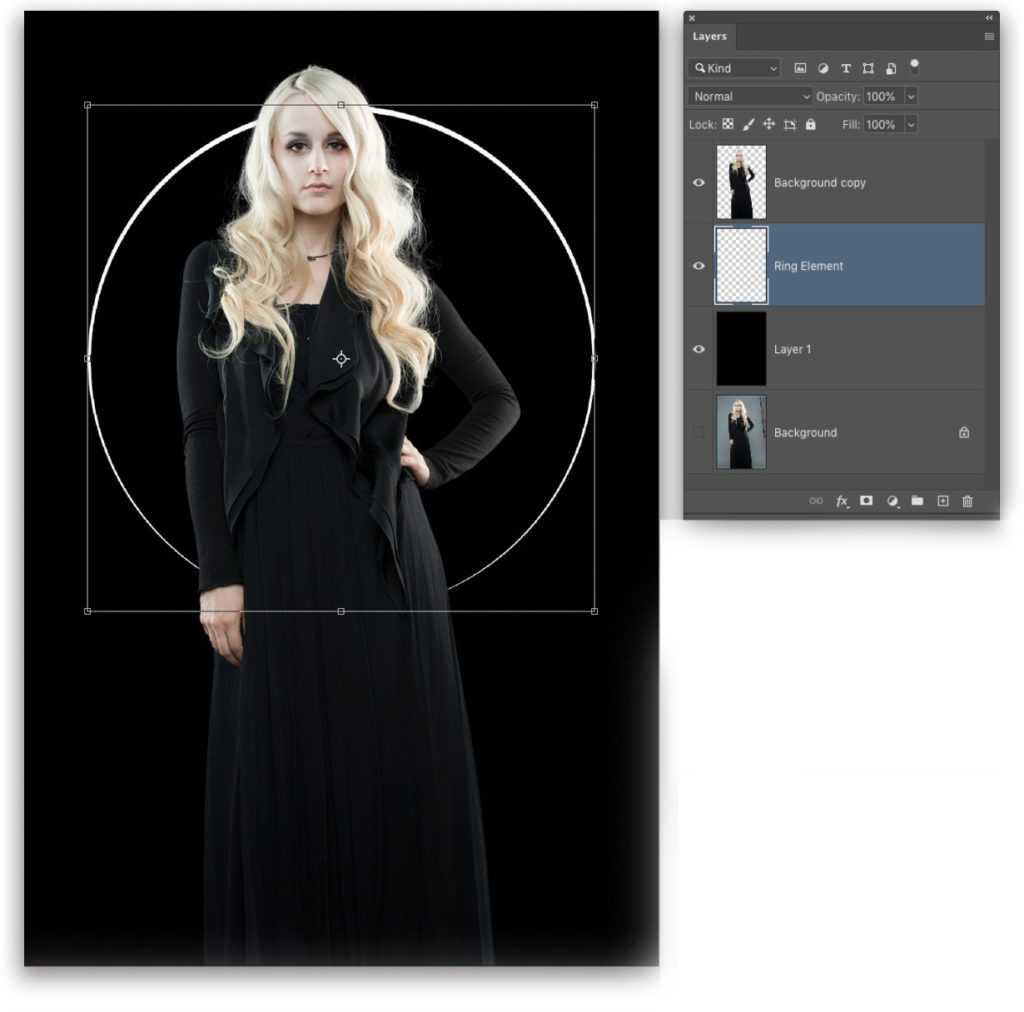
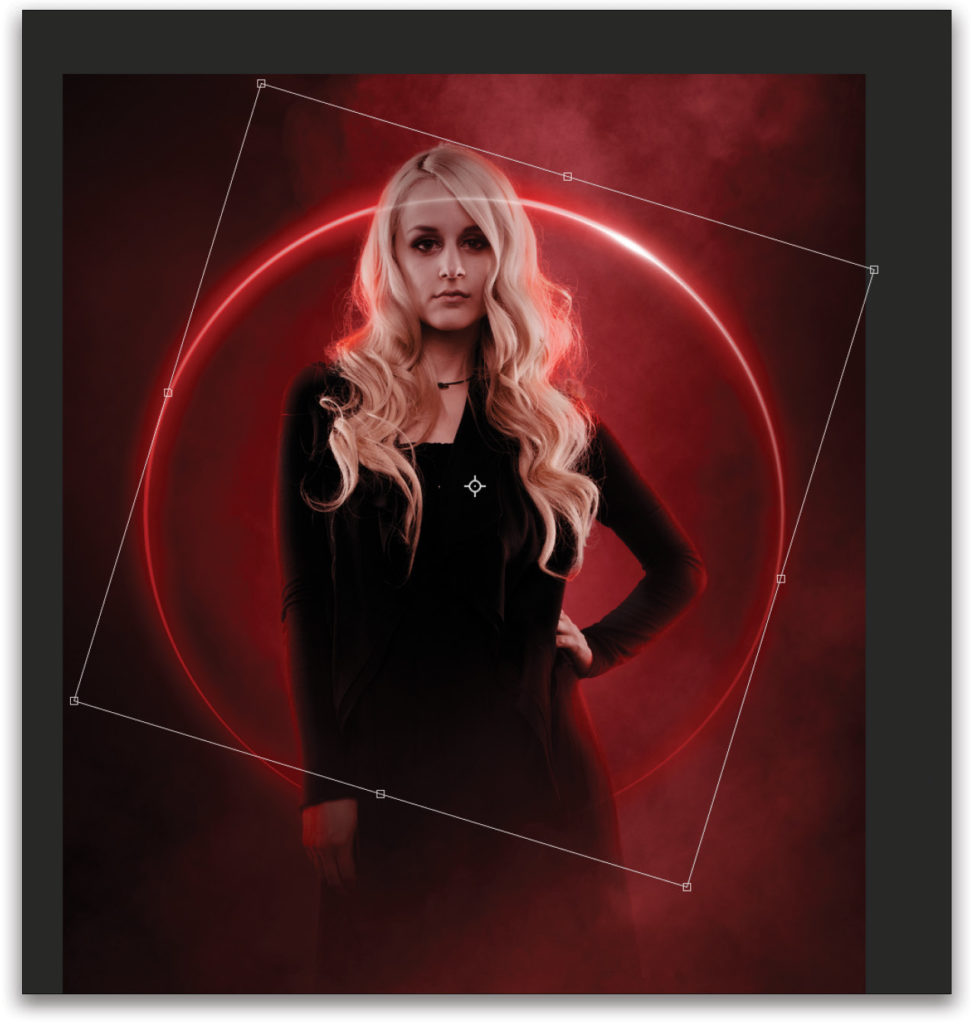
Step 11: Now use the Move tool (V) to drag-and-drop this circular element into the main image. (Don’t close the square image yet; we’ll use that again in a moment.) Make sure this layer is below the subject layer, and use Free Transform (Command-T [PC: Ctrl-T]) to rotate the stroke element so the gap is at the bottom and the thicker part at the top. Resize and position the circular element as shown here, and then press Enter when done to commit the transformation. Double-click the name of the ring layer in the Layers panel, and rename it “Ring Element.”
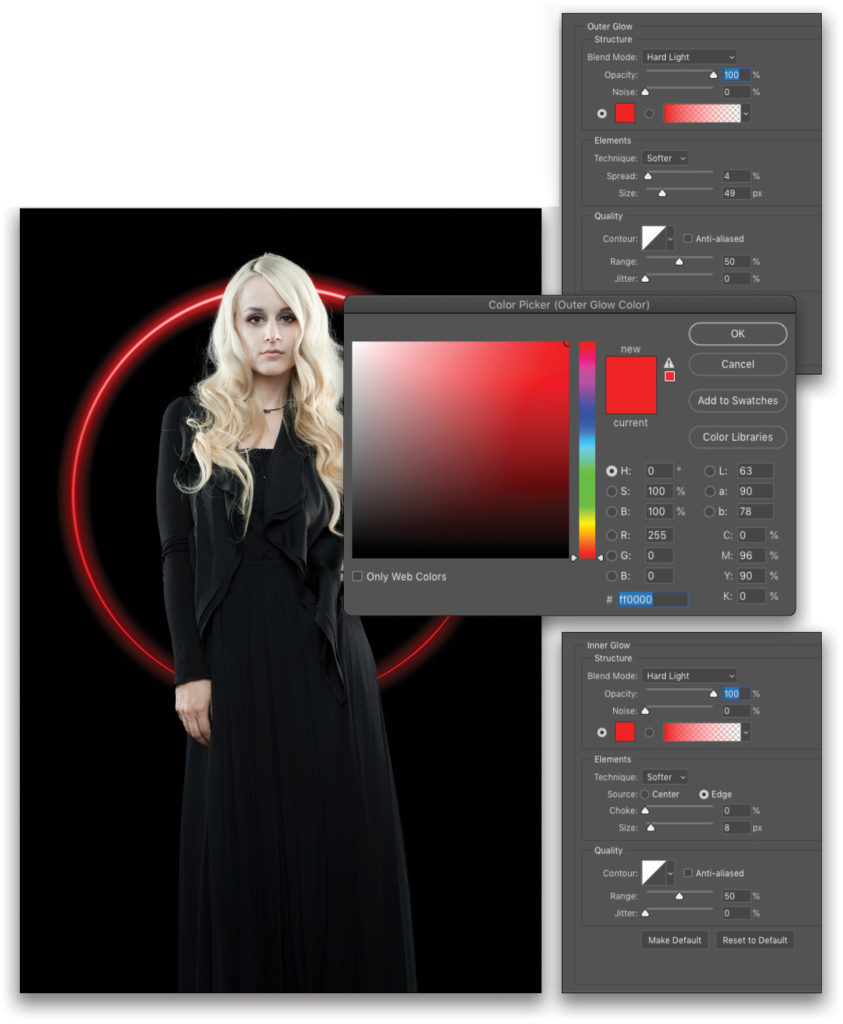
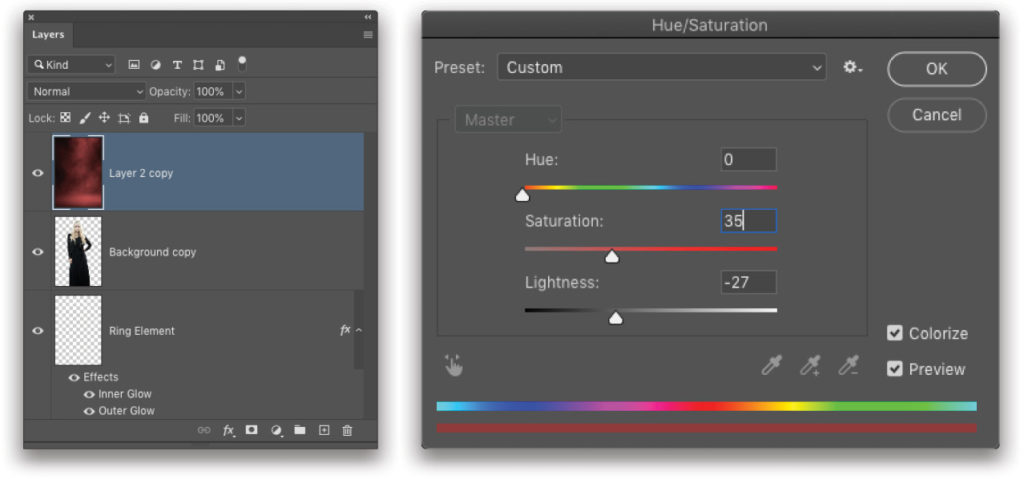
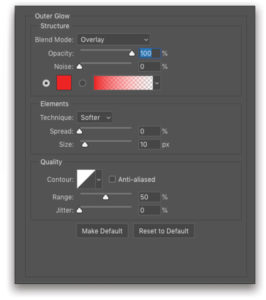
Step 12: With the Ring Element layer still active, click on the Add a Layer Style icon (ƒx) at the bottom of the Layers panel, and choose Outer Glow. Click on the color swatch to open the Color Picker, and set the color to a bright red as shown here (you may want to experiment with other colors depending on your image). Click OK to close the Color Picker. Set the Blend Mode to Hard Light and the Opacity to 100%. Adjust the Spread and Size to get a nice hot glow on the stroke. Make sure Noise is set to 0%.
Activate Inner Glow in the list of Styles on the left side of the Layer Style dialog. Use the same red color and Blend Mode you used for the Outer Glow, and set the Opacity to 100%. Adjust the Choke to 0% and set the Size to 8 px. Again, make sure Noise is set to 0%. Click OK when done. You can see how the distorted width of the stroke gives it a sort of hot spot along the top of the circle.
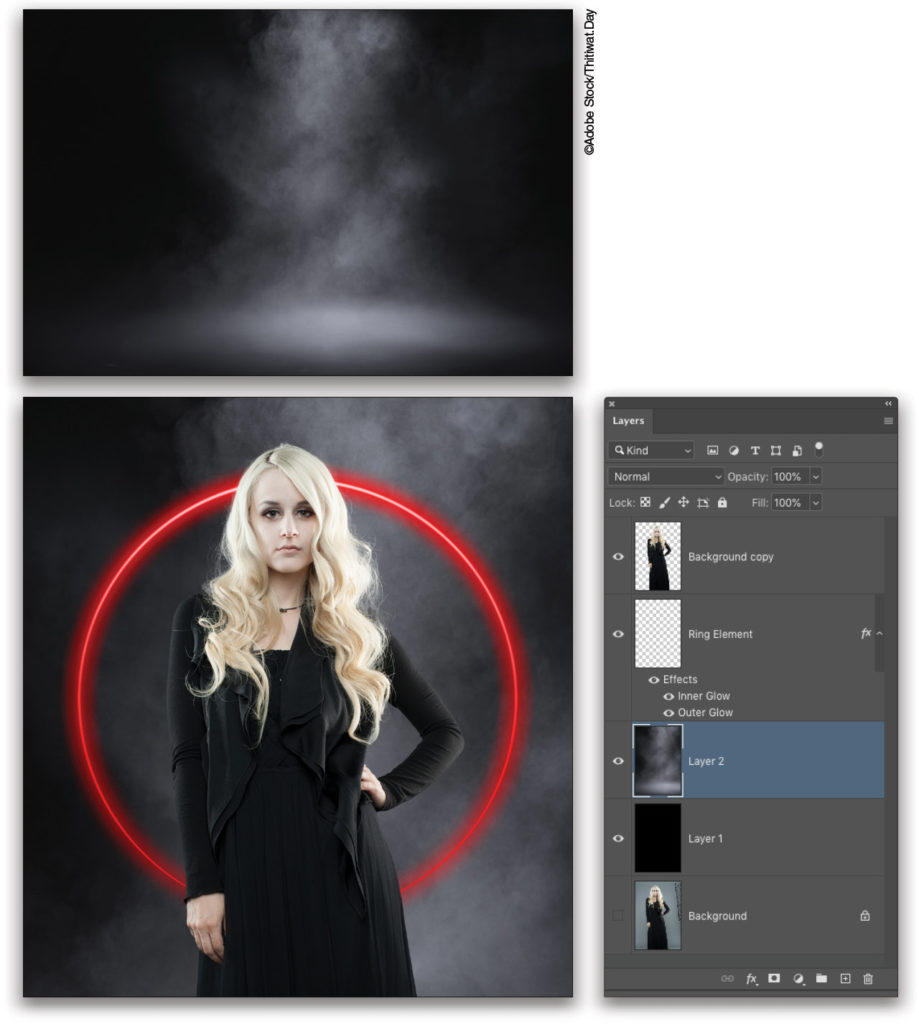
Step 13: To add some atmosphere, we’re going to use a smoke image with some dramatic lighting—one of many available on Adobe Stock. If you’d like to download the low-res watermarked version of this image to follow along, click this link, log in with your Adobe ID, and click the Save to Library button. Double-click the image in the Libraries panel (Window>Libraries) to open it in Photoshop.
Take the image as is and use the Move tool to drag it to the working image. Place this layer just above the black-filled layer in the Layers panel. Once again, use Free Transform to scale and position the smoke within the composition.
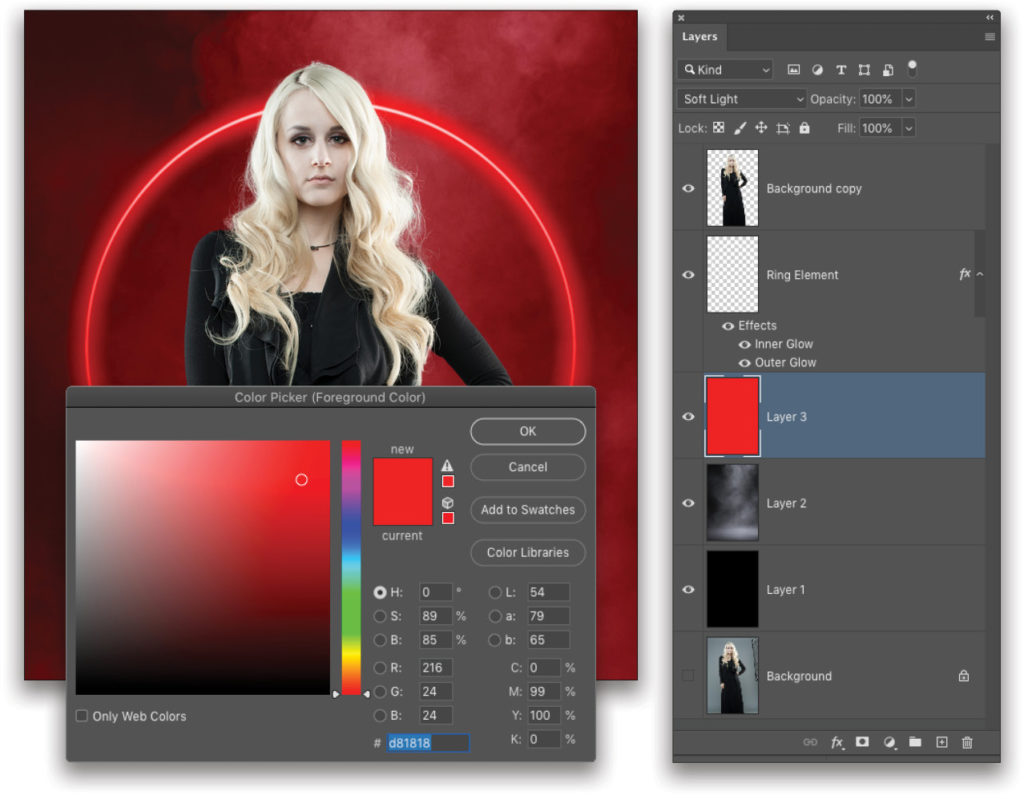
Step 14: Create a new blank layer above the smoke layer. Click on the Foreground color swatch near the bottom of the Toolbar to open the Color Picker, and use a red mixture similar to the one shown here. Click OK to close the Color Picker. Then press Option-Delete (PC: Alt-Backspace) to fill the blank layer with this red color, and change its layer blend mode to Soft Light near the top left of the Layers panel.
Step 15: Click on the smoke layer in the Layers panel to make it active, and duplicate it by pressing Command-J (PC: Ctrl-J). Drag this duplicate layer to the top of the layer stack.
Press Command-U (PC: Ctrl-U) to open the Hue/Saturation dialog, or go under the Image menu, to Adjustments, and choose Hue/Saturation. Check on Colorize, leave the Hue at 0, and set the Saturation to around 35 and the Lightness to around –27. Click OK when done.
Step 16: Click the Add Layer Mask icon (circle in a square) at the bottom of the Layers panel to add a layer mask to this layer. Select the Gradient tool (G) in the Toolbar. Click the gradient preview strip in the Options Bar, choose the Foreground to Transparent preset in the Gradient Editor that appears, and click OK. Choose the Radial Gradient type in the Options Bar, and press D then X to set black as the Foreground color. Starting roughly where the face of the subject should be in the image, drag out a gradient to just above the highlighted area at the bottom of the image to fade the smoke layer and reveal the subject. This will create a sense of atmosphere around the subject.
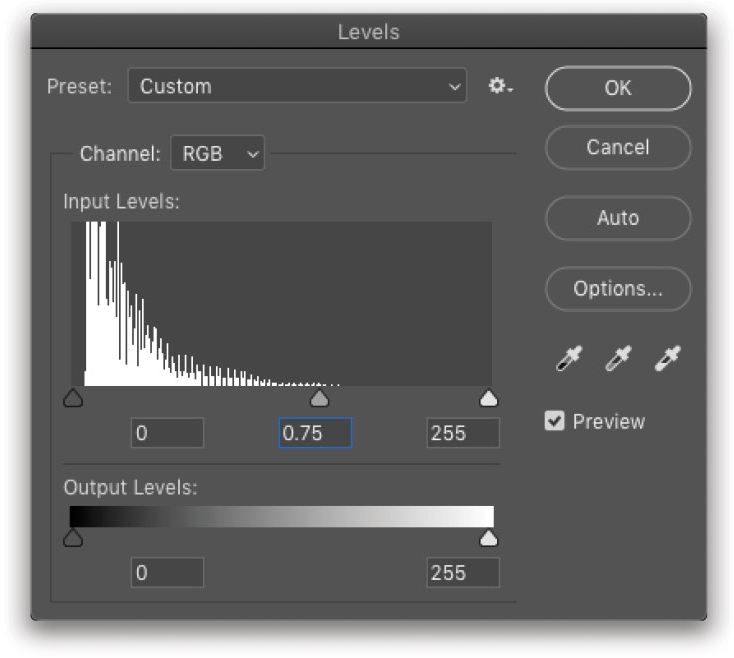
Step 17: You can add a little more contrast to this smoke layer by applying a subtle Levels adjustment. First, click on its layer thumbnail in the Layers panel so the layer is active and not its layer mask. Then press Command-L (PC: Ctrl-L) to bring up the Levels dialog. Here I merely moved the midtone slider below the histogram to the right a little. Click OK.
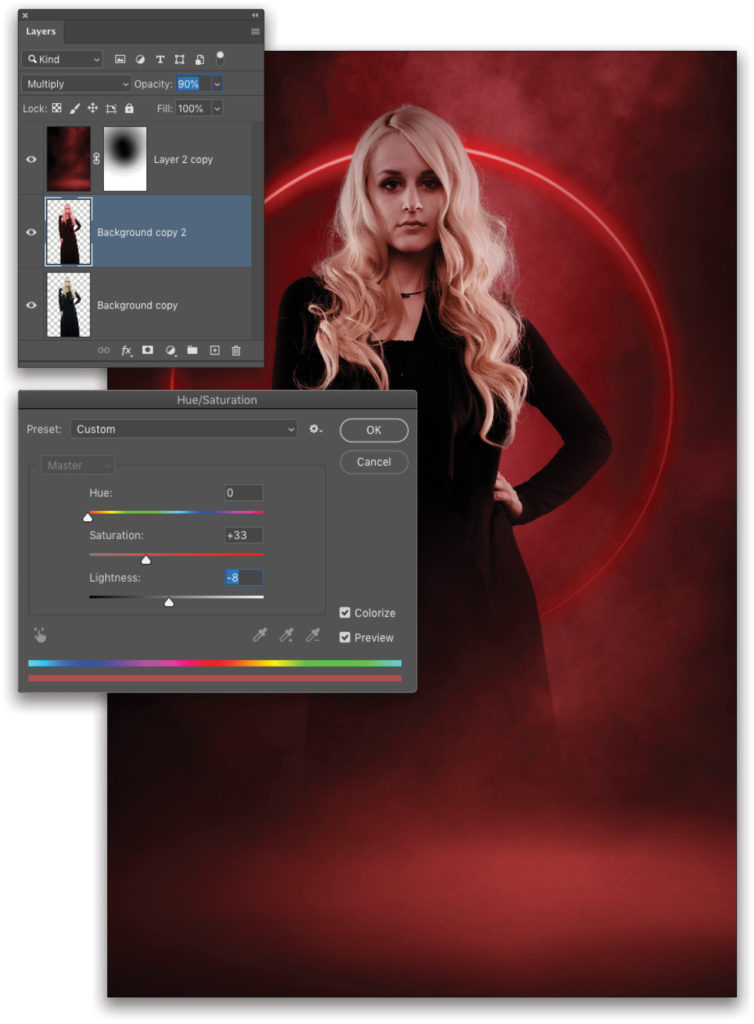
Step 18: Almost there. Click on the main subject layer in the Layers panel to make it active, and create a duplicate by pressing Command-J (PC: Ctrl-J) again. Change the blend mode to Multiply and lower the layer Opacity to 90%.
Once more, press Command-U to open the Hue/Saturation dialog. Check on Colorize and leave the Hue at 0. Increase Saturation to around 33 and lower the Lightness to around –8. Click OK. This will darken and give a red cast over the subject to better reflect the environment around her. Now for some cool edge lighting tricks!
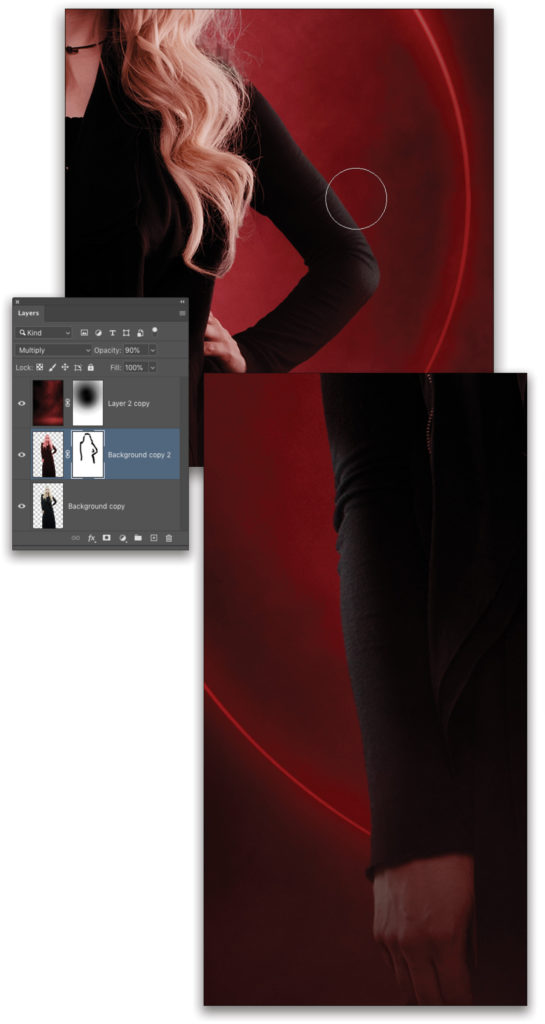
Step 19: Start by adding a layer mask to the duplicate subject layer. Then switch to the Brush tool, and using a standard soft round brush set to black, paint on the layer mask around the edge of the subject to reveal the highlighted edges from the original layer below. Keep the brush mostly on the outside edge and carefully brush all around the subject’s clothing and hair, especially around areas where the stroke element is next to the subject.
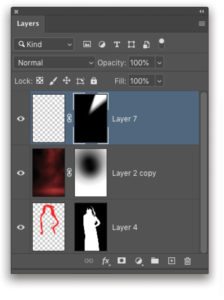
Step 20: Hold down the Command (PC: Ctrl) key and click on the layer thumbnail of either extracted subject layer to load the shape of the subject as a selection. Add a new layer above the two extracted subject layers, and click the Add Layer Mask icon at the bottom of the Layers panel to convert the active selection to a layer mask. Also, change the layer blend mode to Overlay.
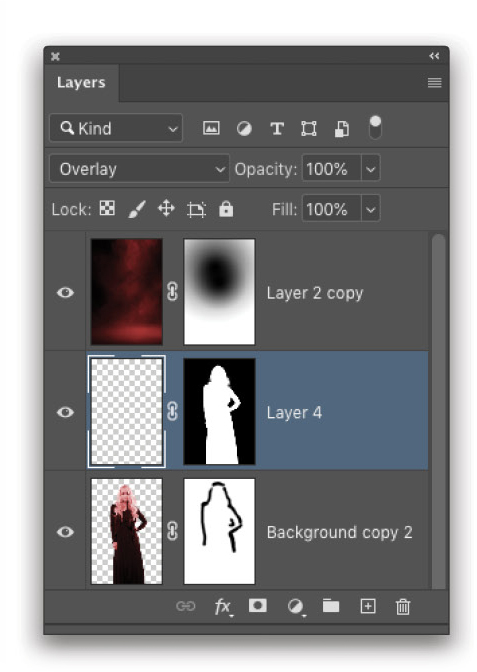
Step 21: Make sure the layer thumbnail of the new layer is active and not its layer mask. Using the same round soft-edged brush, set the Foreground color to the same red we’ve been using in the scene, and start painting around the edge of the subject as we did in Step 19. This time the red will highlight the lighter areas that we revealed earlier, resulting in a realistic red edge glow on the subject.
Do this all around the subject, again adding more in areas where the light streaks would be brighter. Notice the nice effect it adds to the edge of her hair. Because her hair is very light, it can be easy to overdo it; if you do, just re-select the layer mask in the Layers panel and paint with black to mask away any excess spillover of the red.

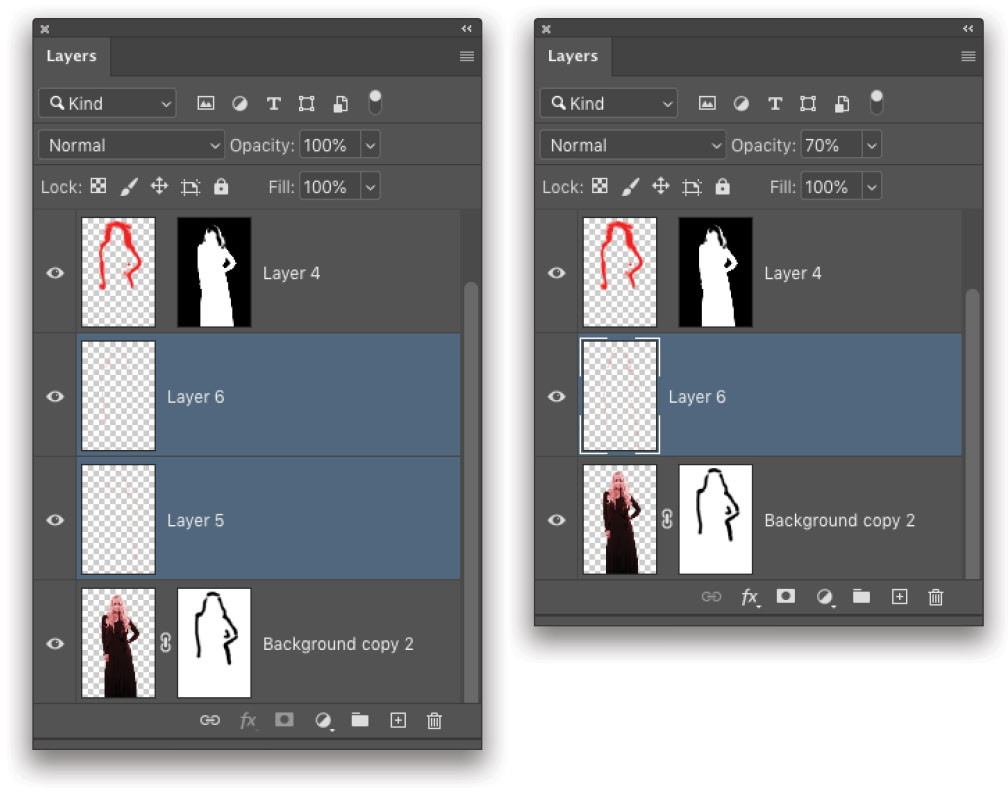
Step 22: As good as this edge glow looks, let’s en-hance the edge even more. This is another cool trick I often use. Hold down the Command (PC: Ctrl) key again and click the duplicate subject layer’s thumbnail to load it as a selection. Create another new layer above the copy of the extracted subject, and fill the selection with the same red color. Make sure you have any of the selection tools chosen in the Toolbar as we want to nudge the selection and not the pixels. Press the Left Arrow key on your keyboard two times to offset the selection. Press Delete (PC: Backspace) and this will leave a harsh red outline on the right side. Press Command-D (PC: Ctrl-D) to deselect.
Step 23: Repeat the last step, except this time press the Right Arrow key two times before deleting. You should have two layers creating the red outline around the subject. With one of the layers active, Shift-click the other layer in the Layers panel to select them both, and merge them by pressing Command-E (PC: Ctrl-E). Then, lower the layer Opacity of the combined layer to 70%.
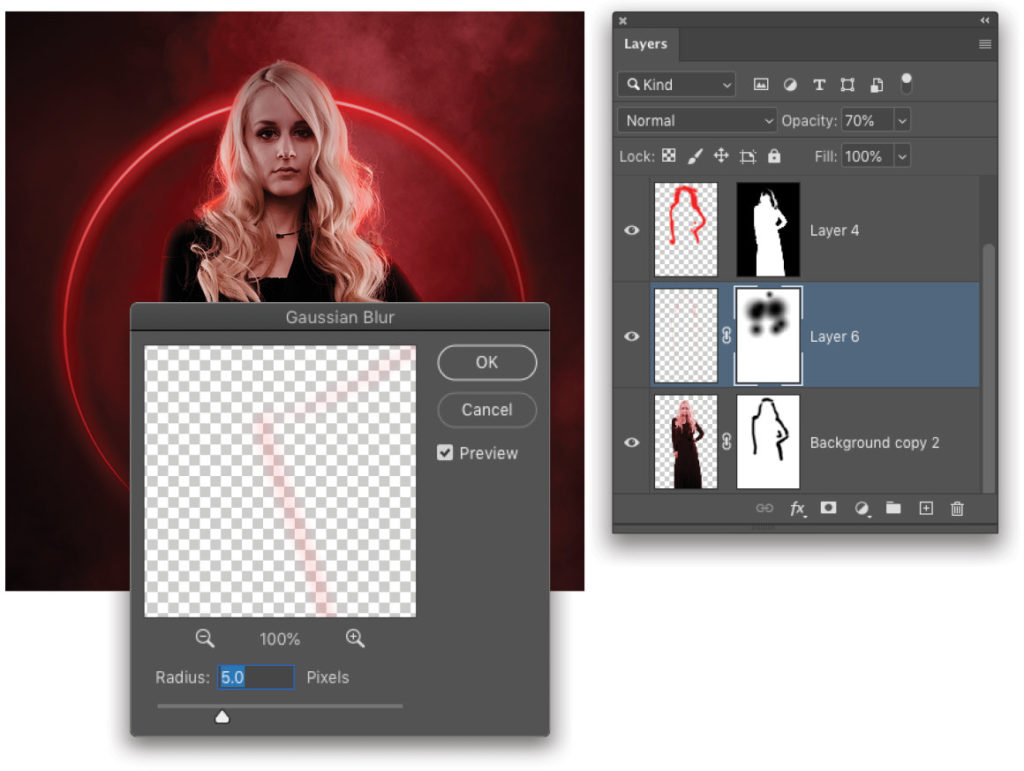
Step 24: Go under the Filter menu, to Blur, and choose Gaussian Blur. Set the Radius to 5 pixels and click OK. Add a layer mask and use the Gradient tool set to the same Radial Foreground to Transparent gradient we used in Step 16 to mask away areas that would be further away from the light source, as well as in areas around the hair where it’s a bit too much.
Step 25: Okay, one final effect to add. Remember that black square file in which we created the circle? Go back to that, turn off the circle layer by clicking its Eye icon in the Layers panel, and create a new blank layer. We’re going to use a flare brush that you’ll find in the downloads folder along with the practice file. Just double-click the brush ABR file to load it into Photoshop.
Switch to the Brush tool, and look for the Flare_Brush folder at the bottom of the Brushes panel (Window>Brushes). Select the Cinematic_Flare_5 brush inside that folder. Set the Foreground color to white by pressing D then X, and then paint one instance of the flare at the bottom area of the canvas in roughly the same area we created the stroke.
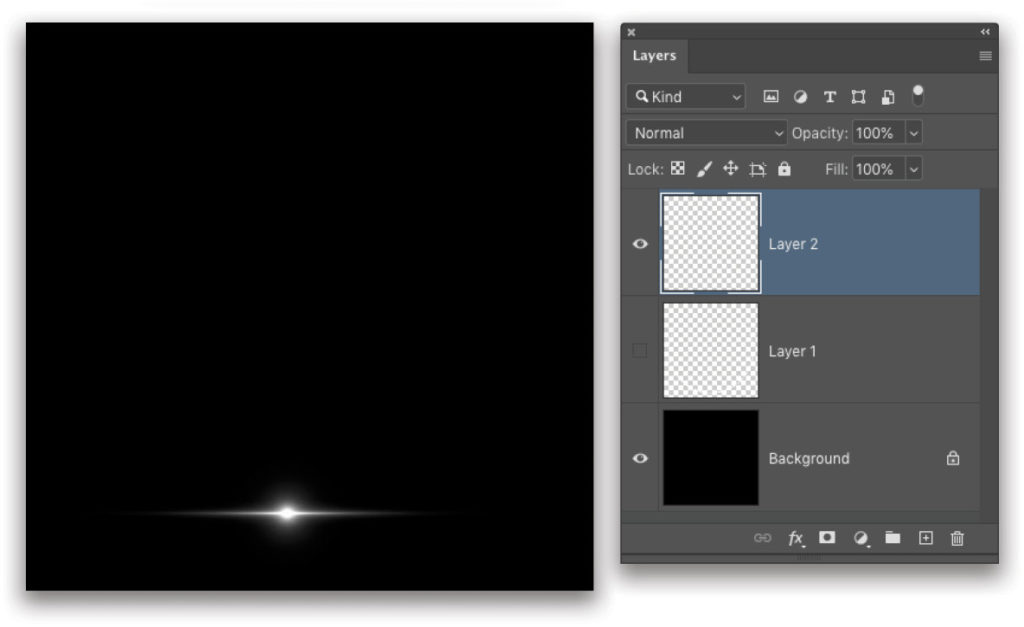
Step 26: Once again, apply the Polar Coordinates filter (Filter>Distort>Polar Coordinates). This will give you a circular flare. Just use the Move tool to drag this to the main image like before, and drag it to the top of the layer stack.
Step 27: Use Free Transform to scale, rotate, and position the curved flare along the existing circular streak to the right of the subject’s head. Press Enter when done. It’s better to have these flares as separate elements rather than add them to the original stroke so you can position them independently depending on the scene.
Step 28: Once in place, add a layer mask, and use the Gradient tool to fade the flare edges that are spilling over onto the subject. This time set the gradient type to Linear in the Options Bar, and draw multiple short gradients as needed in order to fade the flare from multiple sides. Note: Only the Foreground to Transparent gradient will allow you to draw multiple gradients on a layer mask.
Step 29: As we did with the ring element in Step 12, add an Outer Glow layer style to the flare to enhance the red glow (it doesn’t need the Inner Glow). You can use the settings shown here.
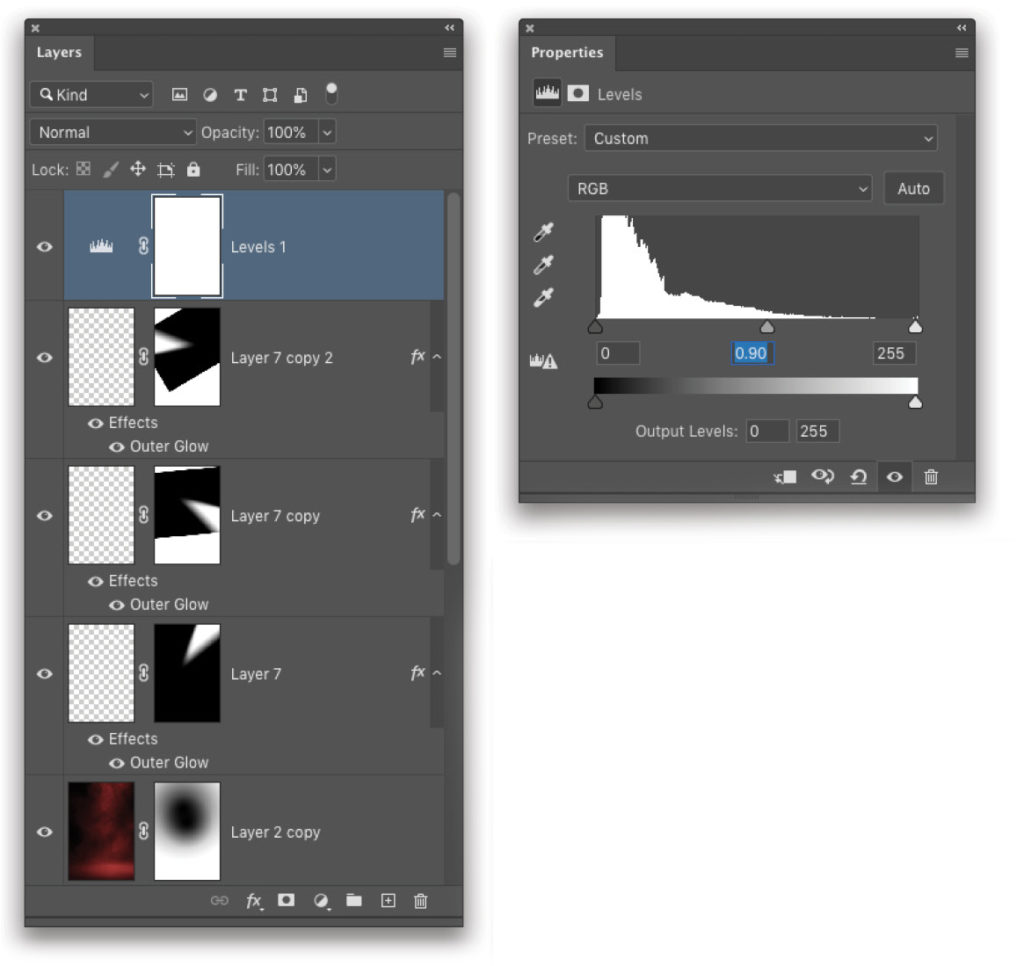
Step 30: Make a couple duplicates of this flare layer and use Free Transform to rotate and position them around the subject along the ring element. You only need two or three—don’t go crazy! As a final touch, add a Levels adjustment layer (Layer>New Adjustment Layer>Levels) at the very top of the layer stack. Just push the midtone slider in the Properties panel (Window>Properties) slightly to the right to boost the overall contrast of the final image.
This article originally published in the September, 2020 issue of Photoshop User magazine.


