As Star Trek: Discovery finished up their third season, we were still transfixed by the unique design of the title sequence. The blend of tech sketches and watercolor brushes work surprisingly well together. In this project, we boldly explore a technique inspired by that very effect. It’s accomplished by some clever uses of filters, blending modes, and stock images but proves to be a versatile technique that can be applied to your own work. One of the essential elements of the technique is a set of watercolor brushes freely available on Adobe’s website.
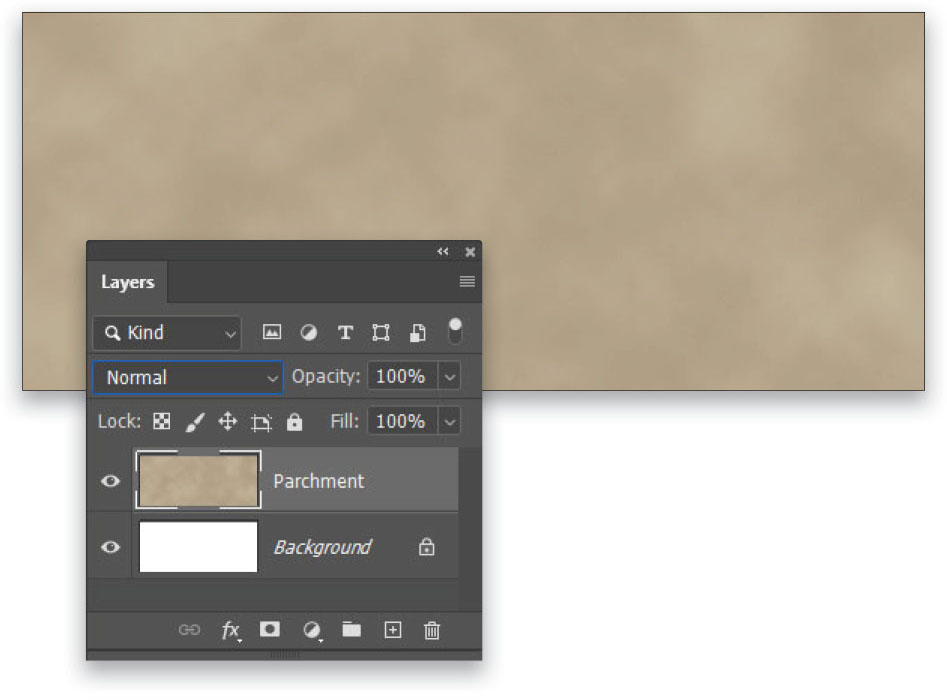
Step One: In Photoshop, go to File>New. In the New Document dialog, set the filename to “Camera Discovery,” the Width to 1280 pixels, the Height to 537 pixels, and the Resolution to 72 ppi. After clicking Create, add a new layer by clicking the Create a New layer icon (+) at the bottom of the Layers panel. Double-click the name of the layer and rename it “Parchment.”
Click on the Foreground color near the bottom of the Toolbar, and set it to a light tan (#c3b69c). Click OK to close the Color Picker. Set the Background color to a darker version of that color (#ab9a7f), and then go to Filter>Render>Clouds to fill the layer with a fractal-like cloud pattern.
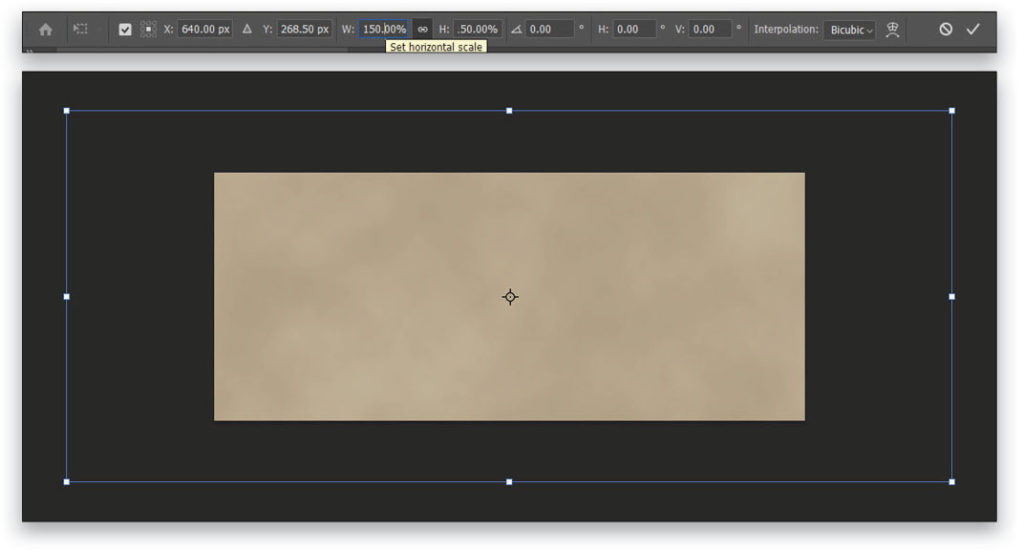
Step Two: One drawback of the Clouds filter is that there’s no scale setting. Instead, the layer needs to be manually scaled to increase the texture size. Press Command-T (PC: Ctrl-T) to get the Free Transform handles. Either drag one of the corners out while holding the Option (PC: Alt) key, or set both the Width and Height to 150% in the Options Bar. Then press Enter to commit the transformation.
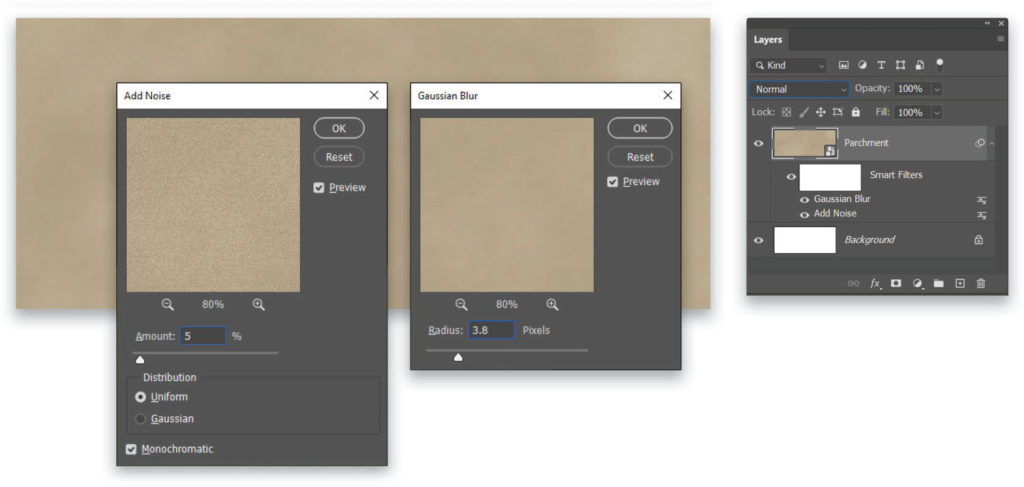
Step Three: Go to Filter>Convert for Smart Filters to change the layer into a smart object. Then go to Filter>Noise>Add Noise, set the Amount to 5%, and click OK. Follow this with a Filter>Blur>Gaussian Blur filter using a Radius of 3.8 Pixels to soften the noise a bit. Click OK.
Step Four: Next click the ƒx icon at the bottom of the Layers panel to add a Pattern Overlay style. Click on the Pattern thumbnail to open the Pattern Picker, and select the Grass–Safari preset from the Grass folder. Change the Blend Mode to Soft Light, reduce the Opacity to 60%, and set the Scale to 45%. Click OK. This adds a touch of grain to the layer and creates a more parchment-like appearance.
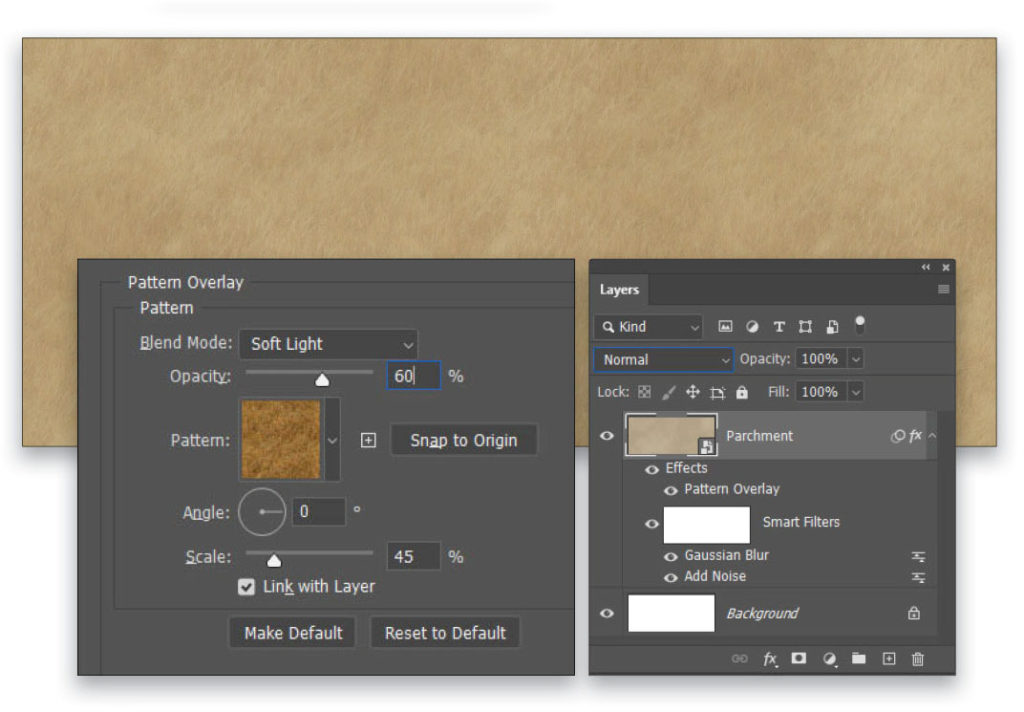
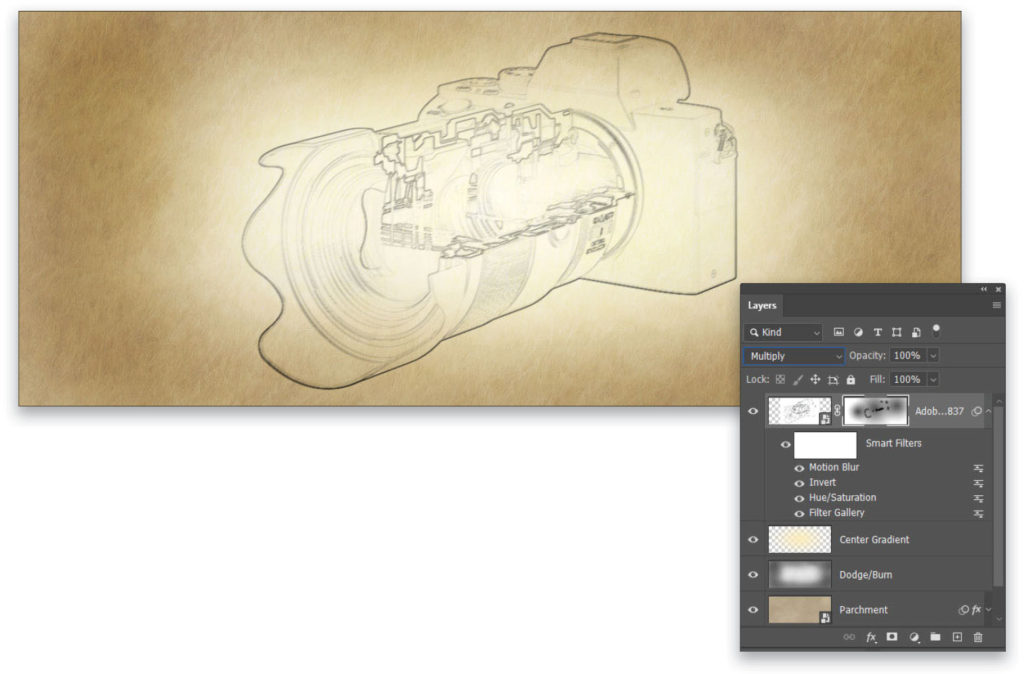
Step Five: Use the Layer>New>Layer menu to add a new layer. In the New Layer dialog, name the layer “Dodge/Burn” and set the Mode to Overlay. Enable the option for Fill with Overlay-Neutral Color (50% Gray), and click OK. This creates a gray-filled layer that’s rendered invisible due to the blending mode. Then use the Burn tool (nested below the Dodge tool [O] in the Toolbar) with a large soft round brush tip to darken the outside edges of the layer. Likewise use the Dodge tool to brighten the central area.
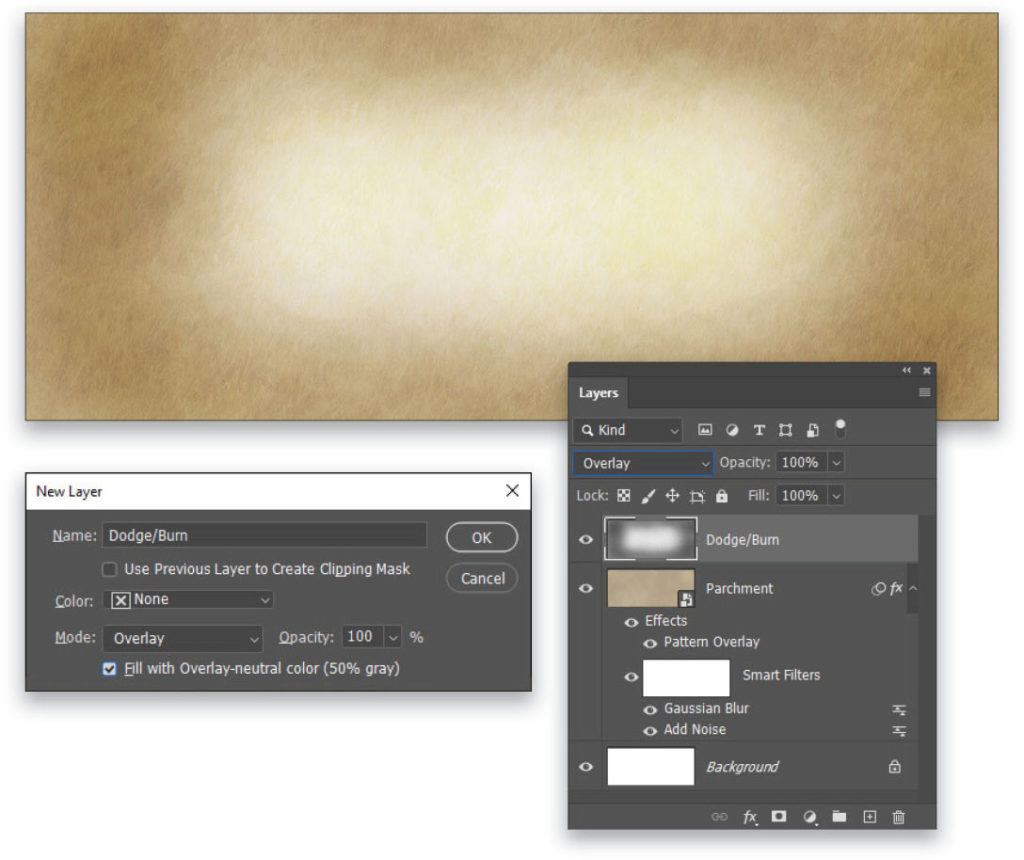
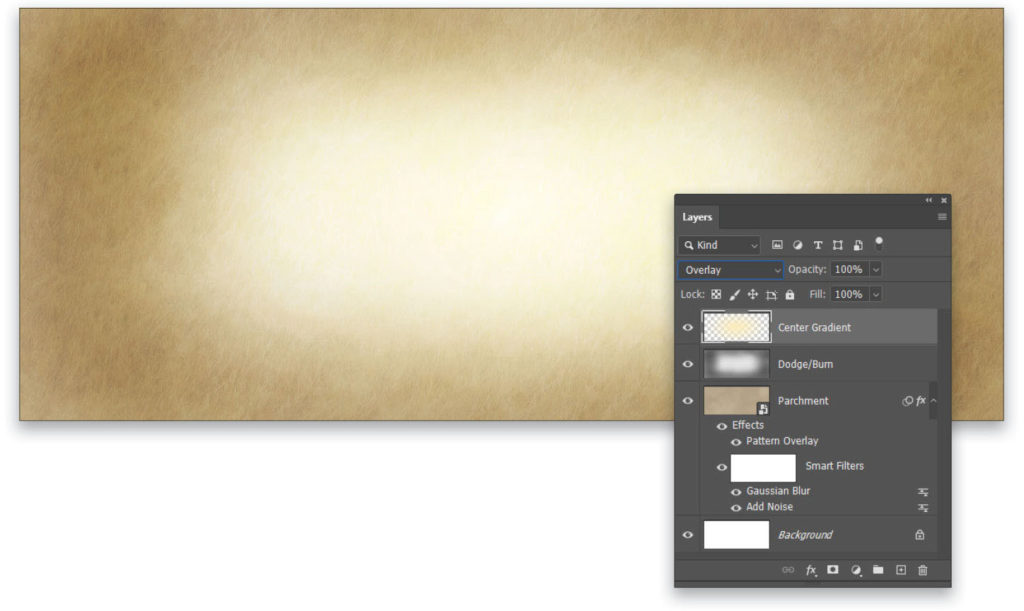
Step Six: Add another new layer named “Center Gradient.” Change the Foreground color to a pale yellow (#fbedbd) and grab the Gradient tool (G). Click on the gradient preview in the Options Bar, and select the Foreground to Transparent preset in the Basics set. Click OK to close the Gradient Editor, and select the Radial Gradient icon in the Options Bar. Draw out a gradient from the center of the canvas to about halfway to the right edge of the document.
Press Command-T (PC: Ctrl-T) for Free Transform, press-and-hold Shift-Option (PC: Shift-Alt), and drag the right center control point to the edge of the document to stretch out the gradient horizontally. Press Enter to commit the transformation. Then set the layer’s blending mode (near the top left of the Layers panel) to Overlay. This completes the background parchment creation; it’s time to move on to the primary artwork.
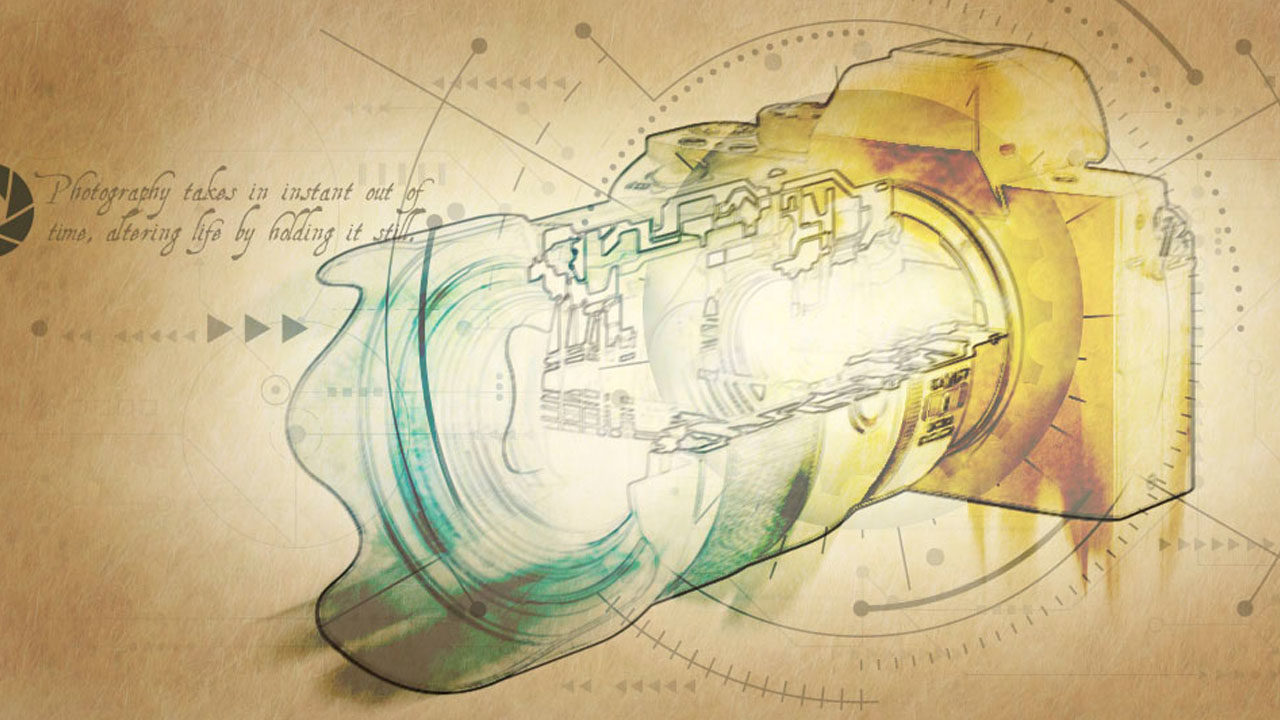
Step Seven: Go to File>Place Embedded and select the image you’d like to use. If you’d like to download the low-res version of the camera cross section image that we’re using here from Adobe Stock, click this link, log in with your Adobe ID, and click the Save to Library button. Double-click the downloaded image in the Libraries panel (Window>Libraries) to open it in Photoshop. Go to Image>Image Size, set the Width to 3000 pixels, the Resample drop-down menu to Preserve Details 2.0, and click OK (we normally don’t recommend enlarging images, but this is for practice purposes only). Using the Move tool (V), hold the Shift key, and drag the camera to the parchment document (the Shift key will center the layer in the document). Right-click on the camera layer in the Layers panel, and choose Convert to Smart Object. Press Command-T (PC: Ctrl-T) for Free Transform, and press Command-0 (PC: Ctrl-0) to zoom out the image so you can see the entire transform bounding box. While holding the Option (PC: Alt) key, drag a corner point to scale the camera down so it fits in the image. Press Enter to commit the transformation.
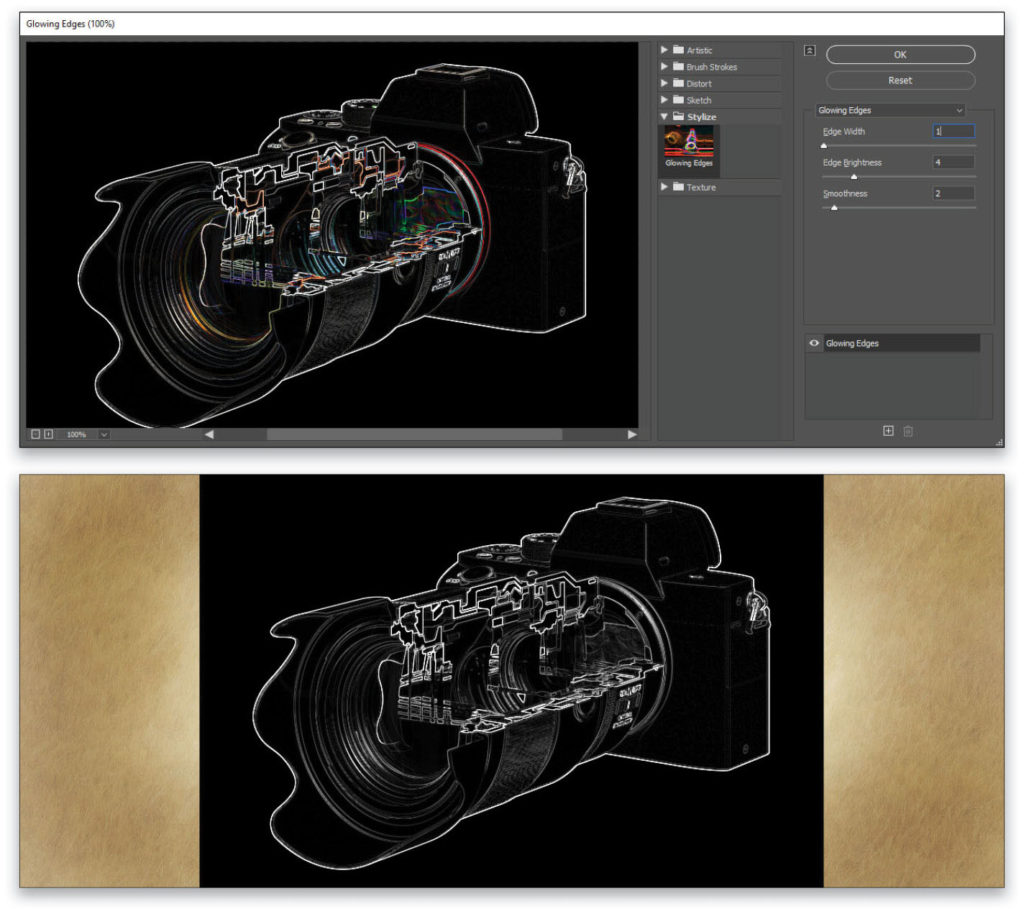
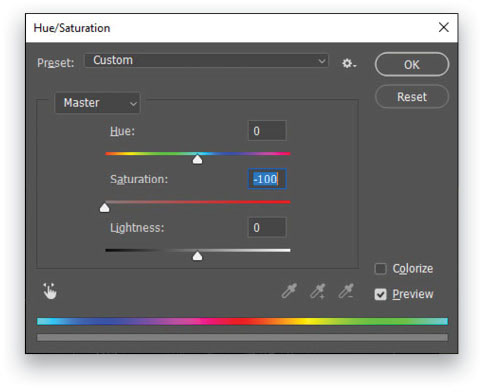
After placing the camera, go to Filter>Filter Gallery and select the Glowing Edges filter from the Stylize folder. Set Edge Width to 1, Edge Brightness to 4, and Smoothness to 2. This filter creates colorful lines for the detected edges of the image. We need the lines but not the color, so after clicking OK to apply the filter, go to Image>Adjustments>Hue/Saturation, reduce the Saturation to –100 to nullify all the color values, and click OK.
Step Eight: Next, go to Image>Adjustments>Invert to make the camera lines dark and its background white. Set the layer blending mode to Multiply and the white background disappears, leaving just the dark sketch lines. The lines are a bit overly sharp, so go to Filter>Blur>Motion Blur and set the Angle to 21° and the Distance to 2 Pixels. Click OK. This softens the lines just a bit so it looks more like actual ink on parchment.

Step Nine: Click the Add Layer Mask icon (circle in a square) at the bottom of the Layers panel, and switch to the Brush tool (B). Press D then X to set the Foreground color to black, and use a small, soft round brush to paint on the mask and “paint out” the more central, intricate parts of the lens. Then press the Right Bracket key (]) to increase the brush size, and reduce the brush Opacity to around 40% in the Options Bar. Now paint to soften some of the remaining lines of the camera. This isn’t to hide the lines, but just to introduce some variation, so the sketch seems more hand-drawn and less mechanically generated.
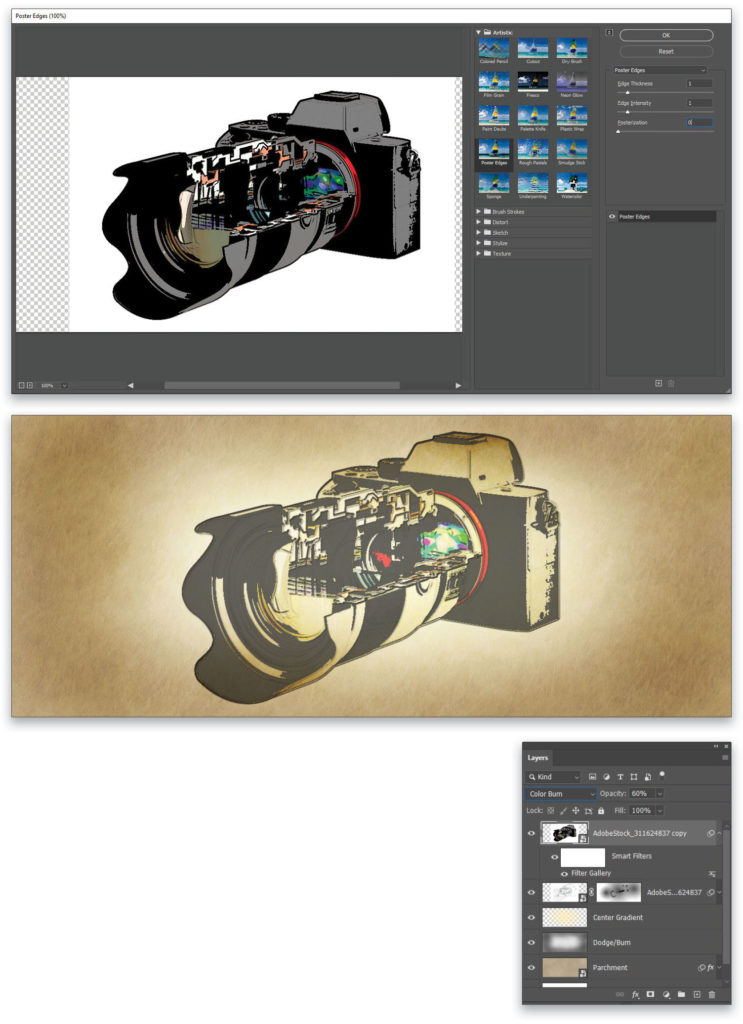
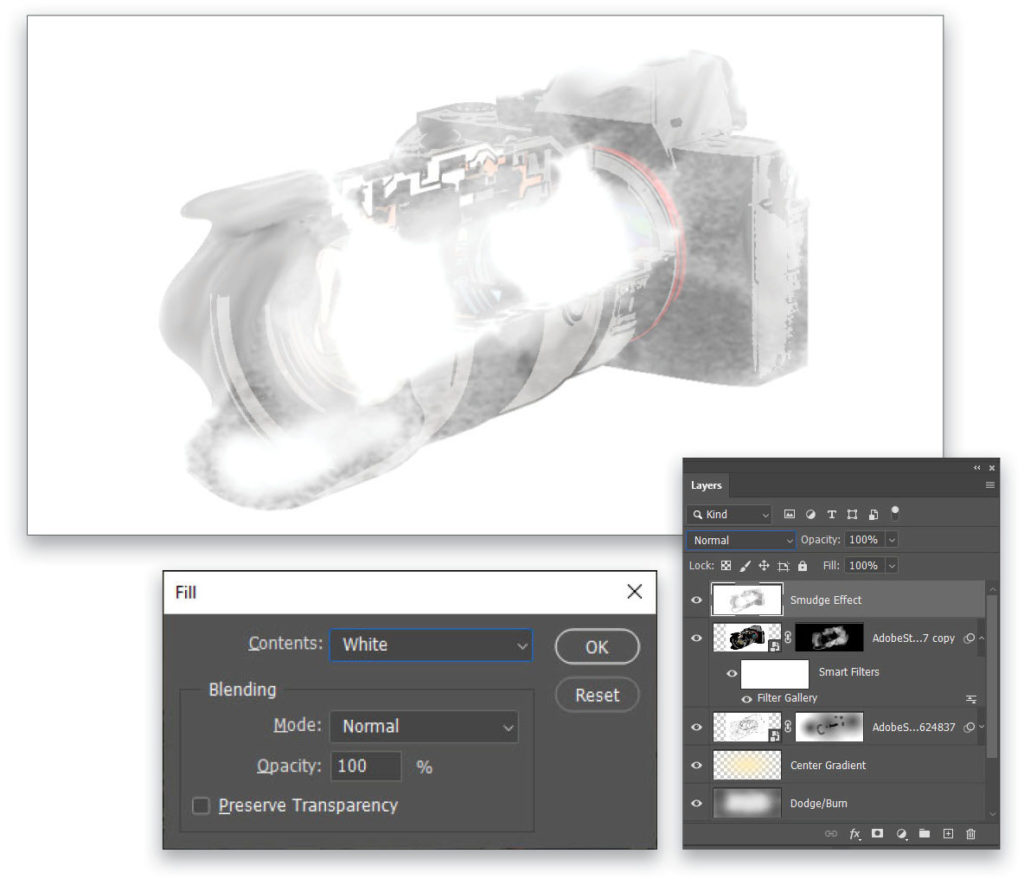
Step 10: Press Command-J (PC: Ctrl-J) to duplicate the camera stock layer. On this copy, remove the mask by dragging its thumbnail to the Delete Layer icon (trash can) at the bottom of the Layers panel. Do the same for the smart filters to clear them, as well, so we’re working with a fresh smart object.
Then run the Filter Gallery again and select the Poster Edges filter from the Artistic folder. Set Edge Thickness to 1, Edge Intensity to 1, and Posterization to 0. After clicking OK to apply the filter, change the blending mode to Color Burn and reduce the layer Opacity to 60% to allow some of the underlying sketch work to show through.
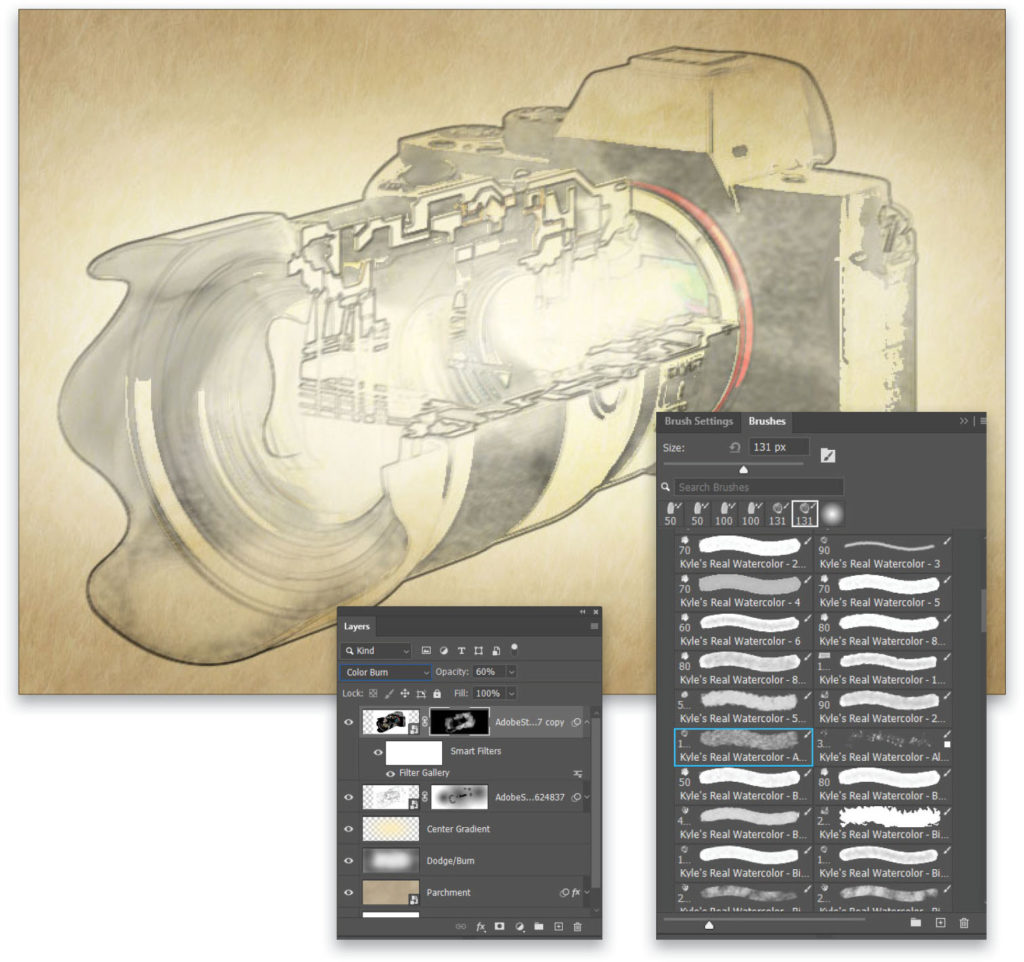
Step 11: Hold down the Option (PC: Alt) key while clicking on the Add Layer Mask icon at the bottom of the Layers panel to add a black-filled mask, completely hiding the layer. Click here to find the watercolor brushes that I mentioned at the beginning of the article. Make sure that you’re logged in with your Adobe ID, scroll down, and click the Download button for the Watercolor set of brushes. Navigate to the downloaded brushes on your computer and drag the ABR file onto Photoshop’s app icon to load them into Photoshop.
Switch to the Brush tool (B), and open the Brush Settings panel (Window>Brush Settings). Make sure that all the settings on the left are unlocked (the padlock icon). Open the Brushes panel (Window>Brushes) and use the search field near the top of the panel to search for the brush called “Kyle’s Real Watercolor – Add Paper Texture.”
Press D to set the Foreground color to white, and change the brush Mode in the Options Bar from Linear Burn to Normal. Make sure the layer mask is targeted in the Layers panel, and then use the brush to paint the effect back onto the image, focusing on the camera body and outer edge of the lens. You can use the Blur and Smudge tools in the toolbar, to smooth out the strokes on the top portion of the lens hood.
Step 12: Press Command-J (PC: Ctrl-J) again to duplicate the layer, rename this copy to “Smudge Effect,” and change the blending mode back to Multiply. Hold down the Command (PC: Ctrl) key and click the Create a New Layer icon in the Layers panel again to place a layer beneath the Smudge Effect layer. Then go to Edit>Fill, select White as the Contents, and click OK to fill the entire layer with white. Click again on the Smudge Effect layer and press Command-E (PC: Ctrl-E) to merge it with the white layer beneath it. You’ll probably need to rename the layer “Smudge Effect” again.
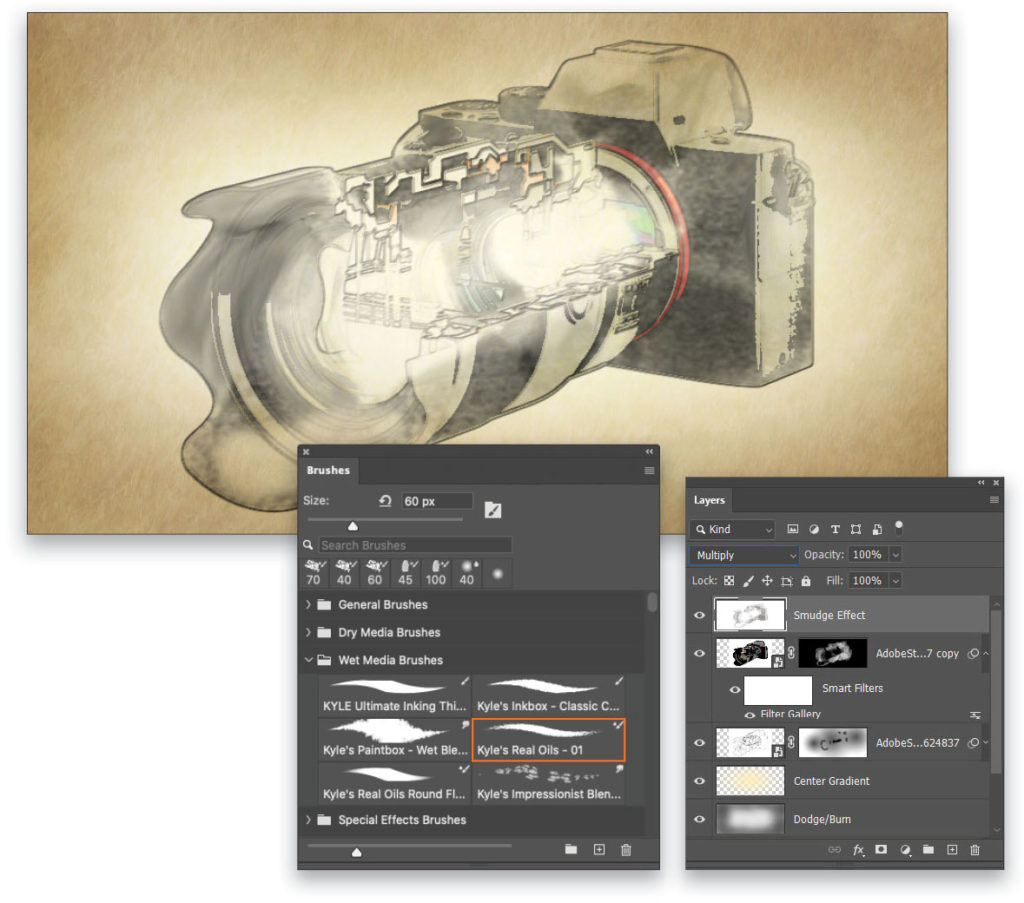
Step 13: Open the Brushes panel again and look in the Wet Media Brushes folder for a brush called “Kyle’s Real Oils – 01.” This uses the Mixer Brush instead of the traditional Brush tool. The entire point of crafting that merged layer is so this brush has some white pixels with which to work. Set the layer’s blending mode back to Multiply, so those white areas aren’t visible, but still available for use with the Mixer Brush.
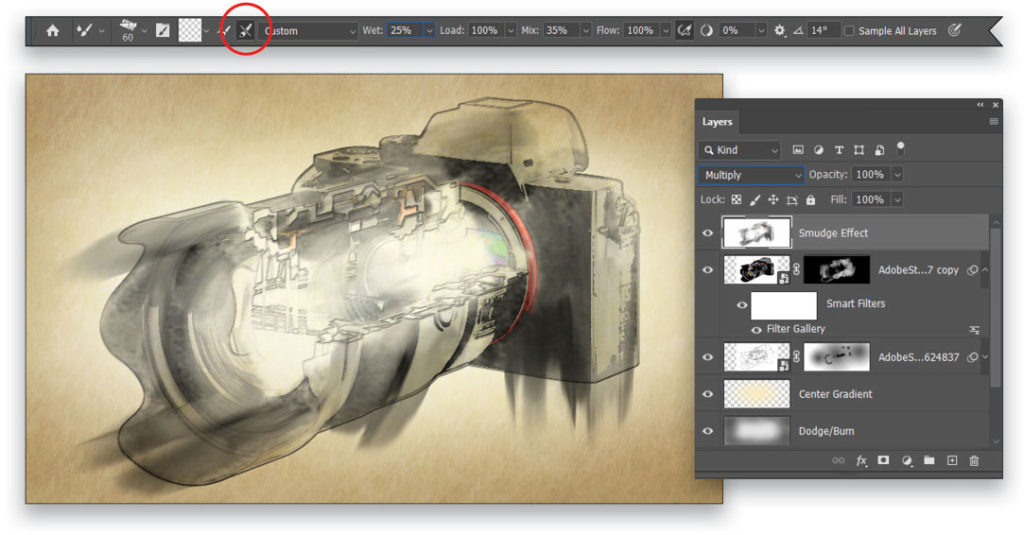
Step 14: In the Options Bar, click the icon to Clean the Brush After Each Stroke (the brush with the line through it) and set Wet to 25%. Then use this brush to “pull out” some painted effects from the watercolor portions of the image (as shown here). Don’t overuse this effect; be judicious and use just a handful of strokes. If the effect is too strong, reduce the Opacity to around 80%.
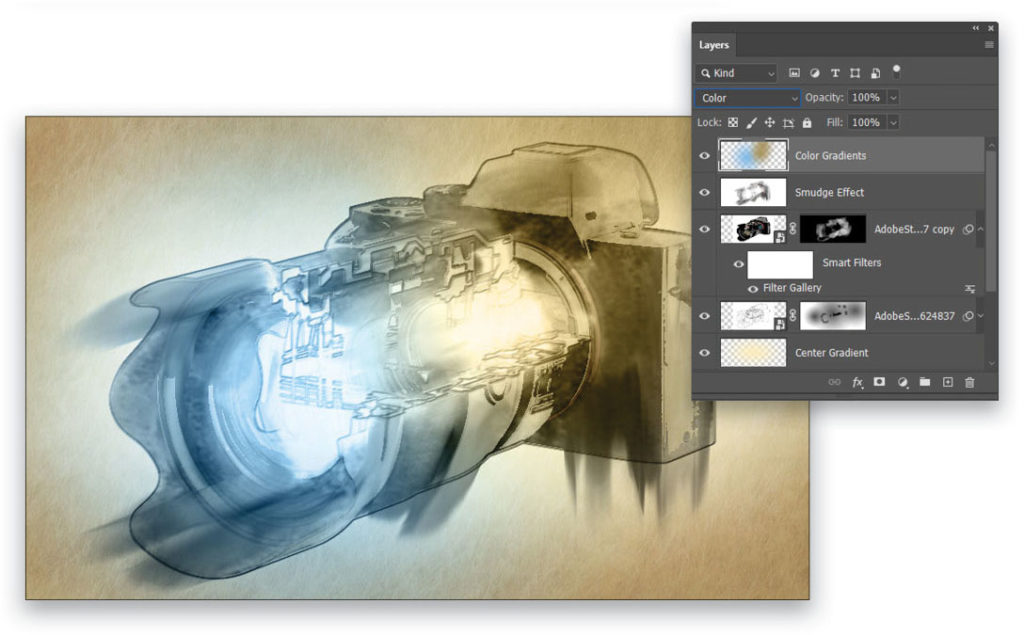
Step 15: Add a new layer named “Color Gradients” above the Smudge Effect layer. First, set the Foreground color to a deep tan (#aa955c) and use the Gradient tool to create a radial gradient centered on the camera body. Then, change the Foreground color to a bright blue (#7dbbe5) and create a radial gradient centered on the lens. Set this layer’s blending mode to Color.
Step 16: In the Layers panel, click on the topmost camera stock layer to make it active, and then Shift-click the Smudge Effect layer and the Color Gradient layer so all three layers are selected. Go to Layer>Group Layers, name the group “Camera Sketch,” and then change the blending mode of the group to Color Burn. Notice how the group level blending mode doesn’t override the layer level blending modes, but mixes with them to create a more intense color effect. The color intensity can be adjusted by reducing the Opacity of the Group.
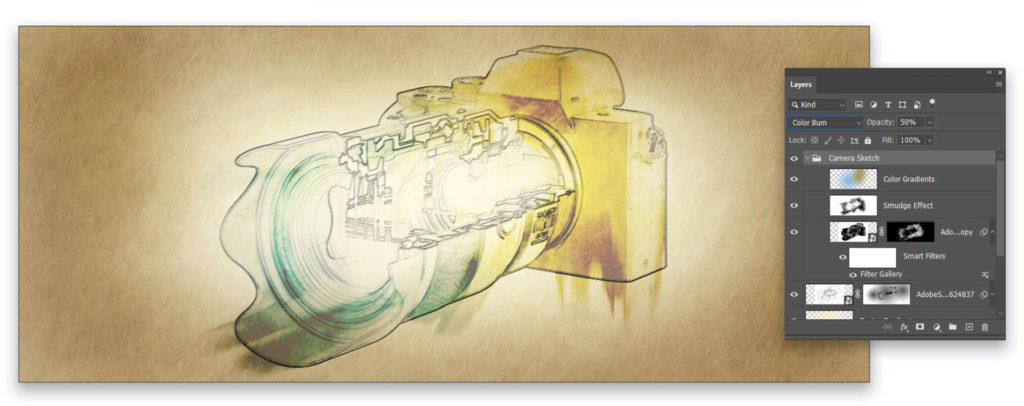
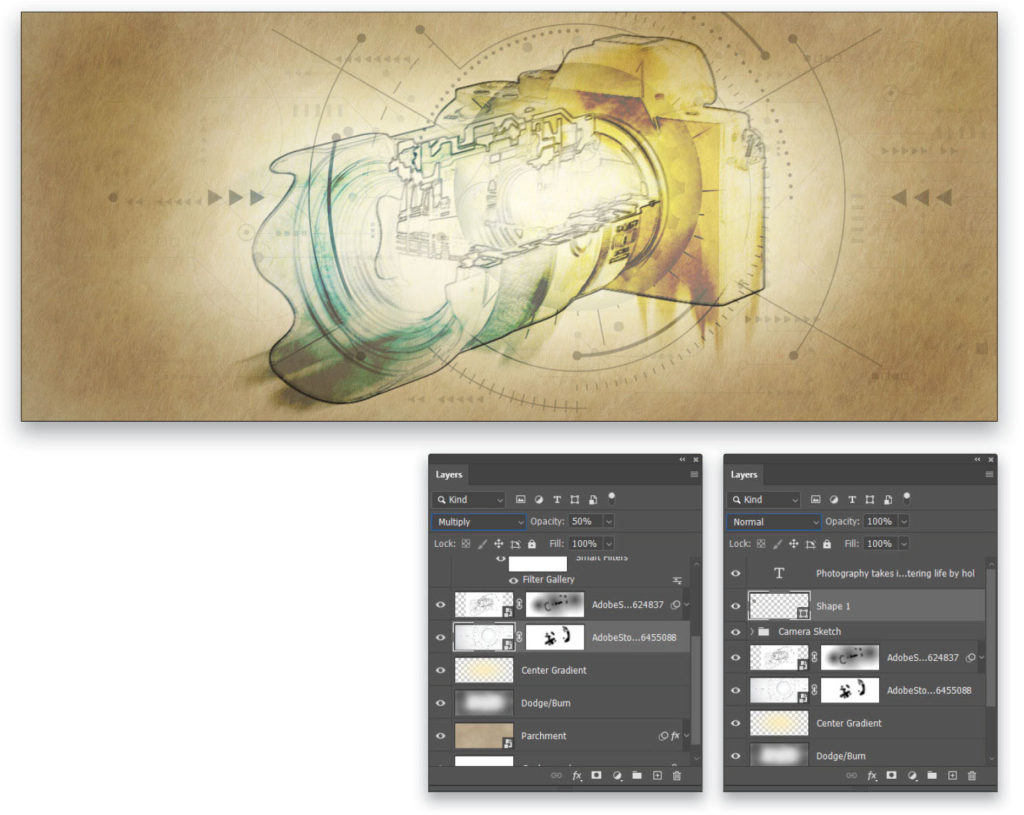
Step 17: Next use Edit>Place Embedded to place a tech interface image as a layer beneath all the camera layers in the Layers panel. You can find the one we’re using from Adobe Stock by clicking here. After you Place it, or drag it from the Libraries panel, resize it so it’s larger than the image, drag it into position, and press Enter to commit it. Set the blending mode to Multiply, reduce the Opacity to 50%, and use a layer mask and a soft round brush with black to paint out the interface elements that compete with the sketch.
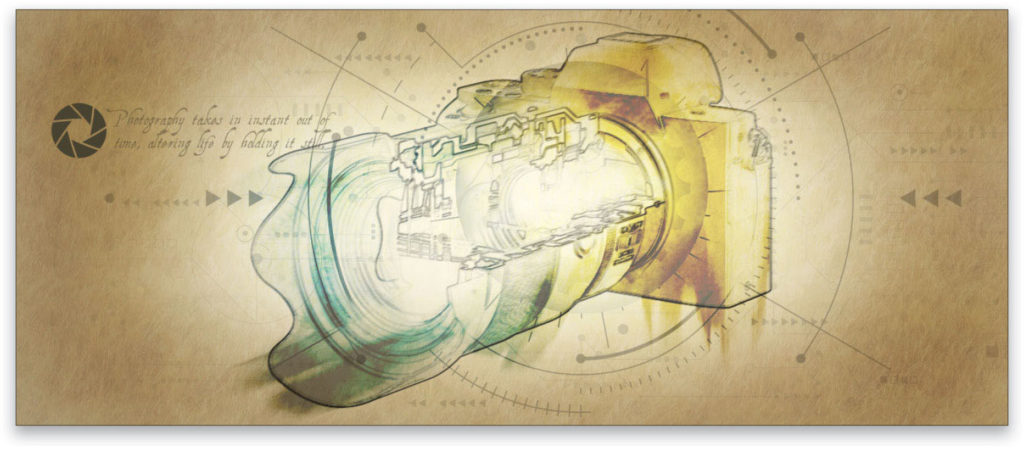
Step 18: For an extra effect, consider adding in a camera shutter icon and a bit of text to adorn the final piece. Then enjoy your sci-fi watercolor artwork!
The intermixing of high-tech sketch work along with traditional paint effects is a brilliant combination. Let this inspire you to experiment with other combinations of effects that normally wouldn’t go together. Exploration is key to learning!
This article originally published in the March, 2021 issue of Photoshop User magazine.


