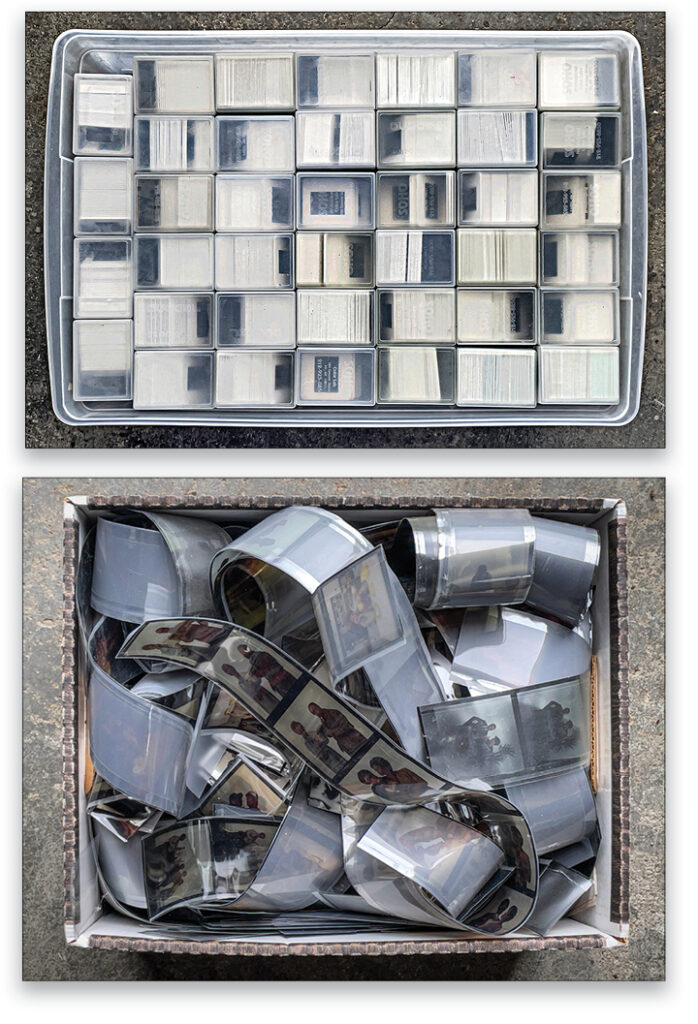
Is your significant other giving you the stink eye over your overflowing collection of negatives, slides, and prints? As the old adage asks, “How do you eat an elephant?” The answer is “One bite at a time.” While this cliché is humorous and true, it’s also the method for facing an archive of photos collected over many decades. Henri Cartier-Bresson once said, “Your first 10,000 images are your worst.” Well, it seems I still have all those negatives and chromes and prints.
What to do? I started out using a scanner with great results, but quickly realized I’d have to live to about 163 years old to get everything scanned. I want the best quality scans of my images at the fastest speed. And I found my solution.
Three items solved my issues: using a camera rather than a scanner, a software program called Negative Lab Pro, and finally, Lightroom Classic to process and catalog everything. It’s so much faster, and the quality is so close to a good scanner that only a high-end drum scanner really produces better results. A good drum scan is better in that it’ll usually pick up more detail in the shadows and highlights, but sometimes you just need a good pleasure boat to get you there and not have to maneuver a huge battleship.
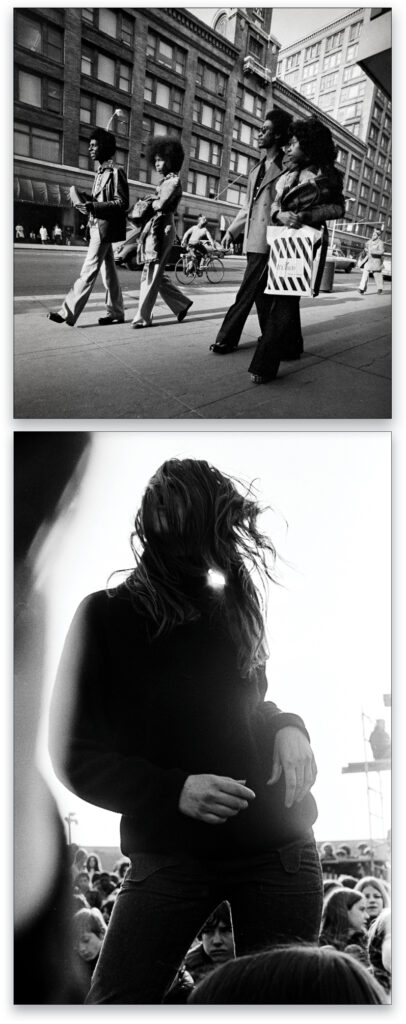
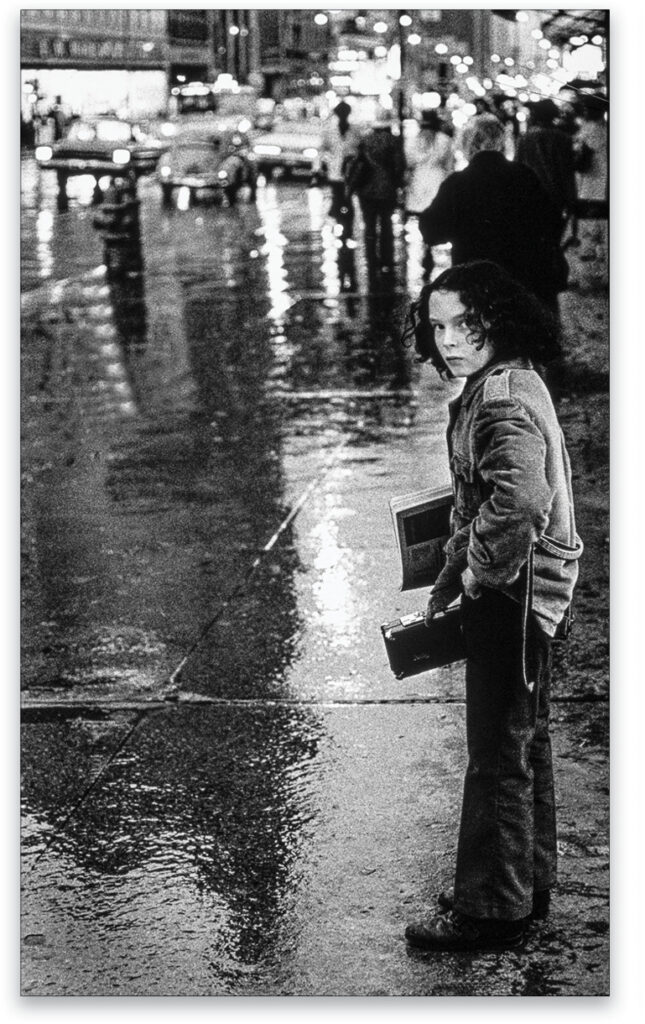
How good are the results? I recently had 11 black-and-white prints in a show at the Rochester Museum and Science Center that I took in the early 70s as a teenager—all from camera-scanned negatives. The quality is there.
THE SETUP
There are many methods of using cameras to scan. A tripod, a rack system, bellows, extension tubes, enlarger columns, and more. My camera is a Canon EOS 5DS R camera that has a 50-MB sensor, a 100mm Macro lens, and a 50mm when I need to scan large prints. After trying other methods, I progressed to a Kaiser Copy Stand, as I have negatives and slides in 35mm, 2 1/4, 6×7, and 4×5. I also use the Kaiser Slimlite Plano 5000K LED lightbox because it offers very even illumination. To see if your light source is even or not, take a photo of it and underexpose it until the image is gray. The result should be fairly even, or you’ll obviously have trouble.
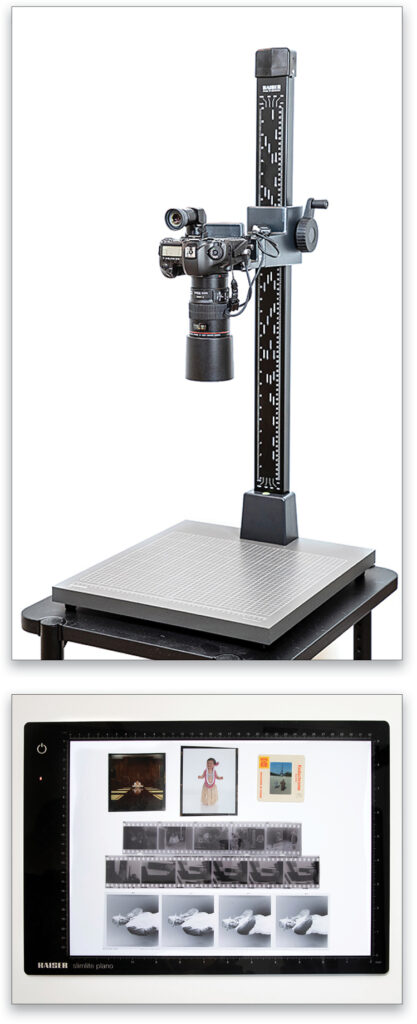
An LED lightbox is a diffused light that’s a little more forgiving of minor scratches and imperfections in negatives and slides, while a scanner can accentuate and make such imperfections stand out. Also important for scanning color negatives is the CRI (color rendering index). There’s a lot of info online on CRI ratings, which is different from color temperature. You want to get as close to a rating of 100 as you can. Anything under 90 will give you issues with the reproduction of specific colors. The Kaiser is rated 95.
My exposures are usually aperture priority set at f/8 at 100 ISO, and I manually adjust the shutter while looking at the histogram or visually evaluating the negative. The shutter for a normal negative is around 1/4 second, give or take. I’ll also take multiple exposures to blend later if I want more shadow detail with more highlight detail.
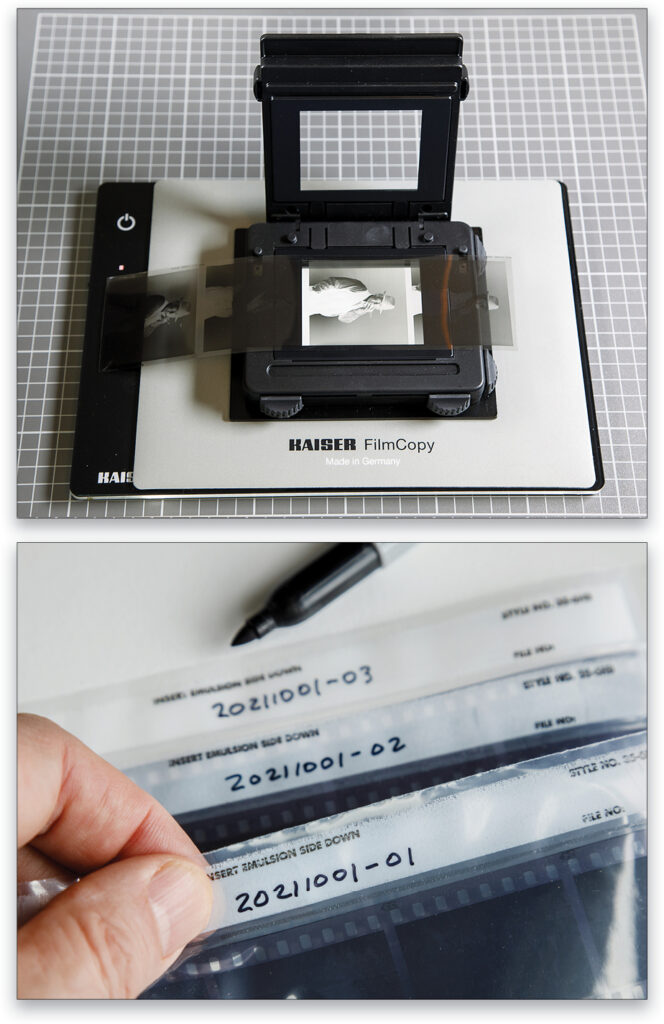
Film holders have been a progression for me. I looked again into Kaiser (those Germans know how to build stuff) and found their FilmCopy Vario Holder. It helped make my scanning faster with less handling of film. It handles 35mm mounted slides, 35mm strips, 2 1/4, and 6×7 film. There are inserts for each size, but the 6×7 frame works well with my 2 1/4 square film, as they have built-in sliders (brilliant) to mask out the excess light, or simply crop tighter if you want.
ORGANIZING SCANNED IMAGES IN LIGHTROOM
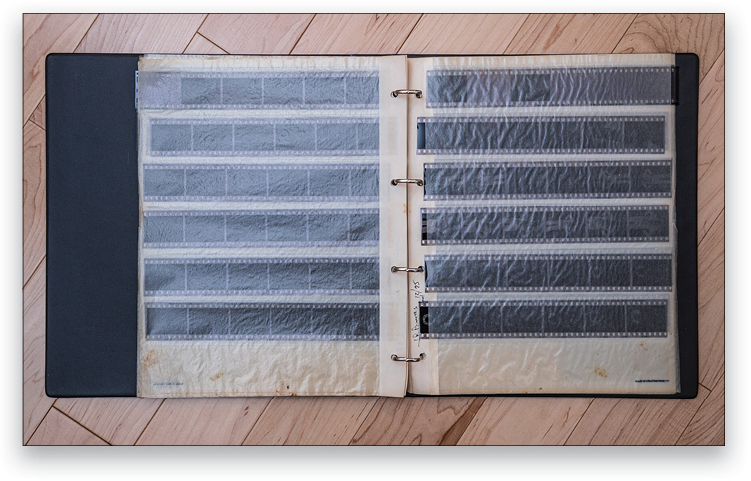
The mountain of images I had were previously filed with the same time-honored system that many of us use, called Braille or Guesswork. “It’s here in this pile! Oh wait, maybe I put it over here.” With Lightroom and it’s cataloging ability, I can now find images in minutes rather than hours.
After a camera scanning session, I import all my images into a single folder in Lightroom and then place them in specific folders. Some images go into several folders; for example, a photo taken of my wife in Italy goes into an Italy folder (in my “locations” folder set) and also into a folder of images of my wife (in my “personal” folder set).
Importing everything into a single folder makes initial culling, batch processing, and renaming easier. I found I really don’t know what’s in the negatives until I process them. Some that look like an ugly duckling as a negative turn into a lovely swan when turned into a positive.
My filenaming convention is simple and keeps things moving. I use the year/month/day and a sequence number for the storage file sheets. So 20211001-01-01 would be a scan taken on October 1, and it’s the first file sheet and the first frame. If it was a file in the 8th sheet that day and the 14 frame, that filename would be 20211001-08-14.
A little secret: If I started on October 1 and continued on October 3, I’d continue numbering them with the October 1 numbering. The dates really didn’t matter, it’s just a numbering system to stay organized in finding the originals. While it looks like a lot of numbers to read, once you start, it’s very easy to read quickly. The sheets of original negatives or slides go into three-ring binders. Original flat art, like old family photos or small prints, go into hanging folders. I’ll use my 50mm lens for larger print pieces; otherwise the 100mm Macro still works well on snapshot photos.
After a while I realized it was even faster to tether my camera directly into Lightroom. Duh! It eliminates the downloading from cards. Another slowdown in my workflow was changing batteries in the camera. I’d have to remove my camera from my copy stand and then re-level the camera every time I needed to replace the battery. So I ordered a DC unit for my Canon and now I don’t have to ever change a battery. Mush on.
PROCESSING
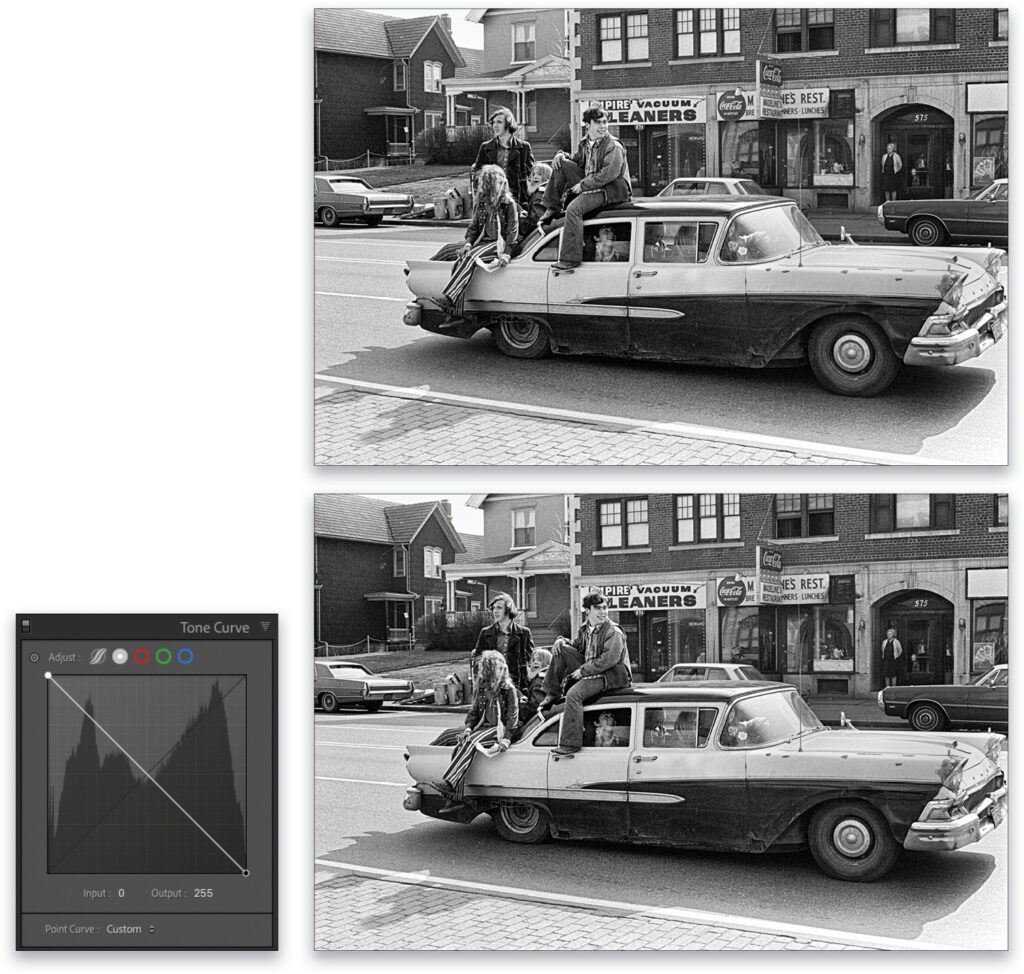
Now it’s time to process negatives into positives. Initially, I created a preset in Lightroom to reverse the curve to turn negatives into positives. In the Tone Curve panel, you move the lower left point (the shadows) to the upper left and the upper right point (the highlights) to the lower right. Then, save that as a preset. It’s easy except that every correction is now reversed. Increasing the Exposure slider makes it darker rather than lighter and the Shadows and Highlights sliders are also reversed. You really have to process by sight, looking at the image. With color, it’s a bit trickier.
Which brings us to the Negative Lab Pro (NLP) plug-in. NLP only works in Lightroom Classic; not the cloud-based Lightroom or Photoshop. In my opinion, it’s the best solution for converting color negatives by far. And, as I found out, it’s also a lot better for black-and-white negative conversions. It gives me a much better starting point than simply reversing the curve. Why? Because it analyzes each channel on each negative individually with both color and black-and-white. So you start with richer-looking positives, a better tonal look. NLP gives you a lot of controls for different looks when you process your negatives either in black-and-white or color.
STEP ONE: After importing into Lightroom Classic, it’s best to crop out everything but the image, which helps create better renditions during the conversions, especially for color negatives. But before you crop, you need to use the border with color negatives to set the white balance with the White Balance Selector tool (W) using the base of the film. So set white balance, then crop.
If you’re a purist and want to show the entire frame, you can always re-crop the file after conversion. You just want to have minimal-to-no-border for the conversion. It helps with analyzing the colors and tones.
STEP TWO: After downloading NLP and following the instructions to add it to Lightroom via the Plug-in Manager, select all the negatives that you want to convert in Lightroom and go to File>Plug-in Extras>Negative Lab Pro; or easier, use the shortcut keys Control-N on a Mac. On a PC, if you have the Windows Hotkey running, use the hotkey combo for the nationality you have selected in your Lightroom language preferences. For English, German, and Swedish use Ctrl-Alt-N. For other languages, look in preferences.
STEP THREE: When the NLP interface comes up, you’ll see two tabs at the top; we’ll start with Convert. The Source for me is always set to Digital Camera, but you can also choose a scanner or a TIFF file if you used a scanner rather than a camera to capture the negatives.
You have several choices in Color Model: None, Basic, Frontier, Noritsu, or B+W. The Frontier and Noritsu are scanners that the conversion will emulate. It doesn’t matter if you used those machines to capture your negative, you can still choose one of them if that’s the conversion look you like. I first started with None for color negatives and B+W for black-and-white negatives, but now I use Frontier for color negatives as I like the warmer tones.
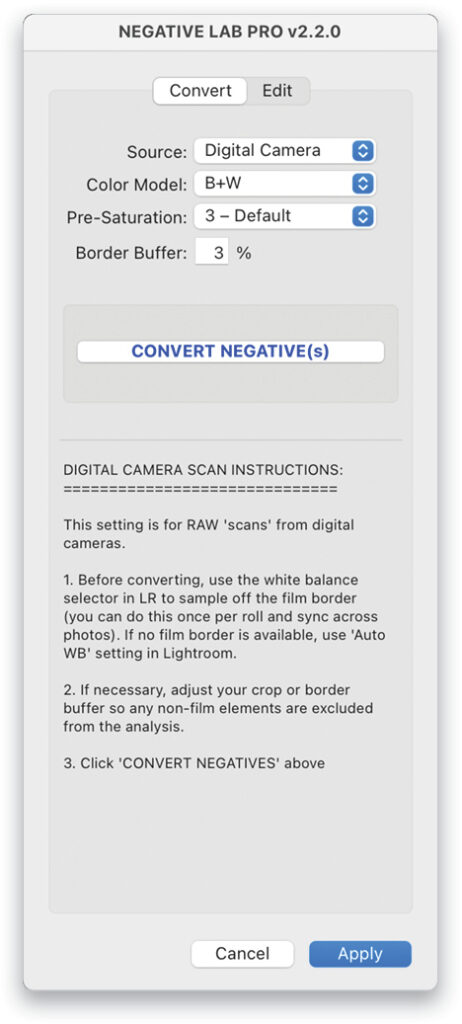
In Pre-Saturation, I start with the default number 3. If I feel I have problems with the color conversion, then I’ll go back and play with the Pre-Saturation. Lowering it will lower the color separation, create warmer color hues, and have less vividness; higher values will go in the other direction: more color separation, cooler color hues, and more vividness. Play to find your preference.
The final option is the Border Buffer, which helps the conversion if you don’t crop at all or, like me, minimally. This prevents the border areas from affecting the conversion analysis. I usually put in 3% with tight crops, more when I’m not cropping before I convert. You can always re-crop later, but tighter crops make for better conversion analysis.
STEP FOUR: Now click Convert Negatives, and you’ll get a progress bar to show NLP is working away. It will look at each negative separately and create a specific tone curve for each color channel in both color and black-and-white conversions. After it’s done, you’ll now see your negatives as positives and the Edit tab will open.
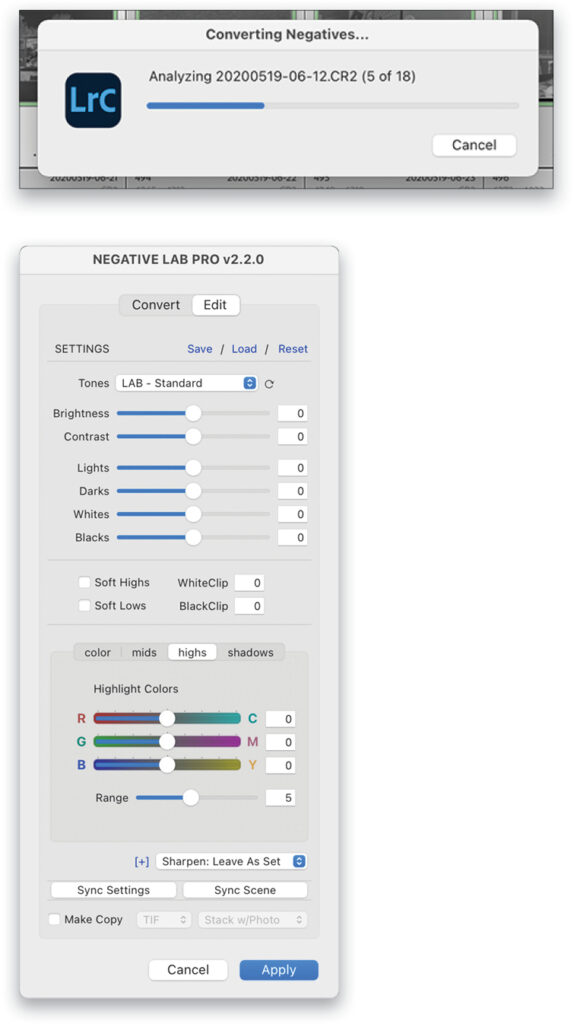
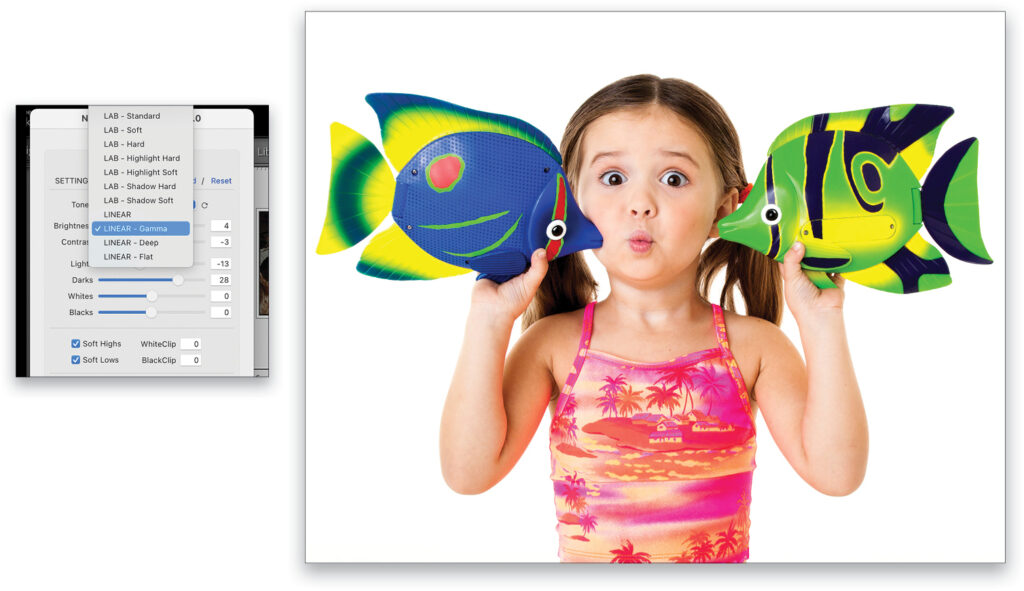
STEP FIVE: Next, choose a look in the Tones drop-down menu. There are three families of tone choices: Cinematic, Lab, and Linear, and variations within those choices. For example, within Lab you can process for soft or hard highlights, soft or hard shadows, or soft or hard overall. I usually start with Linear-Gamma, but for some things, such as my old commercial “Norman Rockwell-looking” images, I like the LAB-Highlight Hard to get the look I want.
STEP SIX: After choosing the Tones look, you have all the familiar adjustment controls such as Brightness, Contrast, Lights, Darks, Whites, and Blacks. You’ll want to do as much as you can here in NLP as opposed to doing it in Lightroom because, as I mentioned earlier, the controls in Lightroom will be mostly reversed. So in Lightroom when you move the Exposure slider to the right, instead of making it brighter as you’d expect, it goes darker. Highlights are shadows and shadows are highlights. It’s very confusing, like an American in England making a right-hand turn in a car with the driver side reversed and the roads backwards. Throw in a stick shift in the car and you’ll get the idea of how confusing it can get in Lightroom. If you jump to Photoshop to make adjustments, everything will be normal in the adjustments because you’re now working on a TIFF, JPEG, or PSD file.
STEP SEVEN: The Soft Highs and Soft Lows options will slightly smooth out tonal rolloff in the highlight and shadow parts of the image curve. This will make the tones look more natural and softer but might also make the tones a little flatter. If you have a very contrasty file, this might help.
STEP EIGHT: The WhiteClip and BlackClip points are adjustable. It goes from –50 to +50 in both but you need to visually play to get what you want. I usually start with zeros for the clipping points.
STEP NINE: With the color controls I can get a nice warm tone in my black-and-white images. I find straight conversions a bit cold for my taste in my older images and I like them warmer. With color, adjust to your taste.
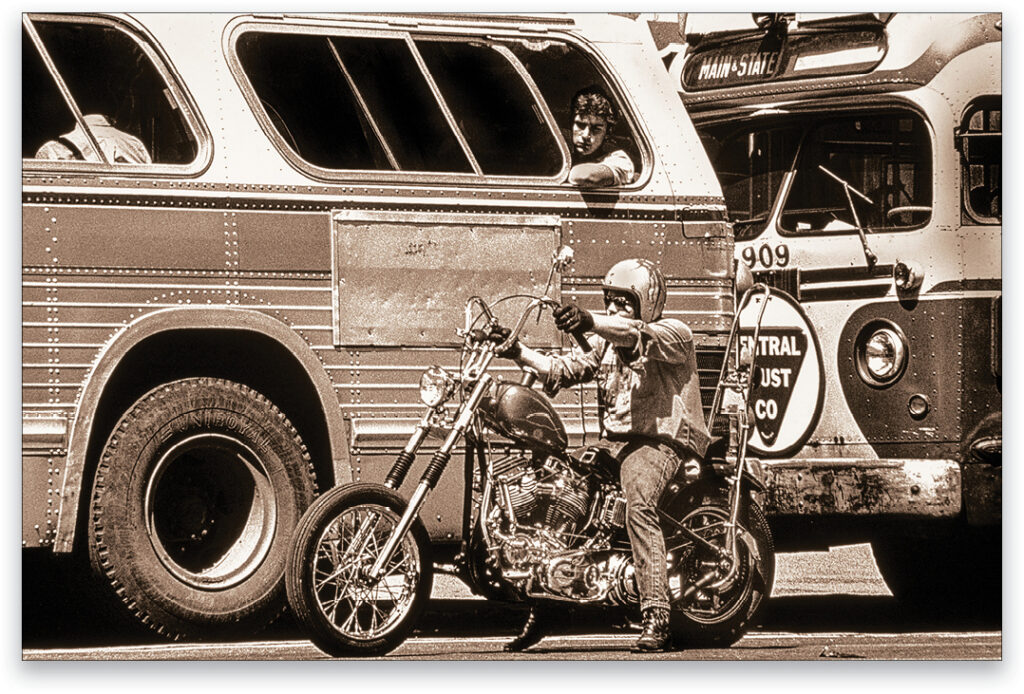
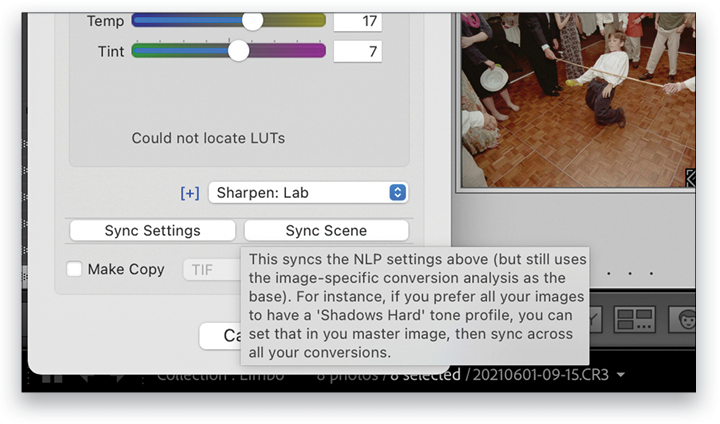
STEP 10: There is a sharpening adjustment. My older negatives are generally old Tri-X and I like nice sharp grain, so with black-and-white negatives I use the Sharpen: Lab setting. Sharpen: Lab works on sharpening the edges and uses a mask for the smoother areas. There’s a + sign to the left of the sharpen drop-down menu. Clicking on that enlarges your selected image so you can see the sharpening.

STEP 11: If you’re batch processing, all the exposure and color settings are initially applied to just the main highlighted image. If you want to apply those settings to all your images, click the Sync Settings button. It will still evaluate each negative separately, so if you previously set Soft Shadows, it will apply that throughout all the negatives you’re processing. Use Sync Scene when you have multiple images from the same scene and you want them to match.
STEP 12: You can make a TIFF or JPEG copy that will be placed alongside the processed RAW file or in a subfolder. This is a great timesaver if you want to quickly send images to relatives or post on social media.
STEP 13: This is an important step. Don’t forget to hit the Apply button. You already converted the negatives which can take time. The Apply button is very fast at writing and saving the metadata of what you did to all the negatives.
THE POSITIVES
This article was based on NLP version 2.2. The next version, 2.3, should be out by the time you read this and, more importantly, version 3.0 is in the works and will be out before the end of the year. Download a free full version of NLP and it will let you convert 12 negatives. I did it and after three negatives converted, I couldn’t get my $99 out fast enough to purchase it.
Now I’m doing my camera scans, getting super organized, finding old gems, throwing away a bunch of excess negatives and slides, and I’m very happy. And so is my wife.
[To learn more about scanning negatives, check out Jack’s latest KelbyOne course, Scanning Images Using Your Camera.]
This article originally published in the October, 2021 issue of Photoshop User magazine.
About Photoshop User and KelbyOne
Photoshop User magazine comes out digitally 12 times a year and is part of KelbyOne, the leading educational resource for Photoshop, Lightroom, and photography. Pro members have access to more than 900 video courses and 100 back issues of Photoshop User. To learn more about KelbyOne, click here.