Many years ago, I wrote a book on the dozen or so ways to convert an image to black-and-white, and why one way was better than another for a given case. Three decades into its development, Photoshop has more features than ever; however, when it comes to black-and-white, the solutions proposed here are now considerably more refined, much faster, easier, and markedly better than the resources we had all those years back! Honestly, we can squeeze today’s version of that entire book into this short article; things have come that far.
Let’s take a look at how to get the very best black-and-white images out of Photoshop; but, in the interest of being complete, let’s start outside Photoshop. After all, your edits are only as good as the source, so better black-and-white images begin long before they reach your computer.
Capturing An Image
The rules here are the same for color, but they’re important and they bear repeating and clarifying.
Shoot in RAW: If at all possible, capture your images in a RAW format. RAW images are uncompressed, infinitely editable, and the color values aren’t baked into the pixels; rather, they exist in separate channels of raw information. These files are the highest resolution and most pristine captures, and they’ll yield the most value in terms of dynamic range, color correction, and general flexibility—all paramount in creating great black-and-white images.
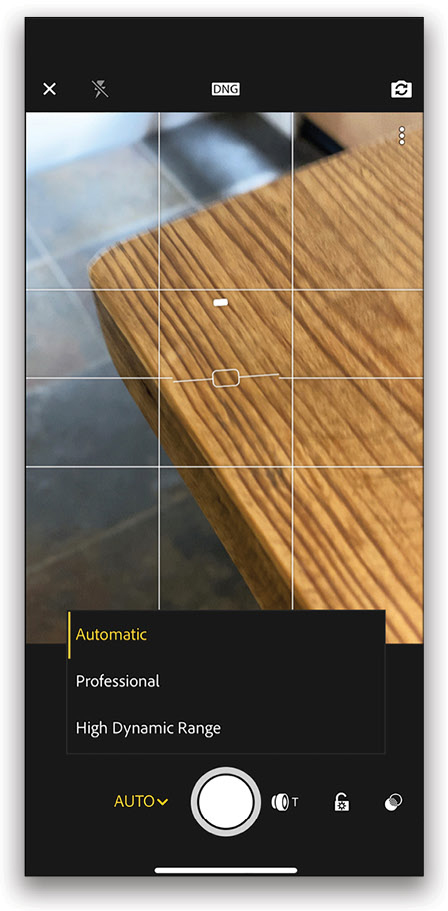
For those of you using your phones (no shame in that, I shoot 10 images on my iPhone for every one taken on my Leica or Sony!), I highly recommend Lightroom Mobile. Not only will your images be stored in a container where you can access the originals from anywhere (mobile, desktop, web), but using Lightroom’s camera module, you can capture a RAW DNG file (yes, from your iOS or Android phone!).
Stabilization: When possible, stabilize your camera with a tripod or by setting it on a stable surface. The best glass is wasted on camera shake, which is to say that expensive lenses, especially when deployed for landscape, portrait, or other controlled environments, are useless if the image quality is compromised by handholding. The best way to ensure a sharp image is to methodically focus, stabilize, and to actuate the camera with a remote shutter release or self-timer. Is this slower? Yes, but slower, more deliberate images will often yield better compositions, and I promise that three fixed legs are far steadier than your (hinged) two.
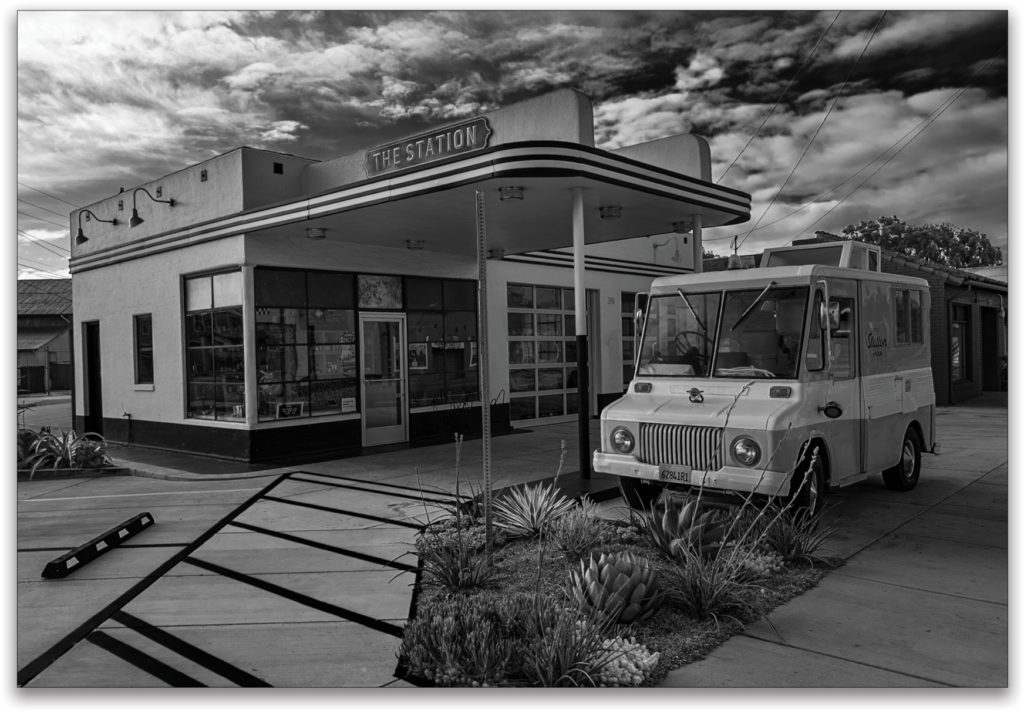
HDR: While often implemented as eye-bleeding, extreme color conversions, high-dynamic range (HDR) images generate incredible monochromatic images. To create an HDR image, shoot three or more images: one a stop or two underexposed, one at the suggestion of the meter, and the last slightly overexposed. I’d err on capturing highlight details, so I’d either capture two underexposed images or underexpose that image by two stops. Both Photoshop and Lightroom do a great job of aligning and blending HDRs!
ISO: If you have the option of overriding your ISO (or “film speed”), electing a low setting will ensure the highest fidelity (lowest noise) image. Yes, this goes hand in glove with the need to stabilize your captures. In the event that you do use a higher ISO (most cameras show their limitations in the form of excessive noise, north of 1600), know that a black-and-white conversion can take your blotchy, color noise and render it into an almost film-like, grainy image.
Seeing in B&W
In the film days, we had to make a conscious, deliberate decision to shoot in color or black-and-white, and there was a mindset that went with the decision to remove color. With a digital source, we aren’t locked into color or black-and-white. In fact, we can have both but, as it pertains to getting your best work, whether it’s capturing or editing, you want to keep a few things in mind.
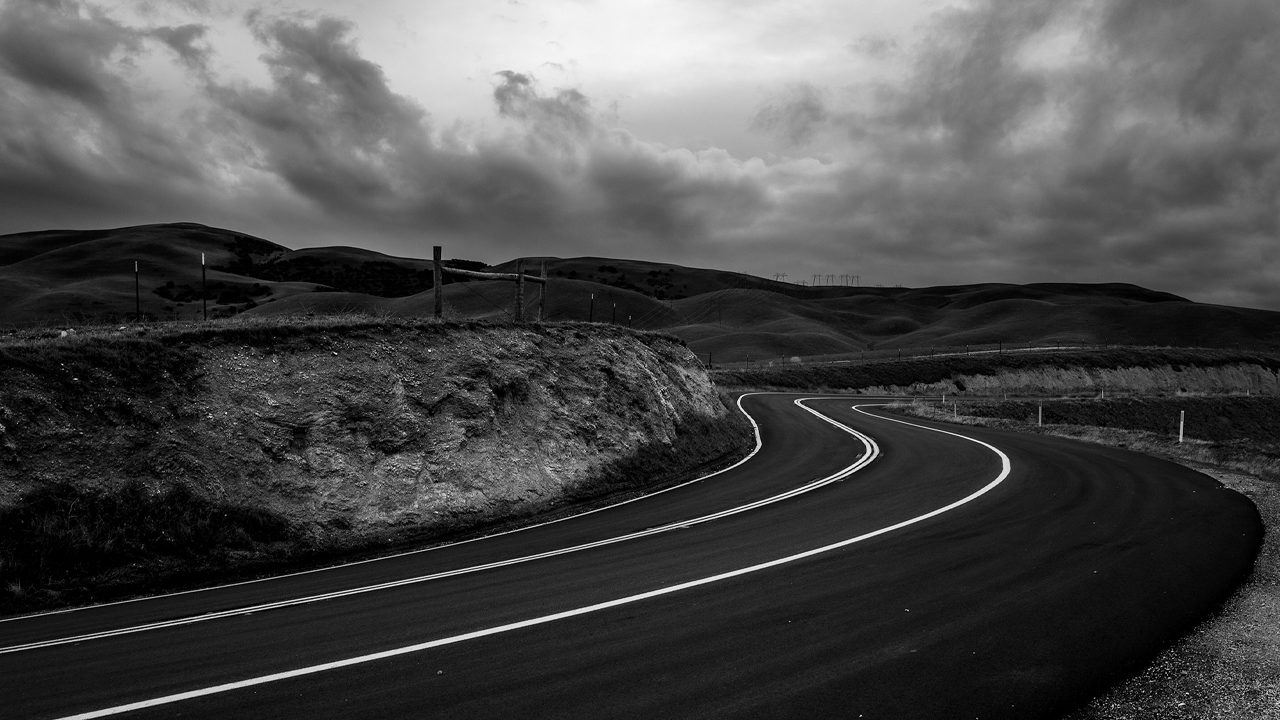
Contrast: Those iconic black-and-white landscapes all pop with clear separation between tones such as dark skies and puffy white clouds. Overall contrast is important. Contrast between similar tones is also key to your subject not getting lost in the conversion. Look for separation in tones, especially with key elements of the image. Look for contrast!
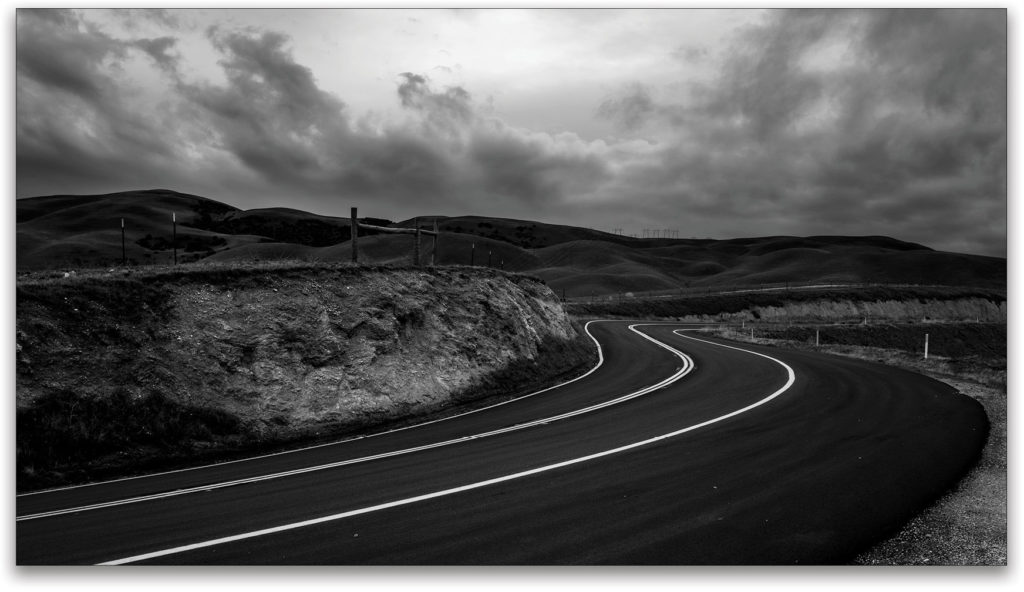
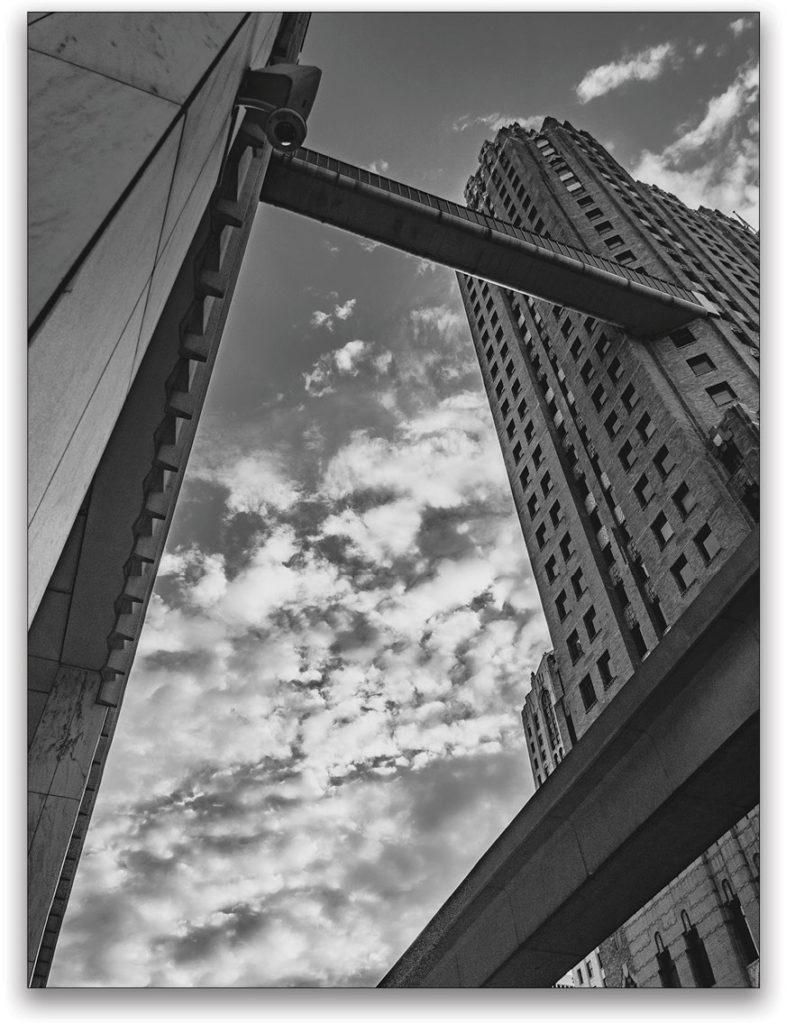
Lines: Distracting power lines, cracks, shadows, etc. can actually become strong elements in your black-and-white conversions. Imagine how that content will lead your viewer’s eye through the frame.
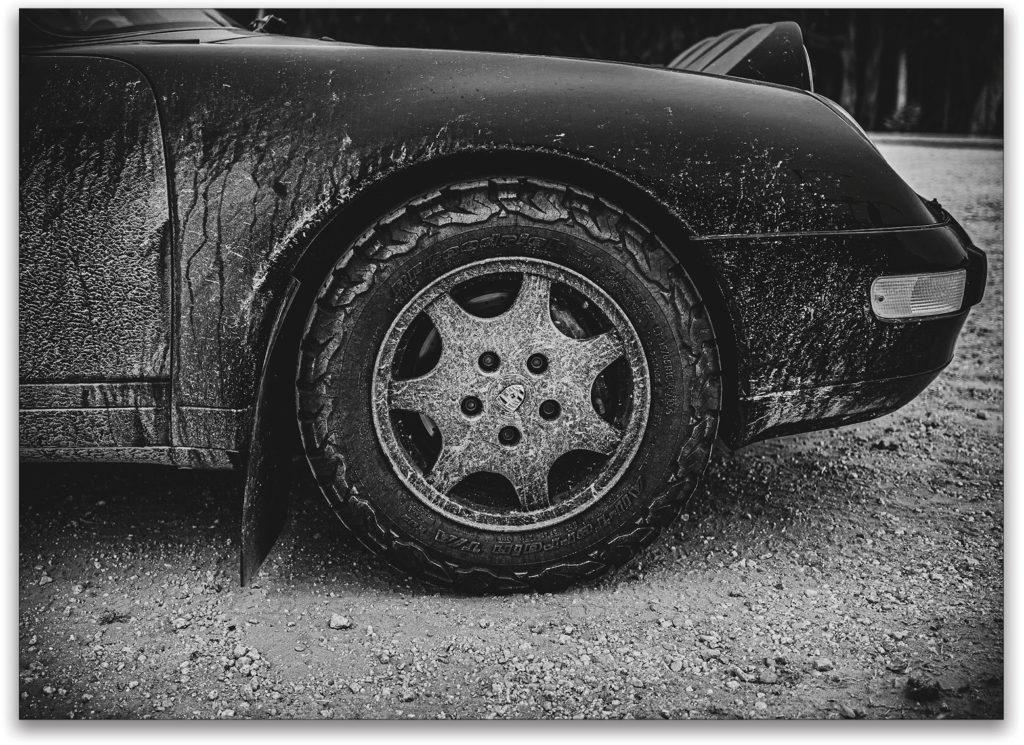
Texture: Black-and-white is especially well-suited for “crunchy” texture. Natural elements such as sand or bark, aggressively edited, can work in a way that we wouldn’t tolerate with color. But in the other direction, soft and glowing skin becomes ethereal. Black-and-white gives you permission to explore the extreme edges of image editing, as you’ve distilled the photo to its most basic elements. While texture is often enriched in the edits, you want to be mindful of it in your capture.
Reparation
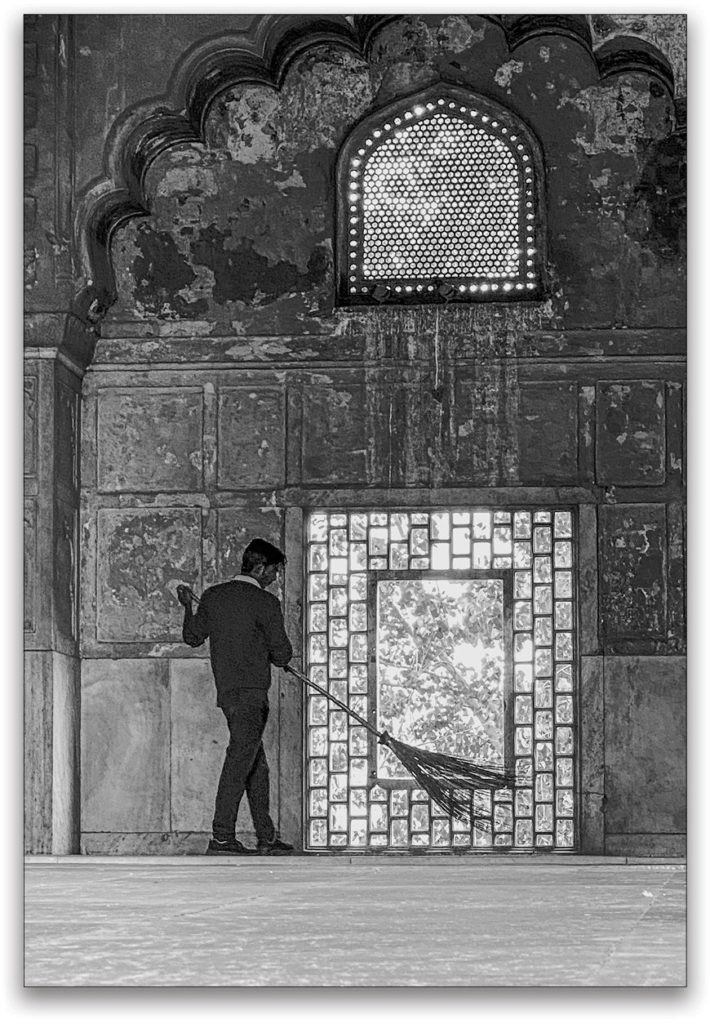
I can’t tell you how many times I’ve used black-and-white conversions to solve a complex editing problem, such as the blue cast of an overhead tarp or the frustration of mixed light sources. Monochromatic images can also be great tools for noisy files, distracting backgrounds, ruddy skin, or harsh lighting. In this example, I had harsh warm light, noisy shadows, and a difficult edit to balance. Removing color turned the artifacts into simple elements of a more pleasing image.
Edit in Color: A Crash Course in Adobe Camera Raw
Okay, now that we have our heads around best practices and vision, let’s get into the fun stuff. What follows are the most efficient and most powerful methods of producing great black-and-white images in Photoshop. As with all things Photoshop, there are many off-ramps, but I’ll do everything I can to pack the aforementioned book into this short article!
RAW files will automatically take you into Camera Raw. In addition, in Camera Raw Preferences, you can default JPEG and TIFF files to open there. Just go to Photoshop (PC: Edit)>Preferences>Camera Raw, and click on File Handling on the left of the dialog to find these options. For all other files, select Filter>Camera Raw Filter. If you convert a video file to a smart object, you can do all of the following steps to video in Adobe Camera Raw, as well!
Whether you’re shooting in RAW or working from an old color scan, Adobe Camera Raw (ACR) is where you’ll be starting your journey and spending most of your time. As Camera Raw is a plug-in, it’s one of Photoshop’s app-within-an-app, and it’s tremendously powerful (it also has parity with Lightroom’s Develop module, so know that the steps here carry over, if that’s your processor of choice).
It’s critical to edit as far as possible in color, for a couple of reasons: first, you might end up liking the color version better, and second, you’ll have more information to edit with before simplifying the image to gray tones.
[KelbyOne members can click here to download the image we’re using here to follow along.]
The Power of Creative Profiles: Creative profiles are the most powerful black-and-white conversion method in your arsenal, but they’re easy to miss. I mention them here because they’re fast, largely unknown, and immensely powerful. If you want to convert your image quickly to a stunning monochrome, or if you just want to see how it might look, in Adobe Camera Raw, navigate to the upper-right, and select Browse in the Profile drop-down menu (or click on the icon to the right of the drop-down). Expand the B&W set, and enjoy some truly beautiful creative interpretations of your image.

These aren’t presets, rather the method that ACR uses to convert the color of your image. As such, these are special because all of the other adjustments in ACR will complement them. I mentioned earlier that we should first edit as far as possible in color, but now you understand this fundamental step and how it can be used for quick effects or previews in the future. Let’s skip this step in our edit for now—don’t worry, we’ll be back! Revert the image back to the Adobe Color profile and let’s move on.
Rethinking Auto: Those of us who’ve been shooting (or editing) for a while are programmed to stay away from anything that purports to know more than we do; however, Auto in ACR is an exception. Auto is powered by Adobe Sensei, powerful machine learning that gives you an intelligent, dynamic series of adjustments in one click. Auto will adjust eight tonal parameters much faster than you can; this should be your first step—always.
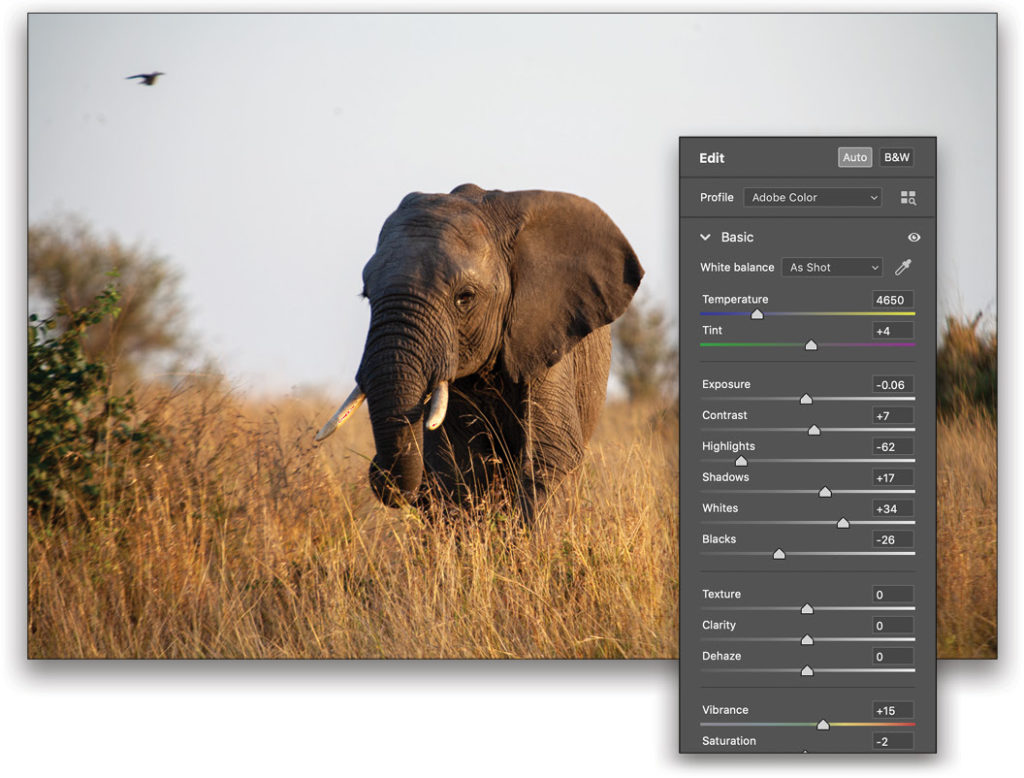
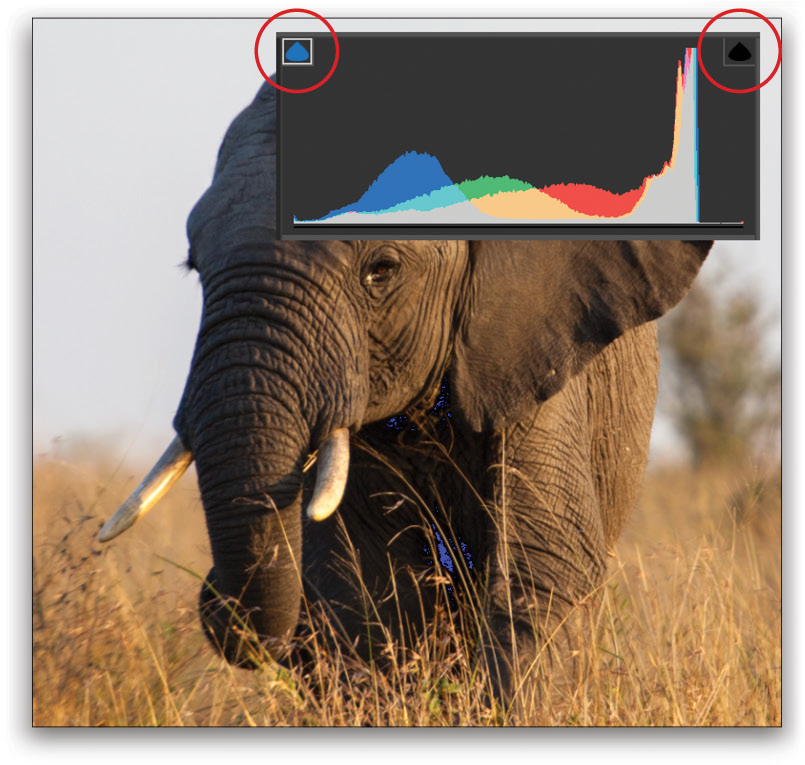
Season to Taste: From here, your tonal adjustments should be finesse: Highlights to recover the brightest detail, Shadows to open up the darkest areas, and Whites and Blacks to massage the extreme ends of your exposure. I encourage you to “season to taste” and consider what looks good to you. As you do, though, take into account clipping (the areas in the shadows or highlights where information is being lost). The clipping preview can be toggled by the arrows at the top of the Histogram in the upper right.
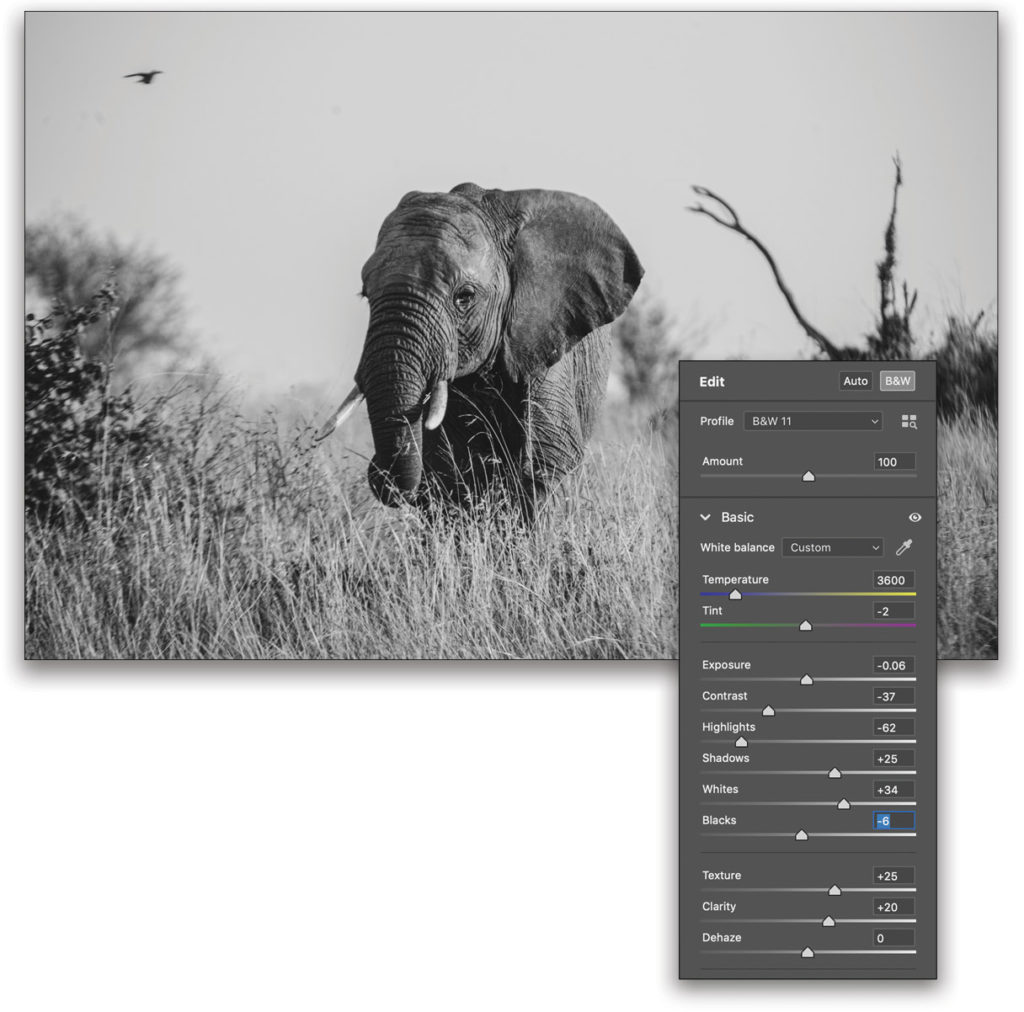
Texture, Clarity, and Dehaze Effects: Texture is the new kid on the block. This slider does just what it says: It increases or decreases “crunchiness,” which is very handy with what will soon become our black-and-white image.
Clarity amplifies (or minimizes, when taken to the negative) midtone contrast. We used to call this “punch,” as that’s what it gives to your image.
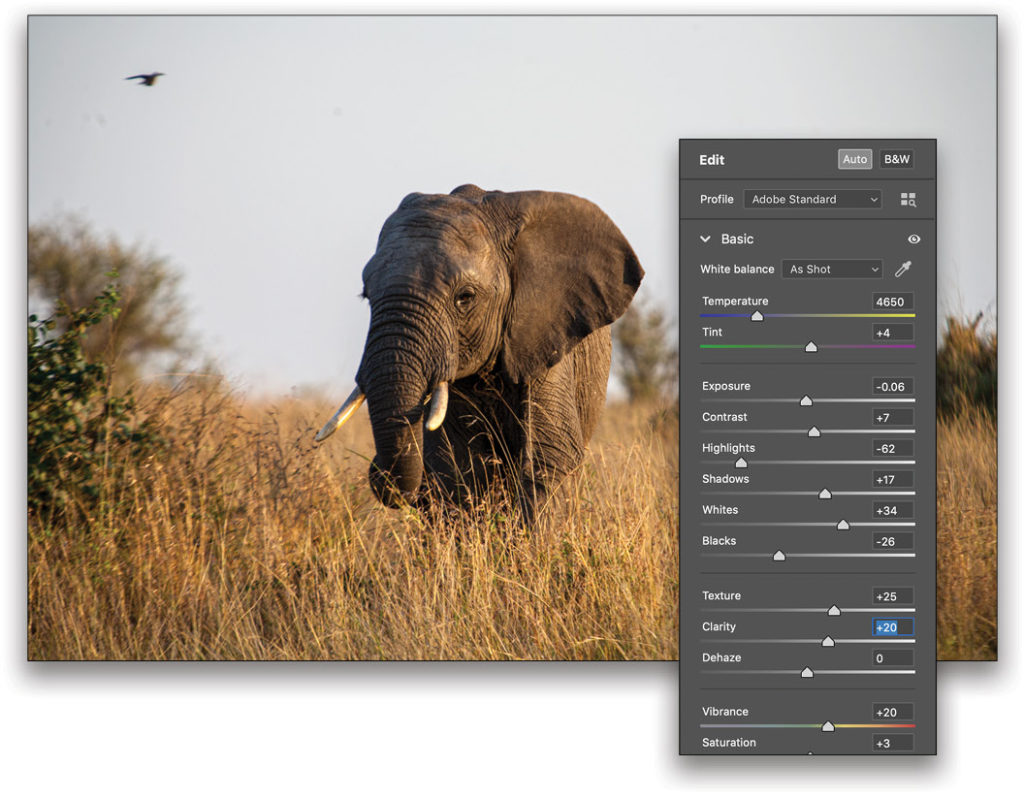
Think of Dehaze as a digital polarizer, one especially adept at minimizing atmospheric haze. Each of these powerful tools can easily be overused, so tread lightly. Dehaze can introduce contrast, so I’ll often add Dehaze, then move it back to reduce contrast.
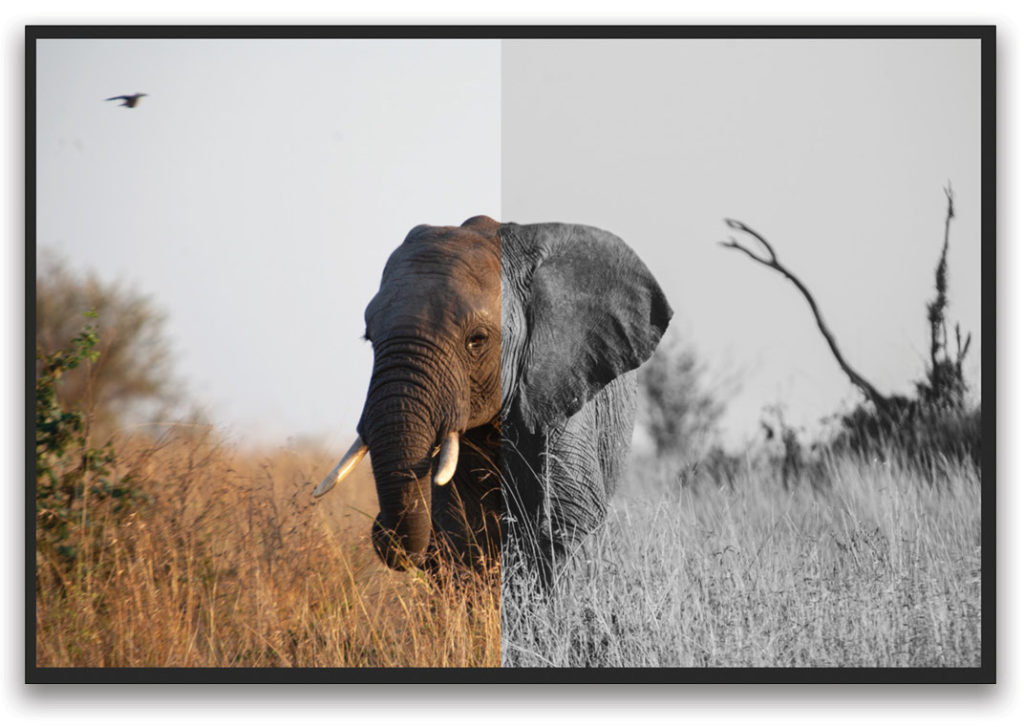
This is a good place to remind you that ACR supports both global and selective edits. With these effects, in particular, it might be that you want to apply them to just a portion of your image. For the sake of this image, I made the elephant’s skin pop with a bit of global Texture and Clarity, and elected to save Dehaze as a selective operation.
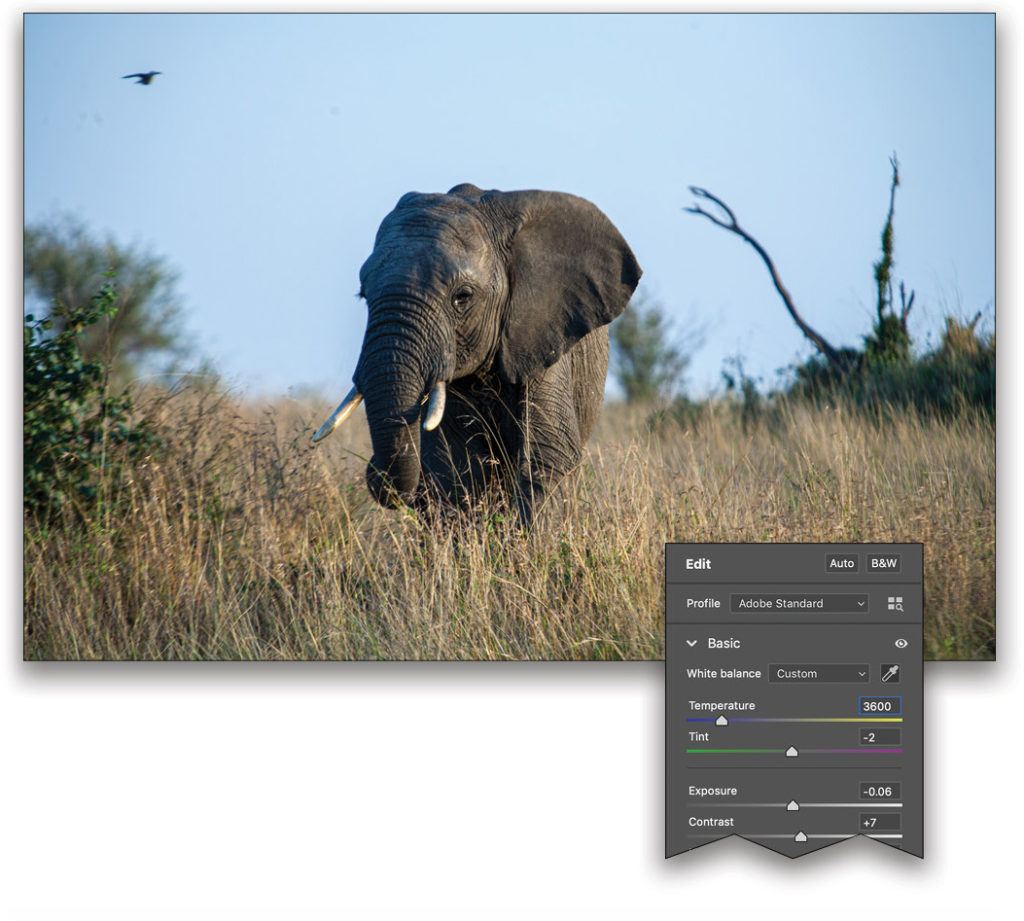
White Balance: While not intuitive, color Temperature and Tint are key to both color and black-and-white edits. The best way to set both is to use the eyedropper to the right of the White Balance drop-down menu in the upper-right of the Basic panel and find a neutral (gray, ideally) tone in your image. This might take some clicking around but it will be obvious when you’ve landed on the right spot (or the wrong one for that matter). This step isn’t always necessary, but as you can see with the elephant, it very much was in this case! Further refinement of Temperature (think of this as shade vs. sun) or Tint (color cast) can be used to produce a neutral, accurate, and/or pleasing result.
Finally, Black-and-White
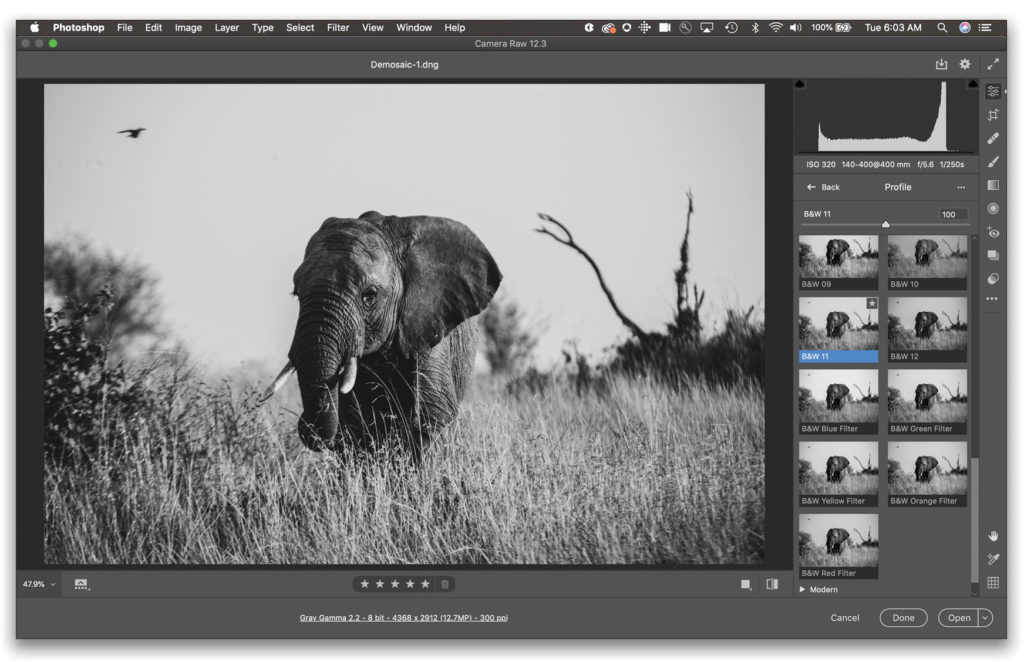
Now we’re ready to make our conversion! At this point you can navigate back to the B&W profiles in the Profile Browser, and choose the one that best suits your image. As you do this, look at your subject, while considering the effect that the various color conversions have on the rest of your image. I chose a very film-like B&W 11.
Reassessing the File: The creative profile has transformed my image, but it’s also introduced a couple of problems: the image is now more high-contrast and I’m missing some information in the shadows. To remedy these, I’ll boost the Shadows recovery, minimize the Contrast, and adjust the Blacks (those most egregious dark values in my image). It’s not unusual to track back to those initial edits, as we create a beautiful black-and-white image.
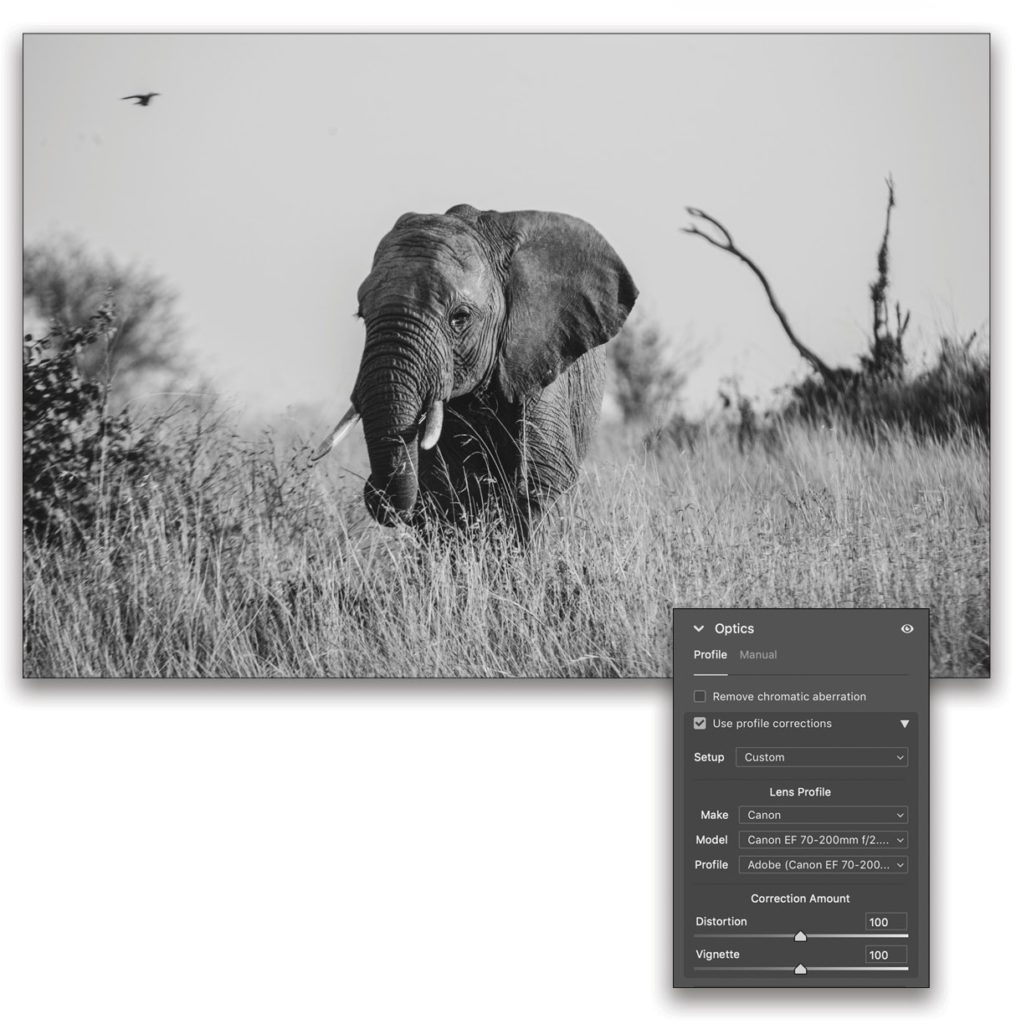
Finishing touches in ACR: All lenses produce some form of distortion: chromatic aberration (color fringing) and vignetting. To combat those, we’ll use the power of lens correction profiles found in the Optics panel of ACR. In the case of the elephant, I needed to manually select the Make (Canon) and Model (70-200/2.8 with a 2x converter). To access those drop-down menus, click the disclosure triangle to the right of Use Profile Corrections. In most cases, Auto will do the work for you here.
Finishing Up in ACR
One thing I could have done, but didn’t, in this image was use the Split Toning panel to sepia tone the final product (ACR would be a good place to do that). I also highly recommend ACR for noise reduction but, for the most part, I’d leave sharpening and spot removal to Photoshop.
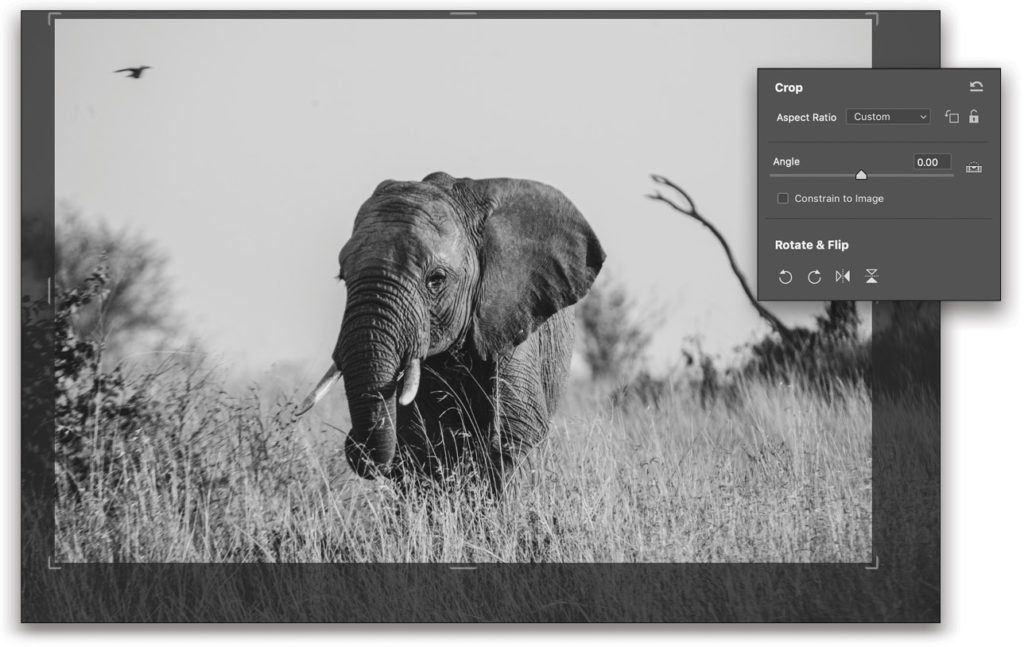
Cropping is the last edit I’ll perform in ACR because, like all things Camera Raw, it’s nondestructive. If I change my mind later, no problem! Press C for the Crop & Rotate tool. For my crop, I’m considering the placement of my subject, any distracting content, and any problems in the image which could be easily solved by omitting them. You may choose to crop upfront, or have an idea of what your fixed, final proportions are.
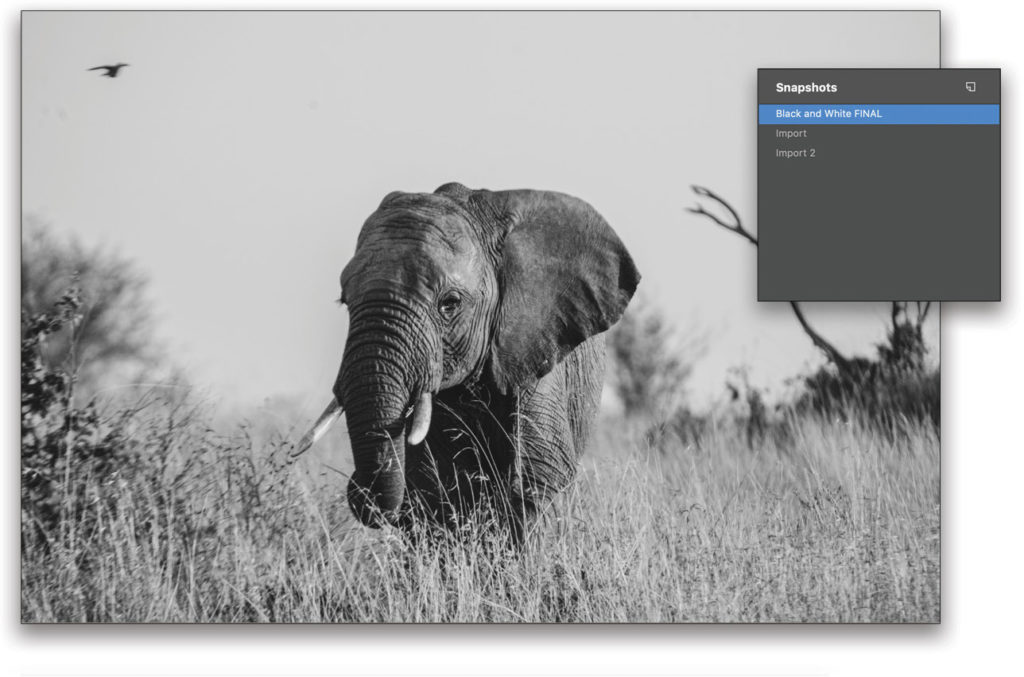
Speaking of changes, now would be a great time to make a snapshot of this particular state of the image because you may need to provide a color image later. A snapshot will make moving between states much easier and will allow you to assess one against the other, quickly and easily. To add a snapshot, press Shift-S to switch to Snapshots, click on the Create Snapshot icon, name it, and click OK. Note: If you’re using the download file, you’ll notice it already includes a snapshot of my final B&W state.
Now you can click Open to move to Photoshop.
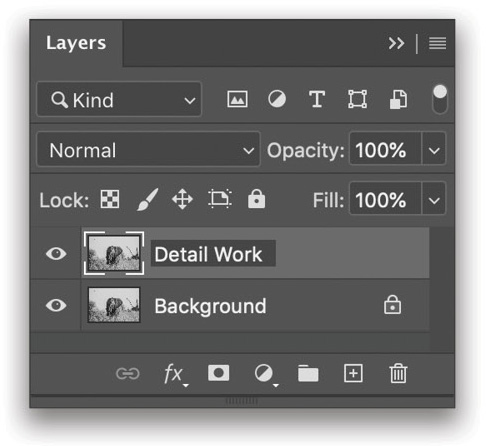
Pixels: Now that our elephant has been converted from a RAW file to actual pixels, let’s leverage Photoshop to finish it off. Photoshop is the gold-standard for many aspects of your black-and-white workflow; in this case, we’ll use it to remove spots, sharpen our image, and add a basic frame. The first step, before applying any destructive edits (those which manipulate pixels), should be to duplicate the layer and work from that. This way, should you choose to undo the edits, or want to visualize the image without the edits, you’ll have a flexible path backward. Press Command-J (PC: Ctrl-J) to duplicate the layer, and then double-click the new layer’s name and rename it. Here I’ve renamed mine “Detail Work.”
Removing Spots: In this shot, I had some minor sensor artifacts visible in the sky. To combat these, zoom in 200%, switch to the Spot Healing Brush tool (J), set it to Content-Aware in the Options Bar, and then paint over the spots to quickly remove them. In the event that this doesn’t work, try a smaller brush, or try the Patch tool (nested below the Spot Healing Brush in the Toolbar), which will allow you to select the spot and then drag the selection to define your source.
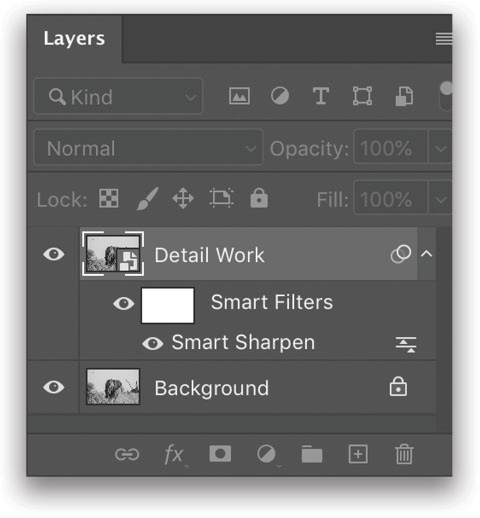
Sharpening: There are many ways to sharpen, but I’m going to show you the only two you need to know. Let’s start with global sharpening. We’re going to first navigate to Filter>Convert for Smart Filters, which will essentially give us a “filter layer,” or the ability to change the parameters of the filter after the fact! Once you’ve converted to a smart object or smart filter, go to Filter>Sharpen>Smart Sharpen.
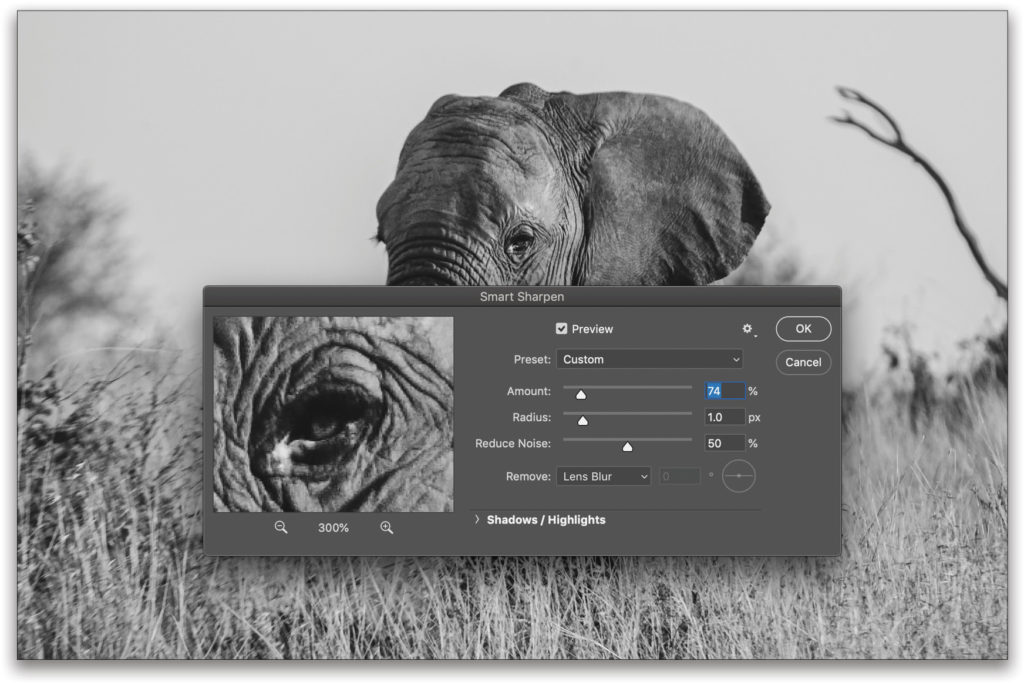
I chose a 300% preview of an area I knew to be in focus (the elephant’s eye), and then applied a minimal sharpening Amount of 74% with a Radius of 1 pixel, and a healthy amount of Reduce Noise (this is a 12-megapixel capture from many years back, and sharpening can make the image and the noise pop!). The advantages of Smart Sharpen vs. Unsharp Mask are: a better preview, a better algorithm (Lens Blur vs. Gaussian, though Gaussian is there, if you like, in the Remove drop-down menu), the ability to adjust the strength of the effects in shadows or highlights (click the disclosure arrow to see those options), and the ability to save your work in the form of a preset (choose Save Preset in the Preset drop-down menu).
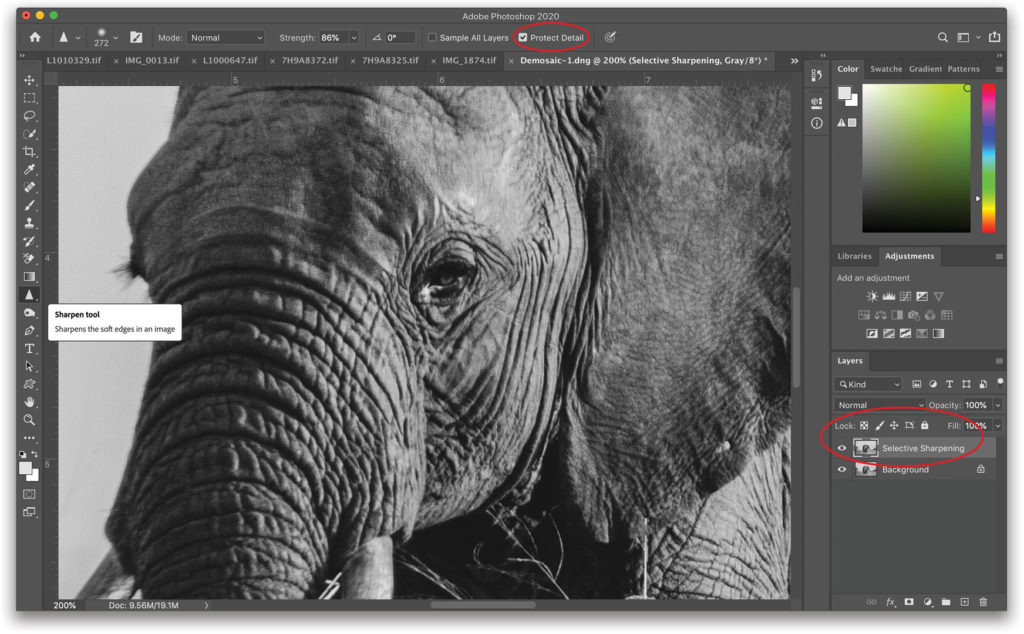
Selective Sharpening: Let’s look at the workflow for selective sharpening. Delete the smart filter layer, dupe the original layer again (recall what I said about this step being key for destructive pixel edits), and rename it “Selective Sharpening.” In the Toolbar, select the Sharpening tool, which is nested below the Blur tool. (I know what you’re thinking, this is the “artifact tool.” Well, not with Protect Detail checked on in the Options Bar.) Gently paint the areas you want to selectively sharpen. There’s no need to mask; just enjoy a very sophisticated method for sharpening, only where you need it. As with any sharpening operation, I recommend treading lightly and at a zoom of at least 100%. You can also control the amount of sharpening the tool applies by adjusting the Strength setting in the Options Bar.
Selective Sharpening: Let’s look at the workflow for selective sharpening. Delete the smart filter layer, dupe the original layer again (recall what I said about this step being key for destructive pixel edits), and rename it “Selective Sharpening.” In the Toolbar, select the Sharpening tool, which is nested below the Blur tool. (I know what you’re thinking, this is the “artifact tool.” Well, not with Protect Detail checked on in the Options Bar.) Gently paint the areas you want to selectively sharpen. There’s no need to mask; just enjoy a very sophisticated method for sharpening, only where you need it. As with any sharpening operation, I recommend treading lightly and at a zoom of at least 100%. You can also control the amount of sharpening the tool applies by adjusting the Strength setting in the Options Bar.
Framing our Image
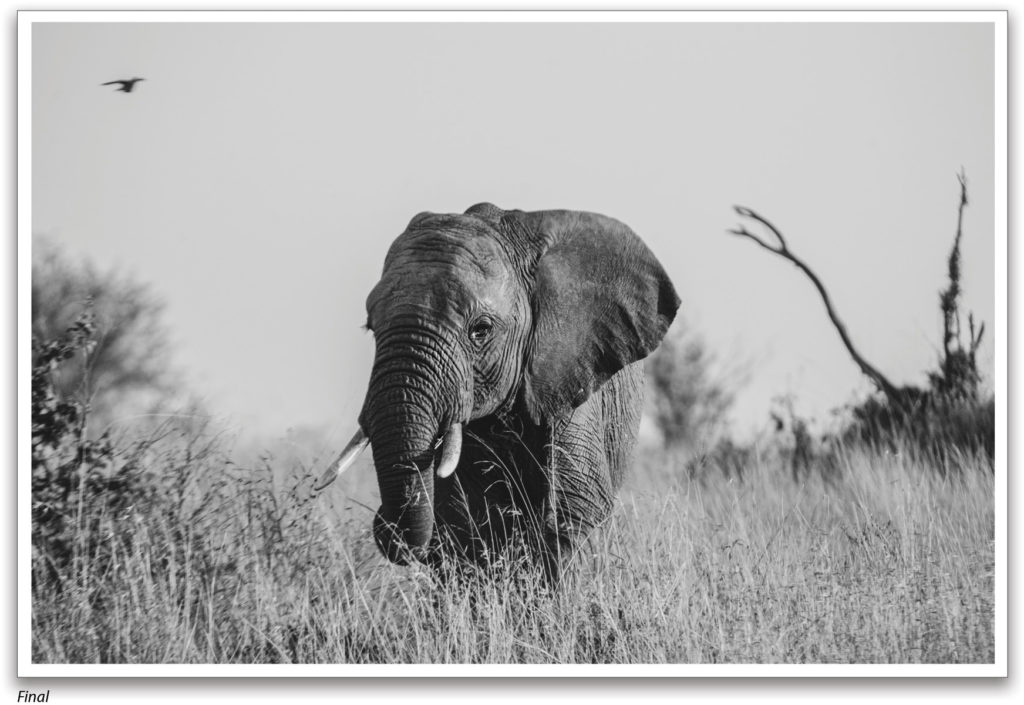
There are many different plug-ins, tricks, and effects to create a frame, but for most of my black-and-white images, I just want a narrow white border. This would be less desirable if the edges of the image were white, but in the case of the elephant, it should be a nice finishing touch.
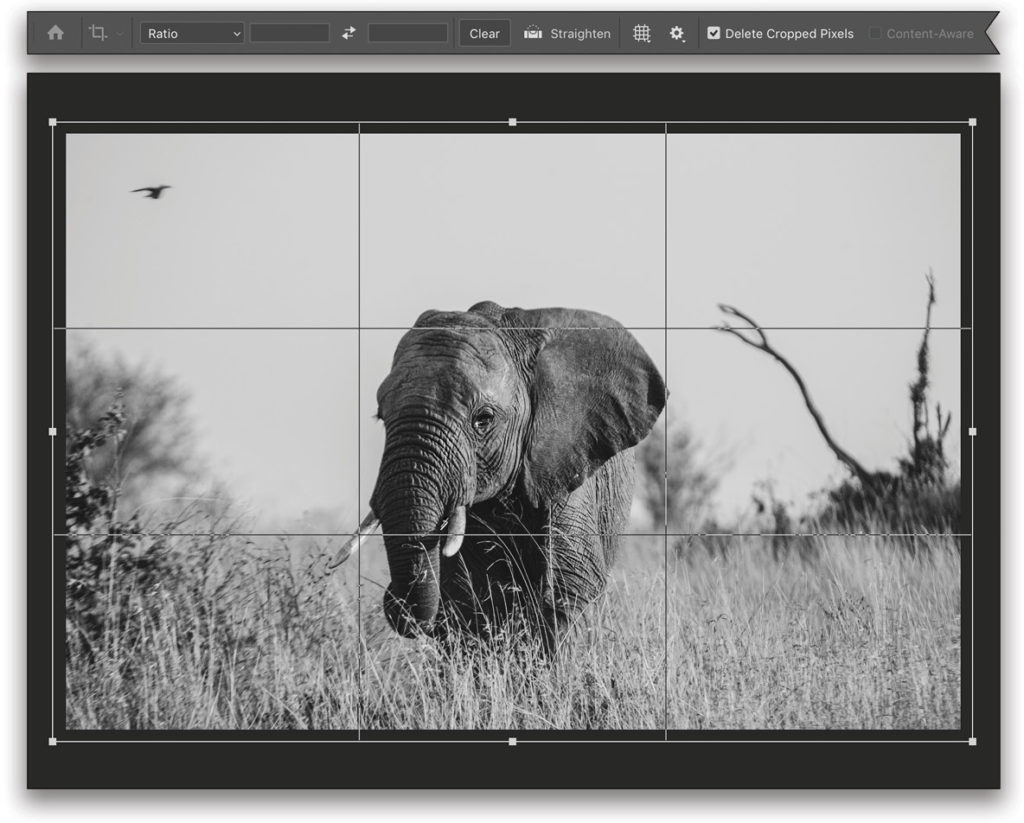
My preferred method is to press D to set the Background color to white, select the Crop tool (C), and with a boundary drawn to select the entire image, pull the edges away from the photo. This workflow allows you to see a rule-of-thirds overlay and dimensions, plus it provides a way to easily trim the border, should you go too far.
Tip: Set the aspect ratio drop-down menu in the Options Bar to Ratio, click the Clear button to remove any dimension settings, and then Option-drag (PC: Alt-drag) a corner point of the crop border to adjust all the sides at the same time from the center.
Black-and-White for Non-RAW Files
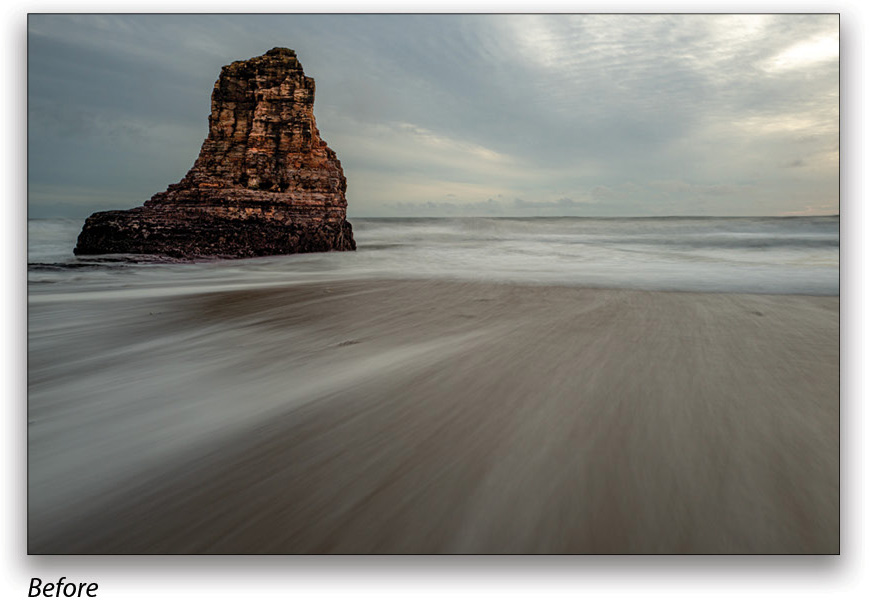
Photoshop itself offers many ways to convert images to black and white and, like many features, they show Photoshop’s evolution over the course of more than three decades. Beyond ACR (which I clearly love), the other method I advocate is the Black & White adjustment layer in Photoshop. As before, the first steps here are to use your color-correction methods of choice to edit your image, assuring balanced tones and confirming that you do, in fact, want to remove the color from the image. Here’s our color-corrected, starting image.
Black-and-White Adjustment Layers: Navigate to the Black & White icon (half-black/half-white square) in the Adjustments panel (Window>Adjustments), or go to Layers>New Adjustment Layer>Black & White. You’ll notice that, by default, there’s contrast between the color channels, which ensures clear separation of tones. Clicking Auto in the Properties panel (Window>Properties) will further refine the adjustments based upon the colors in the image.
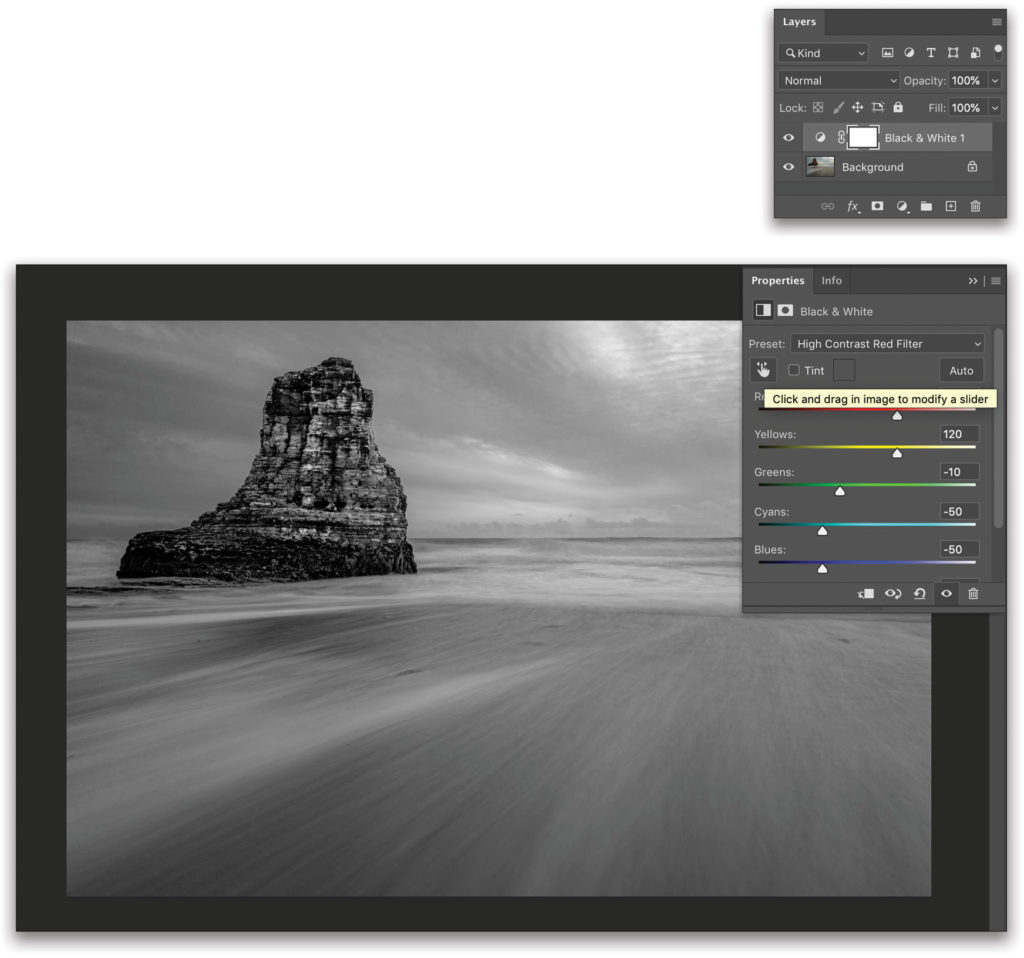
From here, you can elect to try a preset from the drop-down at the top of the Properties panel: High Contrast Red Filter is my choice for this image. From here, you can refine the individual colors. Rather than guess at the color value, select the finger-pointing icon in the Properties panel, and click-and-drag side-to-side on the tone you want to adjust in the image. You’ll see the associated color slider change as you drag in the image.
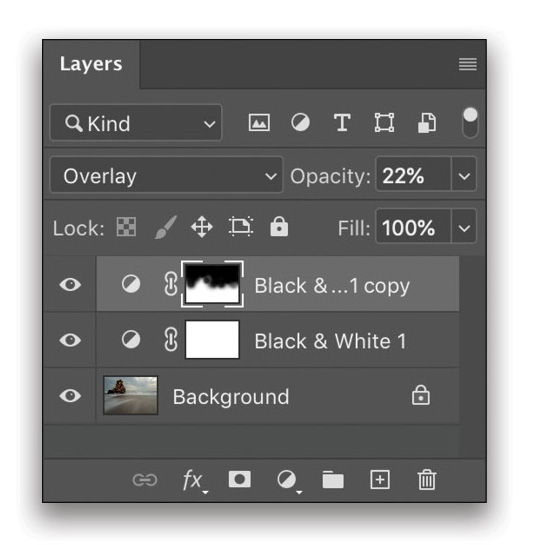
Blending Modes and Masking: Now let’s enjoy some of the magic of layers. Duplicate the Black & White adjustment layer by dragging it onto the Create a New Layer icon (+ in a square) at the bottom of the Layers panel. Now you can experiment with the dramatic changes enjoyed via blending modes (also found in the Layers panel at the top left).
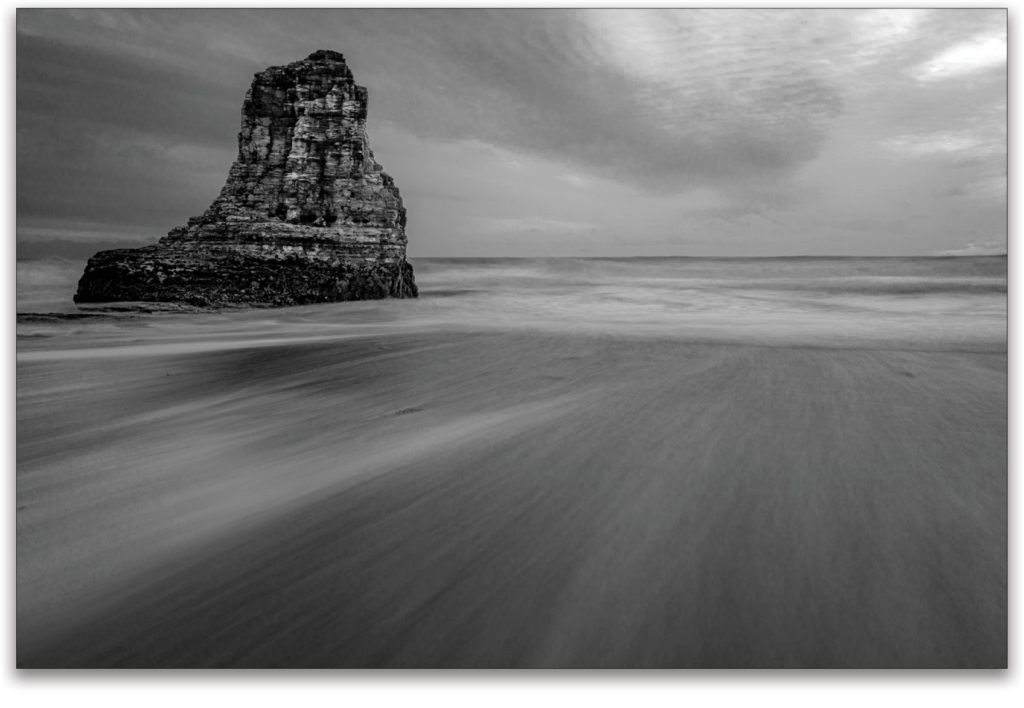
I chose the dramatic Overlay blend mode and reduced the layer’s Opacity to 22%. Lastly, let’s apply this selectively. To do this, click on the layer mask thumbnail of your new, blended layer so it’s active in the Layers panel. You can now select the Brush tool (B); set it to a soft, black brush (press D then X); and paint to remove the effect. My mask keeps the Overlay effect on the foreground and rock, while removing it from the sky.
Dodging and Burning: Rather fittingly, dodging and burning are terms borrowed from the darkroom. These workflows were used to selectively lighten and darken portions of a photo. To do this in Photoshop, select an image that you’ve already converted to black-and-white and duplicate the layer (as we would with any brush-based, pixel edit). Now navigate to the Toolbar and select the Dodge (to lighten) or Burn (to darken) tools (O). In the Options Bar, choose a mid-sized, soft-edged brush; set the Exposure to 40% or less; choose the region you want to darken or lighten (Shadows, Midtones, or Highlights), and ensure that Protect Tones is checked. Now paint away!
I hope you’ve enjoyed this crash course in capture, RAW-processing, color, B&W, and Photoshop. The fundamentals we’ve covered here can be applied to so many aspects of your photography. Now it’s time to share, save, or perhaps even print your final work.

Archiving
If you shoot RAW, your original, high-res, high-bit-depth file is saved alongside your (infinitely editable) adjustments—it just works. If you convert your images to Adobe DNG, they’re (loss-lessly) smaller, easier to pass to other programs, and they contain the edit instructions (as opposed to a sidecar file, which must travel alongside the RAW file). Your edits will even be reflected in the DNG’s thumbnail. If your files make it to Photoshop, be sure to save a full-resolution, layered (if you used layers) copy of your black-and-white conversion in the Photoshop native PSD format.
Sharing
Sharing can mean many different things. Creative Cloud (or your cloud storage solution of choice) will facilitate both anywhere-access and full-resolution collaboration. If you need to email your image or send many, your choices are as follows: reduce the size, choose a format that will compress your image (such as JPEG), or do both. You can also convert your image to grayscale (Image>Mode>Grayscale), but only do this after all else is done and then flatten the image (Layer>Flatten Image). This will retain the same look, but will be devoid of all color channels and information. As a result, your image will be much smaller (roughly 30% of the original size!). These last methods are ideal for the web and social media, as well.
Printing
Entire books have been written on color management and printing. The subject is both incredibly technical and dependent upon a number of “handshakes” (hardware, paper, ink, operating system, monitor, and Photoshop, just to name a few). If the idea of controlling your own output is appealing, know that the technology has never been better. After many years of “enjoying” the creation of my own prints, I now send all of my work to an “outlab.” I can’t say enough good things about the services offered by both Bay Photo Lab and mpix. These companies offer fast, beautiful prints at any scale, on a variety of media, including a number of surfaces and treatments unique to black-and-white!
Parting Thoughts and a Gift
I hope that this article was helpful, and that wherever you are in your creative journey, there’s something of value for you here. I want to encourage you to shoot more and edit less, have fun, experiment, and make mistakes. Try to slow down and be deliberate in your photography, but keep it all in perspective, and don’t forget to pull your face out of the viewfinder and look around from time to time.
We’ve covered a lot, but if you’re hungry for more, I have something you might enjoy. A few years back I did my best to deliver Photoshop solutions to the most common problems in a series of free, short videos. You can find all of those, linked in one place, by clicking here.
Stay safe!
This article originally published in the September, 2020 issue of Photoshop User magazine.


