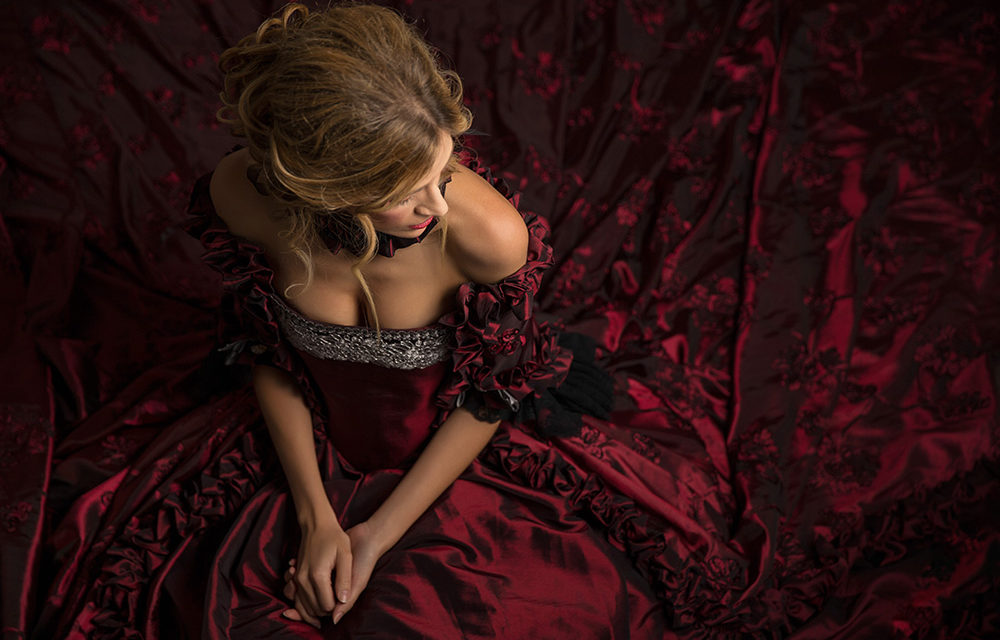
Above: The final image, on a super tight budget from start to finish
Here’s a behind-the-scenes look at a shoot I did for my “Location Lite: High End Low: Low Cost Budget” course here on KelbyOne, using incredibly inexpensive set-up, but with big-budget results.
I try and big and beautiful softbox any change I get (the bigger the light modifier, the more beautiful and wrapping the light), but the problem has always been that really big modifiers were really expensive. My first really big softbox was a 73″ Elinchrom Octa, but it sells for $1,299. It’s an awesome softbox (best I’ve ever used), but it’s also the most expensive softbox I’ve ever used, which is why Westcott’s 7’ Parabolic umbrella is such a bargain at only $99.
Since I was keeping an eye on the budget, I used an equally inexpensive hot-shoe flash — a Yongnuo YN-560 II speedlight (which sell for around $70 street price), and I triggered it using their wireless controller, the Yongnuo YN560-TX (which sells for around $45 street price). So, it’s a very simple, very inexpensive set-up, all sitting on an inexpensive light stand and tilt-bracket. Think about it — the entire lighting rig, including the flash, parabolic umbrella, wireless controller, and light stand, is less than $250. Pretty amazing. OK, now let’s put it all to work.
Figure 1: At the top of this post is the final image of our subject, lit with that single flash and parabolic umbrella. Another money-saving tip here is that we rented her dress for the shoot from dreamshootrentals.com. The idea behind the site is you can rent high-end fashion clothing and accessories that would cost thousands to buy, but the rental is just a fraction of that, and I use them fairly often (about every month or so lately), and it’s worked out really well, and helped us stay on budget.

Figure 2: This angle gives you a good view of the lighting set-up — you’re seeing the back-side of the Parabolic, because this is a “shoot though” so your flash shoots straight through the umbrella toward your subject. Westcott also makes a non- shoot-thru version of this umbrella where your flash fires into the umbrella and the light bounces back toward your subject. I not a fan of that style personally, the light seems to kind of go everywhere, so I feel you have much more control with a shoot-thru. TIP: You want to position the flash a few feet back from the umbrella to help the beam spread out a bit and fill the umbrella — if you get it too close to the umbrella, it doesn’t have room to spread so you’ll wind up with a harsher overall look, and a hot spot in the center of your umbrella (and on your subject). Although I didn’t do it here, if you want to soften and spread the light even further, you can add a diffusion cap over the front of your flash, but that eats up some of the power of the flash as well, so we left it off.
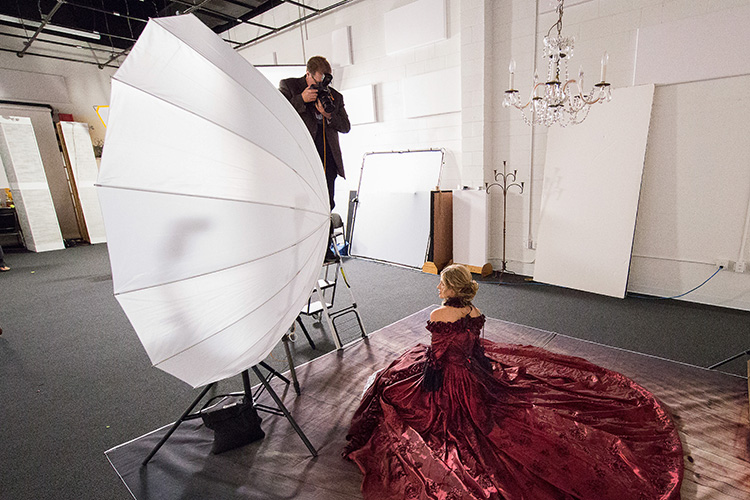
Figure 3: This view gives you a good look at where my subject is positioned. Interesting side note: the Stylist for the shoot kept saying “the dress is sitting funny — it just doesn’t look right — then finally it hits her: she goes over and asks the model how she’s sitting underneath that large dress, and she replies “cross-legged.” That was the problem! She asked her to change her pose to where she was sitting on her knees, and now the dress “laid out” correctly. That’s just one of the 100-reasons you want a stylist on the shoot. Our goal is to pull the dress out around her enough to where you don’t see anything but the dress — no floor whatsoever. Also, since my light is positioned way over to one side, I had to tell my subject to “play” to that light and . Otherwise, I would have a beautifully lit shot of her left ear.
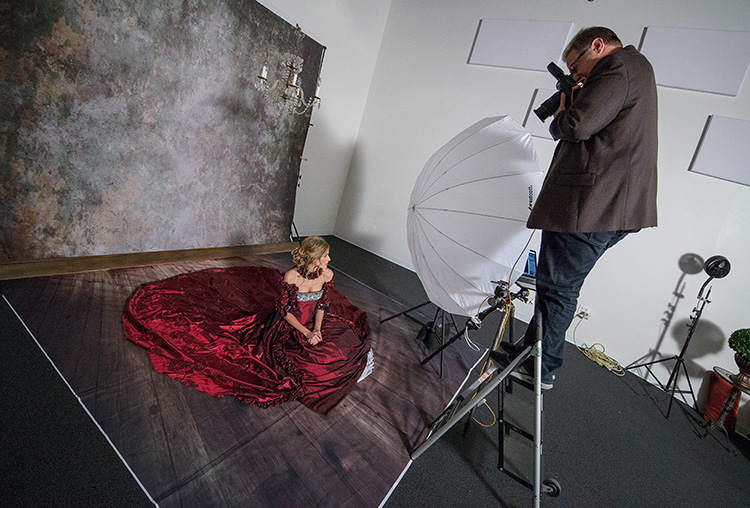
Figure 4: Here you can see my shooting angle. I tried standing on the floor, but I had to use a really wide angle lens to her and the dress all in the shot, and being that close to my subject she started to look a bit distorted. So, I pulled out this step ladder (it’s called a “Ladder Cart” because it’s both a step-ladder and rolling cart — made for carrying gear at location shots and wedding shoots. I tried the 2nd step up (I hate going any higher because I’m deathly afraid of heights and two steps is generally my limit), but I still couldn’t get the look I wanted while avoiding that wide angle distortion on just the 2nd step, so I had to go up one more to the dreaded third step (You can’t tell from the photo, but my knees are wobbling!). The lens I went with was a Canon 24-70mm, f/2.8 lens, and I zoomed out almost all the way out to 70mm (it was shot at 65mm. I nearly could have shot this with my beloved 70-200mm f/2.8).
When I shoot with flash like this, I always shoot in Manual mode so I can lock down the shutter speed, which is pretty necessary when shooting hot shoe flash because if your shutter speed gets above 1/250 of a second, your flash gets out of sync with your shutter and you’ll start to see a dark gradient appear across the bottom of your image. . I tried to limit the ambient light (we had two video lights on during this shoot because it was being taped as part of an online class for the KelbyOne Online Training Community), so I used a shutter speed of 1/160 of a second (the higher you go toward that 1/250 of as second, the less ambient room light is seen in your flash photo).
My ISO was set at 100 for the cleanest possible image (when I’m shooting flash, I’m almost always at 100 ISO since I know the flash will freeze any minor movement on my part or the subjects). My f/stop was set at f/2.8 because I wanted the dress behind her to be a little out of focus if possible. At 65mm you’re not going to get a very shallow depth-of-field. I would have had to climb a much higher ladder and use a 70-200mm at 100mm or tighter to get that really nice soft background, but as you now know, there was no way that was going to happen [see scared of heights], so I’ll take the minor blurring f/2.8 can bring at just 65mm (by the way: an out-of-focus background is more than just f/stop. It’s f/stop + zooming in).
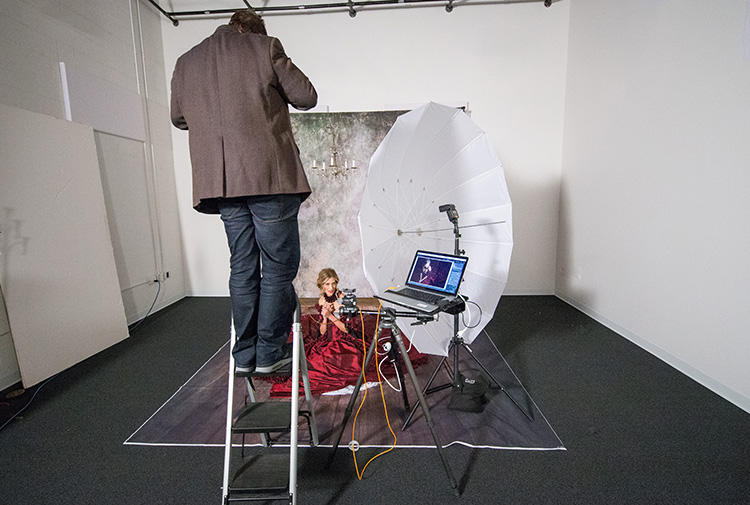
Figure 5: Here you can clearly see I’m shooting tethered into my laptop — going straight into Lightroom CC . That way I can see much larger previews of my images as they’re taken, rather than judging how my images look on that tiny 3” monitor on the back of my camera. By tethering I can see every image come at a very large size, full screen on a 15” monitor, and it helps me make better decisions on focus, lighting, posing, you name it. A huge advantage!.
The orange tethering cable comes from Tethertools.com — it’s orange to help you see it it a dimly lit studio, and it’s much longer than the USB connector cable that comes with your camera. The table holding my laptop comes from Tethertools tool, but the bar that holds it all is the Manfrotto 131DDB Tripod Accessory Arm for Four Heads. It holds a bullhead on one side, and my laptop holder on the other.
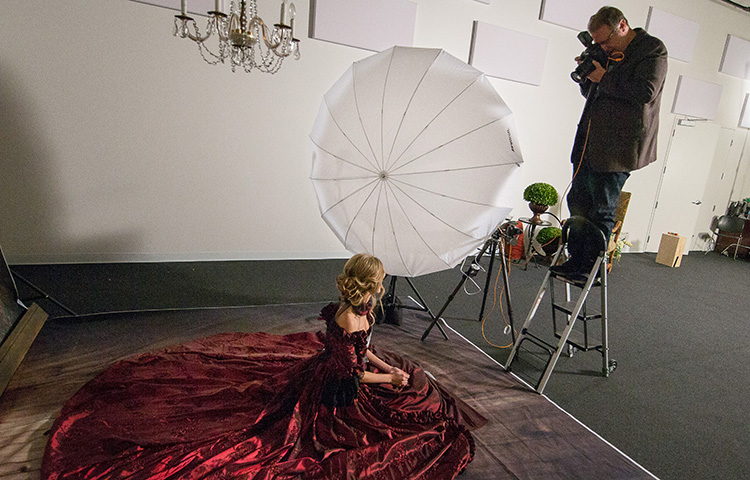
Figure 6: The last piece of this puzzle is the power of the flash. My goal was to make the lighting look natural and really subtle, so I started at just 1/2 power (which is pretty low when you’re using this large of an umbrella) and I actually look it lower during the shoot (remember — I can lower the power of the flash, in 1/3 stop increment, using the controller sitting on the Hot Shoe mount on the top of my Canon DSLR, so I don’t have to climb up/down the ladder — it’s all controlled from my shooting position).
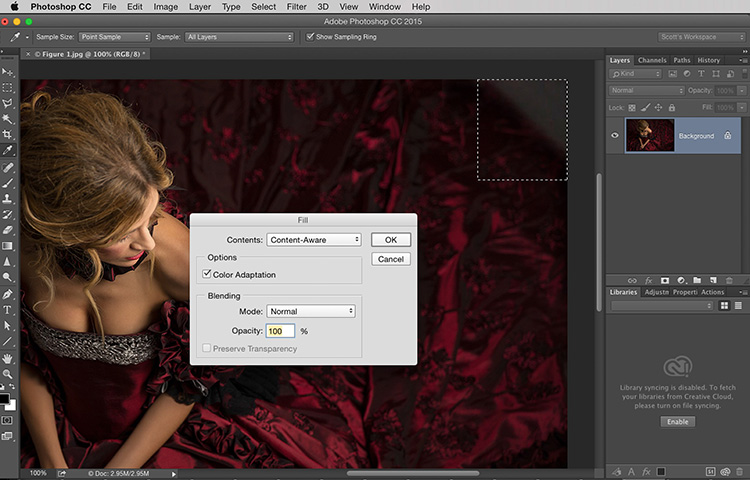
Figure 7: One thing I missed (because I was so focused on the lighting and capturing the gesture of the subject), is that the way I composed it, the top right corner of the dress didn’t fully fill the frame (you could see some of the floor, instead of just the dress). Luckily that was a quick fix in Photoshop. I put a rectangular selection around the area I missed (seen here), then I went under the Edit menu and chose Fill. When the dialog box appeared, I chose Content Aware from the “Use” menu and clicked OK to fill the gap with more of her dress. When you chose Content Aware like this, it uses the surrounding area to help make a “smart” fill, almost like you cloned over it, and here it did a pretty brilliant job (as it often does).
So, there ya have it. One light. One huge light modifier. One tiny lighting budget.
Here’s a link to the full class in case you want to watch it right now.


Cleveland was life changing! A powerful call to be a true man of God by real men and their life stories and experience! 3rd or 4th PK for me and I have been blessed! Thank you for a personal revival! Sinlorecy,Redney