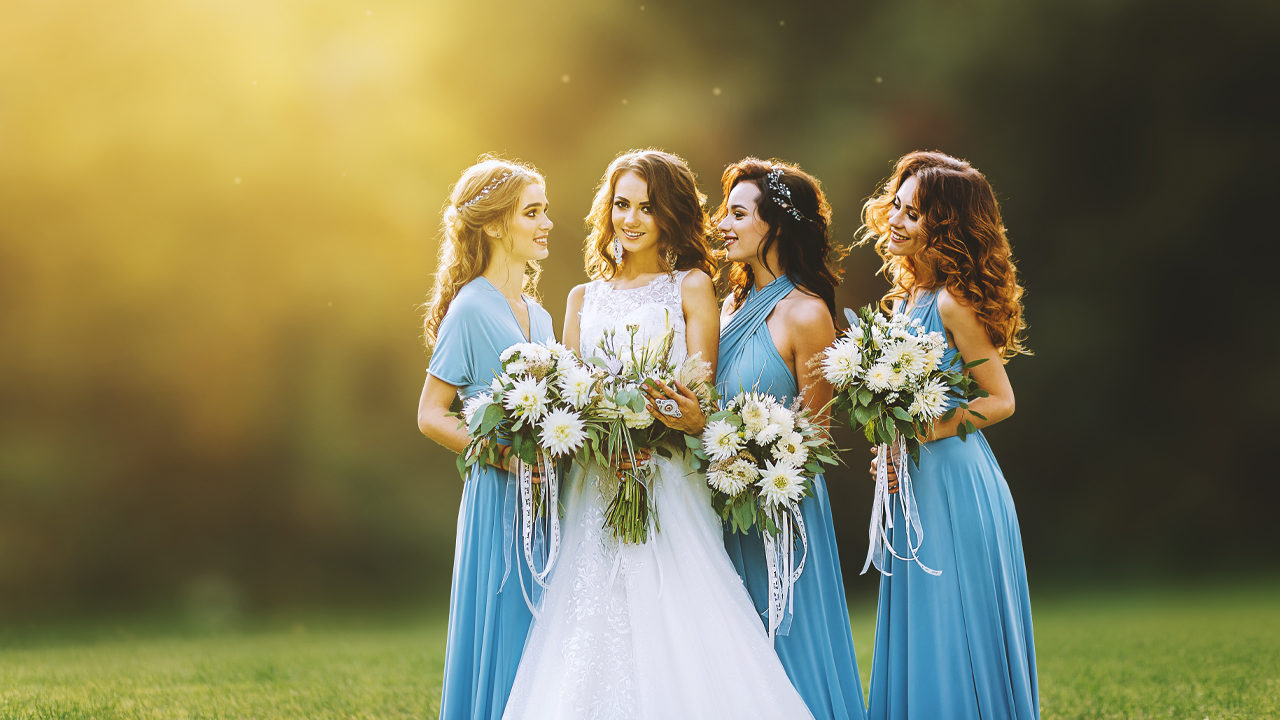
We’ve all seen those photos that show a wonderfully intimate moment made even more magical by an impossibly smooth, creamy background. It’s entirely possible that these types of images can be created right out of the camera by wonderfully talented photographers with ungodly expensive lenses. It’s also possible that it can be done by one of us mere mortals with a few clever techniques in Photoshop. In this project we’ll show you how to accomplish that.
This technique works best when the subject has a significant backlighting that creates a natural rim lighting effect to indicate the light direction. It’s important to follow that light direction and not work against it, or the final effect won’t look natural.
This project does use an Adobe stock image for the instruction. If you don’t wish to purchase the image, feel free to use the smaller water-marked image to learn the technique and then apply what you learn to your own images afterwards.
Step One: Open the image you want to use. We’re using a shot of a beautiful bride and her maids. If you’d like to download the low-res watermarked version of this image to follow along, click this link, log in with your Adobe ID, and click the Save to Library button. Double-click the image in the Libraries panel (Window>Libraries) to open it in Photoshop. To make it easier to work with the image, increase the resolution of the practice file. (We normally don’t recommend enlarging images, but this is only for practice purposes.) Go to Image>Image Size, turn on the Resample checkbox, select Preserve Details 2.0 from the Resample drop-down menu, set the Width to 5760 pixels, and click OK.
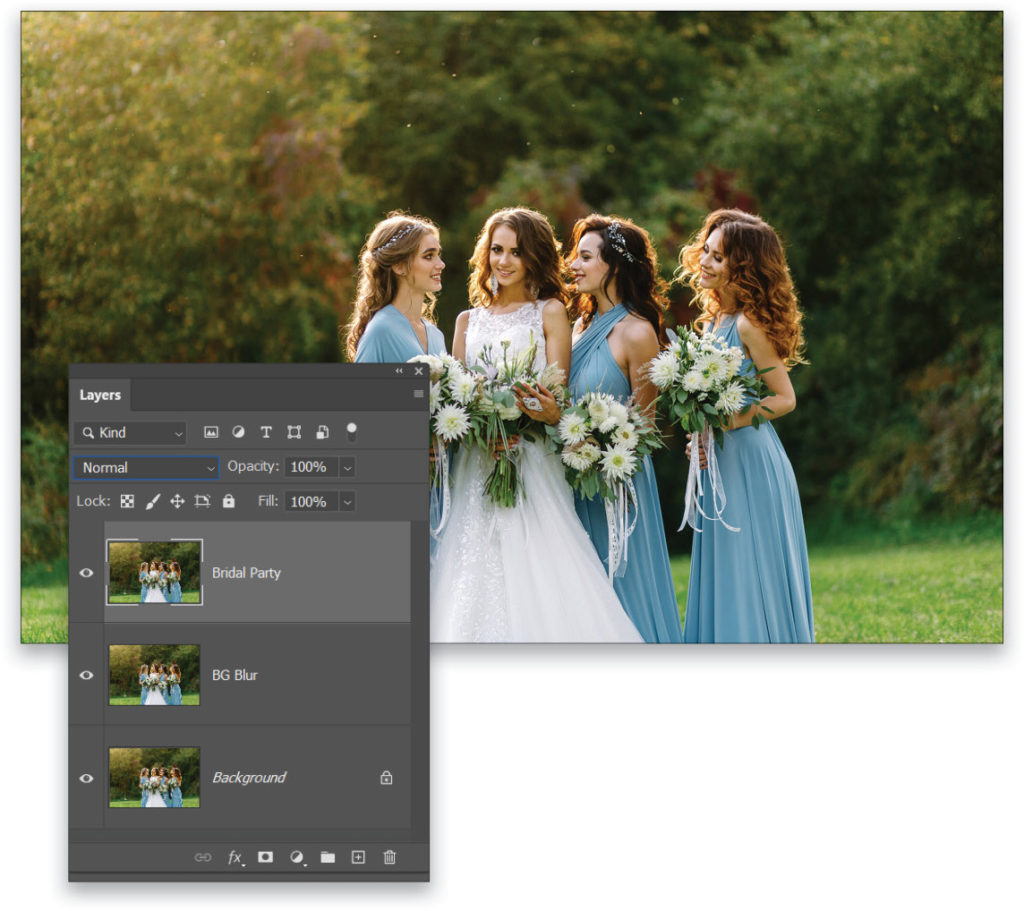
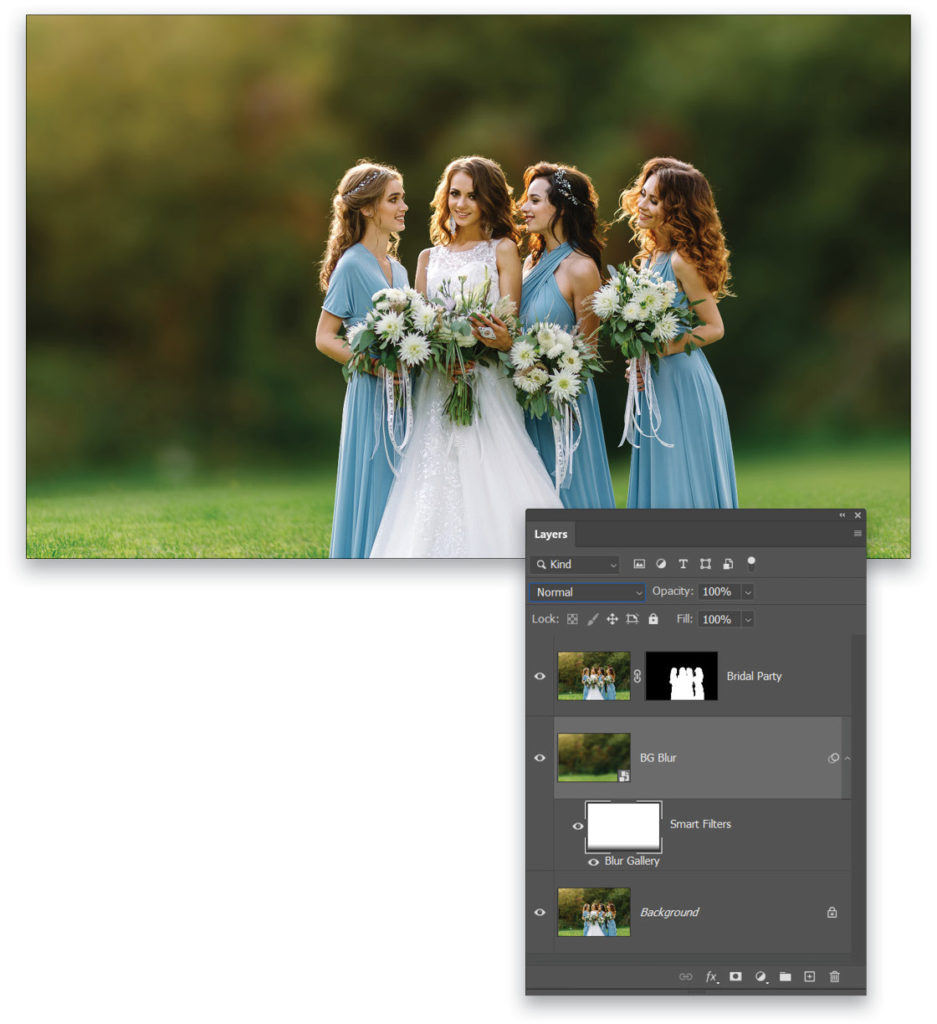
Press Command-J (PC: Ctrl-J) twice to duplicate the Background layer two times. Double-click the name of the top layer and rename it “Bridal Party.” Rename the other copy “BG Blur.”
Step Two: Make sure the Bridal Party layer is the active layer and go to Select>Subject so Photoshop will make a preliminary selection of the ladies. Use the Quick Selection tool (nested below the Object Select tool [W] in the Toolbar) with the Add and Subtract modes in the Options Bar to clean up any portions of the selection that look obviously wrong. Pay attention to the space between the dresses where the background shows through. Tip: Press-and-hold the Option (PC: Alt) key to temporarily switch to the Subtract mode.
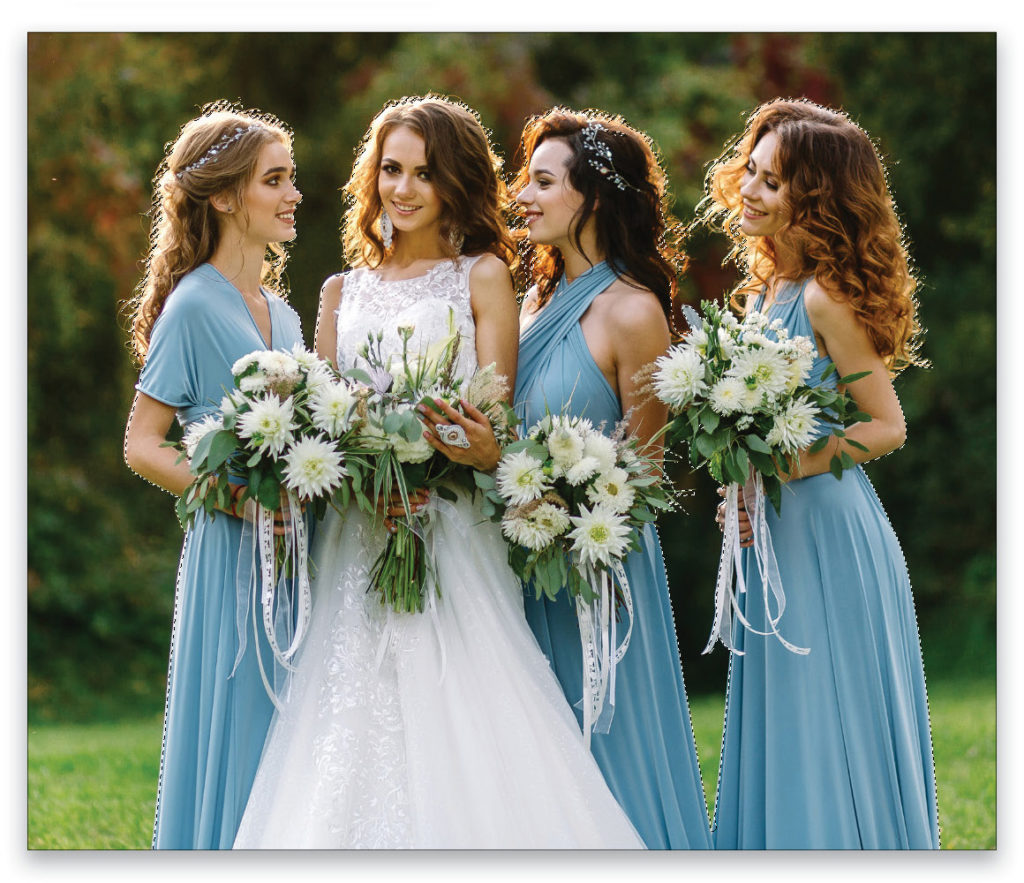
Step Three: Click the Select and Mask button in the Options Bar to launch the Select and Mask workspace. Set the View to On White (T) and adjust the Opacity to help you see the selected areas better. Click on the Refine Hair button in the Options Bar so Photoshop will take another look at the selection around the hair. If it still needs work, use the Refine Edge Brush tool (R) to gently brush the selection along the edges where the ladies’ hair needs to be selected from the background. When you’re fully satisfied with the selection edges, set the Output To drop-down menu in the Output Settings section of the Properties panel to Layer Mask and click OK.
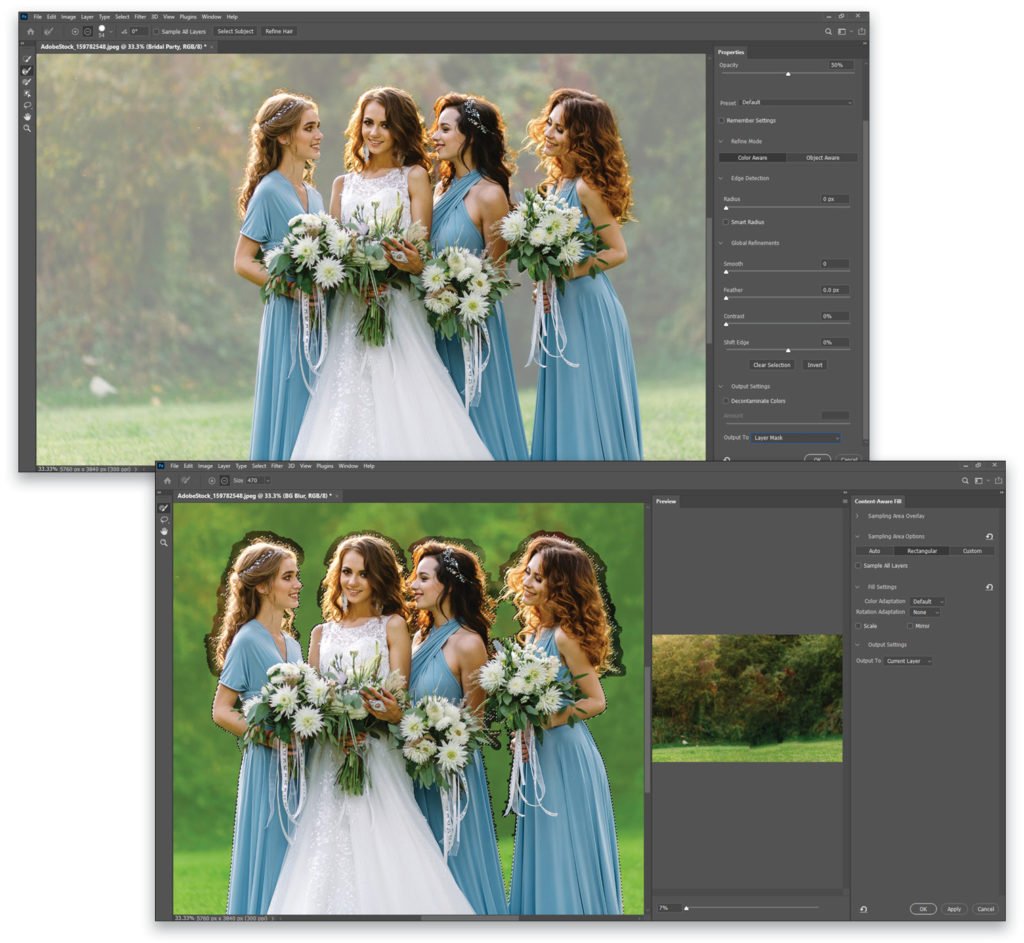
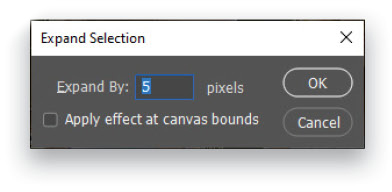
Step Four: Hold down the Command (PC: Ctrl) key and click on the newly formed layer mask to load that as a selection. Then make the BG Blur layer the active layer and go to Select>Modify>Expand. Set Expand By to 5 pixels and click OK. Then go to Edit>Content-Aware Fill. Let Photoshop fill in the selection to remove the ladies from this layer. This doesn’t need to look good, it just needs to be done so the blurring effect that we’re going to apply doesn’t create a halo by blurring the figures. Set the Output To drop-down menu in the Output Settings in the Content-Aware Fill dialog to Current Layer, and click OK. After the selection has been filled, press Command-D (PC: Ctrl-D) to cancel the selection. [For more on Content-Aware Fill, check out “Cracking Open Content-Aware” in this issue.—Ed.]
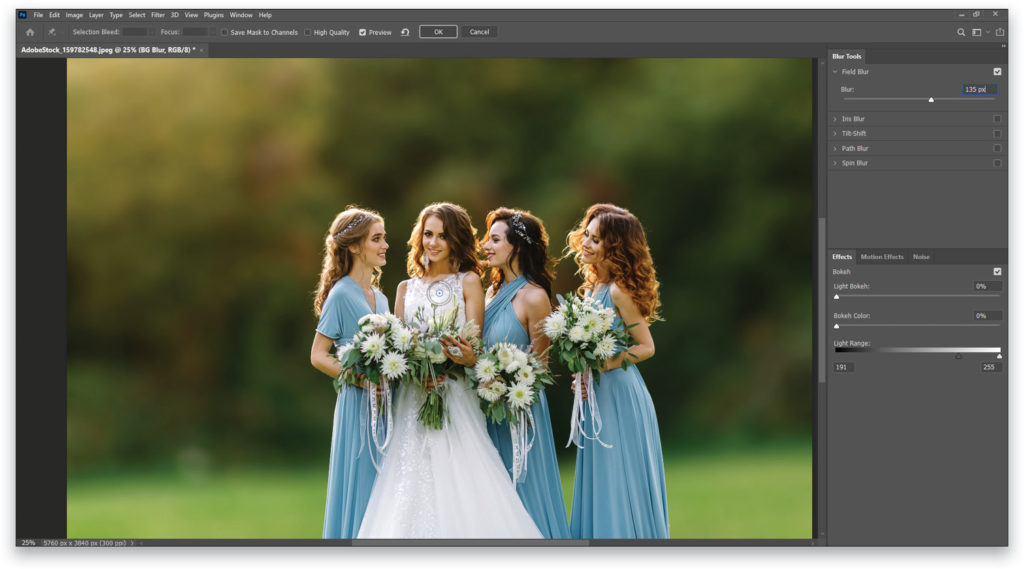
Step Five: Go to Filter>Convert for Smart Filters and then go to Filter>Blur Gallery>Field Blur. Set the Blur slider in the Blur Tools panel to 135 pixels, and click OK in the Option Bar. After applying the filter, click on the mask thumbnail next to the Smart Filters in the Layers panel to make that the active element.
Select the Gradient tool (G) and click on the Linear Gradient style in the Options Bar. Click on the Gradient preview thumbnail in the Options Bar; select the Black, White preset in Basics set in the Gradient Editor; and click OK. Drag from the bottom of the canvas upward to the edge of the grass line. This will fade away the blur from the grass along the bottom of the composition so it appears to be a more natural lens effect.
Step Six: Add a Vibrance adjustment layer (Layer>New Adjustment Layer>Vibrance) above the Bridal Party layer. Go to Layer>Create Clipping Mask to clip the adjustment layer to the Bridal Party layer. Then, set the Vibrance to +72 in the Properties panel (Window>Properties) to enhance the colors of the bridesmaids’ dresses.
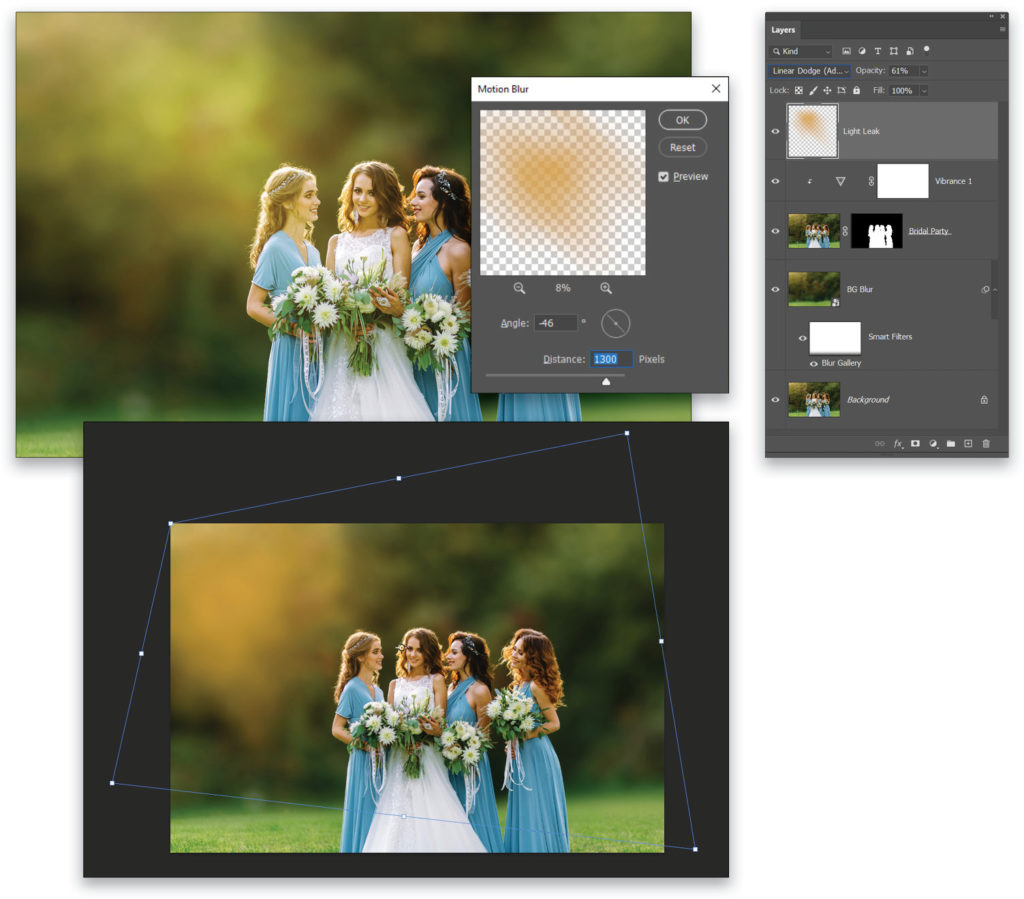
Step Seven: Add a new layer using the plus icon at the bottom of the Layers panel and name it “Light Leak.” Grab the Brush tool (B), hold down the Option (PC: Alt) key, and click on the warm brownish-orange color near the top left to sample that as the paint color. Use the Soft Round brush tip at a nice large size, around 500 px, but reduce the brush Opacity to 40% in the Options Bar. Add several spots to the top left area just by clicking, don’t drag.
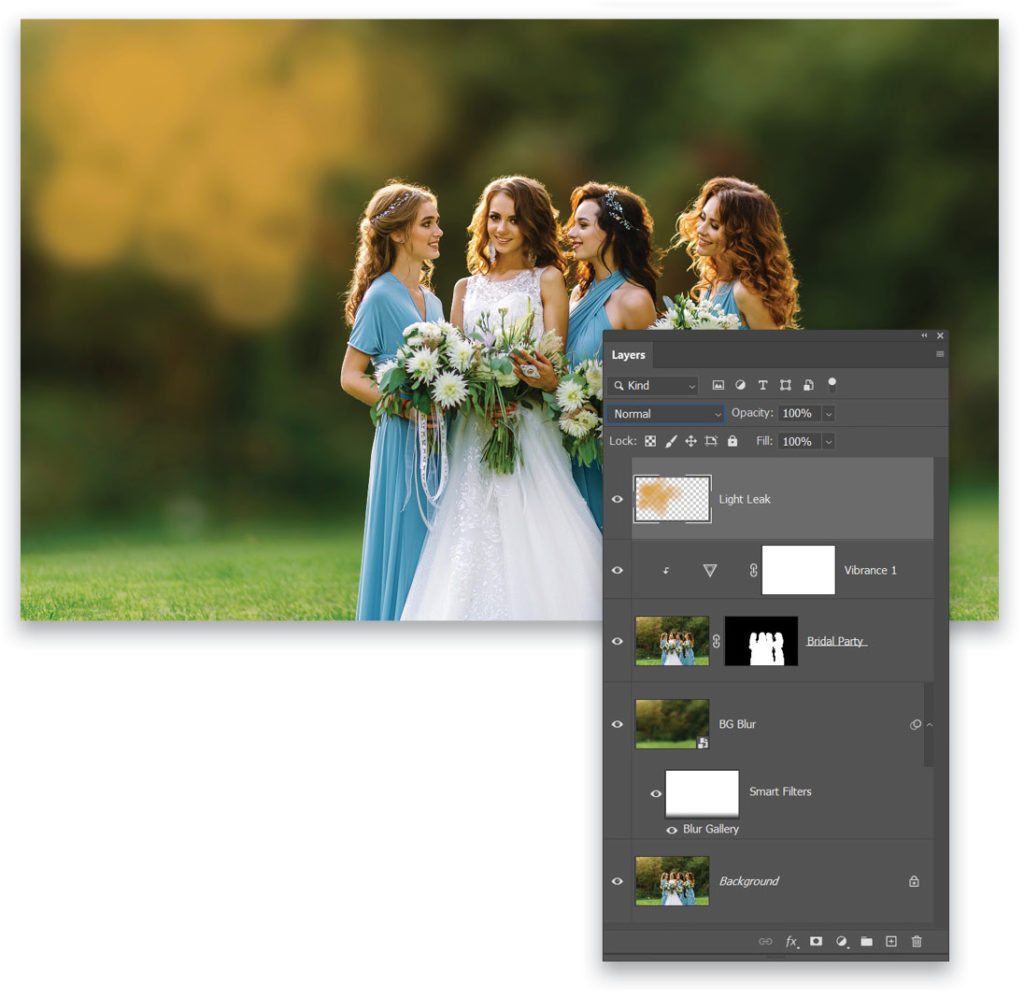
Step Eight: Go to Filter>Blur>Motion Blur and set the Angle to –46° and the Distance to 1300 Pixels. After clicking OK to apply the blur, use Edit>Transform>Distort to adjust the shape of the light to radiate out from the corner. This makes the painted spots softer, and mimics the way the light would bleed into the scene. Set the layer blending mode to Linear Dodge (Add) and reduce the Opacity to 61% to soften the effect.
Step Nine: Now go to Layer>New>Layer and, in the dialog that appears, name the layer “Flare,” set the Mode to Linear Dodge (Add), check the option to Fill with Linear-Dodge-Neutral Color (Black), and click OK to create the layer. Convert this layer to a smart object (Layer>Smart Objects>Convert to Smart Object) and go to Filter>Render>Lens Flare. Use the Lens Type of 50–300mm Zoom, a Brightness of 68%, and place the epicenter of the flare at the top left. Click OK.
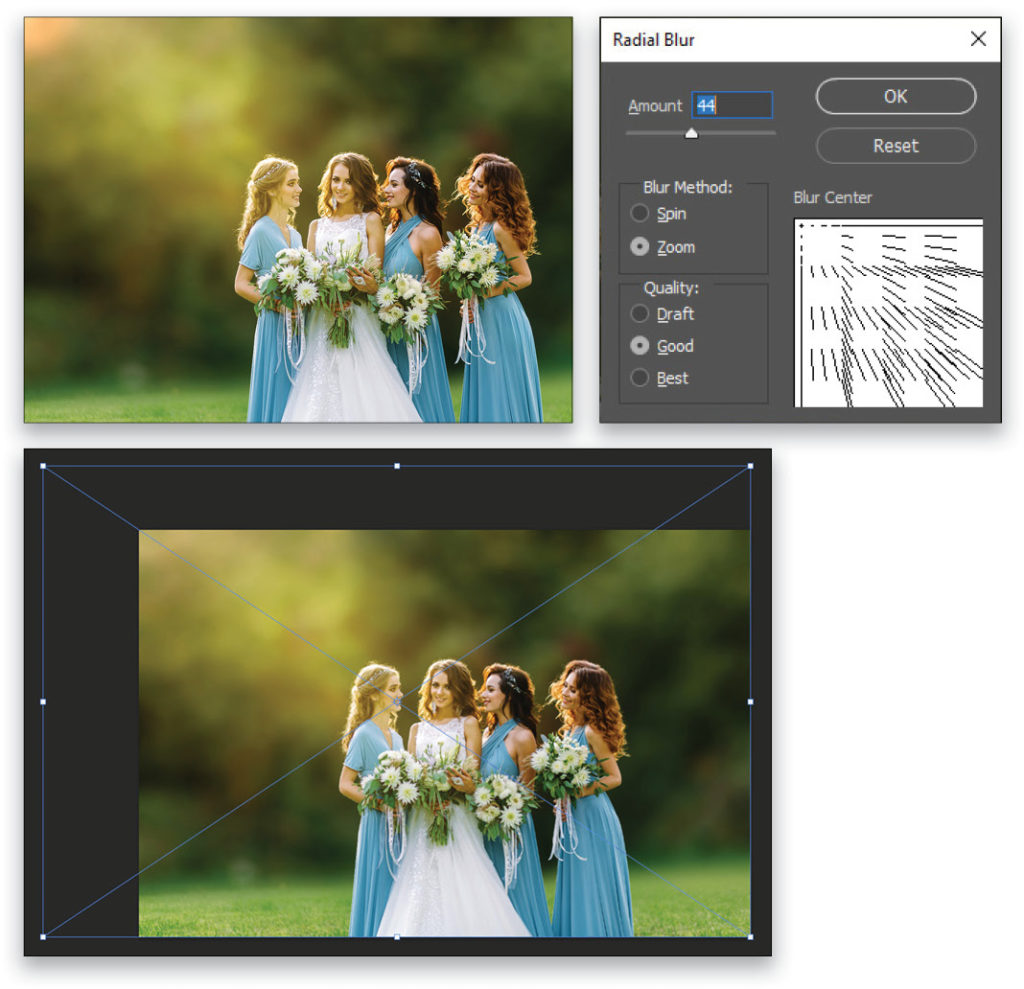
Step 10: Go to the Blur filters again and select the Radial Blur. Set the Amount to 44, Blur Method to Zoom, and move the Blur Center to the top left to match where the Flare was placed. Click OK, and then press Command-T (PC: Ctrl-t) for Free Transform. Drag the top-left corner outward to scale the entire layer up so the hottest spot of the flare is off the top left of the composition. Because the Lens Flare is a smart filter, you won’t be able to see it while you’re transforming the layer, so it may take you a couple of tries to get it right.
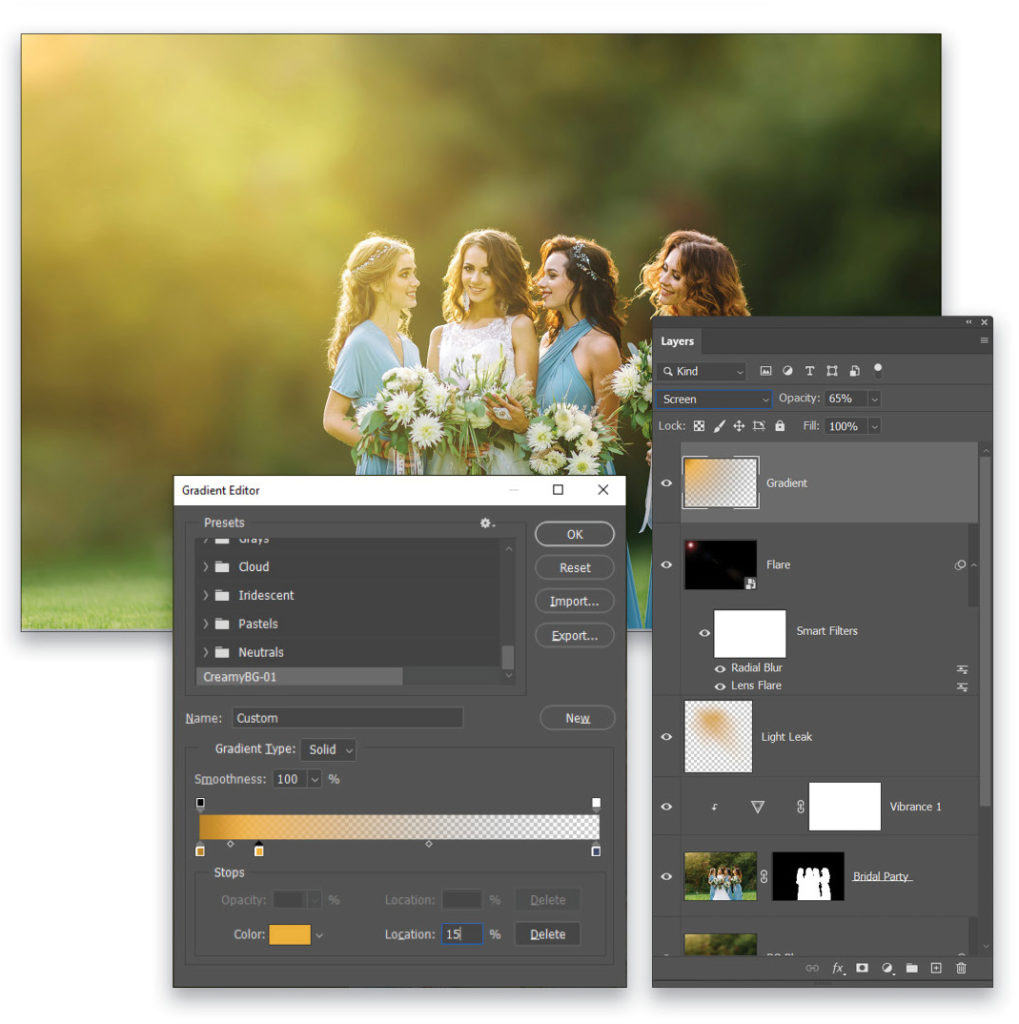
Step 11: Add another new layer and name it “Gradient.” Switch to the Gradient tool and click on the gradient preview in the Options Bar to open the Gradient Editor. Double-click the color stop on the far left below the gradient ramp to open the Color Picker, set it to a creamy brown color (#bb8213), and click OK to close the Color Picker. Click on the leftmost opacity stop above the gradient ramp and make sure its Opacity is set at 100%.
Set the color stop on the bottom far right to a twilight blue (#3f4a67) and the rightmost opacity stop to 0%. Then click below the gradient ramp to add a new color stop and set its Location to 15% and its color to a brighter orange (#ecb03c). Click OK to close the Gradient Editor, and then make sure the gradient shape is set to Radial in the Options Bar. Drag the gradient out from the top-left corner to around the middle of the composition. Set the layer’s blending mode to Screen and reduce its Opacity to 65%.
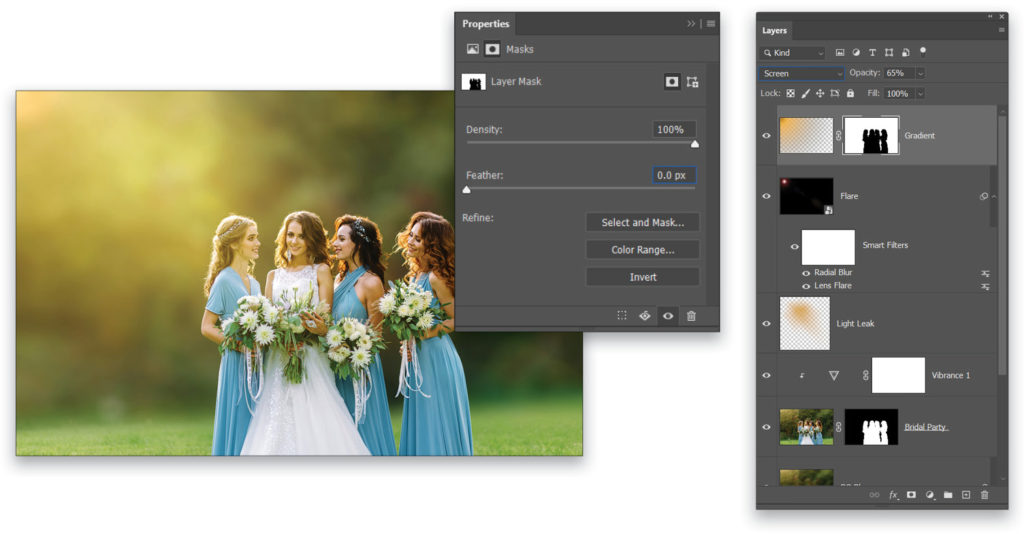
Step 12: The gradient effect should really be behind the ladies, not bleeding into the front of them. So hold down the Option (PC: Alt) key and drag the mask thumbnail from the Bridal Party layer up to the Gradient layer. This copies the mask from one layer to another, but it needs to be reversed. With the mask on the Gradient layer still the active element, open the Properties panel and click the Invert button to reverse the mask area.
Step 13: Add another new layer and call it “Dust.” With the Brush tool active, open the Brush Settings panel (Window>Brush Settings) and select the basic Soft Round brush tip. Set the Size to 45 px, Hardness to 35%, and Spacing to 705%. Enable the Shape Dynamics and set the Size Jitter to 67%. Enable Scattering and set the Scatter amount to 775% and enable the Both Axes option.
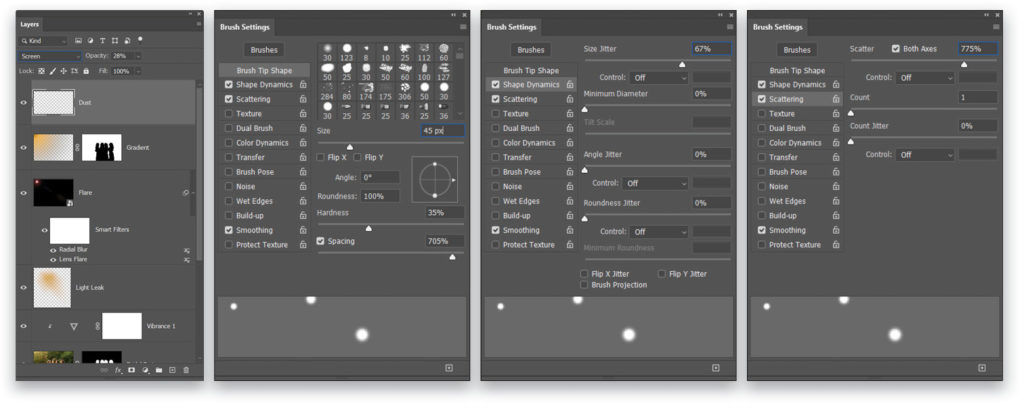
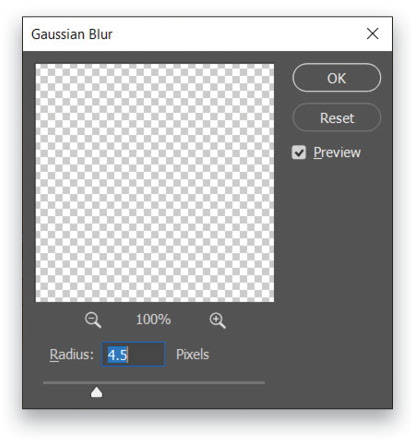
Then click on the Foreground Color swatch near the bottom of the Toolbar and set it to a light yellow (#f5dc81). Click OK to close the Color Picker, and gently paint in a few dust specks over the heads of the bridal party. Go to Filter>Blur>Gaussian Blur and use a Radius of 4.5 Pixels to soften the dust even more. Click OK and change the layer blending mode to Screen and reduce the Opacity to 28% to make the effect a subtle one.
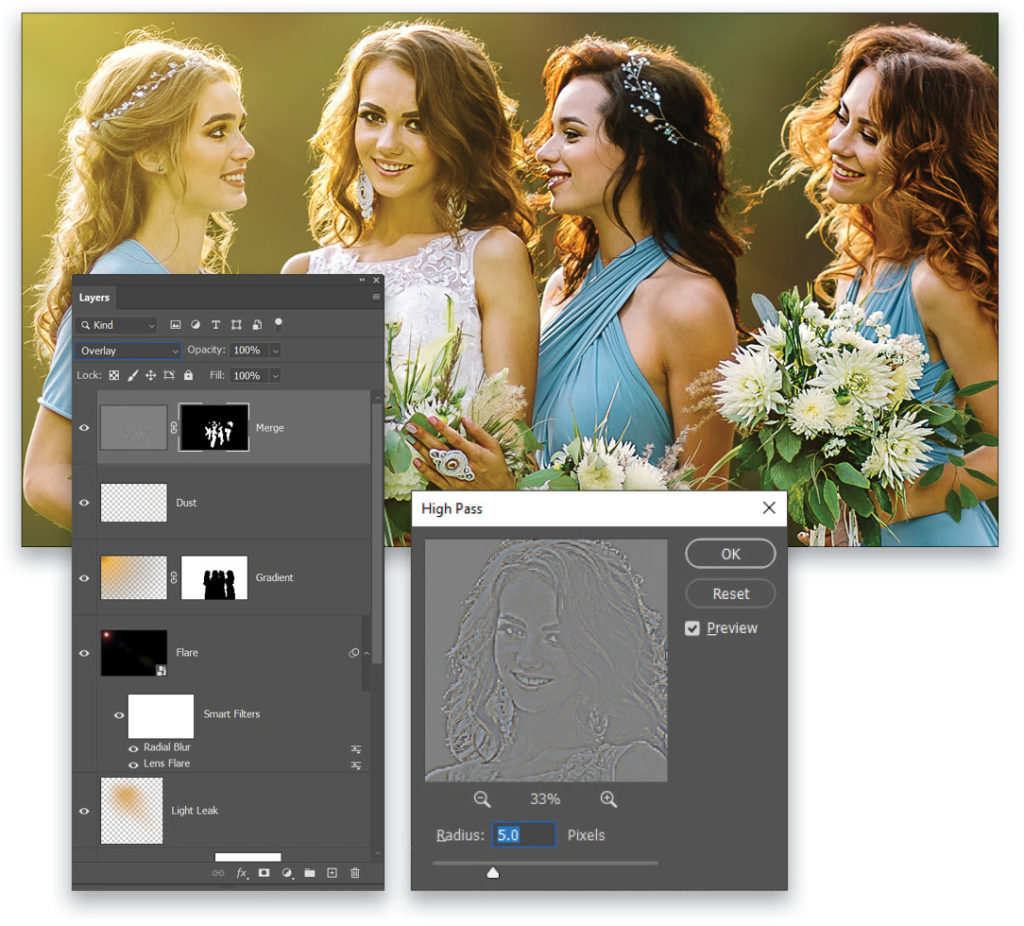
Step 14: The soft creamy background is done, but some selective sharpening will really help to accentuate the image. Hold down the Option (PC: Alt) key and go to Layer>Merge Visible to create a merged layer at the top of the layer stack; name it “Merge.” Then go to Filter>Other>High Pass and use a Radius of 5.0 pixels. Click OK, and set the layer blending mode to Overlay to eliminate all the gray from the High Pass filter.
Then hold down the Option (PC: Alt) key again while clicking the Add Layer Mask icon (circle in a square) at the bottom of the layers panel. This adds a fully black mask to the layer, which hides the entire sharpening effect. Then use a regular Soft Round brush on the mask with white paint to reapply the sharpening to the flowers, dress folds, and the eyes and smiles of the subjects.
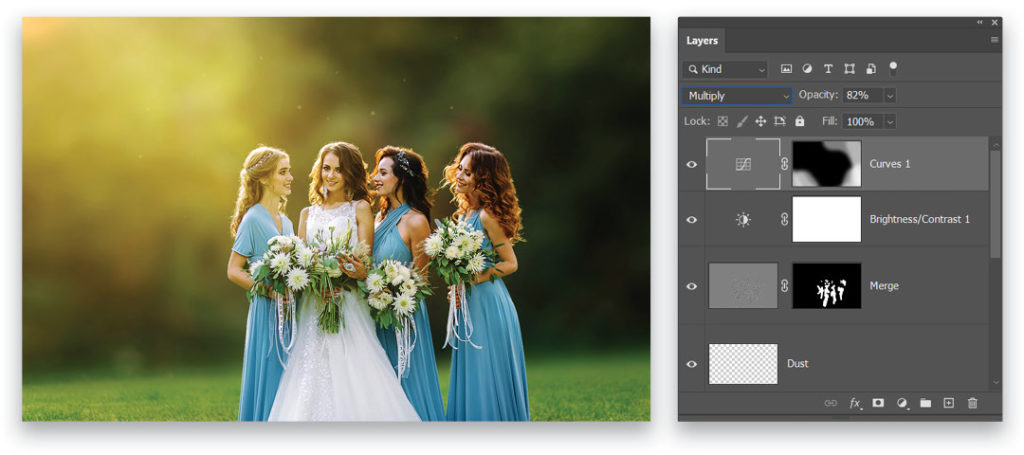
Step 15: Add a Brightness/Contrast adjustment layer at the top of the layer stack, and in the Properties panel set the Brightness to –10 and the Contrast to 31. This helps make those darker areas a little richer so as not to get lost in the work of adding glows and brightness to the overall image.

Step 16: Next, add a Curves adjustment layer but don’t edit the curve. Instead set the adjustment layer blending mode to Multiply to add a natural darkening effect to the entire image. Click on the mask thumbnail and Invert it to hide the effect. Then use a very large Soft Round brush with white to apply the effect to the corner areas that shouldn’t have the light bloom. If the overall effect is too strong, reduce the layer’s Opacity. It’s shown here with the Opacity dialed down to 82%.
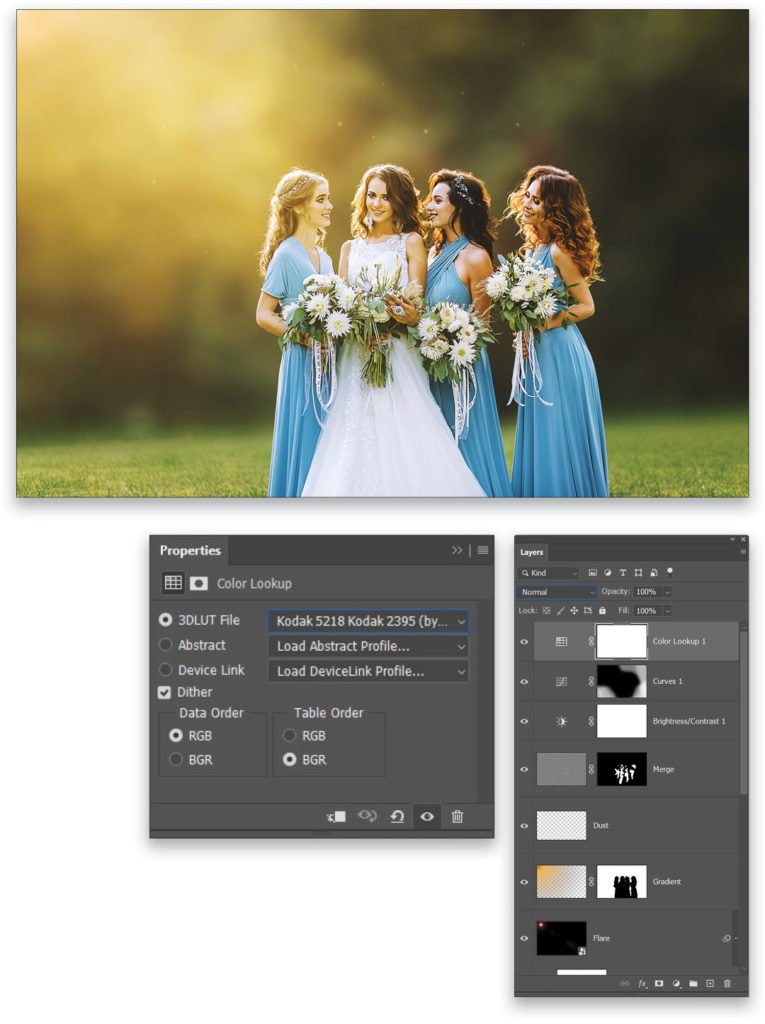
Step 17: For a final warming effect, add a Color Lookup adjustment layer and set the 3DLUT File drop-down menu in the Properties panel to the Kodak 5218 Kodak 2395 (by Adobe).cube file. This has an overall warming effect that works well with this image, but every image should be evaluated independently for the full effect, being very careful with skin tones in particular. But when you find the right one, everything just works together and you end up with a lovely magical creamy background to capture those truly magical moments of life!
This process is very versatile and can be applied to many different types of images to create that deliciously creamy background. Once you’re comfortable with the technique, consider purposely shooting shots for just this purpose: Keep the background distant and work to get strong backlighting, then whip up a dreamy, creamy, magical background. Your clients will love the results!
This article originally published in the January, 2021 issue of Photoshop User magazine.


