Let me begin by saying that you’re a lucky photographer—lucky to have a light meter built into your digital camera. When I started taking pictures with my dad’s Canon Vt 35mm film camera, the light meter (center, bottom of next page) was a separate accessory and a luxury.
Yes, some digital photographers still use light meters—flash and natural light meters. And yes, there are advantages to using hand-held light meters, especially when it comes to taking many flash exposures in the same situation with different subjects wearing different color outfits with different reflectivity. Those are just a few of the factors that can affect a built-in light meter.
That being said, I don’t use an accessory light meter. I’ve learned how to use the light meter in my camera and how to read the histogram displayed on the LCD screen. I’ve also learned the value of the highlight alert, which shows “blinkies,” overexposed areas of an image that blink on and off, after you take a picture with your DSLR.
In this article, we’ll take a look at what the histogram and highlight alert tell us, and how to use that information to get the best possible in-camera image.
The Setup
To illustrate my points, I’ll use five of the more than 160 images from my new KelbyOne class, Uncovering the Magic of Yellowstone and Grand Tetons. The class is mostly about making landscape and wildlife photographs and exploring these two beautiful National Parks. I do, however, include some basic image-processing tips.
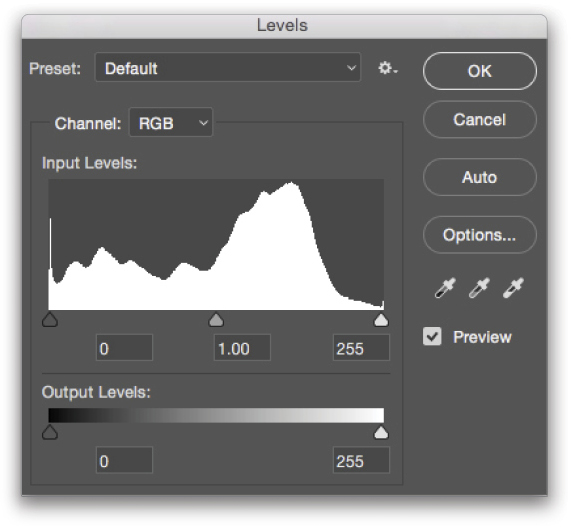
I’ll also use screen grabs from Lightroom and Photoshop to illustrate my points. In both programs, the histogram, which corresponds to the one you see on your camera’s LCD monitor, displays the same information. I chose to use the histogram in Photoshop’s Levels dialog simply
because it’s a bit larger on a monitor than the one in Lightroom, making it easier to read when reproduced here in the magazine.

Hurray for the Histogram
In looking at this photograph, taken from Schwabacher’s Landing in Grand Teton National Park, you see that there are no deep shadows or bright highlights, but there are a lot of midtones. Let’s take a look at how that translates to the histogram and what we can learn from that. But first, this note: In low-contrast situations like this, when you’re shooting in any of the automatic exposure modes (I shoot in the Aperture Priority mode), no exposure compensation is necessary because there are no deep shadows or bright highlights to fool your camera’s light meter into make the wrong exposure decision.
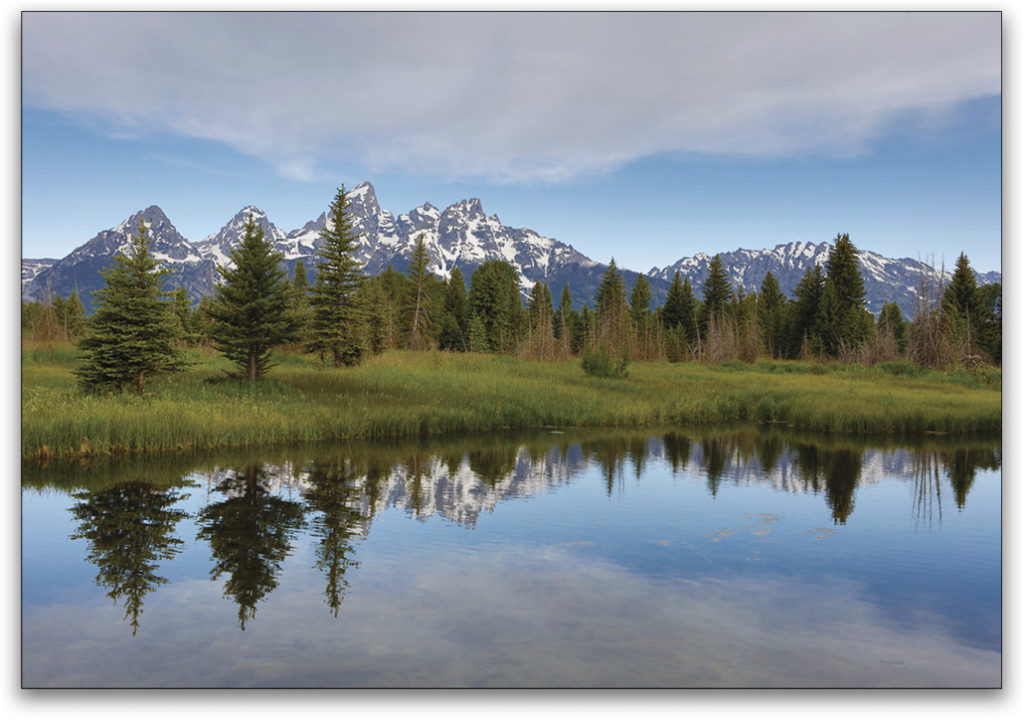
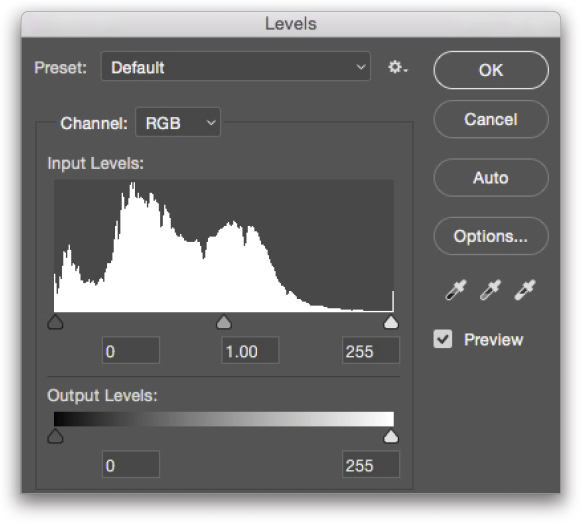
The “mountain range” you see in this screen shot is the histogram for my Schwabacher’s Landing image. In photography, a histogram shows us the distribution of the different brightness levels in the scene. On the left are the shadows, on the right are the highlights, and in the middle are the midtones.
Note: Histograms aren’t unique to photography. Generally speaking, a histogram is a graphic display where the data is grouped into ranges and then plotted as bars.
Getting back to the histogram for my Grand Teton image, if we imagine that we have a brick for each individual brightness level in the scene, we see that there are fewer bricks on the right (highlights) and left (shadows) than there are in the middle (midtones). We also see that the bricks extend from the far left to the far right, which shows that the image has a full range of tones.
In this case, we have a good histogram, because it doesn’t show a spike on the right or left side of the “mountain range.” A spike on the right would show overexposed areas, while a spike on the left would show areas that
are underexposed.
The key, in most cases, is to avoid high spikes. You do this in-camera by setting the correct exposure, which can easily be accomplished by using the +/- exposure compensation feature when shooting in an automatic mode. If you have a spike on the right, reduce your exposure; if you have a spike on the left, increase your exposure. If you’re in manual mode, you can adjust your shutter speed and aperture to avoid spikes.
If all that fails, you may need HDR, perhaps up to nine exposures in a high-contrast scene, or you may need to wait for the light to change. Using a gradual ND (neutral density) filter is another option.
When looking at the histogram on the back of your camera, it’s important to know that it’s a histogram for a JPEG of your RAW file. Knowing that, if you see a small spike on the left or right, those shadow and highlight areas are probably recoverable in Lightroom and Photoshop because a RAW file has a wider exposure latitude (is more forgiving) than a JPEG file. That “forgiveness” is why you should always shoot in RAW.
Histograms Can Be Very Varied
In this photograph, taken after sunrise near Old Faithful in Yellowstone National Park, we see much more contrast. The difference between the shadow and highlight areas is much greater than in the previous photograph. What’s more, there are more dark areas (blue sky and foreground) than light areas (sunburst).
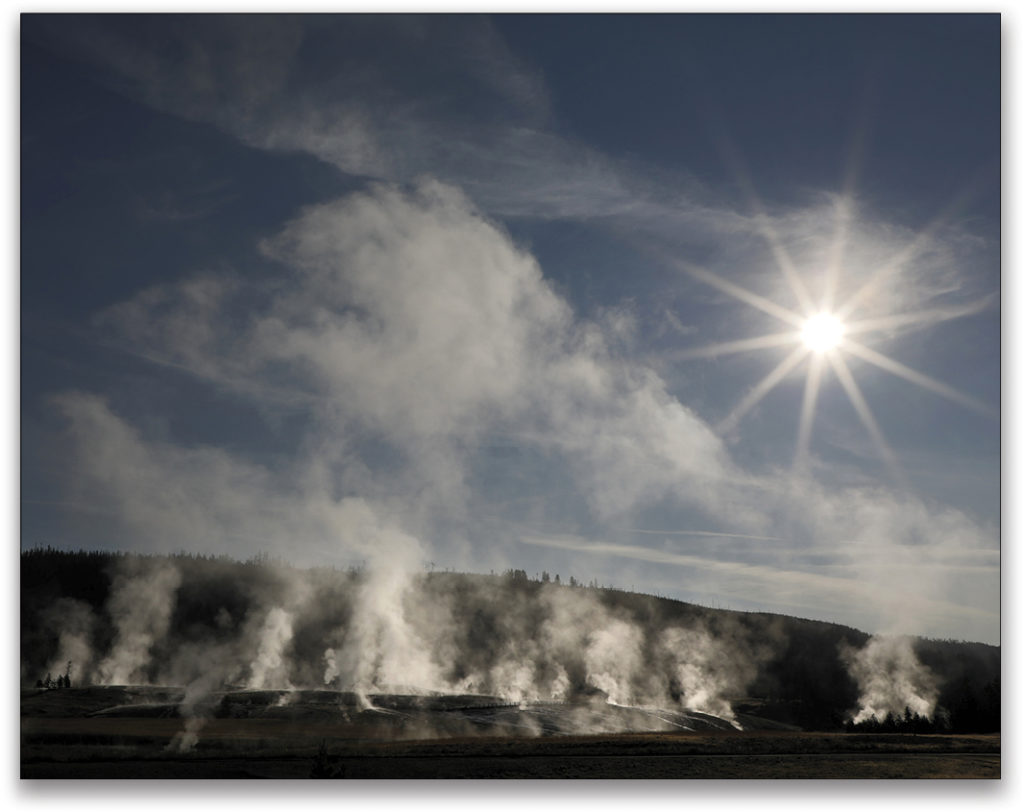
As a side note, to get a good starburst, you need to shoot at a small aperture (f/22 here) and use a wide-angle lens. What’s more, the lower the sun is in the sky, the more dramatic the starburst effect.
This histogram for my after-sunrise shot shows more (percentage-wise) “bricks” for the shadows and midtones than for the highlight areas (on the right). There’s a tiny spike on the right, which represents the white sun in the photograph.
This is a good histogram for my photograph. It looks quite different from the histogram for the previous image and for the following image. The message here is that there is no one “right” histogram for all images.
Adjusting the Histogram in Postprocessing
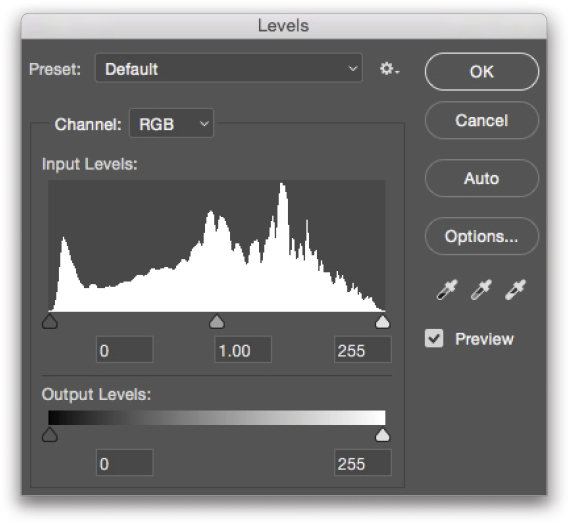
Now let’s see how we can adjust the histogram (our exposure) in Lightroom and Photoshop. The top image looks flat, because the light was relatively flat. The bottom image looks more vibrant.
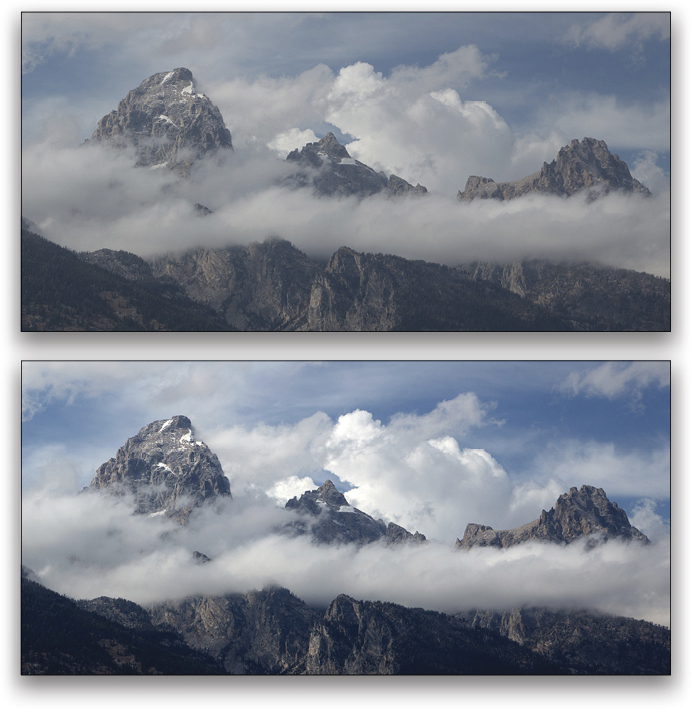
The more vibrant image was created with a simple (and time-proven) Photoshop Levels adjustment: moving the Highlight slider (on the left) to just inside the mountain range, and moving the Shadow slider (on the right) to just inside the mountain range, as illustrated by the red circles.
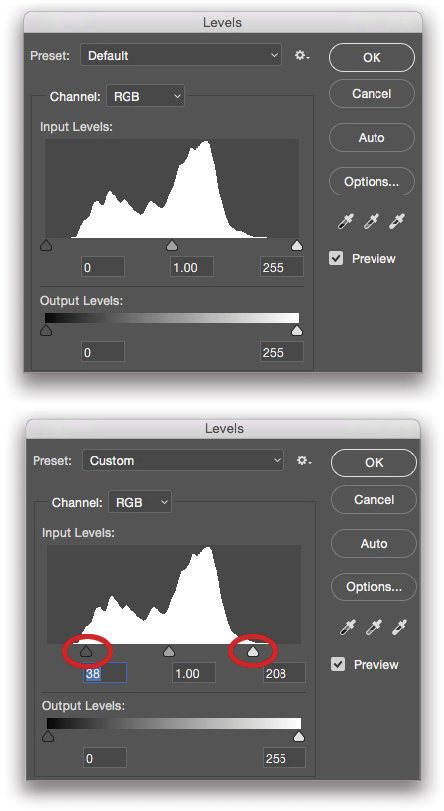
Basically, the original histogram is telling us that we don’t have true whites and true blacks, which results in a lack of contrast.
Clicking OK to apply the Levels adjustment and then opening the Levels dialog again, the highlight and shadow adjustments show a new-and-improved histogram, and tells us that we now have an image with more contrast.
In Lightroom, you can use the Whites and Blacks sliders to stretch the histogram from side to side. Tip: You can also Shift-double-click the Whites and Blacks sliders to have Lightroom automatically define the white and black points.
Value of the Camera’s Highlight Alert
Because I can’t get overexposed areas of a scene to blink on your monitor/tablet/smart phone while you’re reading this article, I needed to simulate the “blinkies” you see on your camera’s LCD monitor. I did this by showing those areas in red. Here, I’m using a screen grab from Lightroom (which also displays overexposed areas of a scene) to illustrate my point.
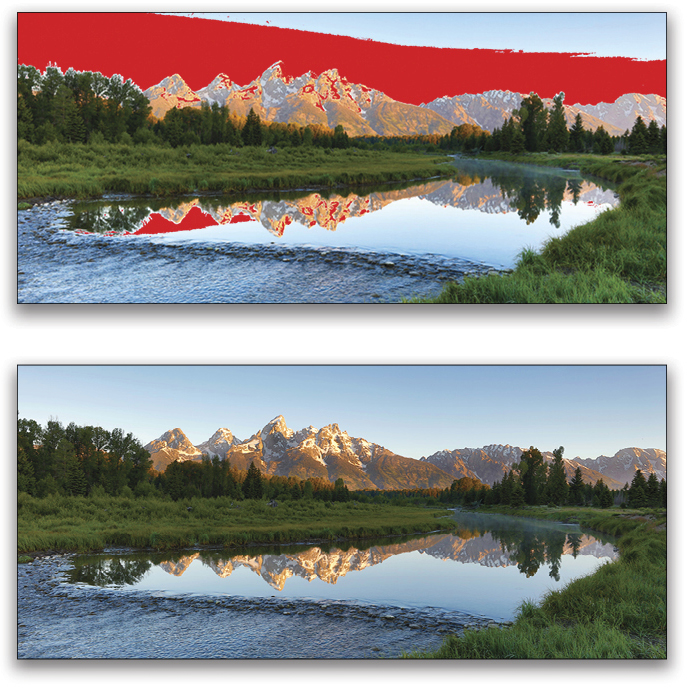
The stronger the contrast range in the scene, the more important it is to check for “blinkies.” This Lightroom screen grab shows part of the mountaintops and sky (also photographed from Schwabacher’s Landing) overexposed.
On site, the solution to preserving the highlights and shadows was HDR, the in-camera HDR feature of my EOS Canon 5Ds. (By the way, this isn’t a pano, rather a cropped section of my original image.)
Get Creative
Yes, getting the best in-camera exposure is important. Adjusting the Levels is important, as is checking the Highlight/Shadow warnings in Lightroom (by clicking on the triangles at the top of the histogram when you’re in the Develop module) to get the best possible processed file. But that’s only the technical side of image making.
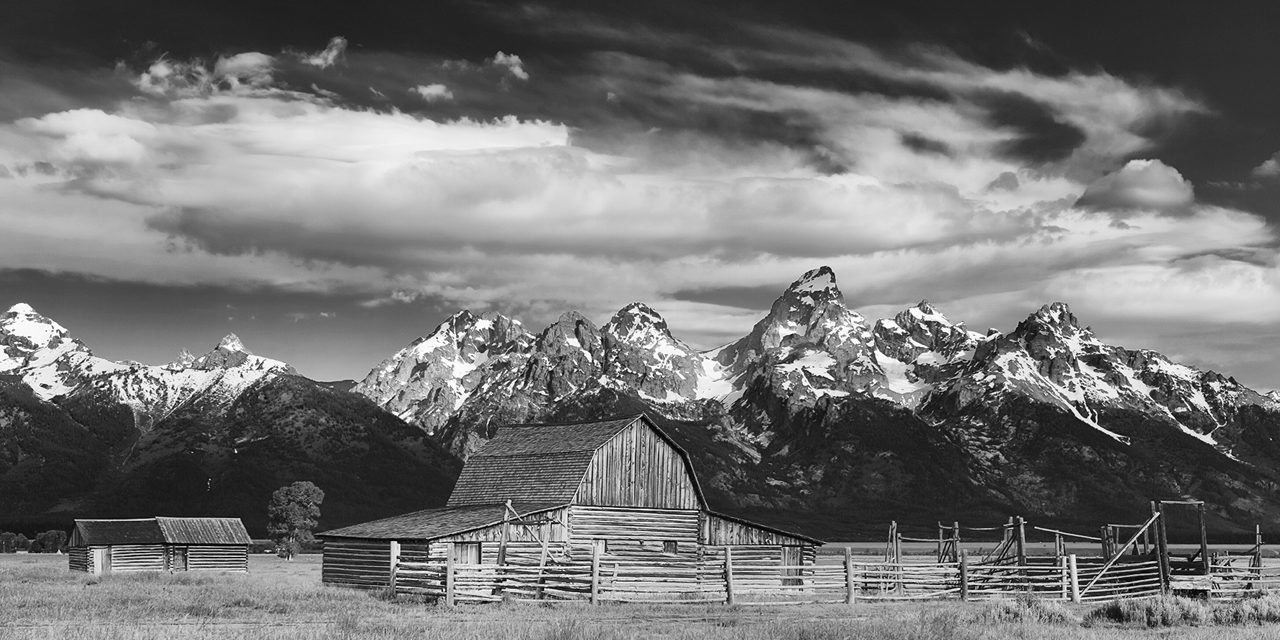
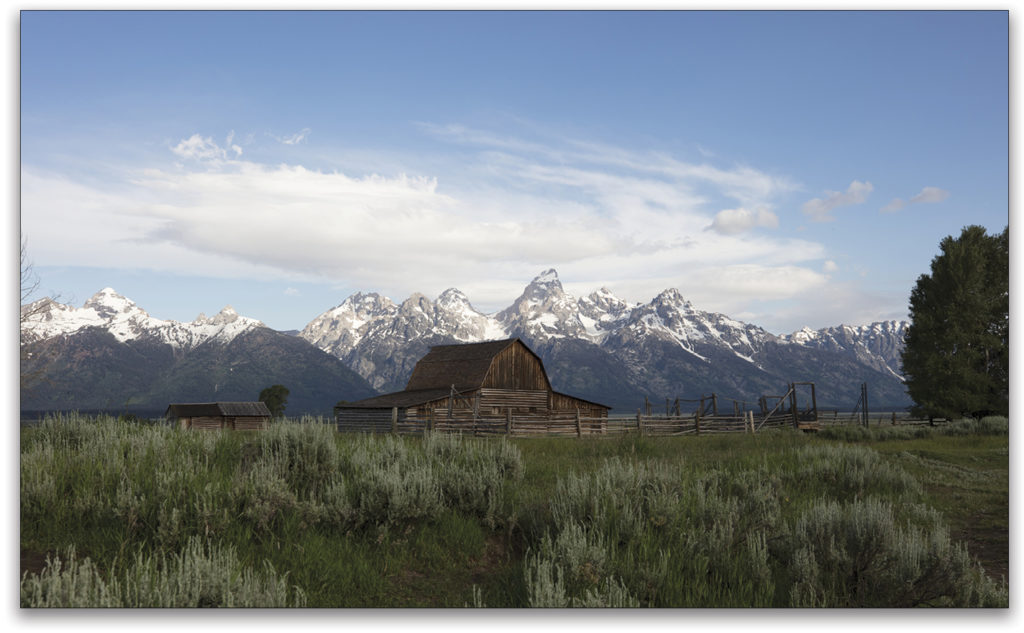
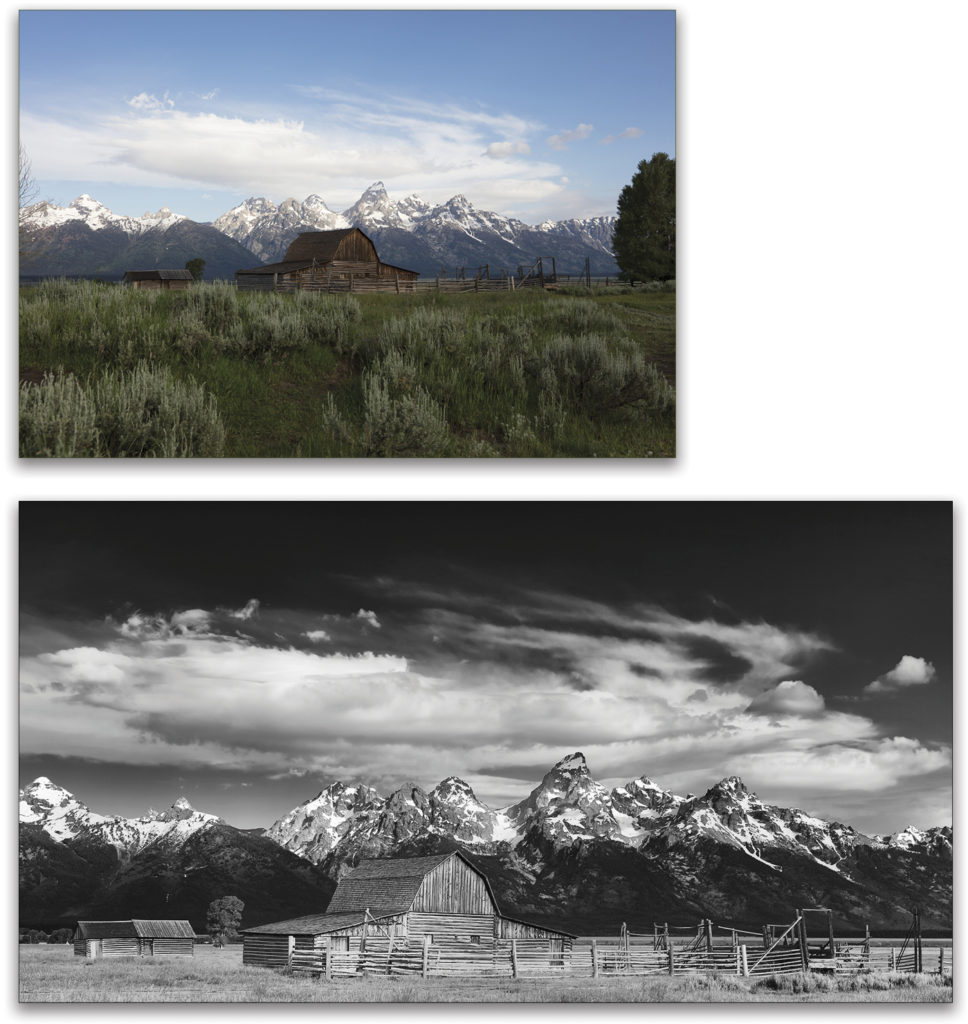
This image of one of the barns on Mormon Row Road in Grand Teton National Park has a near-perfect exposure, but it’s boring as heck.
With a bit of creative cropping, a quick Levels adjustment, a boost in contrast, a reduction of exposure, and a conversion to black-and-white, I transformed my boring shot into one of my favorite images from the park. A quick tip here: In black-and-white photography, contrast is king.
Before leaving you, I’d like you to consider one last important factor: As tempting as it might be to have your LCD monitor set to full-image display, if you shoot with the histogram activated, and if you check your highlight alert, you’ll get a much higher percentage of well-exposed in-camera images.
In closing, keep in mind that, again, you’re a lucky digital photographer to have a camera with an awesome built-in light meter.
This article originally published in Lightroom Magazine, Issue 36.
ALL IMAGES BY RICK SAMMON


