
First, there a few things I’m not including on this list because I’m taking for granted that you’re already drinking the off-camera flash Kool-Aid, and don’t need any convincing about why this will dramatically improve your lighting game! Second, I’m assuming that, like many people, you may find the whole lighting subject a bit confusing or even intimidating. No worries; that’s what I’m here for. The first topic on the list below is my “Four Principles of Strobe Light” that are guaranteed to strip away the mystery, and help simplify the way you think about artificial light. I’ve combined them into one topic to save space, as we have a lot of ground to cover. As a matter of fact, I’ve actually included three bonus tips, bringing the total number of surefire ways to improve your lighting skills up to 13—spooky number! But hey, who’s counting.
1. My Four Principles of Strobe Light are: Quantity of Light, Quality of Light, Direction of Light, and Distance of Light (QQDD for short). Quantity of Light simply refers to how much or how little light you want contributed by a flash or speedlight. You’ll dial this in with a combination of settings, using the strobe/speedlight’s power controls, flash exposure compensation (TTL), ISO, and aperture. In simpler terms, what this means is: If you want more light from your flash, turn it up or move it closer.
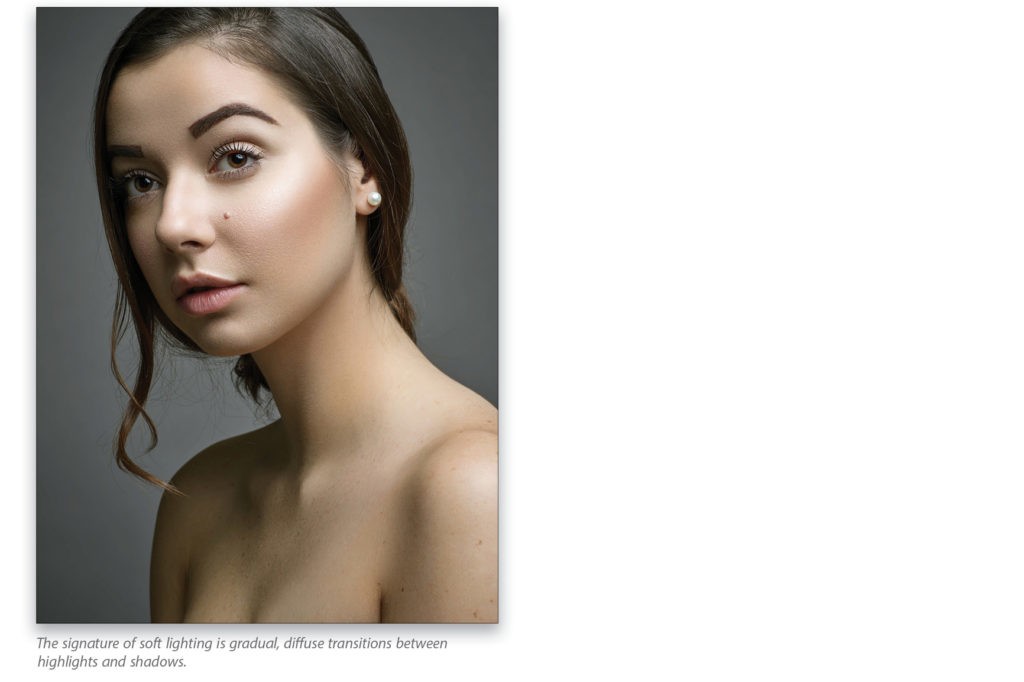
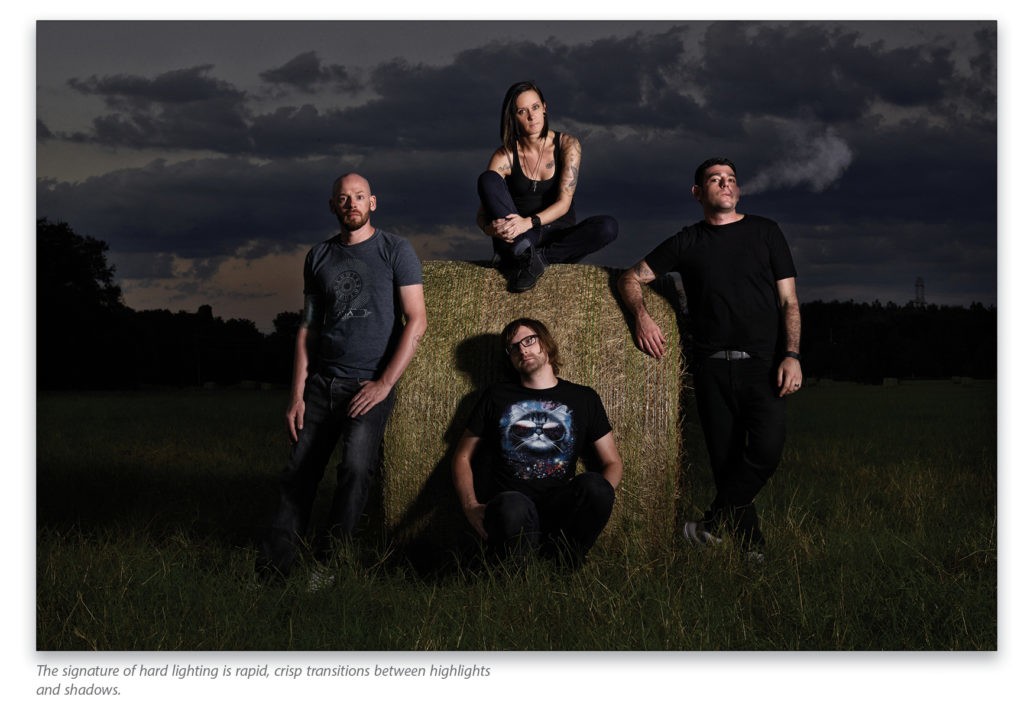
Quality of Light refers to the light’s “softness” or “hardness,” which will depend entirely on the modifier used and the distance it’s placed from the subject—more on distance in a minute. The simple rule of thumb is: The larger the modifier, the softer the light; the smaller the modifier, the harder the quality of light. “Hard” and “soft” are terms used to express the quality of the light as it transitions from shadow to highlight. With hard light, transitions are rapid and crisp; with soft light, transitions are gradual and diffuse. Modifiers with silver interiors will deliver more contrast (a.k.a. specularity), while white interiors will produce a softer look with less contrast.
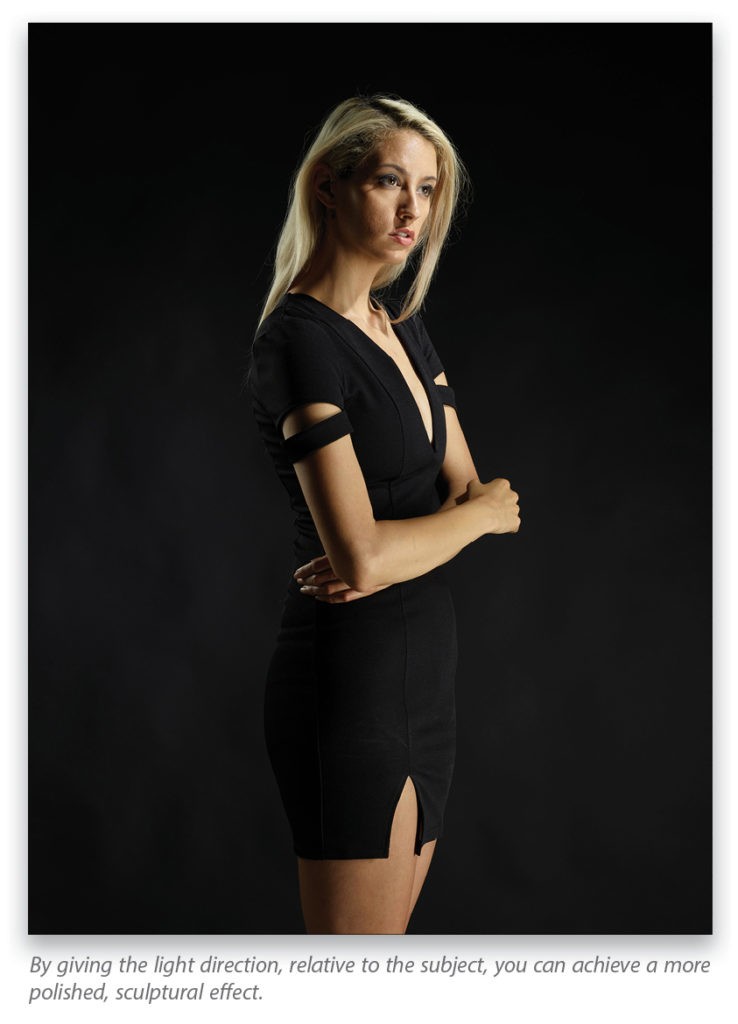
Direction of Light is all about introducing shadows and dimension to your lighting. The more direction you give your light in relation to your subject, the more shadows are created. This is a good thing, because flat lighting is boring.
As its name implies, Distance of Light refers to how far your light is placed from your subject. The closer the light/modifier, the larger its perceived size, relative to your subject, and the softer the quality of light. Conversely, the farther away the light/modifiers are from the subject, the smaller their perceived size is, and the harder the light will be. Distance also plays a key role in light coverage (more on this in #3).
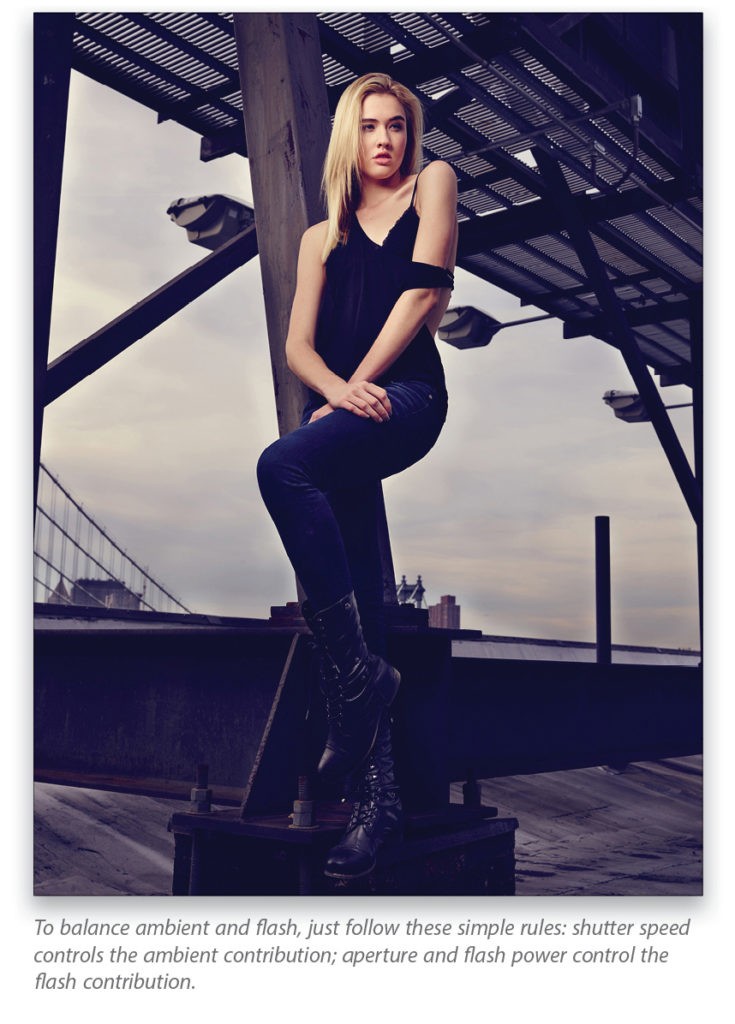
2. Balancing Ambient and Flash: I get a lot of questions about this, and it’s pretty simple once you understand a few easy-to-master concepts. In ambient and flash situations, you’re working with two separate sources of light, and each source is controlled independently using camera and strobe/speedlight settings. Memorize these two simple rules: The amount of illumination contributed by the ambient light is controlled by the camera’s shutter speed and ISO settings; while the amount of illumination contributed by a hot-shoe flash or strobe is controlled by aperture, ISO, the power setting for the light, and flash exposure compensation (FEC), in the case of TTL. Personally, I default to manual, because it’s consistent and straightforward, but the same rules apply with TTL.
Here are the steps: Start without any artificial lights turned on; determine the desired ambient exposure (this is your dominant light source); dial in your preferred aperture; and then use shutter speed to control how much or how little ambient light there is. Next, turn on your flash, and dial in the desired amount of illumination. It’s that simple! If you want less ambient light, use a faster shutter speed; if you want more artificial light, turn up the power on the strobe/speedlight, use a positive FEC setting (TTL), open your aperture, or increase your ISO.
![]()
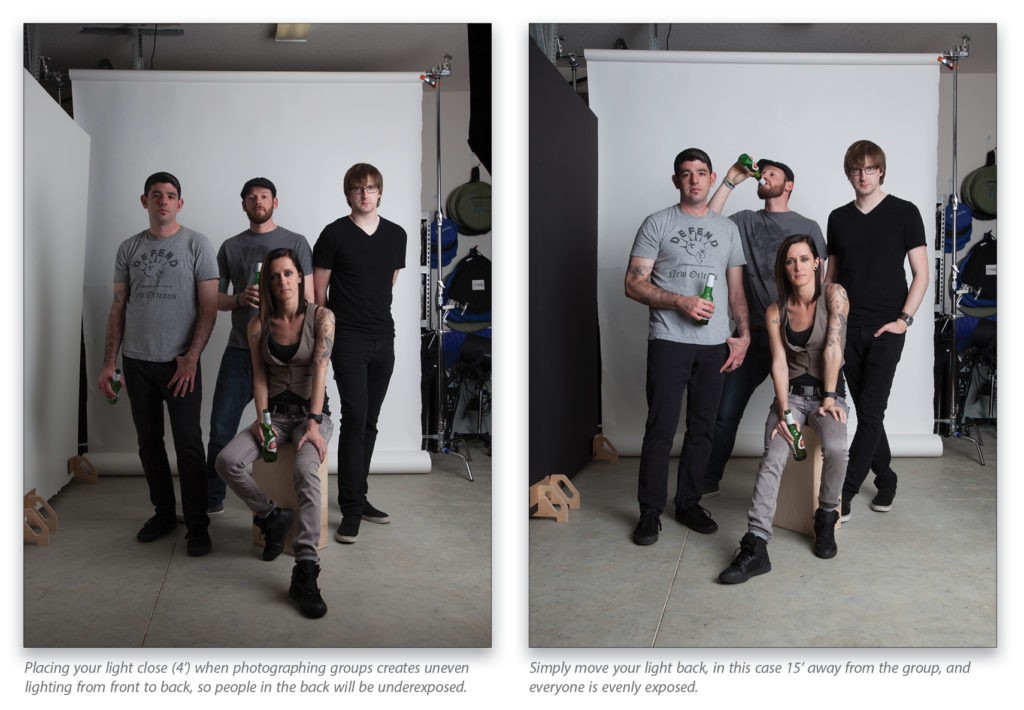
3. Inverse Square Law: This is another one of those head scratchers, because it’s counterintuitive. Without getting overly complicated, suffice it to say that light falls off more quickly as it leaves a speedlight or strobe than it does as it travels farther away. This means that from the tip of the light to 4’ away you may lose 2–3 stops of light, but then this loss gradually slows as the distance between the light source and the subject increases. For example, you might drop from f/16 to f/8 at 4’, but then the light evens out, giving you f/5.6 from 5–7′, f/4 from 7–12′, and f/2.8 from 12–15′. These are just examples; however, the point is that the farther away your subjects are from the light source, the more even the exposure will be over distance. This is especially useful when lighting staggered groups and looking for even illumination from front to back. Distance is the key!
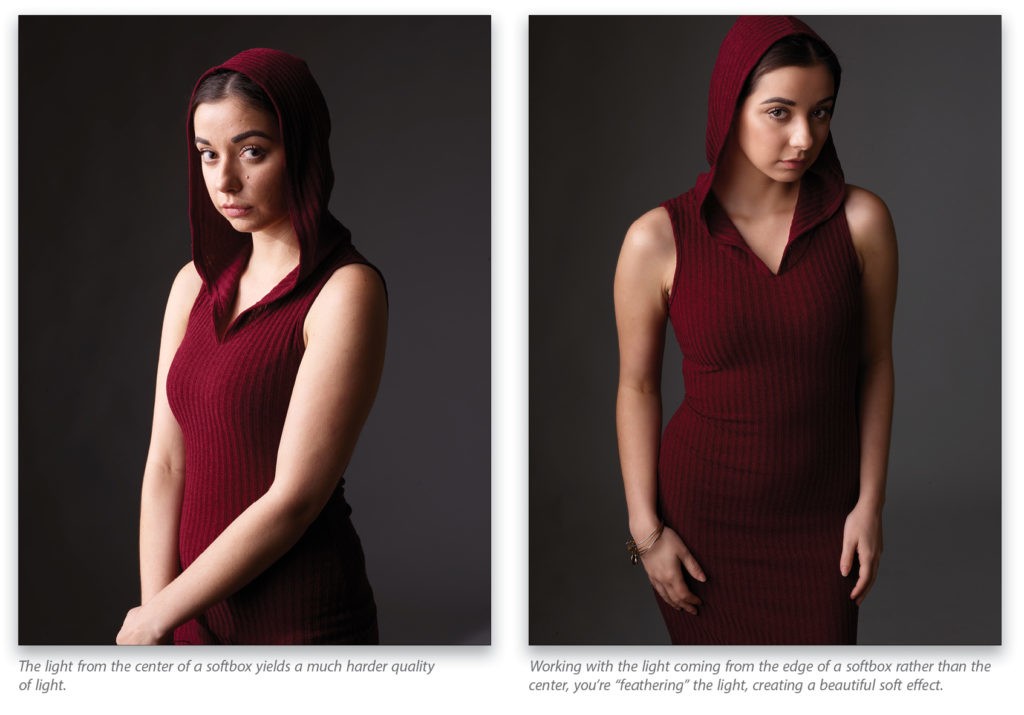
4. Feathered Light: No matter how great your softboxes, stripbanks, octa banks, and beauty dishes are, they all have one common denominator: each is brighter in the center than it is at the edges. This is known as the “hot spot.” Inner and outer diffusion fabrics and discs help soften the hot spot; however, a modifier pointed directly toward a subject typically creates a harsh(er) lighting effect. Instead, there’s an easy, no-fail fix that creates beautiful, soft light every time: feathering the light. With feathering, you work with the light at the edge of the modifier rather than the center, creating a softer, more pleasing quality of light.
Try it yourself. Have your subject stand directly in the path of a modifier (placed on their right or left side), capture an image, then have the subject step back just behind the direct path of the light coming from the modifier and capture another image. Boom! Feathered light.
5. One Modifier, Multiple Uses: We’re probably all guilty of this, and I know I am. We get a new modifier, set it up the first time, and then end up using it the same way time after time. Unfortunately, when we do this, we’re not using our modifiers to their full, multifaceted potential. When you get a new modifier, invest some time into testing each and every way it can be used. That means bare, with interior diffusion only, with exterior diffusion only, with both diffusion fabrics, direct, feathered, from the front, from the side, etc. When you do this, I’m betting you’ll find each modifier has way more uses than you imagined; consequently, you’ll need fewer of them.
6. One-Light Background Illumination: If you’re like a lot of photographers, you may be working with just one light. And if that’s you, don’t fret; the world’s your oyster. There’s a lot you can do with one light, and despite the fact that I have numerous lights, I often end up working with only one of them. It’s a lightweight uncomplicated way to work that can yield stunning results using the right techniques.
This tip is about controlling the amount of illumination on a seamless background with one light for both the subject and background. With several lights, you’d typically separate the light on the background from the key light, used to illuminate your subject. With one light, everything is illuminated by that one source, so you’ll need mechanisms to control it. This is where distance comes in. Once you’ve dialed in your key light with the desired exposure for your subject, consider them (light and subject) as one unit. As long as the distance between them remains constant, the exposure won’t change; however by moving the subject and light closer or farther away from the background, you can dramatically change the amount of light “spilling” onto the background and illuminating it. Get closer for a brighter background, further away for a gray background, and farther still for almost black.
7. Six Foundation Lighting Patterns: By committing the following six classic lighting patterns to memory, you’ll be able to quickly create just about any lighting style you need: Paramount/Butterfly; Clamshell; Loop; Rembrandt; Split Light; and Accent/Rim. There are also other arrangements that come into play, such as backlight, uplight, and top light. As you become more advanced, you’ll likely mix and combine these to create all sorts of creative effects. For now, these six basic patterns will give you a ton of mileage. The big takeaway here is: The more direction there is to your light source relative to your model, the more shadows are introduced. Many of these lighting patterns are covered in KelbyOne courses including here and here. The Internet is also rife with examples; check them out, and start putting these patterns into practice. You’ll be glad you did.
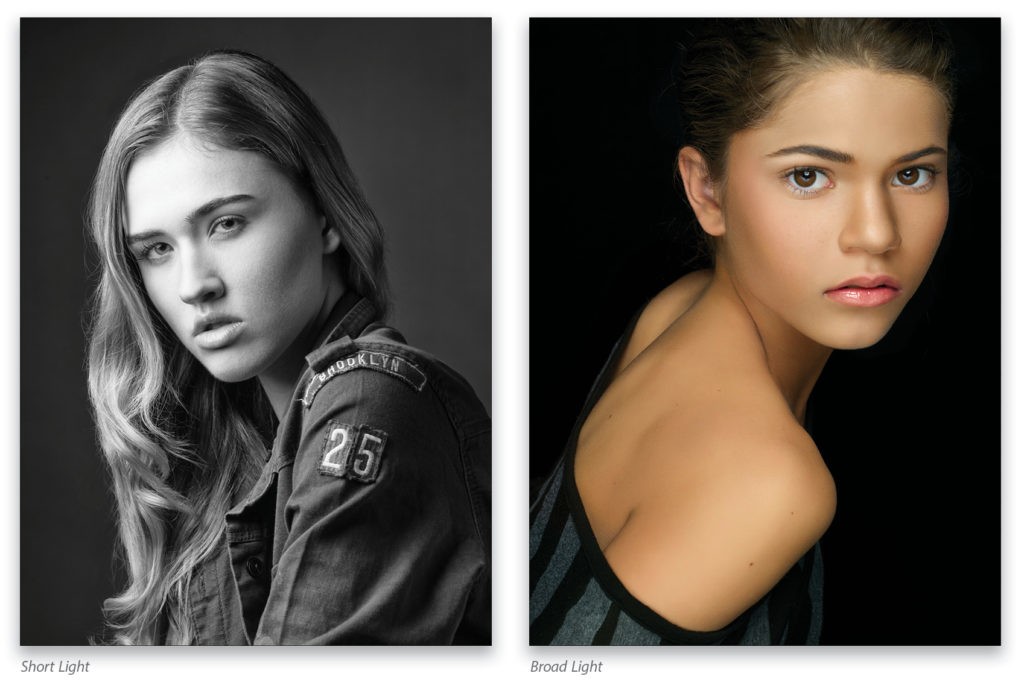
8. Short Light and Broad Light: You may have heard these terms and wondered what they mean. It’s really just jargon for simple, yet extremely useful lighting techniques. Let me try to demystify these terms: Short Light is used to describe lighting designed so the largest part of the subject’s face, the side toward the camera, is in shadow. Conversely, with Broad Light, the largest part of the subject’s face (again toward the camera) is lit while the part facing away falls into shadow. Why does any of this matter? Each lighting style creates a different effect on the perceived size or fullness of the subject’s face. Broad Light adds weight whereas Short Light slims the face. Keep this tip in your back pocket and use it when needed.
9. Independent Zones of Light: See Balancing Ambient and Flash above for more on this, but the same basic concept applies when you’re working with more than one strobe or speedlight. For the most control and creative flexibility, you’ll want to think about, and work with, each light source as a separate zone that’s independently controlled, for example: key light (zone 1), accent light (zone 2), and background light (zone 3).
Starting with the key light, turn on only that one zone and dial in the desired amount of illumination, click the shutter, and confirm its contribution. Turn off that zone and move on to the next, working one zone after the other in exactly the same manner. Once all your zones are set up the way you want them, turn on all your lights and take one more final confirmation shot to see the effect of all the lights on at the same time. Now, just “season” each light to taste! Keep in mind that if you’re using lights exclusively for the background, ensure you create some distance between your subject and the background. This avoids light spilling past your subject and contaminating the background in a significant way.
10. Why Light Meters Matter: I’m a big believer in the use of handheld meters, and here’s why. They do things your camera’s meter simply cannot: They allow you to work consistently, accurately, and way more quickly than possible without one. Sure, you can chimp your way to the right flash exposure, shooting and adjusting until you get it right; but wouldn’t it be great if the first exposure you made was the one you wanted. You’d look like a boss, right? Well that’s exactly what a handheld flash meter allows you to do: It makes you into a lighting boss.
Simply put, your camera’s built-in meter can’t measure flash in manual exposure mode. Even with TTL metering, the camera is inferior to a handheld flash meter. This is because both meters work differently. The meter in a DLSR takes what’s known as a “reflective” reading, measuring the light reflected off whatever you happen to be shooting at that moment; whereas a handheld flash meter takes an “incident” reading, which measures the light falling on the subject matter. Given that different surfaces reflect light with more or less intensity (think black and white fabric next to one another), it makes sense that an incident reading would be much more accurate, as well as consistent. Seriously, meters are just tools and nothing more. They don’t make you more or less creative. My suggestion is to learn how to use a light meter so you’ll have that know-how when you need it.
11. Grids: If you’re not working with these essential light-shaping tools I recommend checking them out ASAP. Rigid grid spots and soft egg crate grids allow you to control precisely where the light from a strobe or constant light falls and where it does not. Available in various degree ratings indicating how wide or narrow they are, grids allow you to avoid light spill, which can contaminate backdrops; create defined pools of accent light; add background halos; and much more. See my “Grids are Essential” in the April issue of Photoshop User (p. 70) for more on these amazing tools.
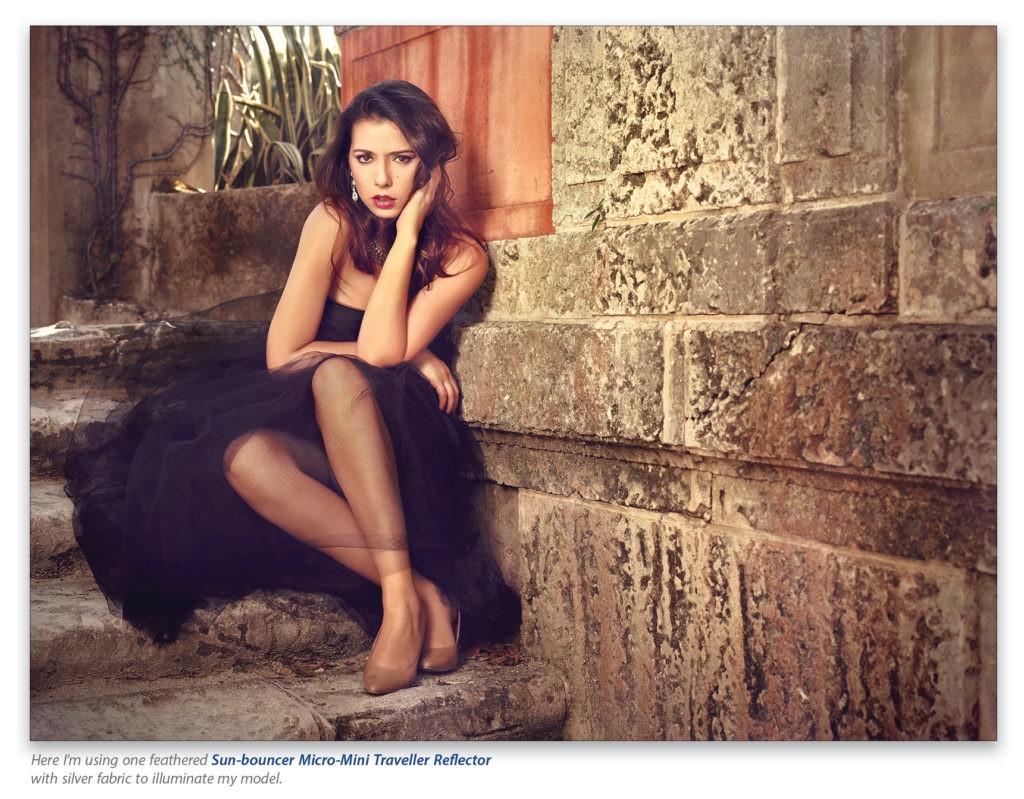
12. Reflectors, Diffusors/Scrims, Subtraction Panels, Flags, and Nets: There’s an entire universe of amazing lighting tools that don’t plug in or operate on batteries. They’re also significantly less expensive, yet no less essential than your lights. Each of these is a must-have tool in my humble opinion.
Use reflectors to create a secondary fill or accent light source. Diffusion panels (available from pop-up sizes to 20×20’) save the day by allowing you to easily tame nasty overhead sun anytime, anywhere. Subtraction panels (often ignored) introduce shadow rather than additional light. And last, but not least, are flags and nets, which are light-shaping tools (available in a variety of shapes and sizes) that allow you to block light entirely or knock it back a few stops exactly where you need it. I can’t say enough good things about the utility and creative uses possible with each of these tools.
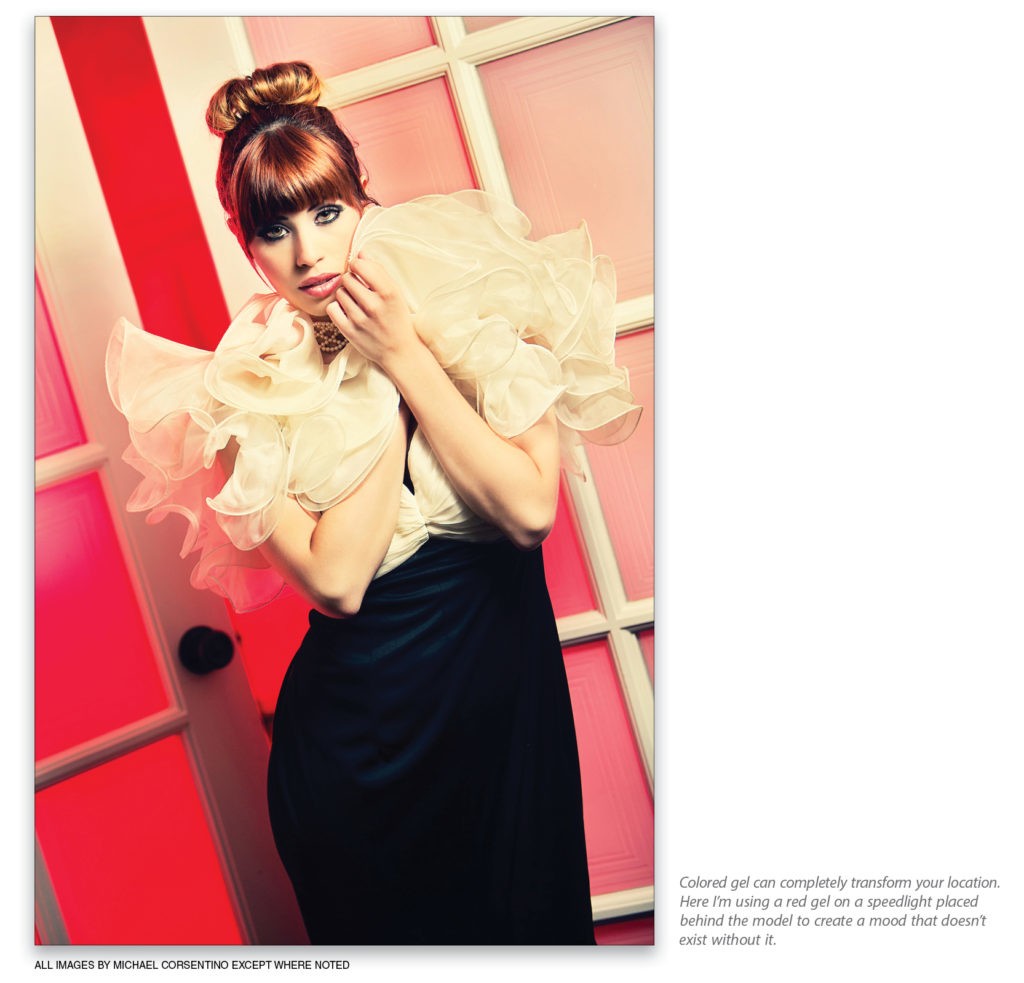
13. Gels: These amazing tools could fill an entire article by themselves. Gels are indispensable tools providing both creative and corrective solutions. One of my simple go-to methods on location is to use a Color Temperature Orange (CTO) gel on my accent light to mimic the warmth of the afternoon sun. You can also introduce an incredible spectrum of colors, mood, and drama with colored gels, or cut light with neutral-density gels, and the list goes on—the sky’s the limit. Keep one important thing in mind: When you’re working with gels, less is more—less light that is. Lower flash-power levels will deliver more color saturation from gels than trying to blast a ton of light through them. Although this seems counterintuitive, trust me it works!
Well now that my editor is ready to kill me for writing a book instead of an article, I’ll wrap it up by reminding you to try not to overcomplicate what lighting is all about. It’s really simple once you grasp a few key concepts. Try everything on the list above and you’ll be well on your way to a fuller understanding. As always, feel free to reach out and post on my Facebook page, Michael Corsentino. I can’t wait to see what you guys come up with!
This article originally published in the May/June 2016 issue of Photoshop User magazine.


A really great article on one of the most important tools that a photographer has. Through my study into photography I’ve seen almost endless references to the investment of cameras and lenses to get better in our craft. While gear is great – if the illumination of the subject is bad then the image will also be bad regardless of the gear used.
At present I only own one speed light and have struggled in the area of getting good images let alone explore the area of creativity in my photography. I’m really looking forward soon to purchasing a couple of more lights to add dimension to my images and then to explore the realm of adding color to my creations.
Thanks for simplifying such a difficult subject. I say ‘simplifying’ to mean talking in easy to understand terms, although I know that it will take a lot longer to produce the effects of light that I want consistently in my images. I just love how light is really the unspoken and usually dreadfully-feared-wonder-tool that is available if we just know how to tame this seeming untameable beast.KKKKkkk