The most accurate method for changing the color of an object has been around since Photoshop 6 or so. It works great but is really slow when you have to make several different color versions of the same thing. Smart object color change is the fast and easy answer.
Credit for this system of changing colors in Photoshop goes to my dear friend, fellow Photoshop World instructor, and commercial photographer, Jim DiVitale. Jim calls it the “dot com” method, which is a way of remembering the layer order and the blend modes required for colors to change (more on that in a minute). His color-change technique evolved because his client, a manufacturer of apparel, needed the same item in various colors for their annual catalog and website. The problem? They only had one color of each item. Jim had to photograph each one then provide it in accurately re-colored versions. The key word is “accurately” making the new colors.
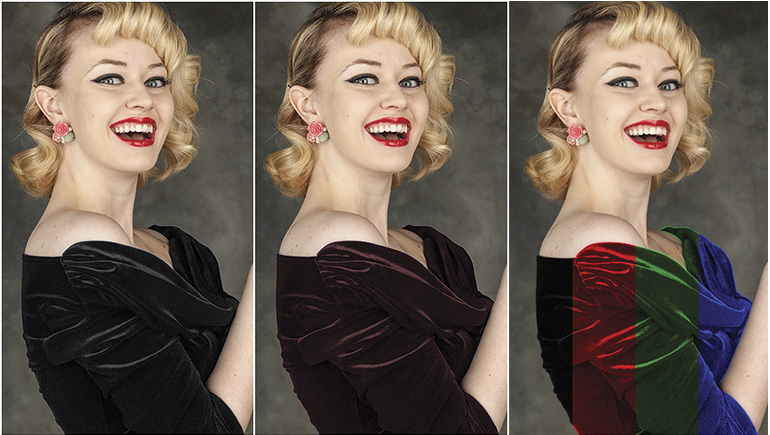
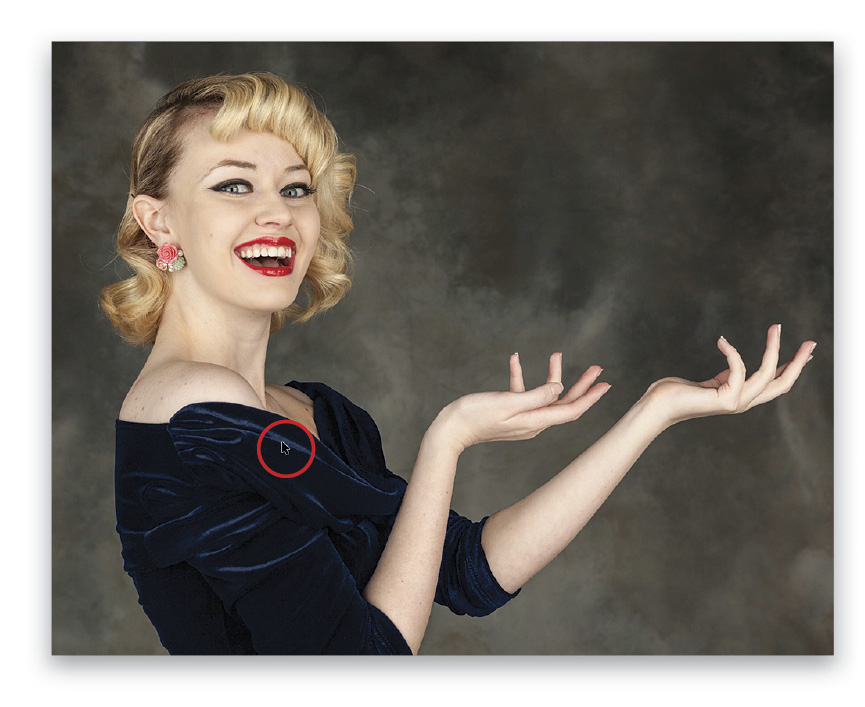
The practice file for this project is a cropped version of the one from last issue’s “Dynamic Range” where I explained the ins and outs of linked smart objects. This time, it’s a different kind of linking for changing the color of Jennie’s black velvet dress to red (or green or blue.)
[KelbyOne members may download the files used in this tutorial here. All files are for personal use only.]
Smart Object Linking
Before getting into the color change portion of this article, there’s a property of smart objects that you’ll want to know: Smart objects that are duplicated using either Command-J (PC: Ctrl-J), Layer>New>Layer via Copy, or simply dragging them to the Create a New Layer icon at the bottom of the Layers panel are linked to each other. Don’t confuse this linking to linked smart objects (see last issue’s “Dynamic Range,” p. 48.) What’s done to a smart object duplicated in any of these ways happens to all of the others. Let’s take a look at an example.
Step One: In Bridge, navigate to where you downloaded the folder containing the practice files for this exercise. Double-click Jennie as Smart Object-1.psd to open it in Photoshop.
Step Two: The filename in Photoshop appears as Jennie as Smart Object-1.psd, but the layer in the Layers panel carries the original filename. It has a special smart object badge in the lower-right corner of the layer’s thumbnail. Press Command-J (PC: Ctrl-J) to make a copy of the smart object. The same layer name plus the word “copy” shows in the layer stack.
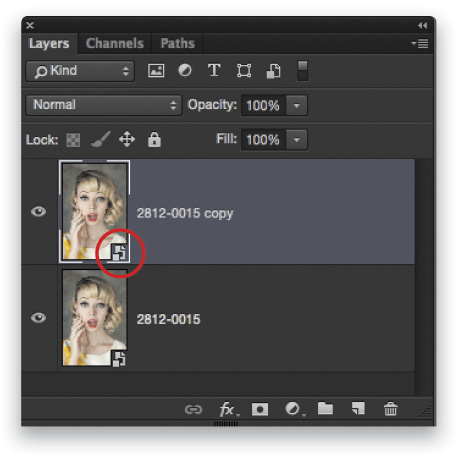
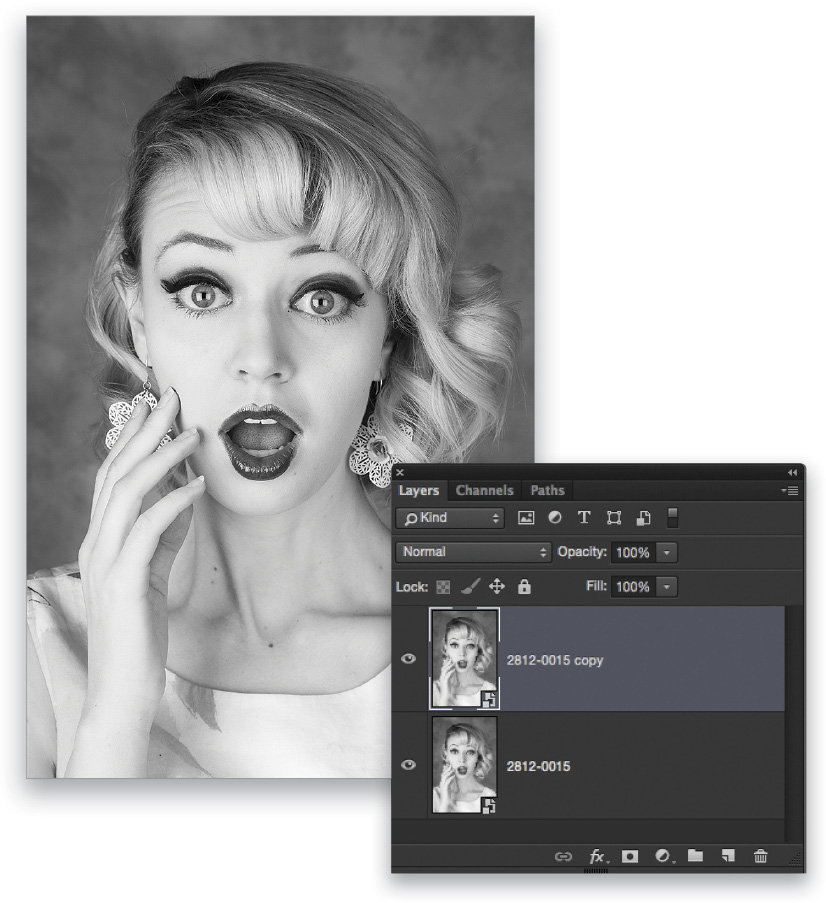
Step Three: Double-click the thumbnail of the highlighted layer—it really doesn’t matter which one—and it opens in the Camera Raw dialog. Click the fourth tab from the left under the histogram to open the HSL / Grayscale panel (or press Command-Option-4 [PC: Ctrl-Alt-4]). Check Convert to Grayscale. The photograph of Jennie converts to black and white. Click OK.
You’d expect that the layer you converted to black and white in Camera Raw would be monochrome while the other one remains in color. What actually happened? Yep, they both became black and white. Remember we said that smart objects made by duplicating another smart object are linked to each other; well, here we changed one and the same change happened to the other. Close the file. Save it if you like.
Contamination
The problem with changing colors is that the existing color in an object contaminates the new one. Any method for making something a new color has to begin with a neutral object. And no, a black dress isn’t necessarily neutral.
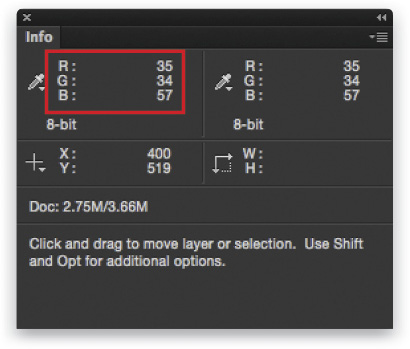
Step One: Open the file Jennie.jpg in Photoshop CC 2015. This tutorial works in all versions of Photoshop that support smart objects. (Note: If the Camera Raw dialog opens, click Cancel, go to Photoshop CC [PC: Edit]>Preferences>Camera Raw, set the JPEG drop-down menu in the JPEG and TIFF Handling section to Disable JPEG Support, click OK, and reopen the Jennie.jpg in Photoshop. There’s a saved path in the JPEG file, and if the file opens with Camera Raw, you won’t see the path in the next step.) Display the Info panel (Window>Info), then hover the cursor over one of the highlights in the dress. In the example shown here, the RGB numbers are 35, 34, and 57, respectively. Blue is almost twice as bright as red and green.
Step Two: Make a selection of the dress using your favorite tool, or go into the Paths panel (Window>Paths), hold down the Command (PC: Ctrl) key, then click on the thumbnail for the path named “Dress.” Next, press Command-Option-R (PC: Ctrl-Alt-R) to open Refine Edge. Feather the selection 0.9 pixels, and click OK.
Step Three: Make a new layer using the shortcut Shift-Command-N (PC: Shift-Ctrl-N), name the layer “Red,” and click OK. Next, press the V key to choose the Move tool and then press the 1 key, which sets the layer Opacity to 10%. Click on the Foreground color swatch near the bottom of the Toolbox. Set R to 255, G to 0, B to 0, and click OK. The color is pure red. Change the blend mode of the Red layer to Color (Shift-Option-C [PC: Shift-Alt-C]). Press Option-Delete (PC: Alt-Backspace) to fill the selection with red. Where you expect to see red in the highlights, it’s purple. The extra blue causes the issue. The object that gets a new color must be neutral first.
Neutralization
Neutralizing a color means making the RGB numbers equal to each other. No, it’s not math; it’s really easy.
Step One: Hide the layer Red by clicking its Eye icon in the Layers panel.
Step Two: With your selection of the dress still in place, click on the Background layer to make it active, and then press Command-J (PC: Ctrl-J) to copy the selection into a new layer. Double-click the new layer’s name and rename it “Grayscale.”
Step Three: Choose Image>Adjustments>Desaturate (from the keyboard, it’s Shift-Command-U [PC: Shift-Ctrl-U]). The blue cast disappears. Run the cursor over the dress and, no matter where you hover, the RGB numbers are always the same. The layer Grayscale is now neutral. The Grayscale layer is the “dot” in the dot com method.
Step Four: Make sure the Red layer is above the Grayscale layer in the Layers panel and make it visible. The color shows at 10% red instead of purple.
Step Five: Highlight Red in the Layers panel, and press the Delete (PC: Backspace) key to remove it from the layer stack.
The “COM” of Color Change
The photograph of Jennie in the black dress still has the Grayscale layer, so we’re set to make color changes quickly and easily. Here’s how:
Step One: Highlight the layer Grayscale in the Layers panel. Duplicate it by pressing Command-J (PC: Ctrl-J).
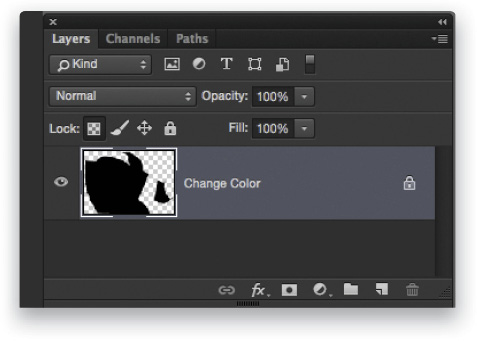
Step Two: Rename this layer “Change Color.” Click the Lock Transparent Pixels icon (checkerboard) to the right of the word “Lock” in the Layers panel.
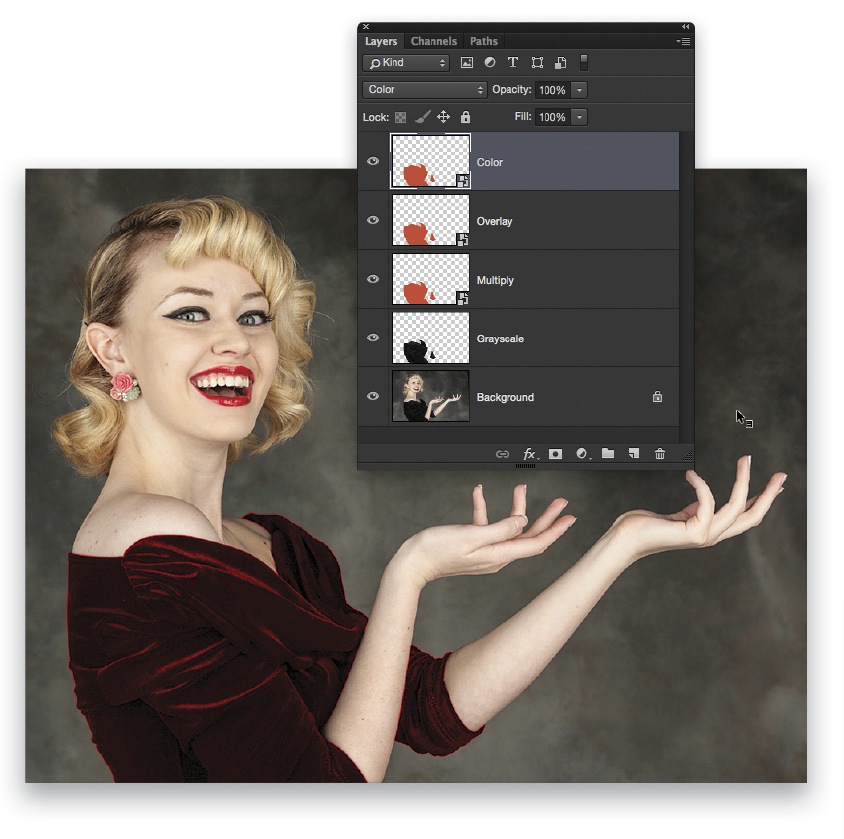
Step Three: Now, choose Layer>Smart Objects>Convert to Smart Object. You can also Right-click to the right of the layer’s name and choose Convert to Smart Object. Rename this layer “Multiply.” Change its blend mode to Multiply in the Layers panel.
Step Four: Duplicate the Multiply layer, rename it “Overlay,” and change its blend mode to Overlay.
Step Five: Duplicate the layer Overlay, change its blend mode to Color, and rename it “Color.”
Step Six: Set the Opacity of the Multiply and Overlay layers to 50%; leave Color at 100%.
There are now three smart objects that are linked to each other by duplication. The top layer is Color, then Overlay, and below that Multiply. The first letter of each layer from the top down spells “com.” Below that is the neutral layer Grayscale or the “dot.” That’s an easy way to remember the modes and their order for the dot com method.
New Color
It’s super easy now to make the black dress red using this smart object setup.
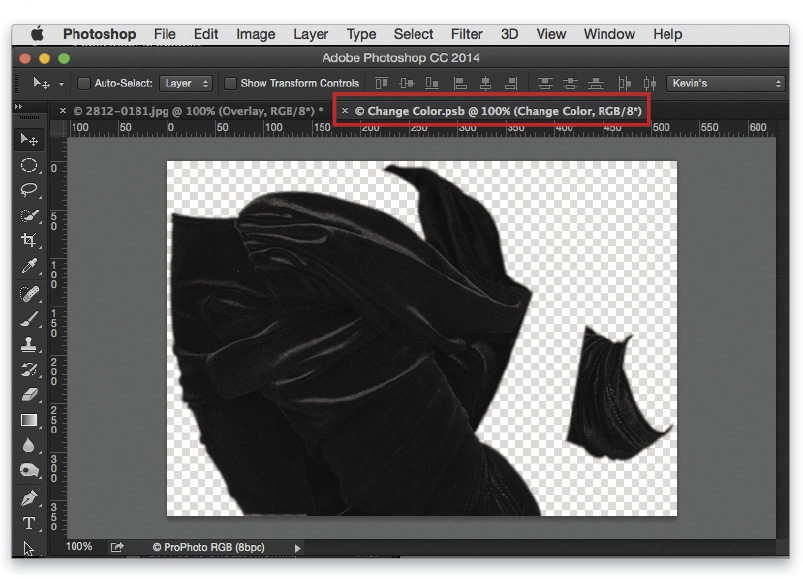
Step One: Double-click on any thumbnail of the three smart objects. It opens in Photoshop. This may seem confusing at first. Here’s what’s happening: Smart objects are separate documents contained within the layer stack. They open in a new tab or file window. In this case, I double-clicked Color. The new tab is Change Color.psb with the Change Color layer active.
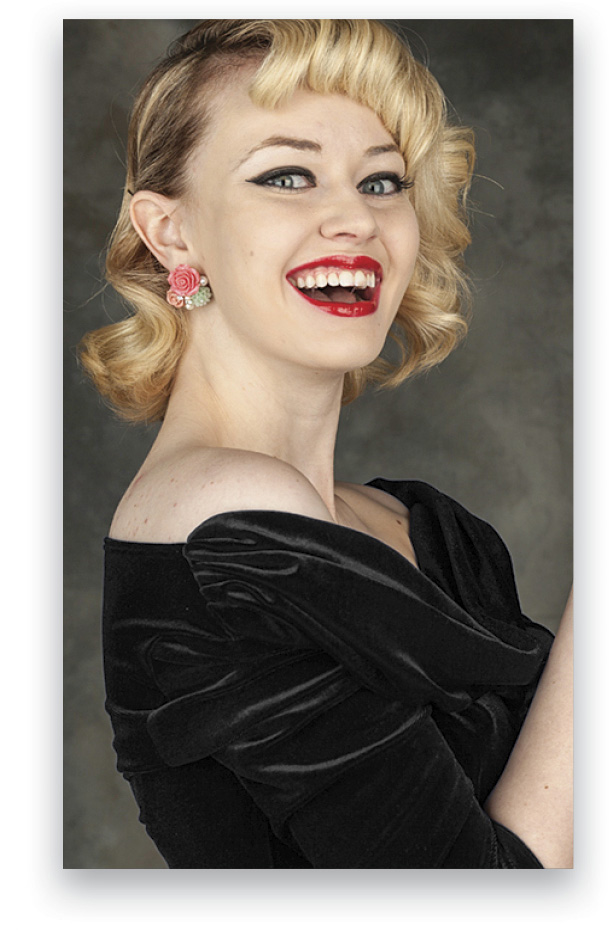
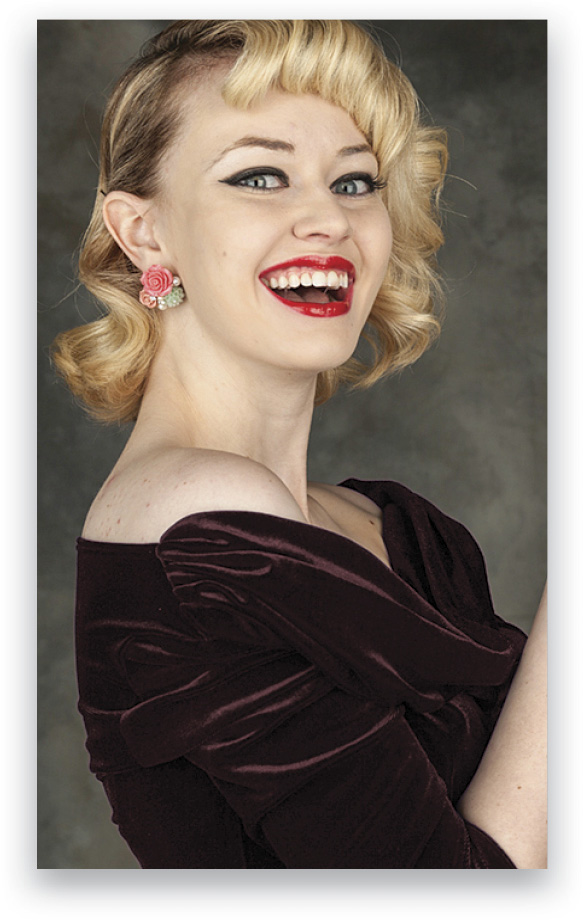
Step Two: Red is still the Foreground color, so press Option-Delete (PC: Alt-Backspace) to fill the pixels in the layer with red. (Note: If the whole layer turns red, the Lock Transparent Pixels icon wasn’t turned on. Press Command-Z [PC: Ctrl-Z] to undo the fill, click the Lock Transparent Pixels icon, and then fill again with red.) Press Command-S (PC: Ctrl-S) to save the file then Command-W (PC: Ctrl-W) to close it. Both changes propagate to the other two smart objects.
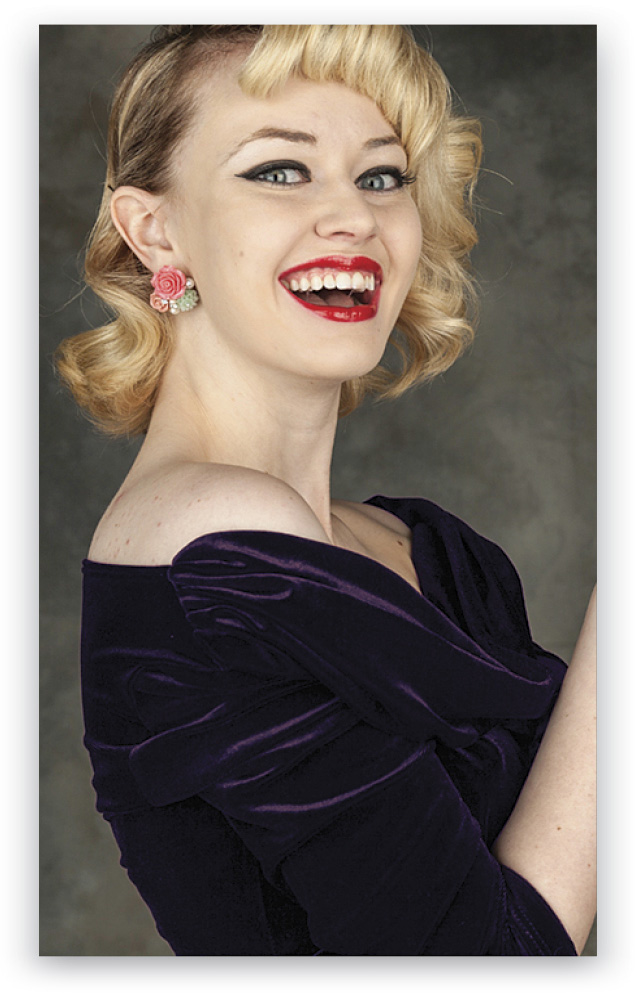
Step Three: Now, let’s make her dress blue. Click the Foreground color, enter 0 for R and 255 for B, and click OK. Now, double-click any of the three smart objects. Fill it with blue, save, and close.
Step Four: Press V for the Move tool, highlight the Multiply layer, and press 1 to set its Opacity to 10%. The blue becomes brighter.
Step Five: To make it brighter still, highlight the Grayscale layer, and duplicate it with Command-J (PC: Ctrl-J). Rename the layer “Screen 50%,” press 5 to set it to 50% Opacity, and change its blend mode from Normal to Screen. This makes the underlying Grayscale layer lighter, which brightens the color.
What Does What?
The Multiply layer controls the brightness, Overlay adjusts the color’s shade, and Color guarantees the color is pure. Adjusting these layer’s Opacities will handle most colors. This works even when starting with something really dark like Jennie’s black velvet dress.
The New Question
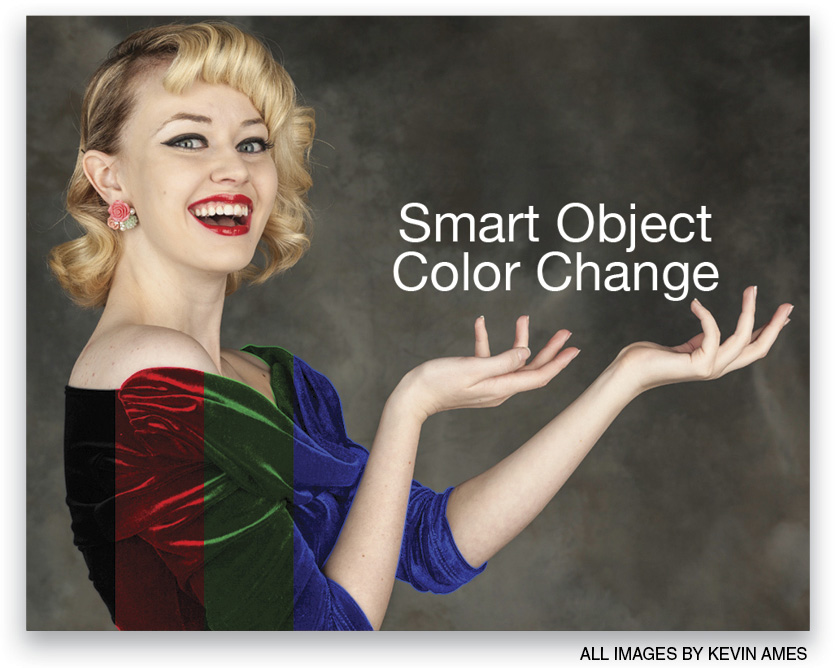
The question used to be, “What color is her dress?” Thanks to smart object color change, the question now is: “What color would you like it to be?”
I’ve been using this method since Jim first shared it back in the days of Photoshop 6. When I showed him how to use smart objects for fast color changes, he told me it would save him about six solid days of prototyping new color products for his client’s latest catalog. Now you too can have new colors on existing photos quickly with smart object color change. Enjoy!
Note: I’ve included an action set called Color Change by Jim DiVitale & Kevin Ames.atn in the downloads folder. Double-click it to load the set into the Actions panel (Window>Actions) in Photoshop. Make a selection of the area you wish to have a different color, and run the action called Smart Object Color Change. It’s preset to make the change red. Double-click any of the com layers, fill it with the new color, save, close, and you’re done!
This tutorial originally published in the October, 2015 issue of Photoshop User magazine.


