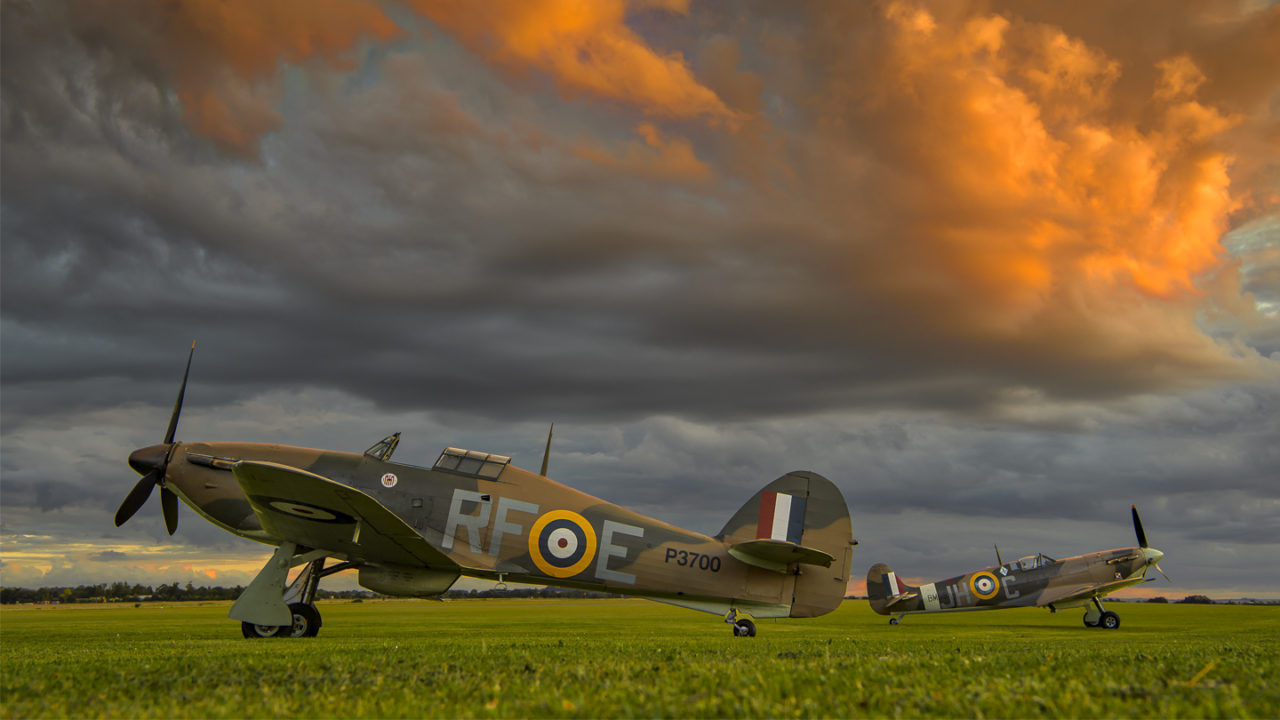
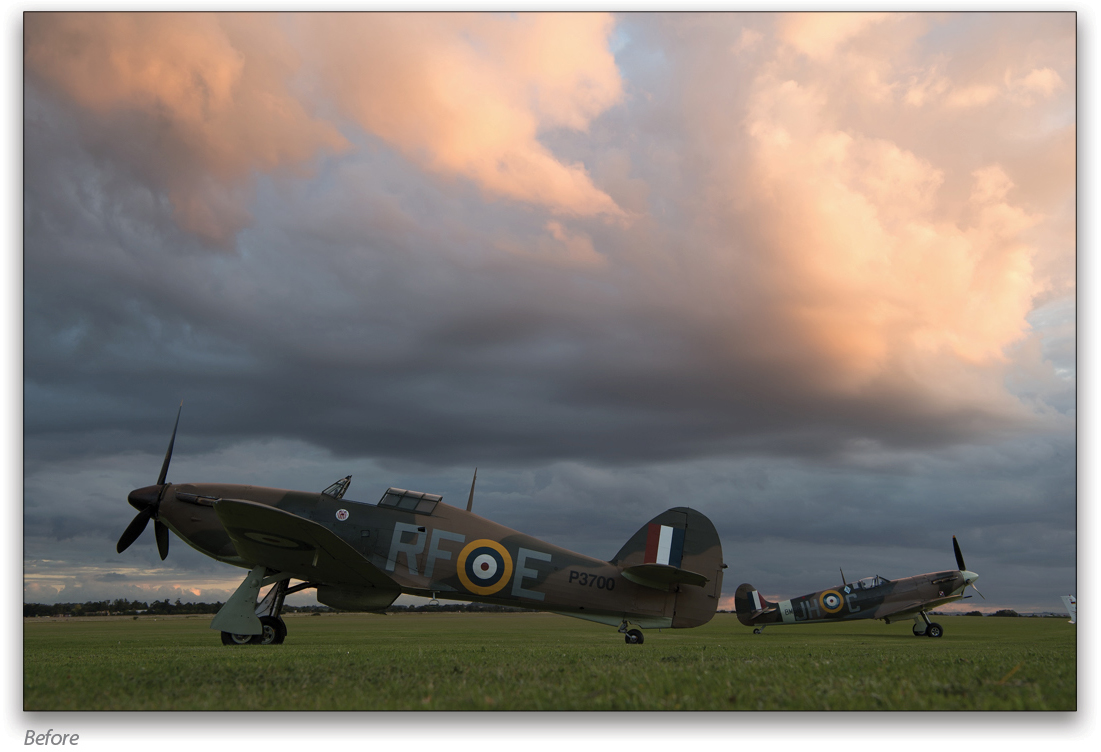
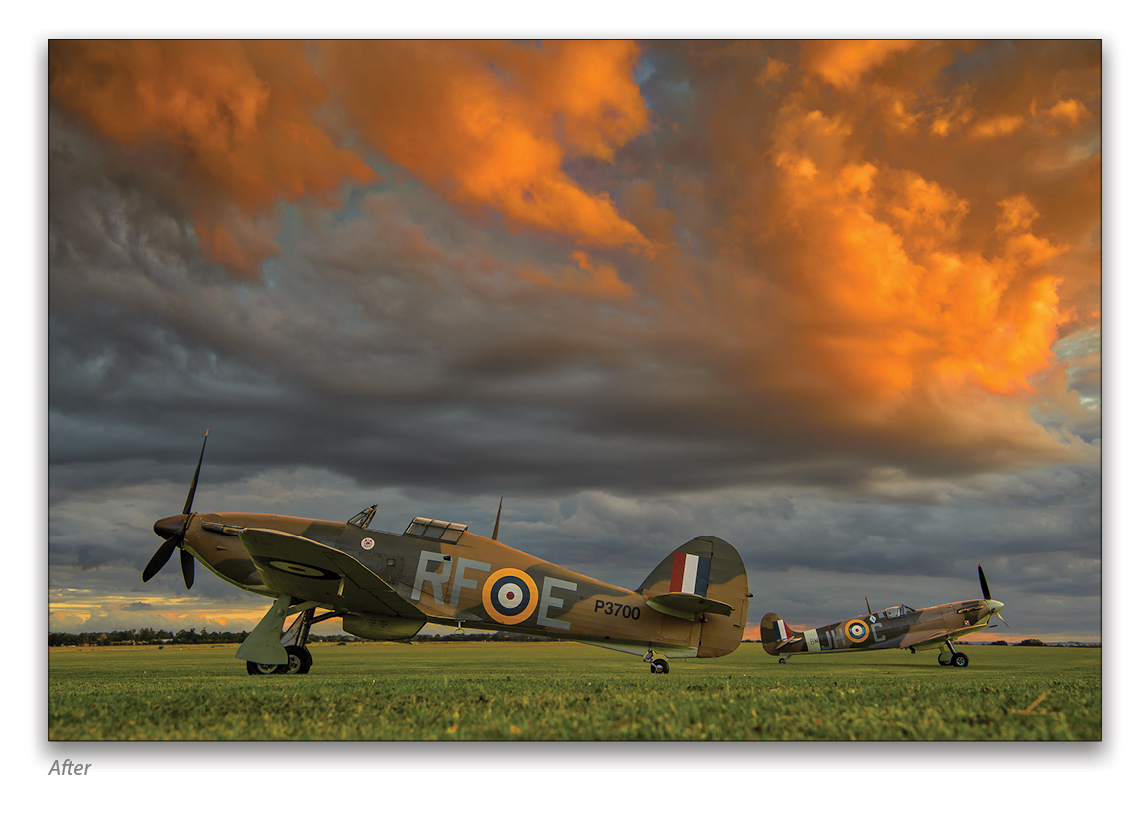
It was a typical day in England, light wise that is. We’d spent the whole day on the historic Duxford Field with the Historic Aircraft Collection’s spectacular Supermarine Spitfire Mk Vb and Hawker Hurricane Mk XIIa. We’d had those stereotypical English gray skies most of the day. The field, aircraft, even the weather is exactly what the men and women of the British Royal Air Force saw during WWII as they launched these very aircraft to defend their nation. That’s a lot of history to shove in your viewfinder, even more when you share that final photograph! Then, when the sun worked its magic as only it can at sunset, the photographic challenge exploded with the romance that it now brought to the field.
The finishing process started before the camera even went click. To start with, I selected my Nikon D5 with the 24–70 VR lens attached. I set the camera’s white balance to Cloudy to have that 6000 K lock in the color of the evening sky. With the shape of the cloud in my fanciful imagination reminiscent of an actual hurricane, I wanted the Hurricane in the foreground. Then, to bring in as much sky as I could, I laid down (not a pretty sight) and pointed the camera up as much as possible, taking in as much sky as I could while still having somewhat large subjects in the foreground.
Before I laid down, I looked at the entire background and the aircraft so they lined up as best as possible to bring energy to their static parking. In aperture priority (f/8) with zero exposure compensation, I made the clicks as the sun sunk in the west while the clouds headed to the east. In a heartbeat, the moment had gone from our vision but remained in our hearts. And that’s how I finished the image—with my heart.
It Starts in ACR
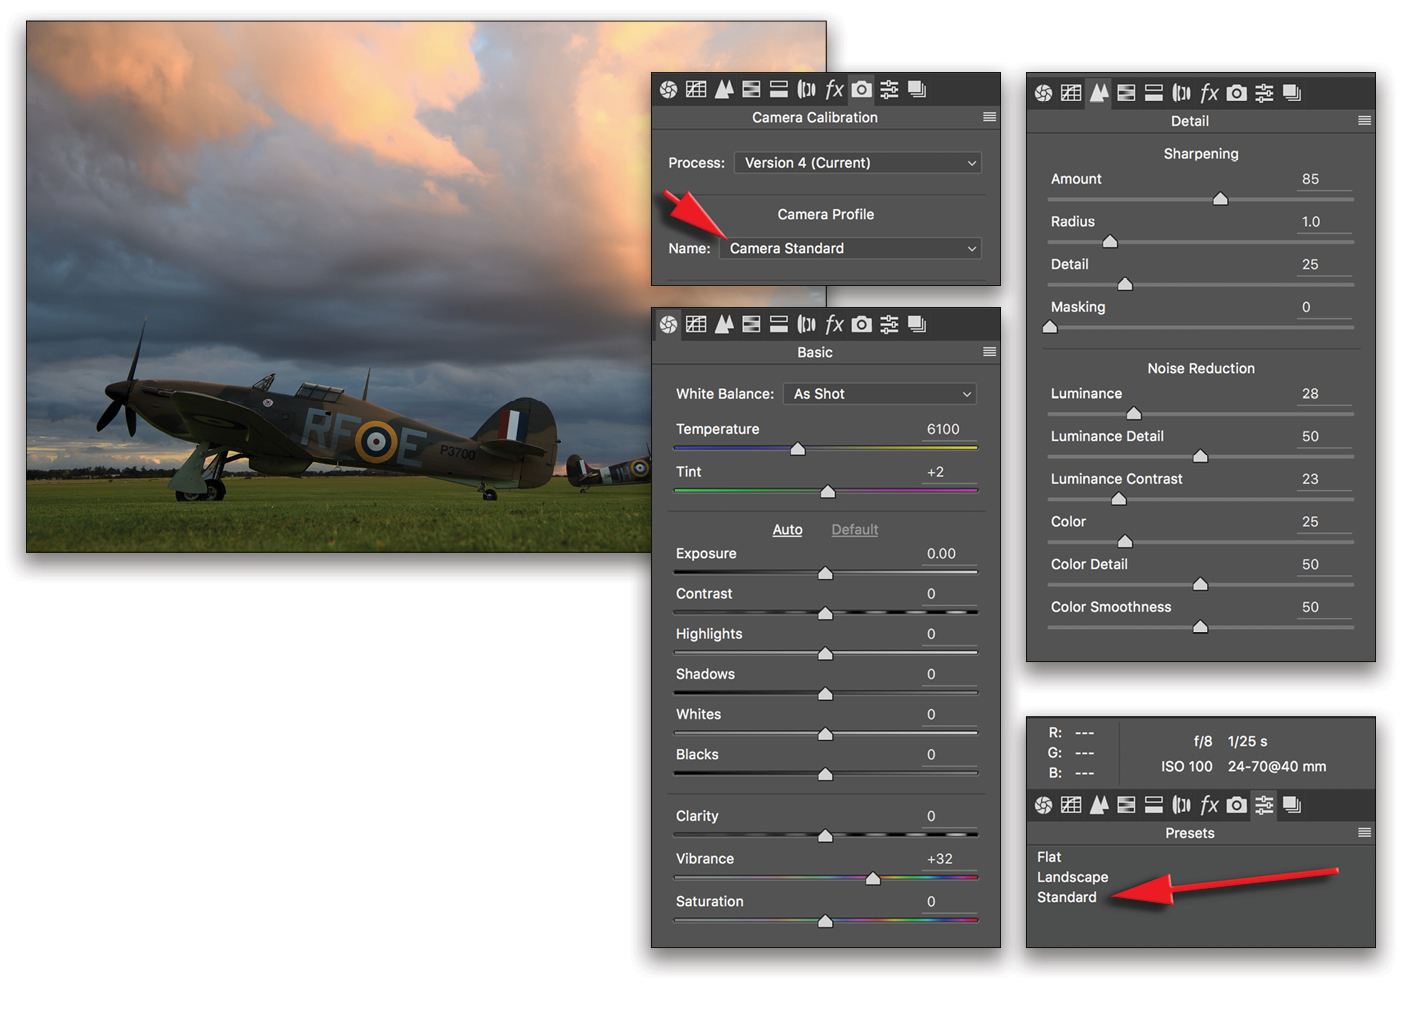
The first thing you see when you open the file in Adobe Camera Raw (ACR) isn’t what your visual memory has stored. That’s important to remember, which is why you use the presets in your camera and then tell ACR to honor them. I shot with the Standard Picture Control in the D5, so I’ve created a preset called “Standard” that, once clicked, honors all those camera settings. It’s simple to create the preset, which not only brings the photo back to life, but also speeds up your workflow.
Step One:
My preset contains the following settings and, if you want, you may copy them to create your own. To create the preset, click the Create New Preset icon at the bottom of the Presets panel, give your preset a name, turn on the settings you want to include, and click OK.
Step Two:
With my photo basically back to what I had seen, it was time to bring the romance into the finishing. Most of what I did at the camera was for the sky: its color, shape, and romance. With the range of light on the verge of being beyond six stops, which is what the D5 can capture in one click, the photo’s brightness and lack of color are the biggest issues. So that’s the first thing to be dealt with in ACR. And it’s simple!
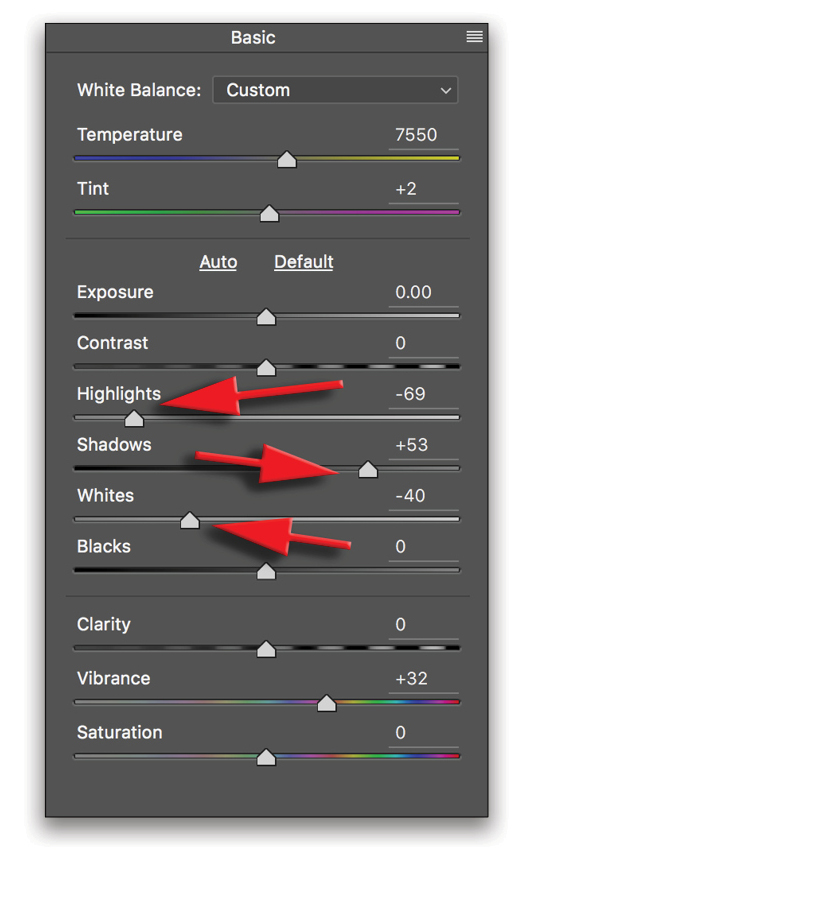
I started in the Basic panel by changing the White Balance up to 7550. While the camera did its job, I wanted more warmth, and I prefer to use White Balance to achieve that. At the same time, I didn’t want the eye pulled up to those clouds too quickly, so I dragged my Highlights and Whites sliders down. Those three quick-and-easy moves bring the sky into the romantic range. The subjects need a tad of light now, so notice how I moved the Shadows slider for them. That move is just for the two aircraft. Easy! But the sky still needs a touch more love to sew up their impact.
Step Three:
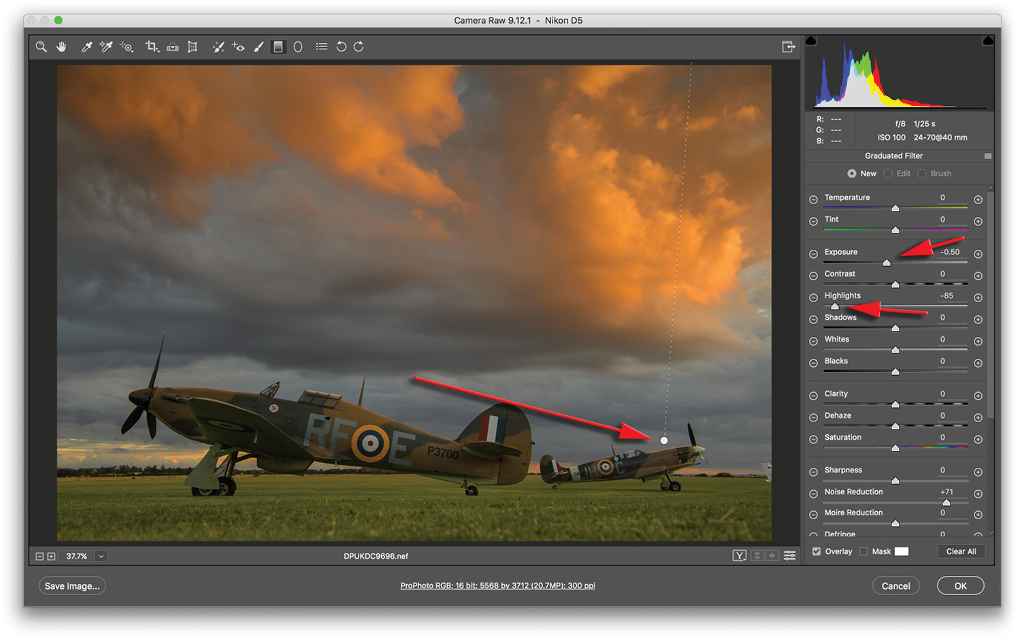
I love using the Graduated Filter (G) in ACR; it’s a simple and powerful tool. As you can see, I did no more than bring down the Exposure and Highlights in those clouds. It doesn’t take much to bring more power and romance to the clouds using this tool. It’s critical to note that the Graduated Filter isn’t drawn down the middle of the photo nor on a perpendicular line. Rather, it’s off to the right and angled down to the left. The reason? Where’s the sun setting in the photograph? It’s in the west, which is the right side of the frame. What direction is the light from the sun going in the frame? From right to left. So in finishing for the romance, you have to stay true to the light, which is why the Graduated Filter is positioned the way you see it.
And with that, I’m done in ACR, so into Photoshop we go. Hold the Shift key so the Open Image button changes to Open Object, and click the button to open the image as a smart object in Photoshop.
The Luminar Kiss
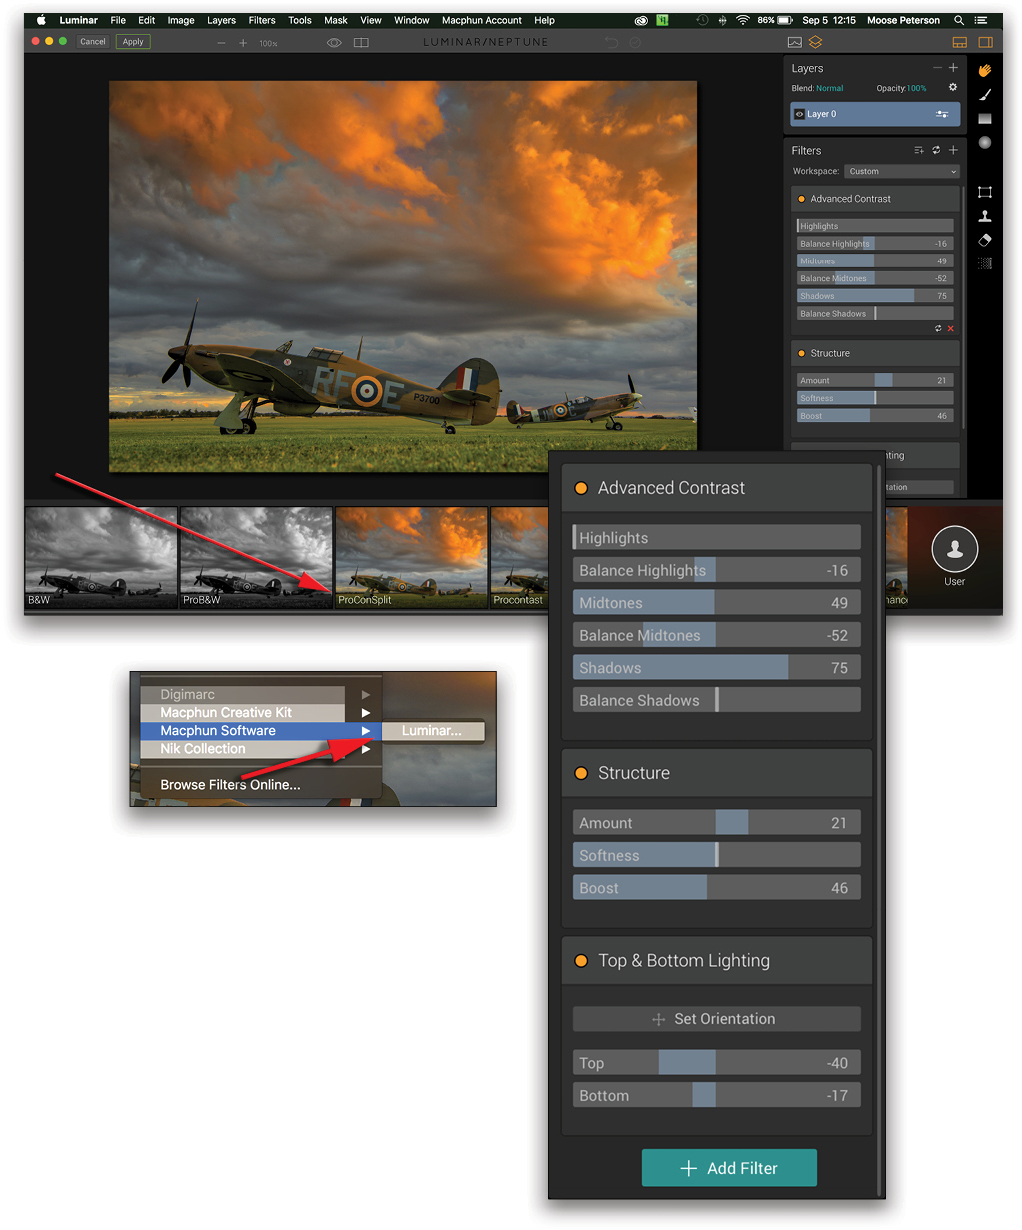
I’m a huge Macphun Luminar fan, and you’re about to see why. With the file open in Photoshop (as a smart object), I chose Luminar near the bottom of the Filter menu to launch the plug-in. You’ll see that I’ve created a bunch of my own Luminar presets. The one I used to finish this photo is what I call “ProConSplit.” It’s a combination of my ProContrast and Split filters. Now what are these doing for the photograph? They bring a “dramatic punch” to the photograph. Before I applied the preset, the photo had pretty strong colors at the top and muted colors at the bottom, so to bring them in line together visually, I used the ProConSplit to darken the top, brighten the bottom, and punch up the colors to force the eye to make a circle within the frame. In application, it’s simple. You need to know your finishing tools before you take your photo because it aids in how you capture the image.
Polishing the Rivets
While this is the most important aspect of finishing my aviation images, it’s the simplest. You could think of it as “sharpening for content,” as that’s how I came upon the technique. I just put a twist on it by creating an action to make it all happen.
Step One:
Start by creating a new document in Photoshop (Command-N [PC: Ctrl-N]). All we need is a blank document. Then go to the Actions panel (Window>Actions) to create your action. If Button Mode is turned on, turn it off by clicking the flyout menu at the top right of the Actions panel, and selecting Button Mode. Click on Create New Action at the bottom of the Actions panel, give it a name (I named mine “High Pass”), and click the Record button in the New Action dialog to start recording. Then perform these steps:
- Press Command-J (PC: Ctrl-J) to duplicate the layer.
- Go to Filter>Other>High Pass, enter 3 pixels, and click OK.
- Change the layer blend mode near the top left of the Layers panel to either Overlay or Soft Light.
- Click on the white square at the bottom of Actions panel to turn off recording. And that’s it.
Step Two:
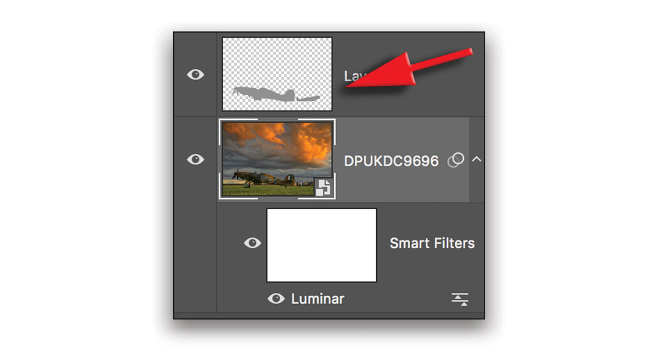
Now press W to switch to the Quick Selection tool (leaving it at its default settings), and make the smart object layer with the image active in the Layers panel. Select both aircraft with the Quick Selection tool. Click on the action you just created, and then click the Play button at the bottom of the Actions panel. You should see a new layer that looks like this.
All this layer is doing is polishing those rivets, bringing out the TLC the plane owner gives his aircraft. You shouldn’t see any big radical change; rather, a very subtle touch that really shines especially when you print your photograph. With that, we’re on the downhill finishing stretch now!
Step Three:
You may have noticed the tail of another airplane sticking into the image on the right side. To remove a distraction like this in an image, start by creating a new empty layer by going to Layer>New>Layer. Switch to the Spot Healing Brush (J), and set it to Sample all Layers in the Options Bar. Using the Bracket keys on your keyboard, make the brush slightly larger than the distraction (in this case the tail of the aircraft), and with one click, the distraction is removed.
I saw the tail of that aircraft when I did my background check, but I knew it could easily disappear in post. Why make its own layer to remove it? You just never know if the plane owner of that tail might want a print with their plane in it.
The last two touches are strictly for the subjects: the two aircraft. After all that has been done to finish the photograph, I wanted them to have more “light” from the clouds above. Here we need to tap into both our and the viewers’ imaginations. We’ve all seen how big, dramatic sunsets bounce their magical light, transforming the landscape. Well this one didn’t do that in real life, but we could make it happen in post. Here’s how:
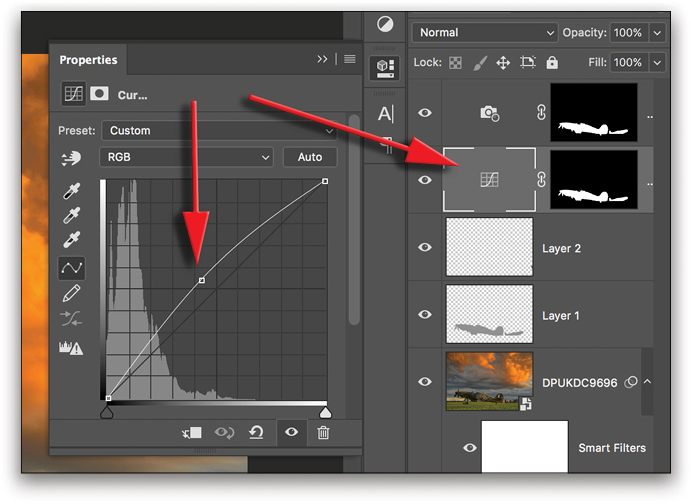
Step Four:
Using that “polishing-the-rivet” layer, hold down the Command (PC: Ctrl) key, and click on its thumbnail in the Layers panel. Those aircraft are now selected. Click on the Create New Adjustment Layer icon (half-black, half-white circle) at the bottom of the Layers panel and select Curves. The Curves adjustment layer uses the selection to create a mask, so only the airplanes will be affected by the curve. In the Properties panel shown here, the grid behind my curve may be showing smaller squares than what you’re seeing in your Properties panel. If that’s the case, hold down the Option (PC: Alt) key and click anywhere in the grid. These smaller squares are called the 10% grid, and if you grab the curve dead center and move it diagonally just one grid square, that’s equal to a stop of exposure compensation.
In this case, you can see I “lit” the two aircraft with an extra half stop of light. The problem with this is that I just introduced white light to the aircraft, and we want warm light from the clouds. No worries!
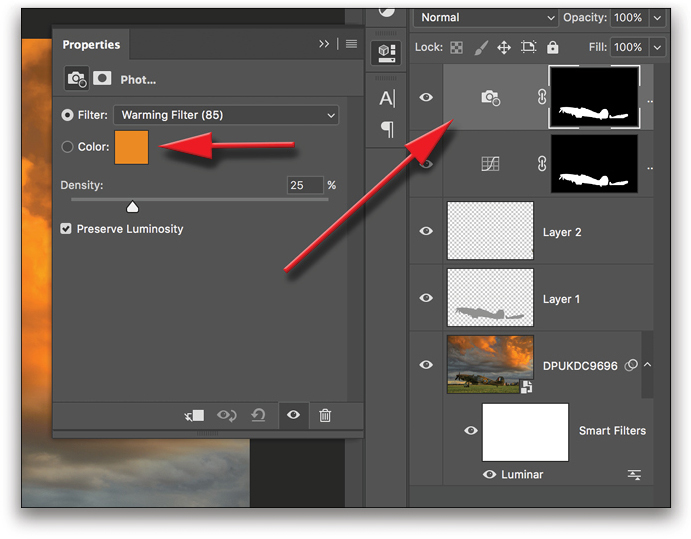
Step Five:
Head back to the “polishing-the-rivet” layer, hold down the Command (PC: Ctrl) key, and click on it again. With the aircraft selected, go to Layer>New Adjustment Layer>Photo Filter. I selected Warming Filter (85) in the Filter drop-down menu in the Properties panel. This gives the white light from the last layer a kiss of warmth, and the photograph is finished!
Bringing the romance out to such a historic war machine takes both camera and computer craft. At the same time, there’s no romance feature in your camera or slider in post. All of this has to come from you, the photographer, the visual storyteller. And, hopefully, with these tips you can move your photography forward to pull on the heartstrings of the viewers of your photographs!
Interested in learning more about aviation photography? Check out Moose’s latest book, Takeoff: The Alpha to Zulu of Aviation Photography.