ON1 Sky Swap AI is a powerful and innovative tool for replacing the skies in your photos quickly and effectively. Of all the uses for AI technology, it’s particularly beneficial for sky replacement. This allows you to select and mask the edges of the sky easily, and make use of a whole library of new skies. ON1 Sky Swap ships with a library of more than 200 skies, including more than 100 from OcuDrone, creators of high-quality replacement skies. You can also access your own custom skies. Using ON1 Sky Swap AI removes the need for painstaking manual masking and allows greater creativity when editing your photos.
With Sky Swap being part of ON1 Photo RAW 2023 for a while, you know that, as a feature, it has been well refined. Now, in plug-in form, it’s ready for use with host programs such as Lightroom Classic or Photoshop. For those tinkering with other programs, it can also be used with Capture One, Affinity Photo, Corel PaintShop Pro, and Apple Photos.
While there are those who will argue that swapping out skies is cheating, it’s often useful for commercial and social photos, be it portraits, landscapes, or even property. If you’re doing any composite work, automatic masking of the sky is a godsend. And of course, there’s just the creativity of trying something new.
ON1 VS ADOBE
As Lightroom Classic doesn’t offer any layer-based options where additional files can be added, there’s no ability to do a sky swap. The Select Sky mask would work for such an option were Adobe to decide to change their mind. It could even be as simple as loading the replacement sky in that part of masking. But sadly, they don’t.
Photoshop now has Sky Replacement and does come with a small set of skies. It does have a different masking to ON1 Sky Swap, but there’s a whole library of skies ready to choose from with ON1. Even if you consider just the library, it’s less than 20¢ per image for a high-res sky. That’s a bargain in itself. Sky Replacement in Photoshop also generates a lot of layers, so it’s not quite as tidy as Sky Swap.
GETTING STARTED
The Sky Swap AI installer automatically creates plug-ins for all of the host applications it finds during the installation process. As is typical, these programs must be closed during this operation for it to be successful.
Once done, it will be available in the Edit In menu in Lightroom, or the Filters menu in Photoshop. At “Maximum Workflow,” we recommend using Photoshop because of the ability to use smart objects for easy editing after saving. If you’re just doing a quick sky replacement, and you know exactly what you want, by all means go direct from Lightroom.

THE INTERFACE
Sky Swap AI couldn’t be much simpler. On the right you have the main settings panel, which has tabs for Sky Swap AI and Local Adjustments.
On the left are general tools: Crop, Local, Mask, Refine, Retouch, and View. View is where you begin using Sky Swap AI. For the most part, you’re probably better off doing a lot of the work that isn’t swapping skies in your host program unless you need the specific masking tools that ON1 provides. We’ll look briefly at Retouch in the first image though.

THE ESSENCE OF THE SWAP
This image is a fairly drab morning at a busy stone circle. Everyone has equal permission to be there, and after a failed sunrise, most moved into the circle for detail shots. There’s not a lot that can save this shot, but it’s a good place to show some of the Sky Swap AI controls.

STEP ONE: From Lightroom you can use either File>Plug-In Extras or the Photo>Edit In menu to access ON1 Sky Swap AI 2023. In Photoshop you access it from the ON1 menu under the Filters menu. Use a new layer, and/or convert to a smart object for easier editing later.

STEP TWO: To begin, choose from one of the sky categories at the top of the Sky Swap AI panel. Use the More triangle icon to reveal additional categories. With this image being quite cloudy, especially with clouds rolling over the hills, the Clouds category is a great choice.
From the Clouds drop-down menu, you can hover over each cloud thumbnail and select a suitable replacement sky. You absolutely have to use sense here. Pick a sky that matches the scene but elevates it. Clouds 013 looks reasonable here.

STEP THREE: Next you can refine the position of the sky and how the mask interacts with it. If you’re curious about what exactly is happening to the mask, click the black-and-white mask icon at the top of the panel, and choose View from the options that appear. You’ll see the mask, and the changes each slider makes to the mask directly from here. While viewing the image should be where you make the final decisions, it’s definitely helpful to see what’s happening behind the scenes.

STEP FOUR: Shift Horizon moves the sky up and down. Here –25 introduces more blue to the top and suits the blending on the right better. You can fade the sky to match the original image using Opacity, but 100 works well here and retains the depth of the blue. If you need to create a deeper blend, Fade Edge and Shift Edge can be used to control how the sky interacts.
Again use the mask to get a sense of what’s happening here, as seeing it visually makes a bigger difference to your understanding of the sliders. Shift Edge is a little harder and works mostly from the sky edge up, while Fade Edge is more like a moveable graduated filter. Scale expands the sky, effectively zooming in on the sky, while Level rotates the horizon.

STEP FIVE: A quick press of the Preview button shows that the new sky has darkened the top of the photo and made it a little cooler. We can easily change this using the Brightness and Warmth sliders, which we set to 14 and 9, respectively.

STEP SIX: These aren’t the only Appearance sliders. You can use Haze to either reduce the haze in the replaced sky, or to add it to match the image. If you love the look of long exposure skies, it’s really easy to mimic this in Sky Swap AI. The Blur Amount slider essentially acts as a shutter speed control, while Blur Angle changes the cloud direction. Here’s how a Blur Amount of 50 looks at a Blur Angle of 0° and 90°. Let’s stick with
0 for this.

STEP SEVEN: As this image has no water for reflections, you only have the option to work on Foreground Lighting. The chosen swatch is a little cool in this image, so we used the eyedropper to select a warmer or neutral tone. We left the blend Mode on Multiply as Screen is too bright. Setting Foreground to 20 with Edges of 21 and Distance of 25 improves this.

STEP EIGHT: With the sky replacement done, and blended, we want to fix the most annoying thing in the scene: those photographers. As the final output from this file is rendered, we may as well take them out here. Over on the left in the Tool Well is the Retouch brush. We painted over the trespassers to remove them. You may need to drag the source point to get the best match.
KEEP IT LOCAL
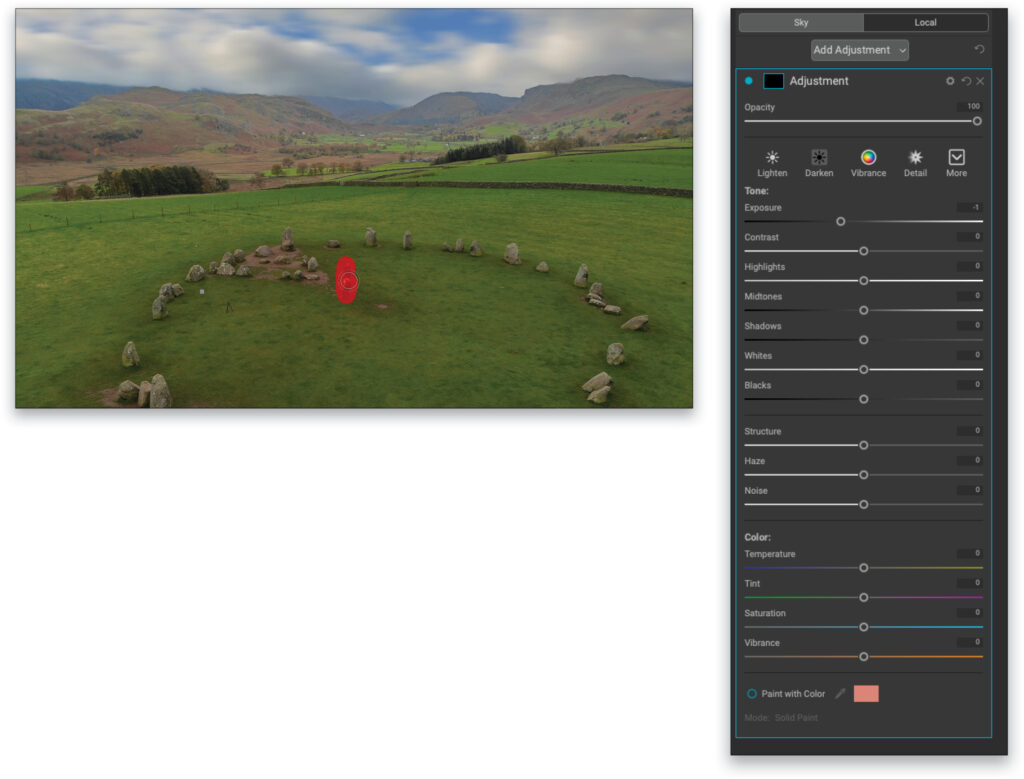
With the sky swap done, you can now consider the overall image and what other work could be done to enhance it. Change to the Local tab. This gives a range of tools that can be masked into the image, or they can affect the whole photo with a white mask. Each time you want to work on a specific area with different settings, click the Add Adjustment button.
STEP NINE: First, we’ll work on the brightness of the photo using Exposure and then Contrast. To see what you’re doing, click the Mask icon at the top of the panel to reveal the mask options. Click Invert to make it white.
Here we set the Exposure to 0.4 and Contrast to 40. The foreground looks great, but these settings don’t affect the replaced sky. You may prefer that they do, but currently they don’t.

STEP 10: We need to blend the top part a little better. Click Local in the Tool Well on the left and in the settings on top, click the second icon and change it to Linear Top. Set the shape to Gradient. We dragged down to the foothills to allow for a smoother transition to the top. This has a side benefit of keeping attention on the stone circle.

STEP 11: After clicking Add Adjustment again, from Local, we chose Gradient from the Shape menu and dragged out a shape around the circle. By default this darkened everything else, and actually improved the image. But really what we need to do here is lighten the circle.

STEP 12: We clicked on the Mask icon in the Mask AI section of the Adjustment panel and clicked Invert from the options that appeared. This now darkens the circle, so we increased the Exposure to 0.5. Refine the mask as required.

You can also add more adjustments should you need, or tidy up other areas such as the grass in this image. When you’re finished, click Done to return to your host application. Here’s the edit and the original.

REAL ESTATE
One area of photography that often needs sky replacement is real estate. The weather can be giving enough light for the photo, but you might have a heavily clouded sky, or possibly worse, an empty blue sky with no interest. Here’s an image with a dull sky, but with sun on the house.
STEP ONE: Selecting the 06 sky from the OcuDrone Majestic Blue category reveals a bit of an issue. The white of the building has been mistaken for sky.

STEP TWO: In this case swapping the Method from Model A to Model B in the Position section helped resolve this. This image still needed some work to get the sky to look better, so we set Fade Edge at –14 combined with a Shift Edge of 17 to smooth the sky edge. Use Shift Horizon to taste until you see a combination of cloud and blue sky you like. Here it’s –41.

WATER BY NIGHT
The next photo is just for fun really. It’s a late evening scene with reflections. The fun part is dropping in the Milky Way where it probably shouldn’t be yet.
STEP ONE: From the Night Category choose Night 010. You can try both Methods. In this example, Model A detected less of the horizon, but Model B missed the gap between sails on the rightmost Galway hooker. So A is more useful here.

STEP TWO: The sky looks out of place, so we brought Opacity down to around 50 and set both Shift Edge and Fade Edge to 100 to allow the sky to fade in.

STEP THREE: To help the blend even more, we brought the Warmth slider down to –100. The Foreground Lighting isn’t working here, so we set both Foreground and Edges to 0.

STEP FOUR: The final tool you haven’t seen yet is Reflection, so let’s turn this on. Amount was a bit strong, so we set it to 30. In reality, you wouldn’t see stars, as the water is moving, but it’s good to see the effect. Shift Vertical is the mirror of Shift Horizon; this lets you place the reflection wherever you like in the shot for the most impact. The default 0 is more than adequate.


THE REPLACEMENTS
ON1 Sky Swap AI 2023 is a versatile tool offering two masking methods, some reasonable tools for working on the edges, and a huge library of interesting skies. It’s competing with Photoshop’s Sky Replacement, though, which actually did a better masking job on our last image (above) in our testing. But it doesn’t have the night sky images used to enhance the photo. You can also import even more skies into ON1 Sky Swap to make access even easier.
You won’t go wrong with ON1 Sky Swap AI, but do try Photoshop’s Sky Replacement, and other plug-ins with AI-based sky replacements. This, after all, is a niche tool and you’ll want to find which one works best for you. A reminder that KelbyOne members get a 20% discount on their next ON1 purchase. All member discounts are linked in your member’s Dashboard.
This article originally published in the June, 2023 issue of Photoshop User magazine. ON1 Photo RAW 2024 is now available.
Ready to elevate your landscape photography to new heights? KelbyOne Live and ON1 are teaming up to bring you the ON1 Landscape Photography Conference, June 18-19, 2024. Unlock the secrets behind planning, shooting, and developing awe-inspiring landscape images. Learn from instructors who are not only seasoned photographers but also masters of leveraging ON1’s powerful tools and features to streamline and enhance the landscape editing process. Learn all about the conference and reserve your ticket!